LAND ROVER DISCOVERY 1999 Workshop Manual
Manufacturer: LAND ROVER, Model Year: 1999, Model line: DISCOVERY, Model: LAND ROVER DISCOVERY 1999Pages: 1529, PDF Size: 34.8 MB
Page 951 of 1529

EXTERIOR FITTINGS
76-2-4 REPAIRS
Refit
1.Clean front wing body mounting brackets.
2.Fit and secure the front wheel arch finisher to
the front wing.
3.Position lower support bracket to the front wing,
fit nut and tighten to 8 Nm (6 lbf.ft).
4.Position front wing to body, fit bracket and bolts
but do not tighten at this stage.
5.Check and adjust alignment of the front wing to
the bonnet and door.
6.Tighten the front wing retaining bolts to 8 Nm (6
lbf.ft).
7.Fit bonnet sealing rubber to the front wing
flange.
8.Fit bolt securing lower support bracket to the
body and tighten to 8 Nm (6 lbf.ft).
9.Fit nut securing sill finisher to the front wing
lower support bracket and tighten to 8 Nm (6
lbf.ft).
10.Fit bolt securing front wing to the front support
bracket and tighten to 8 Nm (6 lbf.ft).
11.Fit side repeater lamp to the front wing and
connect the multiplug.
12.Fit front wheel arch liner extension panel to the
front bumper and secure with screws.
13.Fit and tighten screw securing front wheel arch
liner extension panel to the inner wing.
14.Fit the front wheel arch liner.
+ EXTERIOR FITTINGS, REPAIRS,
Liner - wheel arch - front.
15.Fit the headlamp assembly.
+ LIGHTING, REPAIRS, Headlamp -
from 03MY.
Rear folding step
$% 76.10.41
Remove
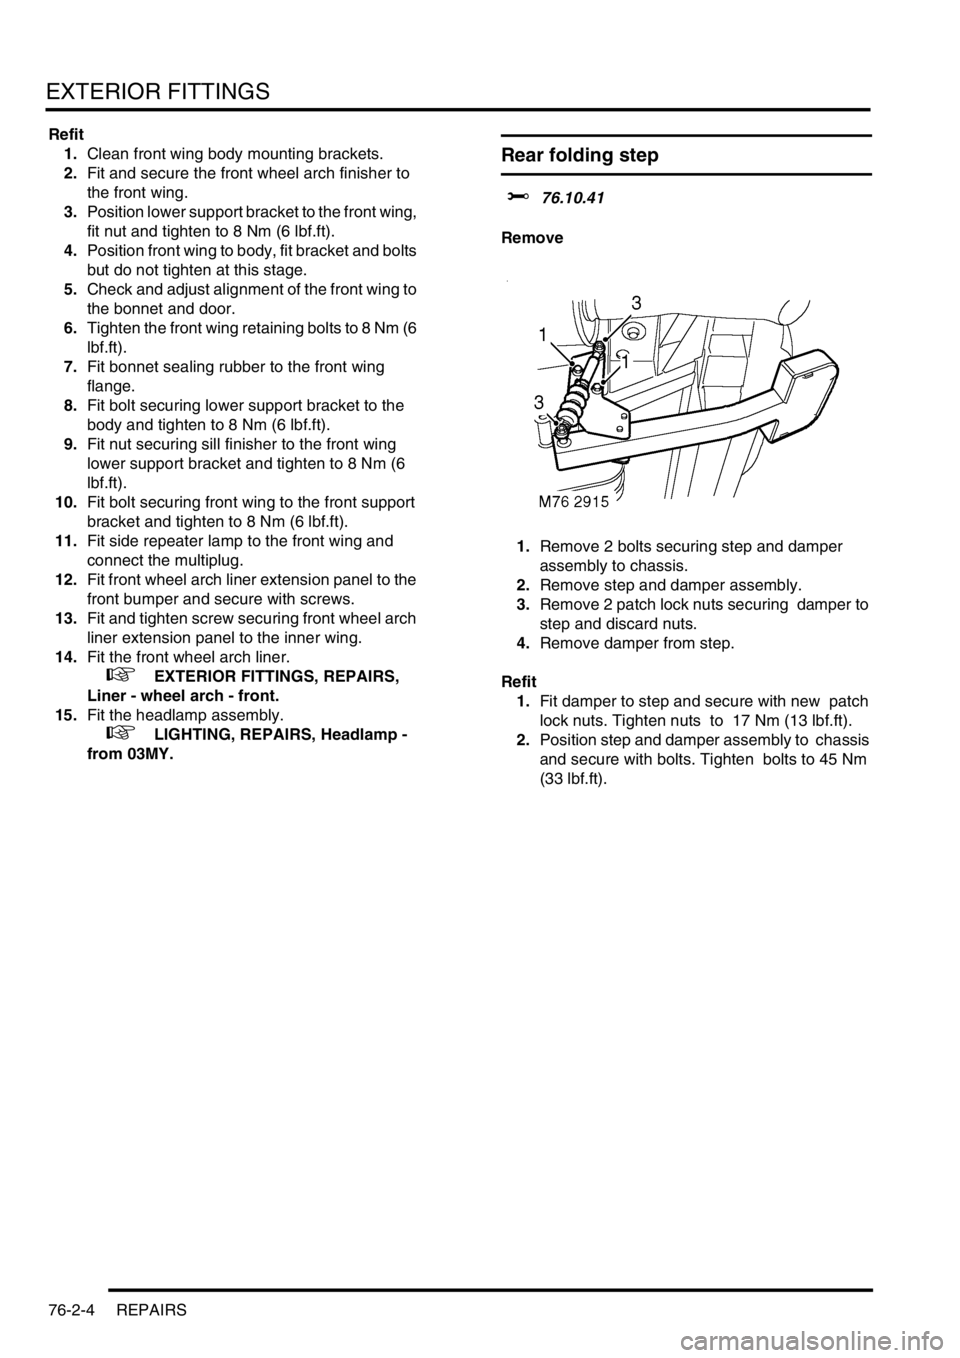
1.Remove 2 bolts securing step and damper
assembly to chassis.
2.Remove step and damper assembly.
3.Remove 2 patch lock nuts securing damper to
step and discard nuts.
4.Remove damper from step.
Refit
1.Fit damper to step and secure with new patch
lock nuts. Tighten nuts to 17 Nm (13 lbf.ft).
2.Position step and damper assembly to chassis
and secure with bolts. Tighten bolts to 45 Nm
(33 lbf.ft).
Page 952 of 1529

EXTERIOR FITTINGS
REPAIRS 76-2-5
Liner - wheel arch - front
$% 76.10.48
Remove
1.Remove 3 screws securing wheel arch liner to
wing.
2.Remove 2 screws securing wheel arch liner to
wheel arch liner extension.
3.Remove centres of 6 trim clips securing wheel
arch liner to body.
4.Remove outers of trim clips.
5.Remove wheel arch liner.Refit
1.Position wheel arch liner to body.
2.Fit trim clip outers to liner.
3.Fit centres to trim clips.
4.Fit and tighten screws securing wheel arch liner
to wing and wheel arch liner extension.
Page 953 of 1529

EXTERIOR FITTINGS
76-2-6 REPAIRS
Liner - wheel arch - rear
$% 76.10.49
Remove
1.Remove 2 trim clips securing rear mud flap to
bumper side section.
2.Remove 2 screws securing bumper side
section to body.
3.Remove bumper side section. 4.Drill out 2 rivets securing mud flap to wheel
arch liner.
5.Remove mud flap.
6.Drill out rivet securing wheel arch liner to
support bracket.
7.Drill out 3 rivets securing wheel arch liner to
body.
8.Remove wheel arch liner.
Refit
1.Position wheel arch liner to vehicle and secure
to body with rivets.
2.Fit rivet securing wheel arch liner to support
bracket.
3.Fit mud flap to wheel arch liner and secure with
rivets.
4.Fit rear bumper side section to body and
secure with screws.
5.Fit trim clips securing mud flaps to side section.
Page 954 of 1529

EXTERIOR FITTINGS
REPAIRS 76-2-7
Panel - underbelly
$% 76.10.50
Remove
1.Raise front of vehicle, support underbody and
lower front axle
WARNING: Do not work on or under a
vehicle supported only by a jack. Always
support the vehicle on safety stands.
2.Remove nut securing drag link to drop arm.
3.Using tool LRT-57-036 break taper joint and
release drag link from drop arm.
4.Remove nut and bolt securing steering damper
to chassis and remove damper.
5.Remove 7 screws securing underbelly panel.
6.Remove underbelly panel.
7.Remove 7 studs securing sound deadening to
underbelly panel.
8.Remove sound deadening.
Refit
1.Position sound deadening to underbelly panel
and secure with studs.
2.Fit underbelly panel and secure with screws.
3.Position steering damper, fit nut and bolt and
tighten to 125 Nm (92 lbf.ft)
4.Fit drag link to drop arm and tighten nut to 80
Nm (59 lbf.ft).
5.Lower front of vehicle.
Mirror - exterior - electric
$% 76.10.57
Remove
1.Release cheater panel from front door.
2.Remove anti-rattle foam pad from front door.
3.Release mirror multiplug from mounting plate.
4.Disconnect multiplug from mirror.
5.Remove 3 bolts securing mirror to door.
6.Remove mirror and collect mounting plate.
Refit
1.Fit mirror and mounting plate to door.
2.Fit bolts securing mirror to door and tighten to
4 Nm (3 lbf.ft).
3.Connect multiplug to mirror.
4.Secure multiplug to mounting plate.
5.Fit anti-rattle foam pad to front door.
6.Secure cheater panel to front door.
Page 955 of 1529

EXTERIOR FITTINGS
76-2-8 REPAIRS
Roof bars
$% 76.11.31
Remove
1.Remove headlining.
+ INTERIOR TRIM COMPONENTS,
REPAIRS, Headlining.
2. Models with rear A/C: Drill out 4 rivets
securing rear centre duct to roof.
3. Models with rear A/C: Release and remove
rear centre duct.
4. Models with rear A/C: Drill out 2 rivets
securing each upper side duct to roof.
5. Models with rear A/C: Remove upper side
ducts.6.Remove 2 nuts securing each roof bar to roof.
7.Remove roof bars and collect foam pads from
each end.
Refit
1.Fit roof bars to roof, ensuring foam pads are
correctly located.
2.Fit nuts securing roof bars to roof and tighten
to 32 Nm (24 lbf.ft).
3. Models with rear A/C: Fit upper side ducts and
secure with rivets.
4. Models with rear A/C: Fit rear centre duct and
secure with rivets.
5.Fit headlining.
+ INTERIOR TRIM COMPONENTS,
REPAIRS, Headlining.
Page 956 of 1529

EXTERIOR FITTINGS
REPAIRS 76-2-9
Bonnet
$% 76.16.01.99
Remove
1.Support bonnet in open position.
2.Fit protection covers to wings and mark hinge
outline on bonnet if bonnet is to be refitted.
3.Disconnect windscreen washer tube at elbow
joint.
4.With assistance, remove bolts securing hinges
to bonnet and remove bonnet.
Refit
1.With assistance, position bonnet to hinges. Fit
and lightly tighten bolts.
2.Connect windscreen washer tube.
3.Close bonnet. Check that bonnet is aligned to
both front wings and that gaps are equal. If
necessary, adjust bonnet alignment and/or
gaps.
4.Finally tighten hinge bolts to 25 Nm (18 lbf.ft).
Cable - bonnet release - up to 03MY
$% 76.16.29
Remove
1.Remove front grille.
+ EXTERIOR FITTINGS, REPAIRS,
Grille - front - up to 03MY.
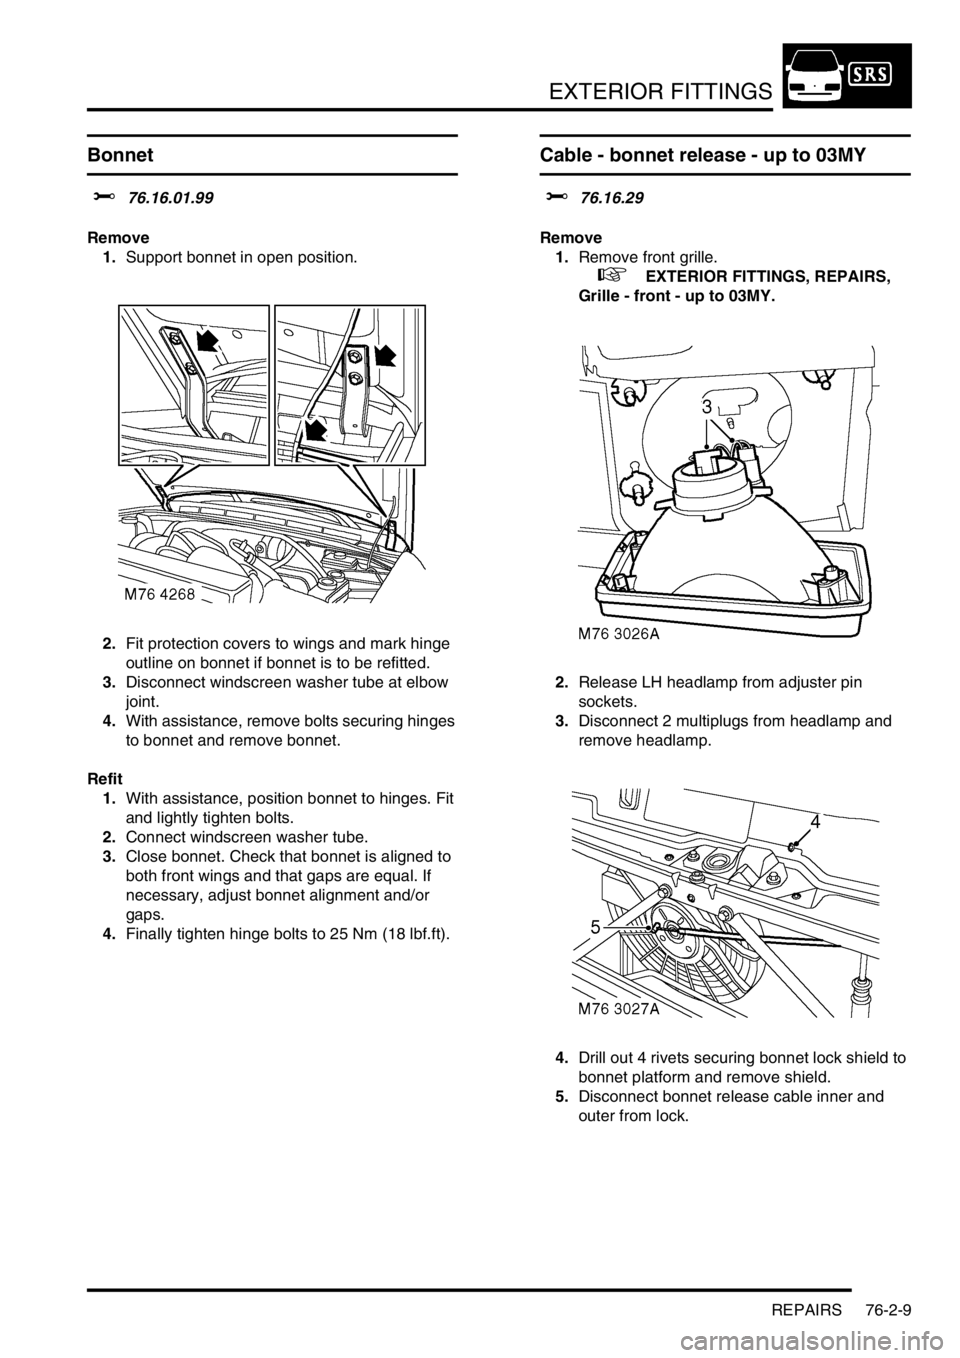
2.Release LH headlamp from adjuster pin
sockets.
3.Disconnect 2 multiplugs from headlamp and
remove headlamp.
4.Drill out 4 rivets securing bonnet lock shield to
bonnet platform and remove shield.
5.Disconnect bonnet release cable inner and
outer from lock.
Page 957 of 1529

EXTERIOR FITTINGS
76-2-10 REPAIRS
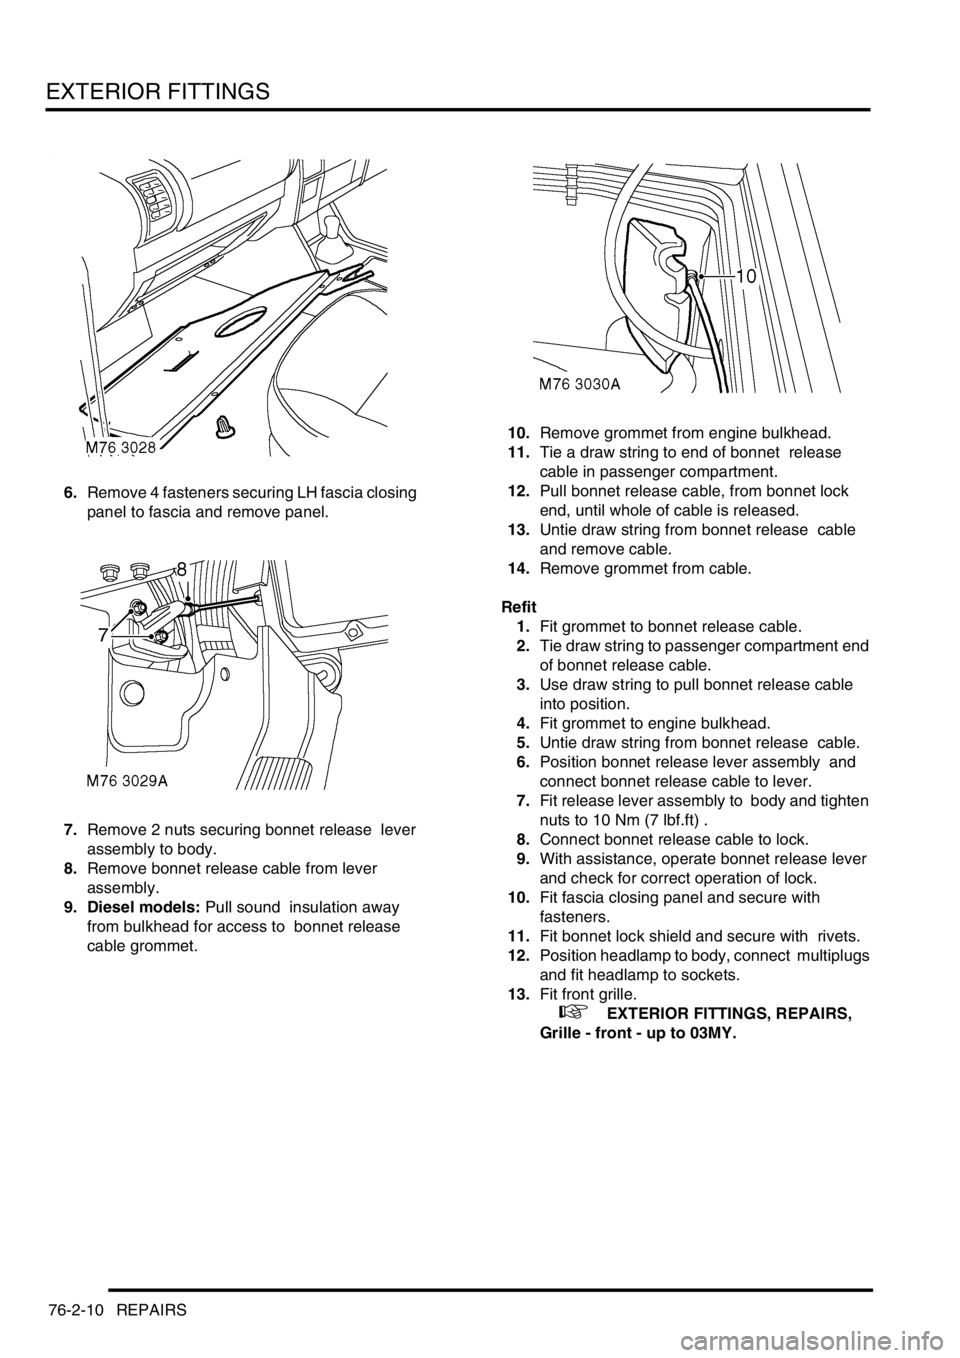
6.Remove 4 fasteners securing LH fascia closing
panel to fascia and remove panel.
7.Remove 2 nuts securing bonnet release lever
assembly to body.
8.Remove bonnet release cable from lever
assembly.
9. Diesel models: Pull sound insulation away
from bulkhead for access to bonnet release
cable grommet. 10.Remove grommet from engine bulkhead.
11.Tie a draw string to end of bonnet release
cable in passenger compartment.
12.Pull bonnet release cable, from bonnet lock
end, until whole of cable is released.
13.Untie draw string from bonnet release cable
and remove cable.
14.Remove grommet from cable.
Refit
1.Fit grommet to bonnet release cable.
2.Tie draw string to passenger compartment end
of bonnet release cable.
3.Use draw string to pull bonnet release cable
into position.
4.Fit grommet to engine bulkhead.
5.Untie draw string from bonnet release cable.
6.Position bonnet release lever assembly and
connect bonnet release cable to lever.
7.Fit release lever assembly to body and tighten
nuts to 10 Nm (7 lbf.ft) .
8.Connect bonnet release cable to lock.
9.With assistance, operate bonnet release lever
and check for correct operation of lock.
10.Fit fascia closing panel and secure with
fasteners.
11.Fit bonnet lock shield and secure with rivets.
12.Position headlamp to body, connect multiplugs
and fit headlamp to sockets.
13.Fit front grille.
+ EXTERIOR FITTINGS, REPAIRS,
Grille - front - up to 03MY.
Page 958 of 1529

EXTERIOR FITTINGS
REPAIRS 76-2-11
Cable - bonnet release - from 03MY
$% 76.16.29
Remove
1.Remove the front grille.
+ EXTERIOR FITTINGS, REPAIRS,
Grille - front - from 03MY.
2.Drill out 4 rivets securing bonnet lock shield to
the bonnet locking platform and remove the
shield.
3.Disconnect bonnet release cable from the
bonnet lock.
4.Disconnect bonnet release cable from the front
panel retaining clip.5.Remove 2 nuts securing bonnet release lever
to the 'A' post.
6.Disconnect bonnet release cable from the
bonnet release lever.
7.Remove bonnet release cable grommet from
the bulkhead.
8.Remove the bonnet release cable.
9.Remove grommet from the bonnet release
cable.
Refit
1.Fit grommet to the bonnet release cable.
2.Position bonnet release cable to body and
connect to the bonnet release lever.
3.Position bonnet release lever to 'A' post, fit nuts
and tighten to 10 Nm (7 lbf.ft).
4.Fit bonnet release cable grommet to the
bulkhead.
5.Connect bonnet release cable to the bonnet
lock.
6.Align timing mark on bonnet release cable to
retaining clip and secure to the clip.
7.With assistance operate bonnet release lever
and check for the correct operation of the lock.
8.Fit bonnet lock shield and secure with rivets
9.Fit the front grille.
+ EXTERIOR FITTINGS, REPAIRS,
Grille - front - from 03MY.
M76 4573
M76 3029B
M76 4574
Page 959 of 1529

EXTERIOR FITTINGS
76-2-12 REPAIRS
Bumper assembly - front
$% 76.22.08
Remove
1.Remove 14 screws securing LH and RH wheel
arch liner extensions to wheel arch liners and
bumper valance and remove extensions.
Note: 18 screws are used on 03 MY onwards.
2.Disconnect multiplugs from fog lamps. 3.Remove 2 nuts securing bumper valance side
mountings to body.
4.Remove 4 nuts securing bumper to crush cans
and remove bumper from body.
5.Remove 3 screws securing bumper to front
cross bar.
6. Models with headlamp wash: Position
container to collect screen washer fluid and
disconnect hose from headlamp washer pump.
Refit
1. Models with headlamp wash: Connect hose
to headlamp washer pump. Refill washer
reservoir with fluid.
2.With assistance position bumper to body.
3.Fit and tighten 3 screws securing bumper to
front cross bar.
4.Tighten nuts securing bumper to crush cans to
13 Nm (10 lbf.ft).
5.Tighten nuts securing bumper to side
mountings to 13 Nm (10 lbf.ft).
6.Connect multiplugs to fog lamps.
7.Fit wheel arch liner extensions and secure with
screws.
Page 960 of 1529

EXTERIOR FITTINGS
REPAIRS 76-2-13
Bumper assembly - rear - from 03MY
$% 76.22.15
Remove
1.Remove both rear tail lamps.
+ LIGHTING, REPAIRS, Lamp - tail/
flasher - bumper.
2.Disconnect park distance control harness
multiplug.
3.Release rear lamp harness clips.4.Remove 2 bolts securing bumper.
5.With assistance remove bumper.
NOTE: Do not carry out further dismantling if
component is removed for access only.
6.Remove 7 bolts and 5 screws securing closing
panel and remove panel.
M76 4566