engine coolant LAND ROVER DISCOVERY 2002 Workshop Manual
[x] Cancel search | Manufacturer: LAND ROVER, Model Year: 2002, Model line: DISCOVERY, Model: LAND ROVER DISCOVERY 2002Pages: 1672, PDF Size: 46.1 MB
Page 632 of 1672

MANIFOLDS AND EXHAUST SYSTEMS - V8
DESCRIPTION AND OPERATION 30-2-3
1Upper manifold
2Bolt 5 off
3Bolt 1 off
4Gasket
5IAC Valve
6IAC valve hose 2 off
7Bolt 4 off
8Bolt 4 off
9Schraeder valve
10Injector 8 off
11Retaining clip 8 off
12Bolt 12 off
13Bolt 2 off
14Clamp 2 off
15Seal 2 off
16Lower manifold/engine gasket
17Coolant pipe18Bolt 3 off
19Bolt
20Heater return pipe
21Pipe connection
22Lower manifold
23Gasket
24Hose clip 2 off
25Throttle housing coolant hose
26Fuel rail
27Throttle housing
28Gasket
29Bolt 4 off
30Plenum
31Rocker cover breather hose connection
32Brake servo vacuum pipe connection
33Hose clip 4 off
Page 634 of 1672

MANIFOLDS AND EXHAUST SYSTEMS - V8
DESCRIPTION AND OPERATION 30-2-5
Description
General
The inlet manifold on the V8 engine is located on the top of the engine, between the cylinders. The manifold directs
intake air into the cylinders. The intake air is mixed with fuel delivered by the injectors prior to ignition in the cylinders.
The inlet manifold comprises three separate aluminium castings.
Two exhaust manifolds are used, one for each bank of four cylinders. Each exhaust manifold allows combustion
gases from the cylinders to leave the engine and directs them into the exhaust system.
The exhaust system is connected to each exhaust manifold and merges into one pipe midway along the underside of
the vehicle. A catalytic converter (where fitted) is located in the front pipe from each manifold. A silencer is installed
midway along the system and a second tail silencer is located at the rear of the vehicle.
Inlet manifold
The inlet manifold comprises three aluminium castings; a lower manifold, an upper manifold and a plenum. The inlet
manifold is located on the top of the engine and feeds air into the cylinders.
Lower manifold
The lower manifold is a one piece machined aluminium casting which locates in the vee on the top of the engine and
is secured to each cylinder head with six bolts per head. A one piece coated metal gasket seals the lower manifold to
each cylinder head and also serves as a cover for the cylinder block.
Eight injectors are fitted into the lower manifold, four on each side. Each injector is sealed in the manifold with O-ring
seals and retained in position by the fuel rails. A fuel rail is attached to each side of the manifold and secured with two
bolts.
Eight air intake ports are cast and machined on the top of the manifold, each port directing intake air into one cylinder.
These ports mate with matching ports in the upper manifold and are sealed with a coated metal gasket between the
two manifolds.
A cavity at the front of the manifold collects coolant flow from the engine. A coolant outlet pipe is sealed and attached
to the front of the manifold and provides for coolant to flow through the cavity in the casting to the radiator top hose.
A smaller port in the manifold also allows coolant to flow from the cavity to the heater matrix. The lower manifold also
locates the Engine Coolant Temperature (ECT) sensor in a port in the front of the manifold.
Upper manifold
The upper manifold is a one piece machined aluminium casting. The manifold has eight ports on its lower face which
mate with the eight ports on the lower manifold. The joint between the upper and lower manifolds is sealed with a
coated metal gasket and secured with six bolts.
The manifold divides from the eight ports into eight branches, four on each side. Each set of four branches merge into
one gallery on each side of the manifold. Each gallery has an opening at its forward end which mates with the intake
plenum.
The upper manifold provides attachment for the Idle Air Control (IAC) valve and for brackets which retain pipes, plug
leads and throttle cables.
Page 646 of 1672
MANIFOLDS AND EXHAUST SYSTEMS - V8
REPAIRS 30-2-17
Gasket - inlet manifold - upper - Without
Secondary Air Injection
$% 30.15.24
Remove
1.Release fixings and remove battery cover.
2.Disconnect battery earth lead.
3.Remove bonnet.
+ EXTERIOR FITTINGS, REPAIRS,
Bonnet.
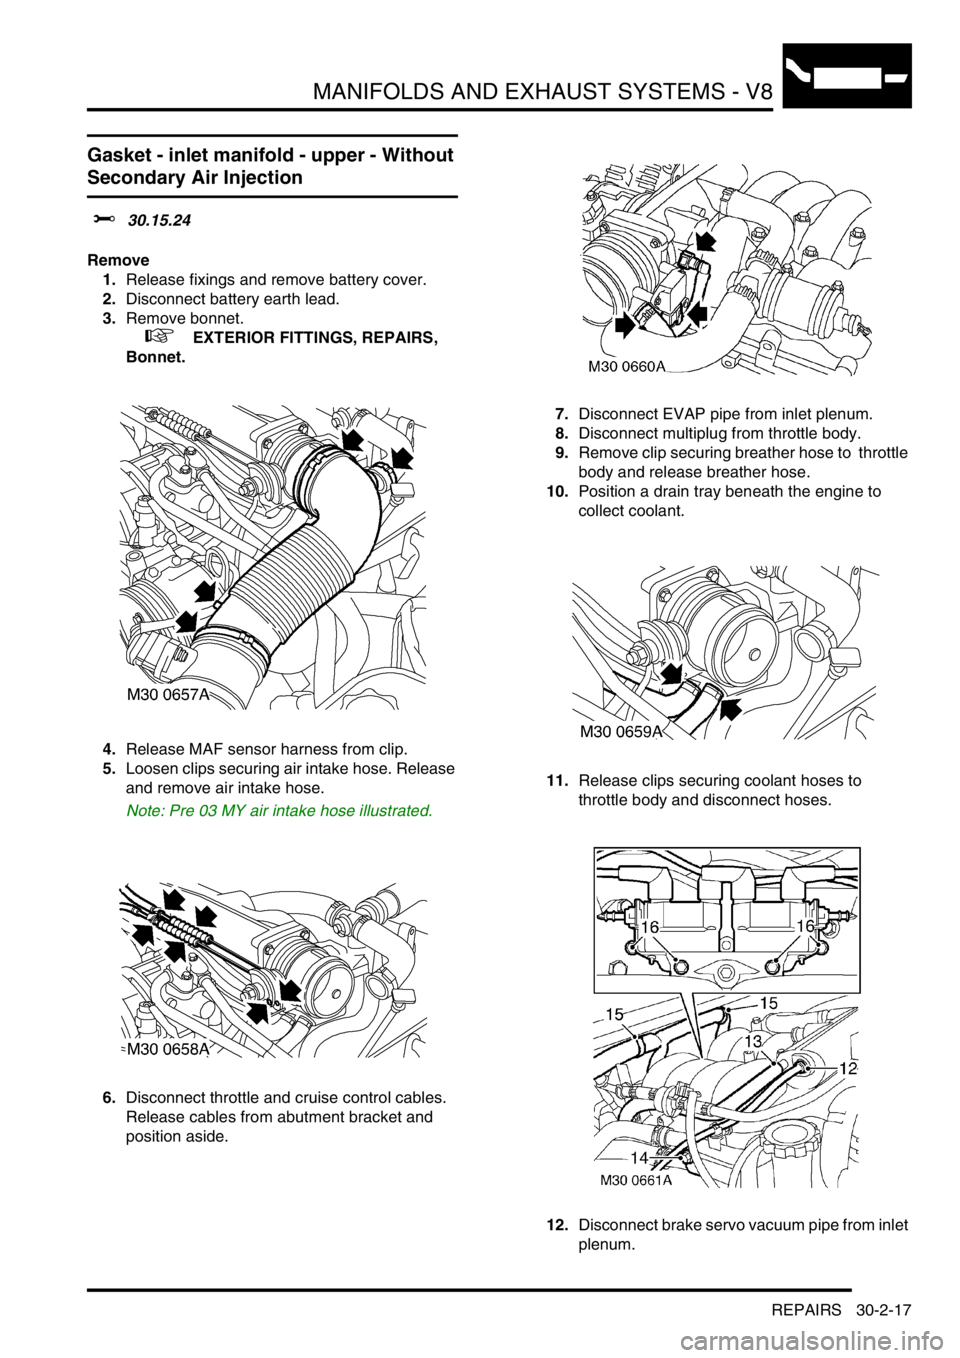
4.Release MAF sensor harness from clip.
5.Loosen clips securing air intake hose. Release
and remove air intake hose.
Note: Pre 03 MY air intake hose illustrated.
6.Disconnect throttle and cruise control cables.
Release cables from abutment bracket and
position aside. 7.Disconnect EVAP pipe from inlet plenum.
8.Disconnect multiplug from throttle body.
9.Remove clip securing breather hose to throttle
body and release breather hose.
10.Position a drain tray beneath the engine to
collect coolant.
11.Release clips securing coolant hoses to
throttle body and disconnect hoses.
12.Disconnect brake servo vacuum pipe from inlet
plenum.
Page 647 of 1672
MANIFOLDS AND EXHAUST SYSTEMS - V8
30-2-18 REPAIRS
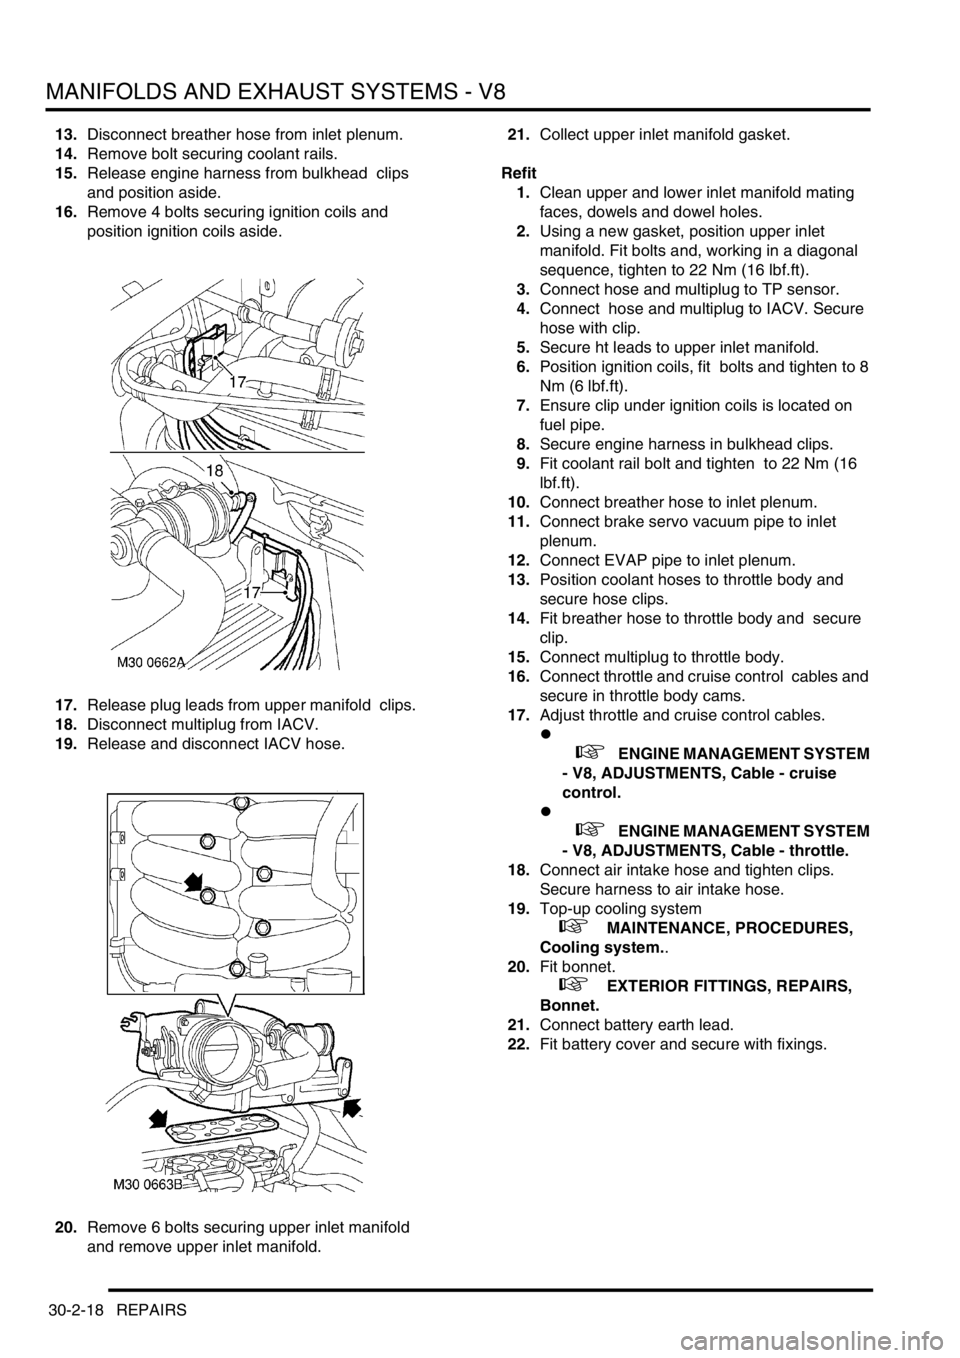
13.Disconnect breather hose from inlet plenum.
14.Remove bolt securing coolant rails.
15.Release engine harness from bulkhead clips
and position aside.
16.Remove 4 bolts securing ignition coils and
position ignition coils aside.
17.Release plug leads from upper manifold clips.
18.Disconnect multiplug from IACV.
19.Release and disconnect IACV hose.
20.Remove 6 bolts securing upper inlet manifold
and remove upper inlet manifold. 21.Collect upper inlet manifold gasket.
Refit
1.Clean upper and lower inlet manifold mating
faces, dowels and dowel holes.
2.Using a new gasket, position upper inlet
manifold. Fit bolts and, working in a diagonal
sequence, tighten to 22 Nm (16 lbf.ft).
3.Connect hose and multiplug to TP sensor.
4.Connect hose and multiplug to IACV. Secure
hose with clip.
5.Secure ht leads to upper inlet manifold.
6.Position ignition coils, fit bolts and tighten to 8
Nm (6 lbf.ft).
7.Ensure clip under ignition coils is located on
fuel pipe.
8.Secure engine harness in bulkhead clips.
9.Fit coolant rail bolt and tighten to 22 Nm (16
lbf.ft).
10.Connect breather hose to inlet plenum.
11.Connect brake servo vacuum pipe to inlet
plenum.
12.Connect EVAP pipe to inlet plenum.
13.Position coolant hoses to throttle body and
secure hose clips.
14.Fit breather hose to throttle body and secure
clip.
15.Connect multiplug to throttle body.
16.Connect throttle and cruise control cables and
secure in throttle body cams.
17.Adjust throttle and cruise control cables.
l
+ ENGINE MANAGEMENT SYSTEM
- V8, ADJUSTMENTS, Cable - cruise
control.
l
+ ENGINE MANAGEMENT SYSTEM
- V8, ADJUSTMENTS, Cable - throttle.
18.Connect air intake hose and tighten clips.
Secure harness to air intake hose.
19.Top-up cooling system
+ MAINTENANCE, PROCEDURES,
Cooling system..
20.Fit bonnet.
+ EXTERIOR FITTINGS, REPAIRS,
Bonnet.
21.Connect battery earth lead.
22.Fit battery cover and secure with fixings.
Page 649 of 1672
MANIFOLDS AND EXHAUST SYSTEMS - V8
30-2-20 REPAIRS
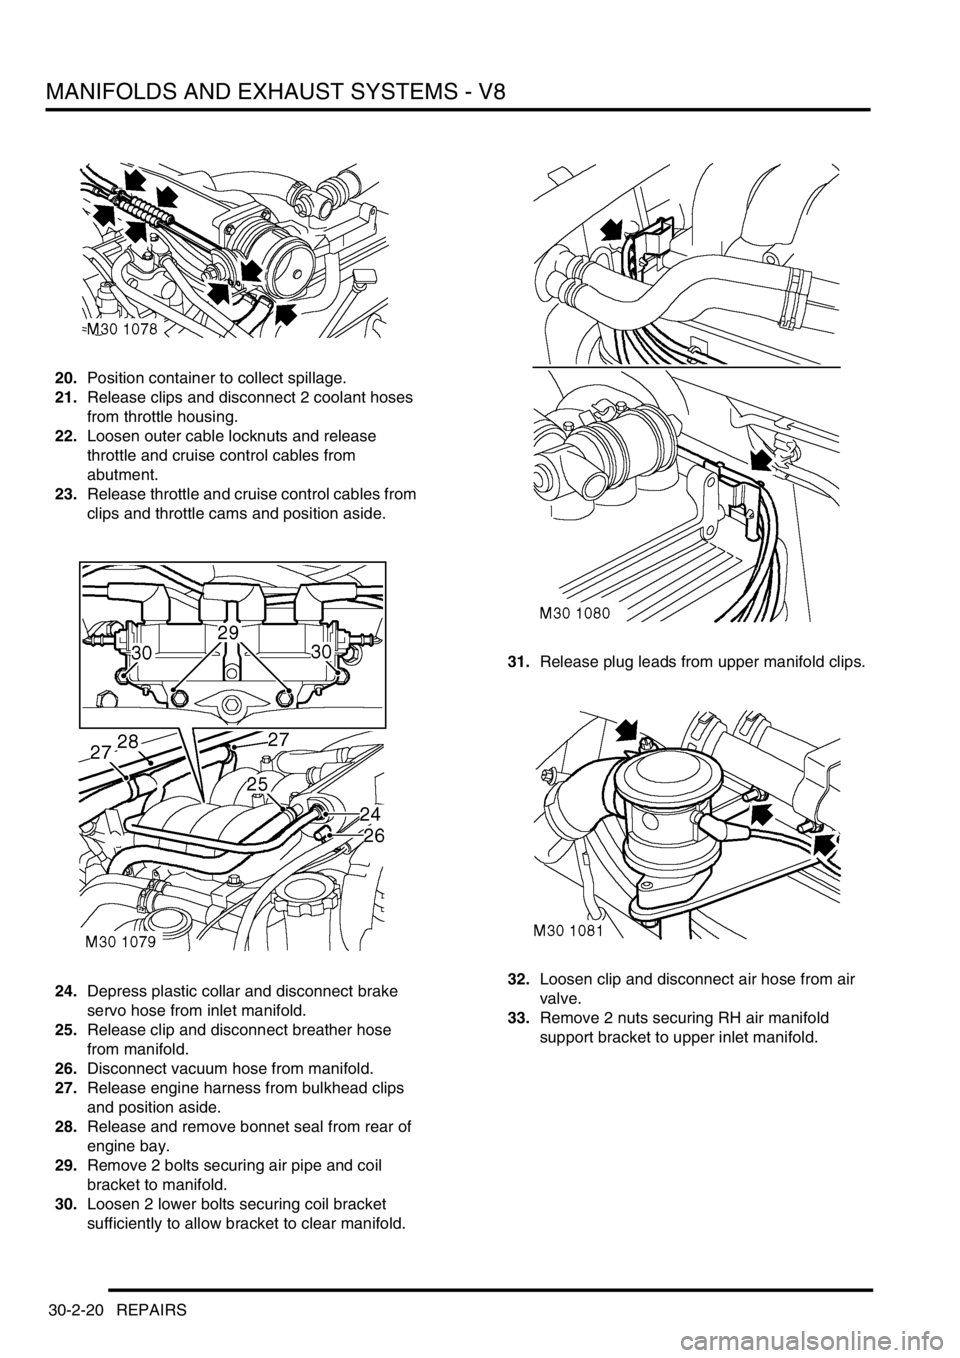
20.Position container to collect spillage.
21.Release clips and disconnect 2 coolant hoses
from throttle housing.
22.Loosen outer cable locknuts and release
throttle and cruise control cables from
abutment.
23.Release throttle and cruise control cables from
clips and throttle cams and position aside.
24.Depress plastic collar and disconnect brake
servo hose from inlet manifold.
25.Release clip and disconnect breather hose
from manifold.
26.Disconnect vacuum hose from manifold.
27.Release engine harness from bulkhead clips
and position aside.
28.Release and remove bonnet seal from rear of
engine bay.
29.Remove 2 bolts securing air pipe and coil
bracket to manifold.
30.Loosen 2 lower bolts securing coil bracket
sufficiently to allow bracket to clear manifold.31.Release plug leads from upper manifold clips.
32.Loosen clip and disconnect air hose from air
valve.
33.Remove 2 nuts securing RH air manifold
support bracket to upper inlet manifold.
Page 650 of 1672
MANIFOLDS AND EXHAUST SYSTEMS - V8
REPAIRS 30-2-21
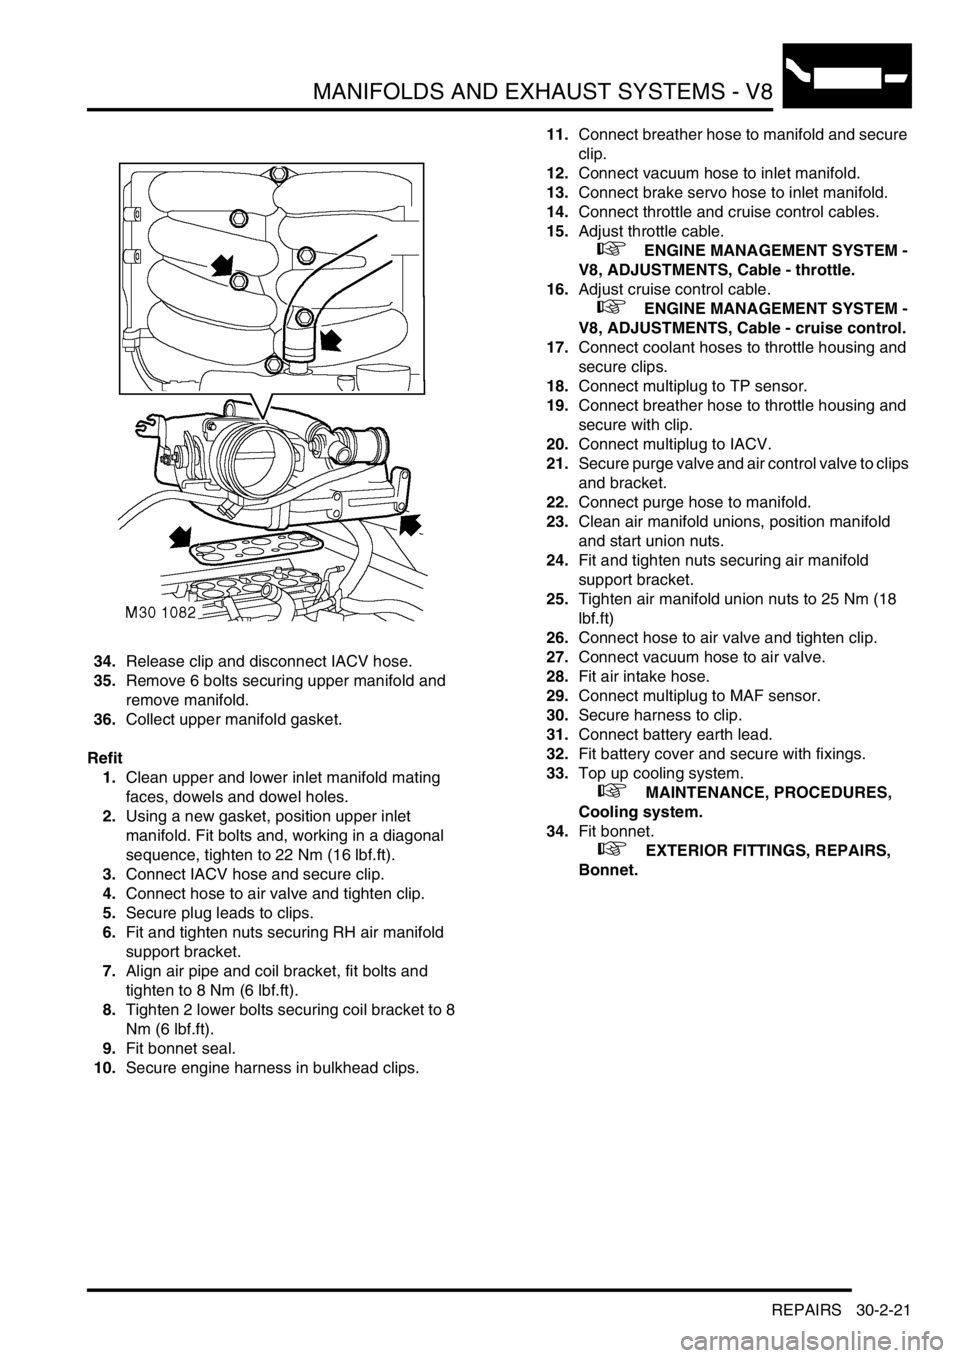
34.Release clip and disconnect IACV hose.
35.Remove 6 bolts securing upper manifold and
remove manifold.
36.Collect upper manifold gasket.
Refit
1.Clean upper and lower inlet manifold mating
faces, dowels and dowel holes.
2.Using a new gasket, position upper inlet
manifold. Fit bolts and, working in a diagonal
sequence, tighten to 22 Nm (16 lbf.ft).
3.Connect IACV hose and secure clip.
4.Connect hose to air valve and tighten clip.
5.Secure plug leads to clips.
6.Fit and tighten nuts securing RH air manifold
support bracket.
7.Align air pipe and coil bracket, fit bolts and
tighten to 8 Nm (6 lbf.ft).
8.Tighten 2 lower bolts securing coil bracket to 8
Nm (6 lbf.ft).
9.Fit bonnet seal.
10.Secure engine harness in bulkhead clips.11.Connect breather hose to manifold and secure
clip.
12.Connect vacuum hose to inlet manifold.
13.Connect brake servo hose to inlet manifold.
14.Connect throttle and cruise control cables.
15.Adjust throttle cable.
+ ENGINE MANAGEMENT SYSTEM -
V8, ADJUSTMENTS, Cable - throttle.
16.Adjust cruise control cable.
+ ENGINE MANAGEMENT SYSTEM -
V8, ADJUSTMENTS, Cable - cruise control.
17.Connect coolant hoses to throttle housing and
secure clips.
18.Connect multiplug to TP sensor.
19.Connect breather hose to throttle housing and
secure with clip.
20.Connect multiplug to IACV.
21.Secure purge valve and air control valve to clips
and bracket.
22.Connect purge hose to manifold.
23.Clean air manifold unions, position manifold
and start union nuts.
24.Fit and tighten nuts securing air manifold
support bracket.
25.Tighten air manifold union nuts to 25 Nm (18
lbf.ft)
26.Connect hose to air valve and tighten clip.
27.Connect vacuum hose to air valve.
28.Fit air intake hose.
29.Connect multiplug to MAF sensor.
30.Secure harness to clip.
31.Connect battery earth lead.
32.Fit battery cover and secure with fixings.
33.Top up cooling system.
+ MAINTENANCE, PROCEDURES,
Cooling system.
34.Fit bonnet.
+ EXTERIOR FITTINGS, REPAIRS,
Bonnet.
Page 698 of 1672
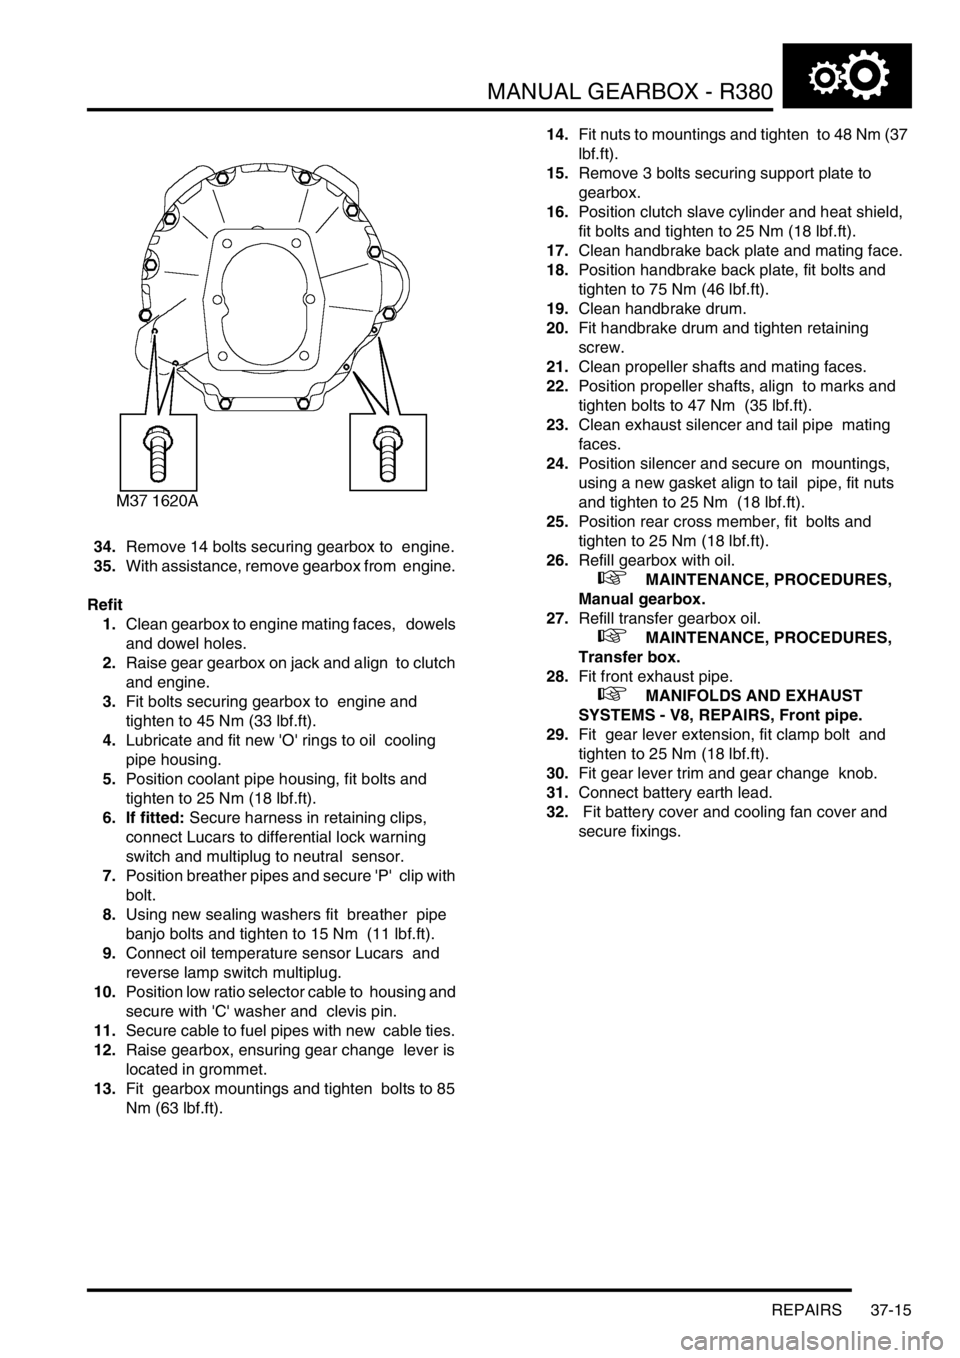
MANUAL GEARBOX - R380
REPAIRS 37-15
34.Remove 14 bolts securing gearbox to engine.
35.With assistance, remove gearbox from engine.
Refit
1.Clean gearbox to engine mating faces, dowels
and dowel holes.
2.Raise gear gearbox on jack and align to clutch
and engine.
3.Fit bolts securing gearbox to engine and
tighten to 45 Nm (33 lbf.ft).
4.Lubricate and fit new 'O' rings to oil cooling
pipe housing.
5.Position coolant pipe housing, fit bolts and
tighten to 25 Nm (18 lbf.ft).
6. If fitted: Secure harness in retaining clips,
connect Lucars to differential lock warning
switch and multiplug to neutral sensor.
7.Position breather pipes and secure 'P' clip with
bolt.
8.Using new sealing washers fit breather pipe
banjo bolts and tighten to 15 Nm (11 lbf.ft).
9.Connect oil temperature sensor Lucars and
reverse lamp switch multiplug.
10.Position low ratio selector cable to housing and
secure with 'C' washer and clevis pin.
11.Secure cable to fuel pipes with new cable ties.
12.Raise gearbox, ensuring gear change lever is
located in grommet.
13.Fit gearbox mountings and tighten bolts to 85
Nm (63 lbf.ft). 14.Fit nuts to mountings and tighten to 48 Nm (37
lbf.ft).
15.Remove 3 bolts securing support plate to
gearbox.
16.Position clutch slave cylinder and heat shield,
fit bolts and tighten to 25 Nm (18 lbf.ft).
17.Clean handbrake back plate and mating face.
18.Position handbrake back plate, fit bolts and
tighten to 75 Nm (46 lbf.ft).
19.Clean handbrake drum.
20.Fit handbrake drum and tighten retaining
screw.
21.Clean propeller shafts and mating faces.
22.Position propeller shafts, align to marks and
tighten bolts to 47 Nm (35 lbf.ft).
23.Clean exhaust silencer and tail pipe mating
faces.
24.Position silencer and secure on mountings,
using a new gasket align to tail pipe, fit nuts
and tighten to 25 Nm (18 lbf.ft).
25.Position rear cross member, fit bolts and
tighten to 25 Nm (18 lbf.ft).
26.Refill gearbox with oil.
+ MAINTENANCE, PROCEDURES,
Manual gearbox.
27.Refill transfer gearbox oil.
+ MAINTENANCE, PROCEDURES,
Transfer box.
28.Fit front exhaust pipe.
+ MANIFOLDS AND EXHAUST
SYSTEMS - V8, REPAIRS, Front pipe.
29.Fit gear lever extension, fit clamp bolt and
tighten to 25 Nm (18 lbf.ft).
30.Fit gear lever trim and gear change knob.
31.Connect battery earth lead.
32. Fit battery cover and cooling fan cover and
secure fixings.
Page 920 of 1672

STEERING
REPAIRS 57-33
21.With assistance remove 2 nuts and bolts
securing RH engine mounting to chassis.
22.Support the engine weight on a jack.
CAUTION: To prevent damage to
components, cushion the jack pad with a
block of wood or hard rubber.
23.Raise the engine sufficiently to allow the
steering box to clear the sump.
24. Models with ACE: Position ACE control arms
to access steering box bolts. 25.With assistance remove 4 bolts securing
steering box and remove steering box.
26.Remove centralising bolt from steering box.
Refit
1.Fit centralising bolt to steering box.
2.With assistance, position steering box, fit bolts
and tighten to 90 Nm (66 lbf.ft).
3.Lower the engine onto its mountings. Fit engine
mounting bolts and tighten to 85 Nm (63 lbf.ft).
4. Models with ACE: Ensure washer is in place
on lower ball joint of anti-roll bar link, then
connect lower ball joint to axle. Tighten nut to
100 Nm (74 lbf.ft).
5.Position drag link, fit nut and tighten to 80 Nm
(59 lbf.ft).
6.Position Panhard rod, fit bolt and nut and
tighten to 230 Nm (170 lbf.ft).
7.Position coolant rail and secure with clips and
bolt.
8.Fit coolant hoses and secure with clips.
9. Models with ACE: Fit and tighten bolt
securing ACE pipes to chassis.
10.Clean PAS pipe ends and 'O' ring recess.
11.Lubricate new 'O' rings for PAS pipes with clean
PAS fluid.
12.Fit 'O' rings to PAS pipes and position pipes in
steering box. Fit PAS pipe bracket and tighten
bolt to 22 Nm (16 lbf.ft).
13.Ensure steering wheel is centralised. Fit
universal joint between steering box and
intermediate shaft and tighten bolts to 25 Nm
(18 lbf.ft).
14.Remove centralising bolt from steering box.
15.Fit intercooler to turbo hose and secure with
clips.
16.Fit road wheel(s) and tighten nuts to 140 Nm
(103 lbf.ft).
17.Remove stand(s) and lower vehicle.
18.Connect battery earth lead.
19.Fit battery cover.
20.Refill cooling system.
+ COOLING SYSTEM - Td5,
ADJUSTMENTS, Drain and refill.
21.Bleed PAS system.
+ STEERING, ADJUSTMENTS,
Hydraulic system - bleed.
22.Centralise steering linkage
+ STEERING, ADJUSTMENTS,
Steering linkage - centralise.
Page 977 of 1672

FRONT SUSPENSION
60-38 REPAIRS
5.Remove 4 nuts securing turret base to chassis.
6.Remove 2 bolts securing damper to axle.
7. ACE models: Remove bolt securing ACE pipe
clamp to chassis.
8. ACE models: Remove bolt securing ACE pipe
clamp to turret.
9.Release harness clip from turret.
10.Raise turret and remove through bolt.
11.Compress damper and manoeuvre turret from
engine bay.
12.Remove damper. Refit
1.Position damper and manoeuvre turret into
position. Raise damper and align to turret. Fit
through bolt but do not tighten at this stage.
2.Align damper assembly to spring seat.
3.Fit bolts securing damper to axle and tighten to
45 Nm (33 lbf.ft).
4.Fit nuts securing turret to chassis and tighten
to 23 Nm (17 lbf.ft).
5.Tighten through bolt to 125 Nm (92 lbf.ft).
6. ACE models: Position ACE pipe clamp to
chassis and secure with bolt.
7. ACE models: Position ACE pipe clamp to
turret and secure with bolt.
8.Secure harness to turret.
9. RH damper: Reposition coolant reservoir.
10.Fit road wheel and tighten nuts to 140 Nm (103
lbf.ft).
11.Remove stand(s) and lower vehicle.
Page 1344 of 1672

HEATING AND VENTILATION
DESCRIPTION AND OPERATION 80-3
Description
General
The heating and ventilation system controls the temperature and distribution of air supplied to the vehicle interior. The
system consists of an air inlet duct, heater assembly, distribution ducts and a control panel. An outlet vent is
incorporated at the rear of the cabin. Some diesel models also incorporate a fuel burning heater (FBH) system in the
engine coolant supply to the heater assembly.
Fresh or recirculated air flows into the heater assembly from the inlet duct. An electrical variable speed blower in the
inlet duct, and/or ram effect, forces the air through the system. Depending on the settings on the control panel, the air
is then heated and supplied through the distribution ducts to fascia and floor level outlets.