fuse box LAND ROVER DISCOVERY 2002 Workshop Manual
[x] Cancel search | Manufacturer: LAND ROVER, Model Year: 2002, Model line: DISCOVERY, Model: LAND ROVER DISCOVERY 2002Pages: 1672, PDF Size: 46.1 MB
Page 50 of 1672
GENERAL INFORMATION
03-15
Hose clips
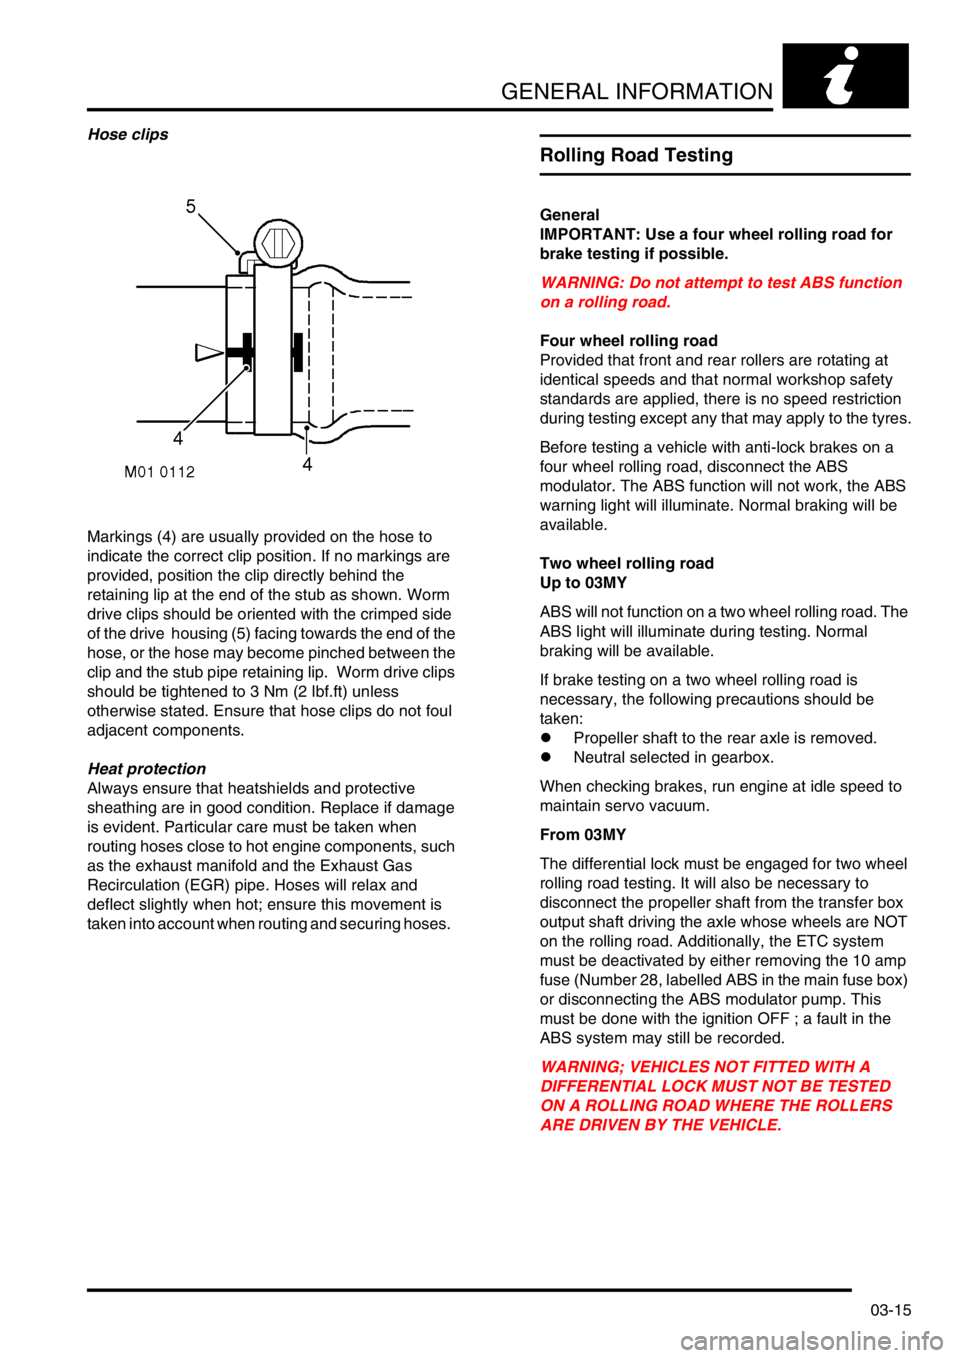
Markings (4) are usually provided on the hose to
indicate the correct clip position. If no markings are
provided, position the clip directly behind the
retaining lip at the end of the stub as shown. Worm
drive clips should be oriented with the crimped side
of the drive housing (5) facing towards the end of the
hose, or the hose may become pinched between the
clip and the stub pipe retaining lip. Worm drive clips
should be tightened to 3 Nm (2 lbf.ft) unless
otherwise stated. Ensure that hose clips do not foul
adjacent components.
Heat protection
Always ensure that heatshields and protective
sheathing are in good condition. Replace if damage
is evident. Particular care must be taken when
routing hoses close to hot engine components, such
as the exhaust manifold and the Exhaust Gas
Recirculation (EGR) pipe. Hoses will relax and
deflect slightly when hot; ensure this movement is
taken into account when routing and securing hoses.
Rolling Road Testing
General
IMPORTANT: Use a four wheel rolling road for
brake testing if possible.
WARNING: Do not attempt to test ABS function
on a rolling road.
Four wheel rolling road
Provided that front and rear rollers are rotating at
identical speeds and that normal workshop safety
standards are applied, there is no speed restriction
during testing except any that may apply to the tyres.
Before testing a vehicle with anti-lock brakes on a
four wheel rolling road, disconnect the ABS
modulator. The ABS function will not work, the ABS
warning light will illuminate. Normal braking will be
available.
Two wheel rolling road
Up to 03MY
ABS will not function on a two wheel rolling road. The
ABS light will illuminate during testing. Normal
braking will be available.
If brake testing on a two wheel rolling road is
necessary, the following precautions should be
taken:
lPropeller shaft to the rear axle is removed.
lNeutral selected in gearbox.
When checking brakes, run engine at idle speed to
maintain servo vacuum.
From 03MY
The differential lock must be engaged for two wheel
rolling road testing. It will also be necessary to
disconnect the propeller shaft from the transfer box
output shaft driving the axle whose wheels are NOT
on the rolling road. Additionally, the ETC system
must be deactivated by either removing the 10 amp
fuse (Number 28, labelled ABS in the main fuse box)
or disconnecting the ABS modulator pump. This
must be done with the ignition OFF ; a fault in the
ABS system may still be recorded.
WARNING; VEHICLES NOT FITTED WITH A
DIFFERENTIAL LOCK MUST NOT BE TESTED
ON A ROLLING ROAD WHERE THE ROLLERS
ARE DRIVEN BY THE VEHICLE.
Page 187 of 1672
ENGINE - TD5
12-1-48 REPAIRS
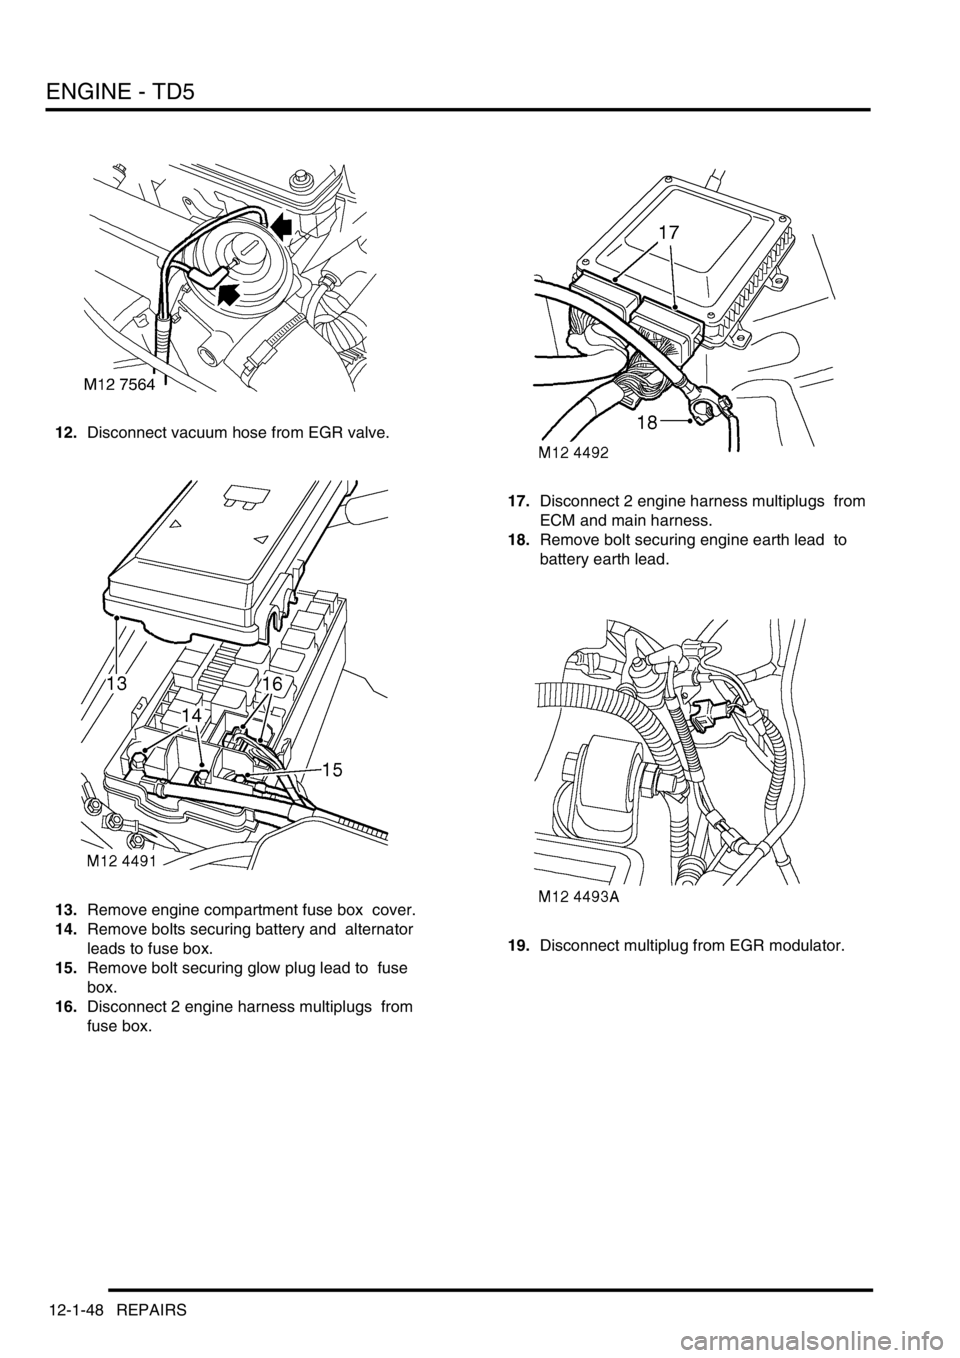
12.Disconnect vacuum hose from EGR valve.
13.Remove engine compartment fuse box cover.
14.Remove bolts securing battery and alternator
leads to fuse box.
15.Remove bolt securing glow plug lead to fuse
box.
16.Disconnect 2 engine harness multiplugs from
fuse box. 17.Disconnect 2 engine harness multiplugs from
ECM and main harness.
18.Remove bolt securing engine earth lead to
battery earth lead.
19.Disconnect multiplug from EGR modulator.
Page 191 of 1672

ENGINE - TD5
12-1-52 REPAIRS
5.Fit 2 upper bolts securing engine oil cooler pipe
and gearbox housing to engine and tighten to
50 Nm (37 lbf.ft) .
6.Lower engine onto mountings, and tighten nuts
to 85 Nm (63 lbf.ft) .
7.Remove tool LRT-12-138 from engine.
8.Fit and tighten bolt securing engine closing
panel to gearbox.
9.Raise vehicle on ramp.
10.Fit nuts and bolts securing engine LH and RH
mountings to chassis and tighten to 85 Nm (63
lbf.ft).
11.Fit remaining bolts securing gearbox housing to
engine and tighten to 50 Nm (37 lbf.ft).
12.Rotate crankshaft and align drive plate to
torque converter.
13.Using a magnetic socket, fit and tighten new
torque converter drive plate bolts to 50 Nm (37
lbf.ft) .
14.Fit front cross member and tighten bolts to 26
Nm (19 lbf.ft).
15.Align gearbox oil cooler pipes.
16.Fit oil cooler pipe clip and tighten bolts to 9 Nm
(7 lbf.ft).
17.Position gearbox oil cooler pipe clamps and
tighten nuts.
18.Position coolant rail and secure support bracket
in engine LH and RH mounting brackets.
19.Fit starter motor.
+ CHARGING AND STARTING,
REPAIRS, Starter motor - diesel.
20.Lower ramp.
21.Position coolant rail to front chassis member, fit
and tighten bolt to 10 Nm (7 lbf.ft).
22.Connect heater hose to coolant rail and secure
with clip.
23.Connect hose to coolant pump and secure with
clip.
24.Position PAS pump and tighten bolts to 25 Nm
(18 lbf.ft).
25.Position PAS pump pulley and lightly tighten
bolts.
26.Position ACE pump, fit bolts and tighten to 25
Nm (18 lbf.ft).
27.Position A/C compressor, fit bolts and tighten
to 25 Nm (18 lbf.ft).
28.Position ancillary drive belt, rotate tensioner
anti-clockwise and locate belt to pulleys.
29.Tighten PAS pump pulley bolts to 10 Nm (7
lbf.ft).
30.Position air intake hose to air cleaner and
secure clips.
31.Position engine harness and connect
multiplugs to compressor, MAF sensor,
turbocharger boost solenoid, AAP & IAT
sensor.
32.Position air inlet hose to turbocharger and
tighten clip. 33.Connect hoses to turbocharger boost solenoid
and secure clips.
34.Clean CKP sensor and mating face.
CAUTION: If originally fitted: Fit spacer to
CKP sensor.
35.Using new 'O' ring, fit CKP sensor, tighten CKP
sensor bolt to 9 Nm (7 lbf.ft) and connect
multiplug.
36.Connect multiplug to EGR modulator.
37.Connect engine earth lead to battery earth lead
and tighten bolt.
38.Connect engine harness multiplug to ECM and
main harness.
39.Connect engine harness multiplugs to fuse
box.
40.Position glow plug lead to fusebox and secure
with bolt.
41.Position battery and alternator leads to fusebox
and secure with bolts.
42.Fit engine compartment fuse box cover.
43.Connect vacuum hose to EGR valve.
44.Connect hose to vacuum pump and secure
vacuum pipe to fuel cooler.
45.Disconnect fuel hose from connector block and
connect to fuel cooler.
46.Connect fuel hoses to fuel cooler and
connector block on cylinder head.
47.Position expansion tank, connect hose and
secure with clip. Secure tank to body mounting.
48.Connect coolant hoses to fuel cooler and
coolant rail and secure clips.
49.Fit turbocharger.
+ ENGINE MANAGEMENT SYSTEM -
Td5, REPAIRS, Turbocharger.
50. Fit radiator.
+ COOLING SYSTEM - Td5, REPAIRS,
Radiator.
51.Fill engine with oil.
+ MAINTENANCE, PROCEDURES,
Engine oil - diesel engine.
52.Fit underbelly panel.
+ EXTERIOR FITTINGS, REPAIRS,
Panel - underbelly.
53.Fit bonnet.
+ EXTERIOR FITTINGS, REPAIRS,
Bonnet.
Page 270 of 1672
ENGINE - V8
REPAIRS 12-2-27
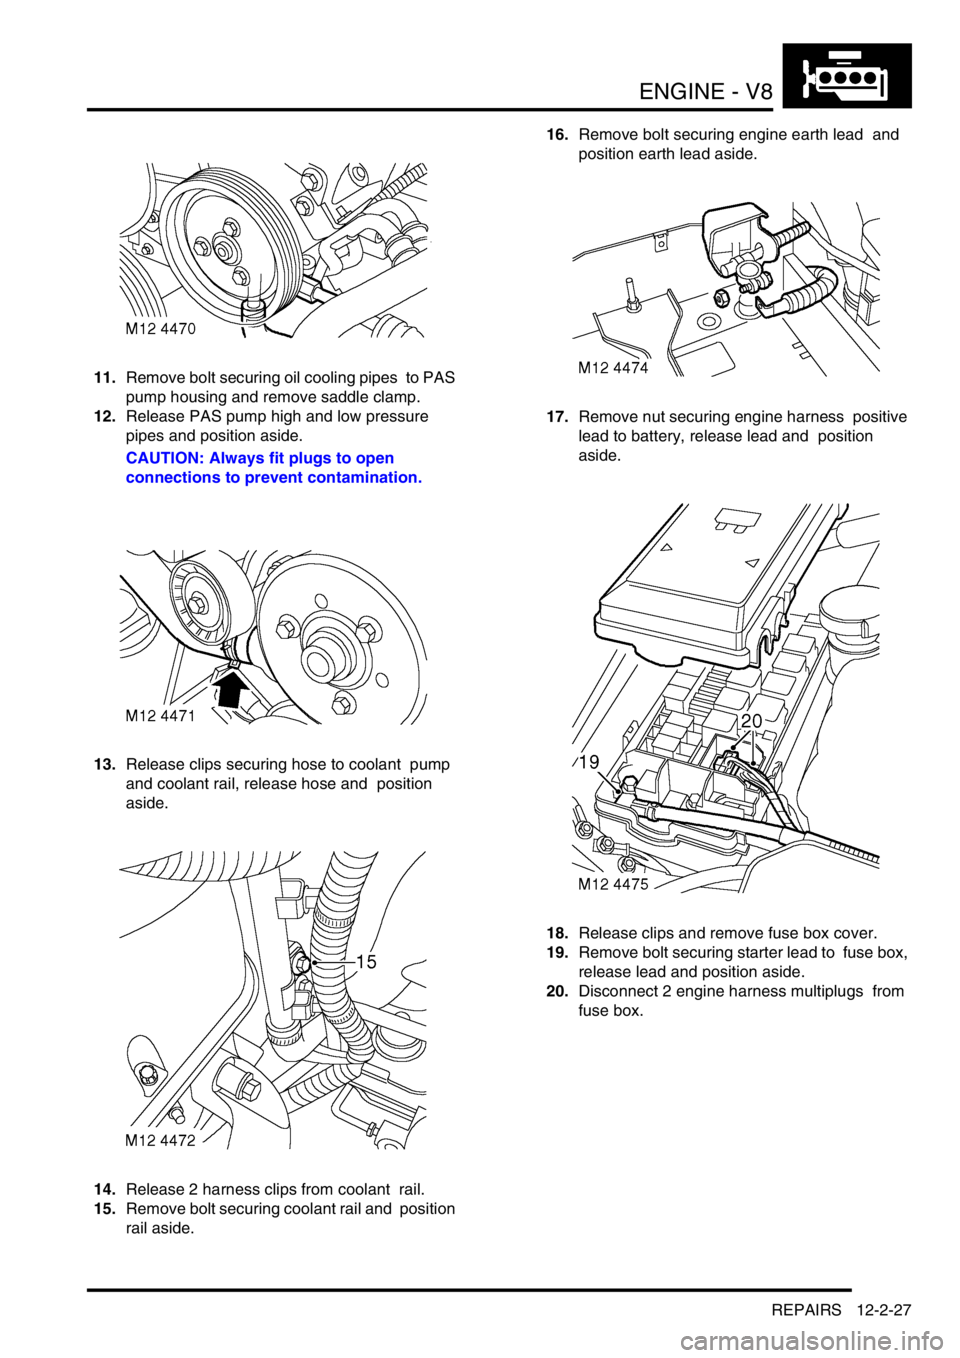
11.Remove bolt securing oil cooling pipes to PAS
pump housing and remove saddle clamp.
12.Release PAS pump high and low pressure
pipes and position aside.
CAUTION: Always fit plugs to open
connections to prevent contamination.
13.Release clips securing hose to coolant pump
and coolant rail, release hose and position
aside.
14.Release 2 harness clips from coolant rail.
15.Remove bolt securing coolant rail and position
rail aside. 16.Remove bolt securing engine earth lead and
position earth lead aside.
17.Remove nut securing engine harness positive
lead to battery, release lead and position
aside.
18.Release clips and remove fuse box cover.
19.Remove bolt securing starter lead to fuse box,
release lead and position aside.
20.Disconnect 2 engine harness multiplugs from
fuse box.
Page 273 of 1672

ENGINE - V8
12-2-30 REPAIRS
Refit
1.Clean mating faces of engine and gearbox,
dowel and dowel holes.
2.Lubricate splines and bearing surface on first
motion shaft with grease.
3.With assistance position engine in engine bay,
align to gearbox and locate on dowels.
4.Position support brackets, fit bell housing bolts
and tighten to 50 Nm (37 lbf.ft).
5.Position engine mountings, fit nuts and tighten
to 85 Nm (63 lbf.ft).
6.Lower lifting equipment and remove from
engine.
7. Models with automatic gearbox: Align torque
converter to drive plate, fit bolts and tighten to
50 Nm (37 lbf.ft). Fit access plug.
8.Fit exhaust front pipe.
+ MANIFOLDS AND EXHAUST
SYSTEMS - V8, REPAIRS, Front pipe.
9.Position oil cooling pipe saddle clamps and
tighten bolts.
10.Position engine harness into foot well.
11.Connect 5 multiplugs to ECM.
12.Fit toe board and secure with trim fixings.
13.Connect engine harness earth to body and
secure with nut.
14.Connect engine harness to main harness
multiplug.
15.Connect multiplug to EVAP purge valve.
16.Connect engine harness multiplugs to fuse
box.
17.Connect starter lead to fuse box and secure
with nut.
18.Connect engine harness positive lead to
battery and tighten nut.
19.Fit fuse box cover.
20.Position engine earth lead and secure with
bolt.
21.Position coolant rail and secure with bolt.
22.Connect harness clips to coolant rail.
23.Connect hose to coolant rail and coolant pump
and secure with clips.
24.Connect PAS pump high and low pressure
pipes and secure with clips.
25.Position oil cooling pipe saddle clamp to PAS
pump housing and secure with bolt.
26.Clean A/C compressor and housing mating
faces, dowels and dowel holes. 27.Position A/C compressor, fit bolts and tighten
to 22 Nm (16 lbf.ft).
28.Connect multiplug to A/C compressor.
29.Clean ACE pump and housing mating faces,
dowels and dowel holes.
30.Position ACE pump, fit bolts and tighten to 22
Nm (16 lbf.ft).
31.Clean all pulley 'V's, fit auxiliary drive belt,
using a 15mm spanner, release belt tensioner
secure belt and re-tension drive belt .
32.Ensure auxiliary drive belt is correctly located
on all pulleys.
33.Fit radiator.
+ COOLING SYSTEM - V8, REPAIRS,
Radiator.
34.Fit top hose and secure with clips.
35.Connect fuel pipe to fuel rail.
36.Position ignition coils and connect ht leads.
37.Fit upper inlet manifold.
+ MANIFOLDS AND EXHAUST
SYSTEMS - V8, REPAIRS, Gasket - inlet
manifold - upper - Without Secondary Air
Injection.
38.Fit new oil filter and refill engine with oil.
+ ENGINE - V8, REPAIRS, Filter - oil.
+ MAINTENANCE, PROCEDURES,
Engine oil - V8 engine.
39.Top up gearbox oil.
+ MAINTENANCE, PROCEDURES,
Automatic gearbox.
Page 342 of 1672
EMISSION CONTROL - V8
DESCRIPTION AND OPERATION 17-2-5
Evaporative emission system control
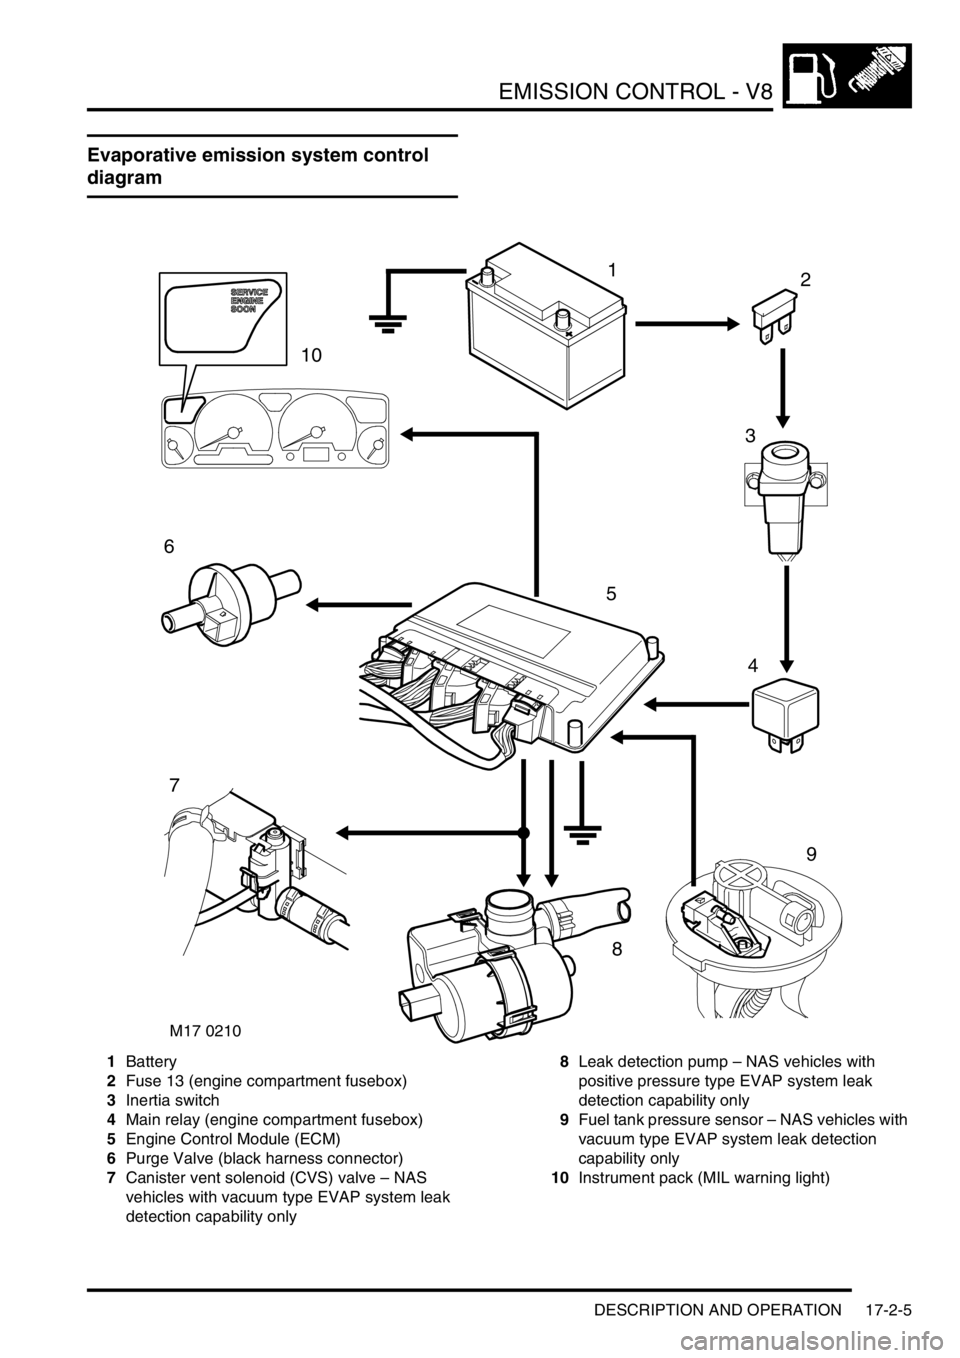
diagram
1Battery
2Fuse 13 (engine compartment fusebox)
3Inertia switch
4Main relay (engine compartment fusebox)
5Engine Control Module (ECM)
6Purge Valve (black harness connector)
7Canister vent solenoid (CVS) valve – NAS
vehicles with vacuum type EVAP system leak
detection capability only8Leak detection pump – NAS vehicles with
positive pressure type EVAP system leak
detection capability only
9Fuel tank pressure sensor – NAS vehicles with
vacuum type EVAP system leak detection
capability only
10Instrument pack (MIL warning light)
M17 0210
12
3
4
5
6
7
9
8
10
Page 345 of 1672
EMISSION CONTROL - V8
17-2-8 DESCRIPTION AND OPERATION
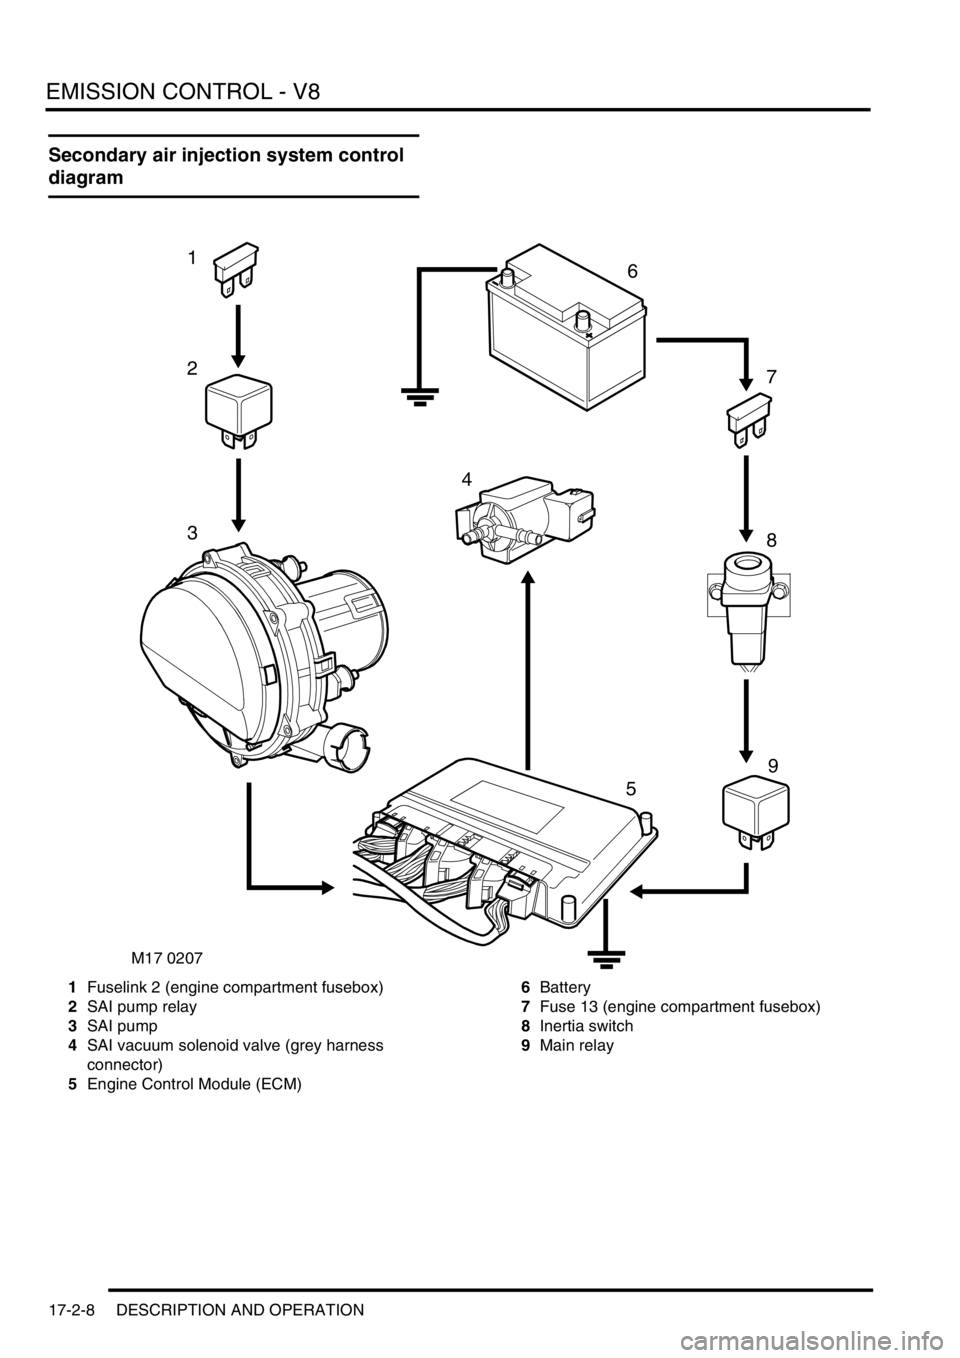
Secondary air injection system control
diagram
1Fuselink 2 (engine compartment fusebox)
2SAI pump relay
3SAI pump
4SAI vacuum solenoid valve (grey harness
connector)
5Engine Control Module (ECM)6Battery
7Fuse 13 (engine compartment fusebox)
8Inertia switch
9Main relay
9
M17 0207
1
2
3
4
5
7
6
8
Page 350 of 1672
EMISSION CONTROL - V8
DESCRIPTION AND OPERATION 17-2-13
The heated oxygen sensor is an integral part of the exhaust emission control system and is used in conjunction with
the catalytic converters and the engine management control unit to ensure that the air:fuel mixture ratio stays around
the stoichiometric point of
λ = 1, where the catalytic converters are most effective. Combinations of four (NAS only)
or two heated lambda sensors are used in the exhaust system dependent on market legislation.
The heated oxygen sensor is screwed into threaded mountings welded into the top of the front exhaust pipes at
suitable locations. They are used to detect the level of residual oxygen in the exhaust gas to provide an instantaneous
indication of whether combustion is complete. By positioning sensors in the stream of exhaust gases from each
separate bank of the exhaust manifold, the engine management system is better able to control the fuelling
requirements on each bank independently of the other, so allowing much closer control of the air:fuel ratio and
optimising catalytic converter efficiency.
Two pre-catalytic converter heated oxygen sensors are mounted in the front pipes for monitoring the oxygen content
of the exhaust gas. NAS models also have two additional post-catalytic converter heated oxygen sensors in the
exhaust front pipe.
CAUTION: HO2 sensors are easily damaged by dropping, over torquing, excessive heat or contamination.
Care must be taken not to damage the sensor housing or tip.
The oxygen sensors consist of a ceramic body (Galvanic cell) which is a practically pure oxygen-ion conductor made
from a mixed oxide of zirconium and yttrium. The ceramic is then coated with gas-permeable platinum, which when
heated to a sufficiently high temperature (
≥ 350° C) generates a voltage which is proportional to the oxygen content
in the exhaust gas stream.
The heated oxygen sensor is protected by an outer tube with a restricted flow opening to prevent the sensor's
ceramics from being cooled by low temperature exhaust gases at start up. The post-catalytic sensors have improved
signal quality, but a slower response rate.
The pre-catalytic and post-catalytic converter sensors are not interchangeable, and although it is possible to mount
them in transposed positions, their harness connections are of different gender and colour. It is important not to
confuse the sensor signal pins; the signal pins are gold plated, whilst the heater supply pins are tinned,
mixing them up will cause contamination and adversely affect system performance.
Each of the heated oxygen sensors have a four pin connector with the following wiring details:
lSensor signal ground (grey wire – connects to engine management ECM)
lSensor signal (black wire – connects to engine management ECM)
lHeater drive (white wire – connects to engine management ECM)
lHeater supply (white wire – connects to fuse 2, underbonnet fuse box)
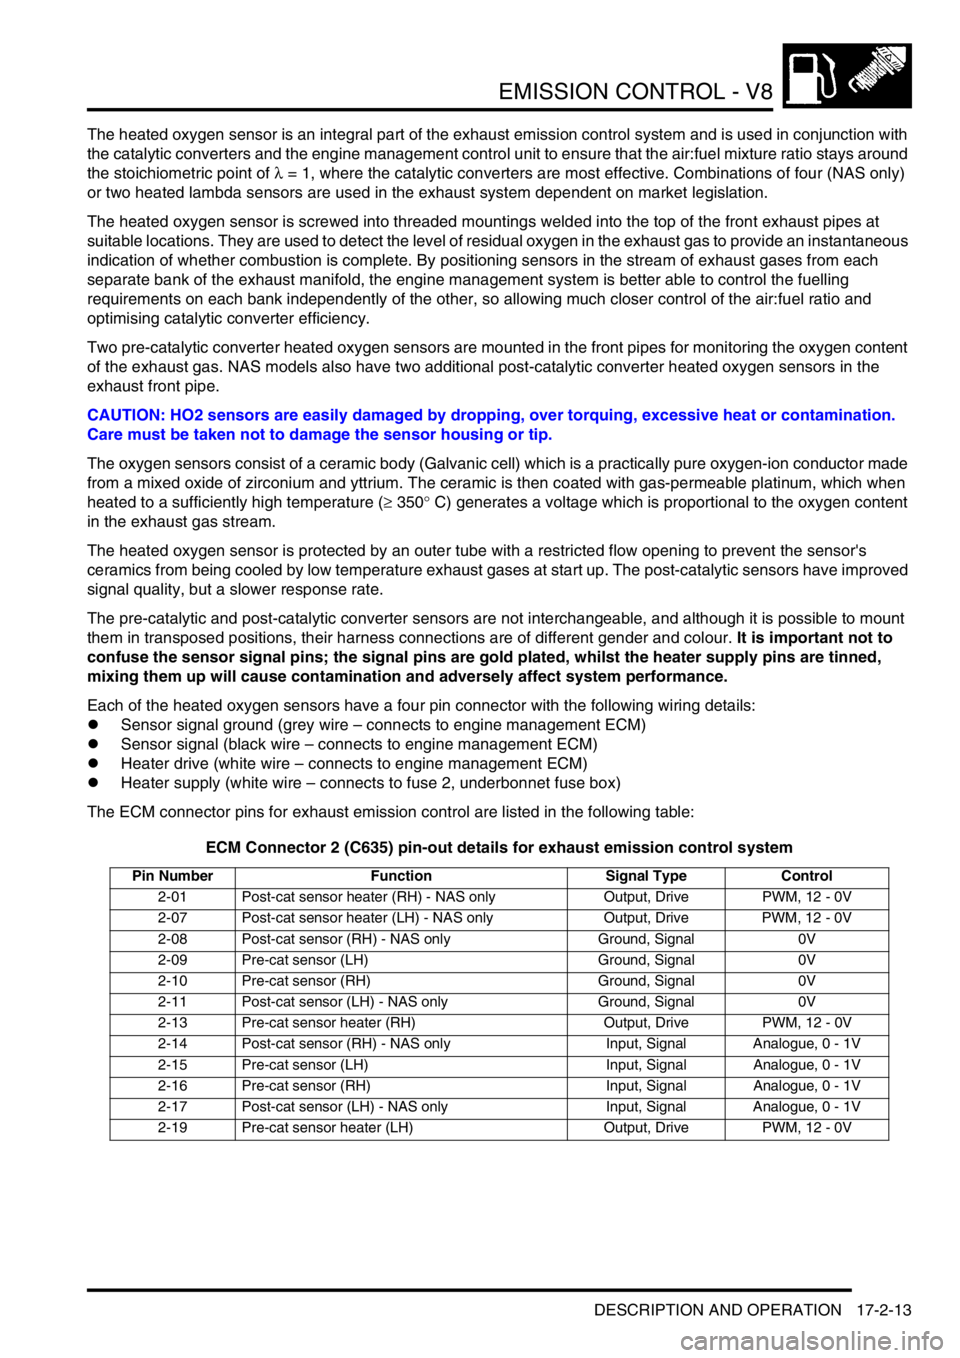
The ECM connector pins for exhaust emission control are listed in the following table:
ECM Connector 2 (C635) pin-out details for exhaust emission control system
Pin Number Function Signal Type Control
2-01 Post-cat sensor heater (RH) - NAS only Output, Drive PWM, 12 - 0V
2-07 Post-cat sensor heater (LH) - NAS only Output, Drive PWM, 12 - 0V
2-08 Post-cat sensor (RH) - NAS only Ground, Signal 0V
2-09 Pre-cat sensor (LH) Ground, Signal 0V
2-10 Pre-cat sensor (RH) Ground, Signal 0V
2-11 Post-cat sensor (LH) - NAS only Ground, Signal 0V
2-13 Pre-cat sensor heater (RH) Output, Drive PWM, 12 - 0V
2-14 Post-cat sensor (RH) - NAS only Input, Signal Analogue, 0 - 1V
2-15 Pre-cat sensor (LH) Input, Signal Analogue, 0 - 1V
2-16 Pre-cat sensor (RH) Input, Signal Analogue, 0 - 1V
2-17 Post-cat sensor (LH) - NAS only Input, Signal Analogue, 0 - 1V
2-19 Pre-cat sensor heater (LH) Output, Drive PWM, 12 - 0V
Page 357 of 1672

EMISSION CONTROL - V8
17-2-20 DESCRIPTION AND OPERATION
Purge valve operation is controlled by the engine control module (ECM). The purge valve has a two-pin electrical
connector which links to the ECM via the engine harness. Pin-1 of the connector is the power supply source from fuse
2 in the engine compartment fusebox, and pin-2 of the connector is the switched earth from the ECM (pulse width
modulated (PWM) signal) which is used to control the purge valve operation time. Note that the harness connector
for the purge valve is black, and must not be confused with the connector for the Secondary Air Injection
vacuum solenoid valve which is grey.
When the purge valve is earthed by the ECM, the valve opens to allow hydrocarbons stored in the EVAP canister to
be purged to the engine inlet manifold for combustion.
If the purge valve breaks or becomes stuck in the open or closed position, the EVAP system will cease to function
and there are no default measures available. The ECM will store the fault in memory and illuminate the MIL warning
lamp if the correct monitoring conditions have been achieved (i.e. valve status unchanged for 45 seconds after engine
has been running for 15 minutes). If the purge valve is stuck in the open position, a rich air:fuel mixture is likely to
result at the intake manifold, this could cause the engine to misfire and the fuelling adaptions will change.
The following failure modes are possible:
lSticking valve
lValve blocked
lConnector or harness wiring fault (open or short circuit)
lValve stuck open
If the purge valve malfunctions, the following fault codes may be stored in the ECM diagnostic memory, which can be
retrieved using 'Testbook':
P-code Description
P0440Purge valve not sealing
P0444Purge valve open circuit
P0445Purge valve short circuit to ground
P0443Purge valve short circuit to battery voltage
Page 358 of 1672
EMISSION CONTROL - V8
DESCRIPTION AND OPERATION 17-2-21
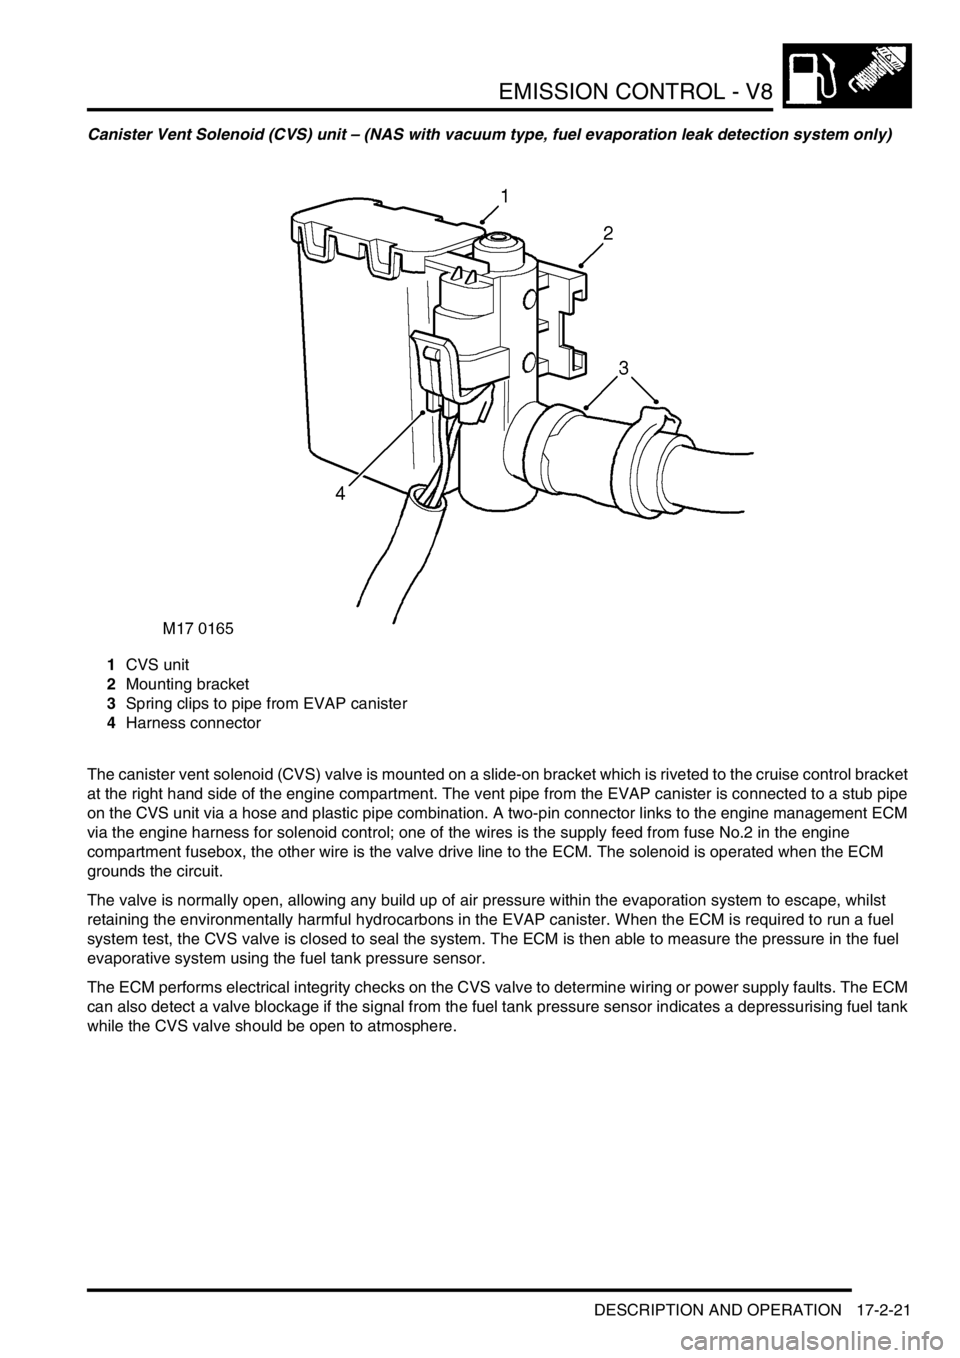
Canister Vent Solenoid (CVS) unit – (NAS with vacuum type, fuel evaporation leak detection system only)
1CVS unit
2Mounting bracket
3Spring clips to pipe from EVAP canister
4Harness connector
The canister vent solenoid (CVS) valve is mounted on a slide-on bracket which is riveted to the cruise control bracket
at the right hand side of the engine compartment. The vent pipe from the EVAP canister is connected to a stub pipe
on the CVS unit via a hose and plastic pipe combination. A two-pin connector links to the engine management ECM
via the engine harness for solenoid control; one of the wires is the supply feed from fuse No.2 in the engine
compartment fusebox, the other wire is the valve drive line to the ECM. The solenoid is operated when the ECM
grounds the circuit.
The valve is normally open, allowing any build up of air pressure within the evaporation system to escape, whilst
retaining the environmentally harmful hydrocarbons in the EVAP canister. When the ECM is required to run a fuel
system test, the CVS valve is closed to seal the system. The ECM is then able to measure the pressure in the fuel
evaporative system using the fuel tank pressure sensor.
The ECM performs electrical integrity checks on the CVS valve to determine wiring or power supply faults. The ECM
can also detect a valve blockage if the signal from the fuel tank pressure sensor indicates a depressurising fuel tank
while the CVS valve should be open to atmosphere.