LAND ROVER DISCOVERY 2002 Workshop Manual
DISCOVERY 2002
LAND ROVER
LAND ROVER
https://www.carmanualsonline.info/img/64/57246/w960_57246-0.png
LAND ROVER DISCOVERY 2002 Workshop Manual
Trending: height adjustment, engine oil, odometer, ECO mode, oil type, earth, headlights
Page 1231 of 1672
SUNROOF
76-6-16 REPAIRS
Refit
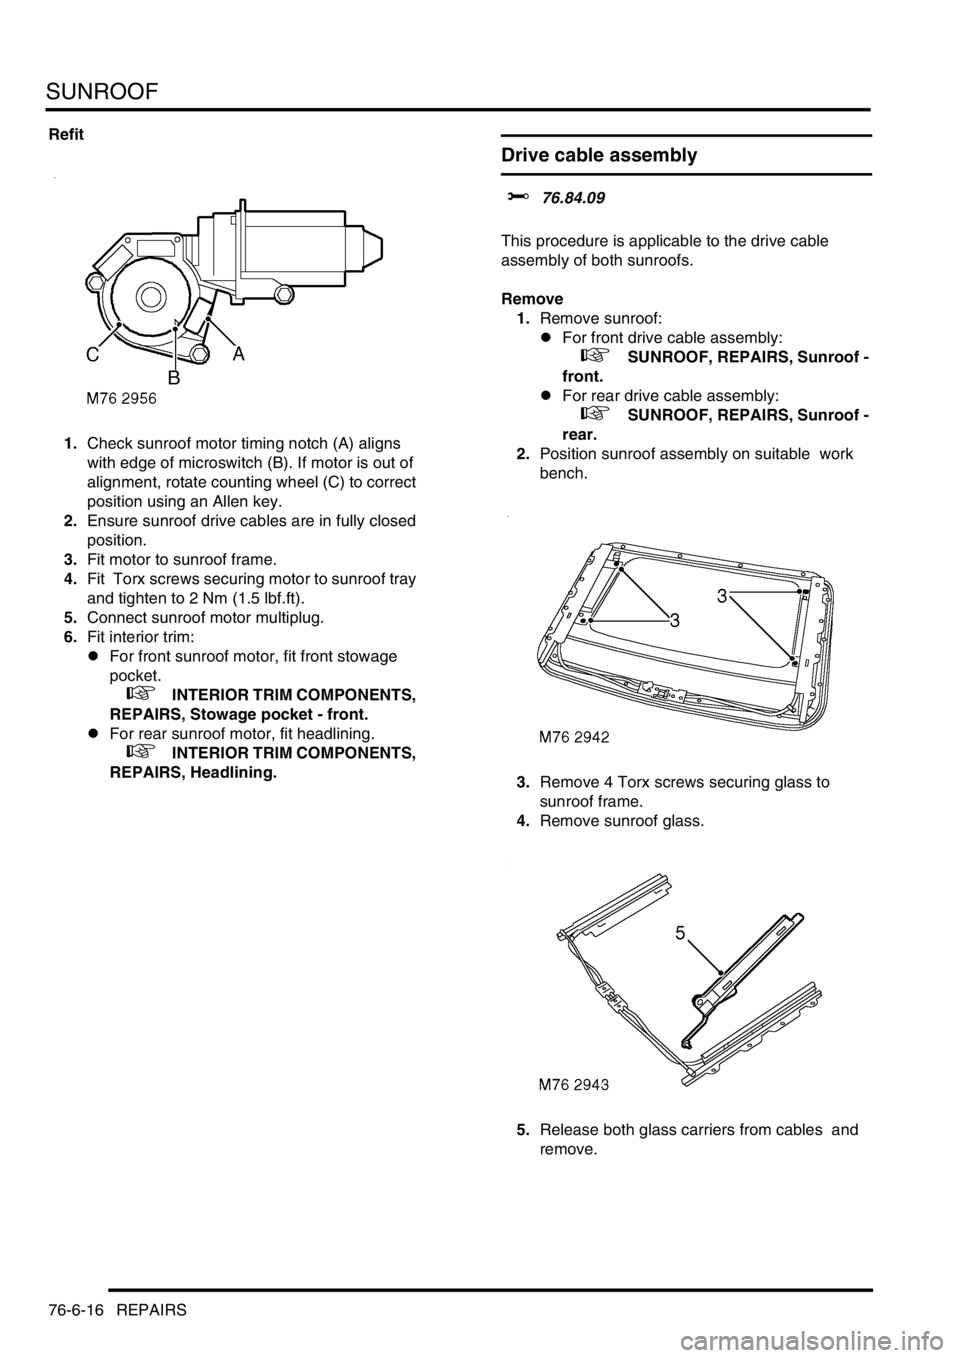
1.Check sunroof motor timing notch (A) aligns
with edge of microswitch (B). If motor is out of
alignment, rotate counting wheel (C) to correct
position using an Allen key.
2.Ensure sunroof drive cables are in fully closed
position.
3.Fit motor to sunroof frame.
4.Fit Torx screws securing motor to sunroof tray
and tighten to 2 Nm (1.5 lbf.ft).
5.Connect sunroof motor multiplug.
6.Fit interior trim:
lFor front sunroof motor, fit front stowage
pocket.
+ INTERIOR TRIM COMPONENTS,
REPAIRS, Stowage pocket - front.
lFor rear sunroof motor, fit headlining.
+ INTERIOR TRIM COMPONENTS,
REPAIRS, Headlining.
Drive cable assembly
$% 76.84.09
This procedure is applicable to the drive cable
assembly of both sunroofs.
Remove
1.Remove sunroof:
lFor front drive cable assembly:
+ SUNROOF, REPAIRS, Sunroof -
front.
lFor rear drive cable assembly:
+ SUNROOF, REPAIRS, Sunroof -
rear.
2.Position sunroof assembly on suitable work
bench.
3.Remove 4 Torx screws securing glass to
sunroof frame.
4.Remove sunroof glass.
5.Release both glass carriers from cables and
remove.
Page 1232 of 1672
SUNROOF
REPAIRS 76-6-17
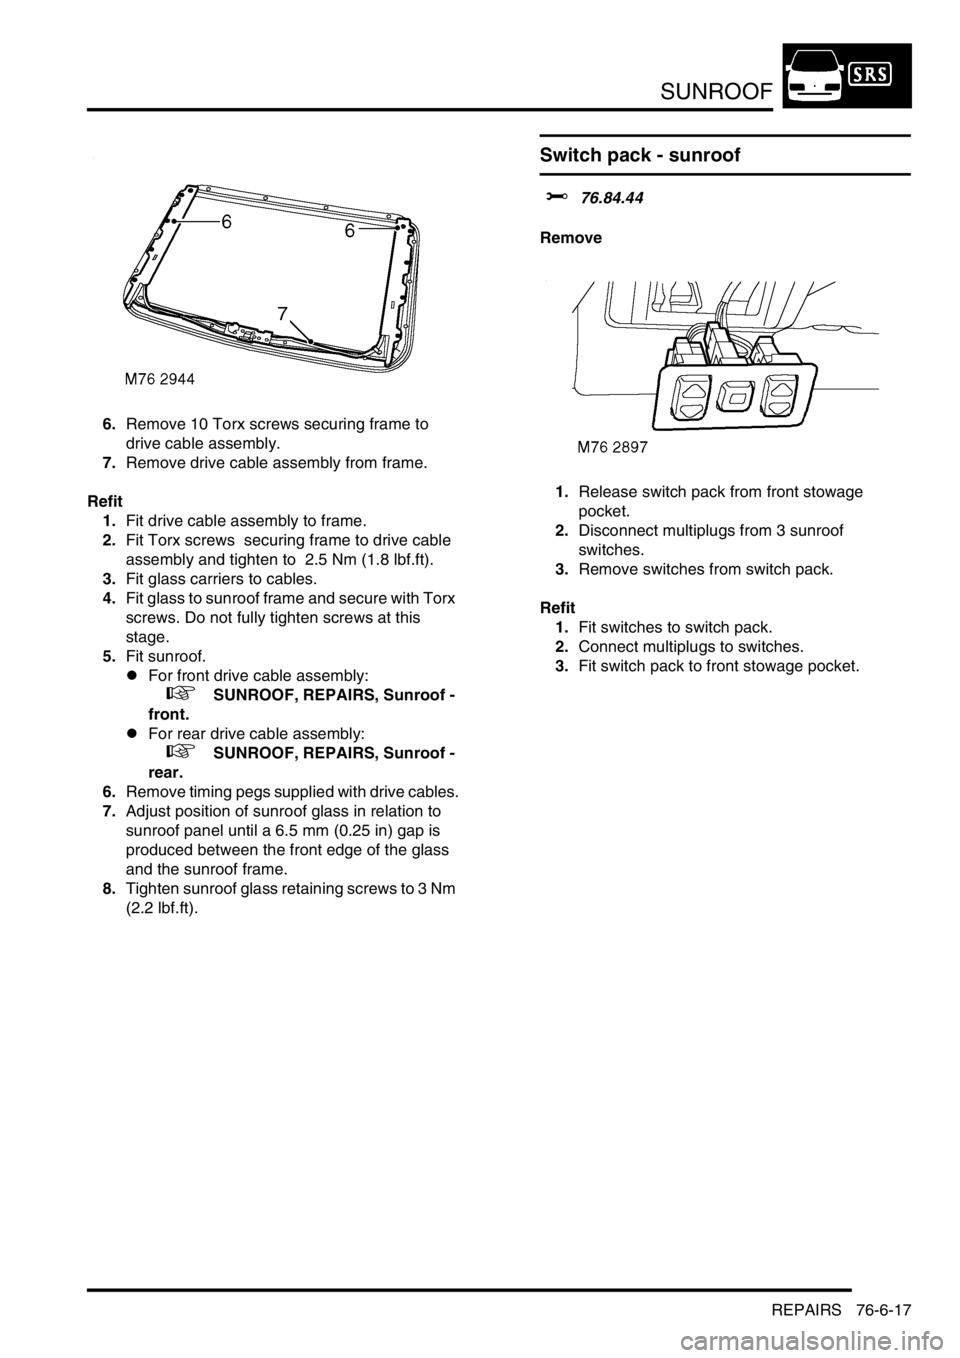
6.Remove 10 Torx screws securing frame to
drive cable assembly.
7.Remove drive cable assembly from frame.
Refit
1.Fit drive cable assembly to frame.
2.Fit Torx screws securing frame to drive cable
assembly and tighten to 2.5 Nm (1.8 lbf.ft).
3.Fit glass carriers to cables.
4.Fit glass to sunroof frame and secure with Torx
screws. Do not fully tighten screws at this
stage.
5.Fit sunroof.
lFor front drive cable assembly:
+ SUNROOF, REPAIRS, Sunroof -
front.
lFor rear drive cable assembly:
+ SUNROOF, REPAIRS, Sunroof -
rear.
6.Remove timing pegs supplied with drive cables.
7.Adjust position of sunroof glass in relation to
sunroof panel until a 6.5 mm (0.25 in) gap is
produced between the front edge of the glass
and the sunroof frame.
8.Tighten sunroof glass retaining screws to 3 Nm
(2.2 lbf.ft).
Switch pack - sunroof
$% 76.84.44
Remove
1.Release switch pack from front stowage
pocket.
2.Disconnect multiplugs from 3 sunroof
switches.
3.Remove switches from switch pack.
Refit
1.Fit switches to switch pack.
2.Connect multiplugs to switches.
3.Fit switch pack to front stowage pocket.
Page 1233 of 1672
SUNROOF
76-6-18 REPAIRS
ECU - sunroof
$% 76.84.46
Remove
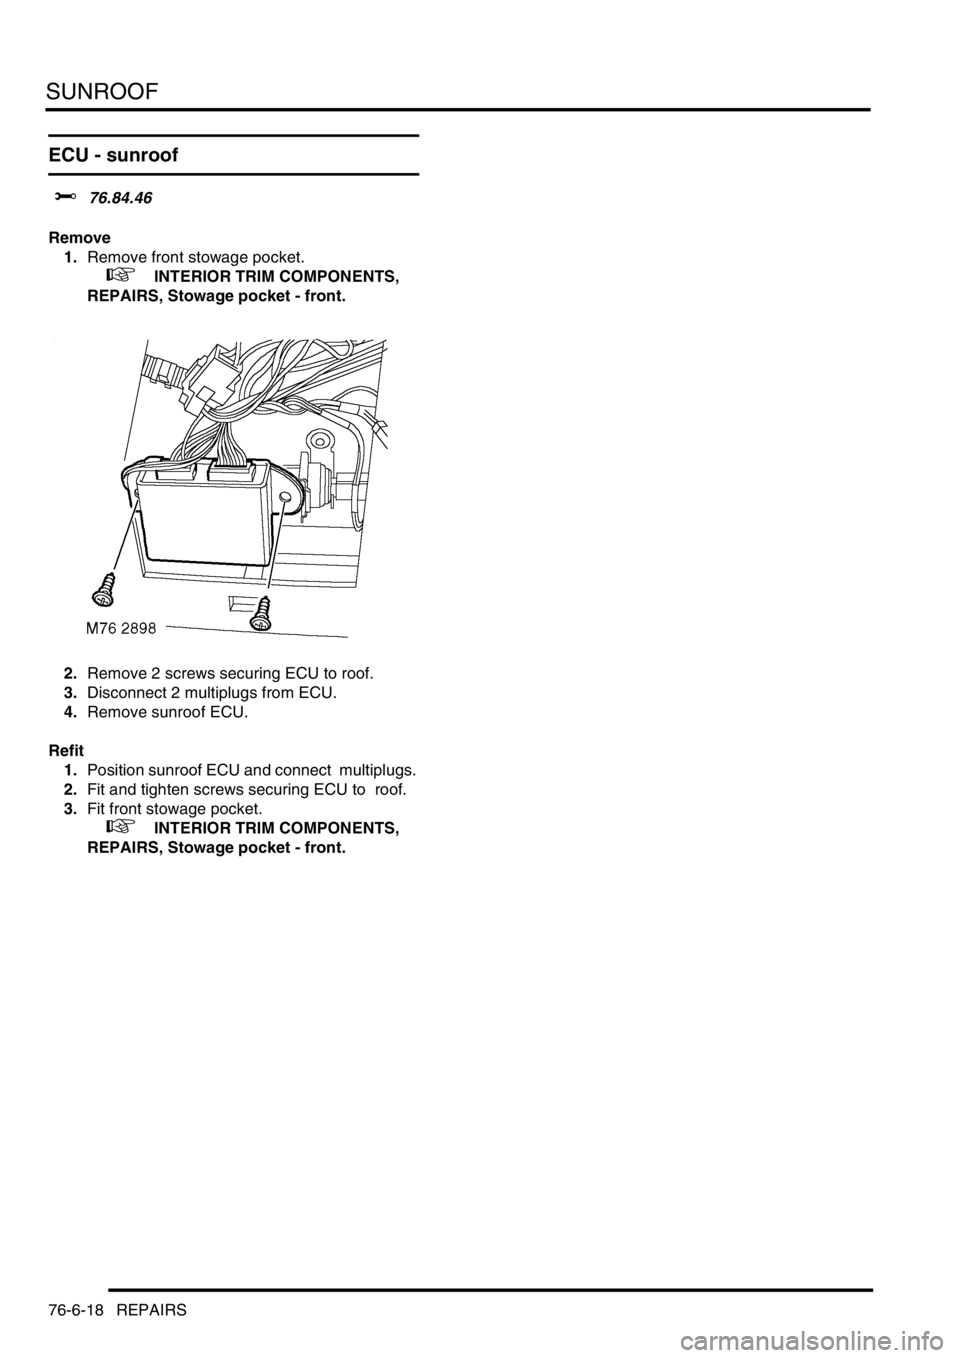
1.Remove front stowage pocket.
+ INTERIOR TRIM COMPONENTS,
REPAIRS, Stowage pocket - front.
2.Remove 2 screws securing ECU to roof.
3.Disconnect 2 multiplugs from ECU.
4.Remove sunroof ECU.
Refit
1.Position sunroof ECU and connect multiplugs.
2.Fit and tighten screws securing ECU to roof.
3.Fit front stowage pocket.
+ INTERIOR TRIM COMPONENTS,
REPAIRS, Stowage pocket - front.
Page 1234 of 1672
CHASSIS AND BODY DIMENSIONS
CHASSIS DIMENSIONS 77-1-1
CHASSIS AND BODY DIMENSIONS CHASSIS DIMENSIONS
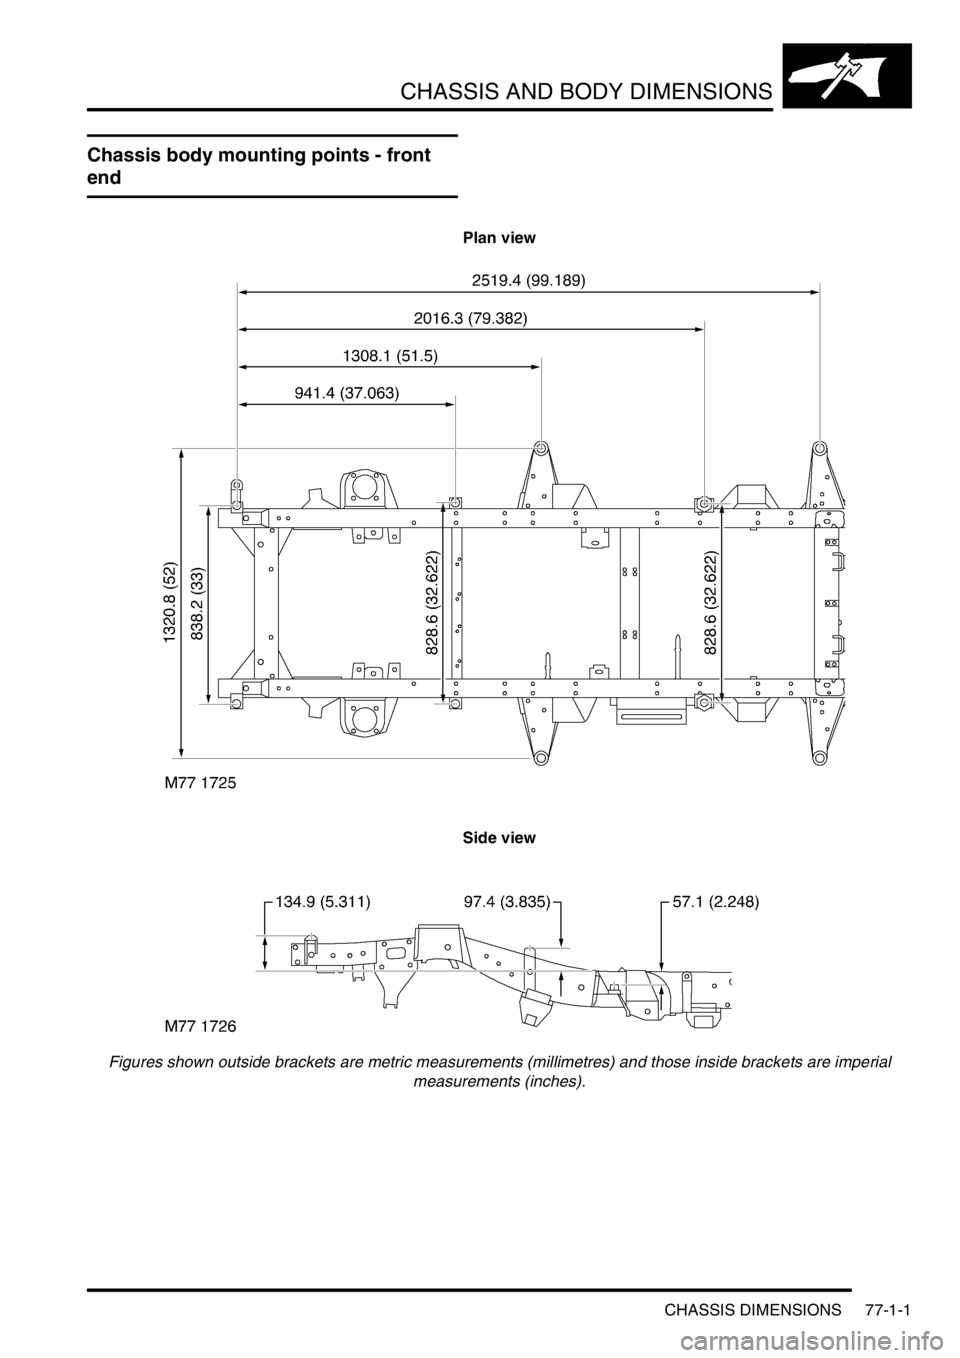
Chassis body mounting points - front
end
Plan view
Side view
Figures shown outside brackets are metric measurements (millimetres) and those inside brackets are imperial
measurements (inches).
Page 1235 of 1672
CHASSIS AND BODY DIMENSIONS
77-1-2 CHASSIS DIMENSIONS
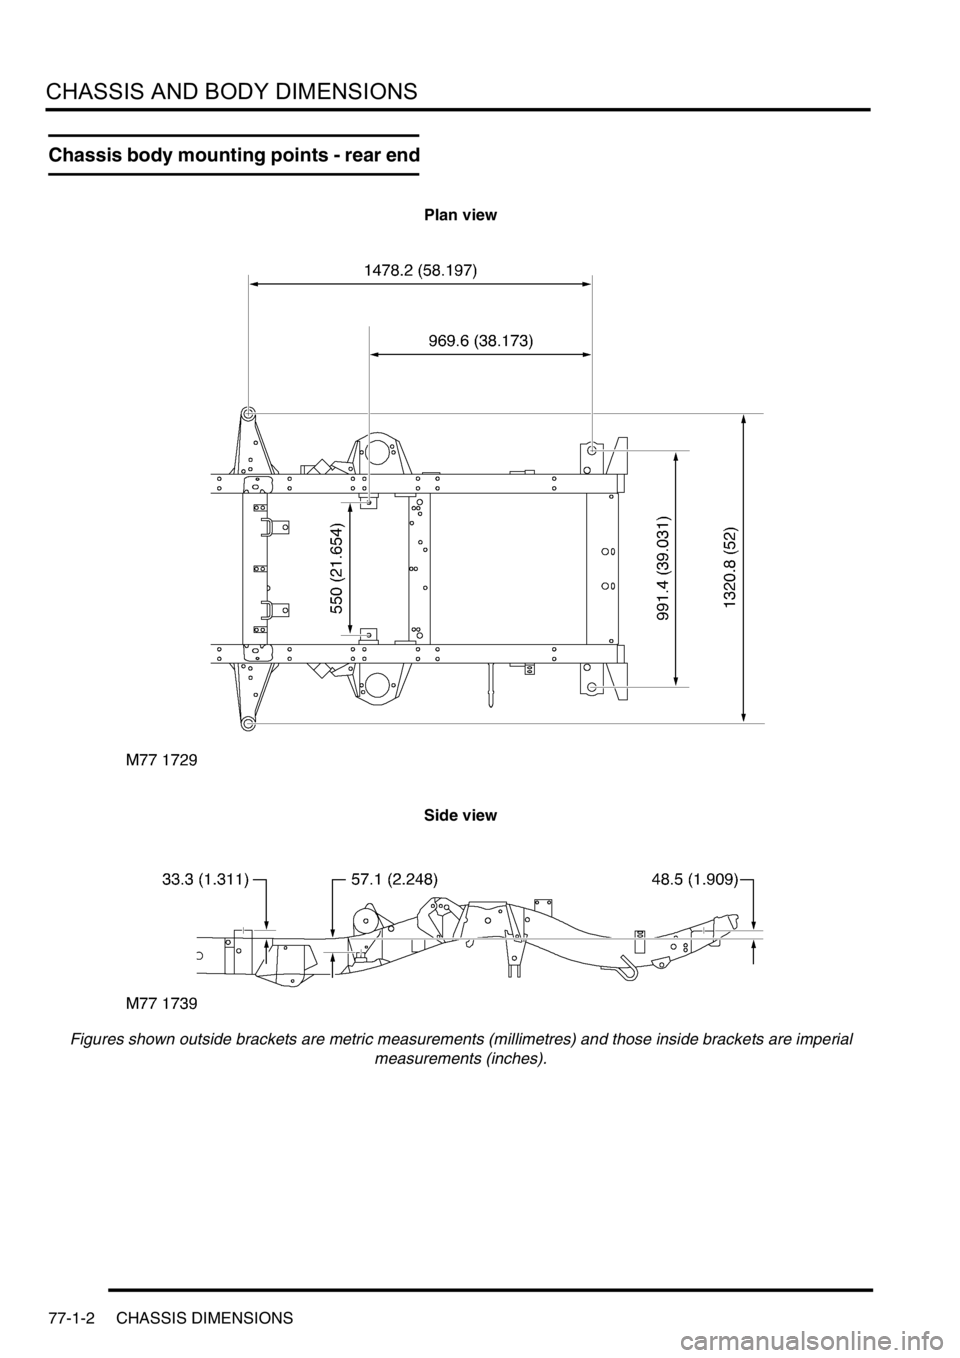
Chassis body mounting points - rear end
Plan view
Side view
Figures shown outside brackets are metric measurements (millimetres) and those inside brackets are imperial
measurements (inches).
Page 1236 of 1672
CHASSIS AND BODY DIMENSIONS
CHASSIS DIMENSIONS 77-1-3
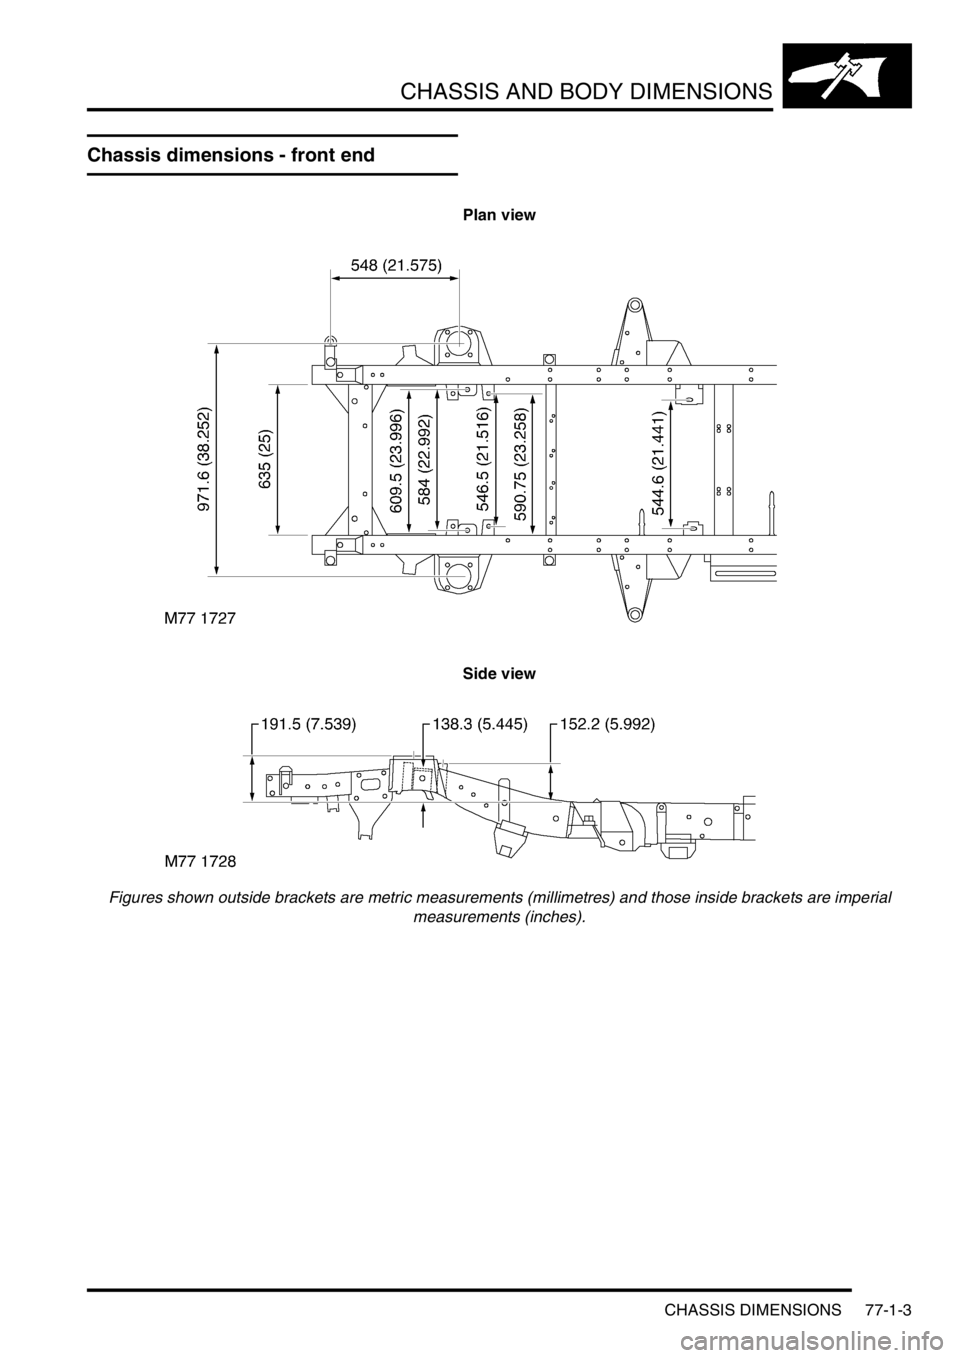
Chassis dimensions - front end
Plan view
Side view
Figures shown outside brackets are metric measurements (millimetres) and those inside brackets are imperial
measurements (inches).
Page 1237 of 1672
CHASSIS AND BODY DIMENSIONS
77-1-4 CHASSIS DIMENSIONS
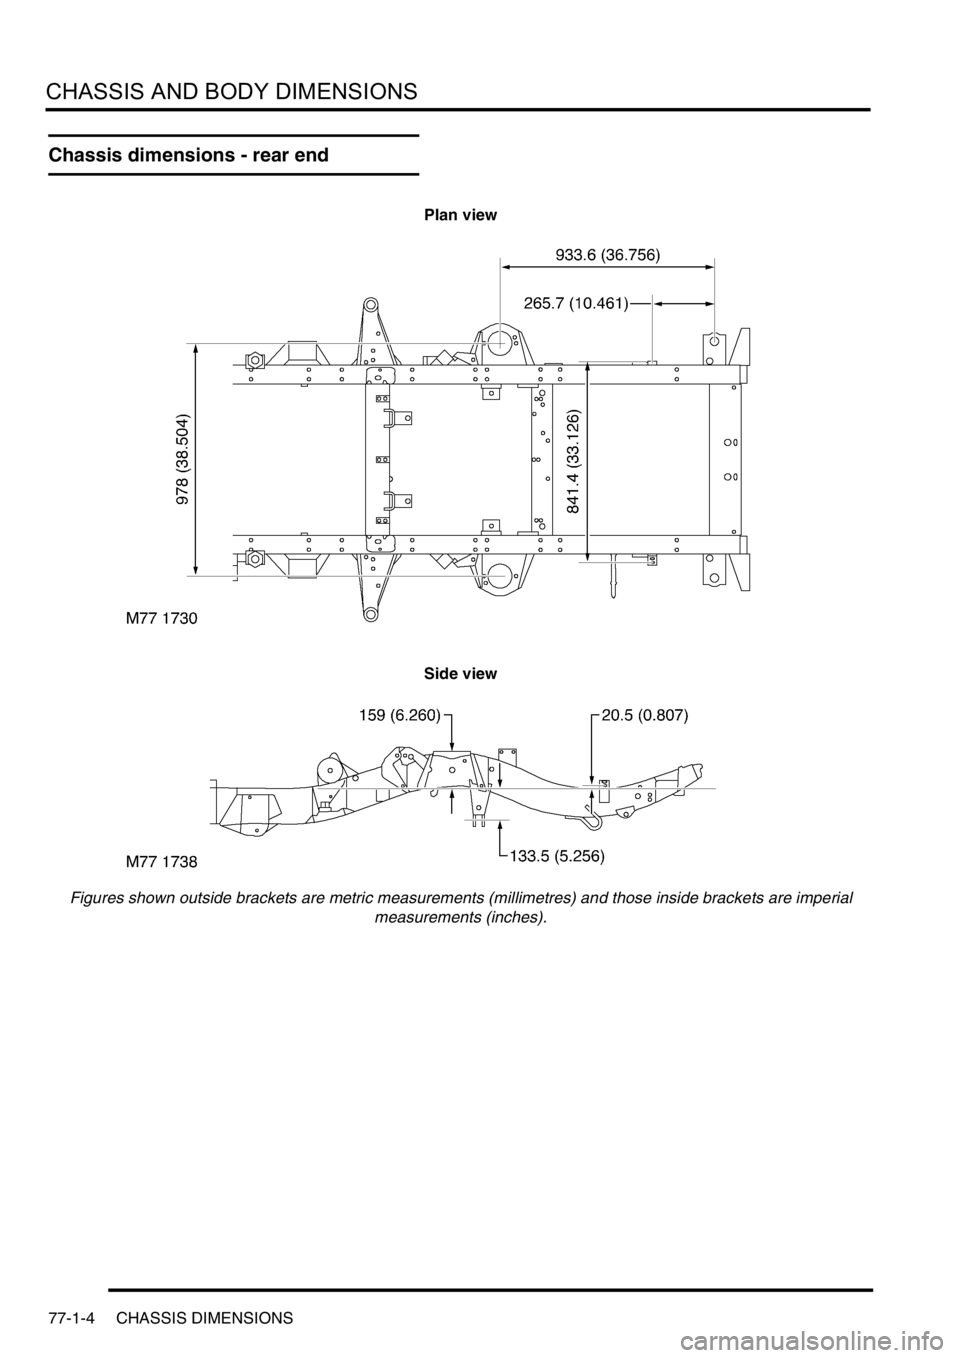
Chassis dimensions - rear end
Plan view
Side view
Figures shown outside brackets are metric measurements (millimetres) and those inside brackets are imperial
measurements (inches).
Page 1238 of 1672
CHASSIS AND BODY DIMENSIONS
BODY DIMENSIONS 77-1-5
BODY DIMENSIONS
Body Dimensions
The following dimensional information is shown to assist the technician in the diagnosis and repair of body panels.
The information is shown in two different forms. In the first part of the information X,Y and Z dimensions are shown
and in the second part actual point to point dimensions are shown.
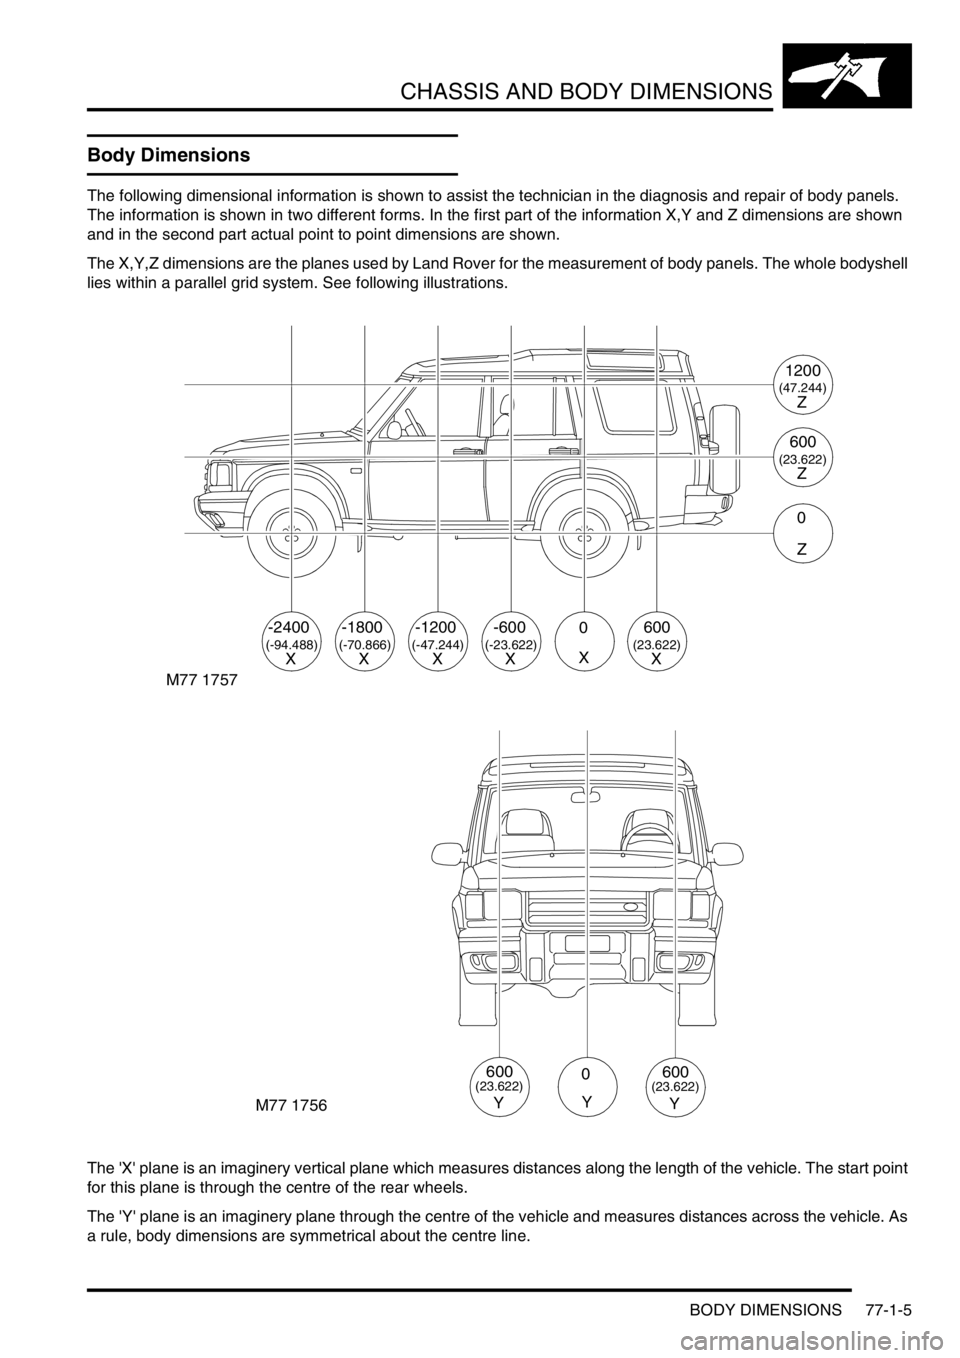
The X,Y,Z dimensions are the planes used by Land Rover for the measurement of body panels. The whole bodyshell
lies within a parallel grid system. See following illustrations.
The 'X' plane is an imaginery vertical plane which measures distances along the length of the vehicle. The start point
for this plane is through the centre of the rear wheels.
The 'Y' plane is an imaginery plane through the centre of the vehicle and measures distances across the vehicle. As
a rule, body dimensions are symmetrical about the centre line.
M77 1757
-2400
(-94.488)X
-1800
(-70.866)
-1200-6000600
(-47.244)(-23.622)(23.622)XXXXX
1200
(47.244)Z
600
(23.622)Z
0
Z
M77 1756
0
Y
600(23.622)
Y
600(23.622)
Y
Page 1239 of 1672
CHASSIS AND BODY DIMENSIONS
77-1-6 BODY DIMENSIONS
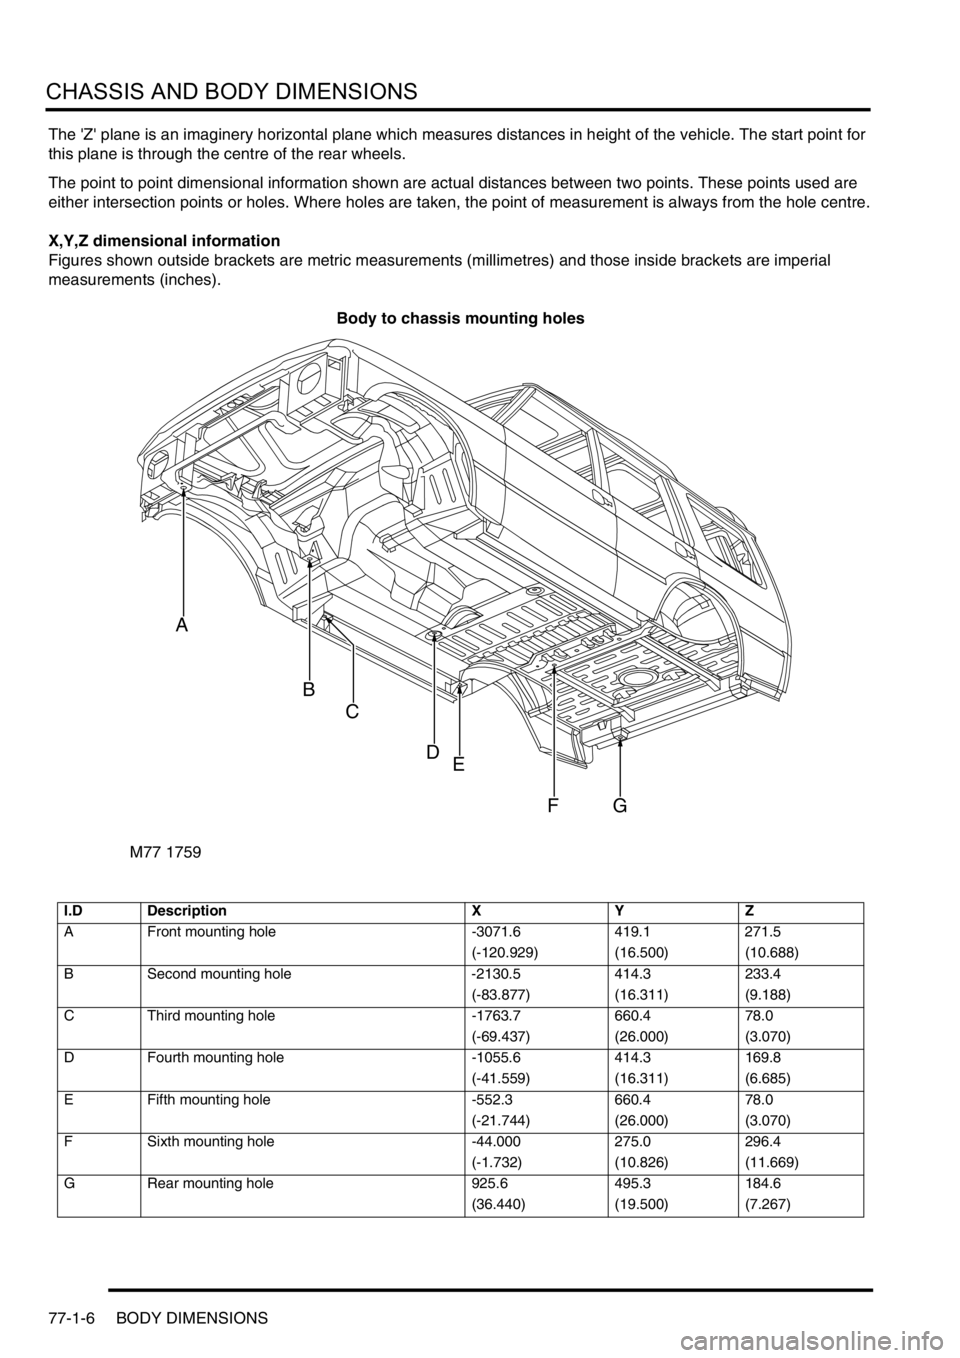
The 'Z' plane is an imaginery horizontal plane which measures distances in height of the vehicle. The start point for
this plane is through the centre of the rear wheels.
The point to point dimensional information shown are actual distances between two points. These points used are
either intersection points or holes. Where holes are taken, the point of measurement is always from the hole centre.
X,Y,Z dimensional information
Figures shown outside brackets are metric measurements (millimetres) and those inside brackets are imperial
measurements (inches).
Body to chassis mounting holes
I.D Description X Y Z
A Front mounting hole -3071.6 419.1 271.5
(-120.929) (16.500) (10.688)
B Second mounting hole -2130.5 414.3 233.4
(-83.877) (16.311) (9.188)
C Third mounting hole -1763.7 660.4 78.0
(-69.437) (26.000) (3.070)
D Fourth mounting hole -1055.6 414.3 169.8
(-41.559) (16.311) (6.685)
E Fifth mounting hole -552.3 660.4 78.0
(-21.744) (26.000) (3.070)
F Sixth mounting hole -44.000 275.0 296.4
(-1.732) (10.826) (11.669)
G Rear mounting hole 925.6 495.3 184.6
(36.440) (19.500) (7.267)
M77 1759
A
B
C
DE
FG
Page 1240 of 1672
CHASSIS AND BODY DIMENSIONS
BODY DIMENSIONS 77-1-7
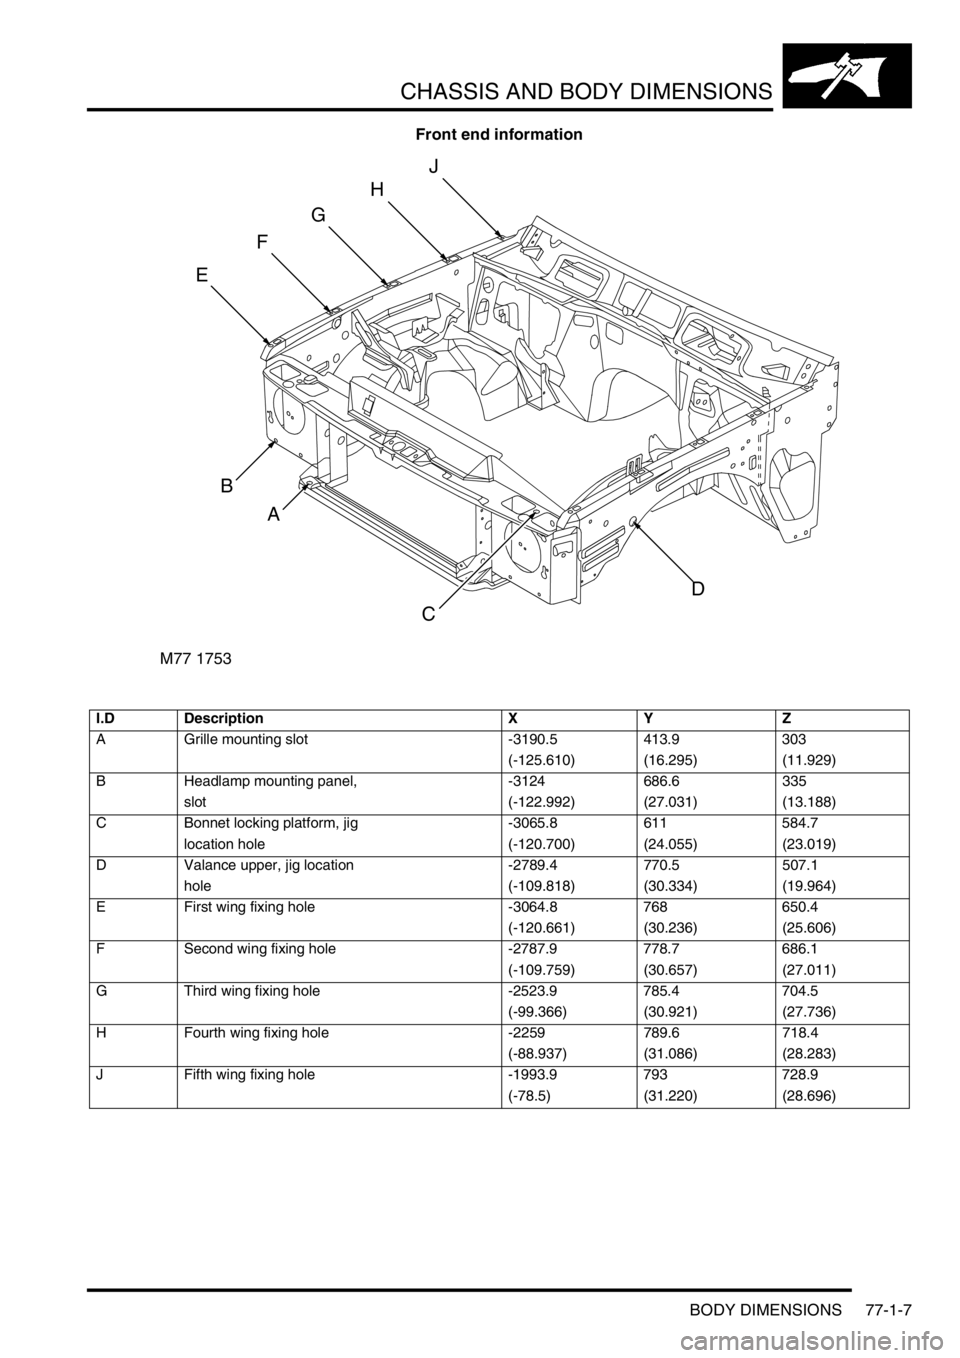
Front end information
I.D Description X Y Z
A Grille mounting slot -3190.5 413.9 303
(-125.610) (16.295) (11.929)
B Headlamp mounting panel, -3124 686.6 335
slot (-122.992) (27.031) (13.188)
C Bonnet locking platform, jig -3065.8 611 584.7
location hole (-120.700) (24.055) (23.019)
D Valance upper, jig location -2789.4 770.5 507.1
hole (-109.818) (30.334) (19.964)
E First wing fixing hole -3064.8 768 650.4
(-120.661) (30.236) (25.606)
F Second wing fixing hole -2787.9 778.7 686.1
(-109.759) (30.657) (27.011)
G Third wing fixing hole -2523.9 785.4 704.5
(-99.366) (30.921) (27.736)
H Fourth wing fixing hole -2259 789.6 718.4
(-88.937) (31.086) (28.283)
J Fifth wing fixing hole -1993.9 793 728.9
(-78.5) (31.220) (28.696)
M77 1753
B
C
D
E
F
G
H
J
A
Trending: cooling system, coolant, stop start, wheel bolt torque, power steering fluid, heating, roof


