turbo LAND ROVER DISCOVERY 2002 Owner's Guide
[x] Cancel search | Manufacturer: LAND ROVER, Model Year: 2002, Model line: DISCOVERY, Model: LAND ROVER DISCOVERY 2002Pages: 1672, PDF Size: 46.1 MB
Page 623 of 1672

MANIFOLDS AND EXHAUST SYSTEMS - TD5
30-1-2 DESCRIPTION AND OPERATION
Exhaust system component layout
1Tail pipe/silencer assembly
2Mounting rubber 4 off
3Turbo/Exhaust manifold gasket
4Flanged nut 3 off
5Front pipe assembly
6Flanged nut 2 off
7Intermediate pipe/silencer assembly
8Flanged nut 3 off
9Gasket
Page 624 of 1672

MANIFOLDS AND EXHAUST SYSTEMS - TD5
DESCRIPTION AND OPERATION 30-1-3
Description
General
The diesel engine has the inlet manifold attached to the right hand side of the engine and the exhaust manifold
attached to the left hand side of the engine. The inlet manifold directs cooled compressed air from the turbocharger
and intercooler into the cylinders, where it is mixed with fuel from the injectors. Exhaust gases from the exhaust
manifold can also be directed into the inlet manifold via a pipe from the exhaust manifold and an Exhaust Gas
Recirculation (EGR) valve on the inlet manifold. The exhaust manifold allows combustion gases from the cylinders to
leave the engine where they are directed into the exhaust system and turbocharger.
The exhaust system is attached to the turbocharger and is directed along the underside of the vehicle to emit exhaust
gases from a tail pipe at the rear of the vehicle. A silencer is installed midway along the system and a second tail
silencer is located at the rear of the vehicle.
Inlet manifold
The inlet manifold is a one piece aluminium casting. The manifold is secured to the cylinder head with two studs and
flanged nuts and eight flanged bolts. A one piece laminated gasket seals the manifold to the cylinder head.
Four threaded bosses on the manifold provide for the attachment of the fuel cooler. The fuel cooler is secured to the
manifold with four bolts. A boss with two threaded holes allows for the attachment of the combined intake air
temperature/pressure sensor. The sensor is secured to the manifold with two screws and sealed with a gasket.
At the forward end of the manifold, a machined face and four threaded holes provide for the attachment of the EGR
valve. The valve is sealed to the manifold with a gasket.
+ EMISSION CONTROL - Td5, DESCRIPTION AND OPERATION, Emission Control Systems.
Exhaust manifold
The exhaust manifold is made from cast iron. The manifold has five ports, one from each cylinder, which merge into
one flanged outlet connection positioned centrally on the manifold.
The manifold is attached to the cylinder head with ten studs and flanged nuts. A laminated metal gasket seals the
manifold to the cylinder head. The flanged outlet on the manifold provides the attachment for the turbocharger, which
is attached with three studs and flanged nuts and sealed with a metal laminated gasket.
A second flanged outlet, located at the forward end of the manifold, provides attachment for the EGR pipe. The EGR
pipe is secured to the manifold with two cap screws and connected to the EGR valve mounted on the inlet manifold.
There is no gasket used between the pipe and the exhaust manifold.
+ EMISSION CONTROL - Td5, DESCRIPTION AND OPERATION, Emission Control Systems.
Exhaust system
The exhaust system comprises a front pipe, an intermediate pipe which incorporates a silencer and a tail pipe
assembly which also has a silencer. The exhaust system is constructed mainly of 63 mm (2.48 in) diameter extruded
pipe with a 1.5 mm (0.06 in) wall thickness. All pipes are aluminized to resist corrosion and the silencers are fabricated
from stainless steel sheet.
Page 625 of 1672

MANIFOLDS AND EXHAUST SYSTEMS - TD5
30-1-4 DESCRIPTION AND OPERATION
Front pipe assembly
The front pipe is of welded and fabricated tubular construction. The front pipe is connected to a flange on the
turbocharger and secured with three flanged nuts and sealed with a metal laminated gasket. The front pipe
incorporates a flexible pipe near the connection with the turbocharger and terminates in a flanged connection with the
intermediate pipe.
The flexible pipe is formed into a concertina shape with woven metal strands around its outer diameter. The flexible
pipe allows for ease of exhaust system alignment and also absorbs engine vibration. The woven metal strands also
increase the longevity of the flexible pipe.
The front pipe is attached via a bracket and a mounting rubber to the chassis. The mounting rubber allows ease of
alignment and vibration absorption.
Intermediate pipe and silencer
The intermediate pipe is of welded and fabricated tubular construction. It connects at its forward end to the front pipe
flange. Two captive studs on the intermediate pipe flange allow for attachment to the front pipe with locknuts. The rear
section of intermediate pipe connects to the tail pipe assembly via a flanged joint, sealed with a metal gasket and
secured with locknuts and studs.
The forward and rear sections are joined by a silencer. The silencer is fabricated from stainless steel sheet to form
the body of the silencer. An end plate closes each end of the silencer and is attached to the body with seam joints.
Perforated baffle tubes, inside the silencer, are connected to the inlet and outlet pipes on each end plate. Internal
baffle plates support the baffle tubes and, together with a stainless steel fibre packing, absorb combustion noise as
the exhaust gases pass through the silencer.
The intermediate pipe is attached by two brackets, positioned at each end of the silencer, and two mounting rubbers
to the chassis. The mounting rubber allows for ease of alignment and vibration absorption.
Tail pipe assembly
The tail pipe is of welded and fabricated construction. The tail pipe connects to the intermediate pipe with a flanged
joint secured with locknuts and sealed with a metal gasket. The pipe is shaped to locate above the rear axle allowing
clearance for axle articulation. The pipe is also curved to clear the left hand side of the fuel tank which has a reflective
shield to protect the tank from heat generated from the pipe.
A fabricated silencer is located at the rear of the tail pipe. The silencer is circular in section and is constructed from
stainless steel sheet. A baffle tube is located inside the silencer and the space around the baffle tube is packed with
a stainless steel fibre. The holes in the baffle tube allow the packing to further reduce combustion noise from the
engine. The tail pipe from the silencer is curved downwards at the rear of the vehicle and directs exhaust gases
towards the ground. The curved pipe allows the exhaust gases to be dissipated by the airflow under the vehicle and
prevents the gases from being drawn behind the vehicle.
The tail pipe is attached by a bracket, positioned forward of the silencer, and a mounting rubber to the chassis. The
mounting rubber allows ease of alignment and vibration absorption.
Page 626 of 1672

MANIFOLDS AND EXHAUST SYSTEMS - TD5
REPAIRS 30-1-5
REPAIRS
Pipe - front
$% 30.10.09
Remove
1.Remove 3 nuts, release front pipe from
turbocharger and discard gasket.
2.Raise vehicle on ramp.
3.Remove 2 nuts and release front pipe from
intermediate pipe/silencer.
4.Remove 16 bolts and remove chassis cross
members. 5.Release and remove front pipe from mounting.
Refit
1.Clean front pipe and mating faces.
2.Position front pipe and new front pipe to
turbocharger gasket. Align front pipe to
intermediate pipe/silencer and turbocharger.
3.Connect mounting to front pipe.
4.Fit nuts securing front pipe to turbocharger and
intermediate pipe/silencer and tighten to 27 Nm
(20 lbf.ft) .
5.Fit chassis cross members and tighten bolts to
25 Nm (18 lbf. ft).
Page 628 of 1672

MANIFOLDS AND EXHAUST SYSTEMS - TD5
REPAIRS 30-1-7
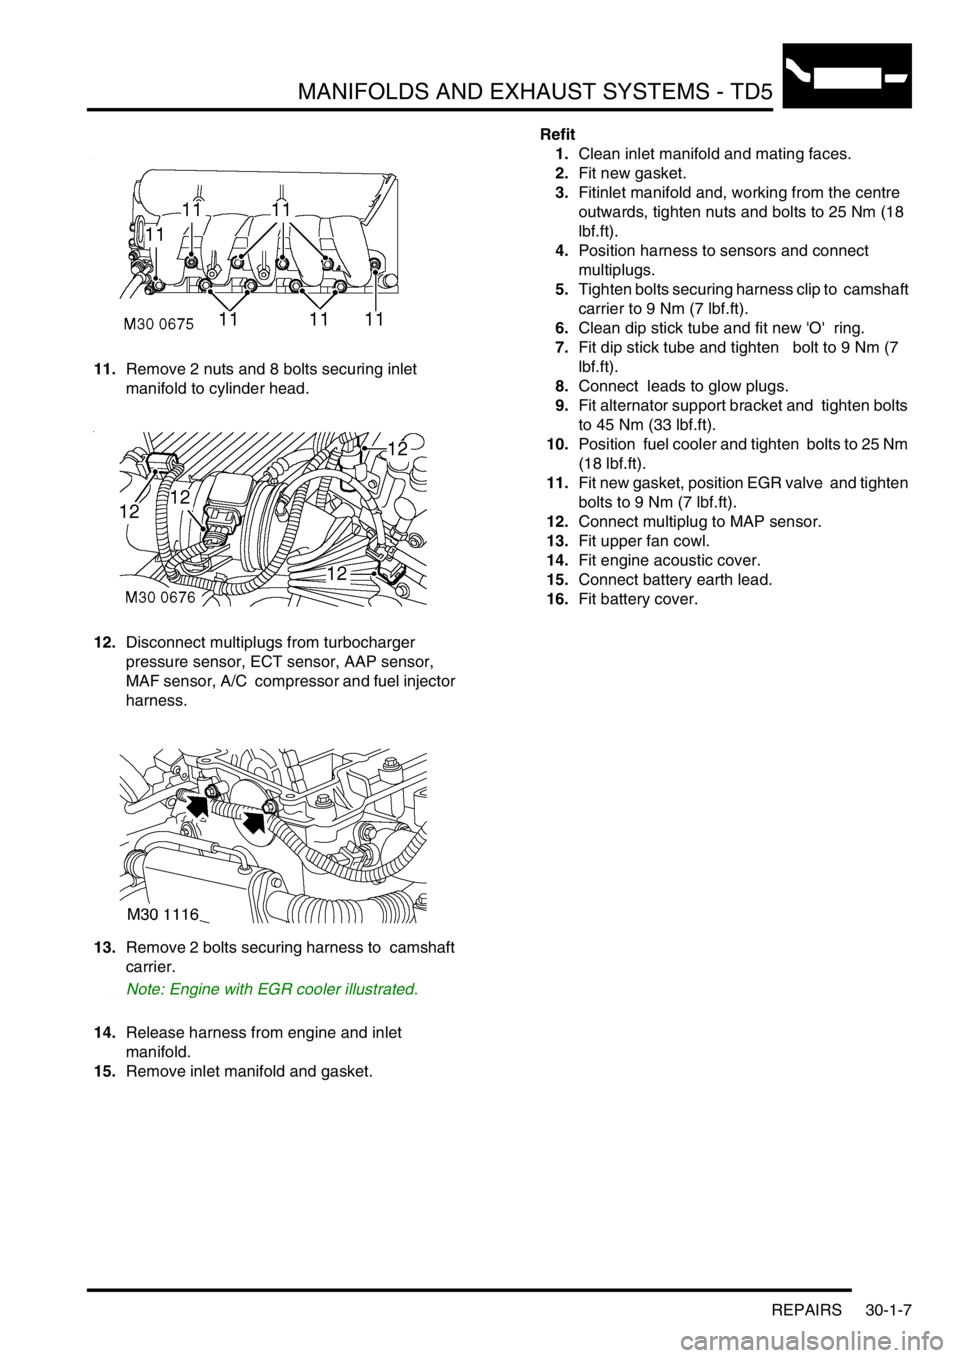
11.Remove 2 nuts and 8 bolts securing inlet
manifold to cylinder head.
12.Disconnect multiplugs from turbocharger
pressure sensor, ECT sensor, AAP sensor,
MAF sensor, A/C compressor and fuel injector
harness.
13.Remove 2 bolts securing harness to camshaft
carrier.
Note: Engine with EGR cooler illustrated.
14.Release harness from engine and inlet
manifold.
15.Remove inlet manifold and gasket. Refit
1.Clean inlet manifold and mating faces.
2.Fit new gasket.
3.Fitinlet manifold and, working from the centre
outwards, tighten nuts and bolts to 25 Nm (18
lbf.ft).
4.Position harness to sensors and connect
multiplugs.
5.Tighten bolts securing harness clip to camshaft
carrier to 9 Nm (7 lbf.ft).
6.Clean dip stick tube and fit new 'O' ring.
7.Fit dip stick tube and tighten bolt to 9 Nm (7
lbf.ft).
8.Connect leads to glow plugs.
9.Fit alternator support bracket and tighten bolts
to 45 Nm (33 lbf.ft).
10.Position fuel cooler and tighten bolts to 25 Nm
(18 lbf.ft).
11.Fit new gasket, position EGR valve and tighten
bolts to 9 Nm (7 lbf.ft).
12.Connect multiplug to MAP sensor.
13.Fit upper fan cowl.
14.Fit engine acoustic cover.
15.Connect battery earth lead.
16.Fit battery cover.
Page 629 of 1672

MANIFOLDS AND EXHAUST SYSTEMS - TD5
30-1-8 REPAIRS
Gasket - exhaust manifold
$% 30.15.12
Remove
Note: The following procedure covers engines
fitted with or without an EGR cooler. The EGR
cooler is bolted to the front of the cylinder head.
1.Remove turbocharger.
+ ENGINE MANAGEMENT SYSTEM -
Td5, REPAIRS, Turbocharger.
2. Models with air conditioning: Remove
auxiliary drive belt.
+ CHARGING AND STARTING,
REPAIRS, Belt - auxiliary drive.
3. Models with air conditioning: Remove 4 bolts
securing compressor and move to one side.
4.Remove and discard 2 Allen screws securing
EGR pipe to exhaust manifold.
Note: Engine with EGR cooler illustrated.5.Remove 10 nuts securing exhaust manifold to
cylinder head.
6.Remove exhaust manifold and gasket.
Refit
1.Clean exhaust manifold and mating faces.
2.Fit new gasket.Fit exhaust manifold and,
working from the centre outwards, tighten nuts
to 25 Nm (18 lbf.ft) .
3. Models with air conditioning:
Positioncompressor and tighten bolts to 25 Nm
(18 lbf.ft).
4.Position EGR valve pipe, fit new Allen screws
and tighten to 9 Nm (7 lbf.ft).
5.Fit turbocharger.
+ ENGINE MANAGEMENT SYSTEM -
Td5, REPAIRS, Turbocharger.
6. Models with air conditioning: Fit auxiliary
drive belt.
+ CHARGING AND STARTING,
REPAIRS, Belt - auxiliary drive.
Page 907 of 1672

STEERING
57-20 ADJUSTMENTS
Power steering pressure check - diesel
models
$% 57.90.10.01
Check
1.Fit gauge and hose LRT- 57-005 to valve
assembly LRT- 57-001 and tighten union.
2.Fit 2 hoses LRT-57-002 to valve assembly
LRT- 57-001 and tighten unions
3.Fit adaptor and hose set LRT-57-041 to LRT-
57-002.
4.Disconnect battery earth lead.
5.Remove engine acoustic cover.
6. LHD only: Remove underbelly panel.
+ EXTERIOR FITTINGS, REPAIRS,
Panel - underbelly.7. LHD only: Disconnect MAF sensor multiplug,
release clips from air cleaner and move intake
hose aside. Discard seal.
8.Position container to collect PAS fluid spillage,
and syphon fluid from PAS reservoir.
9. LHD only: Release PAS reservoir from
mounting move aside, for access to
turbocharger intercooler pipe.
10.Remove vacuum hose from turbocharger
intercooler pipe.
11. LHD only: Release clips and disconnect
turbocharger intercooler pipe from
turbocharger and intercooler.
12.Clean steering box pipe housing.
M57 0902
M57 0903
M57 0904
Page 908 of 1672

STEERING
ADJUSTMENTS 57-21
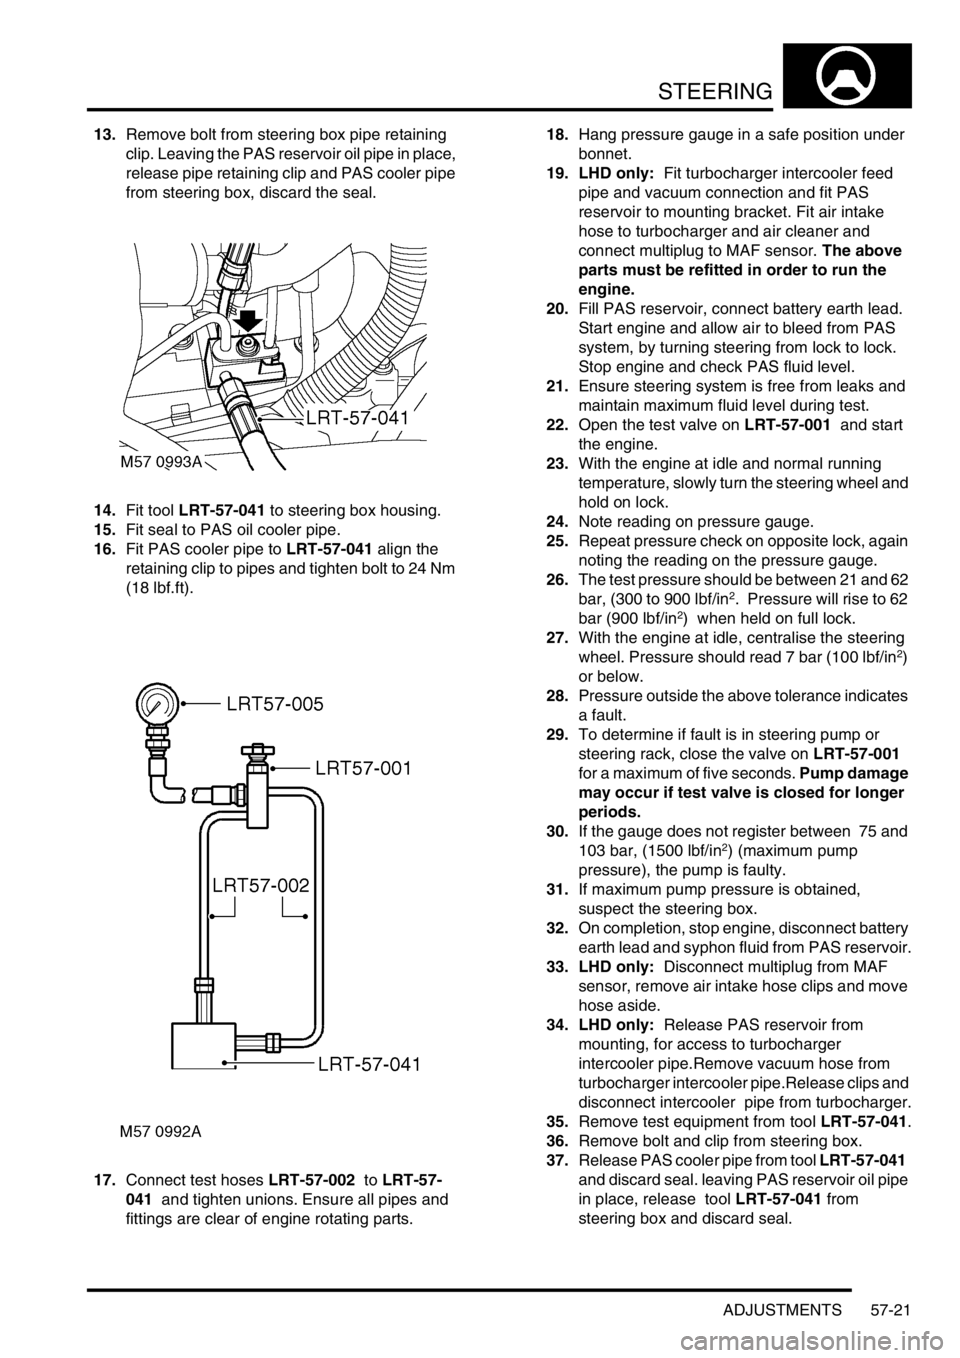
13.Remove bolt from steering box pipe retaining
clip. Leaving the PAS reservoir oil pipe in place,
release pipe retaining clip and PAS cooler pipe
from steering box, discard the seal.
14.Fit tool LRT-57-041 to steering box housing.
15.Fit seal to PAS oil cooler pipe.
16.Fit PAS cooler pipe to LRT-57-041 align the
retaining clip to pipes and tighten bolt to 24 Nm
(18 lbf.ft).
17.Connect test hoses LRT-57-002 to LRT-57-
041 and tighten unions. Ensure all pipes and
fittings are clear of engine rotating parts.18.Hang pressure gauge in a safe position under
bonnet.
19. LHD only: Fit turbocharger intercooler feed
pipe and vacuum connection and fit PAS
reservoir to mounting bracket. Fit air intake
hose to turbocharger and air cleaner and
connect multiplug to MAF sensor. The above
parts must be refitted in order to run the
engine.
20.Fill PAS reservoir, connect battery earth lead.
Start engine and allow air to bleed from PAS
system, by turning steering from lock to lock.
Stop engine and check PAS fluid level.
21.Ensure steering system is free from leaks and
maintain maximum fluid level during test.
22.Open the test valve on LRT-57-001 and start
the engine.
23.With the engine at idle and normal running
temperature, slowly turn the steering wheel and
hold on lock.
24.Note reading on pressure gauge.
25.Repeat pressure check on opposite lock, again
noting the reading on the pressure gauge.
26.The test pressure should be between 21 and 62
bar, (300 to 900 lbf/in
2. Pressure will rise to 62
bar (900 lbf/in2) when held on full lock.
27.With the engine at idle, centralise the steering
wheel. Pressure should read 7 bar (100 lbf/in
2)
or below.
28.Pressure outside the above tolerance indicates
a fault.
29.To determine if fault is in steering pump or
steering rack, close the valve on LRT-57-001
for a maximum of five seconds. Pump damage
may occur if test valve is closed for longer
periods.
30.If the gauge does not register between 75 and
103 bar, (1500 lbf/in
2) (maximum pump
pressure), the pump is faulty.
31.If maximum pump pressure is obtained,
suspect the steering box.
32.On completion, stop engine, disconnect battery
earth lead and syphon fluid from PAS reservoir.
33. LHD only: Disconnect multiplug from MAF
sensor, remove air intake hose clips and move
hose aside.
34. LHD only: Release PAS reservoir from
mounting, for access to turbocharger
intercooler pipe.Remove vacuum hose from
turbocharger intercooler pipe.Release clips and
disconnect intercooler pipe from turbocharger.
35.Remove test equipment from tool LRT-57-041.
36.Remove bolt and clip from steering box.
37.Release PAS cooler pipe from tool LRT-57-041
and discard seal. leaving PAS reservoir oil pipe
in place, release tool LRT-57-041 from
steering box and discard seal.
Page 909 of 1672

STEERING
57-22 ADJUSTMENTS
38.Fit new seal, connect PAS cooler pipe and
tighten union nut to 24 Nm (18 lbf ft).
39. LHD only: Fit turbocharger intercooler feed
pipe and vacuum connection. Fit new seal to air
cleaner. Connect air intake hose and secure
clips. Connect multiplug to MAF sensor.
40.Clean chassis and surrounding area.
41.Fit underbelly panel.
+ EXTERIOR FITTINGS, REPAIRS,
Panel - underbelly.
42.Remove adaptor and hose set from tool LRT-
57-041.
43.Check PAS fluid level.
44.Connect battery earth lead.
Power steering pressure check - V8 LHD
models
$% 57.90.10.01
Check
1.Disconnect battery earth lead.
2.Syphon PAS fluid from reservoir.
3.Raise front of vehicle and support on stands.
4.Turn steering on LH lock.
5.Remove 3 screws securing LH splash shield
and remove shield.
6.Release clip securing PAS pipes.
7.Position absorbent cloth to catch spillage.
8.Position container to collect PAS fluid spillage.
Page 917 of 1672

STEERING
57-30 REPAIRS
Power steering box - LHD - diesel
$% 57.10.01
Remove
1.Remove battery cover.
2.Disconnect battery earth lead.
3.Drain cooling system.
+ COOLING SYSTEM - Td5,
ADJUSTMENTS, Drain and refill.
4.Raise front of vehicle.
WARNING: Do not work on or under a
vehicle supported only by a jack. Always
support the vehicle on safety stands.
5.Remove LH front road wheel.
6.Ensure steering wheel is centralised, remove
key from steering lock and engage column lock.
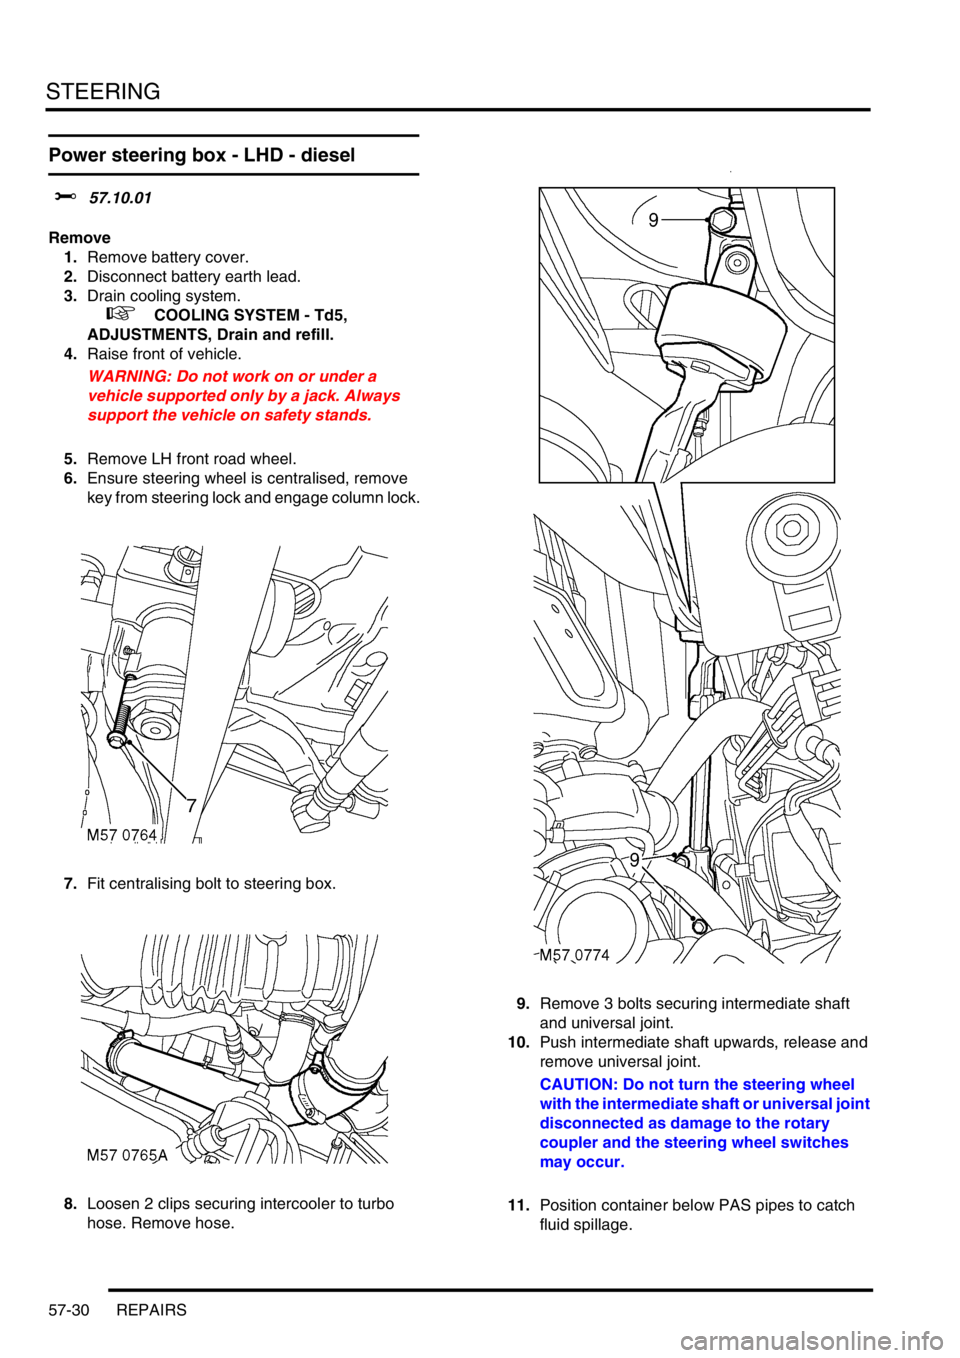
7.Fit centralising bolt to steering box.
8.Loosen 2 clips securing intercooler to turbo
hose. Remove hose.9.Remove 3 bolts securing intermediate shaft
and universal joint.
10.Push intermediate shaft upwards, release and
remove universal joint.
CAUTION: Do not turn the steering wheel
with the intermediate shaft or universal joint
disconnected as damage to the rotary
coupler and the steering wheel switches
may occur.
11.Position container below PAS pipes to catch
fluid spillage.