ECU LAND ROVER DISCOVERY 2002 Workshop Manual
[x] Cancel search | Manufacturer: LAND ROVER, Model Year: 2002, Model line: DISCOVERY, Model: LAND ROVER DISCOVERY 2002Pages: 1672, PDF Size: 46.1 MB
Page 935 of 1672
STEERING
57-48 REPAIRS
Ball joint - track rod
$% 57.55.07
Remove
1.Raise front of vehicle.
WARNING: Do not work on or under a
vehicle supported only by a jack. Always
support the vehicle on safety stands.
2.Remove LH front road wheel.
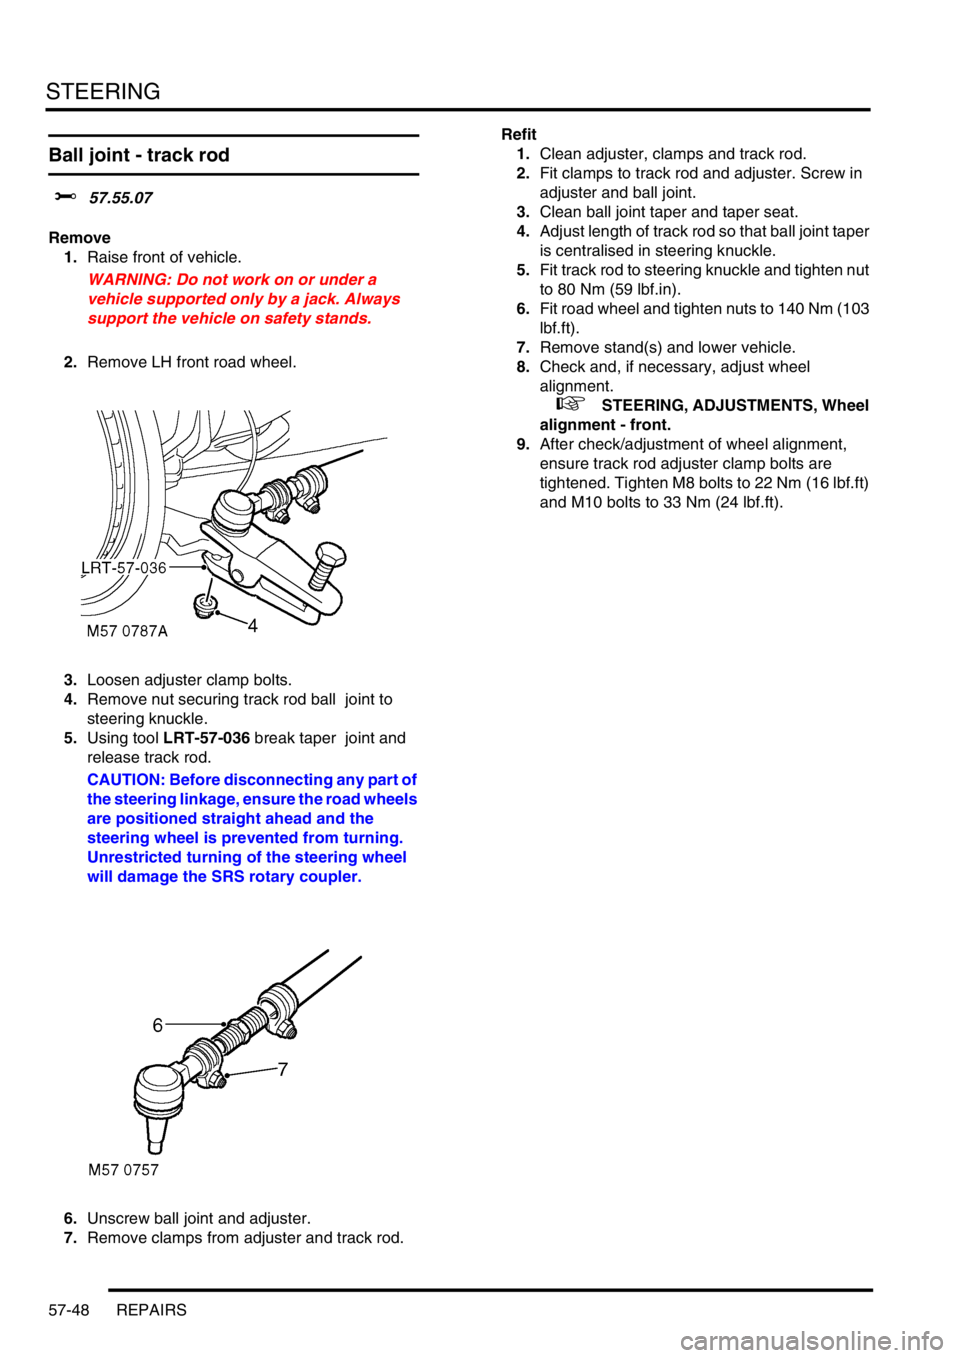
3.Loosen adjuster clamp bolts.
4.Remove nut securing track rod ball joint to
steering knuckle.
5.Using tool LRT-57-036 break taper joint and
release track rod.
CAUTION: Before disconnecting any part of
the steering linkage, ensure the road wheels
are positioned straight ahead and the
steering wheel is prevented from turning.
Unrestricted turning of the steering wheel
will damage the SRS rotary coupler.
6.Unscrew ball joint and adjuster.
7.Remove clamps from adjuster and track rod. Refit
1.Clean adjuster, clamps and track rod.
2.Fit clamps to track rod and adjuster. Screw in
adjuster and ball joint.
3.Clean ball joint taper and taper seat.
4.Adjust length of track rod so that ball joint taper
is centralised in steering knuckle.
5.Fit track rod to steering knuckle and tighten nut
to 80 Nm (59 lbf.in).
6.Fit road wheel and tighten nuts to 140 Nm (103
lbf.ft).
7.Remove stand(s) and lower vehicle.
8.Check and, if necessary, adjust wheel
alignment.
+ STEERING, ADJUSTMENTS, Wheel
alignment - front.
9.After check/adjustment of wheel alignment,
ensure track rod adjuster clamp bolts are
tightened. Tighten M8 bolts to 22 Nm (16 lbf.ft)
and M10 bolts to 33 Nm (24 lbf.ft).
Page 936 of 1672
STEERING
REPAIRS 57-49
Ball joint - drag link
$% 57.55.15
Remove
1.Raise front of vehicle.
WARNING: Do not work on or under a
vehicle supported only by a jack. Always
support the vehicle on safety stands.
2. RHD models: Remove LH front road wheel.
3. LHD models: Remove RH front road wheel.
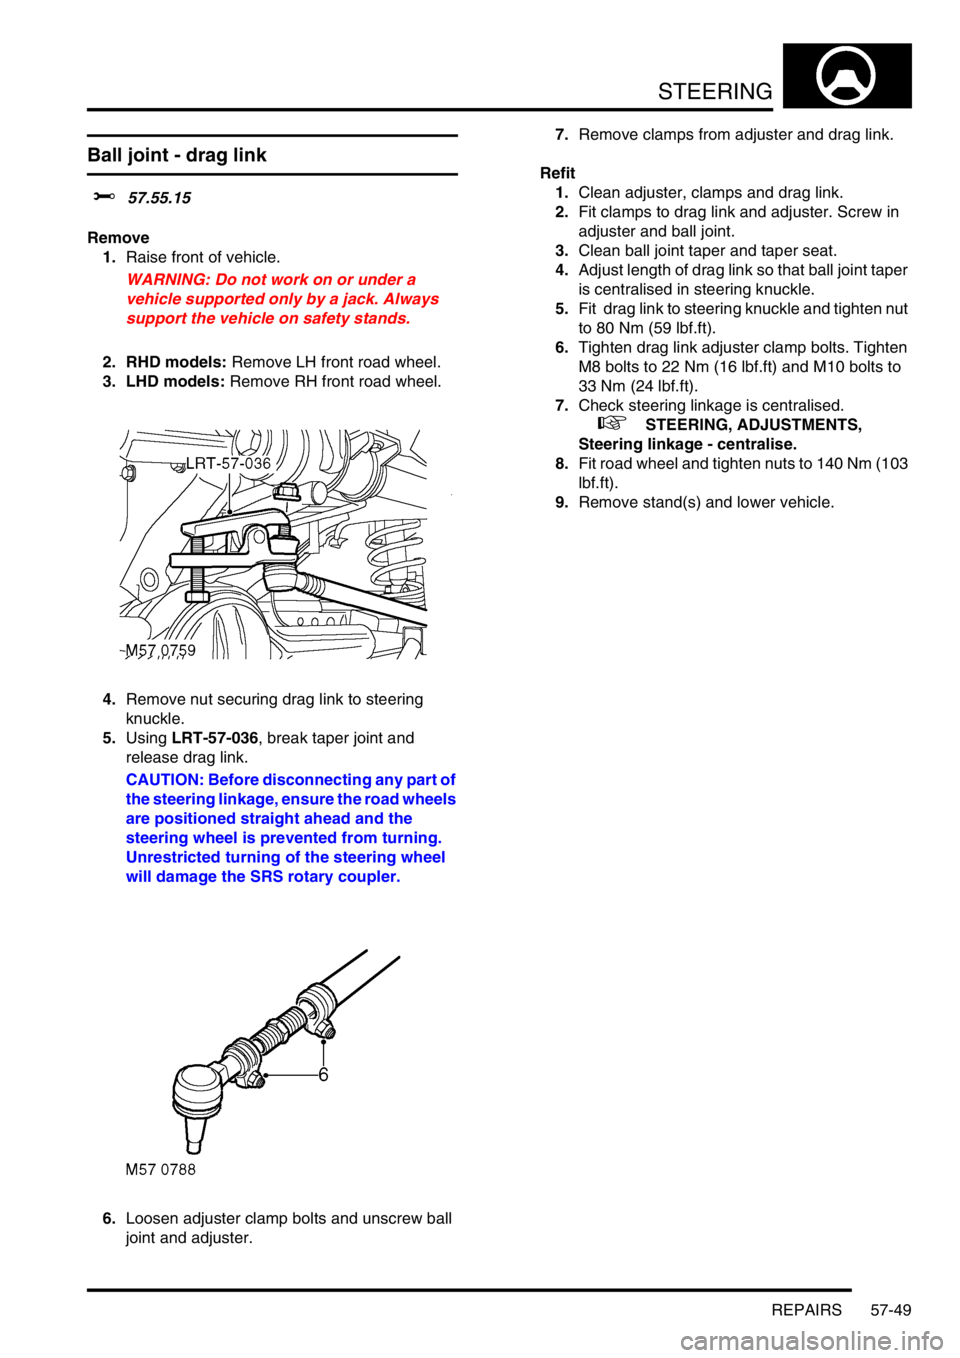
4.Remove nut securing drag link to steering
knuckle.
5.Using LRT-57-036, break taper joint and
release drag link.
CAUTION: Before disconnecting any part of
the steering linkage, ensure the road wheels
are positioned straight ahead and the
steering wheel is prevented from turning.
Unrestricted turning of the steering wheel
will damage the SRS rotary coupler.
6.Loosen adjuster clamp bolts and unscrew ball
joint and adjuster. 7.Remove clamps from adjuster and drag link.
Refit
1.Clean adjuster, clamps and drag link.
2.Fit clamps to drag link and adjuster. Screw in
adjuster and ball joint.
3.Clean ball joint taper and taper seat.
4.Adjust length of drag link so that ball joint taper
is centralised in steering knuckle.
5.Fit drag link to steering knuckle and tighten nut
to 80 Nm (59 lbf.ft).
6.Tighten drag link adjuster clamp bolts. Tighten
M8 bolts to 22 Nm (16 lbf.ft) and M10 bolts to
33 Nm (24 lbf.ft).
7.Check steering linkage is centralised.
+ STEERING, ADJUSTMENTS,
Steering linkage - centralise.
8.Fit road wheel and tighten nuts to 140 Nm (103
lbf.ft).
9.Remove stand(s) and lower vehicle.
Page 937 of 1672
STEERING
57-50 REPAIRS
Drag link
$% 57.55.17
Remove
1.Raise front of vehicle.
WARNING: Do not work on or under a
vehicle supported only by a jack. Always
support the vehicle on safety stands.
2. RHD vehicles: Remove the LH front road
wheel.
3. LHD vehicles: Remove the RH front road
wheel.
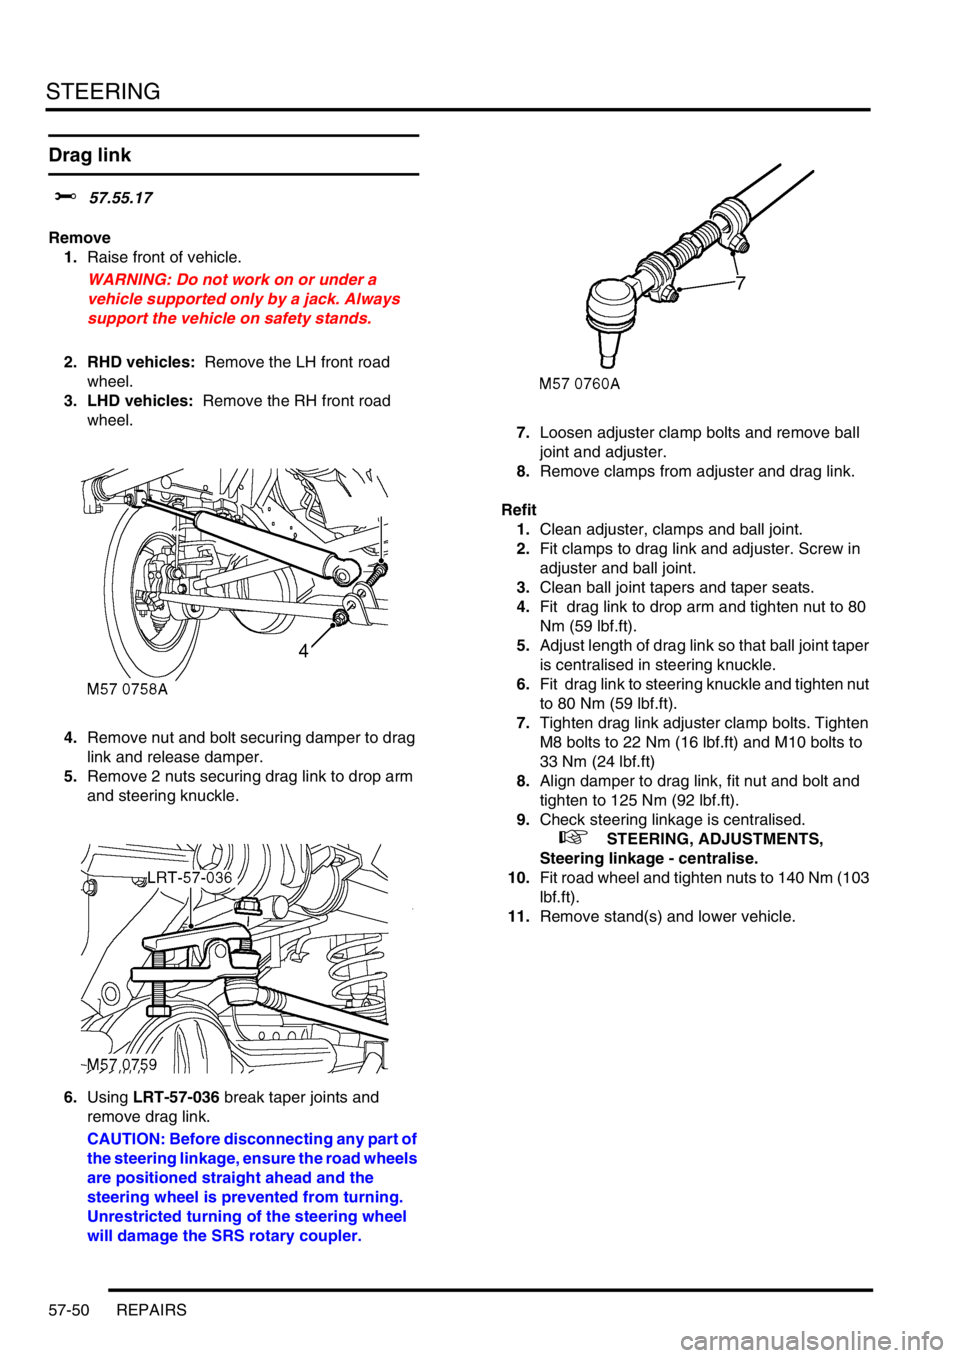
4.Remove nut and bolt securing damper to drag
link and release damper.
5.Remove 2 nuts securing drag link to drop arm
and steering knuckle.
6.Using LRT-57-036 break taper joints and
remove drag link.
CAUTION: Before disconnecting any part of
the steering linkage, ensure the road wheels
are positioned straight ahead and the
steering wheel is prevented from turning.
Unrestricted turning of the steering wheel
will damage the SRS rotary coupler.7.Loosen adjuster clamp bolts and remove ball
joint and adjuster.
8.Remove clamps from adjuster and drag link.
Refit
1.Clean adjuster, clamps and ball joint.
2.Fit clamps to drag link and adjuster. Screw in
adjuster and ball joint.
3.Clean ball joint tapers and taper seats.
4.Fit drag link to drop arm and tighten nut to 80
Nm (59 lbf.ft).
5.Adjust length of drag link so that ball joint taper
is centralised in steering knuckle.
6.Fit drag link to steering knuckle and tighten nut
to 80 Nm (59 lbf.ft).
7.Tighten drag link adjuster clamp bolts. Tighten
M8 bolts to 22 Nm (16 lbf.ft) and M10 bolts to
33 Nm (24 lbf.ft)
8.Align damper to drag link, fit nut and bolt and
tighten to 125 Nm (92 lbf.ft).
9.Check steering linkage is centralised.
+ STEERING, ADJUSTMENTS,
Steering linkage - centralise.
10.Fit road wheel and tighten nuts to 140 Nm (103
lbf.ft).
11.Remove stand(s) and lower vehicle.
Page 938 of 1672
STEERING
REPAIRS 57-51
Damper - steering
$% 57.55.21
Remove
1.Raise front of vehicle.
WARNING: Do not work on or under a
vehicle supported only by a jack. Always
support the vehicle on safety stands.
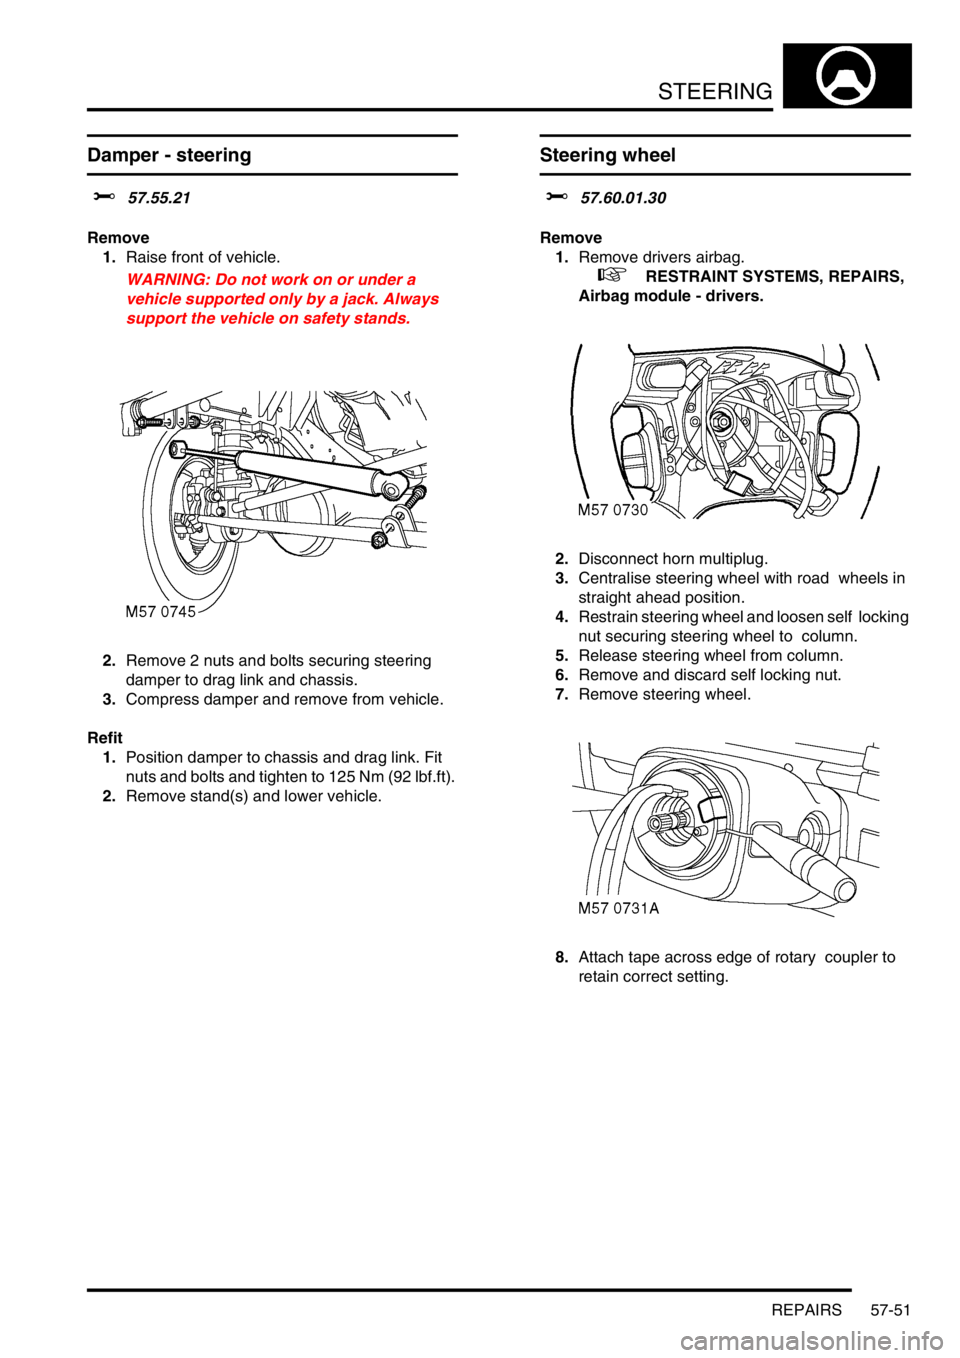
2.Remove 2 nuts and bolts securing steering
damper to drag link and chassis.
3.Compress damper and remove from vehicle.
Refit
1.Position damper to chassis and drag link. Fit
nuts and bolts and tighten to 125 Nm (92 lbf.ft).
2.Remove stand(s) and lower vehicle.
Steering wheel
$% 57.60.01.30
Remove
1.Remove drivers airbag.
+ RESTRAINT SYSTEMS, REPAIRS,
Airbag module - drivers.
2.Disconnect horn multiplug.
3.Centralise steering wheel with road wheels in
straight ahead position.
4.Restrain steering wheel and loosen self locking
nut securing steering wheel to column.
5.Release steering wheel from column.
6.Remove and discard self locking nut.
7.Remove steering wheel.
8.Attach tape across edge of rotary coupler to
retain correct setting.
Page 939 of 1672
STEERING
57-52 REPAIRS
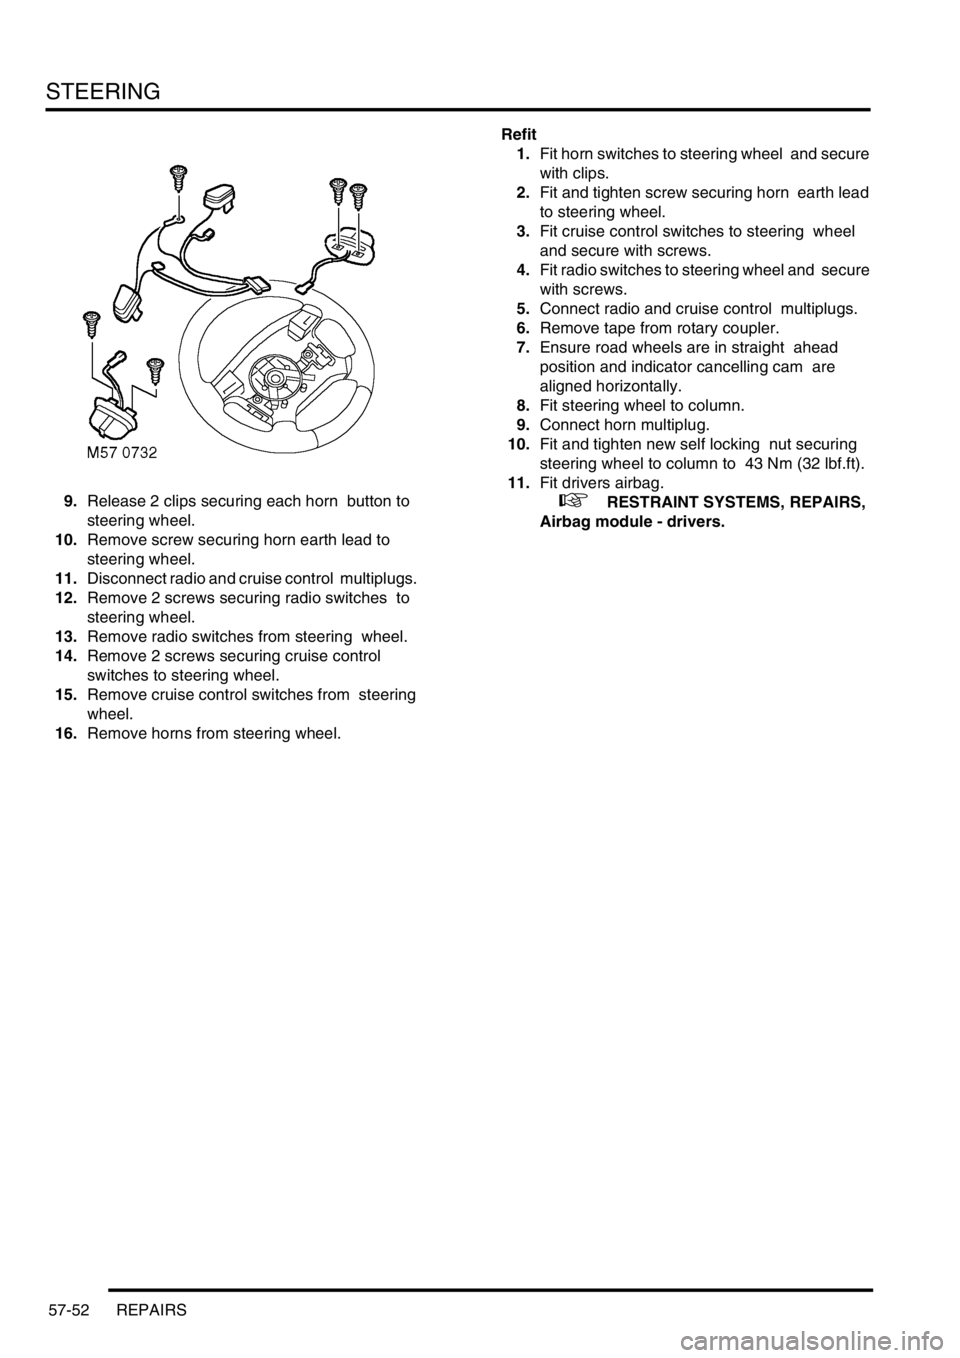
9.Release 2 clips securing each horn button to
steering wheel.
10.Remove screw securing horn earth lead to
steering wheel.
11.Disconnect radio and cruise control multiplugs.
12.Remove 2 screws securing radio switches to
steering wheel.
13.Remove radio switches from steering wheel.
14.Remove 2 screws securing cruise control
switches to steering wheel.
15.Remove cruise control switches from steering
wheel.
16.Remove horns from steering wheel. Refit
1.Fit horn switches to steering wheel and secure
with clips.
2.Fit and tighten screw securing horn earth lead
to steering wheel.
3.Fit cruise control switches to steering wheel
and secure with screws.
4.Fit radio switches to steering wheel and secure
with screws.
5.Connect radio and cruise control multiplugs.
6.Remove tape from rotary coupler.
7.Ensure road wheels are in straight ahead
position and indicator cancelling cam are
aligned horizontally.
8.Fit steering wheel to column.
9.Connect horn multiplug.
10.Fit and tighten new self locking nut securing
steering wheel to column to 43 Nm (32 lbf.ft).
11.Fit drivers airbag.
+ RESTRAINT SYSTEMS, REPAIRS,
Airbag module - drivers.
Page 943 of 1672

FRONT SUSPENSION
60-4 DESCRIPTION AND OPERATION
Description
General
The front suspension comprises two dampers and coil springs, two radius arms, a Panhard rod and an anti-roll bar.
The front axle provides the location points for the dampers, springs, radius arms and the Panhard rod.
The anti-roll bar assembly is an essential part of the front suspension. On vehicles without Active Cornering
Enhancement (ACE) a conventional 'passive' anti-roll bar is fitted. On vehicles fitted with the ACE system, a thicker
diameter anti-roll bar, known as a torsion bar, is used with an actuator at one end.
+ FRONT SUSPENSION, DESCRIPTION AND OPERATION, Description - ACE.
The hydraulic dampers and coil springs provide springing for each front wheel. The long travel dampers, springs and
radius arms provide maximum axle articulation and wheel travel for off-road driving. The front axle is controlled
longitudinally by two forged steel radius arms and transversely by a Panhard rod.
Radius arms
Each radius arm is manufactured from forged steel. Two bushes are pressed into the forward end of the radius arm.
The forward end of the radius arm is located in a fabricated bracket on the axle and secured through the bushes with
two bolts and nuts. A bush is pressed into the rear of the radius arm which is also located in a fabricated bracket on
each chassis longitudinal and secured through the bush with a bolt and nut.
The radius arms prevent longitudinal movement of the front axle and because of their length allow maximum axle
articulation. The stiffness of the bushes in each radius arm also contributes to the vehicle roll stiffness.
Each radius arm has a notch on its lower edge which provides location for the vehicle jack.
Dampers
Two conventional telescopic dampers are used to control body/axle movement. A turret is located on a bracket welded
to the chassis. The upper spring seat has four studs which pass through holes in the bracket and align with
corresponding holes in the turret. Four nuts are screwed onto the studs and secure the turret and upper spring seat
to the chassis.
A fabricated platform is welded to the axle. The platform has two captive nuts which provide for the attachment of the
damper. A lower spring seat is located on the platform. Each spring seat is handed and has a bracket which secures
the ABS sensor harness and the front brake hose.
Each damper is fitted with a bush at its upper end. The bush locates in the top of the turret and is secured with a cross
bolt. The lower attachment point for the damper is also fitted with a bush. This bush has a spindle through its centre
with a hole at each end. The spindle is seated on the lower spring seat and the axle platform and secured with two
bolts. The coil spring is fitted in a compressed state between the upper and lower spring seats and assists the damper
in controlling the body/axle movement. The upper and lower bushes are replaceable items.
Rubber bump stops are fitted to the chassis above each end of the axle. The bump stops are progressive in their
compression and prevent the axle from contacting the chassis in the event of maximum suspension travel being
reached. The bump stops revert to their original shape once the compression load has been removed from them.
The damper functions by restricting the flow of a hydraulic fluid through internal galleries within the damper body. A
chromium plated rod moves axially within the damper. As the rod moves, its movement is limited by the flow of fluid
through the galleries thus providing damping of undulations in the terrain. The damper rod is sealed at its exit point
from the body to maintain fluid within the unit and prevent the ingress of dirt and moisture. The seal also acts as a
wiper to keep the rod outer diameter clean. A plastic shroud protects the rod and slides over the body as the damper
moves. The coil spring aids the damper to extend after being compressed and also aids the damping process.
Page 945 of 1672

FRONT SUSPENSION
60-6 DESCRIPTION AND OPERATION
Spring Data
The following table shows spring fitment applicablity.
Spring Fitment Applicability
The following table shows standard springs and uprated springs required when a front winch is fitted.
Winch Fitment Spring Applicability
Panhard rod
A Panhard rod is used to ensure that the axle remains centrally located. The Panhard rod has bushes pressed into
housings at each end which provide for the attachment to the axle and chassis. One end of the Panhard rod locates
in a fabricated bracket on the axle and is secured with a bolt and locknut. The opposite end is attached to a fabricated
bracket on the chassis and is also secured with a bolt and a locknut. The Panhard rod is shaped at one end to allow
clearance for the axle casing.
The attachment bolts for the Panhard rod are coated with a clear, dry wax which reduces friction on the bolt and allows
the correct torque to be applied to the clamping of the bushes. The bolts can be re-used, but if bolt replacement is
necessary the correct bolt with the wax coating must be used.
On models from 03 Model Year, the Panhard rod is shortened by 30 mm (1.18 in). This modification was introduced
to enhance the suspension bump steer characteristics in line with other suspension improvements introduced
simultaneously. The change to the Panhard rod also required the relocation of the attachment brackets on the axle
casing and the chassis.
Colour Code Total No. of Coils Free Length
Red/Purple 7.4 371 mm (14.6 in)
Yellow/Purple 7.4 378.4 mm (14.9 in)
Blue/Purple 7.4 365 mm (14.4 in)
Grey/Purple 7.4 387 mm (15.2 in)
Purple/Purple 7.4 373.8 mm (14.7 in)
Yellow/Orange 7.4 394.6 mm (15.5 in)
Green/Orange 7.4 382.6 mm (15 in)
Pink/Brown 7.6 405.6 mm (15.9 in)
Left Hand Drive Right Hand Drive
RH side LH side RH side LH side
Red/Purple Red/Purple Yellow/Purple Blue/Purple
Yellow/Purple Yellow/Purple Grey/Purple Purple/Purple
Grey/Purple Grey/Purple Yellow/Orange Green/Orange
Standard Spring Winch Fitted Spring
RH Side LH Side Both Sides
Red/Purple Red/Purple Grey/Purple
Yellow/Purple Blue/Purple Yellow/Orange
Yellow/Purple Yellow/Purple Yellow/Orange
Grey/Purple Purple/Purple Green/Orange
Grey/Purple Grey/Purple Green/Orange
Yellow/Orange Green/Orange Pink/Brown
Page 946 of 1672

FRONT SUSPENSION
DESCRIPTION AND OPERATION 60-7
Torsion/Anti-roll bar
The anti-roll bars fitted differ between ACE and non-ACE vehicles. On non-ACE vehicles a conventional 'passive' anti-
roll bar is used. On ACE vehicles an 'active' torsion bar is used. Both types are attached to the front chassis cross
member with mounting rubbers and clamp plates. The clamp plates locate in brackets on the cross member and are
each secured with a bolt. Each end of the anti-roll bar is attached to an anti-roll bar link. Each link has a spherical
bearing attached at each end. One end is attached to a bracket on the axle and secured with a locknut; a washer is
installed between the spherical bearing and the bracket. The opposite end attaches through a hole in the anti-roll bar
and is secured with a locknut. On 'active' torsion bars, the RH anti-roll bar link is attached to a long arm which in turn
is attached to the torsion bar.
Passive anti-roll bar
The passive anti-roll bar is a conventional anti-roll bar which opposes axle movement, reducing the effects of lateral
forces on the vehicle body.
With the conventional 'passive' anti-roll bar, axle movement is opposed by the anti-roll bar through links attached to
the axle casing and each end of the anti-roll bar. The anti-roll bar is manufactured from 30 mm (1.18 in) diameter
spring steel bar.
Active torsion bar
+ FRONT SUSPENSION, DESCRIPTION AND OPERATION, Description - ACE.
The 'active' torsion bar is used in conjunction with the ACE system to control body roll and directional stability giving
an improved reduction of the effects of lateral forces on the vehicle body over a conventional anti-roll bar.
The torsion bar opposes axle movement by the application of a hydraulic force to oppose the lateral forces through
links attached to the axle casing and each end of the bar. The torsion bar is made from 35 mm (1.4 in) diameter spring
steel bar. One end is fitted with an arm which is operated by a hydraulic actuator to oppose cornering forces.
Page 948 of 1672
FRONT SUSPENSION
DESCRIPTION AND OPERATION 60-9
DESCRIPTION AND OPERAT ION
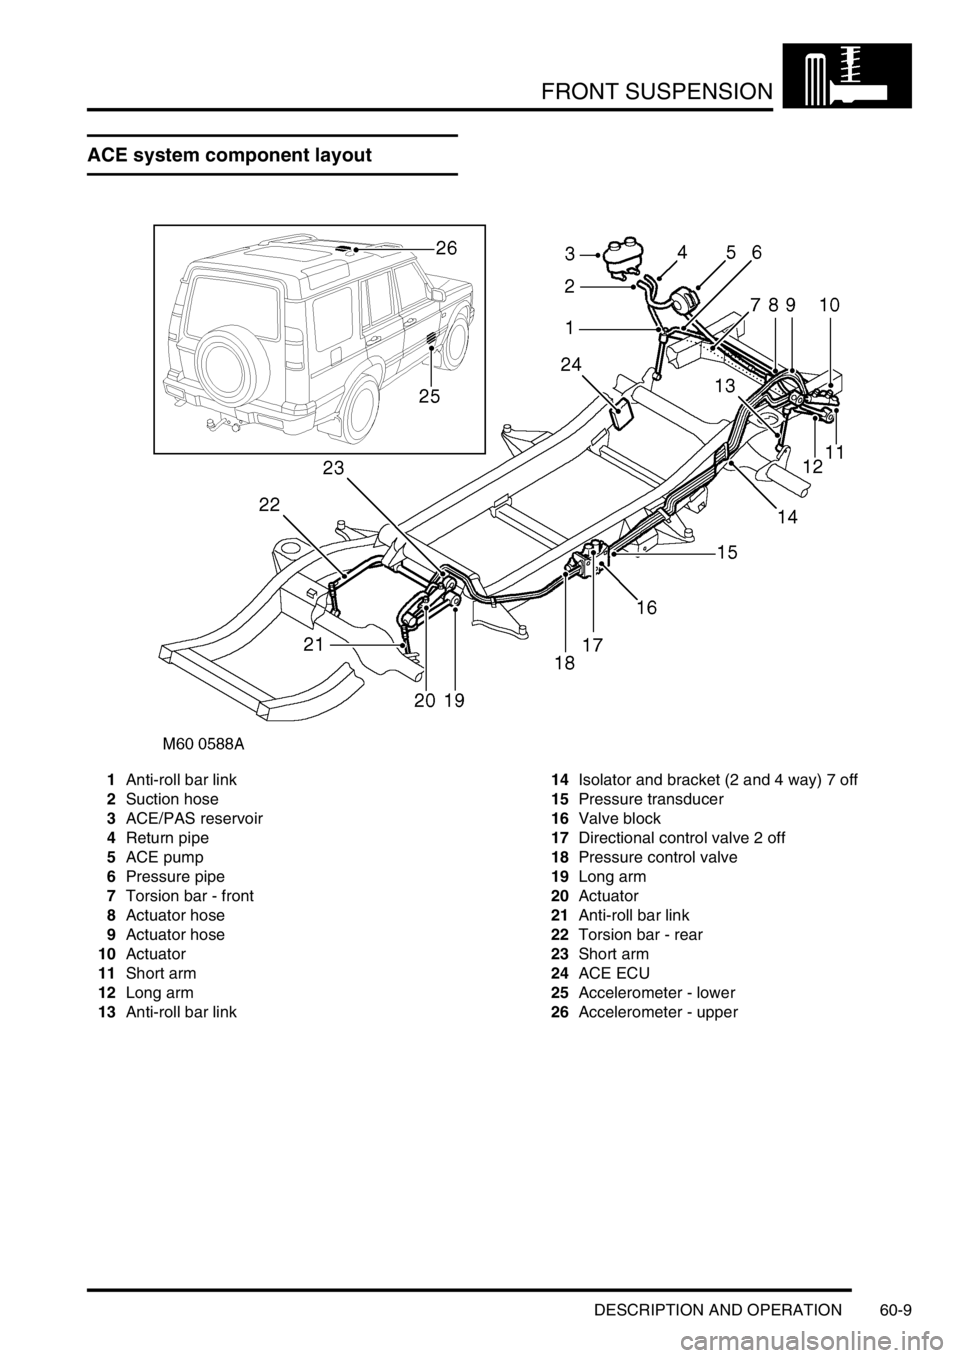
ACE system component layout
1Anti-roll bar link
2Suction hose
3ACE/PAS reservoir
4Return pipe
5ACE pump
6Pressure pipe
7Torsion bar - front
8Actuator hose
9Actuator hose
10Actuator
11Short arm
12Long arm
13Anti-roll bar link14Isolator and bracket (2 and 4 way) 7 off
15Pressure transducer
16Valve block
17Directional control valve 2 off
18Pressure control valve
19Long arm
20Actuator
21Anti-roll bar link
22Torsion bar - rear
23Short arm
24ACE ECU
25Accelerometer - lower
26Accelerometer - upper
Page 949 of 1672
FRONT SUSPENSION
60-10 DESCRIPTION AND OPERATION
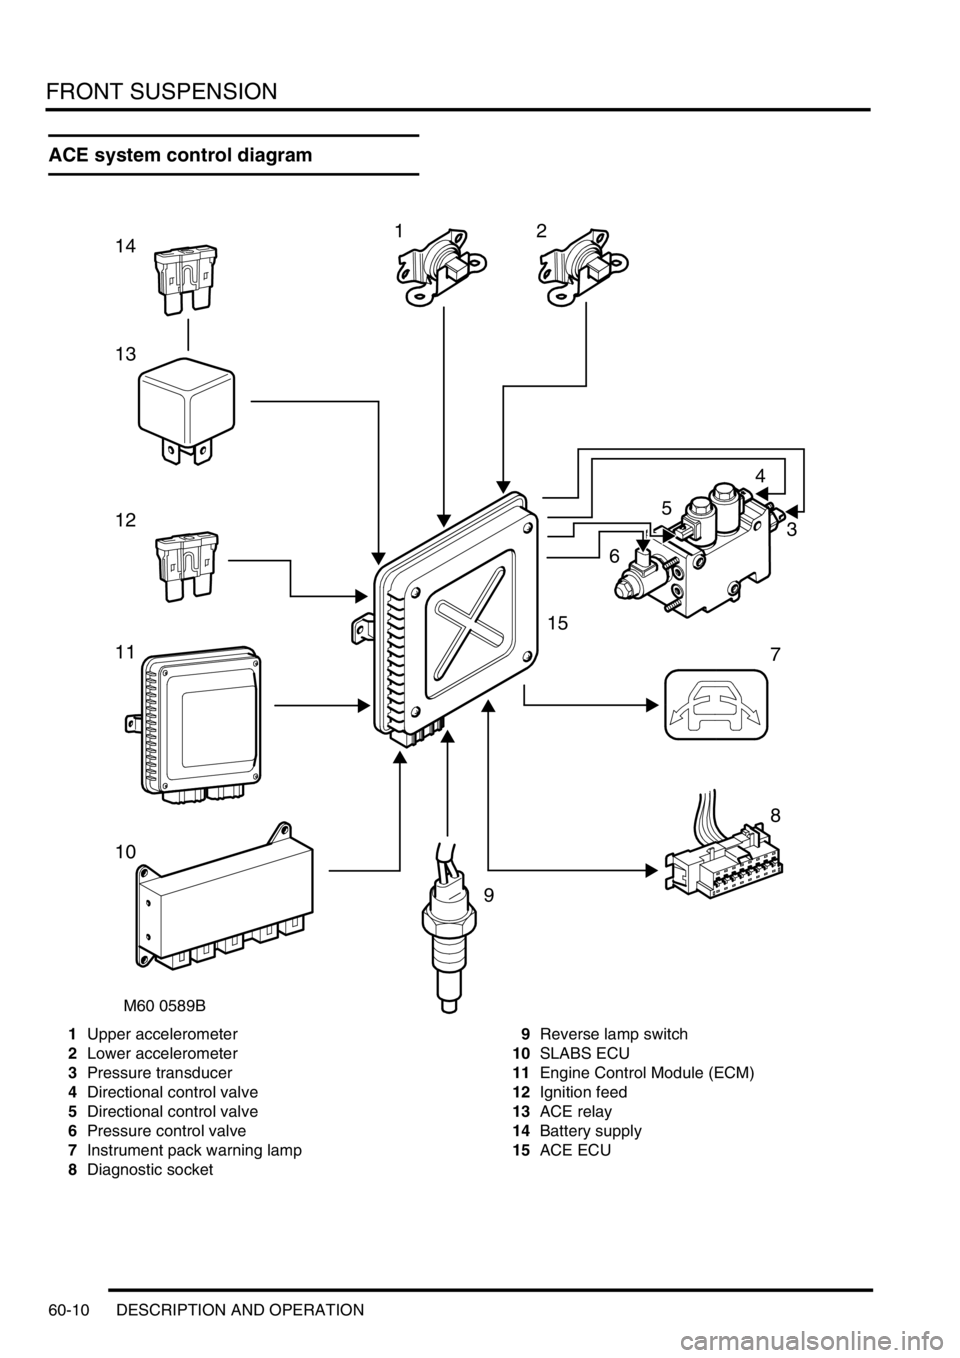
ACE system control diagram
1Upper accelerometer
2Lower accelerometer
3Pressure transducer
4Directional control valve
5Directional control valve
6Pressure control valve
7Instrument pack warning lamp
8Diagnostic socket9Reverse lamp switch
10SLABS ECU
11Engine Control Module (ECM)
12Ignition feed
13ACE relay
14Battery supply
15ACE ECU
M60 0589B
12
5
4
3
6
7
8
9
10
11
12
13
14
15