engine LAND ROVER DISCOVERY 2002 Workshop Manual
[x] Cancel search | Manufacturer: LAND ROVER, Model Year: 2002, Model line: DISCOVERY, Model: LAND ROVER DISCOVERY 2002Pages: 1672, PDF Size: 46.1 MB
Page 1436 of 1672

WIPERS AND WASHERS
DESCRIPTION AND OPERATION 84-15
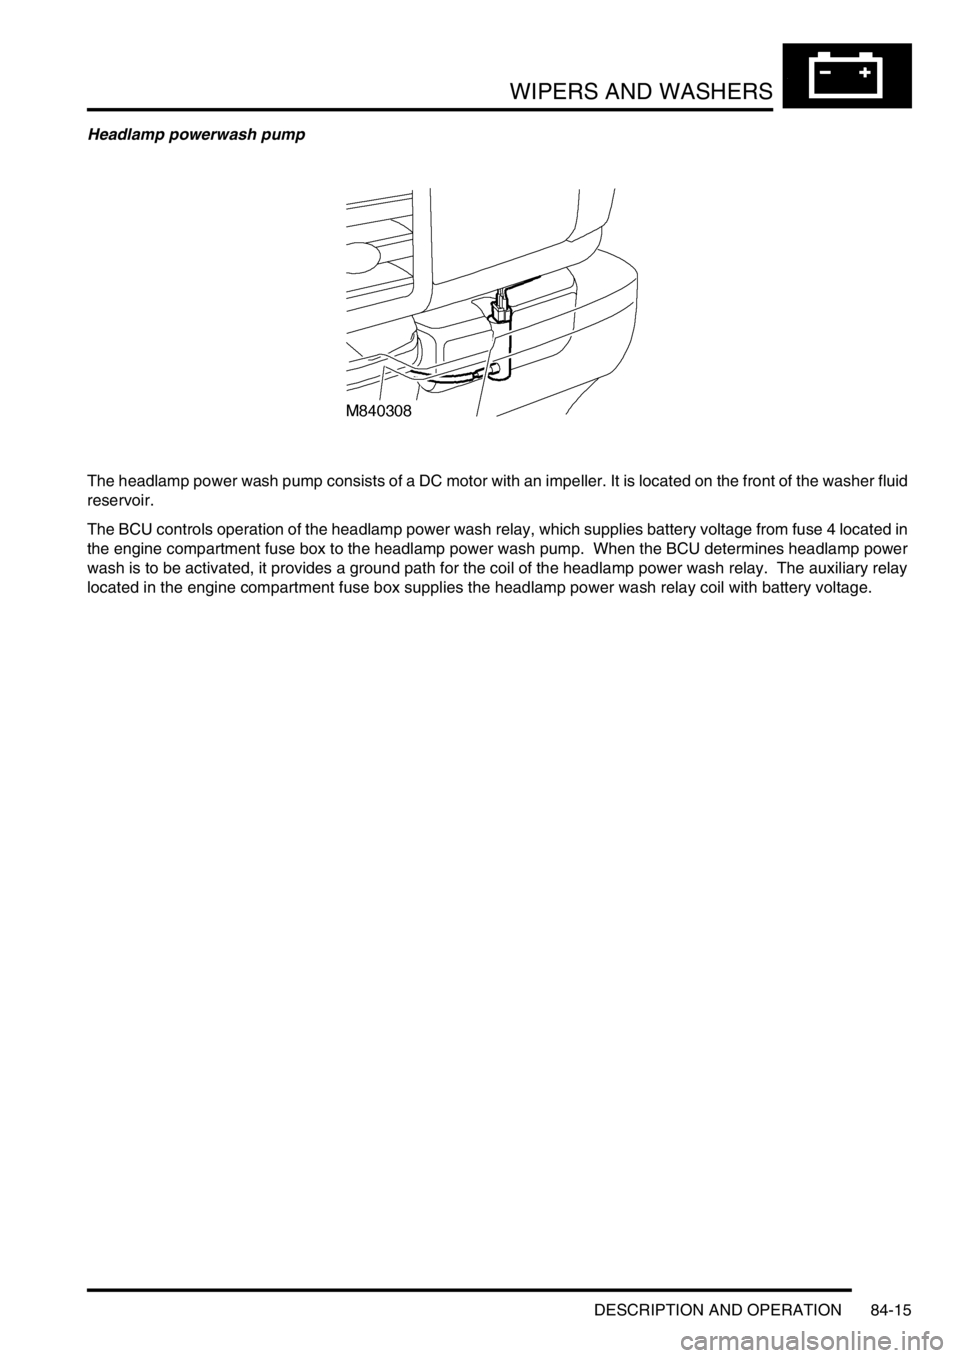
Headlamp powerwash pump
The headlamp power wash pump consists of a DC motor with an impeller. It is located on the front of the washer fluid
reservoir.
The BCU controls operation of the headlamp power wash relay, which supplies battery voltage from fuse 4 located in
the engine compartment fuse box to the headlamp power wash pump. When the BCU determines headlamp power
wash is to be activated, it provides a ground path for the coil of the headlamp power wash relay. The auxiliary relay
located in the engine compartment fuse box supplies the headlamp power wash relay coil with battery voltage.
Page 1451 of 1672

CHARGING AND STARTING
86-1-2 REPAIRS
Refit
1.Clean mating faces of alternator and vacuum
pump.
2.Fit vacuum pump to alternator and tighten
bolts to 8 Nm (6 lbf.ft).
3.Position alternator to engine and connect
multiplug.
4.Connect vacuum hose and oil drain hose to
vacuum pump and secure clips.
5.With assistance align alternator to mounting
bracket and fit but do not tighten bolt.
6.Fit bolt securing support stay to alternator and
tighten to 25 Nm (18 lbf.ft) .
7.Tighten bolt securing alternator to mounting
bracket to 45 Nm (33 lbf.ft).
8.Using new 'O' ring, connect oil supply pipe to
cylinder head and tighten to 10 Nm (7 lbf.ft).
9.Connect lead to alternator and tighten nut to 6
Nm (4.4 lbf.ft).
10.Fit auxiliary drive belt tensioner and tighten bolt
to 50 Nm (37 lbf.ft).
11.Fit auxiliary drive belt.
+ CHARGING AND STARTING,
REPAIRS, Belt - auxiliary drive.
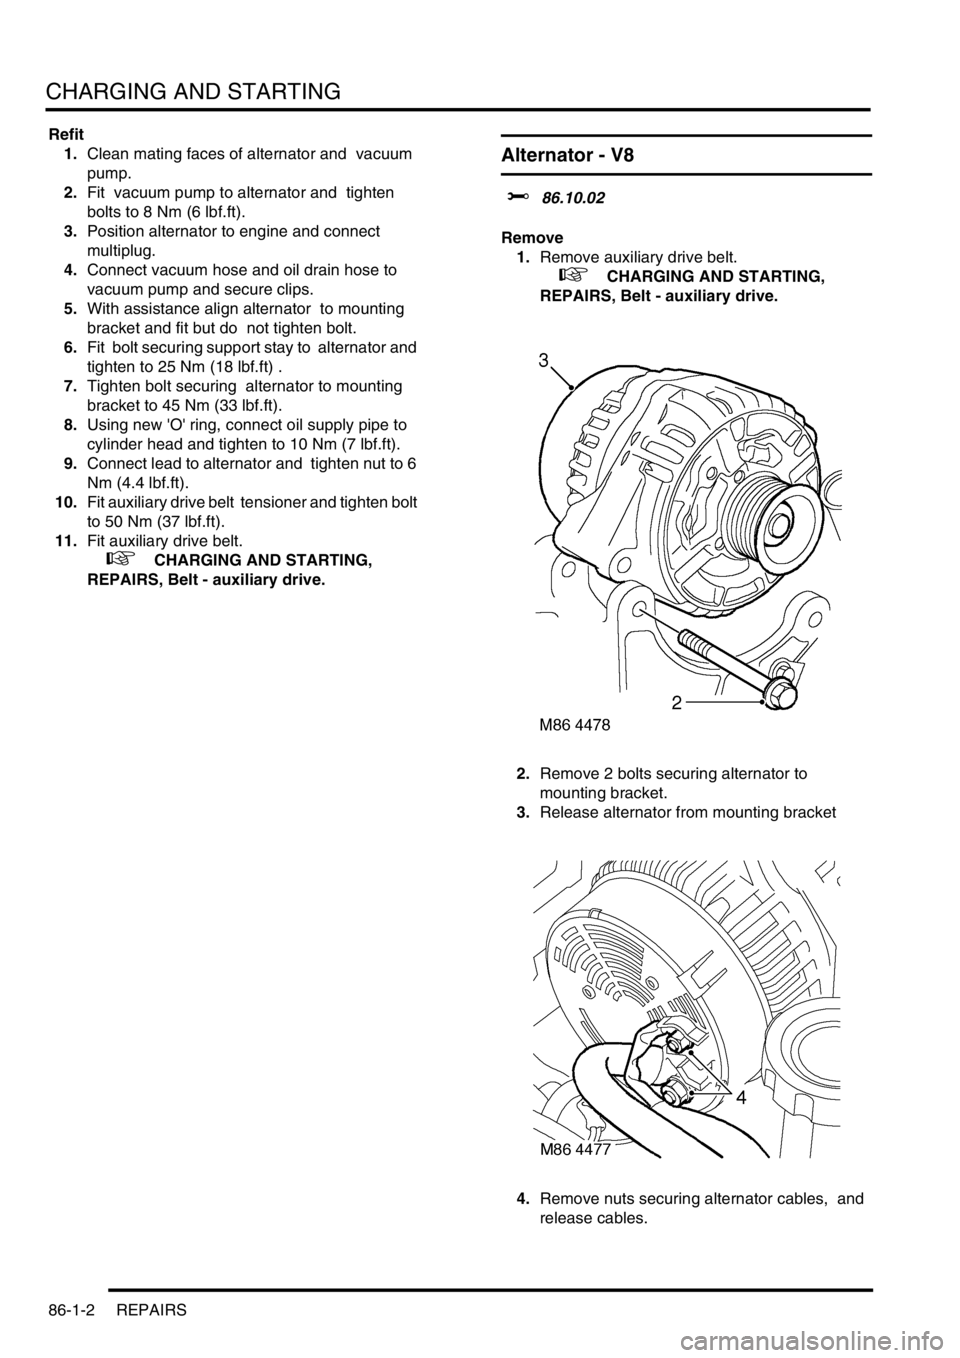
Alternator - V8
$% 86.10.02
Remove
1.Remove auxiliary drive belt.
+ CHARGING AND STARTING,
REPAIRS, Belt - auxiliary drive.
2.Remove 2 bolts securing alternator to
mounting bracket.
3.Release alternator from mounting bracket
4.Remove nuts securing alternator cables, and
release cables.
Page 1454 of 1672

CHARGING AND STARTING
REPAIRS 86-1-5
Refit
1.Fit jack retaining strap, speed nut and clip.
2.Fit battery carrier, fit bolts and tighten to 28 Nm
(21 lbf.ft).
3. Diesel models: Fit ECM and secure with
screw.
4.Secure coolant hose.
5.Fit and secure jack.
6.Fit battery.
+ CHARGING AND STARTING,
REPAIRS, Battery.
Starter motor - diesel
$% 86.60.01
Remove
1.Release fixings and remove battery cover.
2.Disconnect battery earth lead.
3.Raise front of vehicle.
WARNING: Do not work on or under a
vehicle supported only by a jack. Always
support the vehicle on safety stands.
4.Remove underbelly panel.
+ EXTERIOR FITTINGS, REPAIRS,
Panel - underbelly.
5.Disconnect Lucar connector from starter
solenoid.
6.Remove nut and disconnect battery lead from
starter solenoid.
7.Remove nut and 2 bolts securing starter motor
and remove starter motor from engine.
Refit
1.Clean starter motor and mating face on engine.
2.Fit starter motor and tighten nut and 2 bolts to
27 Nm (20 lbf.ft).
3.Connect lead to starter solenoid and tighten nut
to 10 Nm (7 lbf.ft).
4.Connect Lucar connector to starter solenoid.
5.Fit underbelly panel.
+ EXTERIOR FITTINGS, REPAIRS,
Panel - underbelly.
6.Remove stand(s) and lower vehicle.
7.Connect battery earth lead.
8.Fit battery cover and secure the fixings.
Page 1455 of 1672

CHARGING AND STARTING
86-1-6 REPAIRS
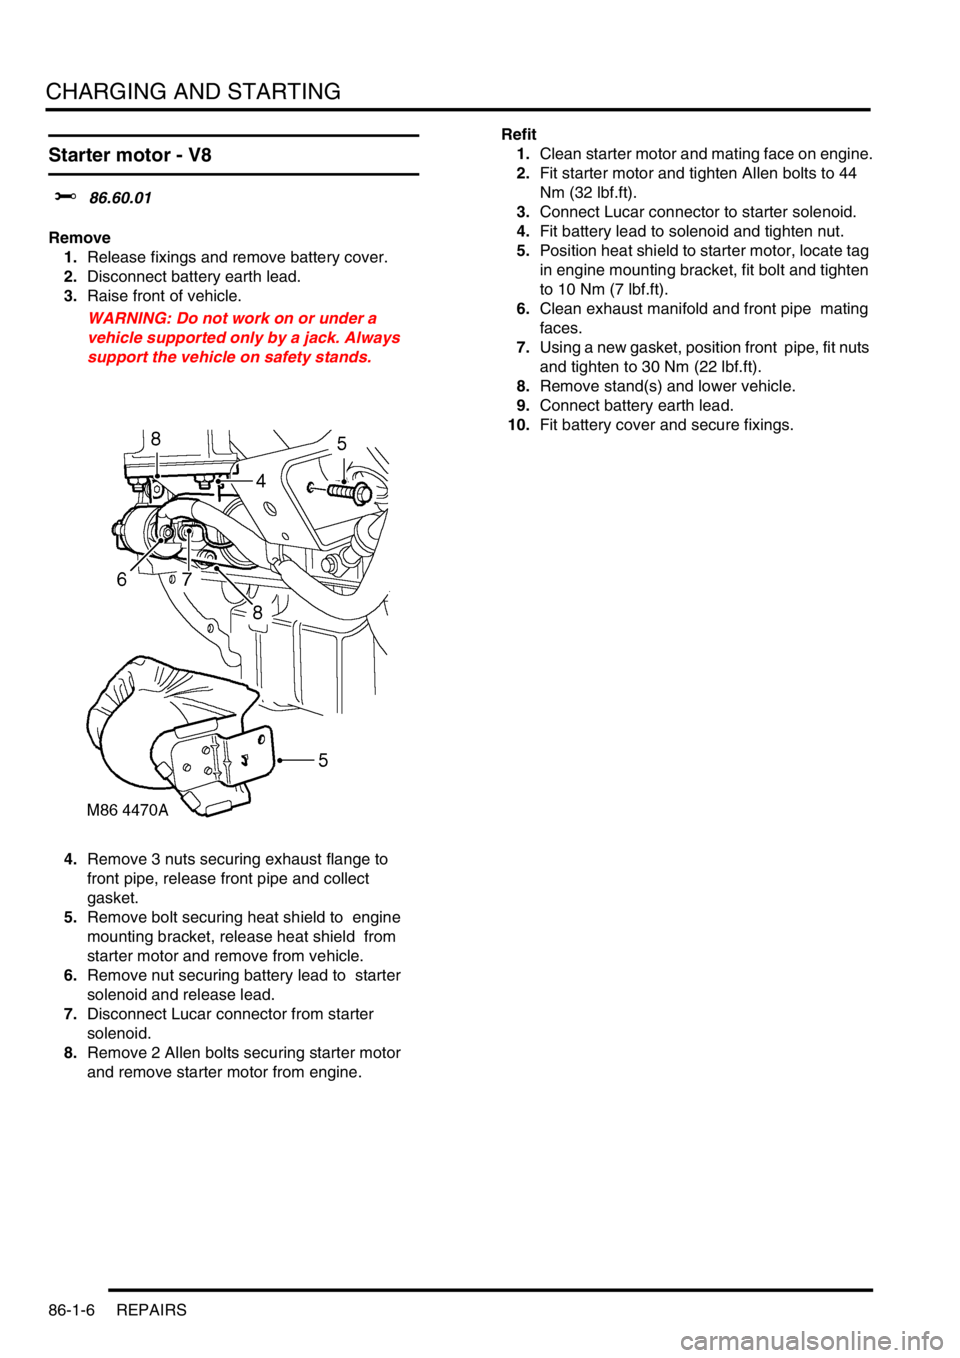
Starter motor - V8
$% 86.60.01
Remove
1.Release fixings and remove battery cover.
2.Disconnect battery earth lead.
3.Raise front of vehicle.
WARNING: Do not work on or under a
vehicle supported only by a jack. Always
support the vehicle on safety stands.
4.Remove 3 nuts securing exhaust flange to
front pipe, release front pipe and collect
gasket.
5.Remove bolt securing heat shield to engine
mounting bracket, release heat shield from
starter motor and remove from vehicle.
6.Remove nut securing battery lead to starter
solenoid and release lead.
7.Disconnect Lucar connector from starter
solenoid.
8.Remove 2 Allen bolts securing starter motor
and remove starter motor from engine. Refit
1.Clean starter motor and mating face on engine.
2.Fit starter motor and tighten Allen bolts to 44
Nm (32 lbf.ft).
3.Connect Lucar connector to starter solenoid.
4.Fit battery lead to solenoid and tighten nut.
5.Position heat shield to starter motor, locate tag
in engine mounting bracket, fit bolt and tighten
to 10 Nm (7 lbf.ft).
6.Clean exhaust manifold and front pipe mating
faces.
7.Using a new gasket, position front pipe, fit nuts
and tighten to 30 Nm (22 lbf.ft).
8.Remove stand(s) and lower vehicle.
9.Connect battery earth lead.
10.Fit battery cover and secure fixings.
Page 1470 of 1672

BODY CONTROL UNIT
DESCRIPTION AND OPERATION 86-3-1
BODY CONTROL UNIT DESCRIPTION AND OPERAT ION
Description
General
The Body Control Unit (BCU) is located behind the passenger glovebox and is connected to the main harness by four
connectors on its bottom edge and an additional connector located on the side of the BCU casing. Mounting the BCU
behind the fascia makes it reasonably inaccessible for intruders to disable the anti-theft system.
The BCU uses solid-state microprocessor control to perform logical operations and timing functions for a variety of
the vehicle's electrically operated systems, these include:
lDoor locking.
lAnti-theft alarm and immobilisation system.
lExterior lighting including direction indicators and hazard warning lamps.
lCourtesy lighting.
lWipers and washers.
lElectric windows and sunroof.
lHeated windows.
The BCU also communicates with several other electronically controlled systems such as the EAT ECU and SLABS
ECU and also has a datalink between the Intelligent Driver Module (IDM) and the instrument pack. The datalink is a
low speed bus capable of transmitting and receiving messages at a data rate of 10,400 bits per second. Additional
inputs and outputs to peripheral devices are included which are necessary for determining vehicle status for particular
logical operations e.g. crank, ignition key inserted, fuel flap enable etc.
The BCU receives its power supply from the engine compartment fuse box, and is protected by a 10 A fuse.
The BCU communicates with the IDM to provide the control signals to perform power switching operations in
conjunction with dedicated relays.
IDM
The IDM is integrated into the passenger compartment fuse box, which is mounted behind the fascia below the
steering column. There are no harnesses between the fuse box and the IDM. The IDM performs the power switching
operations for several of the vehicle's electrical systems.
The IDM communicates with the BCU and the instrument pack via a serial interface. If the BCU or the IDM is replaced,
the communications link between the two units has to be re-established. This can be done either by switching on the
ignition and leaving it on for five minutes, or by using TestBook. The vehicle immobilisation will remain active until the
communications link between the BCU and IDM has been re-established.
Transit mode
To prevent excessive battery drain during transit to overseas markets, the vehicle is placed in a transit mode. The
following functions are disabled when the vehicle is in transit mode:
lVolumetric sensors.
lPassive immobilisation.
lImmobilisation of the vehicle by use of door lock.
lIgnition key interlock.
lElectric seat enable time-out with driver's door open.
Page 1471 of 1672

BODY CONTROL UNIT
86-3-2 DESCRIPTION AND OPERATION
Power supply
Battery supply to the BCU and the IDM is provided through a 10 A fuse located in the engine compartment fuse box.
The BCU unit receives an ignition switched power supply (ignition switch position II) input via a 10 A fuse in the
passenger compartment fuse box.
The BCU receives a signal when the ignition switch is turned to the crank position, it then supplies an earth path to
the starter relay coil, to enable the crank operation by supplying power through the starter relay contacts to the starter
motor.
Battery voltage is monitored and BCU operation will function normally between 8 and 18 volts. Between 5.7 and 8
volts the BCU is in the 'under volts' state. The status of the battery is used to determine which outputs may be driven.
If a voltage supply above 18 volts is experienced, outputs will not normally be driven except for those functions which
are required during cranking (robust immobilisation, antenna coil, crank enable relay and feed to gear position switch
contacts W, X, Y, Z). In the over voltage state the vehicle can be driven, but all other functions are disabled and
outputs are switched off (power windows, heated screen, direction indicators etc.).
All functions are disabled on power up until communications between the BCU and IDM have been established. If
communications cannot be established, operation will commence with degraded functionality.
Battery supply to the IDM is provided through the inertia switch and a 10 A fuse in the engine compartment fuse box.
If the inertia switch contacts are closed battery voltage is available at the IDM; if the inertia switch contacts are open
there is no battery supply to the IDM. The supply condition of the IDM is signalled to the BCU via the serial bus. If the
inertia switch is operated (contacts open) the change in state is detected by the BCU which unlocks the doors if the
ignition switch is in position II and the alarm is not set.
The BCU is earthed through a hard-wire connection.
Inputs and outputs
The BCU and IDM process inputs and provide the necessary outputs for control and operation of the vehicle's 'body'
systems.
BCU inputs
The BCU processes signals received from the following components:
lDoor latch switches.
lDriver's door key lock/ unlock switches.
lBonnet activated security system.
lVolumetric sensors.
lCentral Door Locking (CDL) switches.
lRemote transmitter (via receiver unit).
lInertia fuel cut-off switch.
lIgnition switch.
lFuel flap release switch.
The input voltages (V
in) for BCU digital signals are defined as follows:
lLogic 1 when V
in ≥ 6V.
lLogic 0 when V
in ≤ 2V.
BCU input voltages between 2 and 6 volts are indeterminate and cannot be guaranteed.
Analogue input voltages are measured as a ratio with respect to battery voltage.
Page 1472 of 1672

BODY CONTROL UNIT
DESCRIPTION AND OPERATION 86-3-3
BCU outputs
The BCU processes the input signals it receives and uses the information to determine the control outputs that need
to be established for any given set of conditions. The BCU provides controlled outputs for the following systems:
lInterior courtesy lamps.
lFuel flap release actuator.
lAnti-theft status LED.
lEngine Control Module.
lDoor lock actuators.
lDirection indicators and hazard warning lamps.
lHeadlamps.
lAlarm sounder.
lVehicle horns.
lBattery backed sounder.
lStarter relay.
lPassive re-mobilisation exciter coil.
Simultaneous switching of outputs in different units is limited by the bus transfer time, but the skew is no longer than
100 ms for either the BCU or the IDM. When the processor is reset, all outputs are switched off until the inputs have
been read for the first time to check current condition.
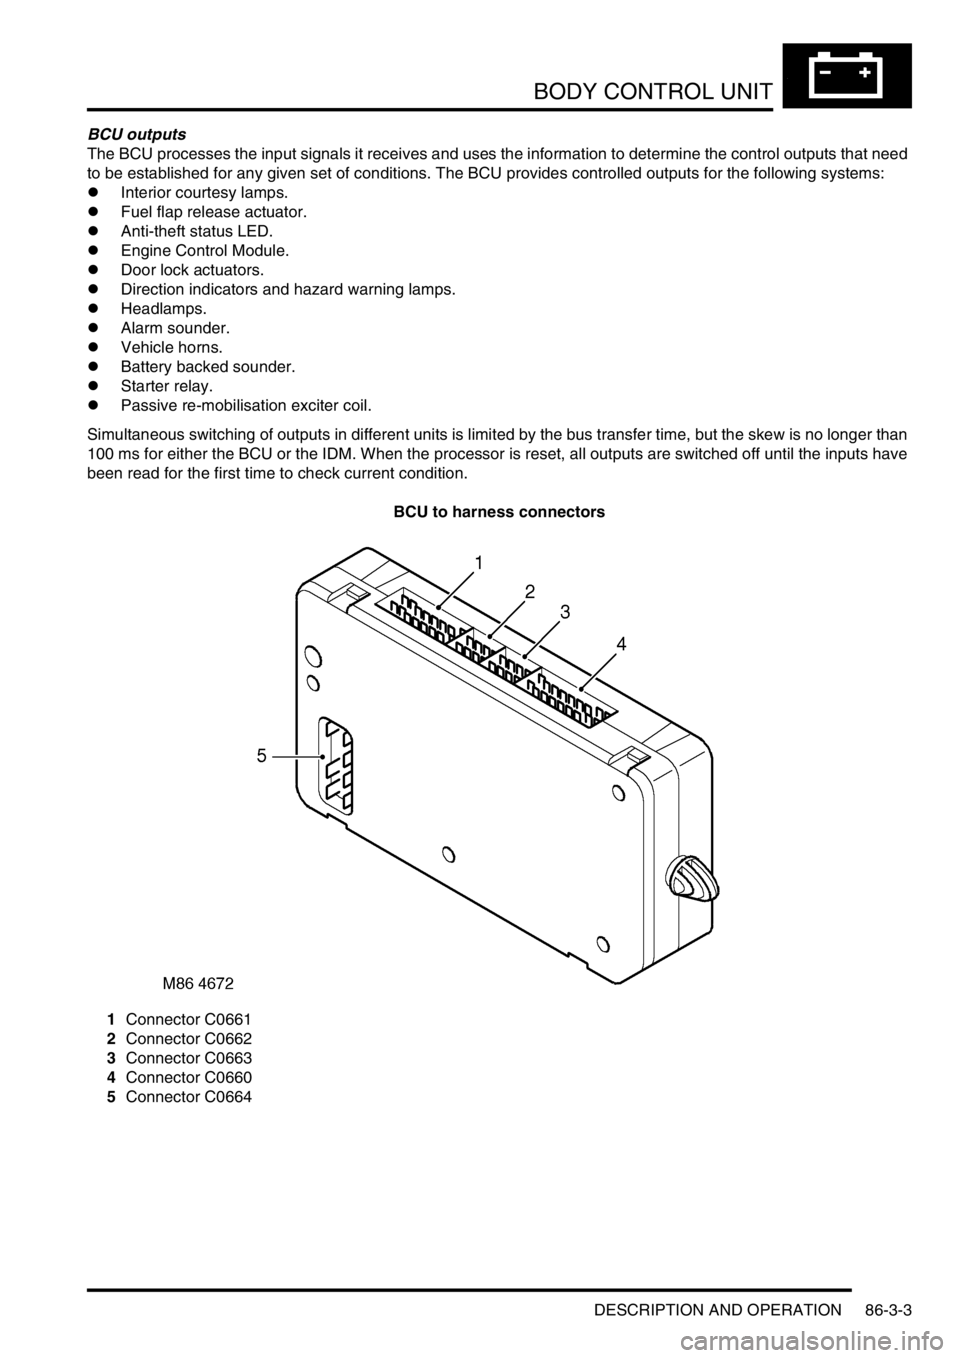
BCU to harness connectors
1Connector C0661
2Connector C0662
3Connector C0663
4Connector C0660
5Connector C0664
Page 1482 of 1672

BODY CONTROL UNIT
DESCRIPTION AND OPERATION 86-3-13
Anti-theft system
The BCU controls the logical switching operations for enabling and activating the anti-theft system. Features include:
lPerimetric protection – monitors the condition of doors and hinged panels.
lVolumetric protection – monitors the vehicle's interior space.
lRemote locking, superlocking and unlocking functions.
lEngine immobilisation and remobilisation.
lAdvanced mislock detection and automatic compensation.
lEKA code functions.
lCustomer configuration options.
lMarket configuration options.
Immobilisation
The immobilisation system comprises the following components:
lRF receiver.
lRF transmitter/ transponder.
lTransponder coil.
lBCU.
lDoor switches, door lock switches and bonnet switch.
lIDM.
lECM.
lStarter solenoid relay.
lStatus LED.
Alarm sounder Alarm Audible warnings are given by the security system sounder only.
Both Audible warnings are given by both the security system sounder
and the vehicle horn.
Vehicle Audible warnings are given by the vehicle horn only.
BBUS Audible warnings are given by the security system sounder,
vehicle horn and BBUS.
Disabled Audible warnings are not given.
Acclimatisation locking Disabled The vehicle cannot be locked if the ignition is on.
Enabled The vehicle can be locked if the ignition is on and the engine is
running.
Alarm tamper Disabled The security system LED does not flash when the security system
has been tampered with.
Enabled The security system LED flashes when the security system has
been tampered with.
Engine immobilised LED off The security system LED does not flash when the engine is
immobilised.
LED flash The security system LED flashes when the engine is immobilised.
Low battery warning Disabled The security system LED does not flash when the remote
transmitter battery is low.
Enabled The security system LED flashes when the remote transmitter
battery is low.
Emergency Key Access
(EKA)Disabled EKA is disabled.
Enabled EKA is enabled and the door locks operate electrically.
No unlock EKA is enabled, but the door locks do not operate electrically. Function Option Details
Page 1485 of 1672

BODY CONTROL UNIT
86-3-16 DESCRIPTION AND OPERATION
Headlamps
The BCU contains a feature which allow the vehicle headlamps to be turned on when the remote transmitter is
pressed (courtesy headlamps).
For markets with daylight running lamps, the BCU controls the logical operation of the daylight running lamps. Options
are daylight running lamps are on if the main beam headlamps are off, or the daylight running lamps are on with main
and dipped beam off and the gearbox not in Park.
Front fog lamps
For markets with front fog lamps fitted, the BCU controls the operation of the front fog lamps. Options can be selected
so that the fog lamps will operate with or without the headlamps on main beam.
Instrument pack
The BCU communicates with the instrument pack via a serial data bus.
+ INSTRUMENTS, DESCRIPTION AND OPERATION, Description.
lThe instrument pack provides the BCU and IDM with details of vehicle speed.
lSignals are provided from the IDM to the instrument pack and BCU when the direction indicator lamps are active.
lFor certain markets, the BCU provides a signal to the instrument pack for indicating when the transfer box is in
neutral.
lThe IDM can signal the instrument pack to illuminate a trailer warning lamp. This operates when the IDM senses
that the current drawn by the indicator circuit exceeds a preset threshold.
lThe odometer reading displayed on the instrument pack LCD screen is also stored in non volatile memory in the
BCU. Whenever the ignition is turned from position I to position II, the instrument pack and the BCU compare
their stored values.
lThe gear selector position is displayed on the instrument pack LCD screen under the direction of the BCU.
Starting
The starting system comprises a starter motor and solenoid located at the rear right hand side of the engine. A starter
relay controlled by the BCU is used to supply battery power for starter solenoid operation. The starter motor receives
its feed directly from the battery.
Cruise control
The BCU processes several signals used for cruise control:
lWhen the brake pedal is pressed, a low voltage brake lamp signal is sent via the BCU to the cruise control ECU.
lThe gear position switch sends an input via the BCU to the cruise control ECU if the selector lever is in Park,
Neutral or Reverse.
lA voltage supply is fed from the BCU to the cruise control SET+ switch.
lA voltage supply is fed from the BCU to the cruise control RES switch.
On vehicles with automatic transmission, if the BCU receives an input from the gear position switch or the brake pedal
switch, the BCU sends a signal to the cruise control ECU to cancel or inhibit cruise control operation.
+ ENGINE MANAGEMENT SYSTEM - Td5, DESCRIPTION AND OPERATION, Description.
+ ENGINE MANAGEMENT SYSTEM - V8, DESCRIPTION AND OPERATION, Description - cruise control.
Shift interlock (where fitted)
On automatic gearbox models, the BCU and IDM combine with an interlock relay located in the passenger
compartment fuse box to operate a shift interlock solenoid, so that the gear selector lever cannot be moved out of
Park until certain logical conditions have been satisfied. Operation of the interlock may be affected, if the battery
becomes discharged.
+ AUTOMATIC GEARBOX - ZF4HP22 - 24, DESCRIPTION AND OPERATION, Description.
Page 1487 of 1672

BODY CONTROL UNIT
86-3-18 DESCRIPTION AND OPERATION
Self levelling suspension and ABS
The BCU communicates with the SLABS ECU for several functions:
lAn output is provided from the SLABS ECU to the BCU to provide the logic conditions for issuing the SLS audible
warning.
lThe BCU receives an input from the SLABS ECU relating to the raise/ lower command from the remote handset.
+ REAR SUSPENSION, DESCRIPTION AND OPERATION, Description - SLS.
Hill descent control
The BCU provides an output signal to the SLABS ECU for automatic transmission in neutral for HDC control. The
BCU checks the status of the ignition and 'gearbox state' inputs and provides a 'Neutral selected' output. If the ignition
is on and 'gearbox state' is Neutral, the 'Neutral selected' output is on, otherwise 'Neutral selected' is off.
+ BRAKES, DESCRIPTION AND OPERATION, Description.
Heated screens
The Heated Front Screen (HFS) is fitted for some market destinations and is operated from a non-latching switch
located on the instrument pack cowl. The BCU will only allow the heated front screen to operate when the engine is
running and controls the time-out period for switching the circuit off.
The heated front screen operation can also be controlled from the Automatic Temperature Control (ATC) ECU on
vehicles fitted with air conditioning.
The heated rear window will only function when the engine is running, and is operated by a non-latching switch on the
instrument pack cowl. The heated rear window can also be operated by the ATC ECU on vehicles fitted with air
conditioning.
Interior courtesy lamps
The BCU controls the operation of the interior courtesy lamps. The courtesy lamps are situated in the front, mid and
rear areas of the headlining.
Fuel flap actuator
The BCU provides an earth path to the fuel flap release solenoid to allow the fuel filler flap to be opened. This is only
allowed if the alarm system is not set and all other conditions have been satisfied. The fuel flap release switch is
located in the fascia switch pack and it receives a voltage supply from the passenger compartment fuse box.
Audible warnings
The BCU can request the instrument pack to generate an audible warning in response to conditions it has detected
and which need to be drawn to the driver's attention. One of six different audible warnings can be requested by the
BCU.
Sound request number Sound functions Priority (1 = lowest, 6 = highest)
0Off 1
1 Seat belt warning 6
2 Key-in warning 3
3 SLABS/ HDC warning 4
4 Transfer box in neutral warning 5
5 Lights on warning 2