relay LAND ROVER DISCOVERY 2002 Workshop Manual
[x] Cancel search | Manufacturer: LAND ROVER, Model Year: 2002, Model line: DISCOVERY, Model: LAND ROVER DISCOVERY 2002Pages: 1672, PDF Size: 46.1 MB
Page 53 of 1672
GENERAL INFORMATION
03-18
Connectors should never be subjected to forced
removal or refit, especially inter-board connectors.
Damaged contacts can cause short-circuit and open-
circuit fault conditions.
Prior to commencing test, and periodically during a
test, touch a good vehicle body earth to discharge
static charge. Some electronic components are
vulnerable to the static electricity that may be
generated by the operator.
Grease for electrical connectors
Some under bonnet and under body connectors may
be protected against corrosion by the application of a
special grease during vehicle production. Should
connectors be disturbed in service, repaired or
replaced, additional grease should be applied: Part
No. BAU 5811, available in 150 gm tubs.
NOTE: The use of greases other than BAU 5811
must be avoided as they can migrate into relays,
switches etc. contaminating the contacts and leading
to intermittent operation or failure.
Supplementary Restraint System
Precautions
General
The Supplementary Restraint System (SRS)
provides active protection for vehicle occupants in
the event of a serious collision. The system
components include airbags and pretensioner seat
belts which are automatically deployed when a
severe frontal crash condition is detected.
In order to assure system integrity, it is essential that
the SRS system is regularly checked and maintained
so that it is ready for operation in the event of an
accident.
The SRS system contains components which could
be potentially hazardous to the service engineer if
not serviced and handled correctly. The following
guidelines are intended to alert the service engineer
to potential sources of danger and emphasise the
importance of ensuring integrity of the SRS
components fitted to the vehicle.
Where necessary, additional specific precautions are
detailed in the Restraint Systems section of this
Manual which should be referred to prior to
commencing repair operations.
It should be noted that these precautions are not
restricted to operations performed when servicing
the SRS system. The same care should be exercised
when working on ancillary systems and components
located in the vicinity of SRS components; these
include but are not limited to steering system (driver's
airbag), body and trim components (passenger's
airbag and seat belt pretensioners) and electrical
system components (SRS harnesses etc.).
Page 342 of 1672
EMISSION CONTROL - V8
DESCRIPTION AND OPERATION 17-2-5
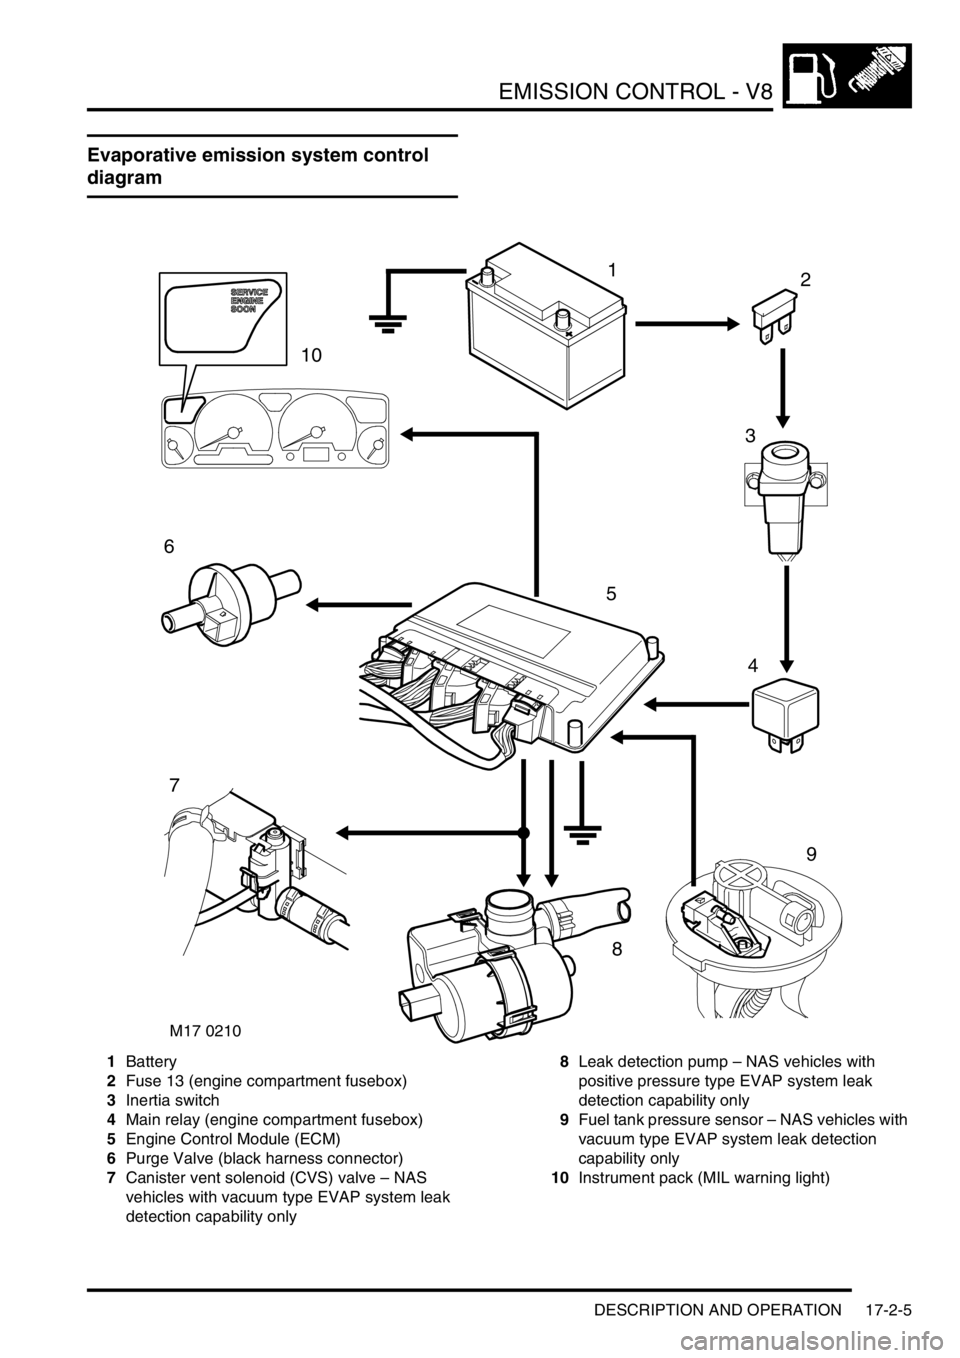
Evaporative emission system control
diagram
1Battery
2Fuse 13 (engine compartment fusebox)
3Inertia switch
4Main relay (engine compartment fusebox)
5Engine Control Module (ECM)
6Purge Valve (black harness connector)
7Canister vent solenoid (CVS) valve – NAS
vehicles with vacuum type EVAP system leak
detection capability only8Leak detection pump – NAS vehicles with
positive pressure type EVAP system leak
detection capability only
9Fuel tank pressure sensor – NAS vehicles with
vacuum type EVAP system leak detection
capability only
10Instrument pack (MIL warning light)
M17 0210
12
3
4
5
6
7
9
8
10
Page 344 of 1672

EMISSION CONTROL - V8
DESCRIPTION AND OPERATION 17-2-7
1Engine Control Module (ECM)
2SAI vacuum solenoid valve
3Purge valve
4Vacuum reservoir
5SAI control valve (2 off)
6SAI pump
7SAI pump relay
8Main relay
Page 345 of 1672
EMISSION CONTROL - V8
17-2-8 DESCRIPTION AND OPERATION
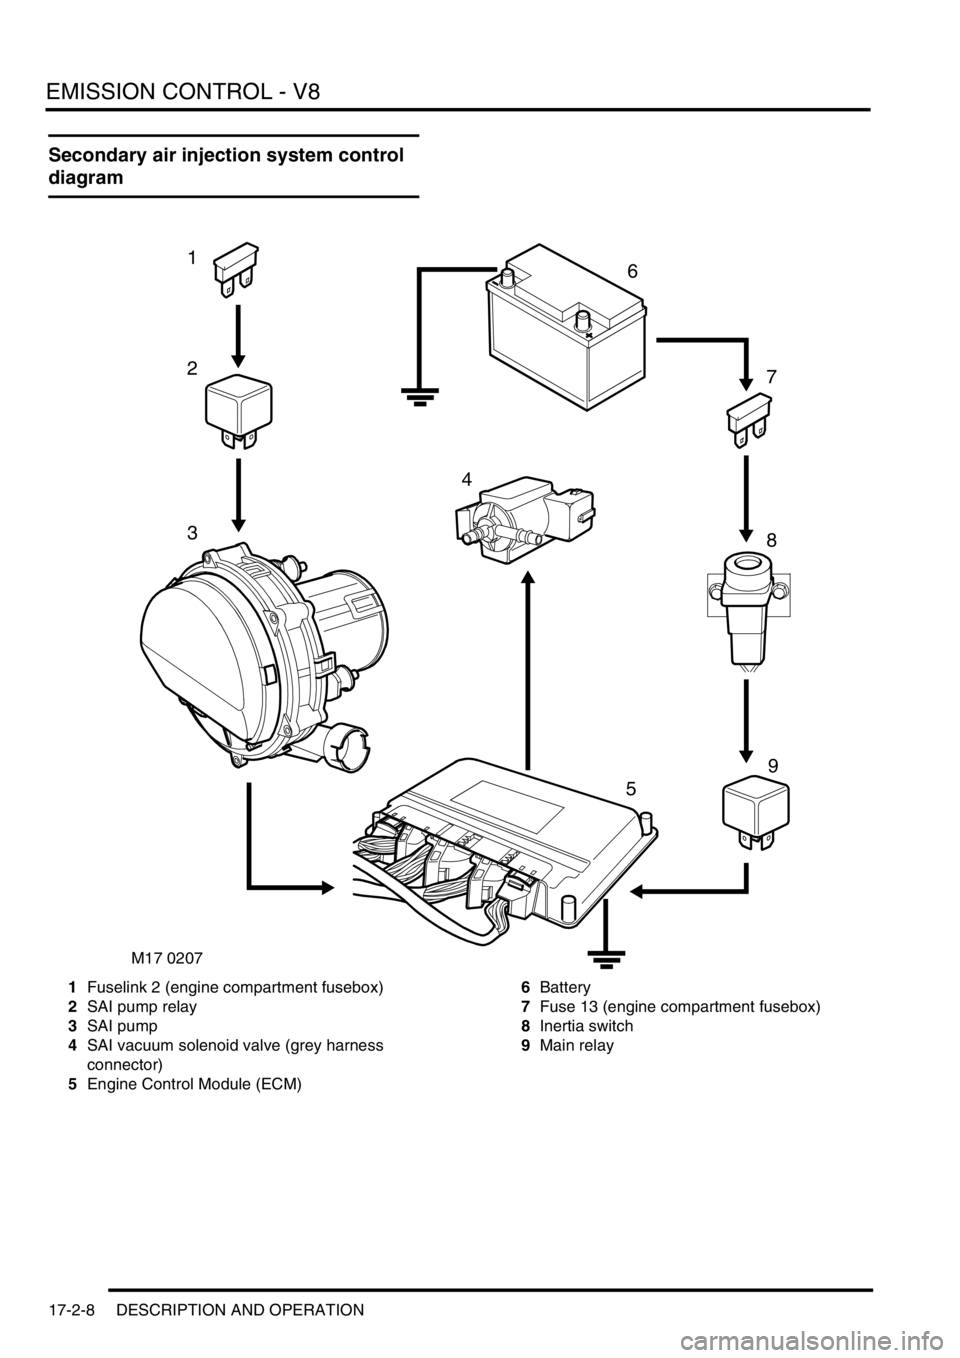
Secondary air injection system control
diagram
1Fuselink 2 (engine compartment fusebox)
2SAI pump relay
3SAI pump
4SAI vacuum solenoid valve (grey harness
connector)
5Engine Control Module (ECM)6Battery
7Fuse 13 (engine compartment fusebox)
8Inertia switch
9Main relay
9
M17 0207
1
2
3
4
5
7
6
8
Page 352 of 1672

EMISSION CONTROL - V8
DESCRIPTION AND OPERATION 17-2-15
Evaporative emission control system
The evaporation emission control (EVAP) system is used to reduce the level of hydrocarbons emitted into the
atmosphere from the fuel system. The system comprises an EVAP canister which stores the hydrocarbons from the
fuel tank, pressure valves, vent lines and a purge control solenoid valve.
Fuel vapour is stored in the canister until it is ready to be purged to the inlet manifold under the control of the Engine
Control Module (ECM).
A two-way valve is included in the vent line between the fuel tank and the EVAP canister in all markets except NAS.
A fuel vapour separator is fitted next to the fuel filler neck, the construction is different between NAS and ROW
vehicles; the liquid vapour separator (LVS) on NAS vehicles is an L-shaped metal tube and for all other markets it is
an integral part of the moulded plastic filler neck.
+ FUEL DELIVERY SYSTEM - V8, DESCRIPTION AND OPERATION, Description.
NAS vehicles have stainless steel filler necks whilst all other markets use moulded plastic filler necks. On NAS fillers,
a valve closes the roll-over valve (ROV) vent line when the fuel filler cap is removed; for all other markets a pressure
relief valve is fitted into the ROV vent line.
+ FUEL DELIVERY SYSTEM - V8, DESCRIPTION AND OPERATION, Description.
Four ROV's are fitted to the fuel tank, for NAS vehicles the valves are fitted inside the fuel tank and for ROW vehicles
the ROV's are welded external to the fuel tank. Nylon vent lines from the ROV's connect to the liquid vapour separator
allowing vapour to pass to the EVAP canister via the LVS. To prevent the canister from being overloaded (particularly
in hot ambient conditions) and to prevent wastage of fuel, the vapour is allowed to condense within the LVS and flow
back through the ROVs into the tank.
+ FUEL DELIVERY SYSTEM - V8, DESCRIPTION AND OPERATION, Description.
Pressure / vacuum relief valves are incorporated into the fuel filler cap which operate in the event of an evaporation
system failure (e.g. blockage in the evaporation system line to atmosphere). The cap relieves fuel tank pressure to
atmosphere at approximately 1.8 to 2.0 psi (12 to 14 kPa) and opens in the opposite direction at approximately – 0.7
psi (- 5kPa) vacuum. All plastic bodied fuel fillers are fitted with a tank overpressure relief valve.
A vent line flow restrictor (anti-trickle valve) is fitted to the filler pipe in the line between the tank and the canister on
NAS vehicles. The purpose of the anti-trickle valve is to preserve the vapour space in the tank by blocking the vent
line during the fuel filling process. The valve is operated by the action of inserting the filler gun, so that when the fuel
in the tank reaches the level of the filling breather, flow cut off occurs due to fuel filling the filler pipe.
+ FUEL DELIVERY SYSTEM - V8, DESCRIPTION AND OPERATION, Description.
The breather ports from the EVAP canister are located high up in the engine bay (CVS unit on NAS vehicles with
vacuum type, fuel evaporation leak detection capability; via an air filter on NAS vehicles with positive pressure type,
fuel evaporation leak detection capability; snorkel tubes on ROW vehicles), to prevent water ingress during vehicle
wading.
The ECM connectors and pins which are pertinent to evaporative emission control are listed in the following table:
Connector / Pin No. Function Signal type Control
C0635-23 Main relay output Output drive Switch to ground
C0635-24 Leak detection pump motor (NAS vehicles
with positive pressure type EVAP system
leak detection only)Output drive Switch to ground
C0636-3 Purge valve drive Output signal PWM 12 - 0V
C0636-6 Fuel tank pressure sensor (NAS vehicles
with vacuum type EVAP system leak
detection only)Ground 0V
C0636-30 Canister vent solenoid (CVS) valve (NAS
vehicles with vacuum type EVAP system
leak detection only) / Fuel leak detection
pump (NAS vehicles with positive pressure
type EVAP system leak detection only)Output drive Switch to ground
Page 361 of 1672
EMISSION CONTROL - V8
17-2-24 DESCRIPTION AND OPERATION
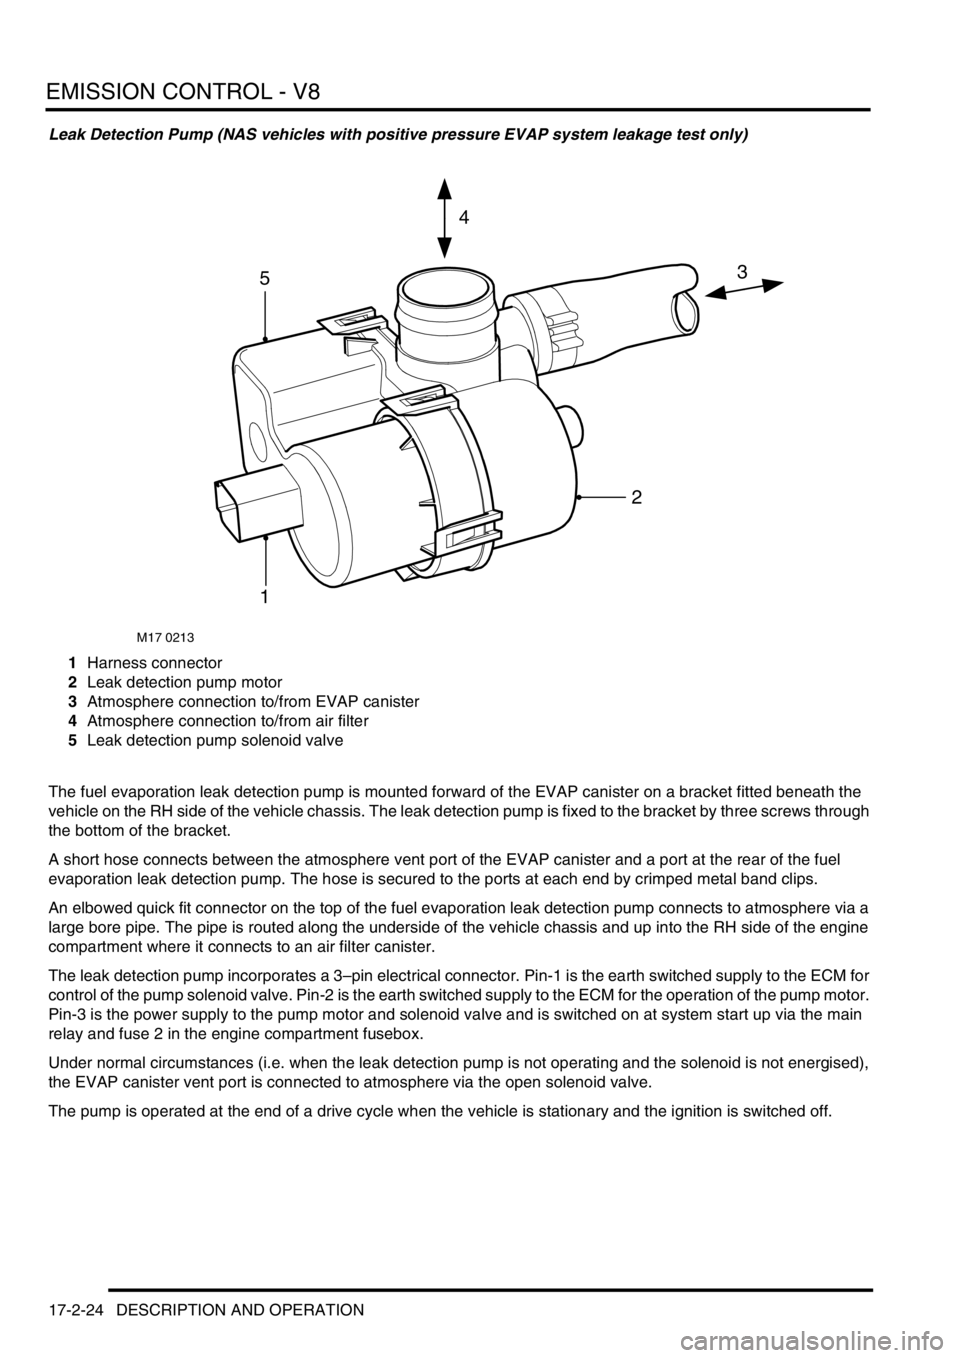
Leak Detection Pump (NAS vehicles with positive pressure EVAP system leakage test only)
1Harness connector
2Leak detection pump motor
3Atmosphere connection to/from EVAP canister
4Atmosphere connection to/from air filter
5Leak detection pump solenoid valve
The fuel evaporation leak detection pump is mounted forward of the EVAP canister on a bracket fitted beneath the
vehicle on the RH side of the vehicle chassis. The leak detection pump is fixed to the bracket by three screws through
the bottom of the bracket.
A short hose connects between the atmosphere vent port of the EVAP canister and a port at the rear of the fuel
evaporation leak detection pump. The hose is secured to the ports at each end by crimped metal band clips.
An elbowed quick fit connector on the top of the fuel evaporation leak detection pump connects to atmosphere via a
large bore pipe. The pipe is routed along the underside of the vehicle chassis and up into the RH side of the engine
compartment where it connects to an air filter canister.
The leak detection pump incorporates a 3–pin electrical connector. Pin-1 is the earth switched supply to the ECM for
control of the pump solenoid valve. Pin-2 is the earth switched supply to the ECM for the operation of the pump motor.
Pin-3 is the power supply to the pump motor and solenoid valve and is switched on at system start up via the main
relay and fuse 2 in the engine compartment fusebox.
Under normal circumstances (i.e. when the leak detection pump is not operating and the solenoid is not energised),
the EVAP canister vent port is connected to atmosphere via the open solenoid valve.
The pump is operated at the end of a drive cycle when the vehicle is stationary and the ignition is switched off.
M17 0213
3
4
5
1
2
Page 363 of 1672

EMISSION CONTROL - V8
17-2-26 DESCRIPTION AND OPERATION
Secondary air injection system
The secondary air injection (SAI) system comprises the following components:
lSecondary air injection pump
lSAI vacuum solenoid valve
lSAI control valves (2 off, 1 for each bank of cylinders)
lSAI pump relay
lVacuum reservoir
lVacuum harness and pipes
The secondary air injection system is used to limit the emission of carbon monoxide (CO) and hydrocarbons (HCs)
that are prevalent in the exhaust during cold starting of a spark ignition engine. The concentration of hydrocarbons
experienced during cold starting at low temperatures are particularly high until the engine and catalytic converter
reach normal operating temperature. The lower the cold start temperature, the greater the prevalence of
hydrocarbons emitted from the engine.
There are several reasons for the increase of HC emissions at low cold start temperatures, including the tendency for
fuel to be deposited on the cylinder walls, which is then displaced during the piston cycle and expunged during the
exhaust stroke. As the engine warms up through operation, the cylinder walls no longer retain a film of fuel and most
of the hydrocarbons will be burnt off during the combustion process.
The SAI pump is used to provide a supply of air into the exhaust ports in the cylinder head, onto the back of the
exhaust valves, during the cold start period. The hot unburnt fuel particles leaving the combustion chamber mix with
the air injected into the exhaust ports and immediately combust. This subsequent combustion of the unburnt and
partially burnt CO and HC particles help to reduce the emission of these pollutants from the exhaust system. The
additional heat generated in the exhaust manifold also provides rapid heating of the exhaust system catalytic
converters. The additional oxygen which is delivered to the catalytic converters also generate an exothermic reaction
which causes the catalytic converters to 'light off' quickly.
The catalytic converters only start to provide effective treatment of emission pollutants when they reach an operating
temperature of approximately 250
°C (482°F) and need to be between temperatures of 400°C (752°F) and 800°C
(1472
°F) for optimum efficiency. Consequently, the heat produced by the secondary air injection “afterburning”,
reduces the time delay before the catalysts reach an efficient operating temperature.
The engine control module (ECM) checks the engine coolant temperature when the engine is started, and if it is below
60º C (131
°F), the SAI pump is started. Secondary air injection will remain operational for a period controlled by the
ECM (76 seconds for NAS vehicles, 64 seconds for EU-3 vehicles). The SAI pump operation can be cut short due to
excessive engine speed or load.
Air from the SAI pump is supplied to the SAI control valves via pipework and an intermediate T-piece which splits the
air flow evenly to each bank.
At the same time the secondary air pump is started, the ECM operates a SAI vacuum solenoid valve, which opens to
allow vacuum from the reservoir to be applied to the vacuum operated SAI control valves on each side of the engine.
When the vacuum is applied to the SAI control valves, they open simultaneously to allow the air from the SAI pump
through to the exhaust ports. Secondary air is injected into the inner most exhaust ports on each bank.
When the ECM breaks the ground circuit to de-energise the SAI vacuum solenoid valve, the vacuum supply to the
SAI control valves is cut off and the valves close to prevent further air being injected into the exhaust manifold. At the
same time as the SAI vacuum solenoid valve is closed, the ECM opens the ground circuit to the SAI pump relay, to
stop the SAI pump.
A vacuum reservoir is included in the vacuum line between the intake manifold and the SAI vacuum solenoid valve.
This prevents changes in vacuum pressure from the intake manifold being passed on to cause fluctuations of the
secondary air injection solenoid valve. The vacuum reservoir contains a one way valve and ensures a constant
vacuum is available for the SAI vacuum solenoid valve operation. This is particularly important when the vehicle is at
high altitude.
Page 364 of 1672
EMISSION CONTROL - V8
DESCRIPTION AND OPERATION 17-2-27
The ECM connector and pins pertinent for secondary air injection are listed in the following table:
Secondary air injection system components
The secondary air injection (SAI) system components (NAS only) are described below:
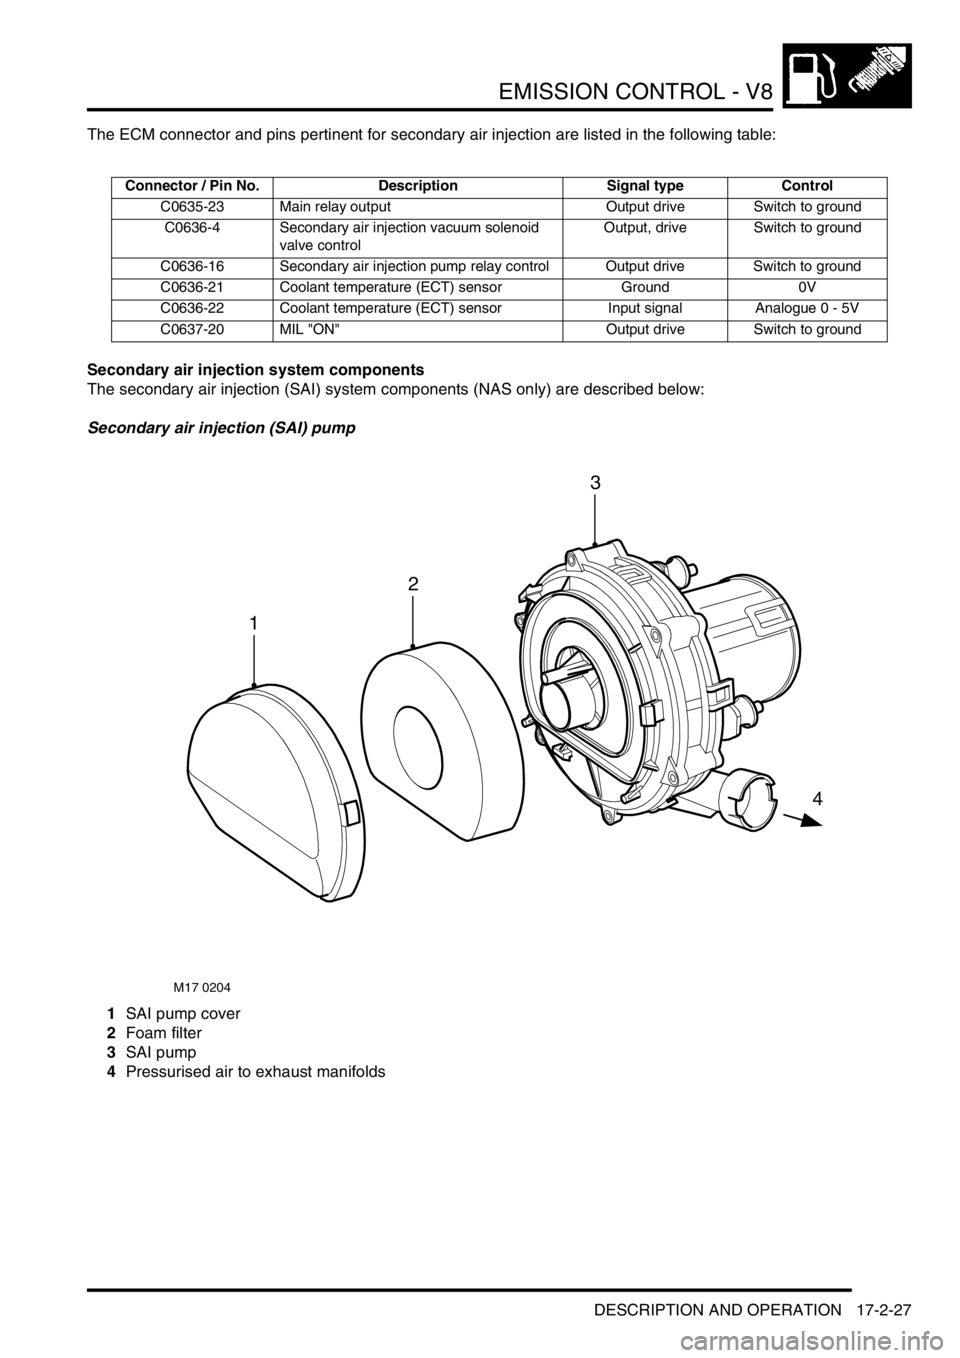
Secondary air injection (SAI) pump
1SAI pump cover
2Foam filter
3SAI pump
4Pressurised air to exhaust manifolds
Connector / Pin No. Description Signal type Control
C0635-23 Main relay output Output drive Switch to ground
C0636-4 Secondary air injection vacuum solenoid
valve controlOutput, drive Switch to ground
C0636-16 Secondary air injection pump relay control Output drive Switch to ground
C0636-21 Coolant temperature (ECT) sensor Ground 0V
C0636-22 Coolant temperature (ECT) sensor Input signal Analogue 0 - 5V
C0637-20 MIL "ON" Output drive Switch to ground
M17 0204
1
4
2
3
Page 365 of 1672

EMISSION CONTROL - V8
17-2-28 DESCRIPTION AND OPERATION
The SAI pump is attached to a bracket at the rear RH side of the engine compartment and is fixed to the bracket by
three studs and nuts. The pump is electrically powered from a 12V battery supply via a dedicated relay and supplies
approximately 35kg/hr of air when the vehicle is at idle in Neutral/Park on a start from 20
°C (68°F).
Air is drawn into the pump through vents in its front cover and is then passed through a foam filter to remove
particulates before air injection. The air is delivered to the exhaust manifold on each side of the engine through a
combination of plastic and metal pipes.
The air delivery pipe is a flexible plastic type, and is connected to the air pump outlet via a plastic quick-fit connector.
The other end of the flexible plastic pipe connects to the fixed metal pipework via a short rubber hose. The part of the
flexible plastic pipe which is most vulnerable to engine generated heat is protected by heat reflective sleeving. The
metal delivery pipe has a fabricated T-piece included where the pressurised air is split for delivery to each exhaust
manifold via the SAI control valves.
The pipes from the T-piece to each of the SAI control valves are approximately the same length, so that the pressure
and mass of the air delivered to each bank will be equal. The ends of the pipes are connected to the inlet port of each
SAI control valve through short rubber hose connections.
The T-piece is mounted at the rear of the engine (by the ignition coils) and features a welded mounting bracket which
is fixed to the engine by two studs and nuts.
The foam filter in the air intake of the SAI pump provides noise reduction and protects the pump from damage due to
particulate contamination. In addition, the pump is fitted on rubber mountings to help prevent noise which is generated
by pump operation from being transmitted through the vehicle body into the passenger compartment.
If the secondary air injection pump malfunctions, the following fault codes may be stored in the ECM diagnostic
memory, which can be retrieved using 'Testbook':
Secondary air injection (SAI) pump relay
The secondary air injection pump relay is located in the engine compartment fusebox. The engine control module
(ECM) is used to control the operation of the SAI pump via the SAI pump relay. Power to the coil of the relay is supplied
from the vehicle battery via the main relay and the ground connection to the coil is via the ECM.
Power to the SAI pump relay contacts is via fusible link FL2 which is located in the engine compartment fusebox.
P-code Description
P0418Secondary air injection pump powerstage fault (e.g. - SAI pump relay fault / SAI
pump or relay not connected / open circuit / harness damage).
Page 367 of 1672
EMISSION CONTROL - V8
17-2-30 DESCRIPTION AND OPERATION
Electrical connection to the SAI vacuum solenoid valve is via a 2–pin connector. A 12V electrical power supply to the
SAI vacuum solenoid valve is provided via the Main relay and Fuse 2 in the engine compartment fusebox. The ground
connection is via the ECM which controls the SAI vacuum solenoid valve operation. Note that the harness
connector to the SAI solenoid valve is grey, and must not be confused with the harness connector to the
EVAP system purge valve which is black.
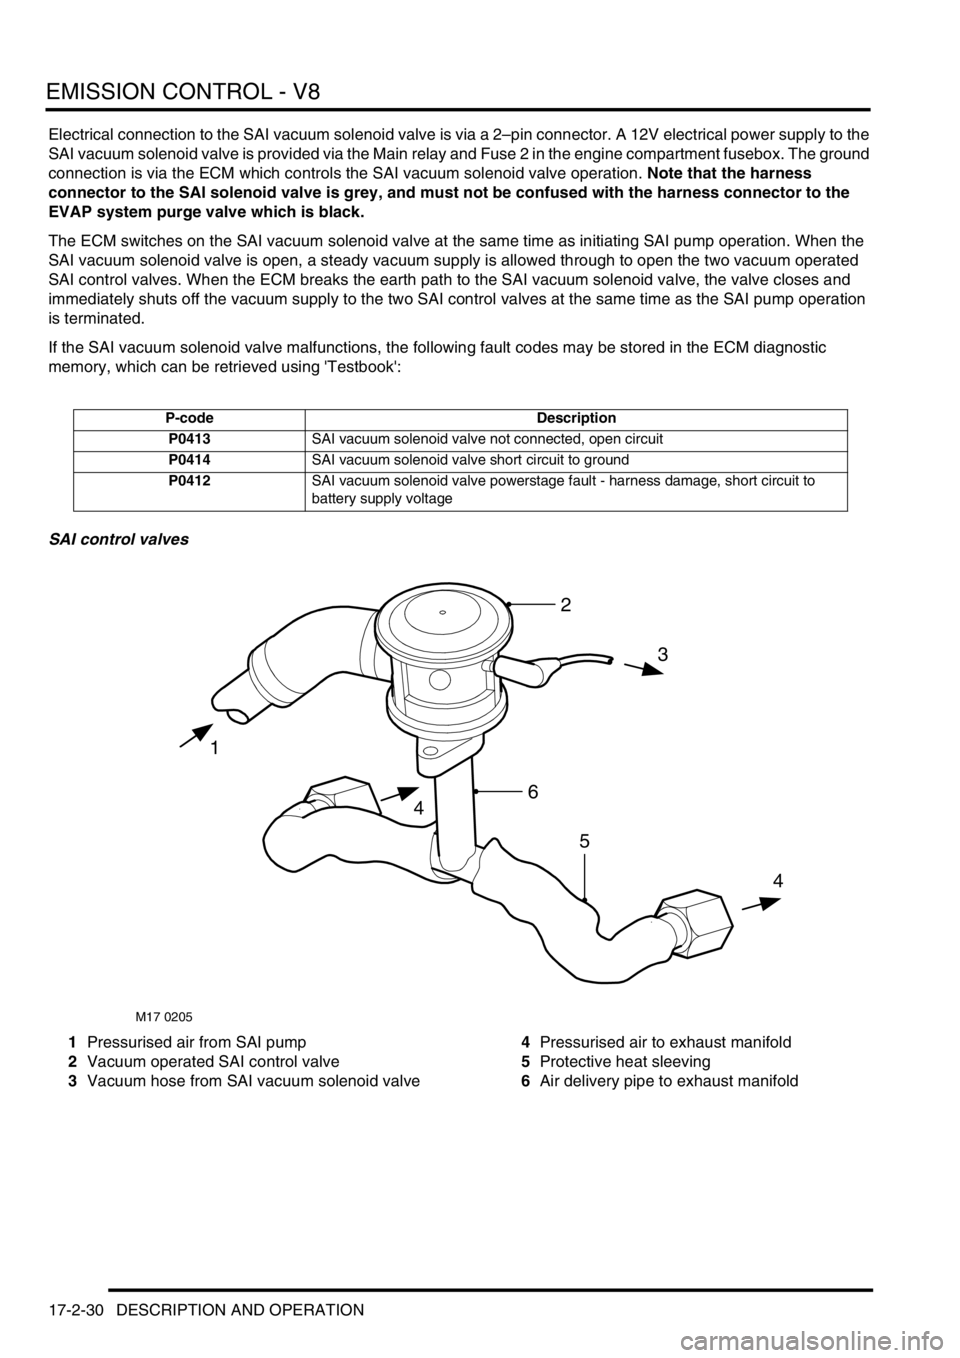
The ECM switches on the SAI vacuum solenoid valve at the same time as initiating SAI pump operation. When the
SAI vacuum solenoid valve is open, a steady vacuum supply is allowed through to open the two vacuum operated
SAI control valves. When the ECM breaks the earth path to the SAI vacuum solenoid valve, the valve closes and
immediately shuts off the vacuum supply to the two SAI control valves at the same time as the SAI pump operation
is terminated.
If the SAI vacuum solenoid valve malfunctions, the following fault codes may be stored in the ECM diagnostic
memory, which can be retrieved using 'Testbook':
SAI control valves
1Pressurised air from SAI pump
2Vacuum operated SAI control valve
3Vacuum hose from SAI vacuum solenoid valve4Pressurised air to exhaust manifold
5Protective heat sleeving
6Air delivery pipe to exhaust manifold
P-code Description
P0413SAI vacuum solenoid valve not connected, open circuit
P0414SAI vacuum solenoid valve short circuit to ground
P0412SAI vacuum solenoid valve powerstage fault - harness damage, short circuit to
battery supply voltage
M17 0205
1
3
4
4
2
6
5