handbrake LAND ROVER FREELANDER 2001 Owner's Manual
[x] Cancel search | Manufacturer: LAND ROVER, Model Year: 2001, Model line: FREELANDER, Model: LAND ROVER FREELANDER 2001Pages: 1007, PDF Size: 23.47 MB
Page 560 of 1007
BRAKES
REPAIRS 70-11
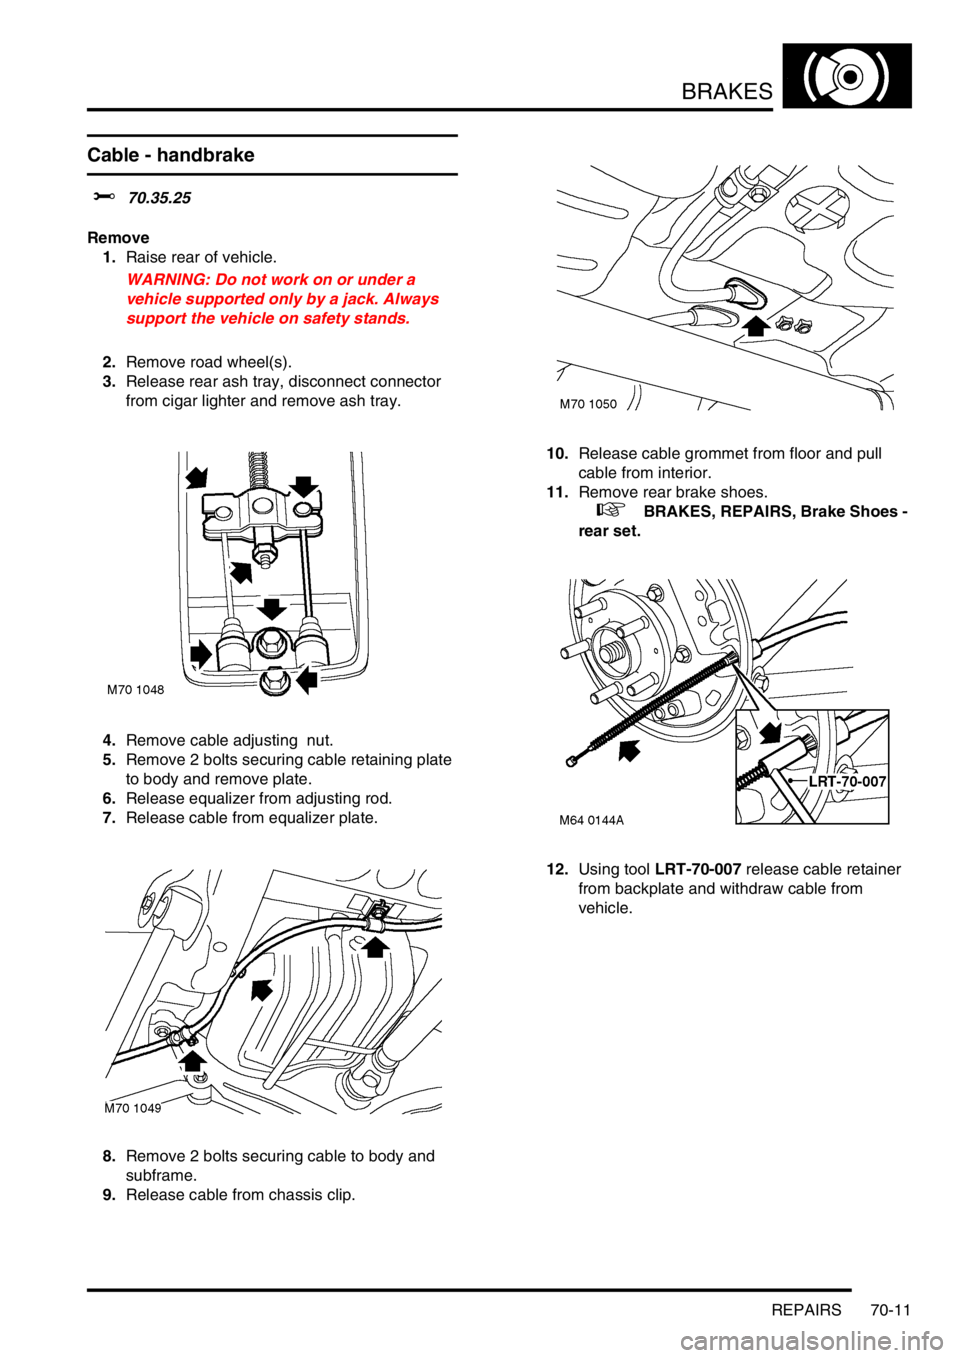
Cable - handbrake
$% 70.35.25
Remove
1.Raise rear of vehicle.
WARNING: Do not work on or under a
vehicle supported only by a jack. Always
support the vehicle on safety stands.
2.Remove road wheel(s).
3.Release rear ash tray, disconnect connector
from cigar lighter and remove ash tray.
4.Remove cable adjusting nut.
5.Remove 2 bolts securing cable retaining plate
to body and remove plate.
6.Release equalizer from adjusting rod.
7.Release cable from equalizer plate.
8.Remove 2 bolts securing cable to body and
subframe.
9.Release cable from chassis clip.10.Release cable grommet from floor and pull
cable from interior.
11.Remove rear brake shoes.
+ BRAKES, REPAIRS, Brake Shoes -
rear set.
12.Using tool LRT-70-007 release cable retainer
from backplate and withdraw cable from
vehicle.
Page 561 of 1007
BRAKES
70-12 REPAIRS
Refit
1.Manoeuvre cable into position and secure floor
grommet.
2.Fit and secure handbrake cable to backplate.
3.Fit brake shoes.
+ BRAKES, REPAIRS, Brake Shoes -
rear set.
4.Align cable clips, fit bolts and tighten to 22 Nm
(16 lbf.ft).
5.Secure cable in chassis clip.
6.Connect handbrake cable to equalizer.
7.Ensure spring is in place and fit equalizer to
adjusting rod.
8.Fit cable adjusting nut.
9.Fit cable retaining plate, fit bolts and tighten to
22 Nm (16 lbf.ft).
10.Adjust handbrake cable.
+ BRAKES, ADJUSTMENTS, Cable -
handbrake - check and adjust.
11.Fit ash tray and cigar lighter to rear console.
12.Fit road wheel(s).
13.Remove stands and lower vehicle.
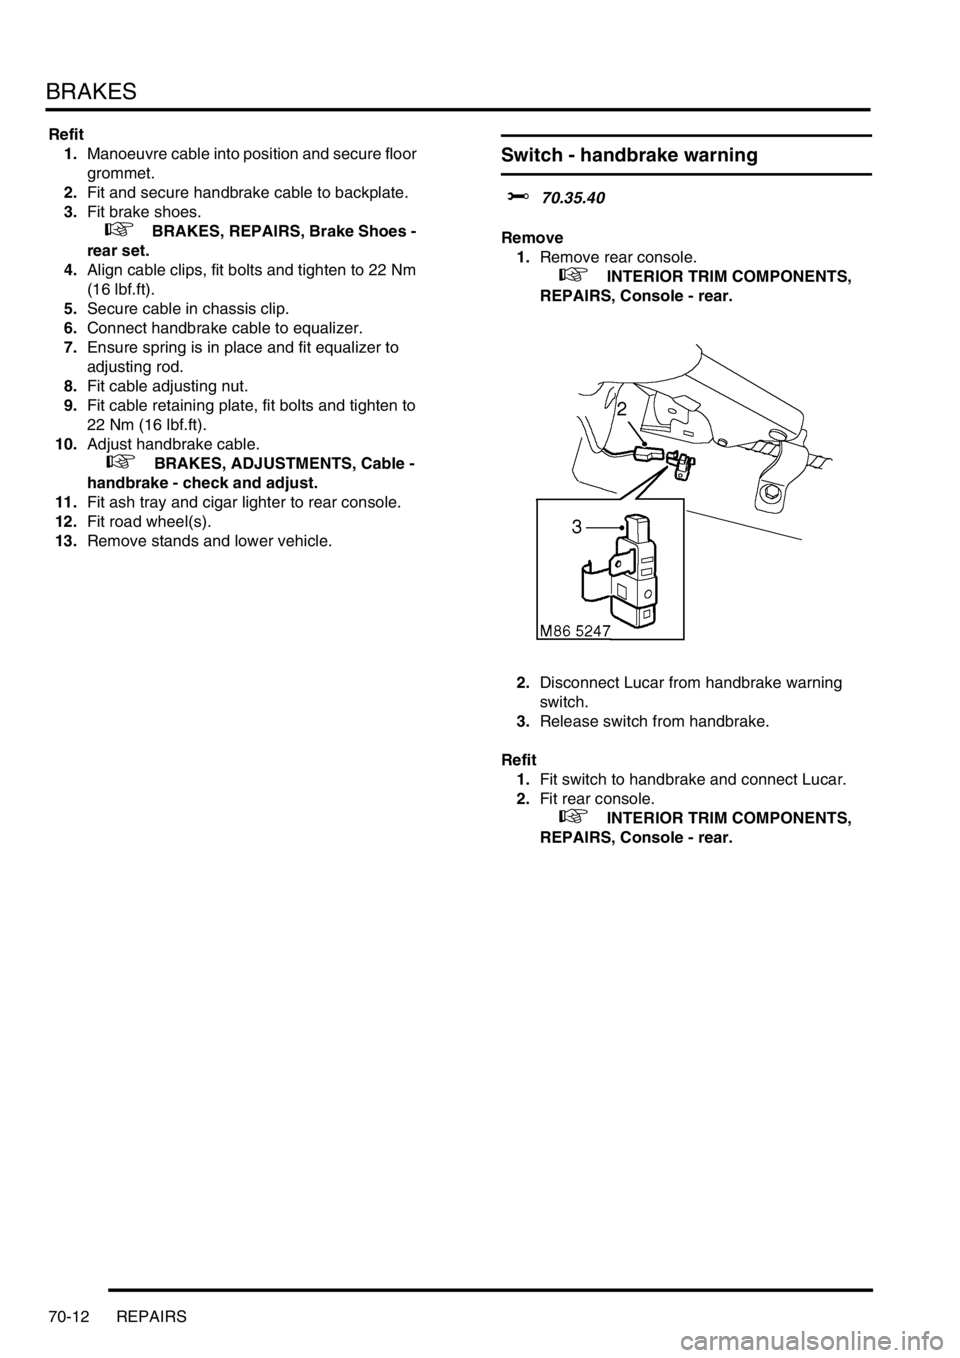
Switch - handbrake warning
$% 70.35.40
Remove
1.Remove rear console.
+ INTERIOR TRIM COMPONENTS,
REPAIRS, Console - rear.
2.Disconnect Lucar from handbrake warning
switch.
3.Release switch from handbrake.
Refit
1.Fit switch to handbrake and connect Lucar.
2.Fit rear console.
+ INTERIOR TRIM COMPONENTS,
REPAIRS, Console - rear.
Page 564 of 1007
BRAKES
REPAIRS 70-15
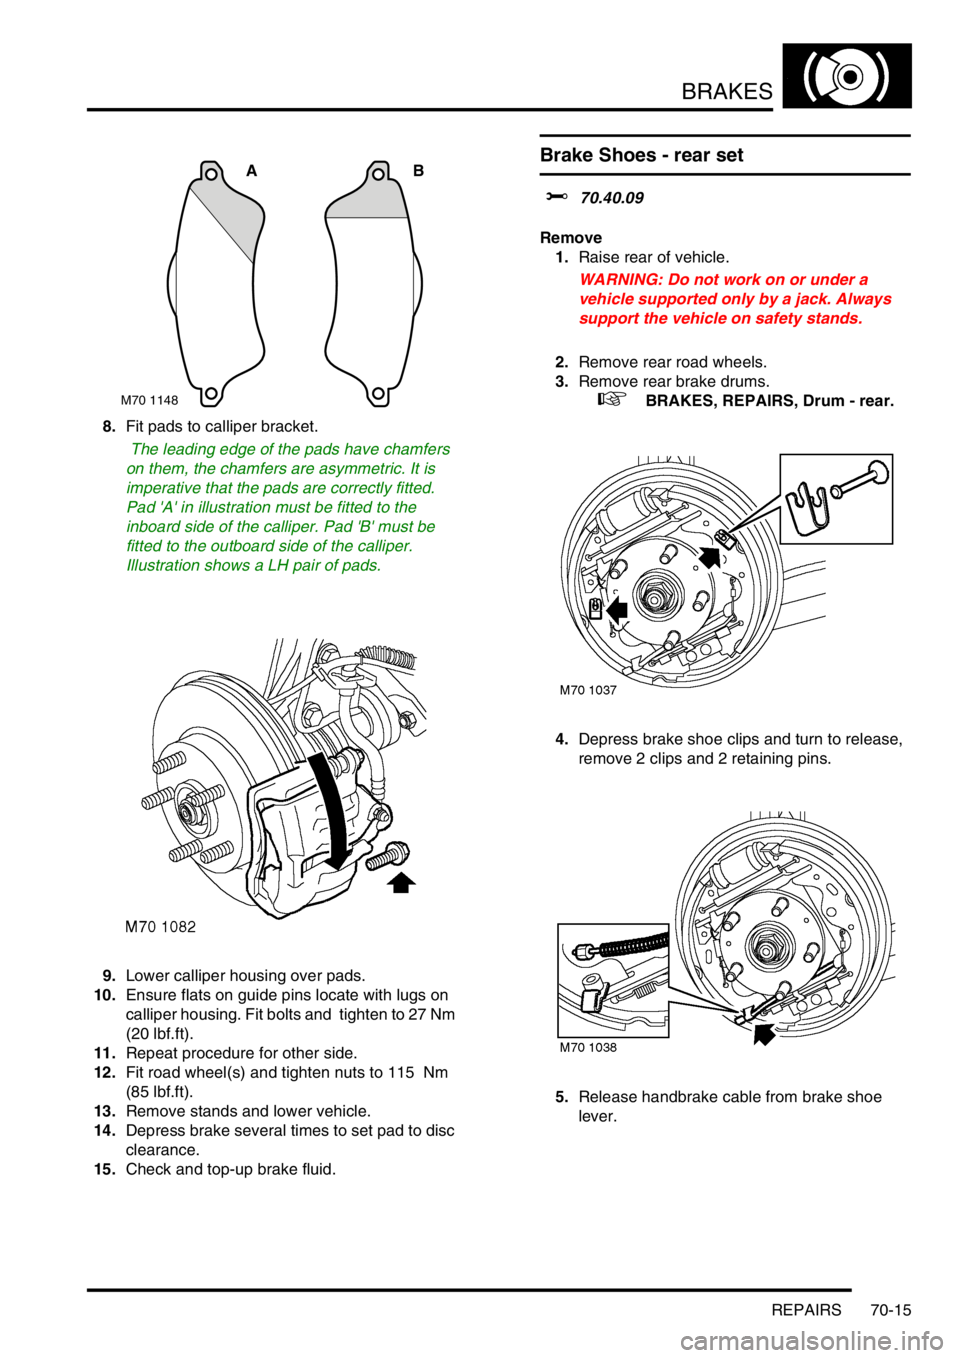
8.Fit pads to calliper bracket.
The leading edge of the pads have chamfers
on them, the chamfers are asymmetric. It is
imperative that the pads are correctly fitted.
Pad 'A' in illustration must be fitted to the
inboard side of the calliper. Pad 'B' must be
fitted to the outboard side of the calliper.
Illustration shows a LH pair of pads.
9.Lower calliper housing over pads.
10.Ensure flats on guide pins locate with lugs on
calliper housing. Fit bolts and tighten to 27 Nm
(20 lbf.ft).
11.Repeat procedure for other side.
12.Fit road wheel(s) and tighten nuts to 115 Nm
(85 lbf.ft).
13.Remove stands and lower vehicle.
14.Depress brake several times to set pad to disc
clearance.
15.Check and top-up brake fluid.
Brake Shoes - rear set
$% 70.40.09
Remove
1.Raise rear of vehicle.
WARNING: Do not work on or under a
vehicle supported only by a jack. Always
support the vehicle on safety stands.
2.Remove rear road wheels.
3.Remove rear brake drums.
+ BRAKES, REPAIRS, Drum - rear.
4.Depress brake shoe clips and turn to release,
remove 2 clips and 2 retaining pins.
5.Release handbrake cable from brake shoe
lever.M70 1148
AB
Page 566 of 1007
BRAKES
REPAIRS 70-17
14.Check wheel cylinder pistons for freedom of
movement.
15.Check brake adjuster threads, nut and
handbrake linkage for wear. Renew if
necessary.
16.Check condition of return springs and renew if
necessary.
17.Ensure brake adjuster is fully off.
Refit
1.Position adjuster and expander to brake shoes
and fit return springs.
2.Smear brake shoe contact points with Molykote
111 grease.
3.Remove elastic band from wheel cylinder.
4.Manoeuvre brake shoes around rear hub and
locate to abutment and wheel cylinder.
5.Fit brake shoe retaining pins and secure with
clips.
6.Connect hand brake cable to brake shoe lever.
7.Fit brake drum.
+ BRAKES, REPAIRS, Drum - rear.
8.Apply brake pedal a min. of 30 times to ensure
full adjustment of rear brake shoes after
refitting.
9.Fit road wheel(s) and tighten nuts to 115 Nm
(85 lbf.ft).
10.Remove stands and lower vehicle.
Servo assembly - LHD
$% 70.50.01
Remove
1. Td4 models: Remove air cleaner element
+ FUEL DELIVERY SYSTEM - DIESEL,
REPAIRS, Element - air cleaner.
2.Remove brake master cylinder.
+ BRAKES, REPAIRS, Cylinder -
master - tandem - LHD.
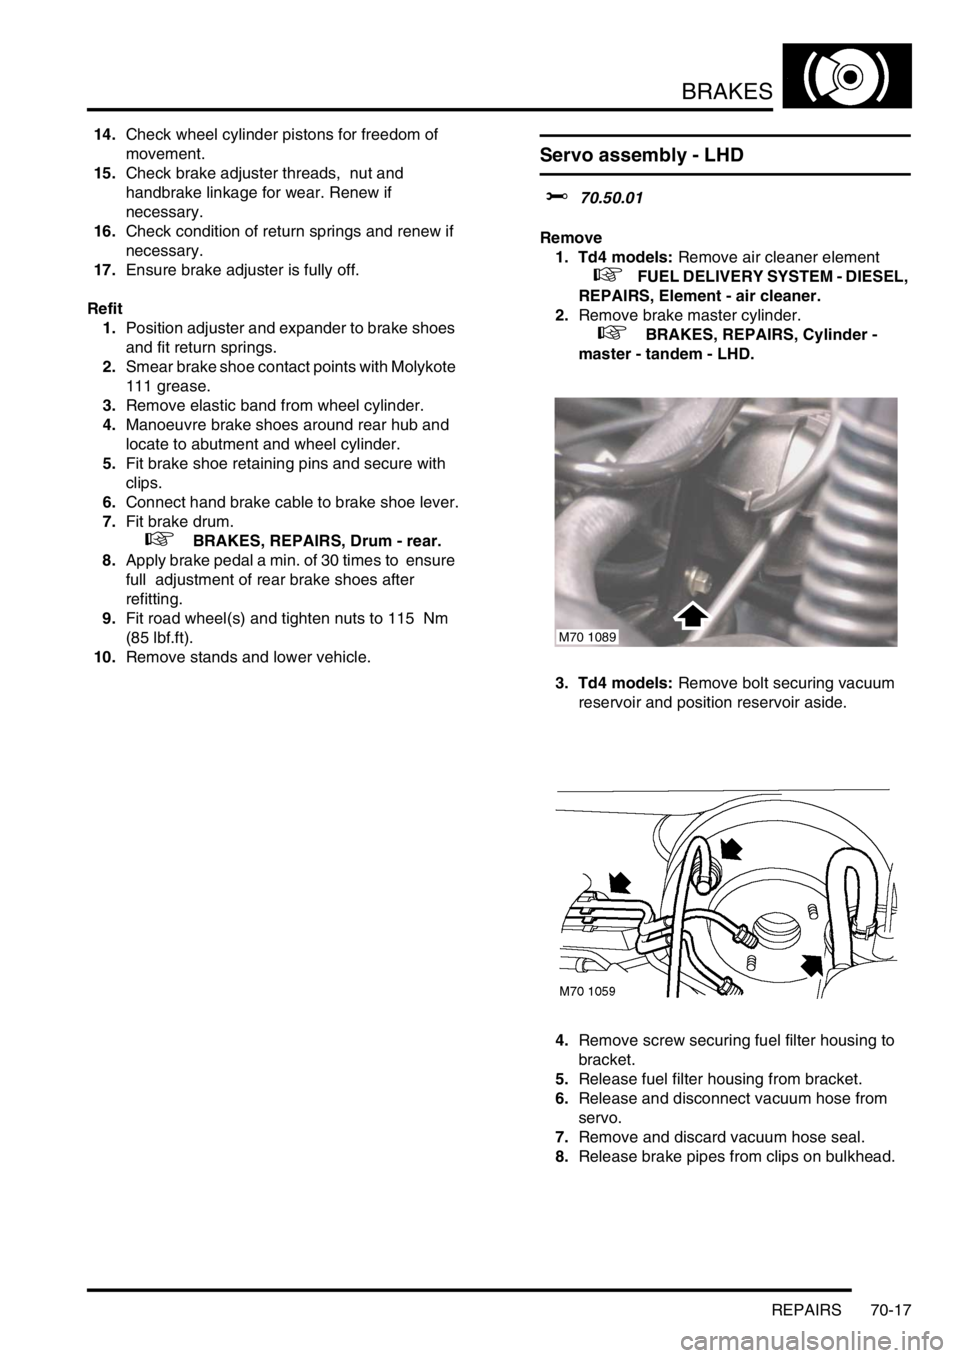
3. Td4 models: Remove bolt securing vacuum
reservoir and position reservoir aside.
4.Remove screw securing fuel filter housing to
bracket.
5.Release fuel filter housing from bracket.
6.Release and disconnect vacuum hose from
servo.
7.Remove and discard vacuum hose seal.
8.Release brake pipes from clips on bulkhead.
M70 1089
Page 982 of 1007

HARNESSES
REPAIRS 86-7-7
61.Disconnect heated oxygen sensor multiplug.
62. Automatic gearbox only: Disconnect
multiplugs from gear selector.
63.Disconnect multiplug from accelerometer.
64. Manual gearbox only: Disconnect multiplug
from gear lever hill descent switch.
65.Disconnect Lucar from handbrake switch.
66.Release 2 relays from bracket and remove
bracket.
67.Release 4 clips securing harness to air ducting.
68.Remove nut from rear heater ducting and
remove ducting.
69.Remove 4 nuts securing steering column to
bracket and lower column.
70.Remove face level vent ducting to access main
harness clips.71.Disconnect multiplug from window lift ECU.
72.Remove nut securing earth header to RH 'A'
post and release header.
73.Release multiplugs and earth header from LH
lower 'A' post.
Page 985 of 1007

HARNESSES
86-7-10 REPAIRS
90.Remove 4 screws from rear bumper lamps,
release lamps and disconnect multiplugs.
91.Release harness clips and pull harness into
luggage compartment.
92.Release main harness retaining clips and pull
harness into vehicle interior.
93.Remove main harness.Refit
1.Lay main harness in vehicle.
2.Locate rear section and secure in retaining
clips.
3.Feed harness to rear bumper lamps, secure in
clips and grommets.
4.Connect multiplugs to rear bumper lamps, fit
rear lamps and secure with screws.
5.Fit LH rear earth header and secure with nut.
6.Connect multiplugs to LH tail lamp.
7.Position RH tail lamp and connect multiplugs.
8.Fit RH tail lamp and secure with Torx screws.
9.Fit RH rear earth header and secure with nut.
10.Connect multiplug to towing electrics.
11.Connect rear screen washer tube.
12.Connect tail door harness multiplugs.
13.Connect and fit rear window lift and wash/wipe
relays.
14.Position harness into luggage compartment.
15.Connect both rear ABS speed sensor
multiplugs and secure harness grommets.
16.Connect multiplug to fuel pump.
17.Fit fuel pump access cover and secure with
screws.
18.Fit luggage compartment carpet.
+ INTERIOR TRIM COMPONENTS,
REPAIRS, Carpet - luggage compartment.
19.Connect multiplugs at the base of 'B/C' Posts.
20.Fit all harness clips to interior of vehicle.
21.Fit multiplugs and earth header to LH lower 'A'
post.
22.Fit earth header to RH lower 'A' post.
23.Connect multiplug to window lift ECU.
24.Fit face level vent ducting.
25.Fit steering column to bracket and secure with
nuts.
26.Fit rear heater ducting and secure with nut.
27.Secure harness to rear heater ducting with
clips.
28.Position mounting bracket and secure relays.
29.Connect Lucar to handbrake switch.
30. Manual gearbox only: Connect multiplug to
gear lever hill descent switch.
31.Connect multiplug to accelerometer.
32. Automatic gearbox only: Connect multiplugs
to gear selector.
33.Connect heated oxygen sensor multiplug.
34.Fit earth header to floor tunnel and secure with
nut.
35.Fit earth lead to airbag ECU and secure with
bolt.
36.Connect multiplug to airbag ECU.
37.Connect multiplugs to brake light switch and
brake pedal position switch.
38.Connect multiplug to throttle position sensor.
39.Fit harness clip to steering column.
40.Connect multiplug to steering column switch.
Page 994 of 1007
DRIVER CONTROLS
REPAIRS 86-8-3
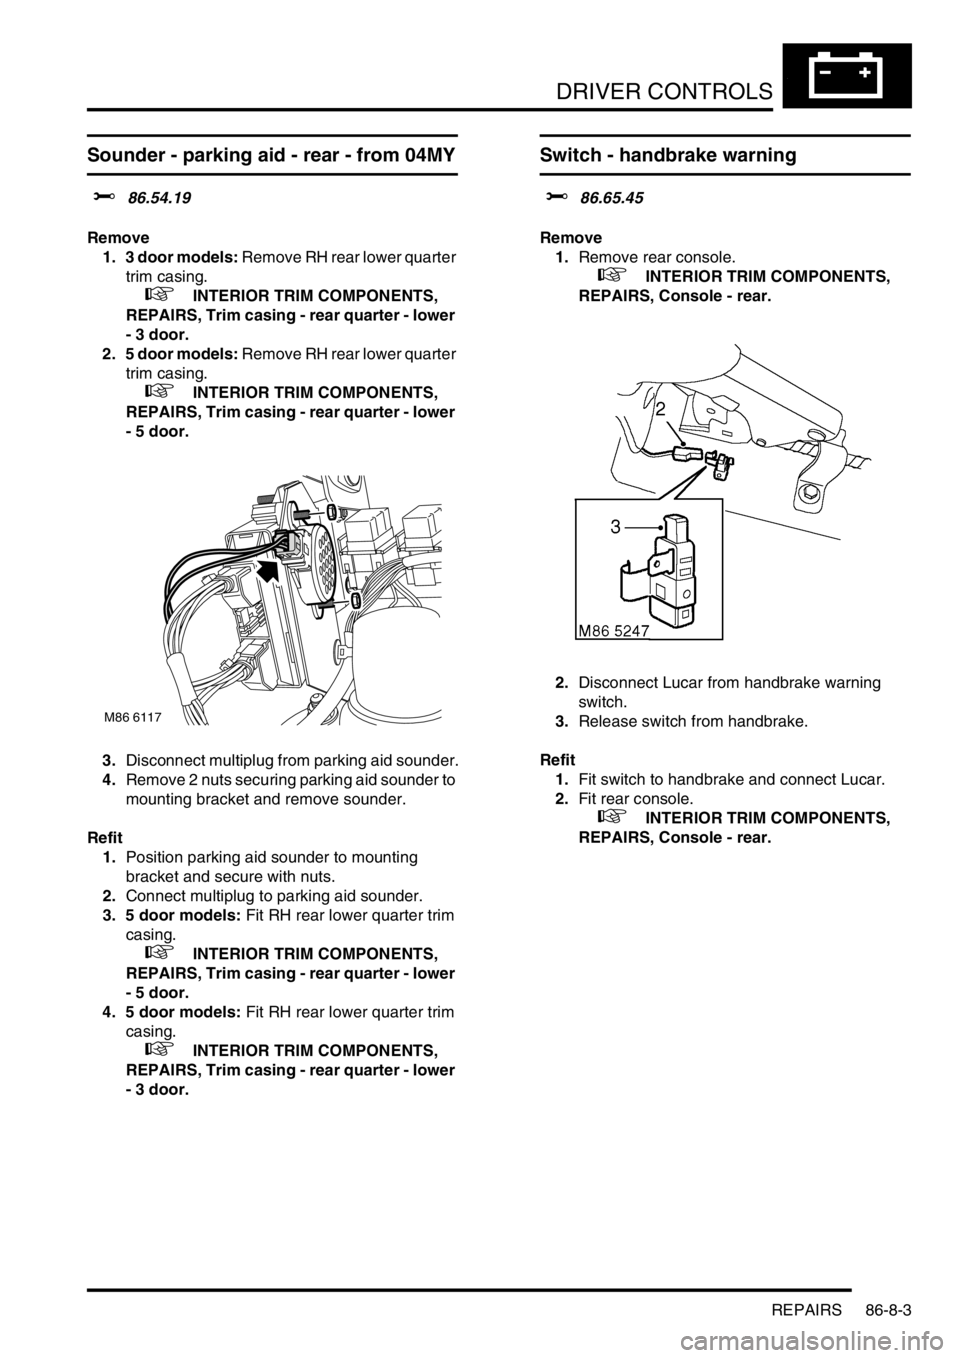
Sounder - parking aid - rear - from 04MY
$% 86.54.19
Remove
1. 3 door models: Remove RH rear lower quarter
trim casing.
+ INTERIOR TRIM COMPONENTS,
REPAIRS, Trim casing - rear quarter - lower
- 3 door.
2. 5 door models: Remove RH rear lower quarter
trim casing.
+ INTERIOR TRIM COMPONENTS,
REPAIRS, Trim casing - rear quarter - lower
- 5 door.
3.Disconnect multiplug from parking aid sounder.
4.Remove 2 nuts securing parking aid sounder to
mounting bracket and remove sounder.
Refit
1.Position parking aid sounder to mounting
bracket and secure with nuts.
2.Connect multiplug to parking aid sounder.
3. 5 door models: Fit RH rear lower quarter trim
casing.
+ INTERIOR TRIM COMPONENTS,
REPAIRS, Trim casing - rear quarter - lower
- 5 door.
4. 5 door models: Fit RH rear lower quarter trim
casing.
+ INTERIOR TRIM COMPONENTS,
REPAIRS, Trim casing - rear quarter - lower
- 3 door.
Switch - handbrake warning
$% 86.65.45
Remove
1.Remove rear console.
+ INTERIOR TRIM COMPONENTS,
REPAIRS, Console - rear.
2.Disconnect Lucar from handbrake warning
switch.
3.Release switch from handbrake.
Refit
1.Fit switch to handbrake and connect Lucar.
2.Fit rear console.
+ INTERIOR TRIM COMPONENTS,
REPAIRS, Console - rear.
M86 6117