heater LAND ROVER FREELANDER 2001 Repair Manual
[x] Cancel search | Manufacturer: LAND ROVER, Model Year: 2001, Model line: FREELANDER, Model: LAND ROVER FREELANDER 2001Pages: 1007, PDF Size: 23.47 MB
Page 971 of 1007

IN CAR ENTERTAINMENT
86-6-8 REPAIRS
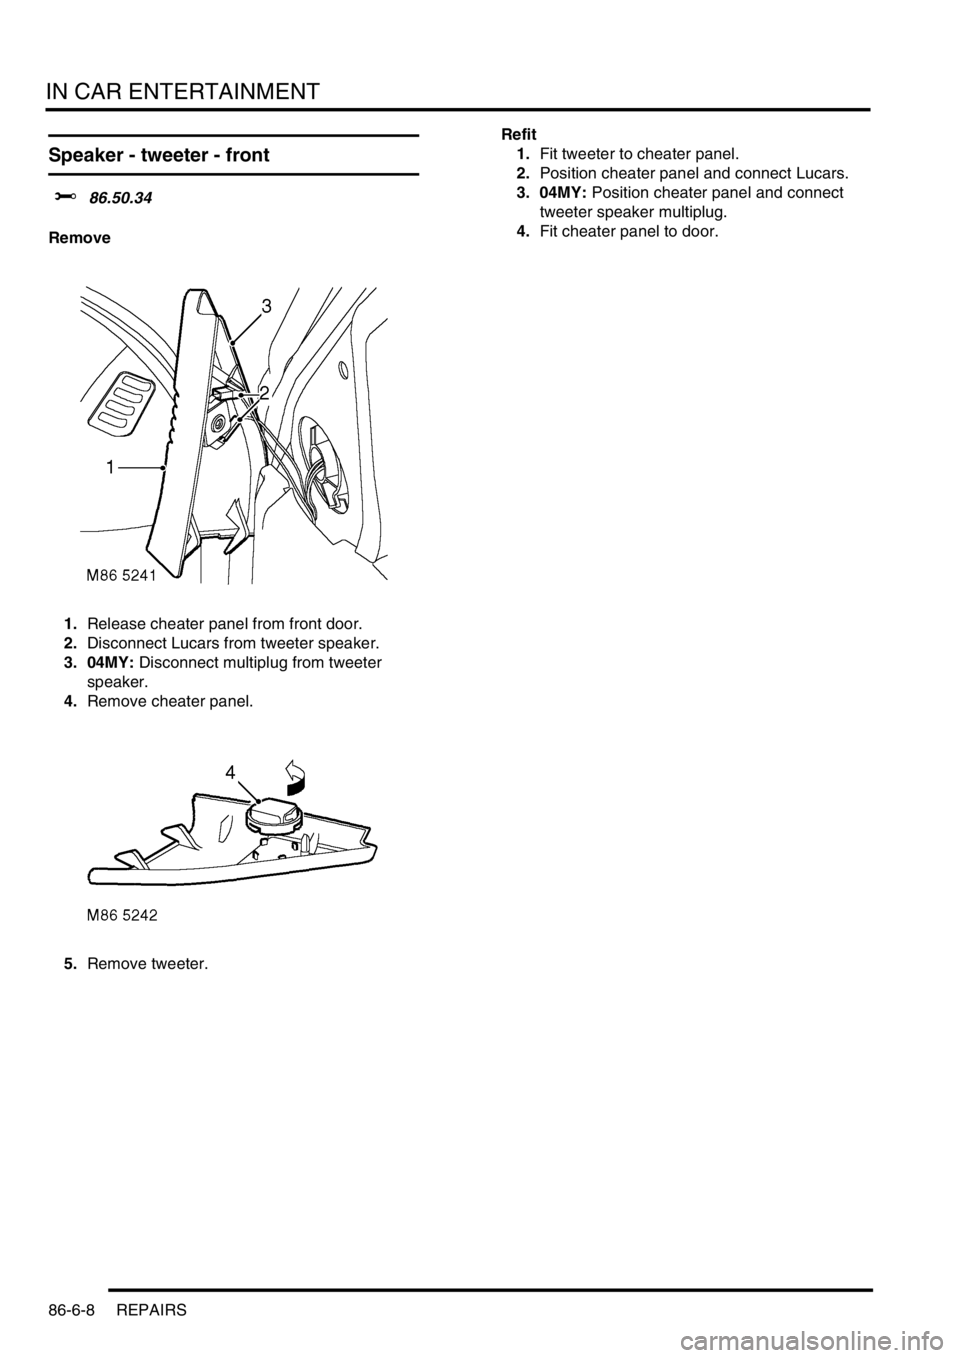
Speaker - tweeter - front
$% 86.50.34
Remove
1.Release cheater panel from front door.
2.Disconnect Lucars from tweeter speaker.
3. 04MY: Disconnect multiplug from tweeter
speaker.
4.Remove cheater panel.
5.Remove tweeter.Refit
1.Fit tweeter to cheater panel.
2.Position cheater panel and connect Lucars.
3. 04MY: Position cheater panel and connect
tweeter speaker multiplug.
4.Fit cheater panel to door.
Page 982 of 1007

HARNESSES
REPAIRS 86-7-7
61.Disconnect heated oxygen sensor multiplug.
62. Automatic gearbox only: Disconnect
multiplugs from gear selector.
63.Disconnect multiplug from accelerometer.
64. Manual gearbox only: Disconnect multiplug
from gear lever hill descent switch.
65.Disconnect Lucar from handbrake switch.
66.Release 2 relays from bracket and remove
bracket.
67.Release 4 clips securing harness to air ducting.
68.Remove nut from rear heater ducting and
remove ducting.
69.Remove 4 nuts securing steering column to
bracket and lower column.
70.Remove face level vent ducting to access main
harness clips.71.Disconnect multiplug from window lift ECU.
72.Remove nut securing earth header to RH 'A'
post and release header.
73.Release multiplugs and earth header from LH
lower 'A' post.
Page 985 of 1007

HARNESSES
86-7-10 REPAIRS
90.Remove 4 screws from rear bumper lamps,
release lamps and disconnect multiplugs.
91.Release harness clips and pull harness into
luggage compartment.
92.Release main harness retaining clips and pull
harness into vehicle interior.
93.Remove main harness.Refit
1.Lay main harness in vehicle.
2.Locate rear section and secure in retaining
clips.
3.Feed harness to rear bumper lamps, secure in
clips and grommets.
4.Connect multiplugs to rear bumper lamps, fit
rear lamps and secure with screws.
5.Fit LH rear earth header and secure with nut.
6.Connect multiplugs to LH tail lamp.
7.Position RH tail lamp and connect multiplugs.
8.Fit RH tail lamp and secure with Torx screws.
9.Fit RH rear earth header and secure with nut.
10.Connect multiplug to towing electrics.
11.Connect rear screen washer tube.
12.Connect tail door harness multiplugs.
13.Connect and fit rear window lift and wash/wipe
relays.
14.Position harness into luggage compartment.
15.Connect both rear ABS speed sensor
multiplugs and secure harness grommets.
16.Connect multiplug to fuel pump.
17.Fit fuel pump access cover and secure with
screws.
18.Fit luggage compartment carpet.
+ INTERIOR TRIM COMPONENTS,
REPAIRS, Carpet - luggage compartment.
19.Connect multiplugs at the base of 'B/C' Posts.
20.Fit all harness clips to interior of vehicle.
21.Fit multiplugs and earth header to LH lower 'A'
post.
22.Fit earth header to RH lower 'A' post.
23.Connect multiplug to window lift ECU.
24.Fit face level vent ducting.
25.Fit steering column to bracket and secure with
nuts.
26.Fit rear heater ducting and secure with nut.
27.Secure harness to rear heater ducting with
clips.
28.Position mounting bracket and secure relays.
29.Connect Lucar to handbrake switch.
30. Manual gearbox only: Connect multiplug to
gear lever hill descent switch.
31.Connect multiplug to accelerometer.
32. Automatic gearbox only: Connect multiplugs
to gear selector.
33.Connect heated oxygen sensor multiplug.
34.Fit earth header to floor tunnel and secure with
nut.
35.Fit earth lead to airbag ECU and secure with
bolt.
36.Connect multiplug to airbag ECU.
37.Connect multiplugs to brake light switch and
brake pedal position switch.
38.Connect multiplug to throttle position sensor.
39.Fit harness clip to steering column.
40.Connect multiplug to steering column switch.
Page 1006 of 1007

INSTRUMENTS
REPAIRS 88-7
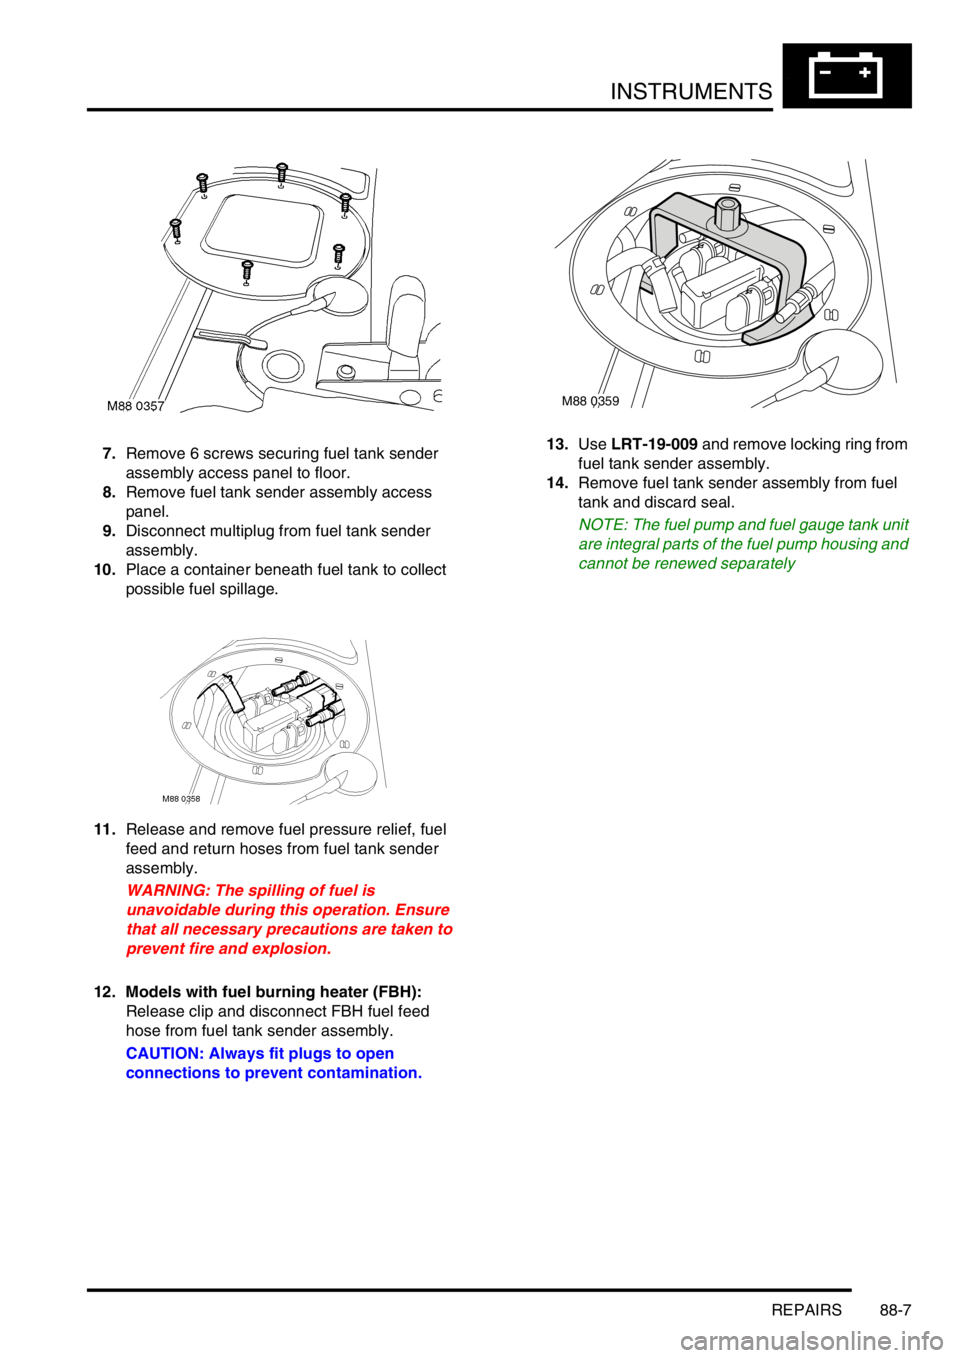
7.Remove 6 screws securing fuel tank sender
assembly access panel to floor.
8.Remove fuel tank sender assembly access
panel.
9.Disconnect multiplug from fuel tank sender
assembly.
10.Place a container beneath fuel tank to collect
possible fuel spillage.
11.Release and remove fuel pressure relief, fuel
feed and return hoses from fuel tank sender
assembly.
WARNING: The spilling of fuel is
unavoidable during this operation. Ensure
that all necessary precautions are taken to
prevent fire and explosion.
12. Models with fuel burning heater (FBH):
Release clip and disconnect FBH fuel feed
hose from fuel tank sender assembly.
CAUTION: Always fit plugs to open
connections to prevent contamination.13.Use LRT-19-009 and remove locking ring from
fuel tank sender assembly.
14.Remove fuel tank sender assembly from fuel
tank and discard seal.
NOTE: The fuel pump and fuel gauge tank unit
are integral parts of the fuel pump housing and
cannot be renewed separately
M88 0359