sensor LAND ROVER FREELANDER 2001 Repair Manual
[x] Cancel search | Manufacturer: LAND ROVER, Model Year: 2001, Model line: FREELANDER, Model: LAND ROVER FREELANDER 2001Pages: 1007, PDF Size: 23.47 MB
Page 343 of 1007
FUEL DELIVERY SYSTEM - PETROL
19-2-22 REPAIRS
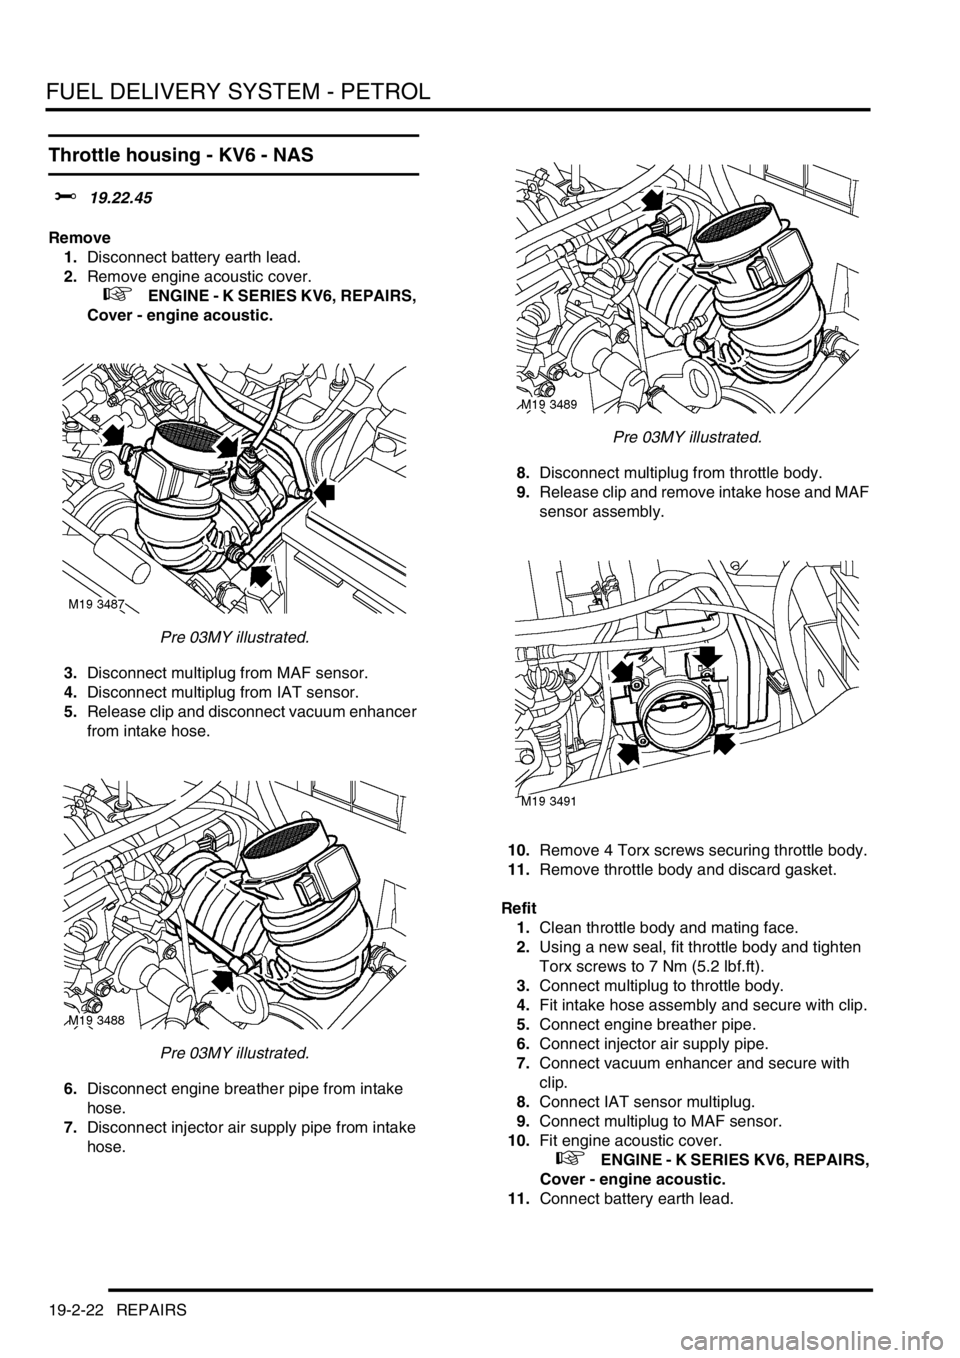
Throttle housing - KV6 - NAS
$% 19.22.45
Remove
1.Disconnect battery earth lead.
2.Remove engine acoustic cover.
+ ENGINE - K SERIES KV6, REPAIRS,
Cover - engine acoustic.
Pre 03MY illustrated.
3.Disconnect multiplug from MAF sensor.
4.Disconnect multiplug from IAT sensor.
5.Release clip and disconnect vacuum enhancer
from intake hose.
Pre 03MY illustrated.
6.Disconnect engine breather pipe from intake
hose.
7.Disconnect injector air supply pipe from intake
hose.Pre 03MY illustrated.
8.Disconnect multiplug from throttle body.
9.Release clip and remove intake hose and MAF
sensor assembly.
10.Remove 4 Torx screws securing throttle body.
11.Remove throttle body and discard gasket.
Refit
1.Clean throttle body and mating face.
2.Using a new seal, fit throttle body and tighten
Torx screws to 7 Nm (5.2 lbf.ft).
3.Connect multiplug to throttle body.
4.Fit intake hose assembly and secure with clip.
5.Connect engine breather pipe.
6.Connect injector air supply pipe.
7.Connect vacuum enhancer and secure with
clip.
8.Connect IAT sensor multiplug.
9.Connect multiplug to MAF sensor.
10.Fit engine acoustic cover.
+ ENGINE - K SERIES KV6, REPAIRS,
Cover - engine acoustic.
11.Connect battery earth lead.
Page 345 of 1007
FUEL DELIVERY SYSTEM - PETROL
19-2-24 REPAIRS
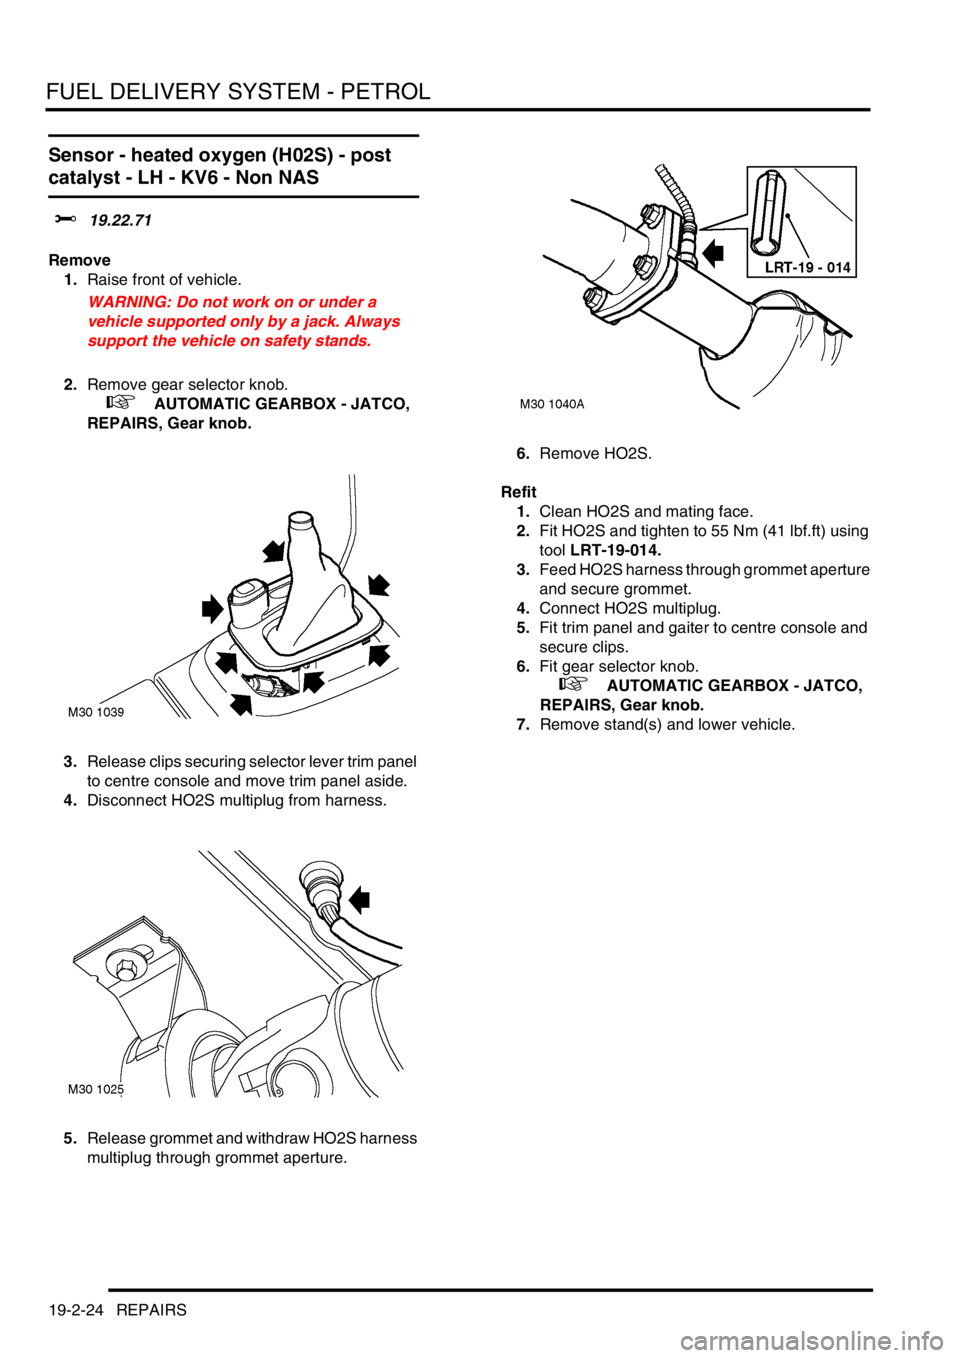
Sensor - heated oxygen (H02S) - post
catalyst - LH - KV6 - Non NAS
$% 19.22.71
Remove
1.Raise front of vehicle.
WARNING: Do not work on or under a
vehicle supported only by a jack. Always
support the vehicle on safety stands.
2.Remove gear selector knob.
+ AUTOMATIC GEARBOX - JATCO,
REPAIRS, Gear knob.
3.Release clips securing selector lever trim panel
to centre console and move trim panel aside.
4.Disconnect HO2S multiplug from harness.
5.Release grommet and withdraw HO2S harness
multiplug through grommet aperture.6.Remove HO2S.
Refit
1.Clean HO2S and mating face.
2.Fit HO2S and tighten to 55 Nm (41 lbf.ft) using
tool LRT-19-014.
3.Feed HO2S harness through grommet aperture
and secure grommet.
4.Connect HO2S multiplug.
5.Fit trim panel and gaiter to centre console and
secure clips.
6.Fit gear selector knob.
+ AUTOMATIC GEARBOX - JATCO,
REPAIRS, Gear knob.
7.Remove stand(s) and lower vehicle.
Page 346 of 1007
FUEL DELIVERY SYSTEM - PETROL
REPAIRS 19-2-25
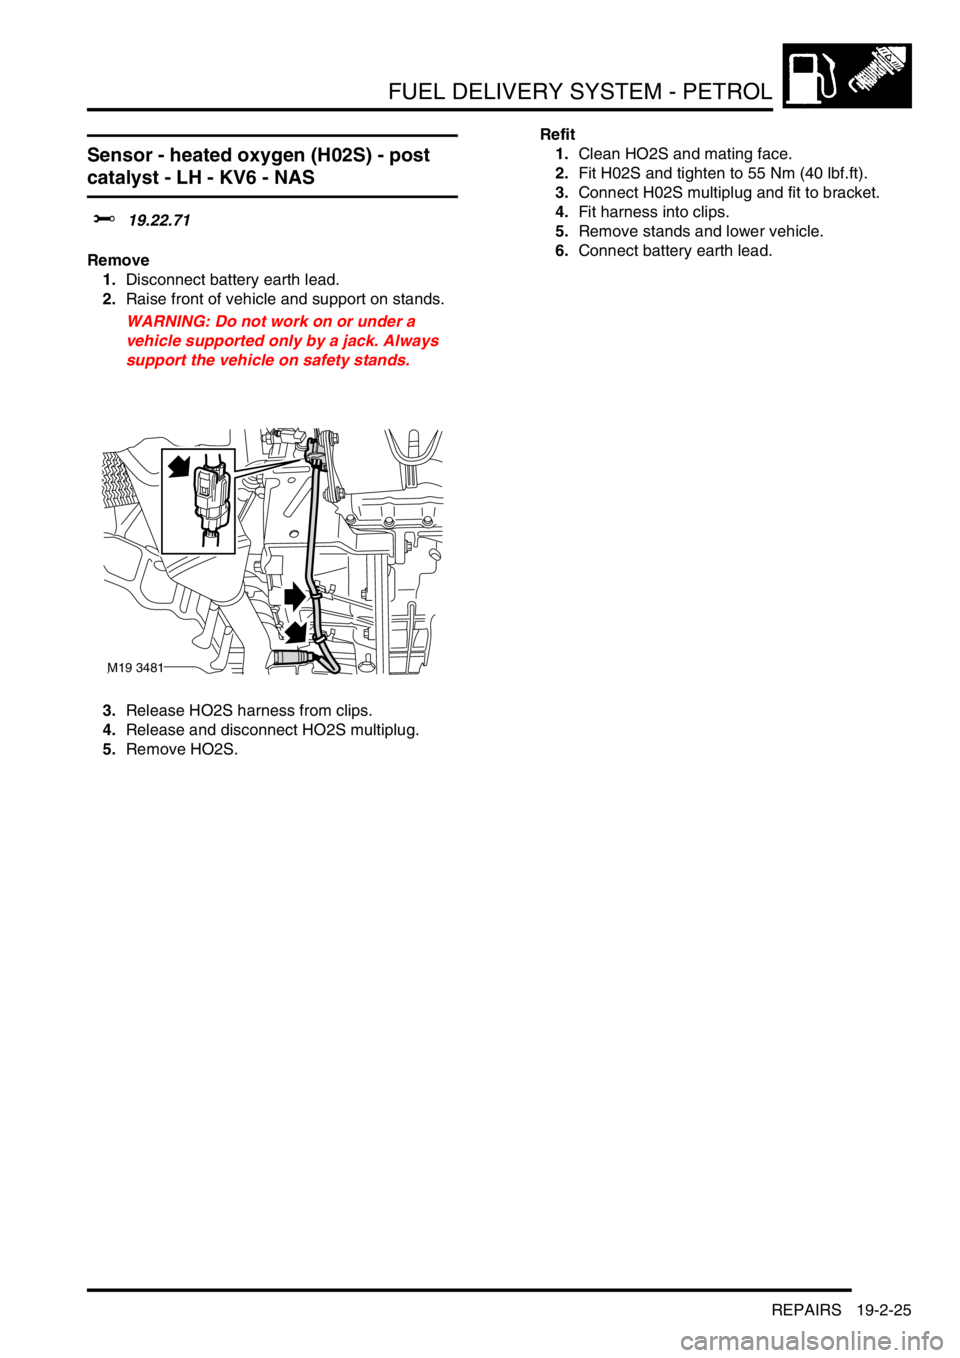
Sensor - heated oxygen (H02S) - post
catalyst - LH - KV6 - NAS
$% 19.22.71
Remove
1.Disconnect battery earth lead.
2.Raise front of vehicle and support on stands.
WARNING: Do not work on or under a
vehicle supported only by a jack. Always
support the vehicle on safety stands.
3.Release HO2S harness from clips.
4.Release and disconnect HO2S multiplug.
5.Remove HO2S.Refit
1.Clean HO2S and mating face.
2.Fit H02S and tighten to 55 Nm (40 lbf.ft).
3.Connect H02S multiplug and fit to bracket.
4.Fit harness into clips.
5.Remove stands and lower vehicle.
6.Connect battery earth lead.
M19 3481
Page 347 of 1007
FUEL DELIVERY SYSTEM - PETROL
19-2-26 REPAIRS
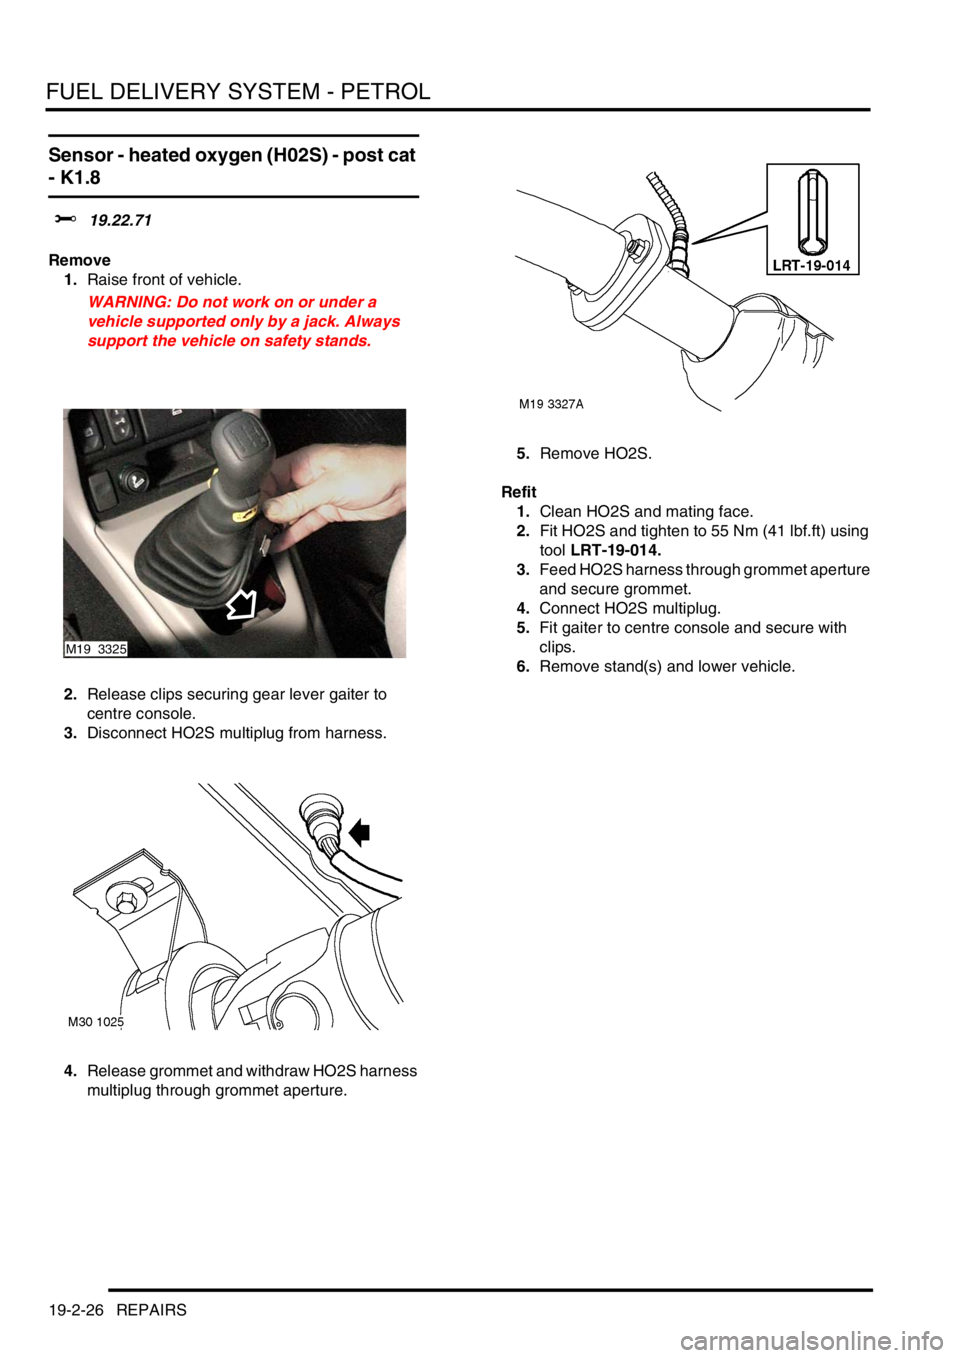
Sensor - heated oxygen (H02S) - post cat
- K1.8
$% 19.22.71
Remove
1.Raise front of vehicle.
WARNING: Do not work on or under a
vehicle supported only by a jack. Always
support the vehicle on safety stands.
2.Release clips securing gear lever gaiter to
centre console.
3.Disconnect HO2S multiplug from harness.
4.Release grommet and withdraw HO2S harness
multiplug through grommet aperture.5.Remove HO2S.
Refit
1.Clean HO2S and mating face.
2.Fit HO2S and tighten to 55 Nm (41 lbf.ft) using
tool LRT-19-014.
3.Feed HO2S harness through grommet aperture
and secure grommet.
4.Connect HO2S multiplug.
5.Fit gaiter to centre console and secure with
clips.
6.Remove stand(s) and lower vehicle.
M19 3325
Page 348 of 1007
FUEL DELIVERY SYSTEM - PETROL
REPAIRS 19-2-27
Sensor - heated oxygen (H02S) - post
catalyst - RH - KV6 - NAS
$% 19.22.72
Remove
1.Disconnect battery earth lead.
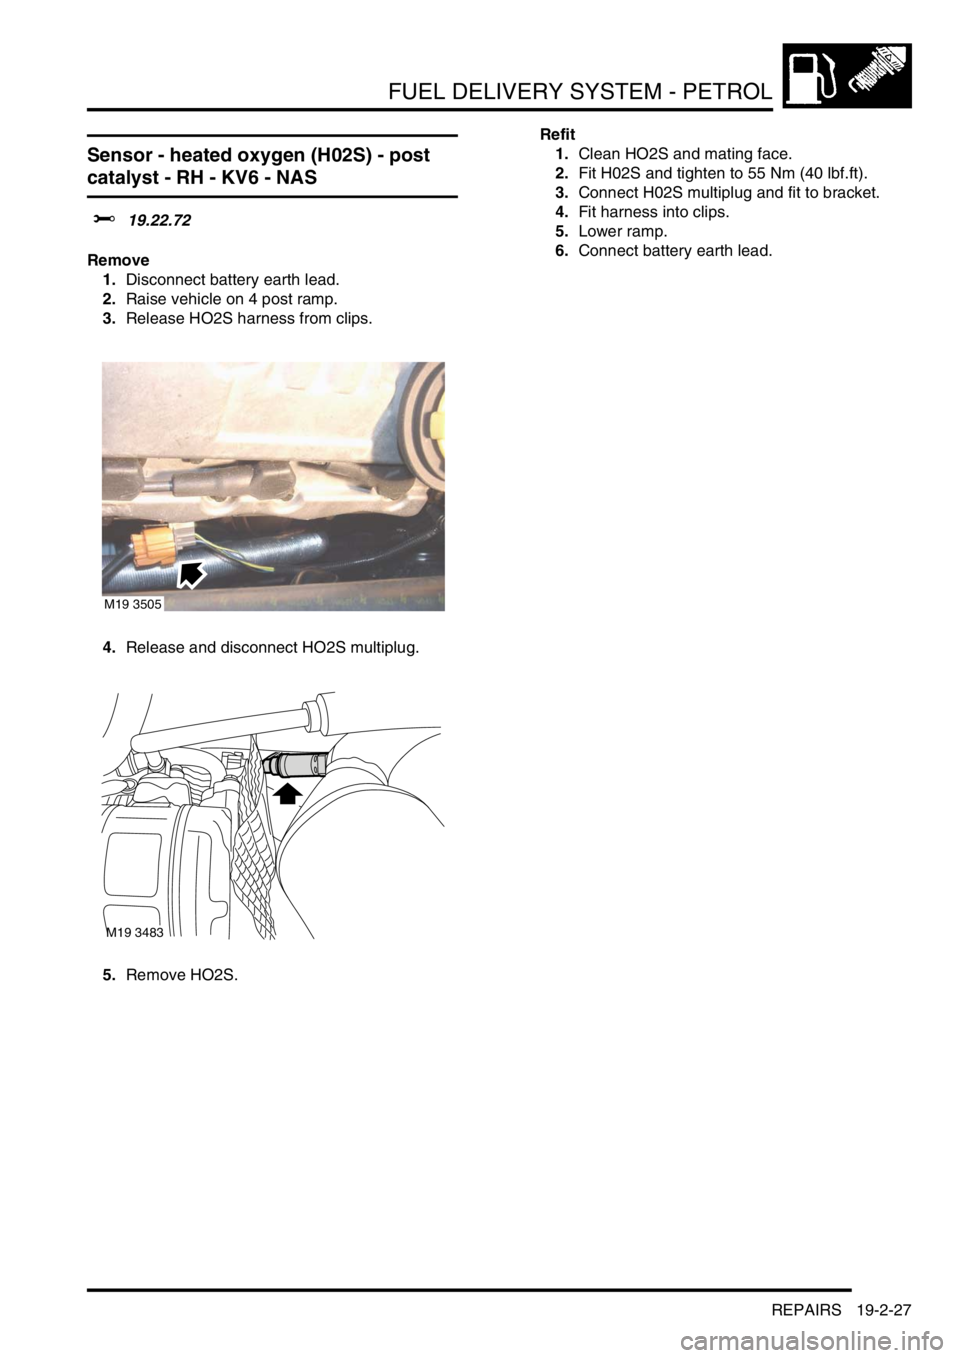
2.Raise vehicle on 4 post ramp.
3.Release HO2S harness from clips.
4.Release and disconnect HO2S multiplug.
5.Remove HO2S.Refit
1.Clean HO2S and mating face.
2.Fit H02S and tighten to 55 Nm (40 lbf.ft).
3.Connect H02S multiplug and fit to bracket.
4.Fit harness into clips.
5.Lower ramp.
6.Connect battery earth lead.
M19 3505
M19 3483
Page 387 of 1007
MANIFOLDS & EXHAUST SYSTEMS - K SERIES KV6
30-3-14 REPAIRS
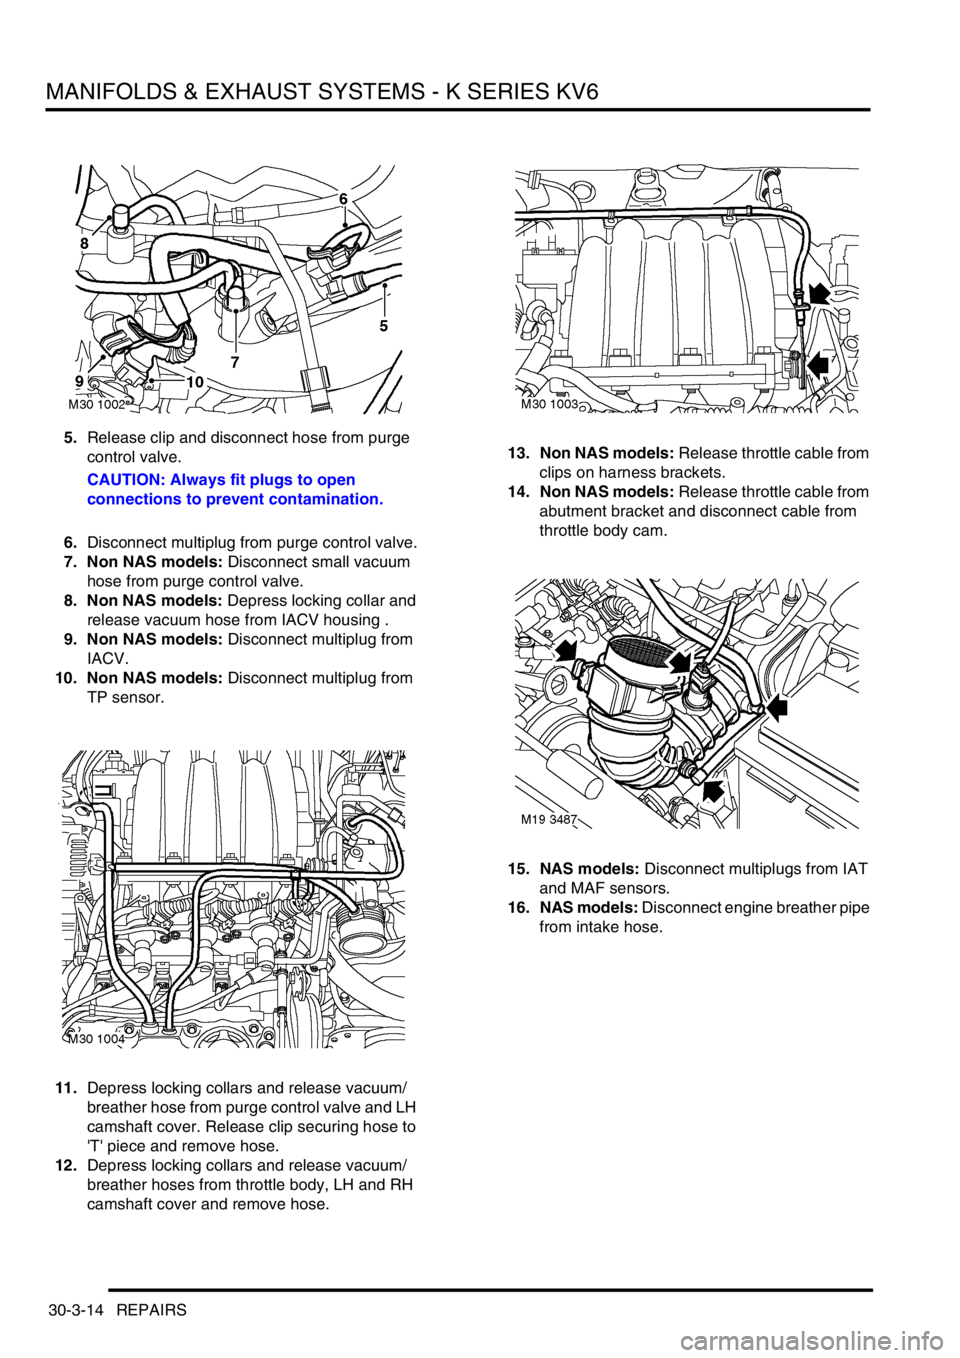
5.Release clip and disconnect hose from purge
control valve.
CAUTION: Always fit plugs to open
connections to prevent contamination.
6.Disconnect multiplug from purge control valve.
7. Non NAS models: Disconnect small vacuum
hose from purge control valve.
8. Non NAS models: Depress locking collar and
release vacuum hose from IACV housing .
9. Non NAS models: Disconnect multiplug from
IACV.
10. Non NAS models: Disconnect multiplug from
TP sensor.
11.Depress locking collars and release vacuum/
breather hose from purge control valve and LH
camshaft cover. Release clip securing hose to
'T' piece and remove hose.
12.Depress locking collars and release vacuum/
breather hoses from throttle body, LH and RH
camshaft cover and remove hose.13. Non NAS models: Release throttle cable from
clips on harness brackets.
14. Non NAS models: Release throttle cable from
abutment bracket and disconnect cable from
throttle body cam.
15. NAS models: Disconnect multiplugs from IAT
and MAF sensors.
16. NAS models: Disconnect engine breather pipe
from intake hose.
Page 388 of 1007
MANIFOLDS & EXHAUST SYSTEMS - K SERIES KV6
REPAIRS 30-3-15
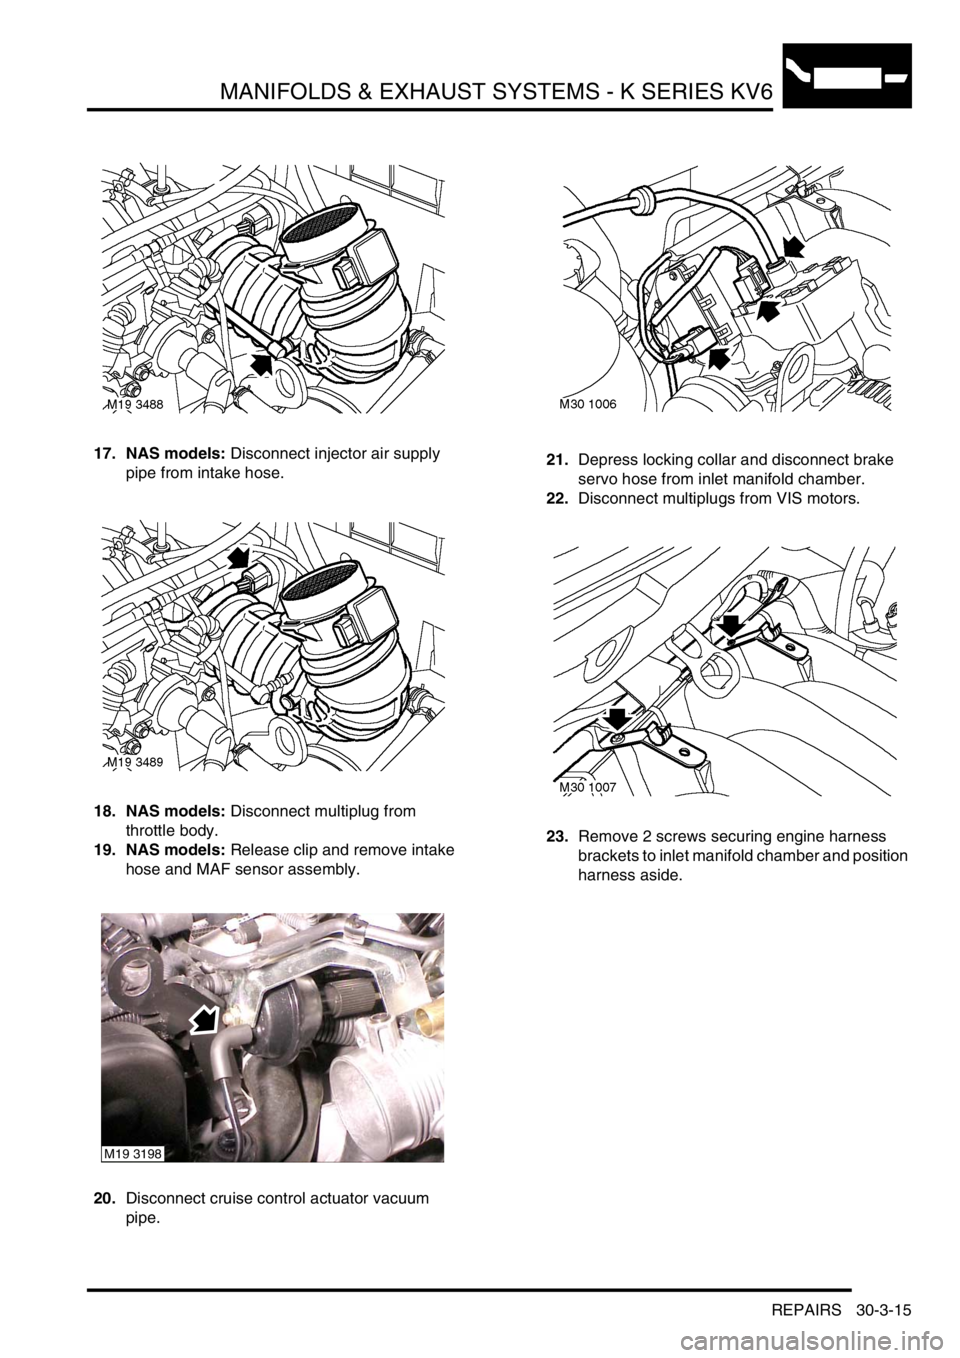
17. NAS models: Disconnect injector air supply
pipe from intake hose.
18. NAS models: Disconnect multiplug from
throttle body.
19. NAS models: Release clip and remove intake
hose and MAF sensor assembly.
20.Disconnect cruise control actuator vacuum
pipe.21.Depress locking collar and disconnect brake
servo hose from inlet manifold chamber.
22.Disconnect multiplugs from VIS motors.
23.Remove 2 screws securing engine harness
brackets to inlet manifold chamber and position
harness aside.
M19 3198
Page 390 of 1007
MANIFOLDS & EXHAUST SYSTEMS - K SERIES KV6
REPAIRS 30-3-17
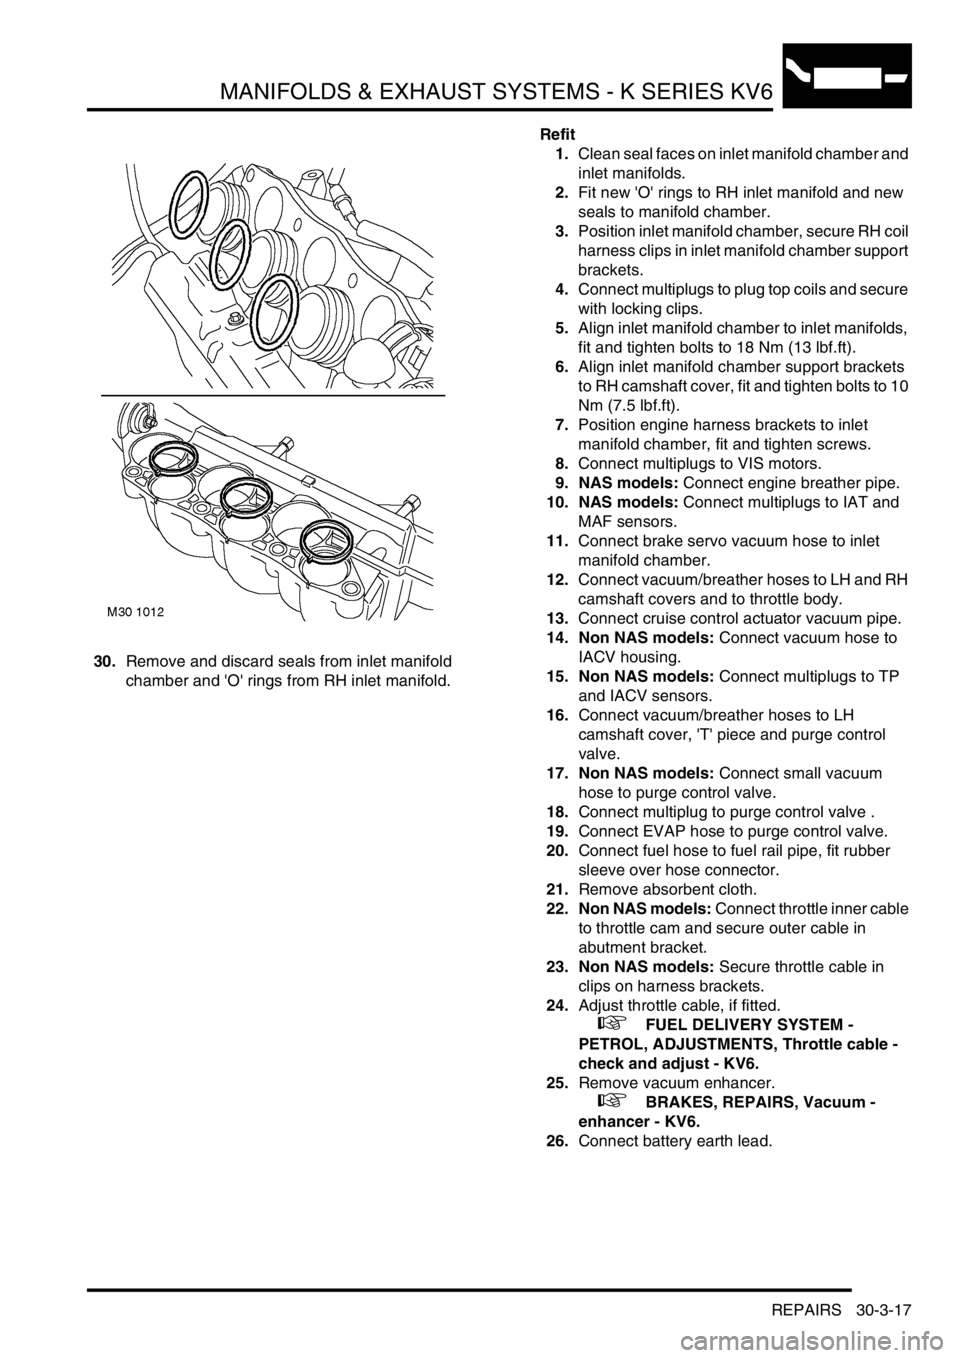
30.Remove and discard seals from inlet manifold
chamber and 'O' rings from RH inlet manifold.Refit
1.Clean seal faces on inlet manifold chamber and
inlet manifolds.
2.Fit new 'O' rings to RH inlet manifold and new
seals to manifold chamber.
3.Position inlet manifold chamber, secure RH coil
harness clips in inlet manifold chamber support
brackets.
4.Connect multiplugs to plug top coils and secure
with locking clips.
5.Align inlet manifold chamber to inlet manifolds,
fit and tighten bolts to 18 Nm (13 lbf.ft).
6.Align inlet manifold chamber support brackets
to RH camshaft cover, fit and tighten bolts to 10
Nm (7.5 lbf.ft).
7.Position engine harness brackets to inlet
manifold chamber, fit and tighten screws.
8.Connect multiplugs to VIS motors.
9. NAS models: Connect engine breather pipe.
10. NAS models: Connect multiplugs to IAT and
MAF sensors.
11.Connect brake servo vacuum hose to inlet
manifold chamber.
12.Connect vacuum/breather hoses to LH and RH
camshaft covers and to throttle body.
13.Connect cruise control actuator vacuum pipe.
14. Non NAS models: Connect vacuum hose to
IACV housing.
15. Non NAS models: Connect multiplugs to TP
and IACV sensors.
16.Connect vacuum/breather hoses to LH
camshaft cover, 'T' piece and purge control
valve.
17. Non NAS models: Connect small vacuum
hose to purge control valve.
18.Connect multiplug to purge control valve .
19.Connect EVAP hose to purge control valve.
20.Connect fuel hose to fuel rail pipe, fit rubber
sleeve over hose connector.
21.Remove absorbent cloth.
22. Non NAS models: Connect throttle inner cable
to throttle cam and secure outer cable in
abutment bracket.
23. Non NAS models: Secure throttle cable in
clips on harness brackets.
24.Adjust throttle cable, if fitted.
+ FUEL DELIVERY SYSTEM -
PETROL, ADJUSTMENTS, Throttle cable -
check and adjust - KV6.
25.Remove vacuum enhancer.
+ BRAKES, REPAIRS, Vacuum -
enhancer - KV6.
26.Connect battery earth lead.
Page 391 of 1007
MANIFOLDS & EXHAUST SYSTEMS - K SERIES KV6
30-3-18 REPAIRS
Seals - inlet manifold chamber - from
03MY
$% 30.15.37
Remove
1.Disconnect battery earth lead.
2.Remove vacuum enhancer.
+ BRAKES, REPAIRS, Vacuum -
enhancer - KV6.
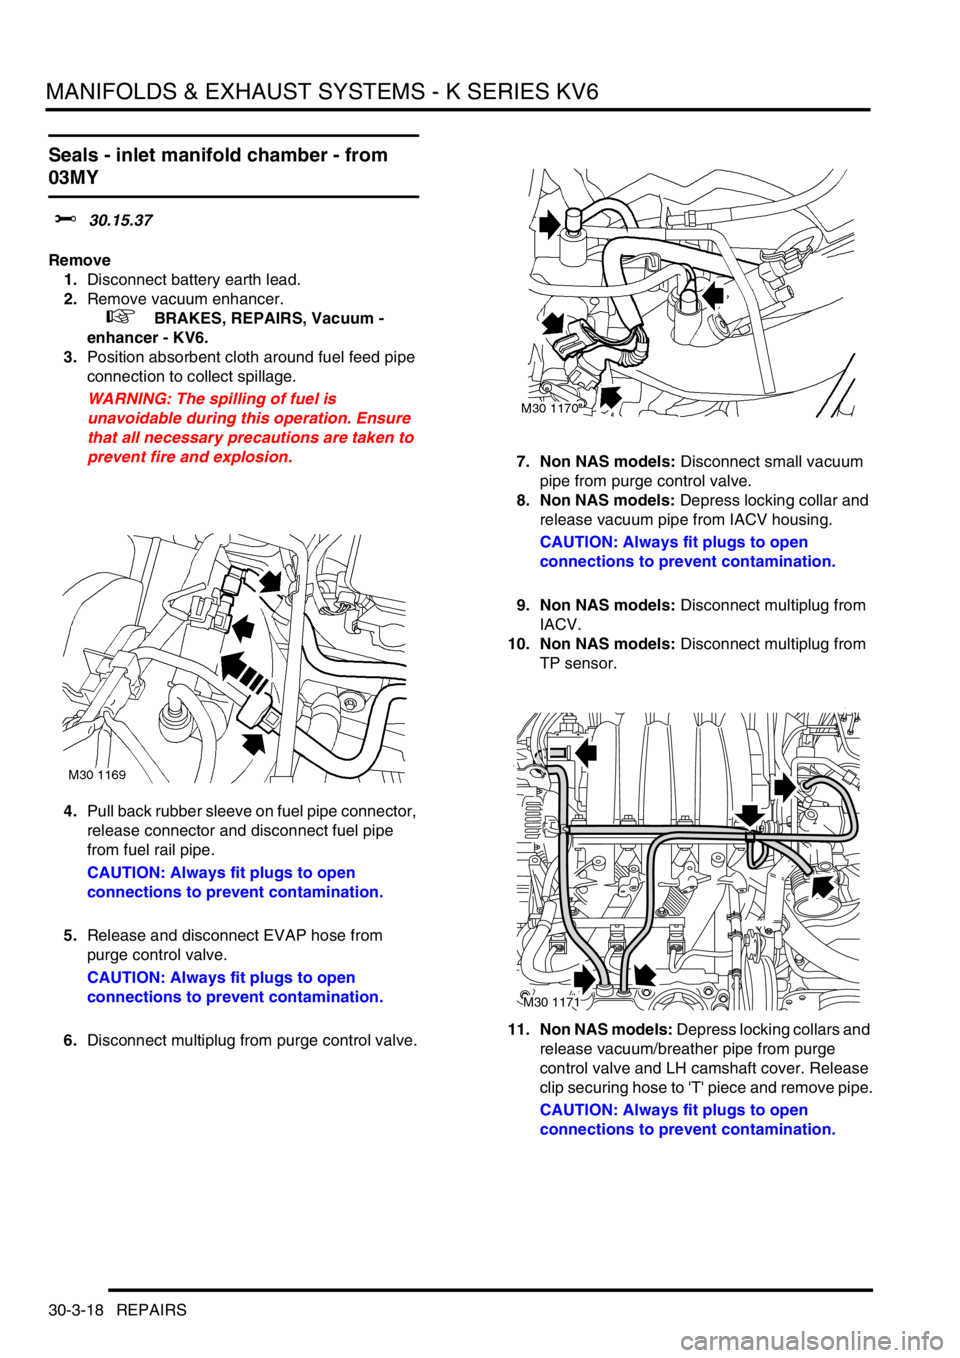
3.Position absorbent cloth around fuel feed pipe
connection to collect spillage.
WARNING: The spilling of fuel is
unavoidable during this operation. Ensure
that all necessary precautions are taken to
prevent fire and explosion.
4.Pull back rubber sleeve on fuel pipe connector,
release connector and disconnect fuel pipe
from fuel rail pipe.
CAUTION: Always fit plugs to open
connections to prevent contamination.
5.Release and disconnect EVAP hose from
purge control valve.
CAUTION: Always fit plugs to open
connections to prevent contamination.
6.Disconnect multiplug from purge control valve.7. Non NAS models: Disconnect small vacuum
pipe from purge control valve.
8. Non NAS models: Depress locking collar and
release vacuum pipe from IACV housing.
CAUTION: Always fit plugs to open
connections to prevent contamination.
9. Non NAS models: Disconnect multiplug from
IACV.
10. Non NAS models: Disconnect multiplug from
TP sensor.
11. Non NAS models: Depress locking collars and
release vacuum/breather pipe from purge
control valve and LH camshaft cover. Release
clip securing hose to 'T' piece and remove pipe.
CAUTION: Always fit plugs to open
connections to prevent contamination.
M30 1171
Page 392 of 1007
MANIFOLDS & EXHAUST SYSTEMS - K SERIES KV6
REPAIRS 30-3-19
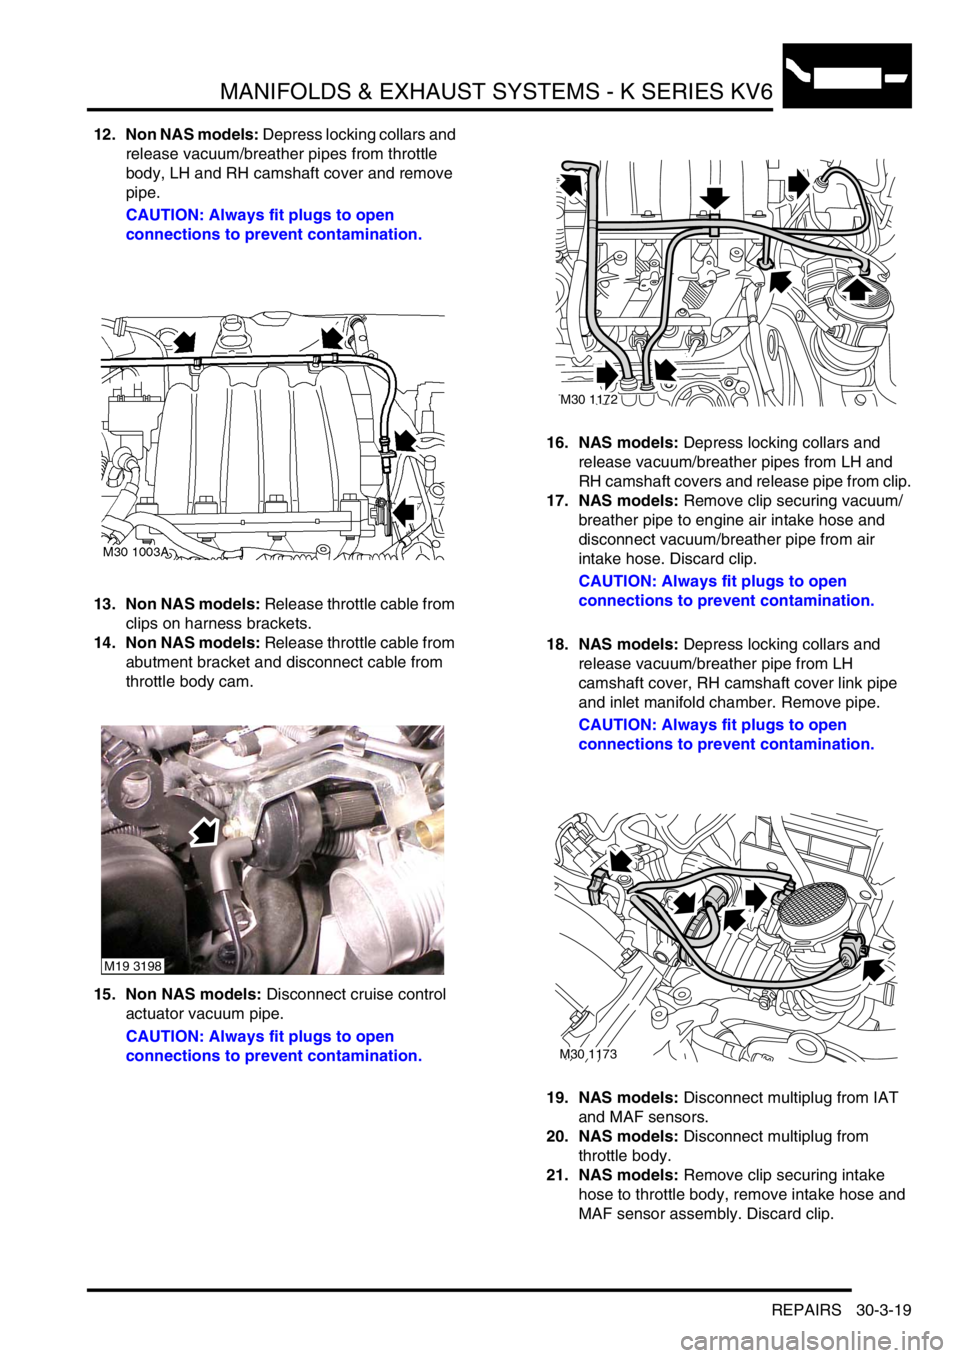
12. Non NAS models: Depress locking collars and
release vacuum/breather pipes from throttle
body, LH and RH camshaft cover and remove
pipe.
CAUTION: Always fit plugs to open
connections to prevent contamination.
13. Non NAS models: Release throttle cable from
clips on harness brackets.
14. Non NAS models: Release throttle cable from
abutment bracket and disconnect cable from
throttle body cam.
15. Non NAS models: Disconnect cruise control
actuator vacuum pipe.
CAUTION: Always fit plugs to open
connections to prevent contamination.16. NAS models: Depress locking collars and
release vacuum/breather pipes from LH and
RH camshaft covers and release pipe from clip.
17. NAS models: Remove clip securing vacuum/
breather pipe to engine air intake hose and
disconnect vacuum/breather pipe from air
intake hose. Discard clip.
CAUTION: Always fit plugs to open
connections to prevent contamination.
18. NAS models: Depress locking collars and
release vacuum/breather pipe from LH
camshaft cover, RH camshaft cover link pipe
and inlet manifold chamber. Remove pipe.
CAUTION: Always fit plugs to open
connections to prevent contamination.
19. NAS models: Disconnect multiplug from IAT
and MAF sensors.
20. NAS models: Disconnect multiplug from
throttle body.
21. NAS models: Remove clip securing intake
hose to throttle body, remove intake hose and
MAF sensor assembly. Discard clip.
M19 3198
M30 1172
M30 1173