display Lexus CT200h 2012 Navigation Manual (in English)
[x] Cancel search | Manufacturer: LEXUS, Model Year: 2012, Model line: CT200h, Model: Lexus CT200h 2012Pages: 436, PDF Size: 28.25 MB
Page 335 of 436

335
1. INFORMATION DISPLAY
CT200h_Navi_OM76078E_(EE)
14.02.06 12:30
8
INFORMATION
1Press the “MENU” button on the
Remote Touch. (See “Remote
Touch” on page 12.)
2Select “Info” on the “Menu” screen.
3Select “Traffic prediction”.
4Scroll the map to the point that it is
desired to view traffic prediction in-
formation for.
The time of the traffic prediction infor-
mation can be viewed in 15-minute
steps.
“+”: Moves the time forward 15 min-
utes.
“-”: Moves the time back 15 minutes.
1Press the “MENU” button on the
Remote Touch. (See “Remote
Touch” on page 12.)
2Select “Info” on the “Menu” screen.
3Select “Parking information”.
TRAFFIC PREDICTION
INFORMATION
Traffic prediction information rele-
vant to the area around the current
position or the cursor position can be
viewed.
PARKING INFORMATION
The location and available spaces of
parking lots can be checked. These
parking lots can also be set as a des-
tination.
Page 336 of 436

336
1. INFORMATION DISPLAY
CT200h_Navi_OM76078E_(EE)
14.02.06 12:30
4Select the desired parking lot.
The parking information screen is dis-
played. For details, see “PARKING
INFORMATION” on page 54.
1Select “Sort”.
2Select the desired sorting criteria.
No.Information/Function
Parking lot name
Distance from current position
Sort
Parking lot search
SORTING
No.Function
Select to sort in order of distance
from the current location.
Select to sort parking lots in order
of most available spaces.
Select to sort in order of name.
Page 337 of 436

337
1. INFORMATION DISPLAY
CT200h_Navi_OM76078E_(EE)
14.02.06 12:30
8
INFORMATION
1Select “Search area”.
2Select the location or area to be
searched.
PARKING LOT SEARCH
No.Function
A search around the current posi-
tion can be performed.
A search around the currently set
destination can be performed.
The size of the search area around
the set location can be selected.
Page 338 of 436

338
CT200h_Navi_OM76078E_(EE)
14.02.06 12:30
2. SETUP
1. TRAFFIC AND PARKING SETTINGS
1Press the “MENU” button on the
Remote Touch.
2Select “Setup”.
3Select “Info”.
4Select the items to be set.
Traffic information
Parking information iconSettings are available for displaying
traffic information icons, receivable
traffic stations, parking information
icons etc.
SCREEN FOR TRAFFIC
SETTINGS
Page 339 of 436

339
2. SETUP
CT200h_Navi_OM76078E_(EE)
14.02.06 12:30
8
INFORMATION
On this screen, the following functions
are available:
SHOW TRAFFIC INFO
1Press the “MENU” button on the
Remote Touch, then select “Setup”.
2Select “Info” on the “Setup” screen.
3Select “Traffic” on the “Info set-
tings” screen.
4Select “Show traffic info”.
No.Function
“On” or “Off” can be selected
for voice guidance for traffic
information.
Traffic information icon dis-
play can be set. (See “SHOW
TRAFFIC INFO” on page
339.)
The avoid traffic events func-
tion can be set to “Auto” or
“Manual”. (See “AVOID
TRAFFIC EVENTS” on page
340.)
When searching for a route, a
detoured route search that
avoids traffic jams and so forth
can be set to “On” or “Off”.
When searching for a route, a
detoured route search that
avoids predicted traffic jams
and so forth can be set to “On”
or “Off”.
Traffic stations can be selected
using automatic search or
manual search. (See “SE-
LECT TRAFFIC STATION”
on page 341.)
Traffic information can set to
be received automatically, or
to receive RDS-TMC traffic
information only. (See “SE-
LECT TRAFFIC INFO SER-
VICE” on page 342.)
“On” or “Off” can be selected
for displaying parking icons
on the map.
Traffic information icon display can
be set.
No.Function
Page 340 of 436

340
2. SETUP
CT200h_Navi_OM76078E_(EE)
14.02.06 12:30
5Select the desired icons to be dis-
played on the map by selecting the
screen button.
“All on”: To select all icons in the traffic
information.
“All off”: Select to cancel all the selec-
tions.
6Select “OK”.
The selected icons appear on the map.
AVOID TRAFFIC EVENTS
1Press the “MENU” button on the
Remote Touch, then select “Setup”.
2Select “Info” on the “Setup” screen.
3Select “Traffic” on the “Info set-
tings” screen.
4Select “Avoid traffic events”.
5Select “Auto” or “Manual”.
“Auto”: The system automatically
changes to a new route.
“Manual”: When the system calculates
a new route, a confirmation to accept the
new route is displayed on the screen.
For more details on traffic informa-
tion icons, see “TRAFFIC INFOR-
MATION” on page 53.
The avoid traffic events function can
be
set to “Auto” or “Manual”.
Page 341 of 436

341
2. SETUP
CT200h_Navi_OM76078E_(EE)
14.02.06 12:30
8
INFORMATION
6Select “OK”.
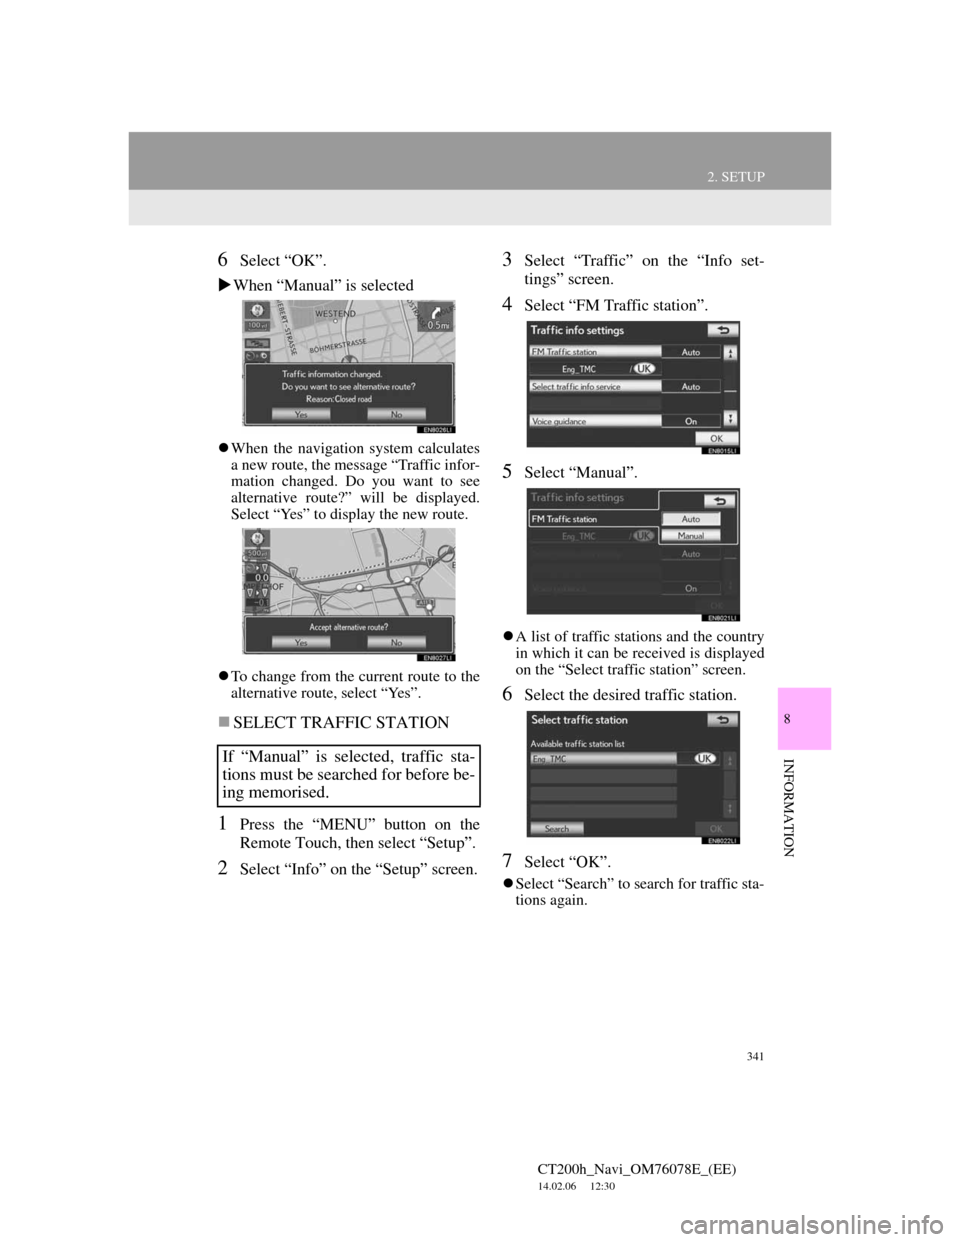
When “Manual” is selected
When the navigation system calculates
a new route, the message “Traffic infor-
mation changed. Do you want to see
alternative route?” will be displayed.
Select “Yes” to display the new route.
To change from the current route to the
alternative route, select “Yes”.
SELECT TRAFFIC STATION
1Press the “MENU” button on the
Remote Touch, then select “Setup”.
2Select “Info” on the “Setup” screen.
3Select “Traffic” on the “Info set-
tings” screen.
4Select “FM Traffic station”.
5Select “Manual”.
A list of traffic stations and the country
in which it can be received is displayed
on the “Select traffic station” screen.
6Select the desired traffic station.
7Select “OK”.
Select “Search” to search for traffic sta-
tions again.
If “Manual” is selected, traffic sta-
tions must be searched for before be-
ing memorised.
Page 348 of 436

348
1. CONNECTED SERVICES
CT200h_Navi_OM76078E_(EE)
14.02.06 12:30
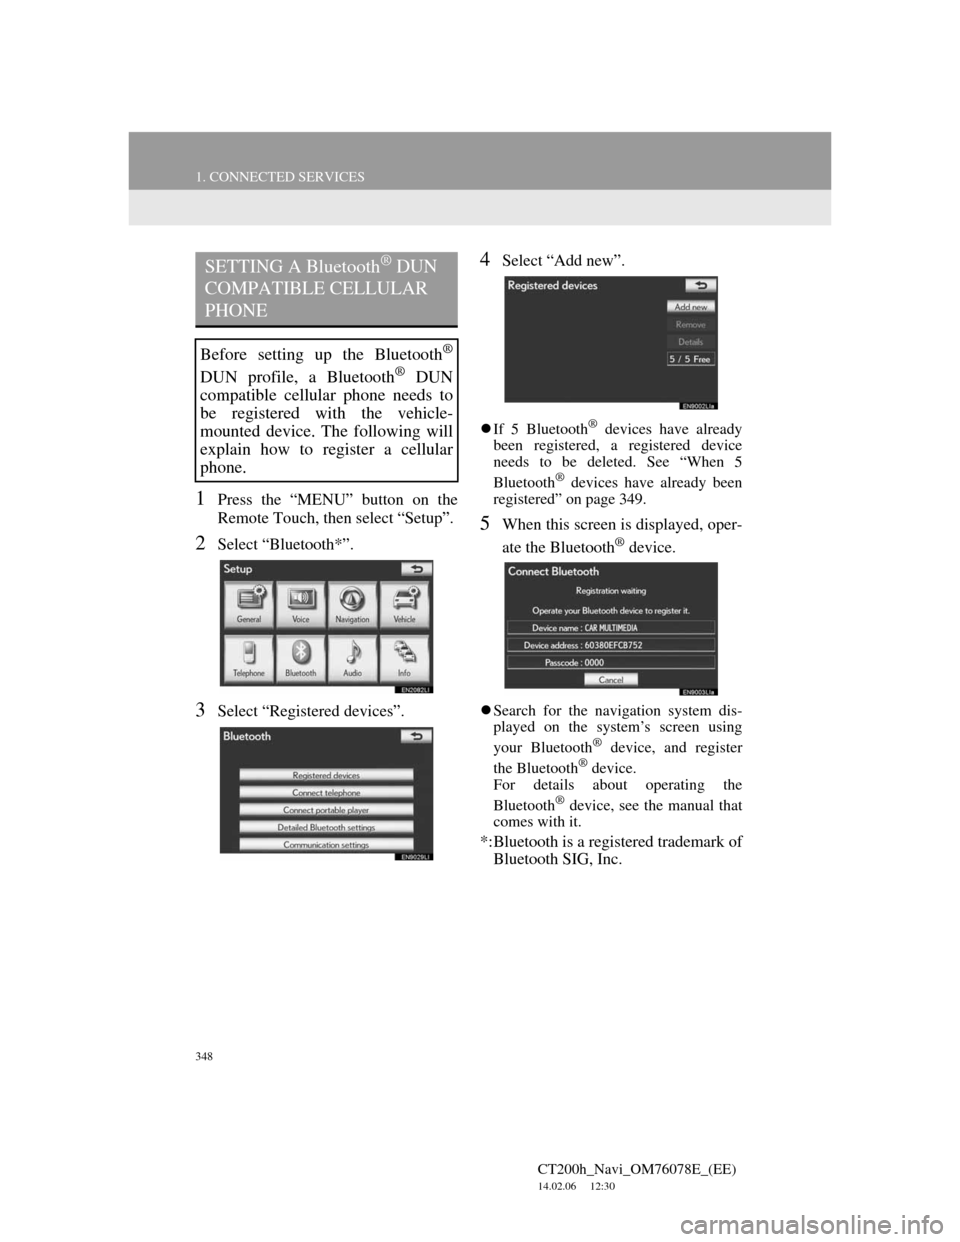
1Press the “MENU” button on the
Remote Touch, then select “Setup”.
2Select “Bluetooth*”.
3Select “Registered devices”.
4Select “Add new”.
If 5 Bluetooth® devices have already
been registered, a registered device
needs to be deleted. See “When 5
Bluetooth
® devices have already been
registered” on page 349.
5When this screen is displayed, oper-
ate the Bluetooth
® device.
Search for the navigation system dis-
played on the system’s screen using
your Bluetooth
® device, and register
the Bluetooth® device.
For details about operating the
Bluetooth
® device, see the manual that
comes with it.
*:Bluetooth is a registered trademark of
Bluetooth SIG, Inc.
SETTING A Bluetooth® DUN
COMPATIBLE CELLULAR
PHONE
Before setting up the Bluetooth®
DUN profile, a Bluetooth® DUN
compatible cellular phone needs to
be registered with the vehicle-
mounted device. The following will
explain how to register a cellular
phone.
Page 349 of 436

349
1. CONNECTED SERVICES
CT200h_Navi_OM76078E_(EE)
14.02.06 12:30
9
CONNECTED SERVICES
A passcode is not required for SSP
(Secure Simple Pairing) compatible
Bluetooth
® devices. Depending on the
type of Bluetooth® DUN compatible
cellular phone being connected, a mes-
sage confirming registration may be
displayed on the “Connect Bluetooth*”
screen. Respond and operate the
Bluetooth
® DUN compatible cellular
phone according to the confirmation
message.
To cancel the registration, select “Can-
cel”.
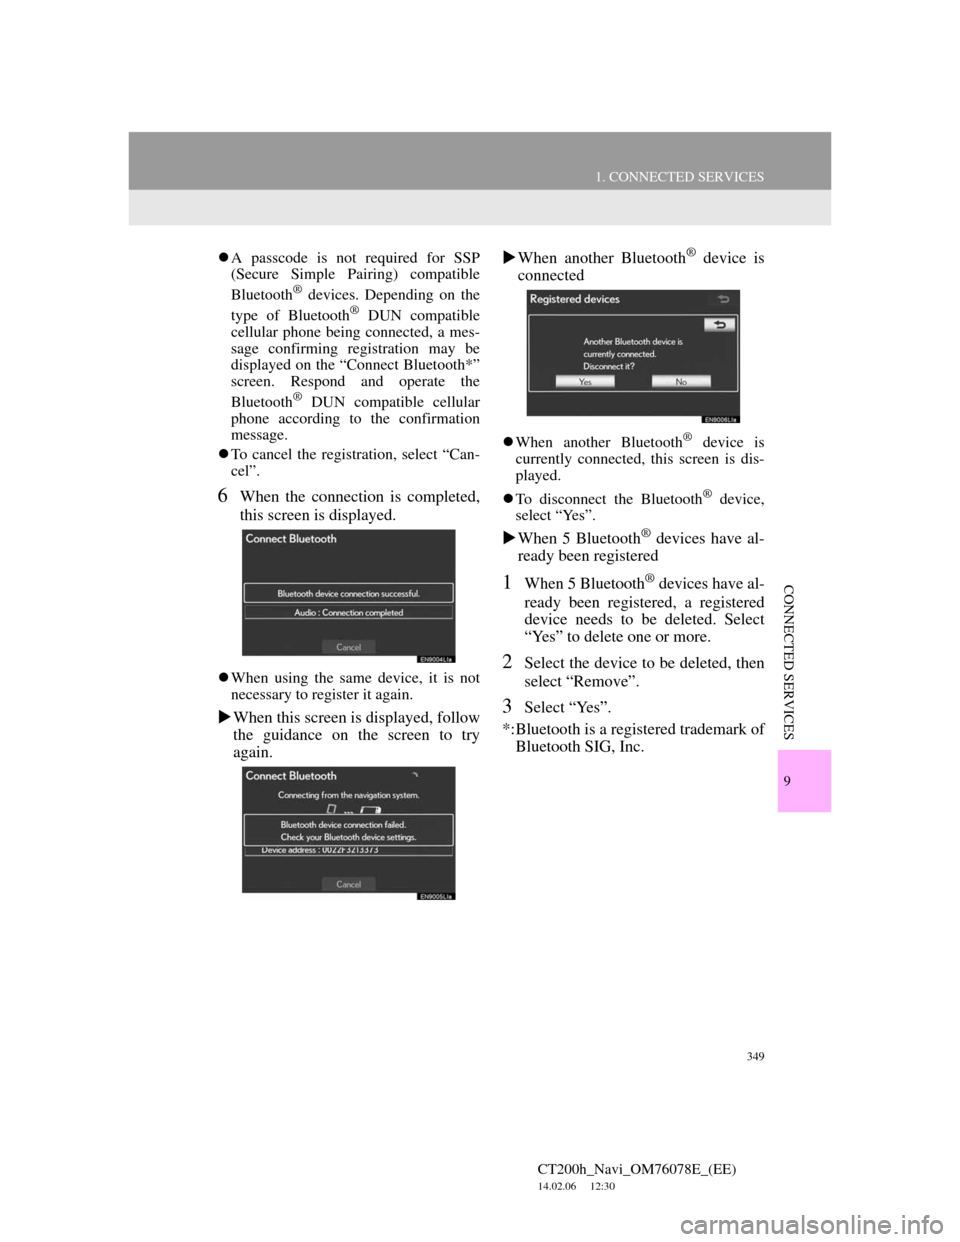
6When the connection is completed,
this screen is displayed.
When using the same device, it is not
necessary to register it again.
When this screen is displayed, follow
the guidance on the screen to try
again.When another Bluetooth
® device is
connected
When another Bluetooth® device is
currently connected, this screen is dis-
played.
To disconnect the Bluetooth
® device,
select “Yes”.
When 5 Bluetooth® devices have al-
ready been registered
1When 5 Bluetooth® devices have al-
ready been registered, a registered
device needs to be deleted. Select
“Yes” to delete one or more.
2Select the device to be deleted, then
select “Remove”.
3Select “Yes”.
*:Bluetooth is a registered trademark of
Bluetooth SIG, Inc.
Page 350 of 436

350
1. CONNECTED SERVICES
CT200h_Navi_OM76078E_(EE)
14.02.06 12:30
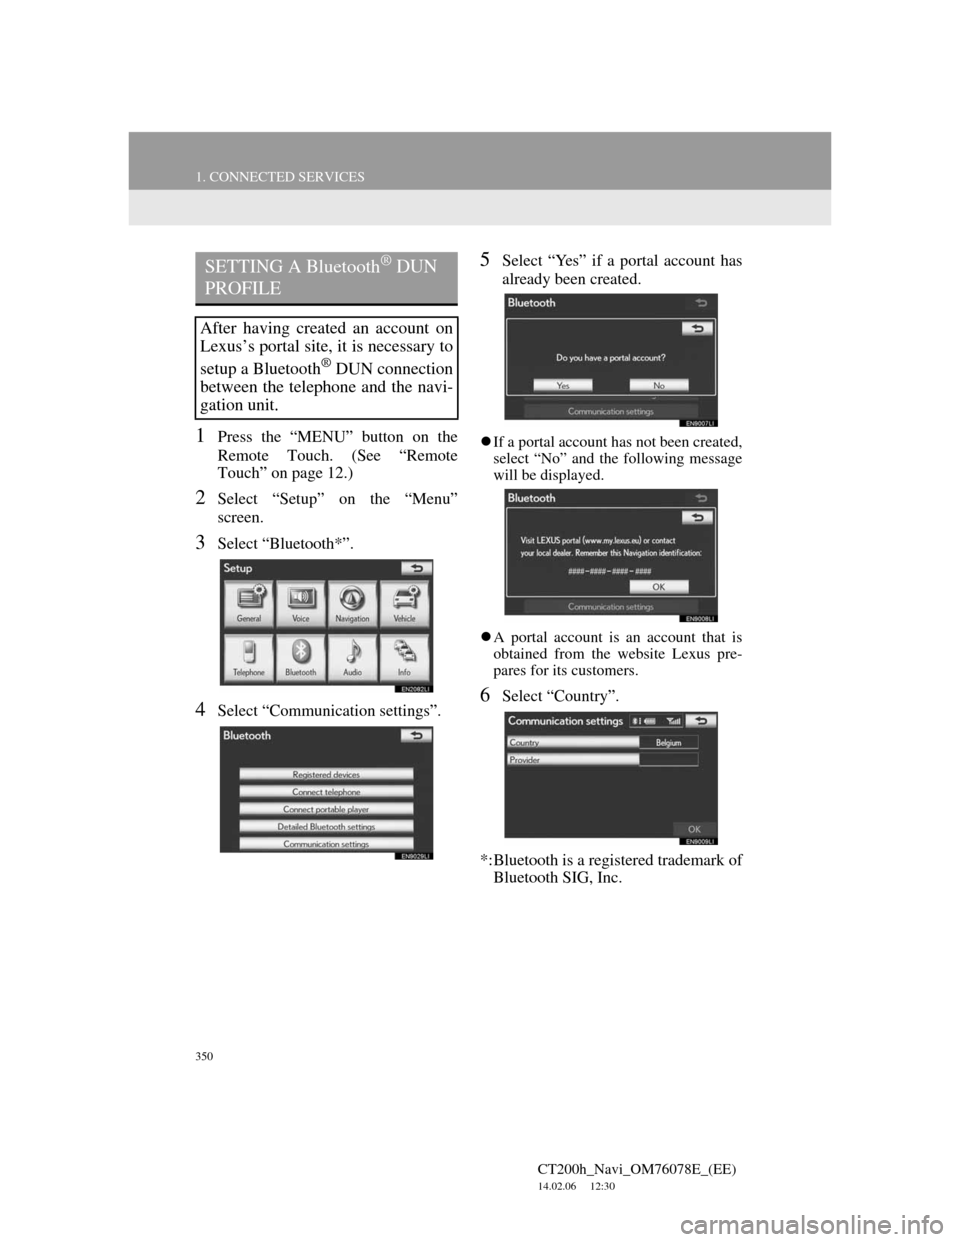
1Press the “MENU” button on the
Remote Touch. (See “Remote
Touch” on page 12.)
2Select “Setup” on the “Menu”
screen.
3Select “Bluetooth*”.
4Select “Communication settings”.
5Select “Yes” if a portal account has
already been created.
If a portal account has not been created,
select “No” and the following message
will be displayed.
A portal account is an account that is
obtained from the website Lexus pre-
pares for its customers.
6Select “Country”.
*:Bluetooth is a registered trademark of
Bluetooth SIG, Inc.
SETTING A Bluetooth® DUN
PROFILE
After having created an account on
Lexus’s portal site, it is necessary to
setup a Bluetooth
® DUN connection
between the telephone and the navi-
gation unit.