Lexus CT200h 2014 Navigation manual (in English)
Manufacturer: LEXUS, Model Year: 2014, Model line: CT200h, Model: Lexus CT200h 2014Pages: 410, PDF Size: 42.88 MB
Page 191 of 410
191
1
2
3
4
5
6
7
4
CT200h_Navi_OM76113E_(EE)
13.12.06 15:16
8
1. CD .................................................... 209
OVERVIEW .......................................... 209
PLAYING AN AUDIO CD ................... 213
PLAYING AN MP3/WMA/AAC
DISC .................................................... 214
2. DVD ................................................. 215
OVERVIEW .......................................... 215
DVD OPTIONS ..................................... 219
3. USB MEMORY ............................... 222
OVERVIEW .......................................... 222
USB AUDIO .......................................... 227
USB VIDEO........................................... 228
USB PHOTO .......................................... 228
4. iPod .................................................. 230
OVERVIEW .......................................... 230
iPod AUDIO........................................... 235
iPod VIDEO ........................................... 236
5. Bluetooth® AUDIO.......................... 237
OVERVIEW .......................................... 237
CONNECTING A Bluetooth®
DEVICE .............................................. 242
LISTENING TO Bluetooth
® AUDIO.... 242
6. AUX ................................................ 244
OVERVIEW ........................................... 244
7. VTR ................................................. 247
OVERVIEW ........................................... 247
VTR OPTIONS....................................... 249
1. STEERING SWITCHES ................. 250
1. AUDIO SETTINGS ........................ 253
AUDIO SETTINGS SCREEN ............... 254
1. OPERATING INFORMATION ..... 263
RADIO .................................................... 263
DVD PLAYER AND DISC ................... 265
iPod ......................................................... 270
FILE INFORMATION ........................... 271
TERMS ................................................... 274
ERROR MESSAGES ............................. 276
3MEDIA OPERATION
4AUDIO/VISUAL REMOTE
CONTROLS
5SETUP
6TIPS FOR OPERATING THE
AUDIO/VISUAL SYSTEM
AUDIO/VISUAL SYSTEM
For vehicles sold outside Europe, some of the functions cannot be operated while
Page 192 of 410
192
CT200h_Navi_OM76113E_(EE)
13.12.06 15:16
1. BASIC OPERATION
1. QUICK REFERENCE
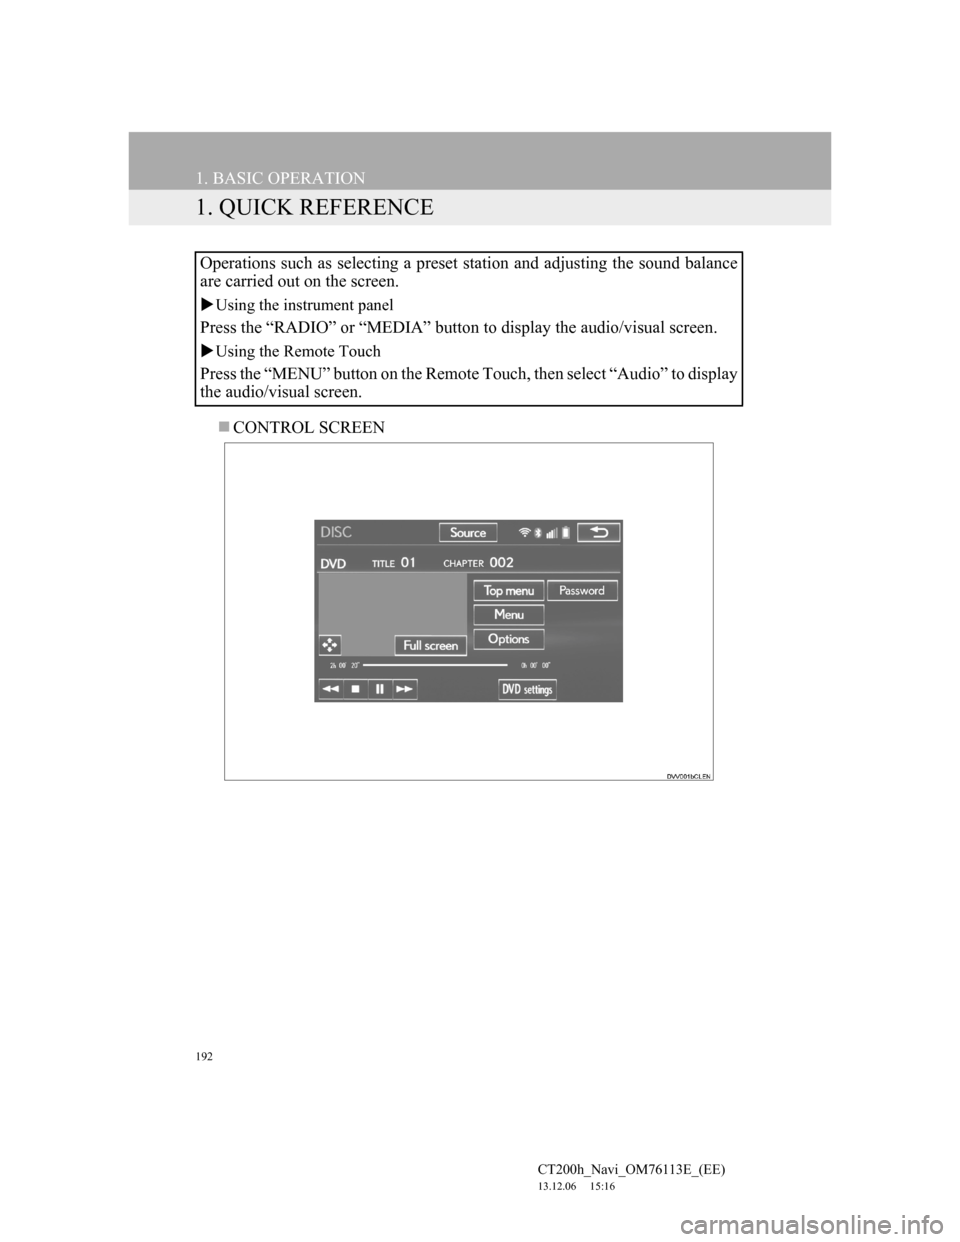
CONTROL SCREEN Operations such as selecting a preset station and adjusting the sound balance
are carried out on the screen.
Using the instrument panel
Press the “RADIO” or “MEDIA” button to display the audio/visual screen.
Using the Remote Touch
Press the “MENU” button on the Remote Touch, then select “Audio” to display
the audio/visual screen.
Page 193 of 410
193
1. BASIC OPERATION
4
AUDIO/VISUAL SYSTEM
CT200h_Navi_OM76113E_(EE)
13.12.06 15:16
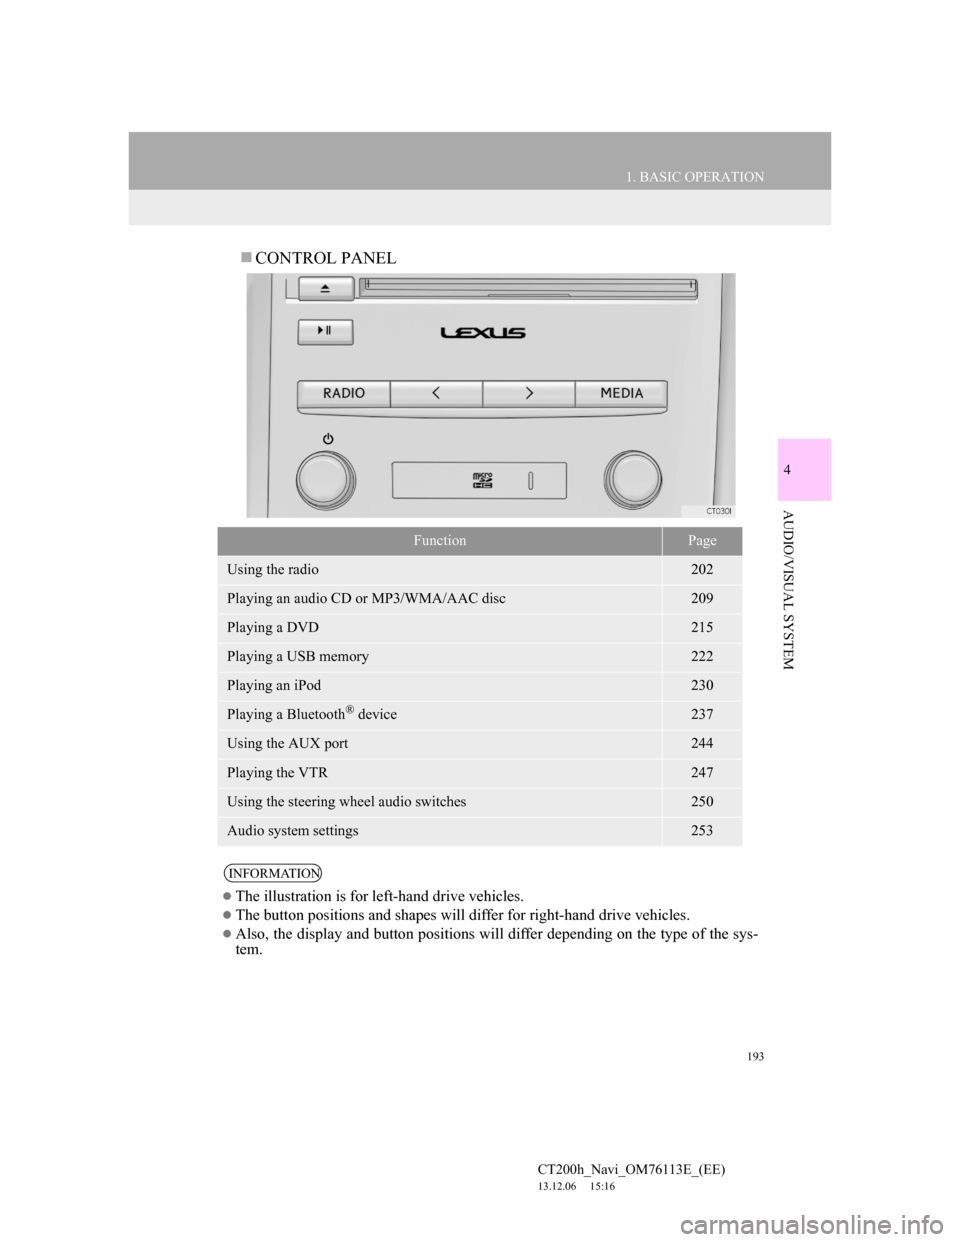
CONTROL PANEL
FunctionPage
Using the radio202
Playing an audio CD or MP3/WMA/AAC disc209
Playing a DVD215
Playing a USB memory222
Playing an iPod230
Playing a Bluetooth® device237
Using the AUX port244
Playing the VTR247
Using the steering wheel audio switches250
Audio system settings253
INFORMATION
The illustration is for left-hand drive vehicles.
The button positions and shapes will differ for right-hand drive vehicles.
Also, the display and button positions will differ depending on the type of the sys-
tem.
Page 194 of 410
194
1. BASIC OPERATION
CT200h_Navi_OM76113E_(EE)
13.12.06 15:16
2. SOME BASICS
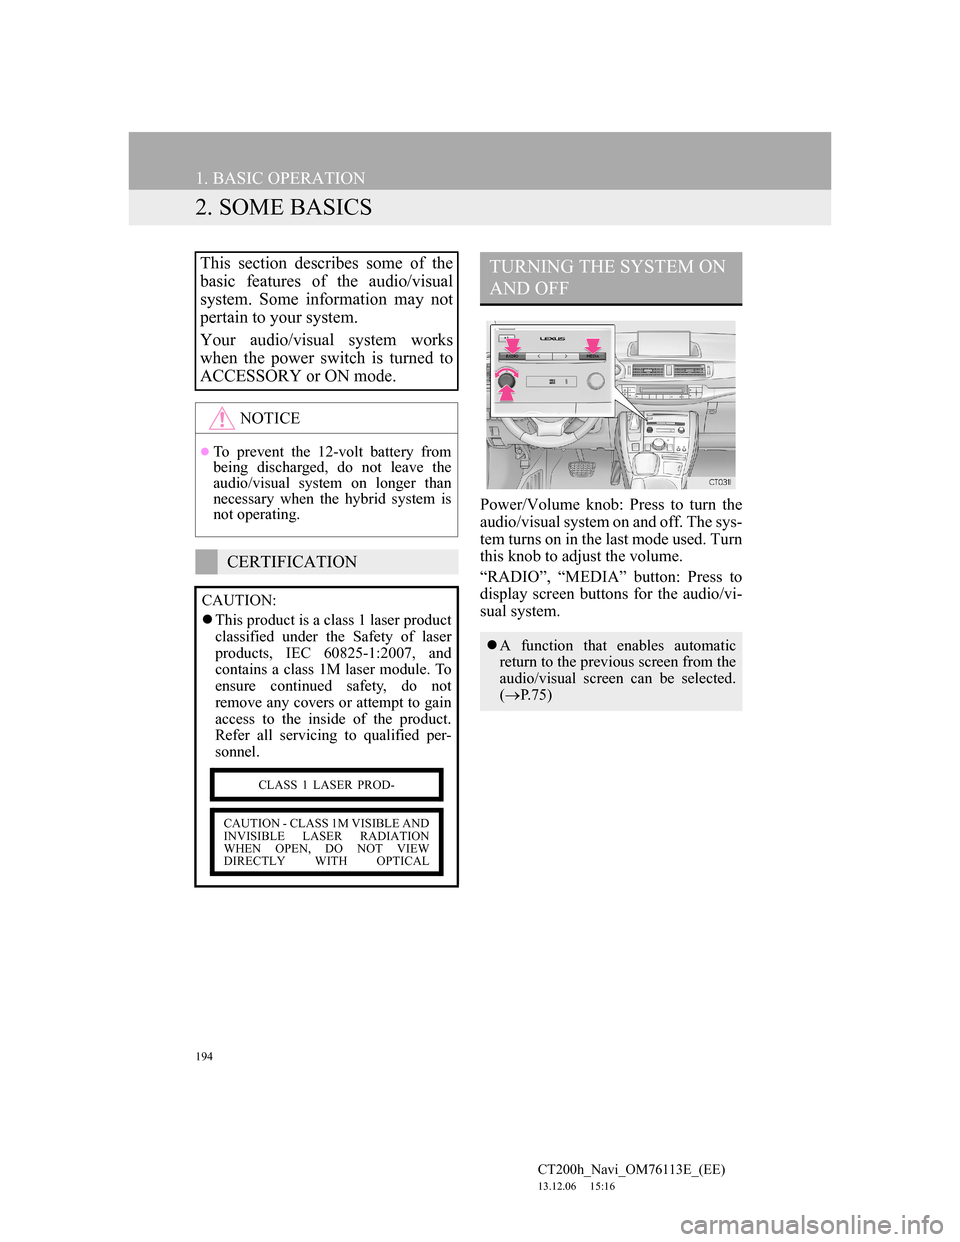
Power/Volume knob: Press to turn the
audio/visual system on and off. The sys-
tem turns on in the last mode used. Turn
this knob to adjust the volume.
“RADIO”, “MEDIA” button: Press to
display screen buttons for the audio/vi-
sual system.
This section describes some of the
basic features of the audio/visual
system. Some information may not
pertain to your system.
Your audio/visual system works
when the power switch is turned to
ACCESSORY or ON mode.
NOTICE
To prevent the 12-volt battery from
being discharged, do not leave the
audio/visual system on longer than
necessary when the hybrid system is
not operating.
CERTIFICATION
CAUTION:
This product is a class 1 laser product
classified under the Safety of laser
products, IEC 60825-1:2007, and
contains a class 1M laser module. To
ensure continued safety, do not
remove any covers or attempt to gain
access to the inside of the product.
Refer all servicing to qualified per-
sonnel.
CLASS 1 LASER PROD-
CAUTION - CLASS 1M VISIBLE AND
INVISIBLE LASER RADIATION
WHEN OPEN, DO NOT VIEW
DIRECTLY WITH OPTICAL
TURNING THE SYSTEM ON
AND OFF
A function that enables automatic
return to the previous screen from the
audio/visual screen can be selected.
(P.75)
Page 195 of 410
195
1. BASIC OPERATION
4
AUDIO/VISUAL SYSTEM
CT200h_Navi_OM76113E_(EE)
13.12.06 15:16
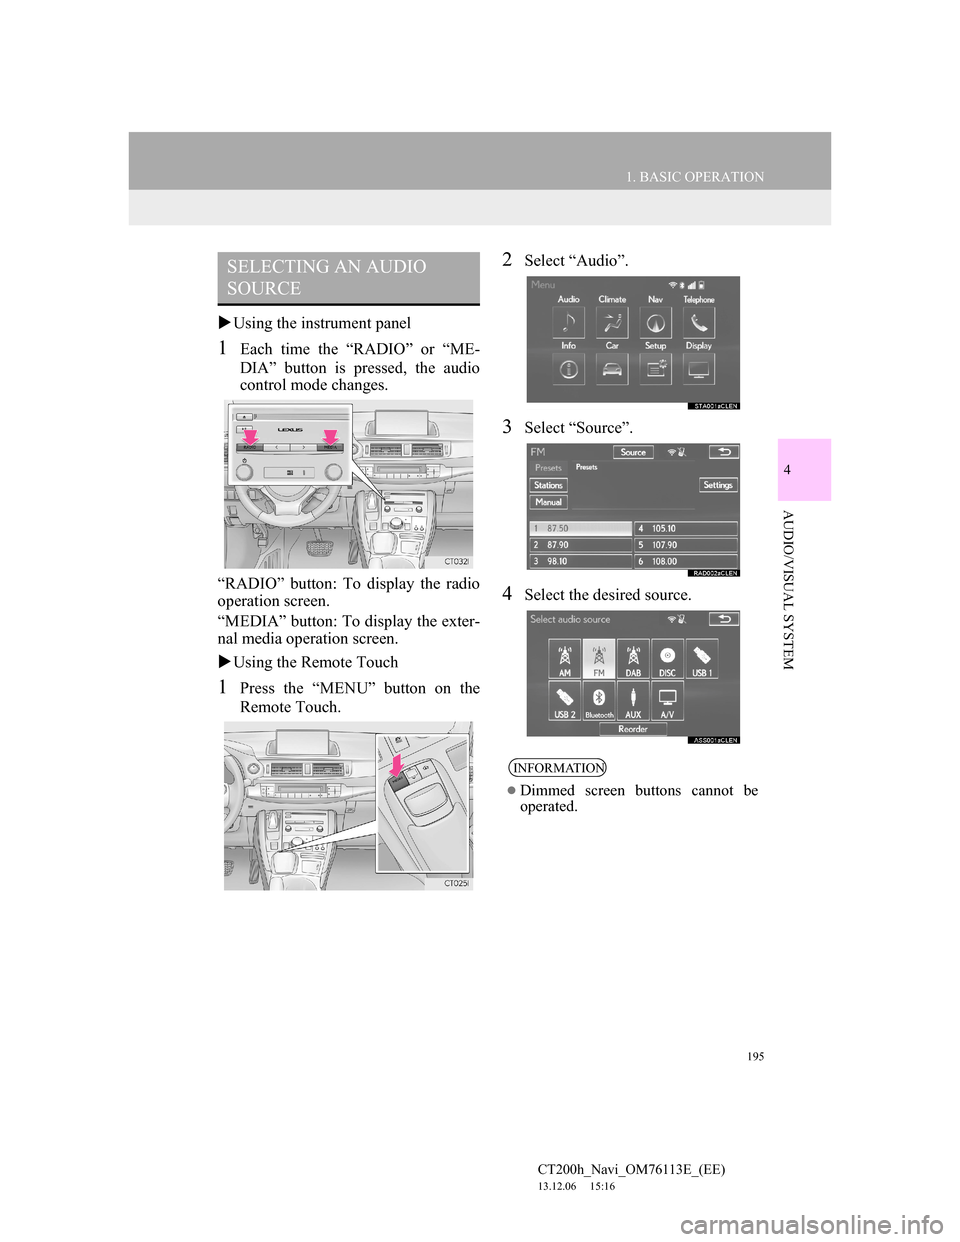
Using the instrument panel
1Each time the “RADIO” or “ME-
DIA” button is pressed, the audio
control mode changes.
“RADIO” button: To display the radio
operation screen.
“MEDIA” button: To display the exter-
nal media operation screen.
Using the Remote Touch
1Press the “MENU” button on the
Remote Touch.
2Select “Audio”.
3Select “Source”.
4Select the desired source.
SELECTING AN AUDIO
SOURCE
INFORMATION
Dimmed screen buttons cannot be
operated.
Page 196 of 410
196
1. BASIC OPERATION
CT200h_Navi_OM76113E_(EE)
13.12.06 15:16
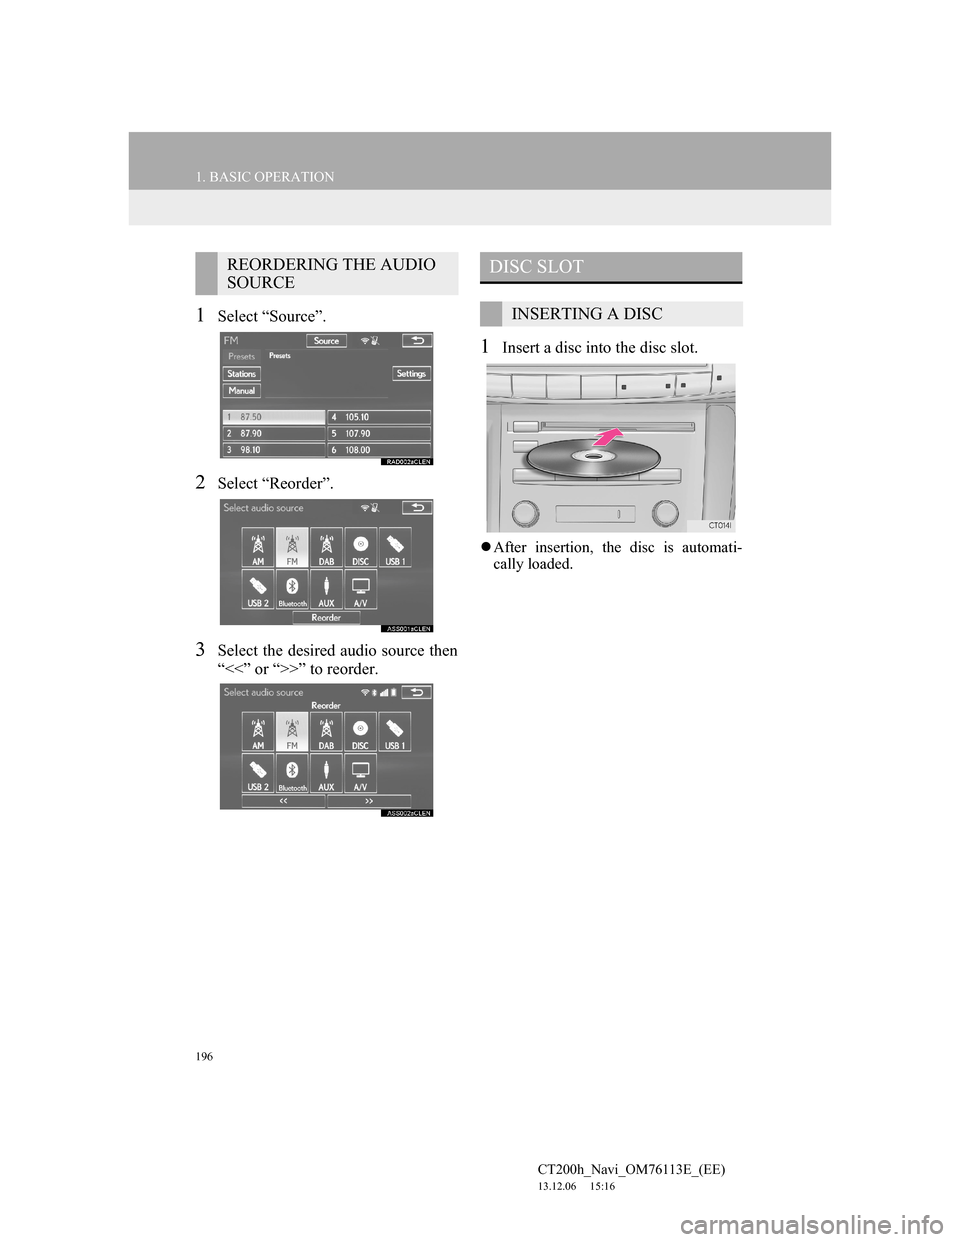
1Select “Source”.
2Select “Reorder”.
3Select the desired audio source then
“<<” or “>>” to reorder.
1Insert a disc into the disc slot.
After insertion, the disc is automati-
cally loaded.
REORDERING THE AUDIO
SOURCEDISC SLOT
INSERTING A DISC
Page 197 of 410
197
1. BASIC OPERATION
4
AUDIO/VISUAL SYSTEM
CT200h_Navi_OM76113E_(EE)
13.12.06 15:16
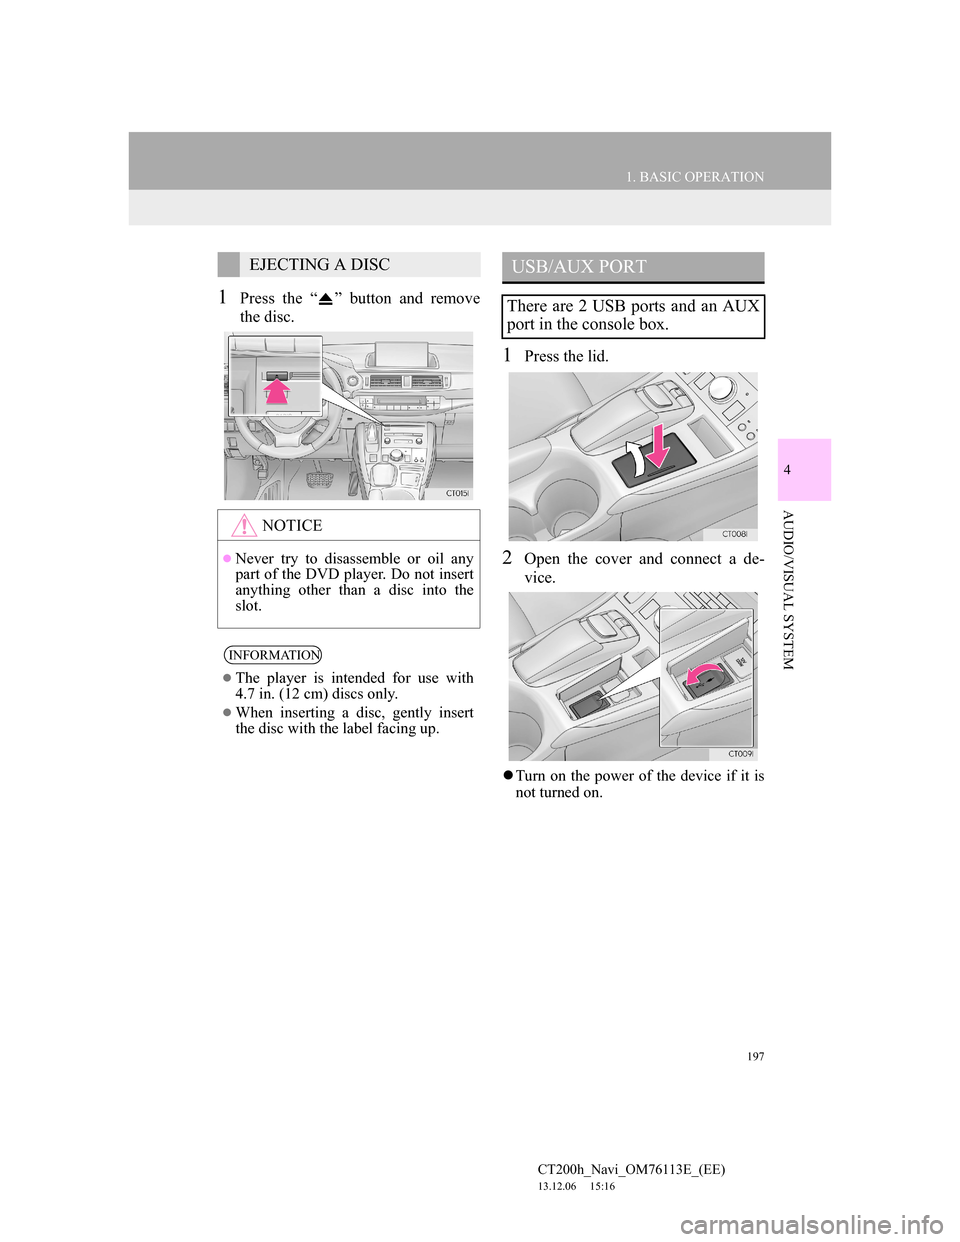
1Press the “ ” button and remove
the disc.
1Press the lid.
2Open the cover and connect a de-
vice.
Turn on the power of the device if it is
not turned on.
EJECTING A DISC
NOTICE
Never try to disassemble or oil any
part of the DVD player. Do not insert
anything other than a disc into the
slot.
INFORMATION
The player is intended for use with
4.7 in. (12 cm) discs only.
When inserting a disc, gently insert
the disc with the label facing up.
USB/AUX PORT
There are 2 USB ports and an AUX
port in the console box.
Page 198 of 410
198
1. BASIC OPERATION
CT200h_Navi_OM76113E_(EE)
13.12.06 15:16
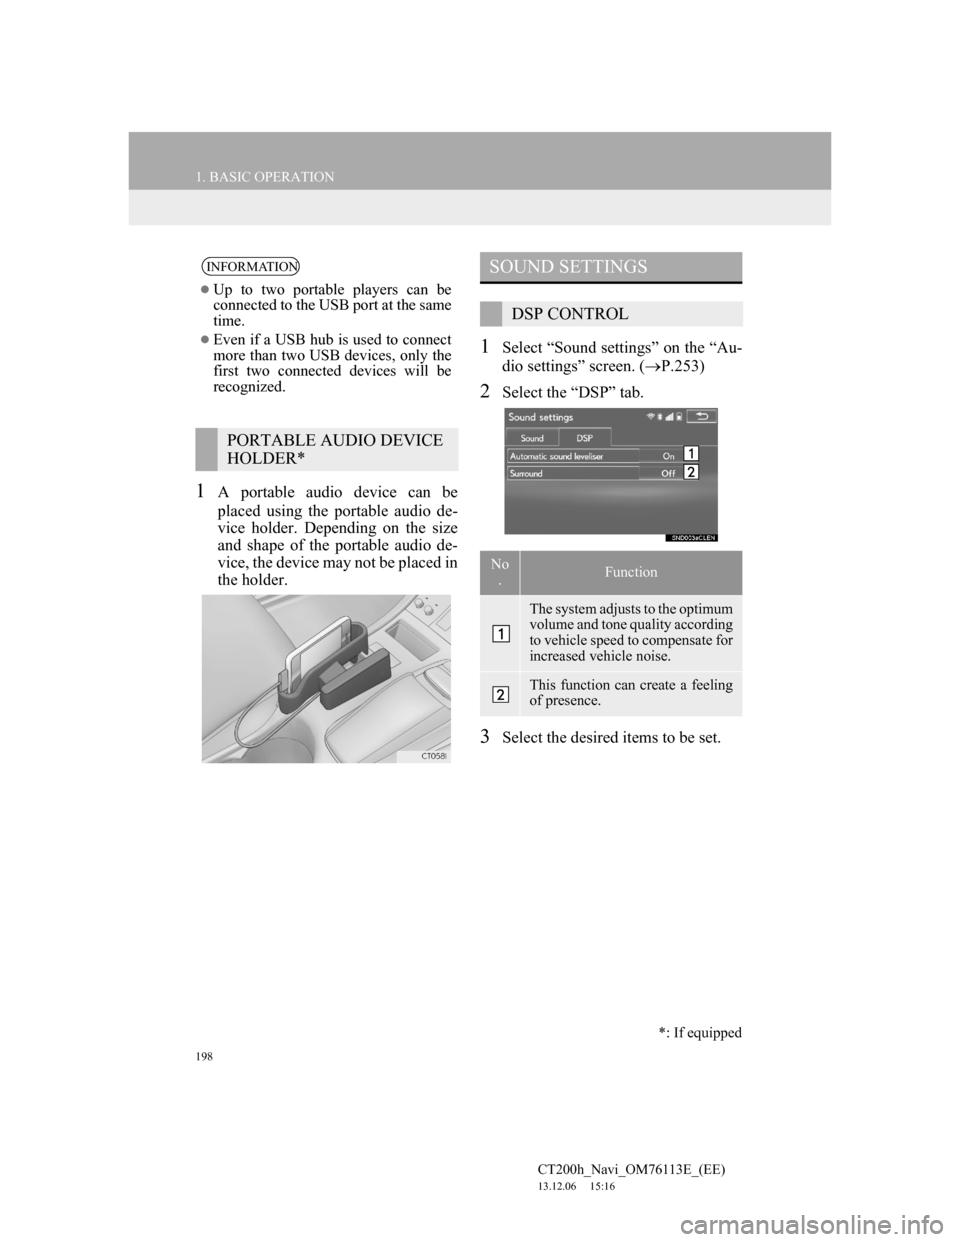
1A portable audio device can be
placed using the portable audio de-
vice holder. Depending on the size
and shape of the portable audio de-
vice, the device may not be placed in
the holder.
1Select “Sound settings” on the “Au-
dio settings” screen. (P.253)
2Select the “DSP” tab.
3Select the desired items to be set.
INFORMATION
Up to two portable players can be
connected to the USB port at the same
time.
Even if a USB hub is used to connect
more than two USB devices, only the
first two connected devices will be
recognized.
PORTABLE AUDIO DEVICE
HOLDER*
SOUND SETTINGS
DSP CONTROL
No
.Function
The system adjusts to the optimum
volume and tone quality according
to vehicle speed to compensate for
increased vehicle noise.
This function can create a feeling
of presence.
*: If equipped
Page 199 of 410
199
1. BASIC OPERATION
4
AUDIO/VISUAL SYSTEM
CT200h_Navi_OM76113E_(EE)
13.12.06 15:16
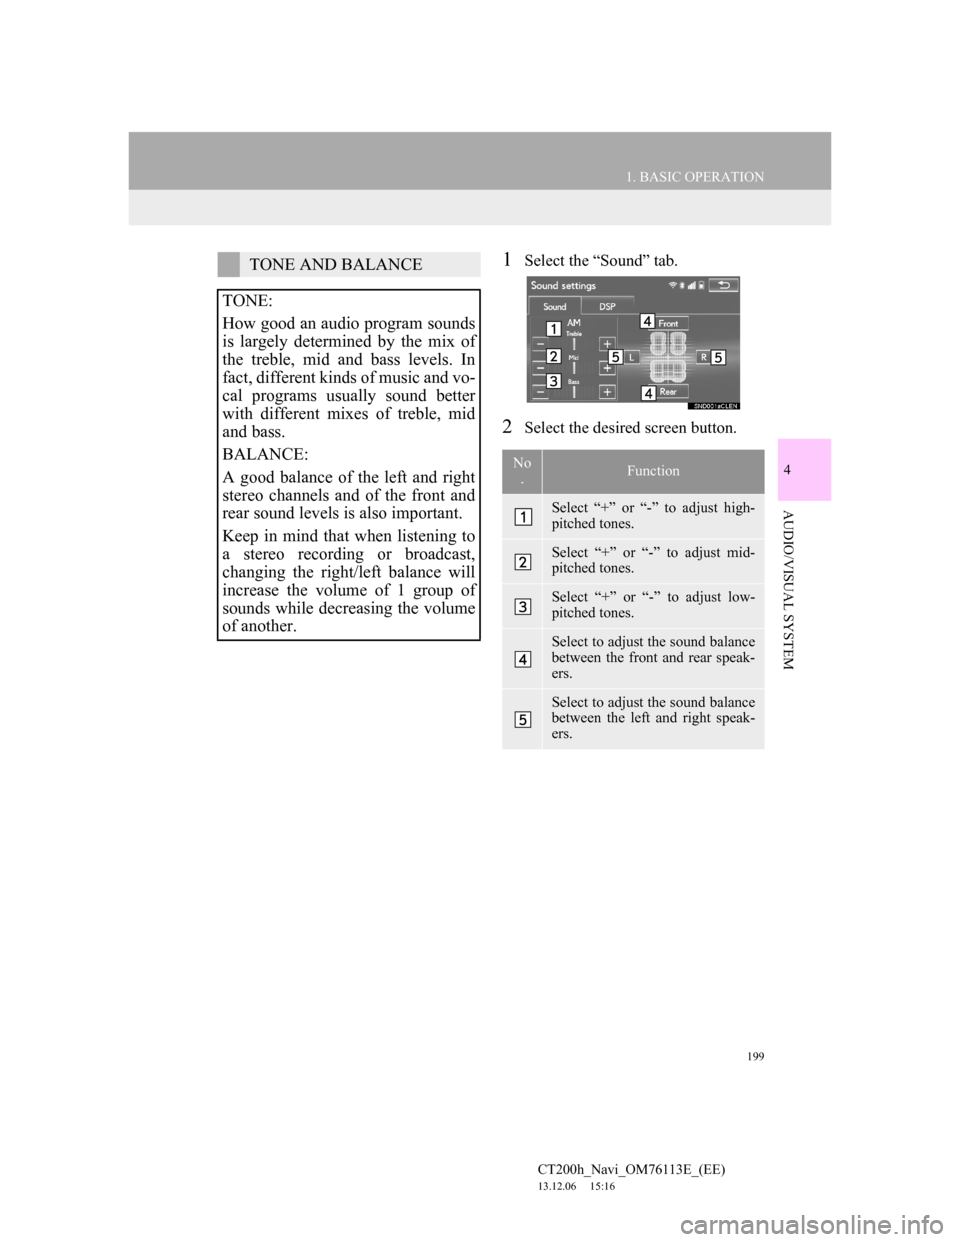
1Select the “Sound” tab.
2Select the desired screen button.
TONE AND BALANCE
TONE:
How good an audio program sounds
is largely determined by the mix of
the treble, mid and bass levels. In
fact, different kinds of music and vo-
cal programs usually sound better
with different mixes of treble, mid
and bass.
BALANCE:
A good balance of the left and right
stereo channels and of the front and
rear sound levels is also important.
Keep in mind that when listening to
a stereo recording or broadcast,
changing the right/left balance will
increase the volume of 1 group of
sounds while decreasing the volume
of another.
No
.Function
Select “+” or “-” to adjust high-
pitched tones.
Select “+” or “-” to adjust mid-
pitched tones.
Select “+” or “-” to adjust low-
pitched tones.
Select to adjust the sound balance
between the front and rear speak-
ers.
Select to adjust the sound balance
between the left and right speak-
ers.
Page 200 of 410
200
1. BASIC OPERATION
CT200h_Navi_OM76113E_(EE)
13.12.06 15:16
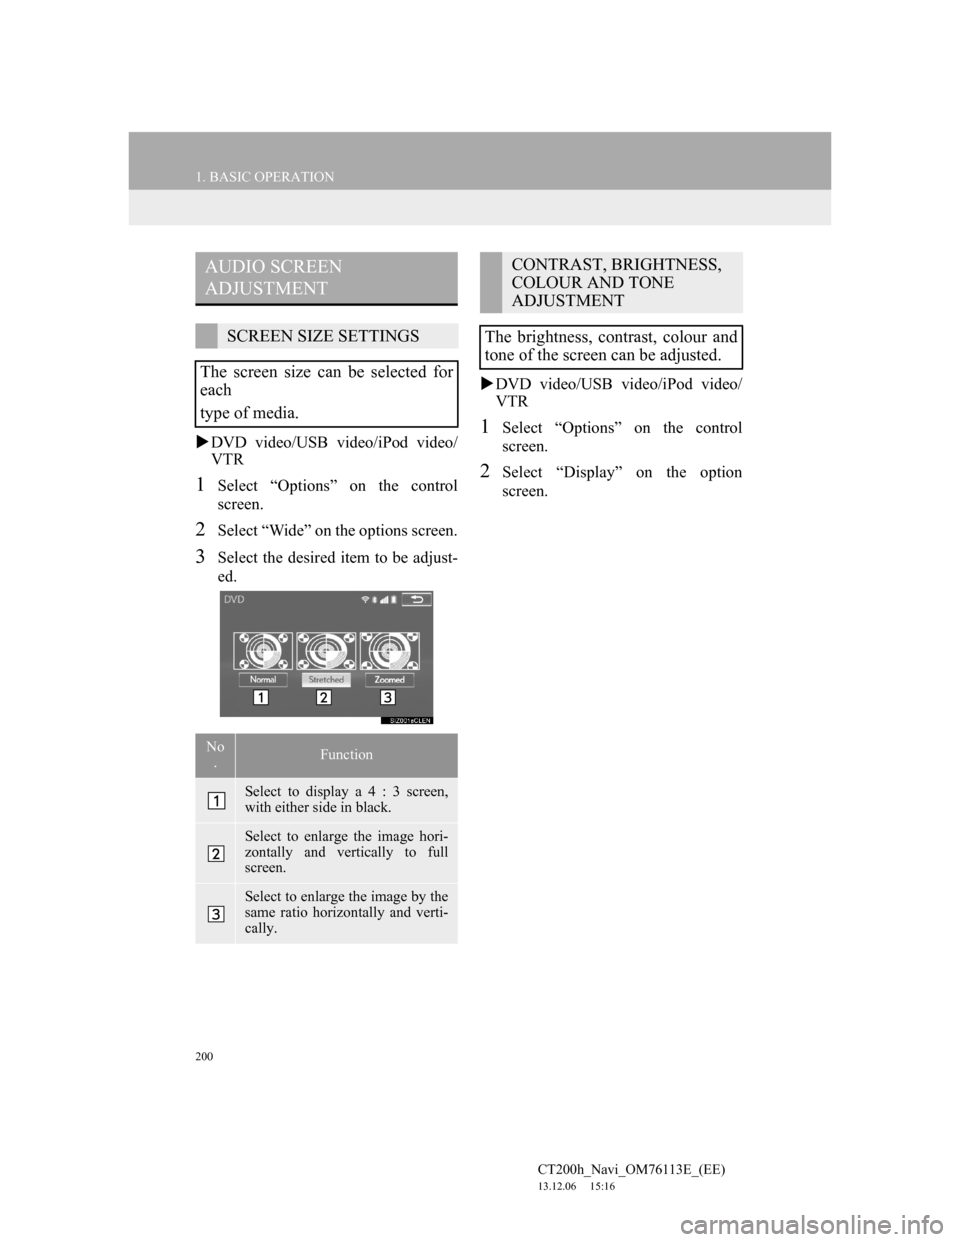
DVD video/USB video/iPod video/
VTR
1Select “Options” on the control
screen.
2Select “Wide” on the options screen.
3Select the desired item to be adjust-
ed.DVD video/USB video/iPod video/
VTR
1Select “Options” on the control
screen.
2Select “Display” on the option
screen.
AUDIO SCREEN
ADJUSTMENT
SCREEN SIZE SETTINGS
The screen size can be selected for
each
type of media.
No
.Function
Select to display a 4 : 3 screen,
with either side in black.
Select to enlarge the image hori-
zontally and vertically to full
screen.
Select to enlarge the image by the
same ratio horizontally and verti-
cally.
CONTRAST, BRIGHTNESS,
COLOUR AND TONE
ADJUSTMENT
The brightness, contrast, colour and
tone of the screen can be adjusted.