USB port Lexus CT200h 2014 Navigation manual (in English)
[x] Cancel search | Manufacturer: LEXUS, Model Year: 2014, Model line: CT200h, Model: Lexus CT200h 2014Pages: 410, PDF Size: 42.88 MB
Page 23 of 410
23
2. QUICK REFERENCE
1
QUICK GUIDE
CT200h_Navi_OM76113E_(EE)
13.12.06 15:15
No.FunctionPage
Using RDS-TMC* station based on FM-multiple broadcasting or
TPEG* information that is received, traffic events near the cur-
rent position or the cursor position can be viewed as a list.
109
Using TPEG* information that is received, the location and avail-
able spaces of a parking lot can be checked. The parking lot can
also be set as a destination.113
Select to display a Street View. 391
Select to view information on the selected point. 393
Select to view pictures in the USB memory connected to USB
port 1.
228Select to view pictures in the USB memory connected to USB
port 2.
*:Can only be used when receiving RDS-TMC or TPEG (Transport Protocol Ex-
perts Group) information. Depending on the country or area, receiving RDS-
TMC and TPEG information may not be possible.
Page 167 of 410
167
4. MY MEMORY
CT200h_Navi_OM76113E_(EE)
13.12.06 15:16
3
NAVIGATION SYSTEM
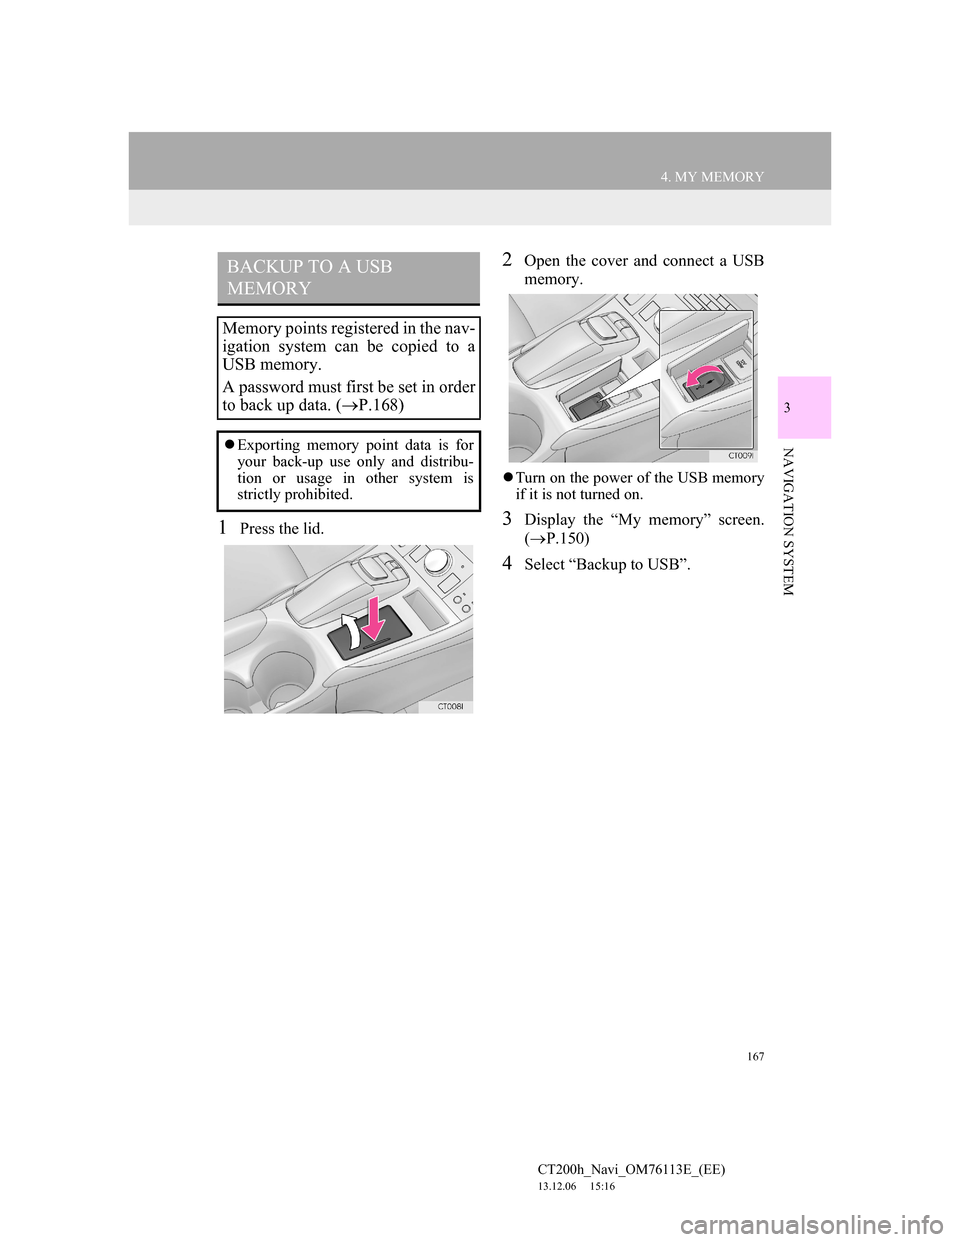
1Press the lid.
2Open the cover and connect a USB
memory.
Turn on the power of the USB memory
if it is not turned on.
3Display the “My memory” screen.
(P.150)
4Select “Backup to USB”.
BACKUP TO A USB
MEMORY
Memory points registered in the nav-
igation system can be copied to a
USB memory.
A password must first be set in order
to back up data. (P.168)
Exporting memory point data is for
your back-up use only and distribu-
tion or usage in other system is
strictly prohibited.
Page 190 of 410
190
CT200h_Navi_OM76113E_(EE)
13.12.06 15:16
1. QUICK REFERENCE..................... 192
2. SOME BASICS ............................... 194
TURNING THE SYSTEM
ON AND OFF...................................... 194
SELECTING AN AUDIO SOURCE ..... 195
DISC SLOT ............................................ 196
USB/AUX PORT ................................... 197
SOUND SETTINGS .............................. 198
AUDIO SCREEN ADJUSTMENT........ 200
SPEECH COMMAND SYSTEM .......... 201
1. AM/FM/DAB RADIO..................... 202
OVERVIEW ........................................... 202
PRESETTING A STATION .................. 205
MANUAL TUNING .............................. 205
RDS (RADIO DATA SYSTEM) ........... 206
TIME SHIFT OPERATION (DAB) ...... 208
1BASIC OPERATION
2RADIO OPERATION
Page 193 of 410
193
1. BASIC OPERATION
4
AUDIO/VISUAL SYSTEM
CT200h_Navi_OM76113E_(EE)
13.12.06 15:16
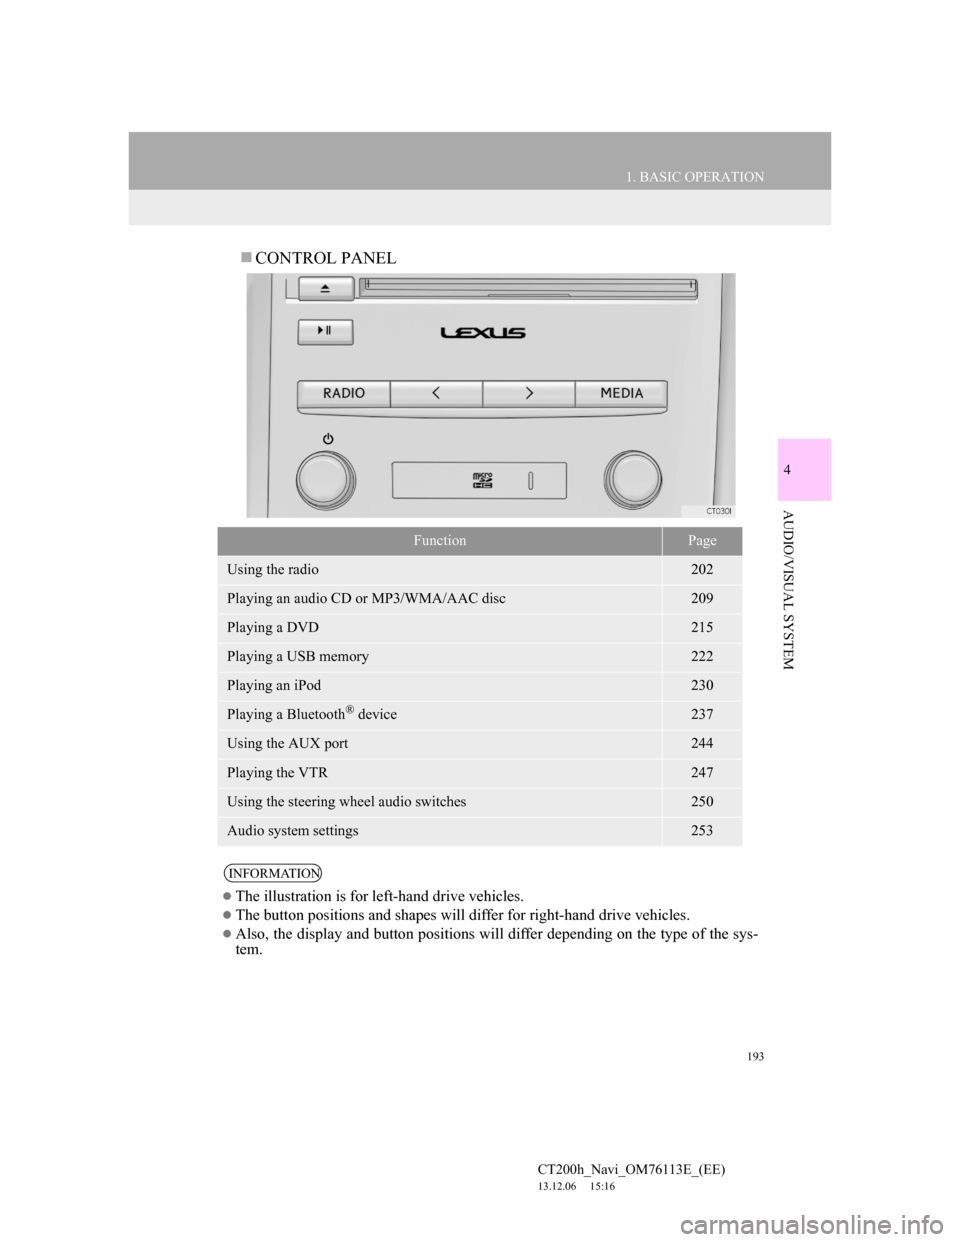
CONTROL PANEL
FunctionPage
Using the radio202
Playing an audio CD or MP3/WMA/AAC disc209
Playing a DVD215
Playing a USB memory222
Playing an iPod230
Playing a Bluetooth® device237
Using the AUX port244
Playing the VTR247
Using the steering wheel audio switches250
Audio system settings253
INFORMATION
The illustration is for left-hand drive vehicles.
The button positions and shapes will differ for right-hand drive vehicles.
Also, the display and button positions will differ depending on the type of the sys-
tem.
Page 197 of 410
197
1. BASIC OPERATION
4
AUDIO/VISUAL SYSTEM
CT200h_Navi_OM76113E_(EE)
13.12.06 15:16
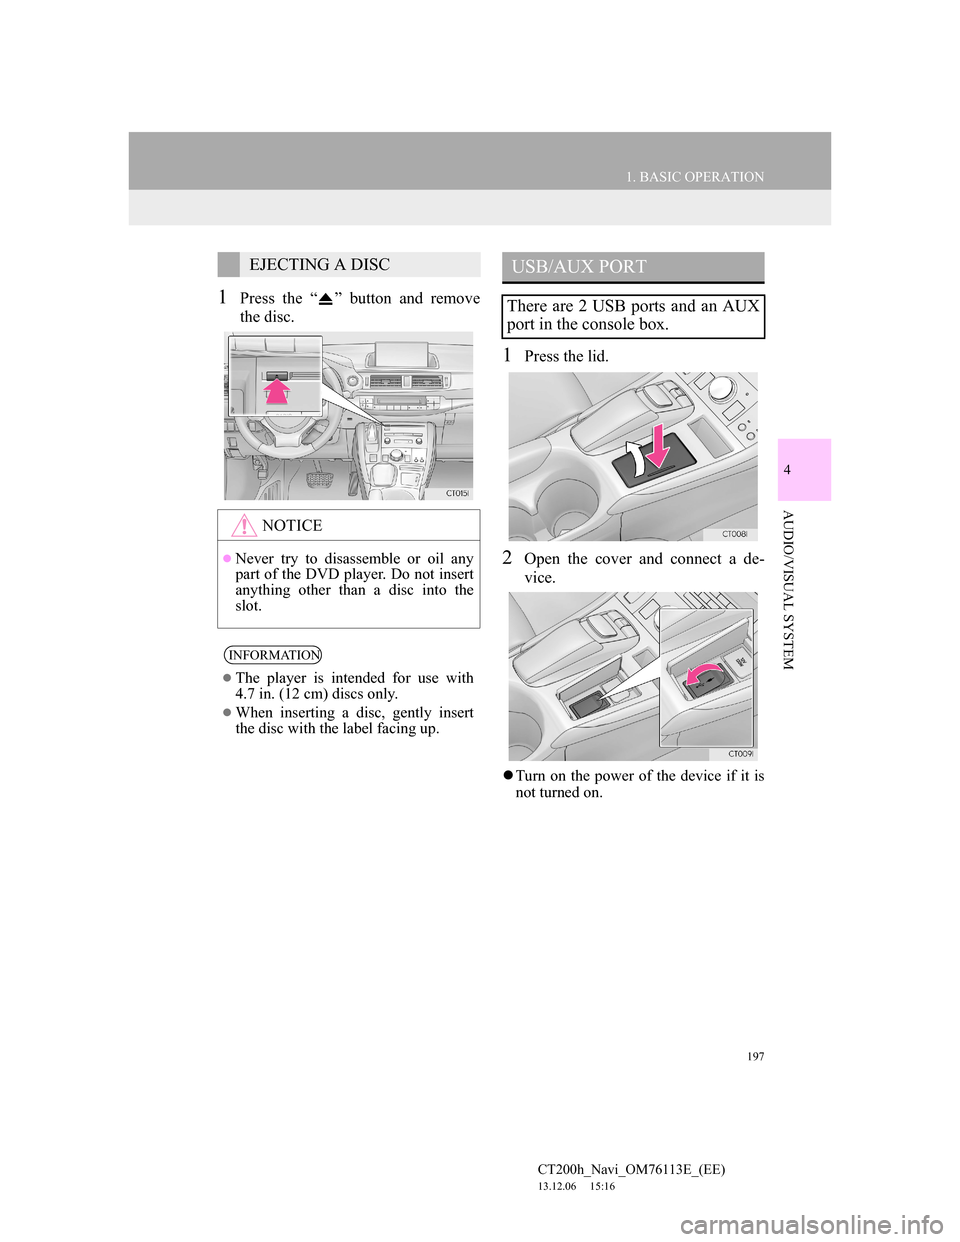
1Press the “ ” button and remove
the disc.
1Press the lid.
2Open the cover and connect a de-
vice.
Turn on the power of the device if it is
not turned on.
EJECTING A DISC
NOTICE
Never try to disassemble or oil any
part of the DVD player. Do not insert
anything other than a disc into the
slot.
INFORMATION
The player is intended for use with
4.7 in. (12 cm) discs only.
When inserting a disc, gently insert
the disc with the label facing up.
USB/AUX PORT
There are 2 USB ports and an AUX
port in the console box.
Page 198 of 410
198
1. BASIC OPERATION
CT200h_Navi_OM76113E_(EE)
13.12.06 15:16
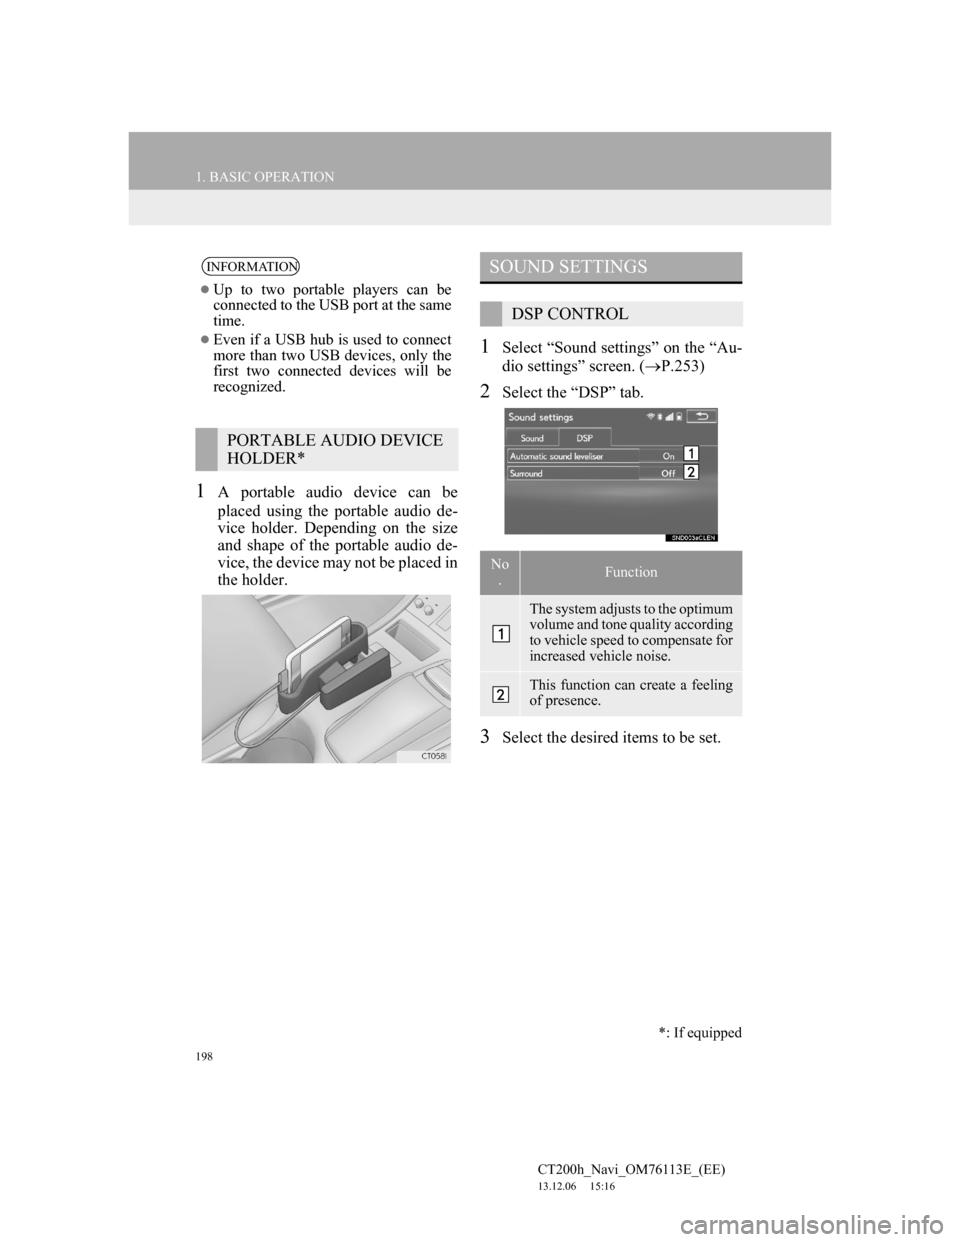
1A portable audio device can be
placed using the portable audio de-
vice holder. Depending on the size
and shape of the portable audio de-
vice, the device may not be placed in
the holder.
1Select “Sound settings” on the “Au-
dio settings” screen. (P.253)
2Select the “DSP” tab.
3Select the desired items to be set.
INFORMATION
Up to two portable players can be
connected to the USB port at the same
time.
Even if a USB hub is used to connect
more than two USB devices, only the
first two connected devices will be
recognized.
PORTABLE AUDIO DEVICE
HOLDER*
SOUND SETTINGS
DSP CONTROL
No
.Function
The system adjusts to the optimum
volume and tone quality according
to vehicle speed to compensate for
increased vehicle noise.
This function can create a feeling
of presence.
*: If equipped
Page 226 of 410
226
3. MEDIA OPERATION
CT200h_Navi_OM76113E_(EE)
13.12.06 15:16
WA R N I N G
Do not operate the player’s controls or connect the USB memory while driving.
NOTICE
Depending on the size and shape of the USB memory that is connected to the sys-
tem, the lid may not close fully. In this case, do not forcibly close the lid as this may
damage the USB memory or the terminal, etc.
Do not leave your portable player in the car. In particular, high temperatures inside
the vehicle may damage the portable player.
Do not push down on or apply unnecessary pressure to the portable player while it
is connected as this may damage the portable player or its terminal.
Do not insert foreign objects into the port as this may damage the portable player or
its terminal.
INFORMATION
The system can only output the sound while driving.
Audio files and image files can be played back at the same time. However, the slide
show interval may be longer than when an audio file is not being played back.
If tag information exists, the file/folder names will be changed to track/album
names.
Page 270 of 410
270
6. TIPS FOR OPERATING THE AUDIO/VISUAL SYSTEM
CT200h_Navi_OM76113E_(EE)
13.12.06 15:16
“Made for iPod”, “Made for iPhone”
and “Made for iPad” mean that an elec-
tronic accessory has been designed to
connect specifically to iPod, iPhone, or
iPad, respectively, and has been certi-
fied by the developer to meet Apple
performance standards.
Apple is not responsible for the opera-
tion of this device or its compliance
with safety and regulatory standards.
Please note that the use of this acces-
sory with iPod, iPhone, or iPad may
affect wireless performance.
iPad, iPhone, iPod, iPod classic, iPod
nano, and iPod touch are trademarks of
Apple Inc., registered in the U.S. and
other countries. Lightning is a trade-
mark of Apple Inc.
The Lightning connector works with
iPhone 5, iPod touch (5th generation),
and iPod nano (7th generation).
The 30-pin connector works with
iPhone 4S, iPhone 4, iPhone 3GS,
iPhone 3G, iPhone, iPod touch (1st
through 4th generation), iPod classic,
and iPod nano (1st through 6th genera-
tion).
USB works with iPhone 5, iPhone 4S,
iPhone 4, iPhone 3GS, iPhone 3G,
iPhone, iPod touch (1st through 5th
generation), iPod classic, and iPod
nano (1st through 7th generation).
The following iPod®, iPod nano®, iPod
classic®, iPod touch® and iPhone® de-
vices can be used with this system.
Made for
• iPod touch (5th generation)*
• iPod touch (4th generation)
• iPod touch (3rd generation)
• iPod touch (2nd generation)
• iPod touch (1st generation)
• iPod classic
• iPod with video
• iPod nano (7th generation)*
• iPod nano (6th generation)
• iPod nano (5th generation)
• iPod nano (4th generation)
• iPod nano (3rd generation)
• iPod nano (1st generation)
•iPhone 5*
•iPhone 4S
•iPhone 4
• iPhone 3GS
•iPhone 3G
•iPhone
*: iPod video not supported
iPodCOMPATIBLE MODELS
INFORMATION
Depending on differences between
models or software versions etc.,
some models might be incompatible
with this system.
Page 375 of 410
8
375
1
2
3
4
5
6
7
CT200h_Navi_OM76113E_(EE)
13.12.06 15:16
8
1. CONNECTED SERVICES
OVERVIEW .................................. 376
BEFORE USING CONNECTED
SERVICES .......................................... 378
2. SETTINGS REQUIRED FOR
USING THE SERVICE................. 379
OBTAINING LEXUS PORTAL SITE
ACCOUNT .......................................... 379
CONNECTING TO INTERNET ........... 380
3. ONLINE SEARCH ......................... 381
ONLINE SEARCH ................................. 381
VIEWING POI* DETAILS .................... 385
4. IMPORTING MEMORY POINTS
AND STORED ROUTES ............. 387
REGISTERING AN EXTERNAL
POINT AS A MEMORY POINT AND
ROUTES FROM THE INTERNET..... 387
PROCEDURE FOR DOWNLOADING
MEMORY POINTS AND ROUTES
FROM A USB MEMORY ................... 388
5. Street View ...................................... 391
6. Panoramio ........................................ 393
1. CONNECTED SERVICE
SETTINGS .................................... 395
CONNECTED SERVICE SETTINGS
SCREEN .............................................. 396
1CONNECTED SERVICES
2SETUP
CONNECTED SERVICES
Not all connected services may be available in all countries.
*: Point of Interest
Page 377 of 410
377
1. CONNECTED SERVICES
8
CONNECTED SERVICES
CT200h_Navi_OM76113E_(EE)
13.12.06 15:16
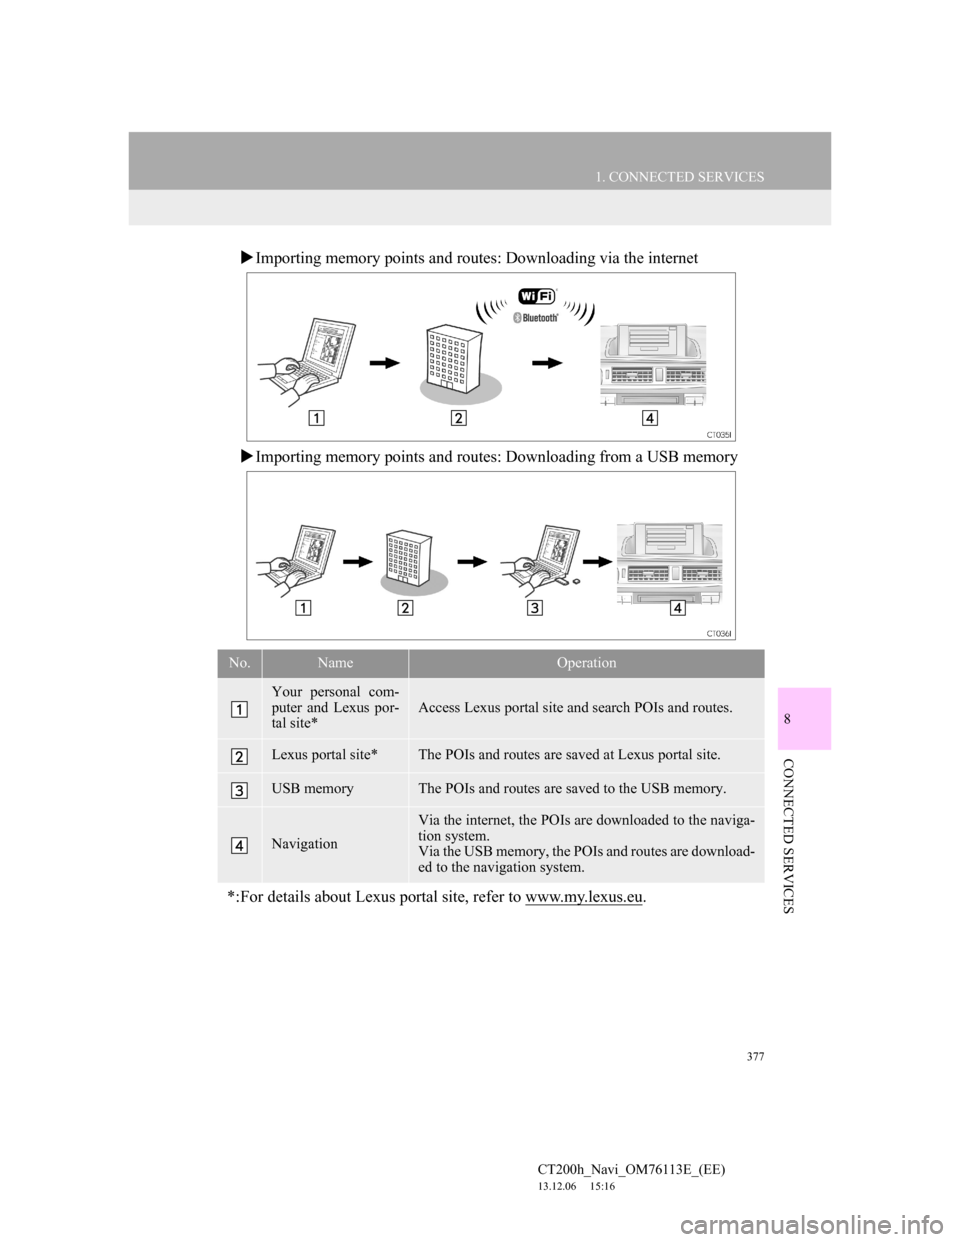
Importing memory points and routes: Downloading via the internet
Importing memory points and routes: Downloading from a USB memory
No.NameOperation
Your personal com-
puter and Lexus por-
tal site*
Access Lexus portal site and search POIs and routes.
Lexus portal site*The POIs and routes are saved at Lexus portal site.
USB memoryThe POIs and routes are saved to the USB memory.
Navigation
Via the internet, the POIs are downloaded to the naviga-
tion system.
Via the USB memory, the POIs and routes are download-
ed to the navigation system.
*:For details about Lexus portal site, refer to www.my.lexus.eu.