change time Lexus CT200h 2014 (in English) User Guide
[x] Cancel search | Manufacturer: LEXUS, Model Year: 2014, Model line: CT200h, Model: Lexus CT200h 2014Pages: 622
Page 192 of 622
1924-3. Operating the lights and wipers
CT200h_OM_OM76135E_(EE)
Ō¢ĀDaytime running light system
To make your vehicle more visible to other drivers, the front position lights turn on auto-
matically (at an increased intensity) whenever the hybrid system is started and the park-
ing brake is released. Daytime running lig hts are not designed for use at night.
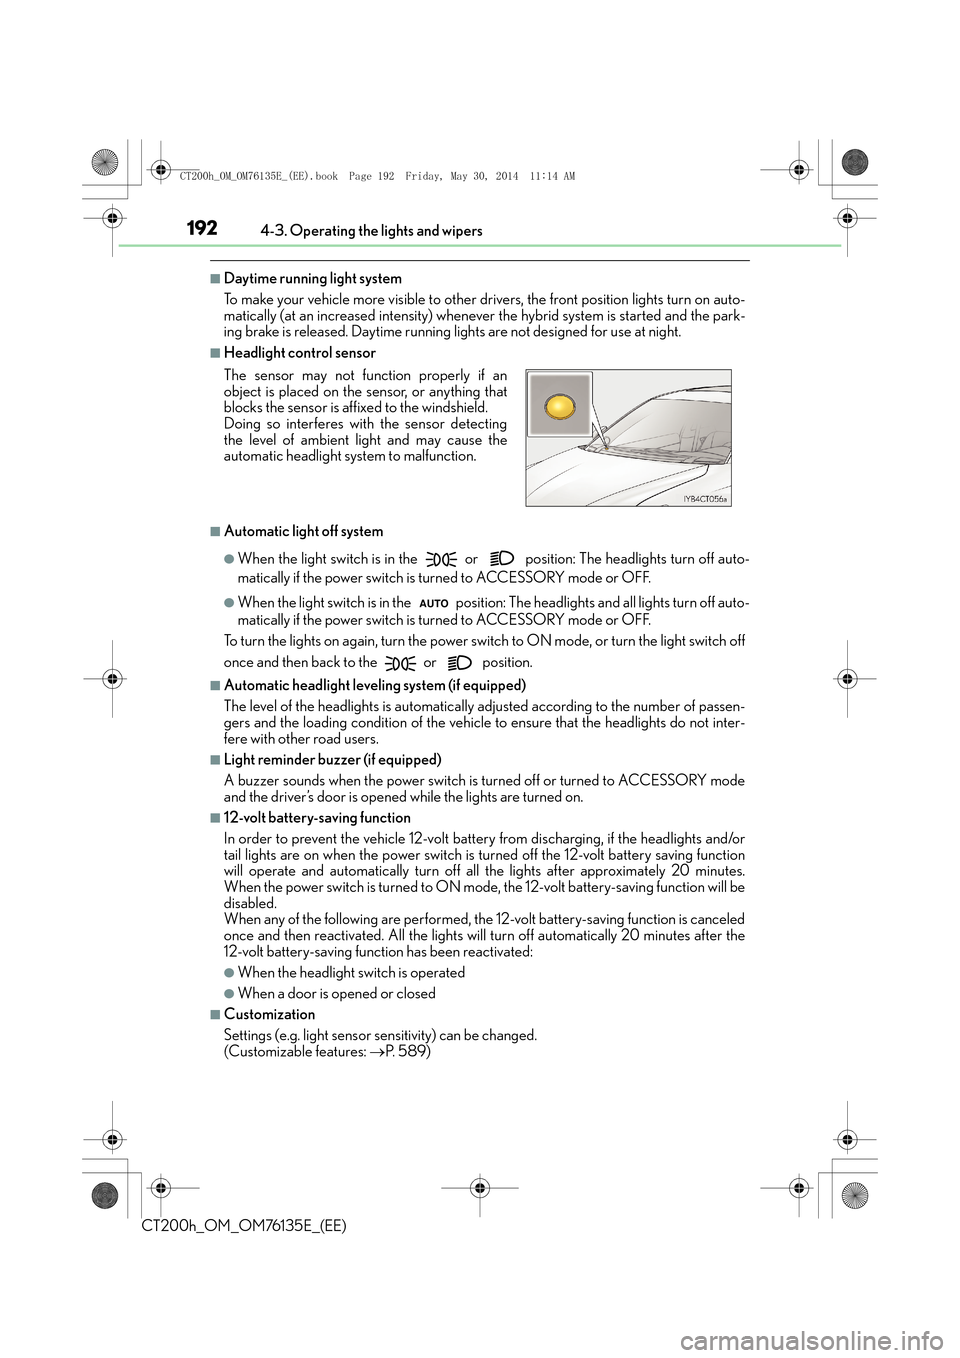
Ō¢ĀHeadlight control sensor
Ō¢ĀAutomatic light off system
ŌŚÅWhen the light switch is in the or position: The headlights turn off auto-
matically if the power switch is turned to ACCESSORY mode or OFF.
ŌŚÅWhen the light switch is in the position : The headlights and all lights turn off auto-
matically if the power switch is turned to ACCESSORY mode or OFF.
To turn the lights on again, turn the power swit ch to ON mode, or turn the light switch off
once and then back to the
or position.
Ō¢ĀAutomatic headlight leveling system (if equipped)
The level of the headlights is automatically adjusted according to the number of passen-
gers and the loading condition of the vehicle to ensure that the headlights do not inter-
fere with other road users.
Ō¢ĀLight reminder buzzer (if equipped)
A buzzer sounds when the power switch is turned off or turned to ACCESSORY mode
and the driverŌĆÖs door is opened while the lights are turned on.
Ō¢Ā12-volt battery-saving function
In order to prevent the vehicle 12-volt battery from discharging, if the headlights and/or
tail lights are on when the power switch is turned off the 12-volt battery saving function
will operate and automatically turn off all the lights after approximately 20 minutes.
When the power switch is turned to ON mode, the 12-volt battery-saving function will be
disabled.
When any of the following are performed, the 12-volt battery-saving function is canceled
once and then reactivated. A ll the lights will turn off automatically 20 minutes after the
12-volt battery-saving function has been reactivated:
ŌŚÅWhen the headlight switch is operated
ŌŚÅWhen a door is opened or closed
Ō¢ĀCustomization
Settings (e.g. light sensor se nsitivity) can be changed.
(Customizable features: ŌåÆP. 5 8 9 )
The sensor may not function properly if an
object is placed on the sensor, or anything that
blocks the sensor is affixed to the windshield.
Doing so interferes with the sensor detecting
the level of ambient light and may cause the
automatic headlight system to malfunction.
CT200h_OM_OM76135E_(EE).book Page 192 Friday, May 30, 2014 1
1:14 AM
Page 206 of 622
2064-5. Using the driving support systems
CT200h_OM_OM76135E_(EE)
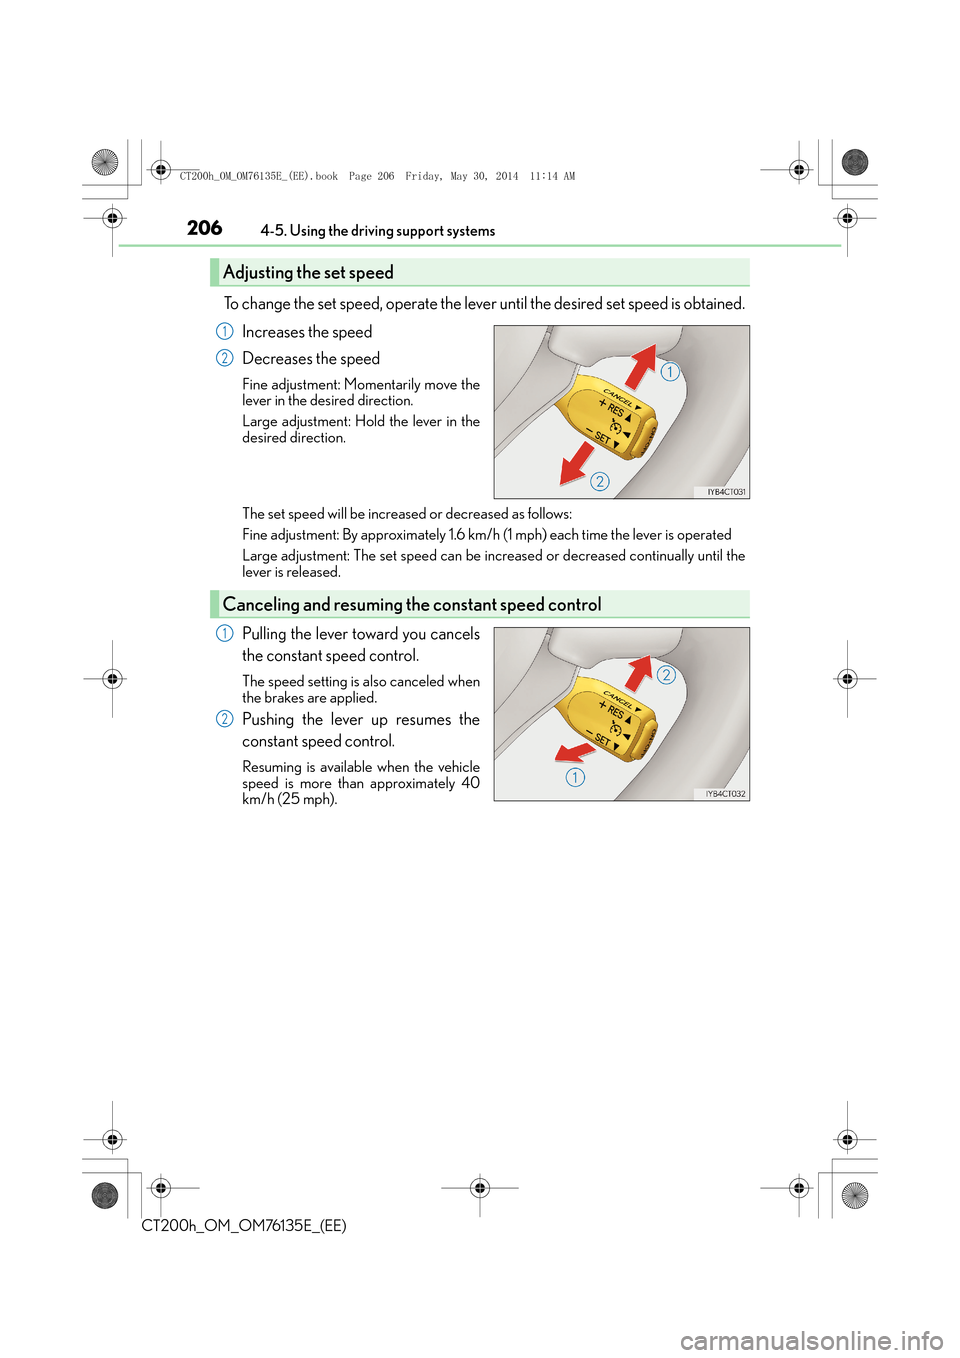
To change the set speed, operate the lever until the desired set speed is obtained.Increases the speed
Decreases the speed
Fine adjustment: Momentarily move the
lever in the desired direction.
Large adjustment: Hold the lever in the
desired direction.
The set speed will be increased or decreased as follows:
Fine adjustment: By approximately 1.6 km/h (1 mph) each time the lever is operated
Large adjustment: The set speed can be incr eased or decreased continually until the
lever is released.
Pulling the lever toward you cancels
the constant speed control.
The speed setting is also canceled when
the brakes are applied.
Pushing the lever up resumes the
constant speed control.
Resuming is available when the vehicle
speed is more than approximately 40
km/h (25 mph).
Adjusting the set speed
1
2
Canceling and resuming th e constant speed control
1
2
CT200h_OM_OM76135E_(EE).book Page 206 Friday, May 30, 2014 1 1:14 AM
Page 210 of 622

2104-5. Using the driving support systems
CT200h_OM_OM76135E_(EE)
To change the set speed, operate the lever until the desired set speed is dis-
played.Increases the speed
Decreases the speed
Fine adjustment: Momentarily move the
lever in the desired direction.
Large adjustment: Hold the lever in the
desired direction.
In the vehicle-to-vehicle distance control mode, the set speed will be increased or
decreased as follows:
�XFor Europe
ŌĆó When the set speed is shown in ŌĆ£km/hŌĆØ
Fine adjustment: By approximately 5 km/h (3.1 mph) each time the lever is oper-
ated
Large adjustment: By approximately 5 km/h (3.1 mph) for each 0.75 seconds the
lever is held
ŌĆó When the set speed is shown in ŌĆ£MPHŌĆØ Fine adjustment: By approximately 5 mph (8 km/h) each time the lever is operated
Large adjustment: By approximately 5 mph (8 km/h) for each 0.75 seconds the
lever is held
�XFor Ukraine and Israel
ŌĆó When the set speed is shown in ŌĆ£km/hŌĆØ
Fine adjustment: By approximately 1 km/h (0.6 mph) each time the lever is oper-
ated
Large adjustment: By approximately 5 km/h (3.1 mph) for each 0.75 seconds the
lever is held
ŌĆó When the set speed is shown in ŌĆ£MPHŌĆØ Fine adjustment: By approximately 1 mph (1.6 km/h) each time the lever is oper-
ated
Large adjustment: By approximately 5 mph (8 km/h) for each 0.75 seconds the
lever is held
In the constant speed control mode ( ŌåÆP. 213), the set speed will be increased or
decreased as follows:
Fine adjustment: By approximately 1.6 km/h (1 mph) each time the lever is operated
Large adjustment: The set speed can be incr eased or decreased continually until the
lever is released.
Adjusting the set speed
1
2
CT200h_OM_OM76135E_(EE).book Page 210 Friday, May 30, 2014 1 1:14 AM
Page 225 of 622

2254-5. Using the driving support systems
4
Driving
CT200h_OM_OM76135E_(EE)
ŌŚÅThe following situations may occur during use.
ŌĆó Depending on the shape of the obstacle and other factors, the detection distancemay shorten, or detection may be impossible.
ŌĆó Obstacles may not be detected if they are too close to the sensor.
ŌĆó There will be a short delay between obst acle detection and display. Even at slow
speeds, there is a possibility that the obstacl e will come within the sensorŌĆÖs detection
areas before the display is shown and the buzzer sounds.
ŌĆó Thin posts or objects lower than the sensor may not be detected when approached, even if they have been detected once.
ŌĆó It might be difficult to hear beeps due to the volume of audio system or air flow noise of the air conditioning system.
Ō¢ĀIf a message is displayed on the multi-information display
ŌåÆ P. 5 2 1
Ō¢ĀCustomization
Settings (e.g. buzzer sounds volume) can be changed.
(Customizable features: ŌåÆP. 5 8 9 )
WA R N I N G
Ō¢ĀWhen using the Lexus parking assist-sensor
Observe the following precautions.
Failing to do so may result in the vehicle be ing unable to be driven safely and possibly
cause an accident.
ŌŚÅDo not use the sensor at speeds in excess of 10 km/h (6 mph).
ŌŚÅThe sensorsŌĆÖ detection areas and reaction times are limited. When moving forward or
reversing, check the areas surrounding the vehicle (especially the sides of the vehi-
cle) for safety, and drive slowly, using the brake to control the vehicleŌĆÖs speed.
ŌŚÅDo not install accessories within the sensorsŌĆÖ detection areas.
CT200h_OM_OM76135E_(EE).book Page 225 Friday, May 30, 2014 1 1:14 AM
Page 228 of 622

2284-5. Using the driving support systems
CT200h_OM_OM76135E_(EE)
ŌŚÅTo temporarily turn off the monitor
when it is on.
Push the ŌĆ£AUTOŌĆØ button. The indica-
tor should turn orange.
The monitor will automatically turn
on again after the power switch is
turned off and ON mode.
ŌŚÅTo manually turn on the monitor
when it is turned off.
Push the ŌĆ£AUTOŌĆØ button. The indica-
tor should turn green.
Ō¢ĀWhen using the rear view monitor system
The anti-glare function of the inside rear view mirror will be canceled.
Ō¢ĀAutomatic shut off
The display will be turned off automatically after 5 minutes.
Ō¢ĀDisplay mode
The rear view monitor display mode can be adjusted when the power switch is
in ON mode and the shift position is in R.
ŌŚÅTo select a display language (English, French or Spanish).
Push and hold the ŌĆ£AUTOŌĆØ button for 6 to 12 seconds.
The monitor should turn on and the indicator should turn green.
Push the ŌĆ£AUTOŌĆØ button.
Each time the ŌĆ£AUTOŌĆØ button is pushed and released, the language will
change.
The warning message should flash 5 seconds after the button is
released, indicating that the change has been completed.
Switching the screen (rear view mirror type)
1
2
3
CT200h_OM_OM76135E_(EE).book Page 228 Friday, May 30, 2014 1 1:14 AM
Page 268 of 622

2685-3. Using the radio
CT200h_OM_OM76135E_(EE)
Ō¢ĀManually operationSearch for the desired stations by turning the ŌĆ£TUNEŌĆóSELŌĆØ knob or press-
ing ŌĆ£ Ōł¦ŌĆØ or ŌĆ£ Ōł©ŌĆØ on the ŌĆ£SEEKŌĆóTRACKŌĆØ button.
Press and hold the button (from the ŌĆ£1ŌĆØ button to the ŌĆ£6ŌĆØ button) the station
is to be set to until you hear a beep.
Ō¢ĀAutomatically operation
Press and hold the ŌĆ£ASTŌĆØ button until you hear a beep. Up to 6 stations are set in order of reception quality. When the setting is
complete, 2 beeps will be heard.
This feature allows your radio to receive station and program information (classi-
cal, news, etc.) from radio stations which broadcast this information.
Ō¢ĀListening to stations of the same network
Press the ŌĆ£AFŌĆØ button.
ŌĆ£AF-ONŌĆØ, ŌĆ£REG-OFFŌĆØ modes:
A station among those of the same network with strong reception is selected.
ŌĆ£A F - O N ŌĆØ , ŌĆ£ R E G - O N ŌĆØ m o d e s :
A station among those of the same netw ork with strong reception and broad-
casting the same program is selected.
Each time the ŌĆ£AFŌĆØ button is pressed, the mode changes in the following order:
ŌĆ£AF-ONŌĆØ, ŌĆ£REG-OFFŌĆØ ŌåÆ ŌĆ£A F - O N ŌĆØ , ŌĆ£ R E G - O N ŌĆØ ŌåÆ ŌĆ£AF-OFFŌĆØ, ŌĆ£REG-OFFŌĆØ.
Setting station presets
RDS (Radio Data System)
1
2
CT200h_OM_OM76135E_(EE).book Page 268 Friday, May 30, 2014 1 1:14 AM
Page 269 of 622
2695-3. Using the radio
5
Audio system
CT200h_OM_OM76135E_(EE)
Ō¢ĀTraffic information
Press the ŌĆ£TAŌĆØ button.
TP mode:
The system automatically switches to traffic information when a broadcast
with a traffic information signal is received.
The station returns to the previous one when the traffic information ends.
TA m o d e :
Traffic information can be heard only when a signal is received. The system
switches to the mute mode when a signal is not received. In CD or MP3/WMA
mode, the system automatically switches to traffic information when a signal is
received.
The audio system returns to the mute, CD or MP3/WMA mode when the traffic
information ends.
Audio system mode changes as follows each time the ŌĆ£TAŌĆØ button is pressed:
FM modes: ŌĆ£TPŌĆØ ŌåÆ ŌĆ£TAŌĆØ ŌåÆ off
Modes other than the radio modes: ŌĆ£TAŌĆØ ŌåÆ off
Ō¢ĀEmergency broadcast reception mode
ŌĆ£ALARMŌĆØ appears in the display in the event that an emergency broadcast is
received, and the emergency broadcast is aired.
Ō¢ĀEON (Enhanced Other Network) system (for traffic announcement function)
If the RDS station (with EON data) you are liste ning to is not broadcasting a traffic infor-
mation program and the audio system is in the TA (traffic announcement) mode, the
radio will be switched automatically to a station broadcasting a traffic information pro-
gram in the EON AF list when traffic information begins.
Ō¢ĀWhen the 12-volt battery is disconnected
All preset stations are erased.
Ō¢ĀReception sensitivity
ŌŚÅMaintaining perfect radio reception at all time s is difficult due to the continually chang-
ing position of the antenna, differences in si gnal strength and surrounding objects, such
as trains, transmitters, etc.
ŌŚÅWhen the ŌĆ£ASTŌĆØ button is used, automati c station selection may not be possible.
ŌŚÅThe radio antenna is mounted inside the rear window. To maintain clear radio reception,
do not attach metallic window tinting or other metallic objects to the antenna wire
mounted inside the rear window.
Ō¢ĀDigital Audio Broadcast (DAB) radio
The optional radio antenna and tuner are necessary for the use of Digital Audio Broad-
cast (DAB) radio.
CT200h_OM_OM76135E_(EE).book Page 269 Friday, May 30, 2014 1 1:14 AM
Page 271 of 622
2715-4. Playing audio CDs and MP3/WMA discs
5
Audio system
CT200h_OM_OM76135E_(EE)
Insert a CD.
Press and remove the CD.
Ō¢ĀSelecting a track
Press ŌĆ£Ōł¦ŌĆØ to move up or ŌĆ£ Ōł©ŌĆØ to move down using the ŌĆ£SEEKŌĆóTRACKŌĆØ button
until the desired track number appears on the displayed.
Ō¢ĀFast-forwarding and reversing tracks
To fast-forward or reverse, press and hold ŌĆ£ Ōł¦ŌĆØ or ŌĆ£ Ōł©ŌĆØ on the ŌĆ£SEEKŌĆóTRACKŌĆØ
button until you hear a beep.
Ō¢ĀRandom play
Press the ŌĆ£1ŌĆØ button.
Songs are played in random order.
To cancel, press the button again.
Ō¢ĀRepeat play
Press the ŌĆ£2ŌĆØ button.
To cancel, press the button again.
Ō¢ĀSwitching the display
Press the ŌĆ£TEXTŌĆØ button.
Each time the button is pressed, the display changes in the following order:
Elapsed time ŌåÆ CD title ŌåÆ Track title
Ō¢ĀSelecting a folder one at a time
Press the ŌĆ£5ŌĆØ button or the ŌĆ£6ŌĆØ bu tton to select the desired folder.
Ō¢ĀReturning to the first folder
Press and hold the ŌĆ£5ŌĆØ button until you hear a beep.
Ō¢ĀFast-forwarding and reversing files
To fast-forward or reverse, press and hold ŌĆ£ Ōł¦ŌĆØ or ŌĆ£ Ōł©ŌĆØ on the ŌĆ£SEEKŌĆóTRACKŌĆØ
button until you hear a beep.
Loading CDs or MP3 and WMA discs
Ejecting CDs or MP3 and WMA discs
Using the CD player
Playing back MP3 and WMA discs
CT200h_OM_OM76135E_(EE).book Page 271 Friday, May 30, 2014 1 1:14 AM
Page 272 of 622
2725-4. Playing audio CDs and MP3/WMA discs
CT200h_OM_OM76135E_(EE)
Ō¢ĀSelecting file
Turn the ŌĆ£TUNEŌĆóSELŌĆØ knob or press ŌĆ£Ōł¦ŌĆØ or ŌĆ£ Ōł©ŌĆØ on the ŌĆ£SEEKŌĆóTRACKŌĆØ button
to select the desired file.
Ō¢ĀRandom play
�XPlaying files from a folder in random order
Press the ŌĆ£1ŌĆØ button.
To cancel, press the button again.
�XPlaying all the files from a disc in random order
Press and hold the ŌĆ£1ŌĆØ button until you hear a beep.
To cancel, press the button again.
Ō¢ĀRepeat play
�XRepeating a file
Press the ŌĆ£2ŌĆØ button.
To cancel, press the button again.
�XRepeating all the files in a folder
Press and hold the ŌĆ£2ŌĆØ button until you hear a beep.
To cancel, press the button again.
Ō¢ĀSwitching the display
Press the ŌĆ£TEXTŌĆØ button.
Each time the button is pressed, the display changes in the following order:
Folder no./File no./Elapsed time ŌåÆ Folder name ŌåÆ File name ŌåÆ
Album title (MP3 only) ŌåÆ Track title ŌåÆ Artist name
Ō¢ĀCD player protection feature
To protect the internal components, playback is automatically stopped when a problem is
detected.
Ō¢ĀDisplay
Up to 12 characters can be displayed at a time.
If there are 13 or more characters, pressing and holding the ŌĆ£TEXTŌĆØ button for 1 second
or more enables to display the remaining characters.
A maximum of 24 characters can be displayed.
If the ŌĆ£TEXTŌĆØ button is pressed for more than 1 second again or has not been operated
for more than 6 seconds, the display will return to the first 12 characters.
Depending on the contents recorded, the characters may not be displayed properly or
may not be displayed at all.
CT200h_OM_OM76135E_(EE).book Page 272 Friday, May 30, 2014 1 1:14 AM
Page 279 of 622
2795-5. Using an external device
5
Audio system
CT200h_OM_OM76135E_(EE)
Turn the ŌĆ£TUNEŌĆóSELŌĆØ knob or press ŌĆ£Ōł¦ŌĆØ or ŌĆ£ Ōł©ŌĆØ on the ŌĆ£SEEKŌĆóTRACKŌĆØ button to
select the desired song.
To play or pause a song, press the ŌĆ£3ŌĆØ button.
To fast-forward or rewind, press and hold ŌĆ£ Ōł¦ŌĆØ or ŌĆ£ Ōł©ŌĆØ on the ŌĆ£SEEKŌĆóTRACKŌĆØ but-
ton until you hear a beep.
Ō¢ĀPlaying songs from one playlist or album in random order
Press the ŌĆ£1ŌĆØ button.
To cancel, press the button again.
Ō¢ĀPlaying songs from all the playlists or albums in random order
Press and hold the ŌĆ£1ŌĆØ button until you hear a beep.
To cancel, press the button again.
Press the ŌĆ£2ŌĆØ button.
To cancel, press the button again.
Press the ŌĆ£TEXTŌĆØ button.
Each time the button is pressed, the di splay changes in the following order:
Elapsed time ŌåÆ Album title ŌåÆ Track title ŌåÆ Artist name
Press the ŌĆ£TUNEŌĆóSELŌĆØ knob to enter iPod menu mode.
Pressing the knob changes sound modes. ( ŌåÆP. 2 6 5 )
Selecting songs
Playing and pausing songs
Fast-forwarding and rewinding songs
Shuffle playback
Repeat play
Switching the display
Adjusting sound quality and volume balance
1
2
CT200h_OM_OM76135E_(EE).book Page 279 Friday, May 30, 2014 1 1:14 AM