settings Lexus GS300h 2016 Navigation manual
[x] Cancel search | Manufacturer: LEXUS, Model Year: 2016, Model line: GS300h, Model: Lexus GS300h 2016Pages: 383, PDF Size: 46.51 MB
Page 79 of 383
79
3. OTHER SETTINGS
BASIC FUNCTION
GS_Navi+MM_OM30F13E_(EE)
15.09.01 14:54
2
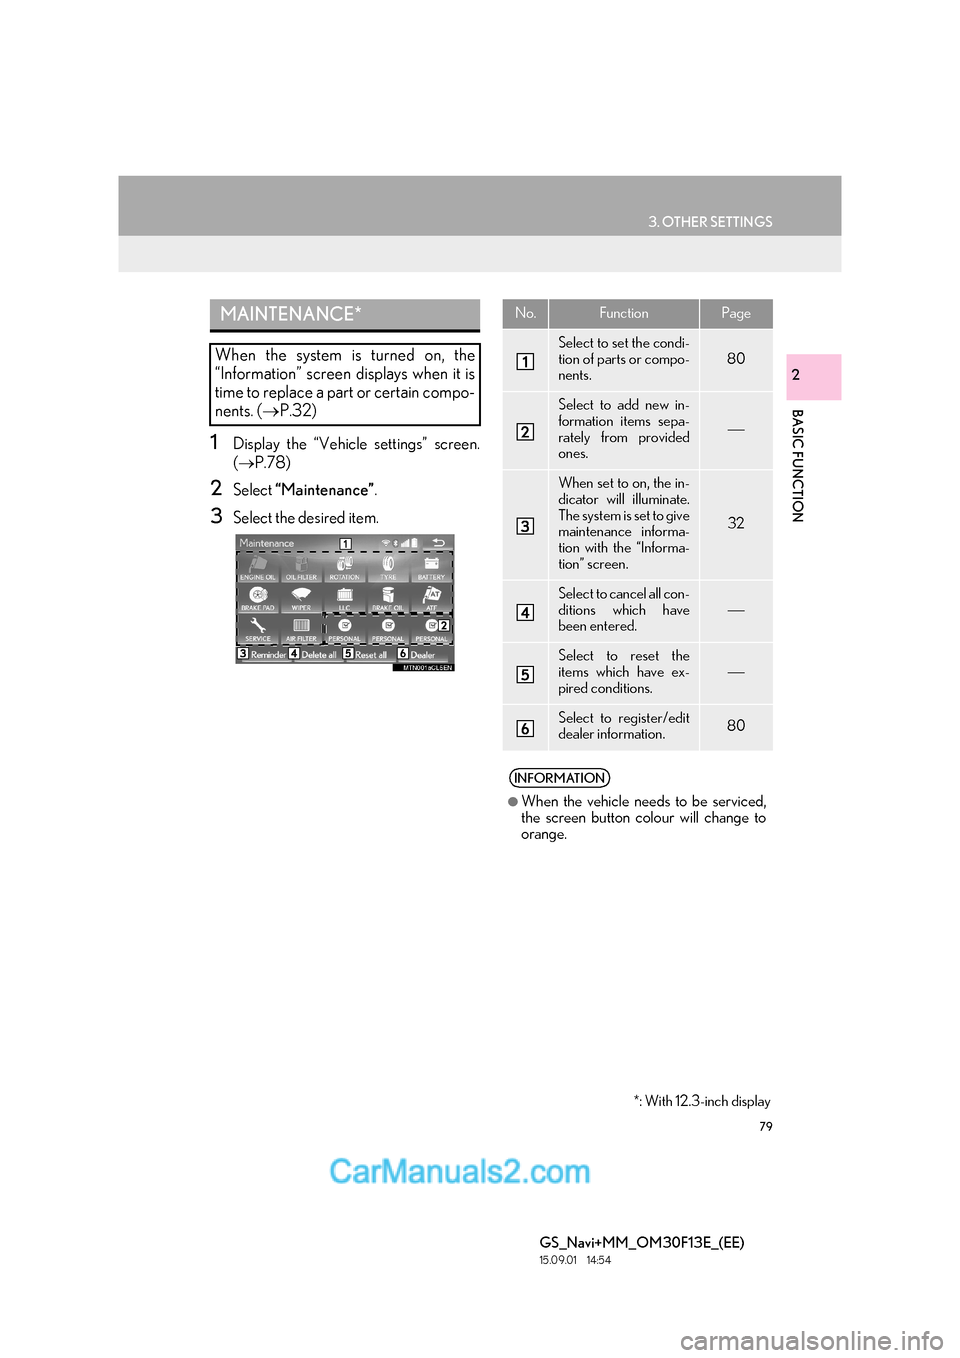
1Display the “Vehicle settings” screen.
(→ P.78)
2Select “Maintenance” .
3Select the desired item.
MAINTENANCE*
When the system is turned on, the
“Information” screen displays when it is
time to replace a part or certain compo-
nents. (→P.32)
No.FunctionPage
Select to set the condi-
tion of parts or compo-
nents.
80
Select to add new in-
formation items sepa-
rately from provided
ones.
When set to on, the in-
dicator will illuminate.
The system is set to give
maintenance informa-
tion with the “Informa-
tion” screen.
32
Select to cancel all con-
ditions which have
been entered.
Select to reset the
items which have ex-
pired conditions.
Select to register/edit
dealer information.80
INFORMATION
●
When the vehicle needs to be serviced,
the screen button colour will change to
orange.
*: With 12.3-inch display
Page 80 of 383
80
3. OTHER SETTINGS
GS_Navi+MM_OM30F13E_(EE)
15.09.01 14:54
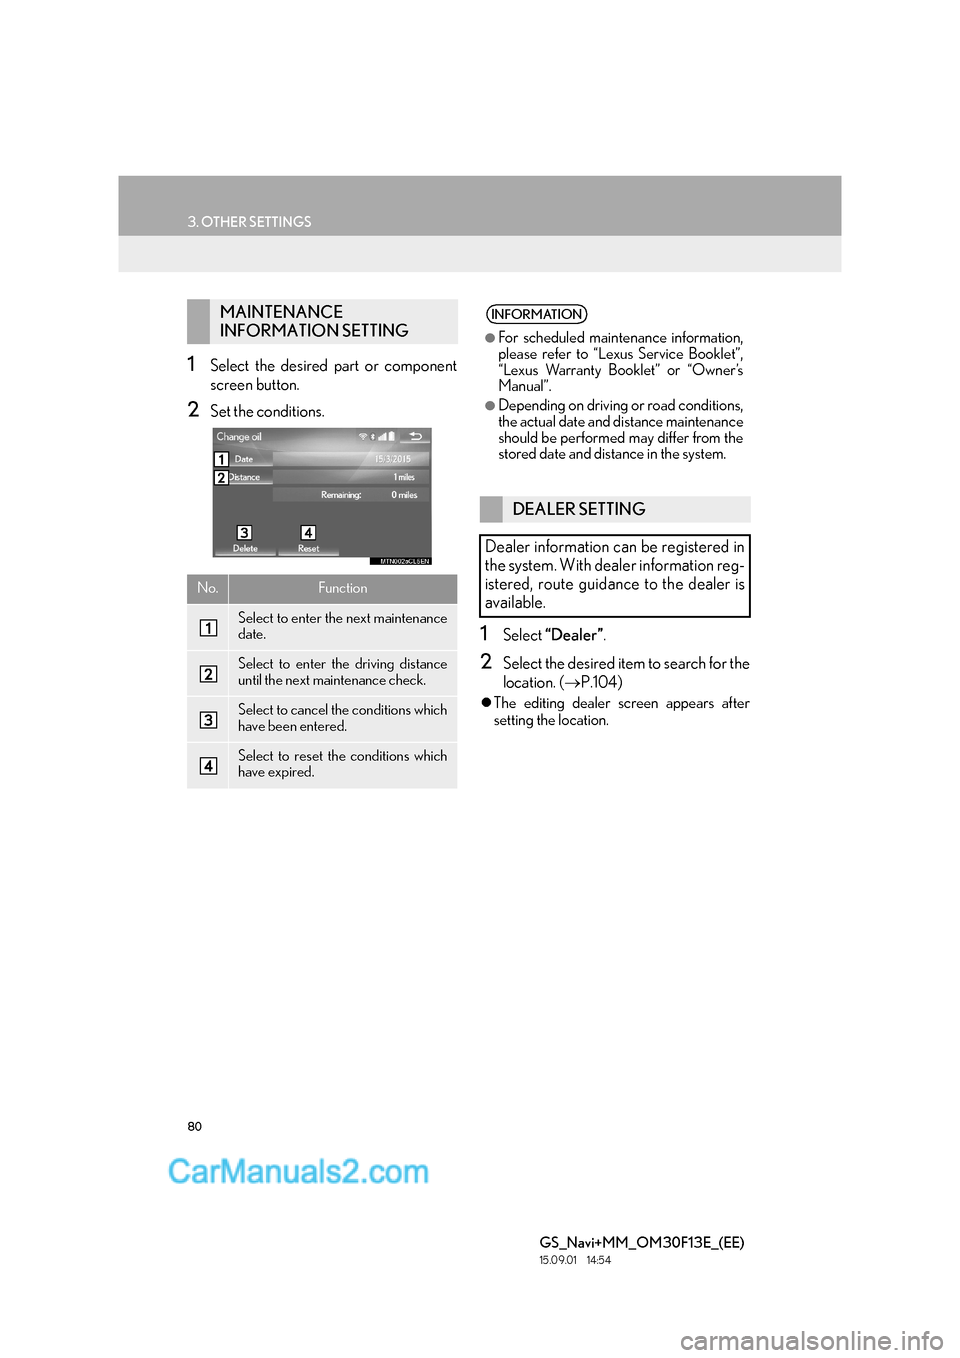
1Select the desired part or component
screen button.
2Set the conditions.
1Select “Dealer” .
2Select the desired item to search for the
location. ( →P.104)
zThe editing dealer screen appears after
setting the location.
MAINTENANCE
INFORMATION SETTING
No.Function
Select to enter the next maintenance
date.
Select to enter the driving distance
until the next maintenance check.
Select to cancel the conditions which
have been entered.
Select to reset the conditions which
have expired.
INFORMATION
●
For scheduled maintenance information,
please refer to “Lexus Service Booklet”,
“Lexus Warranty Booklet” or “Owner’s
Manual”.
●Depending on driving or road conditions,
the actual date and distance maintenance
should be performed may differ from the
stored date and distance in the system.
DEALER SETTING
Dealer information can be registered in
the system. With dealer information reg-
istered, route guidance to the dealer is
available.
Page 81 of 383

81
3. OTHER SETTINGS
BASIC FUNCTION
GS_Navi+MM_OM30F13E_(EE)
15.09.01 14:54
2
3Select the desired item to be edited.■EDITING DEALER OR CONTACT
NAME
1Select “Dealer” or “Contact” .
2Enter the name and select “OK”.
■EDITING THE LOCATION
1Select “Location” .
2Scroll the map to the desired point
(→ P.95) and select “OK”.
■EDITING TELEPHONE NUMBER
1Select “Tel. no.” .
2Enter the telephone number and select
“OK”.
No.FunctionPage
Select to enter the name of
a dealer.81
Select to enter the name of
a dealer member.81
Select to set the location.81
Select to set the telephone
number.81
Select to set the displayed
dealer as a destination.115
Select to delete the dealer
information displayed on
the screen.
Page 82 of 383

82
3. OTHER SETTINGS
GS_Navi+MM_OM30F13E_(EE)
15.09.01 14:54
Page 85 of 383
85
GS_Navi+MM_OM30F13E_(EE)
15.09.01 14:52
1
2
3
4
5 6
7
8 9
1. MY MEMORY SETTINGS ..................... 131
SETTING UP HOME ............................................. 132
SETTING UP QUICK ACCESS ...................... 134
SETTING UP MEMORY POINTS .................. 136
SETTING UP AREA TO AVOID ..................... 140
SETTING UP ROUTE TRACE .......................... 142
BACKUP TO A USB MEMORY ..................... 144
COPYING FROM A USB MEMORY.......... 146
1. NAVIGATION SETTINGS .................... 147
NAVIGATION SETTINGS SCREEN ........... 147
2. TRAFFIC AND PARKING SETTINGS.................................................. 151
TRAFFIC AND PARKING SETTINGS
SCREEN ..................................................................... 151
1. GPS (GLOBAL POSITIONING SYSTEM) ................................................... 160
LIMITATIONS OF THE NAVIGATION
SYSTEM .................................................................... 160
2. MAP DATABASE VERSION AND COVERED AREA ................................. 163
MAP DATA ................................................................. 163
ABOUT THE MAP DATA ................................... 164
4MY MEMORY
5SETUP
6TIPS FOR THE NAVIGATION
SYSTEM
Page 131 of 383
131
GS_Navi+MM_OM30F13E_(EE)
15.09.01 14:54
NAVIGATION SYSTEM
3
4. MY MEMORY
1. MY MEMORY SETTINGS
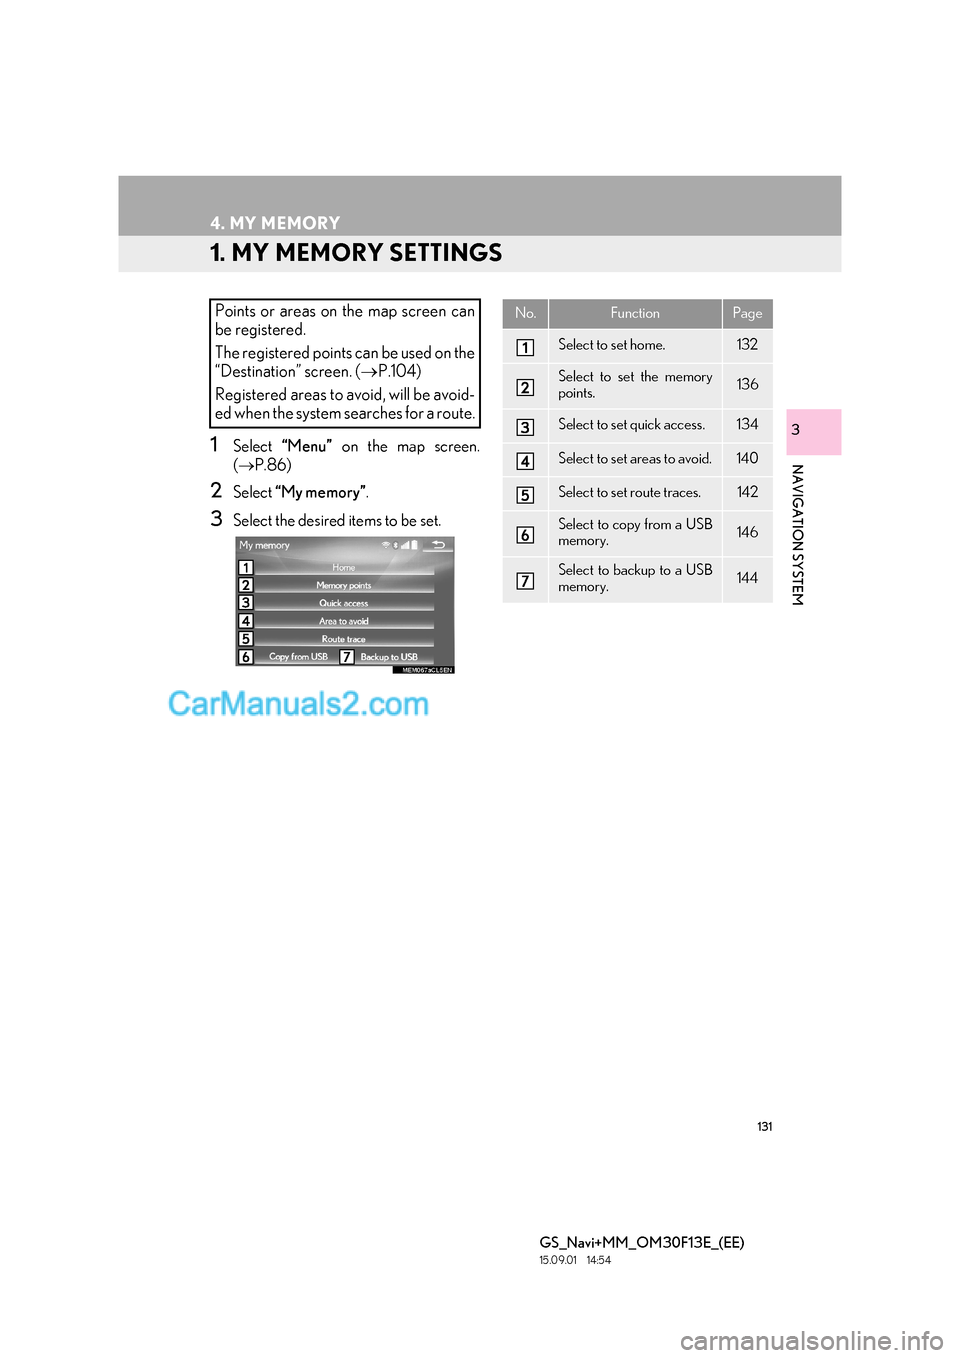
1Select “Menu” on the map screen.
( → P.86)
2Select “My memory” .
3Select the desired items to be set.
Points or areas on the map screen can
be registered.
The registered points can be used on the
“Destination” screen. ( →P.104)
Registered areas to avoid, will be avoid-
ed when the system searches for a route.No.FunctionPage
Select to set home.132
Select to set the memory
points.136
Select to set quick access.134
Select to set areas to avoid.140
Select to set route traces.142
Select to copy from a USB
memory.146
Select to backup to a USB
memory.144
Page 147 of 383

147
GS_Navi+MM_OM30F13E_(EE)
15.09.01 14:54
NAVIGATION SYSTEM
3
5. SETUP
1. NAVIGATION SETTINGS
1Press the “MENU” button on the
Remote Touch.
2Select “Setup” .
3Select “Navigation” .
4Select the items to be set.
NAVIGATION SETTINGS
SCREEN
Page 148 of 383

148
5. SETUP
GS_Navi+MM_OM30F13E_(EE)
15.09.01 14:54
No.FunctionPage
Select to set the automatic
screen button hiding func-
tion on/off. When set to on,
certain screen buttons on
the map screen will disap-
pear several seconds after
the Remote Touch has
been operated. When set
to off, all the screen buttons
will always be displayed.
Detailed connected service
settings can be changed.357
Select to set the average
vehicle speed.149
Select to set displayed POI
icon categories.149
Select to set display of 3D
landmarks on/off.
*Select to set speed limit in-
formation on/off.
Select to set the automatic
zooming function on/off.
(When the vehicle ap-
proaches a guidance point)
Select to set the automatic
zooming function on/off for
the side display.
Select to set display of cau-
tionary messages on/off.
(e.g., When the route in-
cludes traffic restrictions or
seasonally restricted
roads.)
Select to set display of pop-
up messages on/off.
Select to adjust the current
position mark manually.
Miscalculation of the dis-
tance caused by tyre re-
placement can also be
adjusted.
150
Coverage areas and legal
information can be dis-
played.
163
Select to reset all setup
items.
*: Without RSA (Road Sign Assist)
No.FunctionPage
Page 149 of 383
149
5. SETUP
GS_Navi+MM_OM30F13E_(EE)
15.09.01 14:54
NAVIGATION SYSTEM
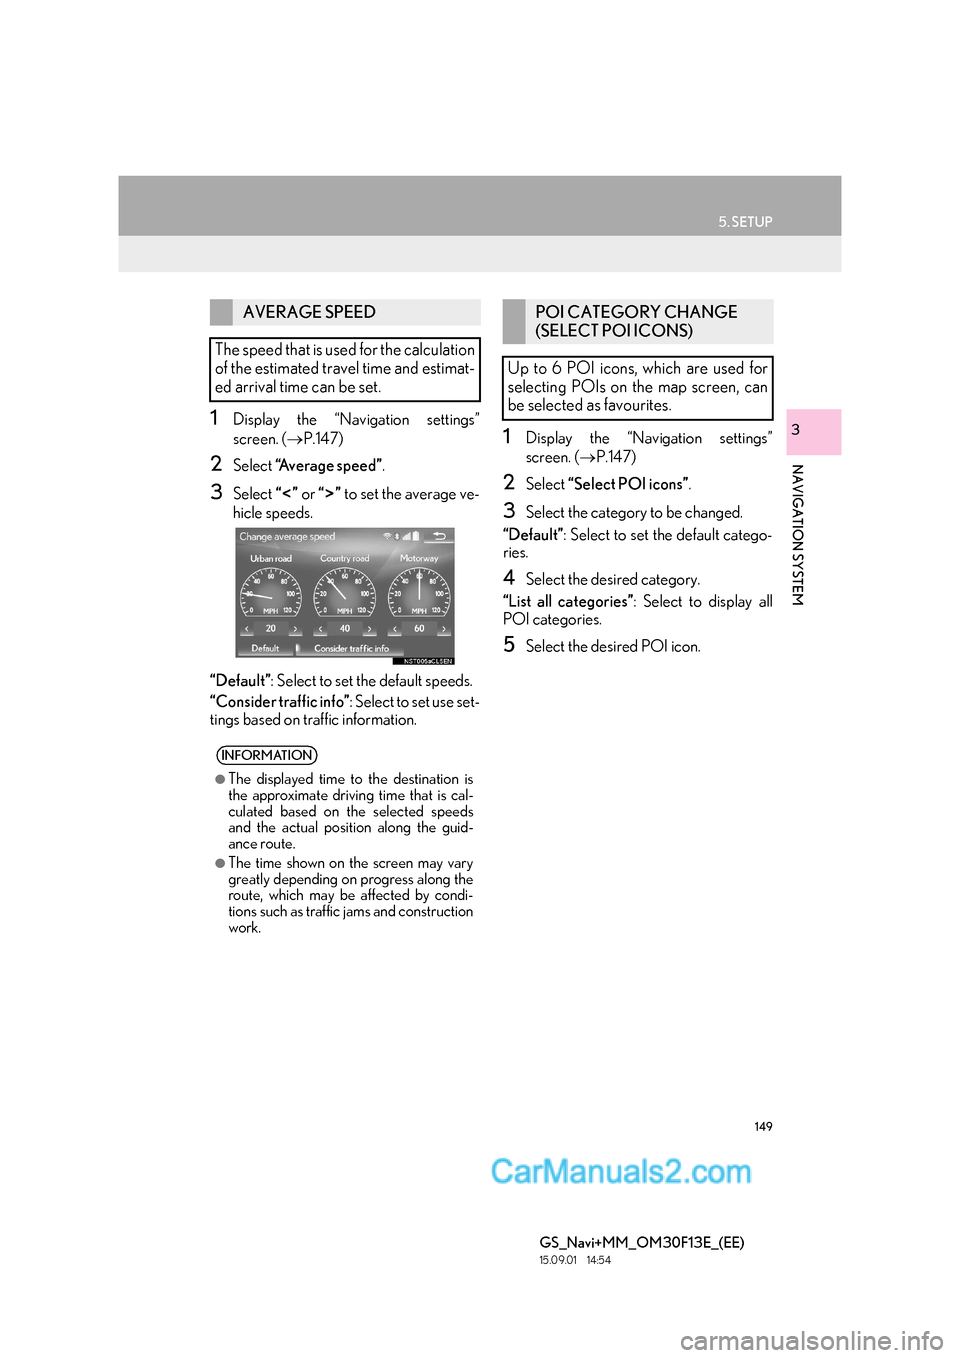
31Display the “Navigation settings”
screen. (→P.147)
2Select “Average speed” .
3Select “” or “” to set the average ve-
hicle speeds.
“Default” : Select to set the default speeds.
“Consider traffic info” : Select to set use set-
tings based on traffic information.
1Display the “Navigation settings”
screen. ( →P.147)
2Select “Select POI icons” .
3Select the category to be changed.
“Default” : Select to set the default catego-
ries.
4Select the desired category.
“List all categories” : Select to display all
POI categories.
5Select the desired POI icon.
AVERAGE SPEED
The speed that is used for the calculation
of the estimated travel time and estimat-
ed arrival time can be set.
INFORMATION
●
The displayed time to the destination is
the approximate driving time that is cal-
culated based on the selected speeds
and the actual position along the guid-
ance route.
●The time shown on the screen may vary
greatly depending on progress along the
route, which may be affected by condi-
tions such as traffic jams and construction
work.
POI CATEGORY CHANGE
(SELECT POI ICONS)
Up to 6 POI icons, which are used for
selecting POIs on the map screen, can
be selected as favourites.
Page 150 of 383

150
5. SETUP
GS_Navi+MM_OM30F13E_(EE)
15.09.01 14:54
1Display the “Navigation settings”
screen. (→P.147)
2Select “Calibration” .
3Select the desired item.
■POSITION/DIRECTION CALI-
BRATION
1Select “Position / Direction” .
2Scroll the map to the desired point
(→ P.95) and select “OK”.
3Select an arrow to adjust the direction of
the current position mark and select
“OK”.
■TYRE CHANGE CALIBRATION
1Select “Tyre change” .
zThe message appears and the quick dis-
tance calibration is automatically started.
CURRENT POSITION/TYRE
CHANGE CALIBRATION
The current position mark can be adjust-
ed manually. Miscalculation of the dis-
tance caused by tyre replacement can
also be adjusted.
z For additional information on the accu-
racy of a current position: →P.1 6 0
When driving, the current position mark
will be automatically corrected by GPS
signals. If GPS reception is poor due to
location, the current position mark can
be adjusted manually.
The tyre change calibration function will
be used when replacing the tyres. This
function will adjust miscalculation
caused by the circumference difference
between the old and new tyres.
INFORMATION
●
If this procedure is not performed when
the tyres are replaced, the current posi-
tion mark may be incorrectly displayed.