control Lexus GS350 2010 Owners Manual
[x] Cancel search | Manufacturer: LEXUS, Model Year: 2010, Model line: GS350, Model: Lexus GS350 2010Pages: 650, PDF Size: 15.04 MB
Page 355 of 650
354
3-4. Using the hands-free system (for cellular phone)
GS_G_U (OM30C80U)
January 27, 2010 4:47 pm
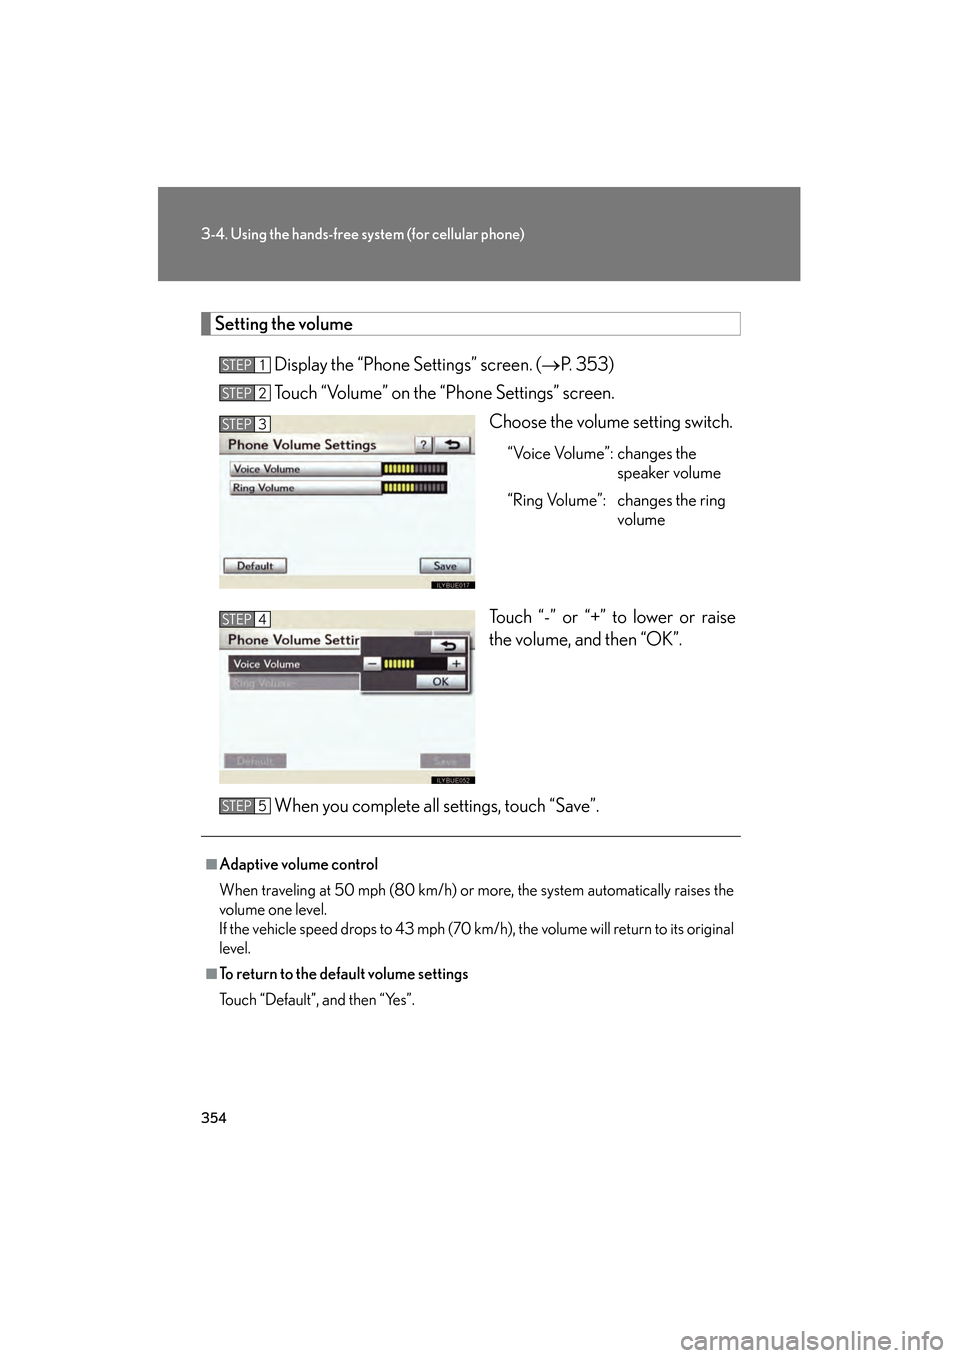
Setting the volume
Display the “Phone Settings” screen. ( →P. 353)
Touch “Volume” on the “Phone Settings” screen.
Choose the volume setting switch.
“Voice Volume”: changes the speaker volume
“Ring Volume”: changes the ring volume
Touch “-” or “+” to lower or raise
the volume, and then “OK”.
When you complete all settings, touch “Save”.
STEP1
STEP2
STEP3
STEP4
■Adaptive volume control
When traveling at 50 mph (80 km/h) or more, the system automatically raises the
volume one level.
If the vehicle speed drops to 43 mph (70 km/h), the volume will return to its original
level.
■To return to the default volume settings
Touch “Default”, and then “Yes”.
STEP5
GS_U_G.book Page 354 Wednesday, January 27, 2010 4:48 PM
Page 383 of 650
382
GS_G_U (OM30C80U)
January 27, 2010 4:47 pm
3-5. Using the interior lights
Interior lights list
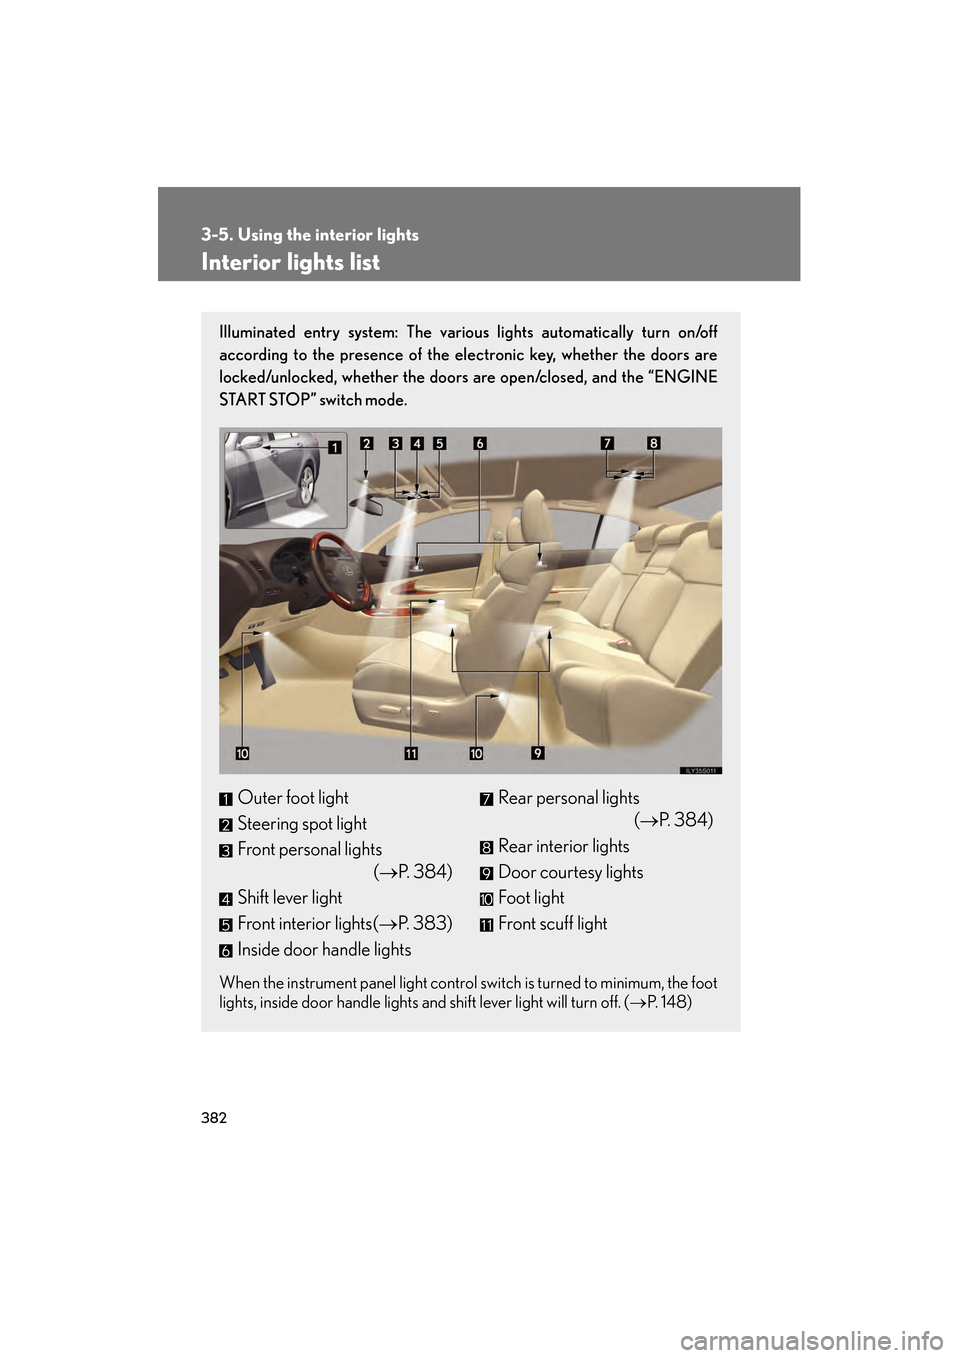
Illuminated entry system: The various lights automatically turn on/off
according to the presence of the electronic key, whether the doors are
locked/unlocked, whether the doors are open/closed, and the “ENGINE
START STOP” switch mode.
When the instrument panel light control switch is turned to minimum, the foot
lights, inside door handle lights and shift lever light will turn off. (→P. 1 4 8 )
Outer foot light
Steering spot light
Front personal lights
(→P. 384)
Shift lever light
Front interior lights( →P. 383)
Inside door handle lightsRear personal lights (→P. 384)
Rear interior lights
Door courtesy lights
Foot light
Front scuff light
GS_U_G.book Page 382 Wednesday, January 27, 2010 4:48 PM
Page 412 of 650
411
3-7. Other interior features
3
Interior features
GS_G_U (OM30C80U)
January 27, 2010 4:47 pm
Garage door opener
The garage door opener (HomeLink® Universal Transceiver) is manufactured
under license from HomeLink®.
Programming the HomeLink® (for U.S.A. owners)
The HomeLink
® compatible transceiver in your vehicle has 3 buttons
which can be programmed to operate 3 different devices. Refer to the
programming method below appropriate for the device.
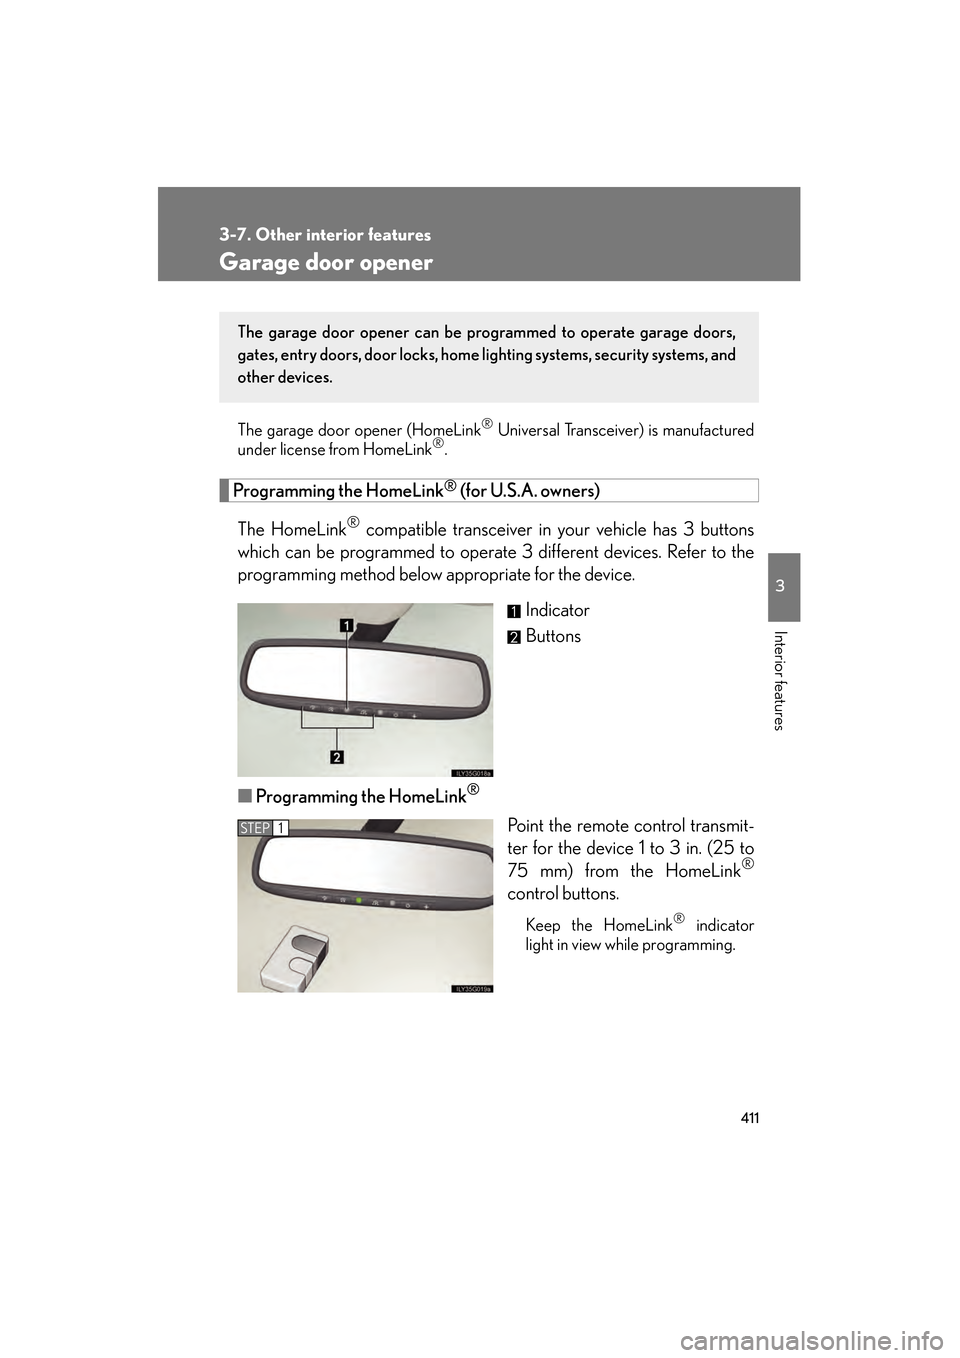
Indicator
Buttons
■ Programming the HomeLink
®
Point the remote control transmit-
ter for the device 1 to 3 in. (25 to
75 mm) from the HomeLink
®
control buttons.
Keep the HomeLink® indicator
light in view while programming.
The garage door opener can be pr ogrammed to operate garage doors,
gates, entry doors, door locks, home lighting systems, security systems, and
other devices.
STEP1
GS_U_G.book Page 411 Wednesday, January 27, 2010 4:48 PM
Page 413 of 650
412
3-7. Other interior features
GS_G_U (OM30C80U)
January 27, 2010 4:47 pm
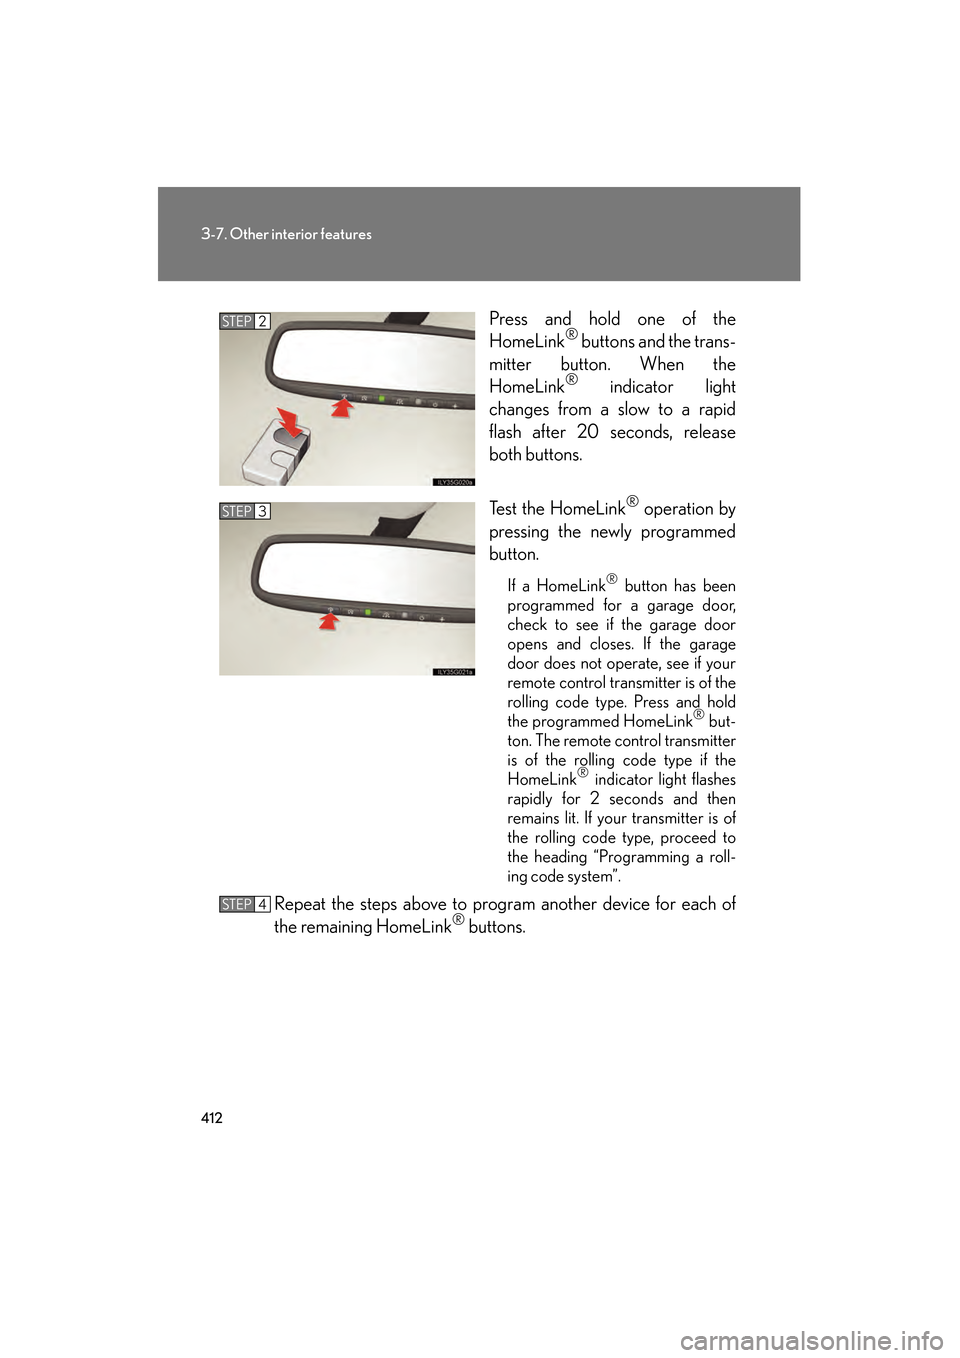
Press and hold one of the
HomeLink® buttons and the trans-
mitter button. When the
HomeLink
® indicator light
changes from a slow to a rapid
flash after 20 seconds, release
both buttons.
Te s t t h e H o m e L i n k
® operation by
pressing the newly programmed
button.
If a HomeLink® button has been
programmed for a garage door,
check to see if the garage door
opens and closes. If the garage
door does not operate, see if your
remote control transmitter is of the
rolling code type. Press and hold
the programmed HomeLink
® but-
ton. The remote control transmitter
is of the rolling code type if the
HomeLink
® indicator light flashes
rapidly for 2 seconds and then
remains lit. If your transmitter is of
the rolling code type, proceed to
the heading “Programming a roll-
ing code system”.
Repeat the steps above to program another device for each of
the remaining HomeLink® buttons.
STEP2
STEP3
STEP4
GS_U_G.book Page 412 Wednesday, January 27, 2010 4:48 PM
Page 415 of 650
414
3-7. Other interior features
GS_G_U (OM30C80U)
January 27, 2010 4:47 pm
■Programming an entry gate (for U.S.A. owners)/Programming all
devices in the Canadian market
Place your transmitter 1 to 3 in. (25 to 75 mm) away from the sur-
face of the HomeLink
®.
Keep the indicator light on the HomeLink® in view while programming.
Press and hold the selected HomeLink® button.
Repeatedly press and release (cycle) the device’s remote control
button for two seconds each until step 4 is completed.
When the indicator light on the HomeLink
® compatible trans-
ceiver starts to flash rapidly, release the buttons.
Test the operation of the HomeLink
® by pressing the newly pro-
grammed button. Check to see if the gate/device operates cor-
rectly.
Repeat the steps above to program another device for each of
the remaining HomeLink
® buttons.
■ Programming other devices
To program other devices such as home security systems, home door
locks or lighting, contact your authorized Lexus dealer for assistance.
■ Reprogramming a button
The individual HomeLink
® buttons cannot be erased but can be
reprogrammed. To reprogram a button, follow the “Reprogramming a
HomeLink
® button” instructions.
STEP1
STEP2
STEP3
STEP4
STEP5
STEP6
GS_U_G.book Page 414 Wednesday, January 27, 2010 4:48 PM
Page 417 of 650
416
3-7. Other interior features
GS_G_U (OM30C80U)
January 27, 2010 4:47 pm
■Before programming
●Install a new battery in the remote control transmitter.
●The battery side of the remote control transmitter must be pointed away from
the HomeLink® button.
■Certification for the garage door opener
FCC ID: NZLWZLHL4
This device complies with Part 15 of the FCC Rules and with RSS-210 of the IC
Rules.
Operation is subject to the following two conditions: (1) this device may not cause
harmful interference, and (2) this device must accept any interference received,
including interference that may cause undesired operation.
WARNING: This transmitter has been tested and complies with FCC and IC rules.
Changes or modifications not expressly approved by the party responsible for
compliance could void the user’s authority to operate the device.
■When support is necessary
Visit on the web at www.homelink.com
or call 1-800-355-3515
CAUTION
■When programming a garage door or other remote control devices
The garage door on other devices may operate, so ensure people and objects are
out of danger to prevent potential harm.
■Conforming to federal safety standards
Do not use the HomeLink
® Compatible Transceiver with any garage door opener
or device that lacks safety stop and reverse features as required by federal safety
standards.
This includes any garage door that cannot detect an obstruction object. A door or
device without these features increases the risk of death or serious injury.
GS_U_G.book Page 416 Wednesday, January 27, 2010 4:48 PM
Page 440 of 650
439
4-2. Maintenance
4
Maintenance and care
GS_G_U (OM30C80U)
January 27, 2010 4:47 pm
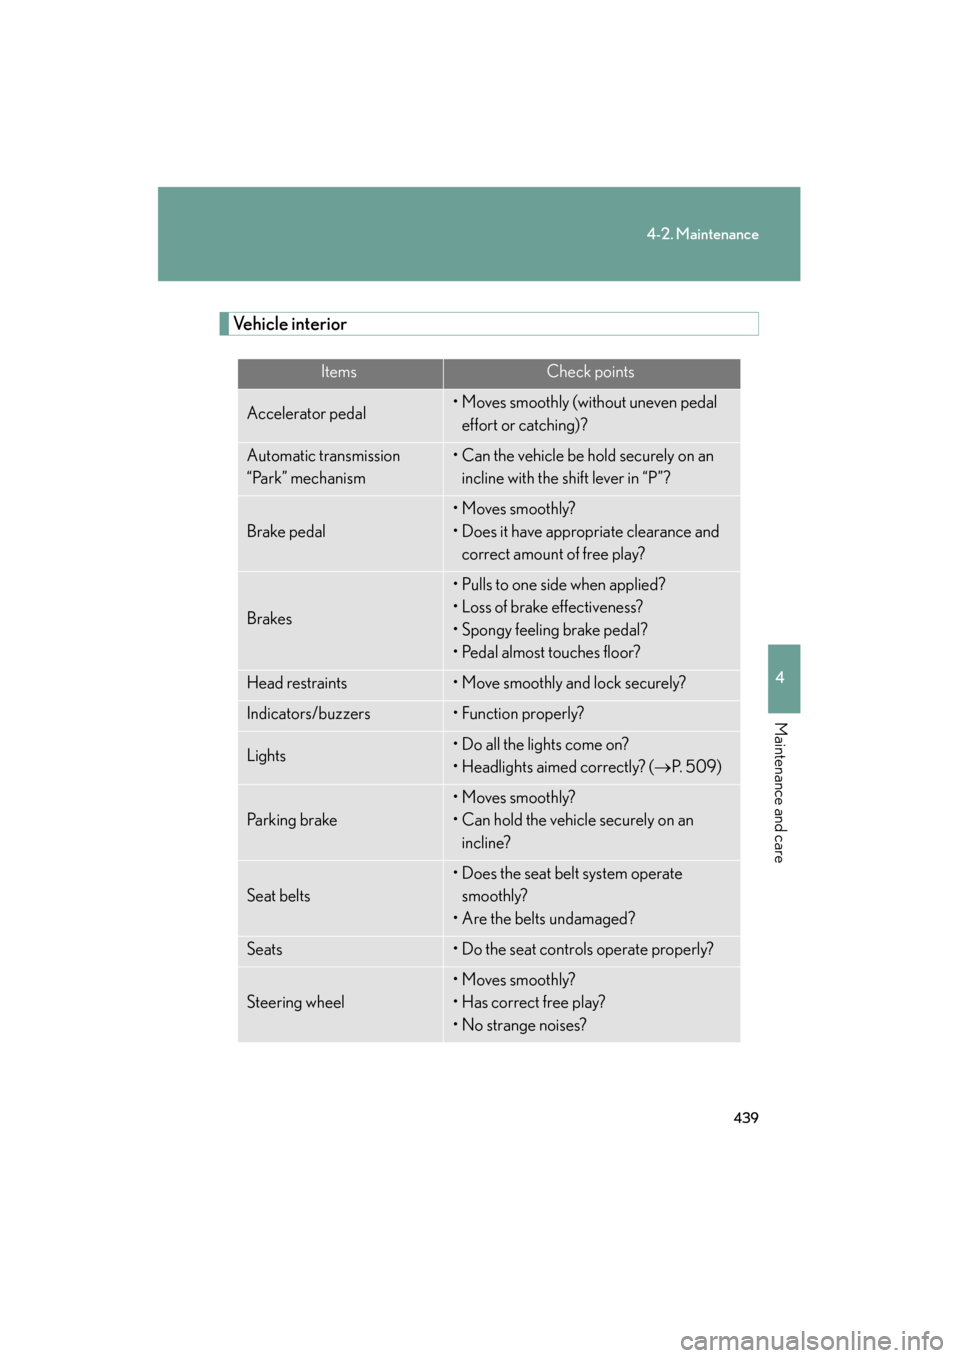
Vehicle interior
ItemsCheck points
Accelerator pedal• Moves smoothly (without uneven pedal effort or catching)?
Automatic transmission
“Park” mechanism• Can the vehicle be hold securely on an incline with the shift lever in “P”?
Brake pedal
• Moves smoothly?
• Does it have appropriate clearance and correct amount of free play?
Brakes
• Pulls to one side when applied?
• Loss of brake effectiveness?
• Spongy feeling brake pedal?
• Pedal almost touches floor?
Head restraints• Move smoothly and lock securely?
Indicators/buzzers• Function properly?
Lights• Do all the lights come on?
• Headlights aimed correctly? ( →P. 5 0 9 )
Pa r k i n g b r a ke
• Moves smoothly?
• Can hold the vehicle securely on an
incline?
Seat belts
• Does the seat belt system operate smoothly?
• Are the belts undamaged?
Seats• Do the seat controls operate properly?
Steering wheel
• Moves smoothly?
• Has correct free play?
• No strange noises?
GS_U_G.book Page 439 Wednesday, January 27, 2010 4:48 PM
Page 442 of 650
441
4-2. Maintenance
4
Maintenance and care
GS_G_U (OM30C80U)
January 27, 2010 4:47 pm
Emission inspection and maintenance (I/M) programs
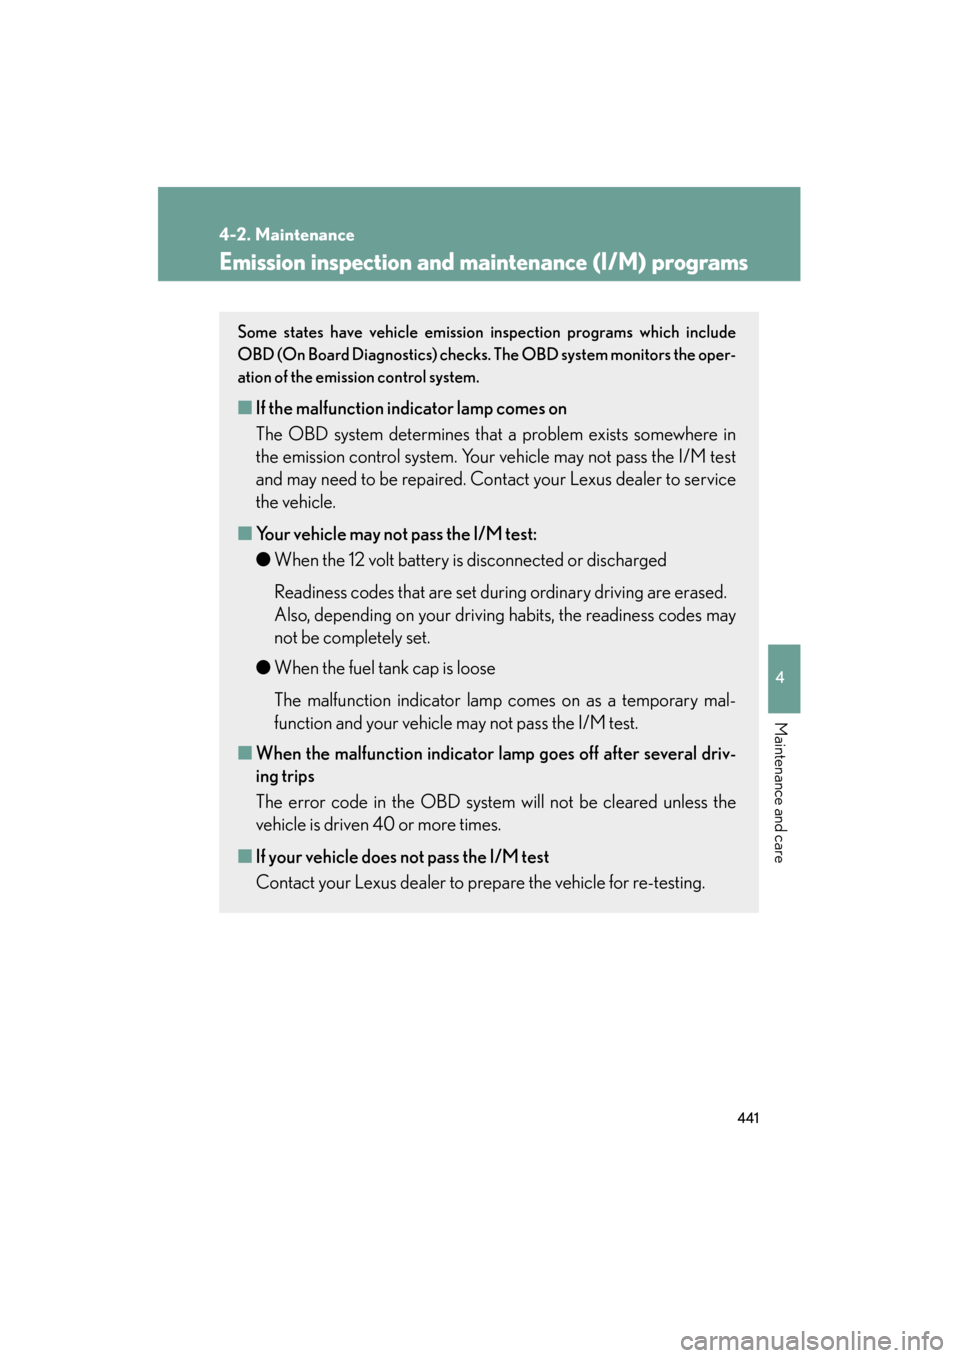
Some states have vehicle emission inspection programs which include
OBD (On Board Diagnostics) checks. The OBD system monitors the oper-
ation of the emission control system.
■If the malfunction indicator lamp comes on
The OBD system determines that a problem exists somewhere in
the emission control system. Your vehicle may not pass the I/M test
and may need to be repaired. Cont act your Lexus dealer to service
the vehicle.
■ Your vehicle may not pass the I/M test:
● When the 12 volt battery is disconnected or discharged
Readiness codes that are set du ring ordinary driving are erased.
Also, depending on your driving habits, the readiness codes may
not be completely set.
● When the fuel tank cap is loose
The malfunction indicator lamp comes on as a temporary mal-
function and your vehicle may not pass the I/M test.
■ When the malfunction indicator la mp goes off after several driv-
ing trips
The error code in the OBD system will not be cleared unless the
vehicle is driven 40 or more times.
■ If your vehicle does not pass the I/M test
Contact your Lexus dealer to prepare the vehicle for re-testing.
GS_U_G.book Page 441 Wednesday, January 27, 2010 4:48 PM
Page 478 of 650

477
4-3. Do-it-yourself maintenance
4
Maintenance and care
GS_G_U (OM30C80U)
January 27, 2010 4:47 pm
Wheels
If a wheel is bent, cracked or heavily corroded, it should be replaced.
Otherwise, the tire may separate from the wheel or cause loss of handling
control.
■ Wheel selection
When replacing wheels, care should be taken to ensure that they
are equivalent to those removed in load capacity, diameter, rim
width, and inset
*.
Replacement wheels are available at your Lexus dealer.
*: Conventionally referred to as “offset”.
Lexus does not recommend using:
• Wheels of different sizes or types
• Used wheels
• Bent wheels that have been straightened
■ Aluminum wheel precautions
● Use only Lexus wheel nuts and wrenches designed for use with
your aluminum wheels.
● After rotating, repairing or changing your tires, check that the
wheel nuts are still tight after driving 1000 miles (1600 km).
● Be careful not to damage the aluminum wheels when using tire
chains.
● Use only Lexus genuine balance weights or equivalent when bal-
ancing your wheels.
GS_U_G.book Page 477 Wednesday, January 27, 2010 4:48 PM
Page 479 of 650
478
4-3. Do-it-yourself maintenance
GS_G_U (OM30C80U)
January 27, 2010 4:47 pm
■When replacing wheels
The wheels of your Lexus are equipped with tire pressure warning valves and trans-
mitters that allow the tire pressure warning system to provide advanced warning in
the event of a loss in tire inflation pressure. Whenever wheels are replaced, the tire
pressure warning valves and transmitters must be installed. (→P. 4 6 4 )
CAUTION
■When replacing wheels
●Do not use wheels that are a different size from those recommended in the
Owner’s Manual, as this may result in loss of handling control.
●Never use an inner tube in a leaking wheel which is designed for a tubeless tire.
Doing so may result in an accident, causing death or serious injury.
NOTICE
■Replacing tire pressure warning valves and transmitters
●Because tire repair or replacement may affect the tire pressure warning valves
and transmitters, make sure to have tires serviced by your Lexus dealer or other
qualified service shop. In addition, make sure to purchase your tire pressure
warning valves and transmitters at your Lexus dealer.
●Ensure that only genuine Lexus wheels are used on your vehicle.
Tire pressure warning valves and transmitters may not work properly with non-
genuine wheels.
GS_U_G.book Page 478 Wednesday, January 27, 2010 4:48 PM