display Lexus GX460 2010 Navigation Manual
[x] Cancel search | Manufacturer: LEXUS, Model Year: 2010, Model line: GX460, Model: Lexus GX460 2010Pages: 428, PDF Size: 6.27 MB
Page 318 of 428
WIDE VIEW FRONT & SIDE MONITOR
317
D
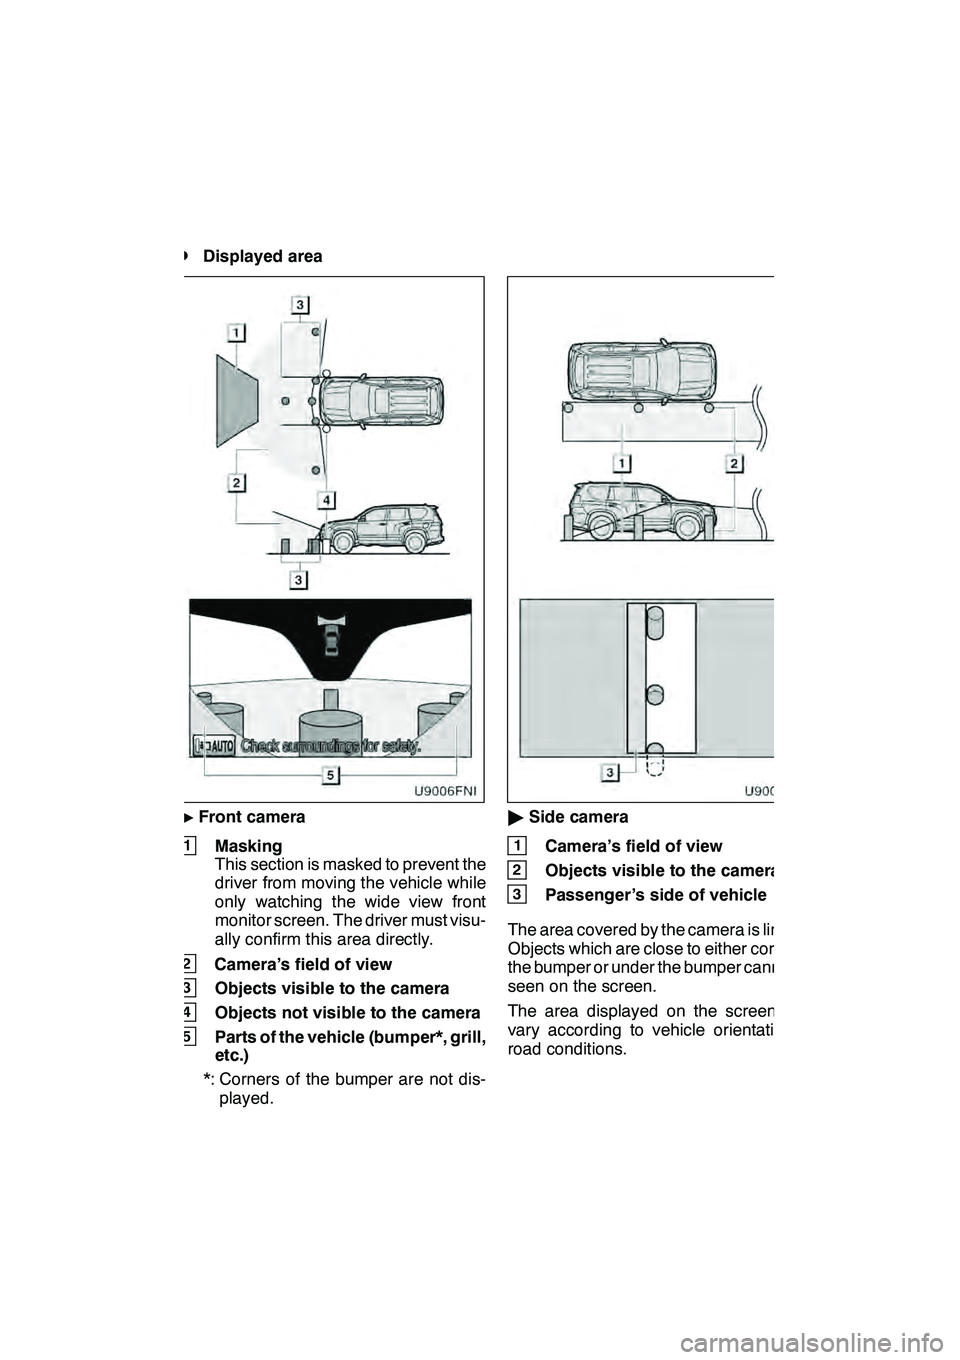
Displayed area
"
Front camera
1Masking
This section is masked to prevent the
driver from moving the vehicle while
only watching the wide view front
monitor screen. The driver must visu-
ally confirm this area directly.
2Camera’s field of view
3Objects visible to the camera
4Objects not visible to the camera
5Parts of the vehicle (bumper*, grill,
etc.)
*: Corners of the bumper are not dis- played.
" Side camera
1Camera’s field of view
2Objects visible to the camera
3Passenger ’s side of vehicle
The area covered by the camera is limited.
Objects which are close to either corner of
the bumper or under the bumper cannot be
seen on the screen.
The area displayed on the screen may
vary according to vehicle orientation or
road conditions.
GX460 Navi (U)
OM60E73U
Finish
09.09.24
9
Page 320 of 428
WIDE VIEW FRONT & SIDE MONITOR
319
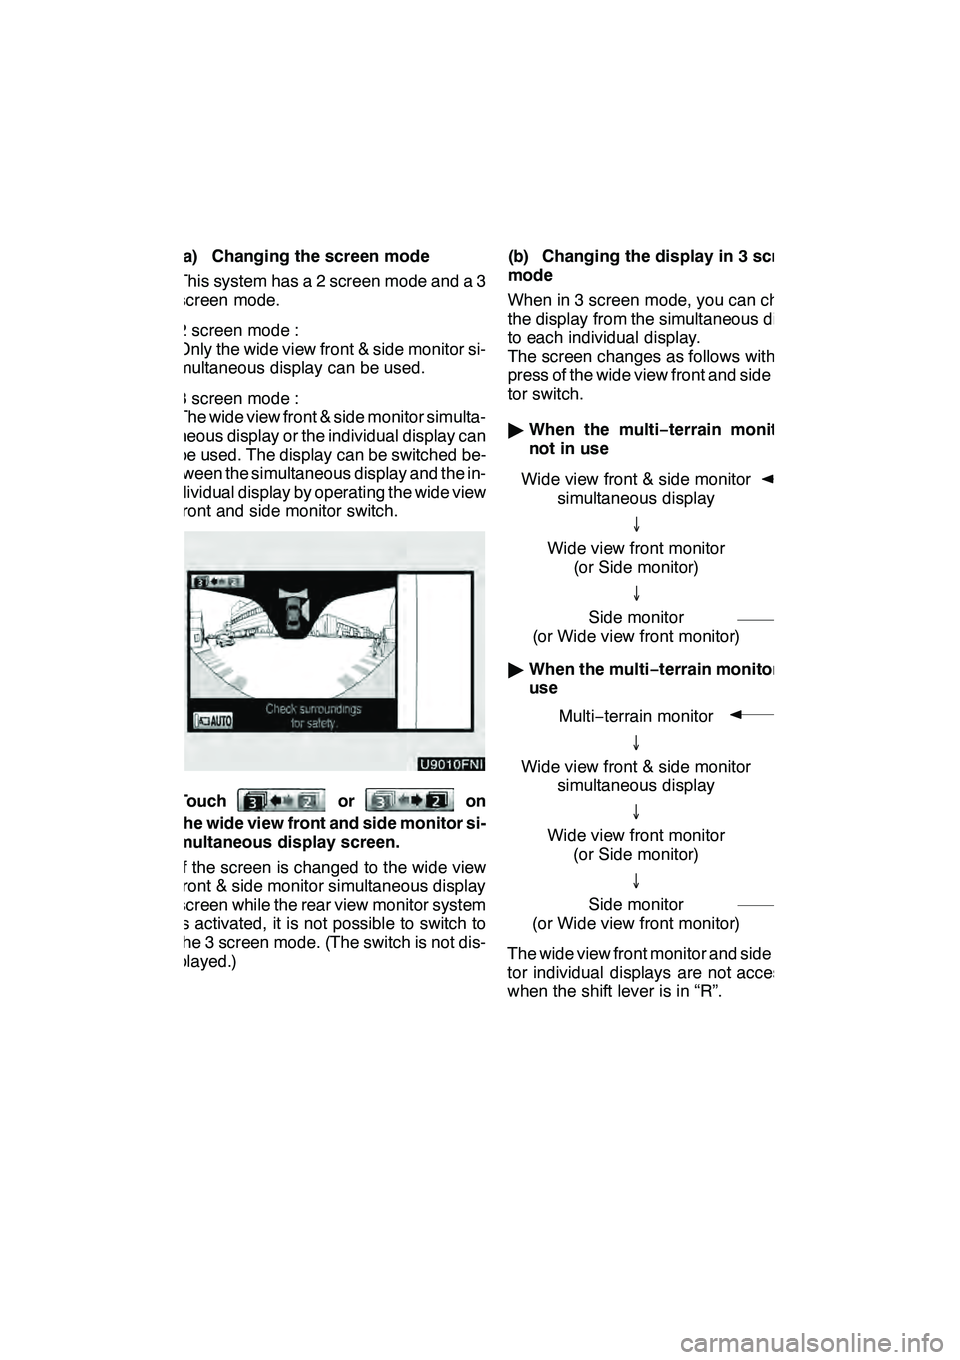
(a) Changing the screen mode
This system has a 2 screen mode and a 3
screen mode.
2 screen mode :
Only the wide view front & side monitor si-
multaneous display can be used.
3 screen mode :
The wide view front & side monitor simulta-
neous display or the individual display can
be used. The display can be switched be-
tween the simultaneous display and the in-
dividual display by operating the wide view
front and side monitor switch.
Touchoron
the wide view front and side monitor si-
multaneous display screen.
If the screen is changed to the wide view
front & side monitor simultaneous display
screen while the rear view monitor system
is activated, it is not possible to switch to
the 3 screen mode. (The switch is not dis-
played.) (b) Changing the display in 3 screen
mode
When in 3 screen mode, you can change
the display from the simultaneous display
to each individual display.
The screen changes as follows with each
press of the wide view front and side moni-
tor switch.
"
When the multi −terrain monitor is
not in use
Wide view front & side monitor simultaneous display
↓
Wide view front monitor (or Side monitor)
↓
Side monitor
(or Wide view front monitor)
" When the multi −terrain monitor is in
use
Multi− terrain monitor
↓
Wide view front & side monitor simultaneous display
↓
Wide view front monitor (or Side monitor)
↓
Side monitor
(or Wide view front monitor)
The wide view front monitor and side moni-
tor individual displays are not accessible
when the shift lever is in “R”.
GX460 Navi (U)
OM60E73U
Finish
09.09.24
9
Page 321 of 428
WIDE VIEW FRONT & SIDE MONITOR
320
(c) Automatic display mode
You can set the automatic display mode,
which automatically changes the display.
Touch
.
When automatic display mode is on, you
can have the system display automatically
in the following situations:
DThe shift lever is in “N”, “D” or “S”.
DThe vehicle speed is approximately
6 mph (10 km/h) or less.
will not be displayed when the shift
lever is in “R”.
INFORMATION
In the following situations, the sys-
tem is canceled automatically.
D When the vehicle speed exceeds
approximately 7 mph (12 km/h).
D When the shift lever is in “R”.
GX460 Navi (U)
OM60E73U
Finish
09.09.24
Page 323 of 428
INTUITIVE PARKING ASSIST
322
The distance to obstacles measured by
the sensors is communicated via the dis-
play and a buzzer when parallel parking or
maneuvering into a garage. Always check
the surrounding area when using this sys-
tem.
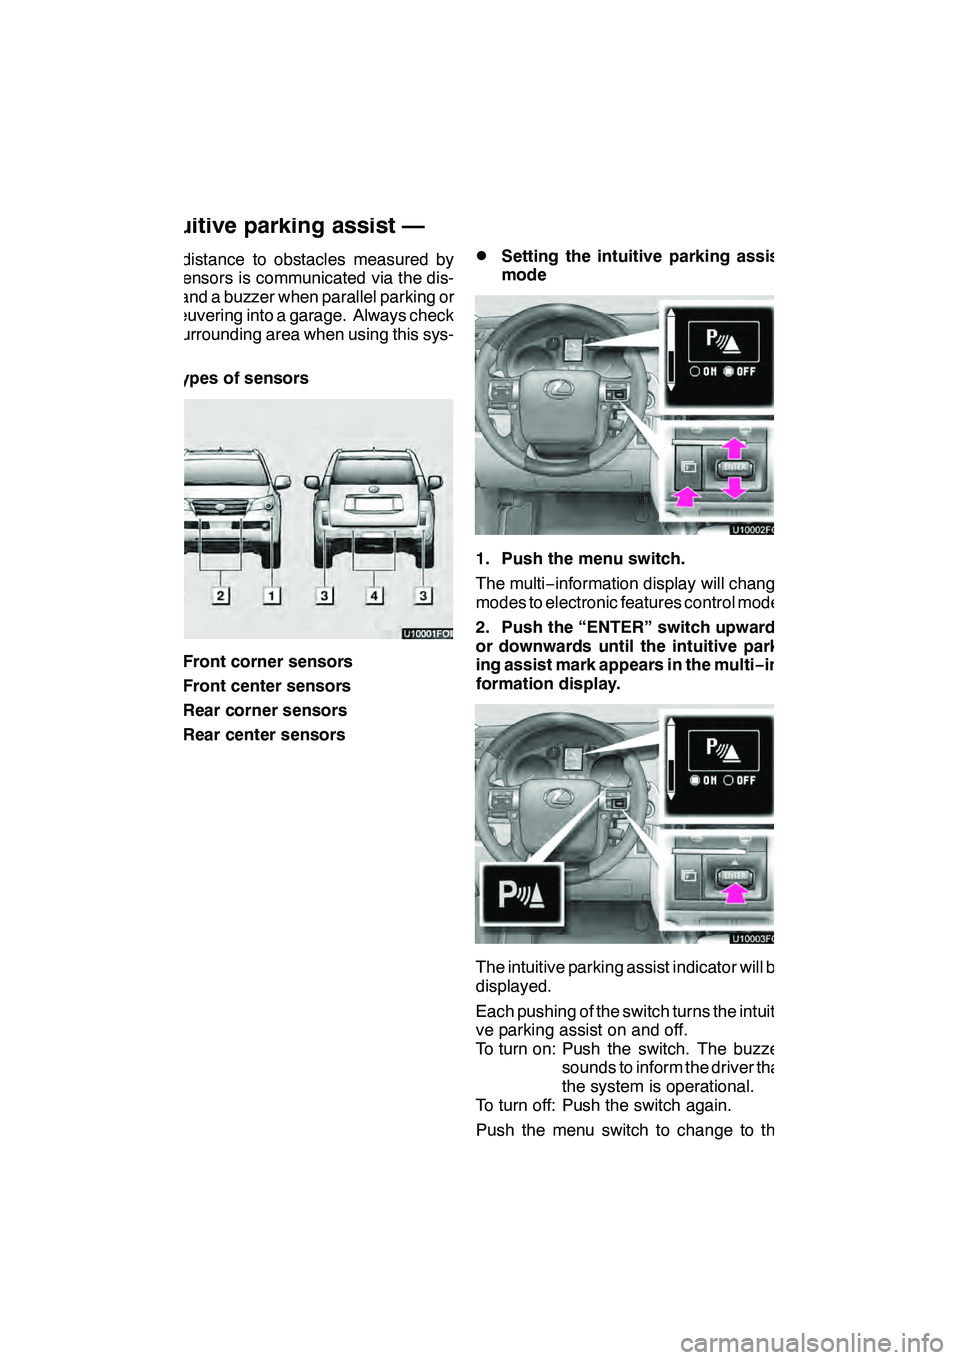
DTypes of sensors
1Front corner sensors
2Front center sensors
3Rear corner sensors
4Rear center sensors
DSetting the intuitive parking assist
mode
U1000xFOI
1. Push the menu switch.
The multi−information display will change
modes to electronic features control mode.
2. Push the “ENTER” switch upwards
or downwards until the intuitive park-
ing assist mark appears in the multi −in-
formation display.
U1000xFOI
The intuitive parking assist indicator will be
displayed.
Each pushing of the switch turns the intuiti-
ve parking assist on and off.
To turn on: Push the switch. The buzzer sounds to inform the driver that
the system is operational.
To turn off: Push the switch again.
Push the menu switch to change to the
normal display.
GX460 Navi (U)
OM60E73U
Finish
09.09.24
Intuitive parking assist —
Page 324 of 428
INTUITIVE PARKING ASSIST
323
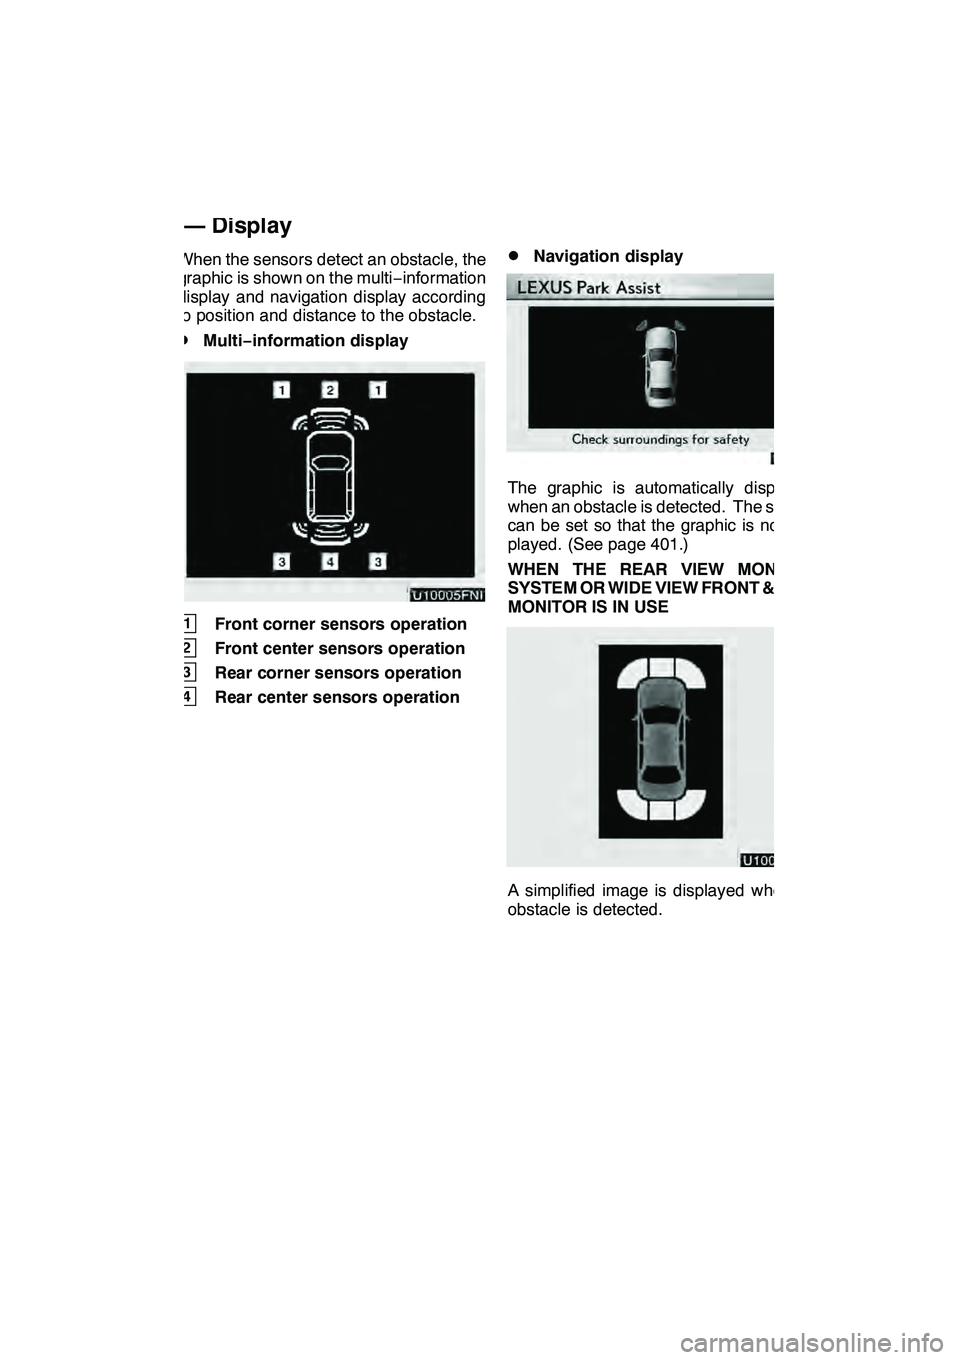
When the sensors detect an obstacle, the
graphic is shown on the multi−information
display and navigation display according
to position and distance to the obstacle.
DMulti −information display
U9001LI
1Front corner sensors operation
2Front center sensors operation
3Rear corner sensors operation
4Rear center sensors operation
DNavigation display
The graphic is automatically displayed
when an obstacle is detected. The screen
can be set so that the graphic is not dis-
played. (See page 401.)
WHEN THE REAR VIEW MONITOR
SYSTEM OR WIDE VIEW FRONT & SIDE
MONITOR IS IN USE
A simplified image is displayed when an
obstacle is detected.
GX460 Navi (U)
OM60E73U
Finish
09.09.24
— Display
10
Page 325 of 428
INTUITIVE PARKING ASSIST
324
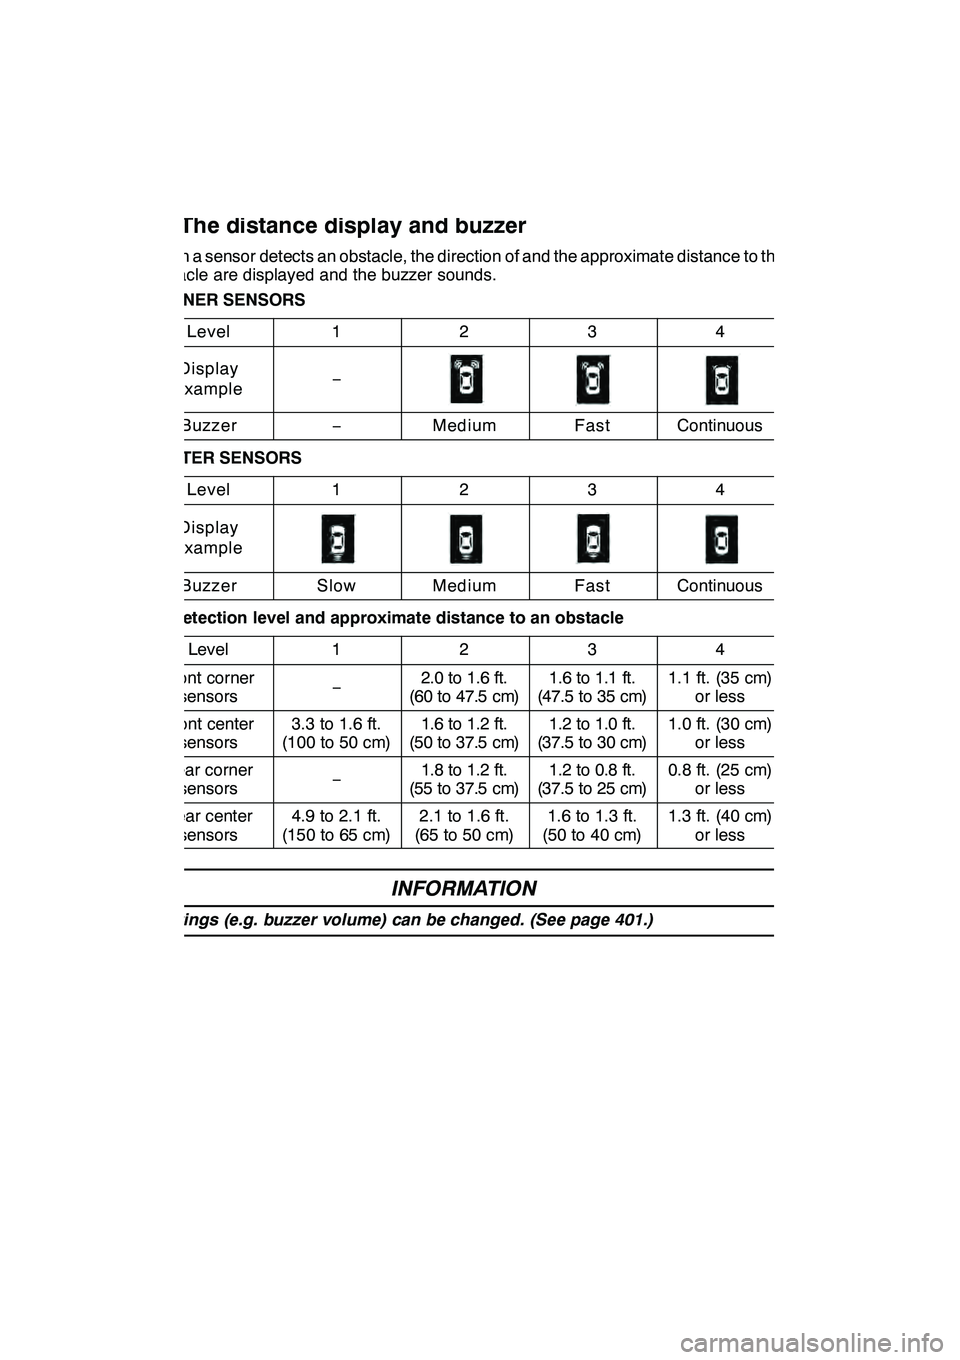
When a sensor detects an obstacle, the direction of and the approximate distance to the
obstacle are displayed and the buzzer sounds.
CORNER SENSORSLevel
1234
Display
example−
Buzzer−MediumFastContinuous
CENTER SENSORS
Level
1234
Display
example
BuzzerSlowMediumFastContinuous
DDetection level and approximate distance to an obstacle
Level
1234
Front cornersensors−2.0 to 1.6 ft.
(60to47.5cm)1.6 to 1.1 ft.
(47.5to35cm)1.1 ft. (35 cm) or less
Front centersensors3.3 to 1.6 ft.
(100 to 50 cm)1.6 to 1.2 ft.
(50to37.5cm)1.2 to 1.0 ft.
(37.5to30cm)1.0 ft. (30 cm) or less
Rear cornersensors−1.8 to 1.2 ft.
(55to37.5cm)1.2 to 0.8 ft.
(37.5to25cm)0.8 ft. (25 cm) or less
Rear centersensors4.9 to 2.1 ft.
(150 to 65 cm)2.1 to 1.6 ft.
(65 to 50 cm)1.6 to 1.3 ft.
(50 to 40 cm)1.3 ft. (40 cm) or less
INFORMATION
Settings (e.g. buzzer volume) can be changed. (See page 401.)
GX460 Navi (U)
OM60E73U
Finish
09.09.24
— The distance display and buzzer
Page 327 of 428

INTUITIVE PARKING ASSIST
326 D
The shape of the obstacle may prevent
a sensor from detecting it. Pay particu-
lar attention to the following obstacles:
DWires, fences, ropes, etc.
DCotton, snow and other materials
that absorb radio waves
DSharply−angled objects
DLow obstacles
DTall obstacles with upper sections
projecting outwards in the direction
of your vehicle
CAUTION
Caution when using the intuitive
parking assist
Observe the following precautions.
Failing to do so may result in the ve-
hicle being unable to be driven safely
and possibly cause an accident.
DDo not use the sensor at speeds in
excess of approximately 6 mph (10
km/h).
DDo not attach any accessories
within the sensor range.
NOTICE
Notes when washing the vehicle
Do not apply intensive bursts of wa-
ter or steam to the sensor area.
Doing so may result in the sensor
malfunctioning.
System malfunction
DAn accident will affect the sensors,
resulting in system failure.
DIf the indicators remain on without
a beeping sound, the system may
be malfunctioning.
Contact your Lexus dealer.
If an error is detected when the intuitive
parking assist is turned on, the vehicle
symbol comes on or flashes with beep-
ing sounds.
However, the sensors functioning properly
continue their obstacle detection.
The intuitive parking assist failure warning
display is not given in either of the following
operations:
DChanging to another screen
DTurning the ituitive parking assist mode
off
GX460 Navi (U)
OM60E73U
Finish
09.09.24
— Intuitive parking assist
failure warning
Page 330 of 428
SECTION11
SETUP
329
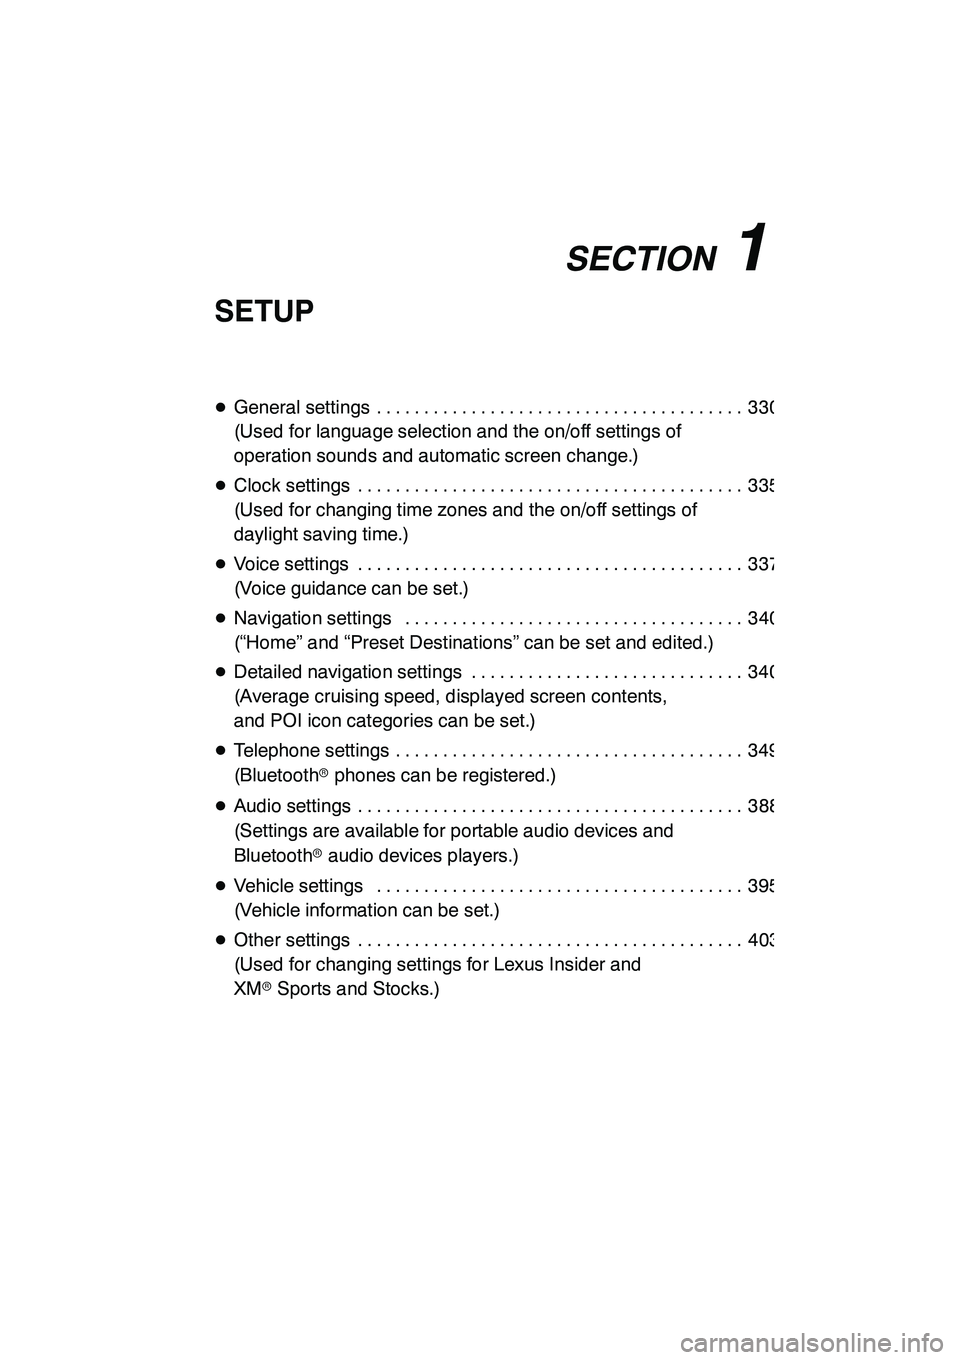
SETUP
DGeneral settings 330 .......................................
(Used for language selection and the on/off settings of
operation sounds and automatic screen change.)
D Clock settings 335 .........................................
(Used for changing time zones and the on/off settings of
daylight saving time.)
D Voice settings 337 .........................................
(Voice guidance can be set.)
D Navigation settings 340 ....................................
(“Home” and “Preset Destinations” can be set and edited.)
D Detailed navigation settings 340 .............................
(Average cruising speed, displayed screen contents,
and POI icon categories can be set.)
D Telephone settings 349 .....................................
(Bluetooth rphones can be registered.)
D Audio settings 388 .........................................
(Settings are available for portable audio devices and
Bluetooth raudio devices players.)
D Vehicle settings 395 .......................................
(Vehicle information can be set.)
D Other settings 403 .........................................
(Used for changing settings for Lexus Insider and
XM rSports and Stocks.)
GX460 Navi (U)
OM60E73U
Finish
09.09.24
11
Page 332 of 428
SETUP
331
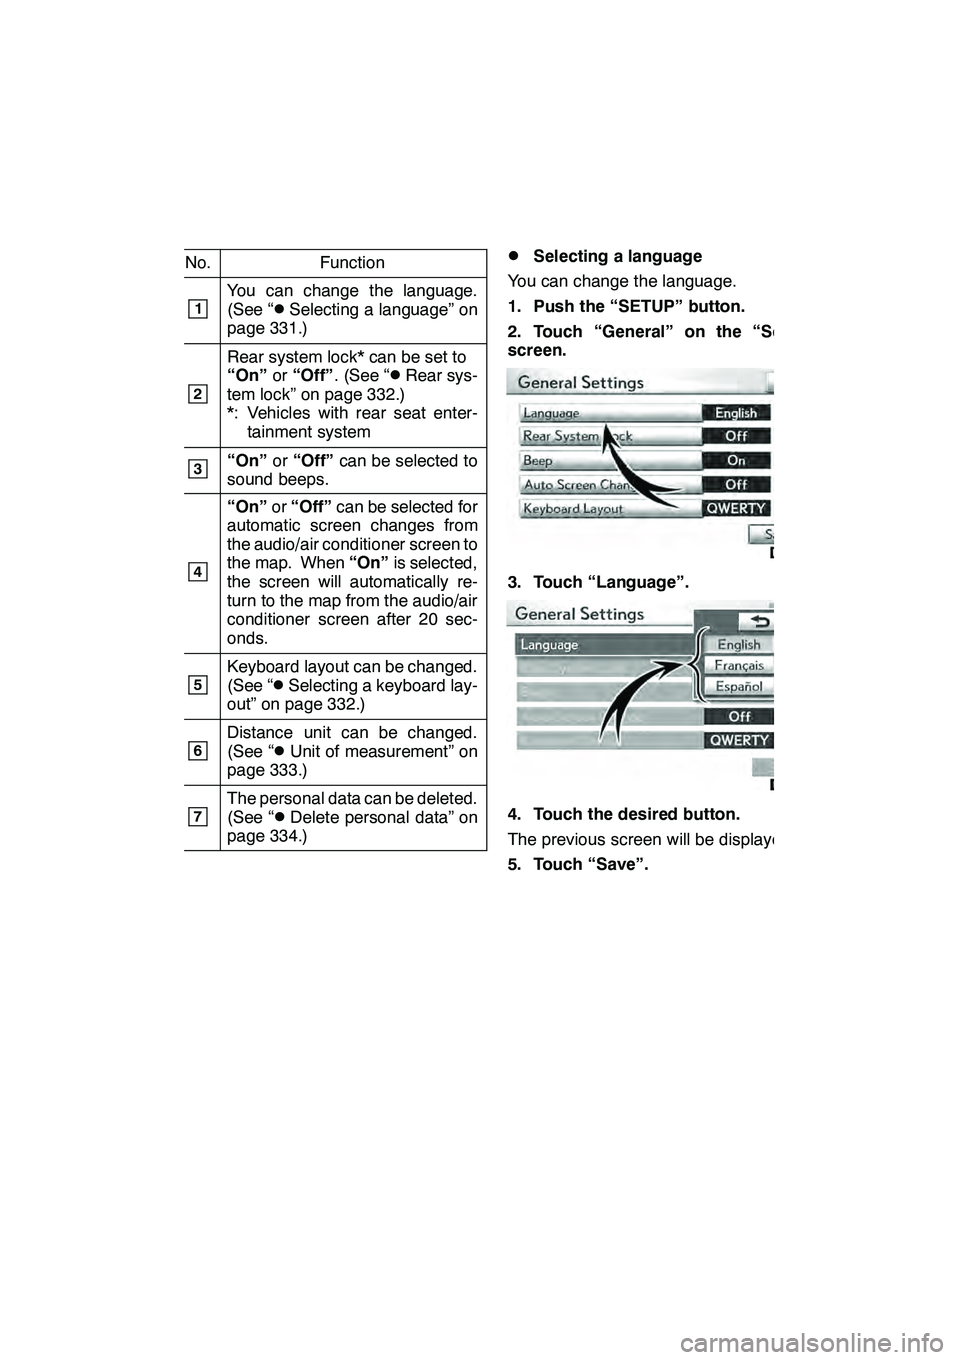
No.Function
1You can change the language.
(See “DSelecting a language” on
page 331.)
2
Rear system lock* can be set to
“On” or“Off” . (See “DRear sys-
tem lock” on page 332.)
*: Vehicles with rear seat enter- tainment system
3“On” or“Off” can be selected to
sound beeps.
4
“On” or“Off” can be selected for
automatic screen changes from
the audio/air conditioner screen to
the map. When “On”is selected,
the screen will automatically re-
turn to the map from the audio/air
conditioner screen after 20 sec-
onds.
5Keyboard layout can be changed.
(See “DSelecting a keyboard lay-
out” on page 332.)
6Distance unit can be changed.
(See “DUnit of measurement” on
page 333.)
7The personal data can be deleted.
(See “DDelete personal data” on
page 334.)
DSelecting a language
You can change the language.
1. Push the “SETUP” button.
2. Touch “General” on the “Setup”
screen.
3. Touch “Language”.
4. Touch the desired button.
The previous screen will be displayed.
5. Touch “Save”.
GX460 Navi (U)
OM60E73U
Finish
09.09.24
11
Page 341 of 428
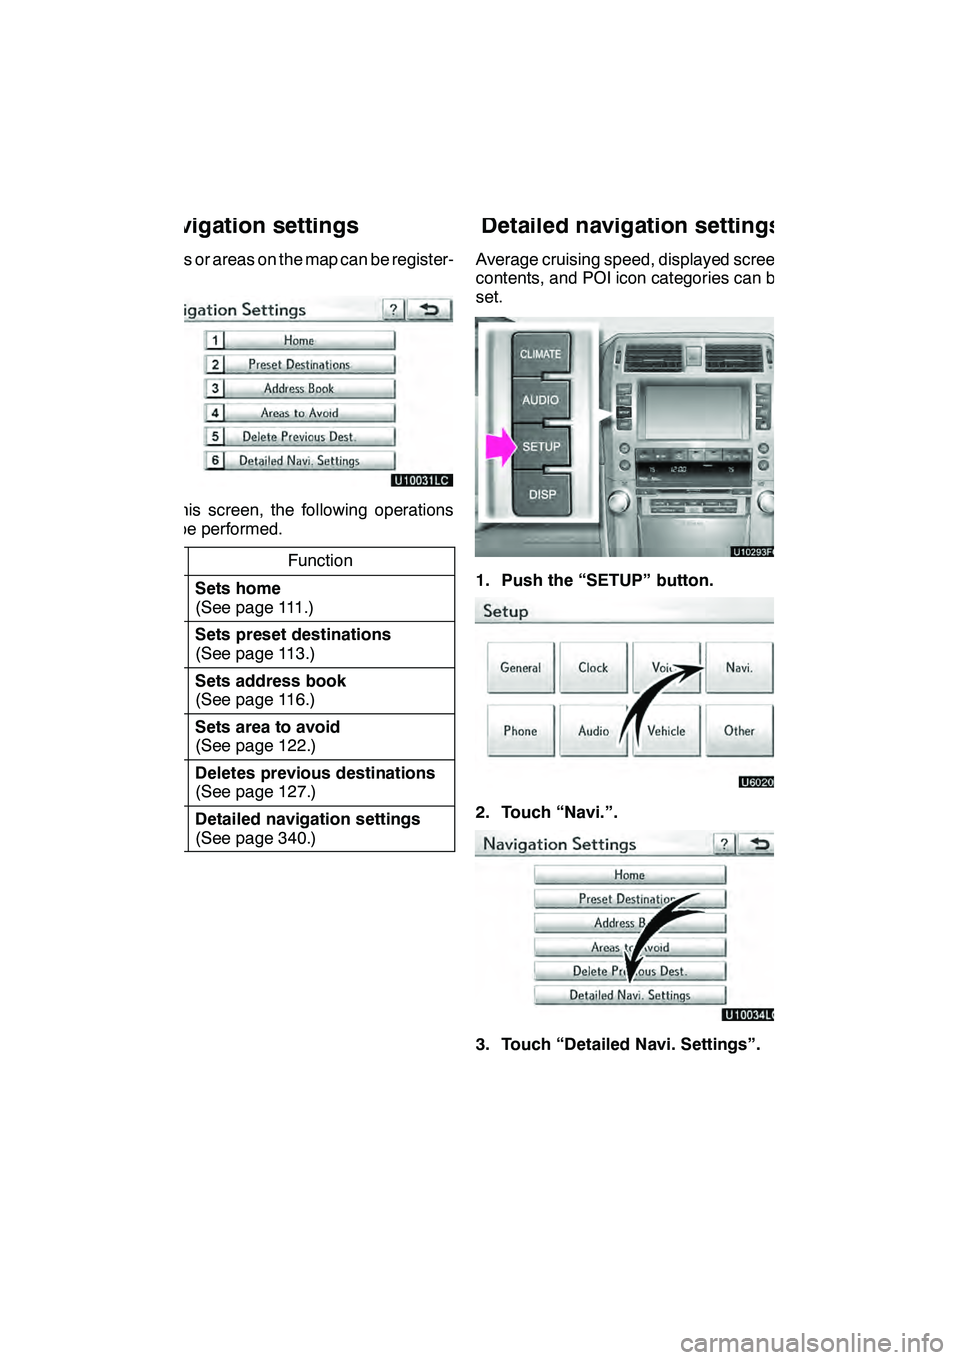
SETUP
340
Points or areas on the map can be register-
ed.
On this screen, the following operations
can be performed.No.
Function
1Sets home
(See page 111.)
2Sets preset destinations
(See page 113.)
3Sets address book
(See page 116.)
4Sets area to avoid
(See page 122.)
5Deletes previous destinations
(See page 127.)
6Detailed navigation settings
(See page 340.)
Average cruising speed, displayed screen
contents, and POI icon categories can be
set.
1. Push the “SETUP” button.
2. Touch “Navi.”.
3. Touch “Detailed Navi. Settings”.
GX460 Navi (U)
OM60E73U
Finish
09.09.24
Navigation settings Detailed navigation settings