display Lexus GX460 2021 / LEXUS 2021 GX460 MULTIMEDIA (OM60T29U) Workshop Manual
[x] Cancel search | Manufacturer: LEXUS, Model Year: 2021, Model line: GX460, Model: Lexus GX460 2021Pages: 186, PDF Size: 4.02 MB
Page 89 of 186

89
3. MEDIA OPERATION
GX460_MM_OM60T29U_(U)20.03.27 13:49
3
AUDIO/VISUAL SYSTEM
4. Bluetooth® AUDIO
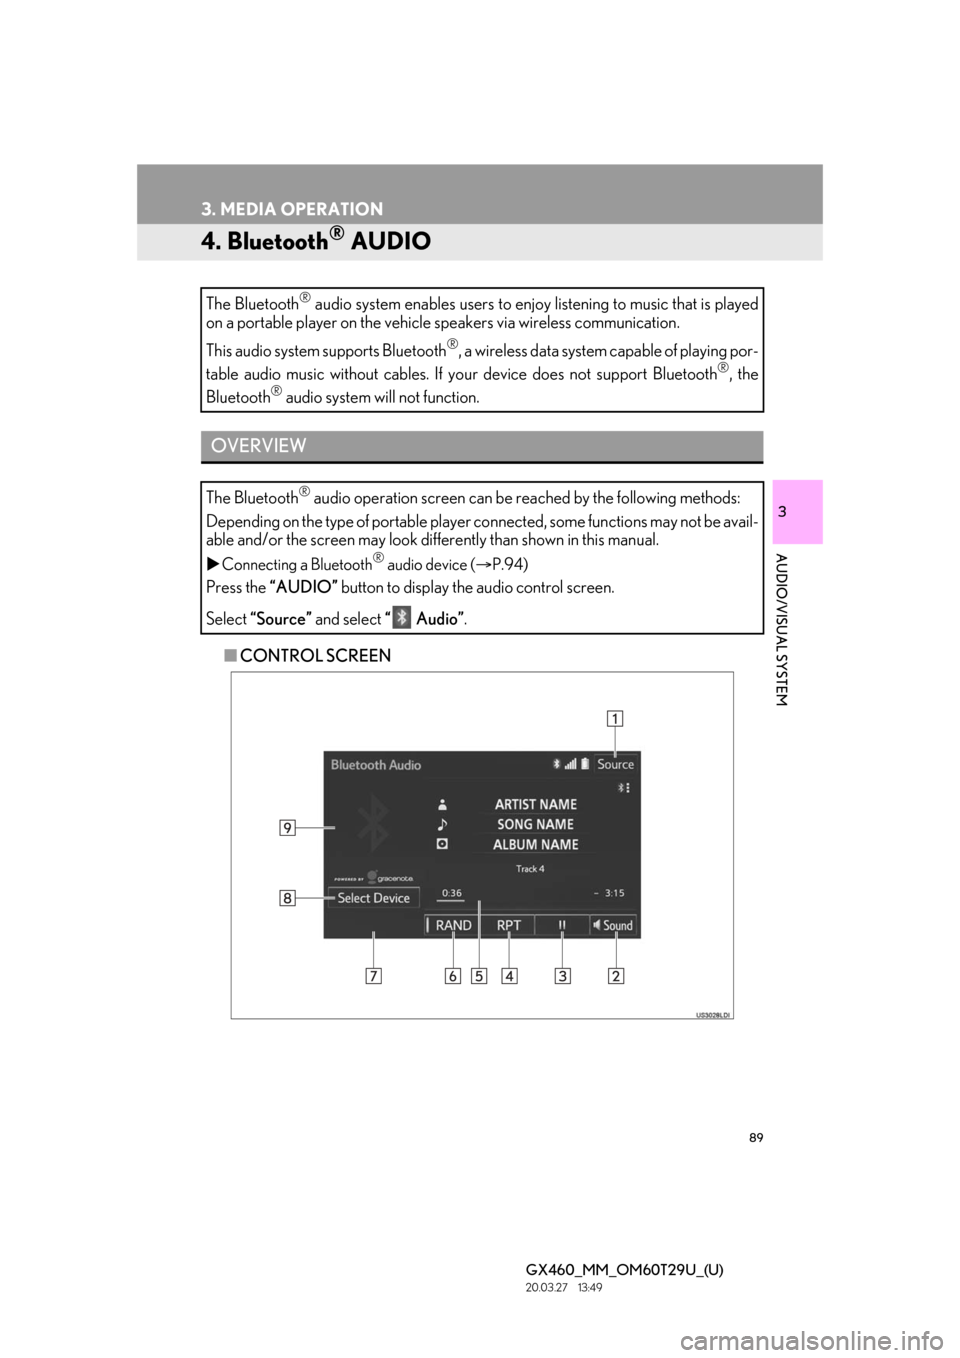
■CONTROL SCREEN
The Bluetooth
® audio system enables users to enjo
y listening to music that is played
on a portable player on the vehicle speakers via wireless communication.
This audio system supports Bluetooth
®, a wireless data system capable of playing por-
table audio music without cables. If your device does not support Bluetooth
®, the
Bluetooth
® audio system will not function.
OVERVIEW
The Bluetooth® audio operation screen can be reached by the following methods:
Depending on the type of portable player connected, some functions may not be avail-
able and/or the screen may look diff erently than shown in this manual.
Connecting a Bluetooth® audio device ( P.94)
Press the “AUDIO” button to display the audio control screen.
Select “Source” and select “ Audio” .
Page 91 of 186

91
3. MEDIA OPERATION
GX460_MM_OM60T29U_(U)20.03.27 13:49
3
AUDIO/VISUAL SYSTEM
No.Function
Select to display the audio source selection screen.
Select to display the sound settings screen.
Select to play/pause.
Select to set repeat playback.
Shows progress
Select to set random playback.
Select to display the playlist screen.
To return to the top screen, select “Now Playing” on the list screen.
Select to display the portab le device connection screen.
Displays cover art
Select to display a track list.
To return to the top screen, select “Now Playing” on the list screen.
Turn to select a track/file.
Turn to move the cursor up/down on the list.
Press to select the list.
Press to select a track/file.
Press and hold to fast forward/rewind.
Turn to adjust volume.
Press to turn the audio system on/off.
Press and hold to restart the audio system.
Press to play/pause.
Page 95 of 186

95
3. MEDIA OPERATION
GX460_MM_OM60T29U_(U)20.03.27 13:49
3
AUDIO/VISUAL SYSTEM
5. AUX
■CONTROL SCREEN
■ CONTROL PANEL
OVERVIEW
The AUX operation screen can be reached by the following methods:
Connecting a device to the AUX port ( P.56)
Press the “AUDIO” button to display the audio control screen.
Select “Source” and select “AUX”.
Page 96 of 186

96
3. MEDIA OPERATION
GX460_MM_OM60T29U_(U)20.03.27 13:49
No.Function
Select to display the audio source selection screen.
Select to display the sound setting screen.
Turn to adjust volume.
Press to turn the audio system on/off.
Press and hold to rest art the audio system.
WARNING
●Do not connect portable audio device or operate the controls while driving.
NOTICE
●Depending on the size and shape of the portable audio device that is connected to the sys-
tem, the lid may not close fully. In this case, do not forcibly close the lid as this may damage
the portable audio device or the terminal, etc.
●Do not leave portable audio device in the ve hicle. The temperature inside the vehicle may
become high, resulting in damage to the player.
●Do not push down on or apply unnecessary pre ssure to the portable audio device while it is
connected as this may damage the portable audio device or its terminal.
●Do not insert foreign objects into the port as this may damage the portable audio device or
its terminal.
Page 97 of 186

97
3. MEDIA OPERATION
GX460_MM_OM60T29U_(U)20.03.27 13:49
3
AUDIO/VISUAL SYSTEM
6. VTR
■CONTROL SCREEN
OVERVIEW
The VTR operation screen can be reached by the following methods:
Connecting a device to the AUX port ( P.56)
Press the “AUDIO” button to display the audio control screen.
Select “Source” and select “A/V”.
Page 98 of 186

98
3. MEDIA OPERATION
GX460_MM_OM60T29U_(U)20.03.27 13:49
■CONTROL PANEL
No.Function
Select to display the audi o source selection screen.
Select to display the sound setting screen.
Select to display full screen video.
Select to change the screen size. ( P.59)
Turn to adjust volume.
Press to turn the audio system on/off.
Press and hold to rest art the audio system.
Page 103 of 186

103
5. SETUP
GX460_MM_OM60T29U_(U)20.03.27 13:49
3
AUDIO/VISUAL SYSTEM
1Display the audio setting screen.
( P.102)
2Select “Number of Radio Presets” .
3Select the button with the desired num-
ber to be displayed.
1Display the audio setting screen.
( P.102)
2Select “iPod Video Sound Input” .
3Select a screen button for the desired
setting.
No.FunctionPage
Select to change the num-
ber of preset radio stations
displayed on the screen.
103
Select to set the iPod audio
signal input settings.103
Select to set the video sig-
nal format settings.104
Select on/off to set the cov-
er art display settings.
The system adjusts to the
optimum volume and tone
quality according to vehicle
speed to compensate for
increased vehicle noise.
This function creates a sur-
rounded by sound effect.
SETTING THE NUMBER OF
RADIO PRESETS
iPod SETTINGS
Page 104 of 186

104
5. SETUP
GX460_MM_OM60T29U_(U)20.03.27 13:49
1Display the audio setting screen.
( P.102)
2Select “Video Input Mode” .
3Select a screen butt on for the desired
setting.
EXTERNAL VIDEO SETTINGS
Page 110 of 186

110
6. TIPS FOR OPERATING THE AUDIO/VISUAL SYSTEM
GX460_MM_OM60T29U_(U)20.03.27 13:49
■CORRESPONDING SAMPLING
FREQUENCY
■ CORRESPONDING BIT RATES
(Variable Bit Rate (VBR) compatible)
MP3 (MPEG Audio Layer 3), WMA
(Windows Media Audio) and AAC
(Advanced Audio Coding) are audio com-
pression standards.
This system can play MP3/WMA/AAC
files on CD-R, CD-RW discs and USB
memory.
This system can play disc recordings com-
patible with ISO 9660 level 1 and level 2
and with the Romeo and Joliet file system.
When naming an MP3/WMA/AAC file,
add an appropriate file extension (.mp3/
.wma/.m4a).
This system plays back files with .mp3/
.wma/.m4a file extensions as MP3/WMA/
AAC files respectively. To prevent noise
and playback errors, use the appropriate
file extension.
This system can play only the first session
when using multi-session compatible CDs.
MP3 files are compatible with the ID3 Tag
Ver. 1.0, Ver. 1.1, Ver. 2.2 and Ver. 2.3 for-
mats. This system cannot display disc title,
track title and artist name in other formats.
WMA/AAC files can contain a WMA/
AAC tag that is used in the same way as an
ID3 tag. WMA/AAC tags carry informa-
tion such as track title and artist name.
The emphasis function is available only
when playing MP3/WMA files recorded at
32, 44.1 and 48 kHz.
This system can play back AAC files
encoded by iTunes.
The sound quality of MP3/WMA files gen-
erally improves with higher bit rates. In
order to achieve a reasonable level of
sound quality, discs recorded with a bit rate
of at least 128 kbps are recommended.
M3u playlists are not compatible with the
audio player.
File typeFrequency
(kHz)
MP3 files:
MPEG 1 LAYER 332/44.1/48
MP3 files:
MPEG 2 LSF LAYER 316/22.05/24
WMA files:
Ver. 7, 8, 9 (9.1/9.2)32/44.1/48
AAC files:
MPEG4/AAC-LC11.025/12/16/
22.05/24/32/
44.1/48
File typeBit rate (kbps)
MP3 files:
MPEG 1 LAYER 332 - 320
MP3 files:
MPEG 2 LSF LAYER 38 - 160
WMA files: Ver. 7, 8CBR 48 - 192
WMA files:
Ver. 9 (9.1/9.2)CBR 48 - 320
AAC files:
MPEG4/AAC-LC16 - 320
Page 117 of 186

117
1. VOICE COMMAND SYSTEM OPERATION
4
VOICE COMMAND SYSTEM
GX460_MM_OM60T29U_(U)20.03.27 13:49
1Press the talk switch.
2Say the tab selection command or se-
lect the desired tab.
Commands related with each function are
displayed on the screen of the each func-
tion tab. Some commonly used commands
are displayed on the sc reen of the Shortcut
tab.
3Say the desired command.
Registered POIs, registered names in the
contacts list etc., can be said in the place of
the “<>” next to the commands. ( P.122)
For example: Say “Call John Smith” etc.
If a desired outcome is not shown, or if no
selections are available, perform one of the
following to return to the previous screen:
•Say “Go back” .
• Select “Go Back” .
To cancel voice re cognition, select
“Cancel”, or press and hold the talk switch.VOICE COMMAND SYSTEM
OPERATION
The voice command system is operated
by selecting a tab corresponding to
each function. The tabs are found on the
upper part of the screen.
All commands that are not displayed on
the screen can be recognized on any
screens.
Voice guidance for the voice command
system can be skipped by pressing the
talk switch.
Saying “Help” prompts voice guidance to
offer examples of commands and opera-
tion methods.
INFORMATION
●If the multimedia system does not
respond or the confir mation screen does
not disappear, press the talk switch and
try again.
●“Voice Recognition Prompts” can be set
to on or off on the “Voice Settings”
screen. ( P.49)
●Voice guidance can be canceled by set-
ting voice prompts to off. Use this setting
when it is desirable to say a command
immediately after pressing the talk switch
and hearing a beep.