Lexus IS F 2011 Owner's Manual
Manufacturer: LEXUS, Model Year: 2011,
Model line: IS F,
Model: Lexus IS F 2011
Pages: 529, PDF Size: 13.89 MB
Lexus IS F 2011 Owner's Manual
IS F 2011
Lexus
Lexus
https://www.carmanualsonline.info/img/36/29677/w960_29677-0.png
Lexus IS F 2011 Owner's Manual
Trending: wiper blades, jump cable, check engine light, instrument panel, ECO mode, roof rack, engine oil
Page 461 of 529
438
5-2. Steps to take in an emergency
IS F_EE
(If equipped)
Indicates that Lexus
parking assist-sensor is
dirty or covered with
ice.
Clean the sensor.
(Flashing and then
continuously on)
(Flashing)
(If equipped)Indicates that the radar
cruise control sensor is
dirty or covered with
ice.
Clean the sensor.
(Flashing and then
continuously on)
(Flashing)
(If equipped)Indicates that the radar
cruise control system is
unable to judge vehicle-
to-vehicle distance.
• Switch the driving
mode to either the
Normal or “Sport”
mode.
• If the windshield wip-
ers are on, turn them
off or set them to
either the intermittent
or the slow mode.
Warning messageDetailsCorrection procedure
Page 462 of 529
5
439
5-2. Steps to take in an emergency
When trouble arises
IS F_EE
(Flashing)
(If equipped)
Indicates that your vehi-
cle is nearing the vehi-
cle ahead (in radar
cruise mode).
Slow the vehicle by
applying the brakes.
(Flashing)
(If equipped)
Indicates that there is a
high possibility of a
frontal collision, or that
the pre-crash braking
function is operating.
Slow the vehicle by
applying the brakes.
Warning light display in radar cruise mode (if equipped)
In the following cases, the warning light may not be displayed even if vehi-
cle-to-vehicle distance decreases.
When your vehicle and the vehicle ahead are traveling at the same speed
or the vehicle ahead is traveling more quickly than your vehicle
When the vehicle ahead is traveling at a very low speed
Immediately after cruise control speed is set
At the instant the accelerator pedal is depressed
Warning messageDetailsCorrection procedure
Page 463 of 529
440
5-2. Steps to take in an emergency
IS F_EE
Follow the correction procedures.
After taking the specified steps to correct the suspected problem,
check that the warning light turns off.
Inte-
rior
buzzerExte-
rior
buzzer
Warning messageDetailsCorrection
procedure
Once
(Comes on for 10 sec-
onds.)
Indicates that an
attempt was
made to start the
engine without
the electronic
key being pres-
ent, or the elec-
tronic key was
not functioning
normally.
Start the engine
with the elec-
tronic key
present.
*
Once3
times
(Flashing)
Indicates that a
door other than
the driver’s door
has been opened
and closed with
the “ENGINE
START STOP”
switch in any
mode other than
OFF and the
electronic key
has been taken
out of the detec-
tion area.
Confirm the
location of the
electronic key.
Page 464 of 529
5
441
5-2. Steps to take in an emergency
When trouble arises
IS F_EE
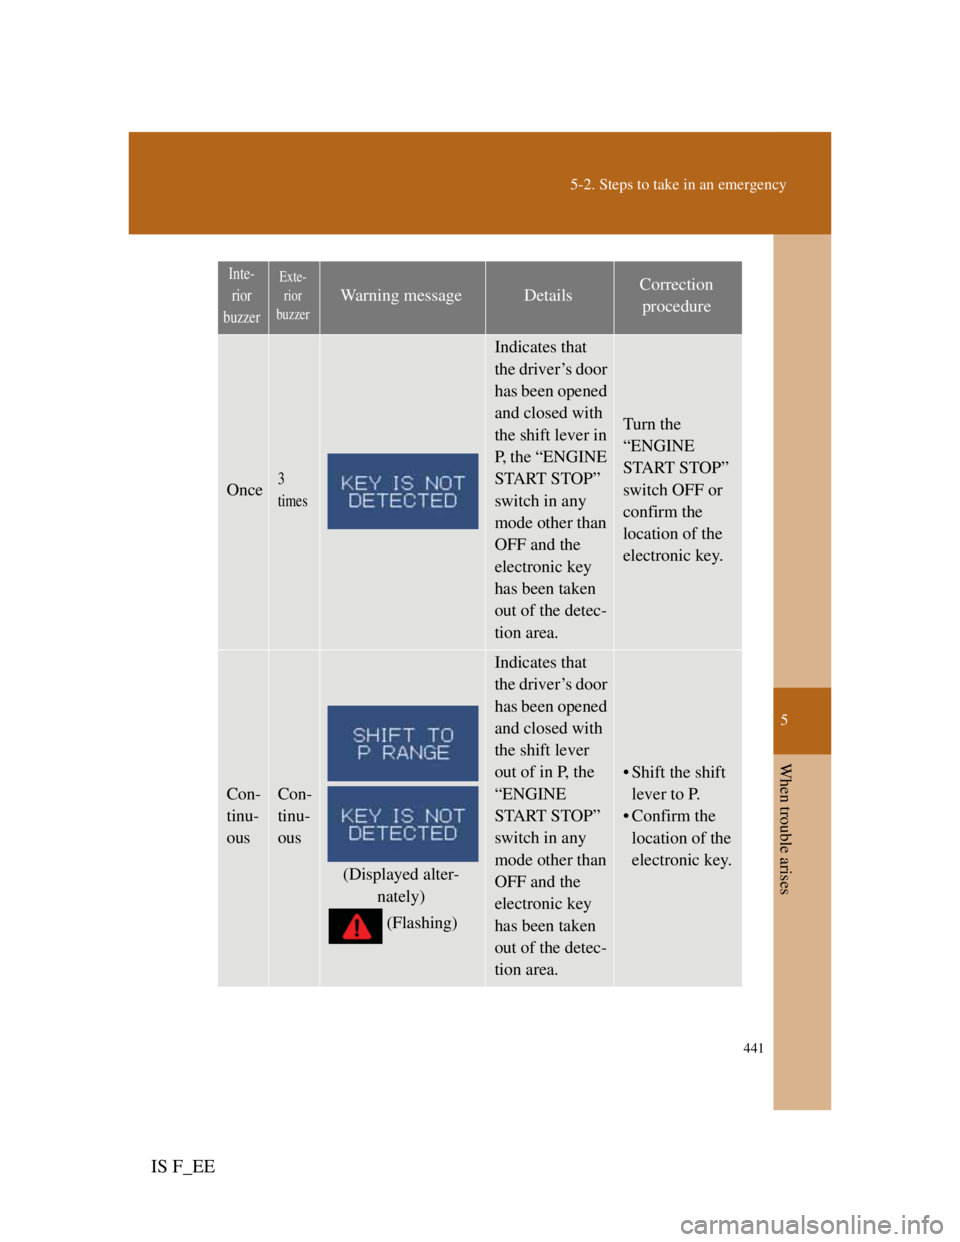
Once3
times
Indicates that
the driver’s door
has been opened
and closed with
the shift lever in
P, the “ENGINE
START STOP”
switch in any
mode other than
OFF and the
electronic key
has been taken
out of the detec-
tion area.
Turn the
“ENGINE
START STOP”
switch OFF or
confirm the
location of the
electronic key.
Con-
tinu-
ousCon-
tinu-
ous
(Displayed alter-
nately)
(Flashing)
Indicates that
the driver’s door
has been opened
and closed with
the shift lever
out of in P, the
“ENGINE
START STOP”
switch in any
mode other than
OFF and the
electronic key
has been taken
out of the detec-
tion area.
• Shift the shift
lever to P.
• Confirm the
location of the
electronic key.
Inte-
rior
buzzerExte-
rior
buzzer
Warning messageDetailsCorrection
procedure
Page 465 of 529
442
5-2. Steps to take in an emergency
IS F_EE
Once(Comes on for 10 sec-
onds.)
(Flashing)
Indicates that
the key battery
is low.Replace the bat-
tery. (P. 390)
Indicates that
the “ENGINE
START STOP”
switch has been
turned twice to
ACCESSORY
mode without
starting the
engine when a
closed door is
opened.
Press the
“ENGINE
START STOP”
switch while
applying the
brakes.
(Flashing)
Indicates that
the steering lock
has not released
within 3 seconds
of pressing the
“ENGINE
START STOP”
switch.Press the
“ENGINE
START STOP”
switch again
while turning
the steering
wheel with the
brake pedal
depressed.
Inte-
rior
buzzerExte-
rior
buzzer
Warning messageDetailsCorrection
procedure
Page 466 of 529
5
443
5-2. Steps to take in an emergency
When trouble arises
IS F_EE
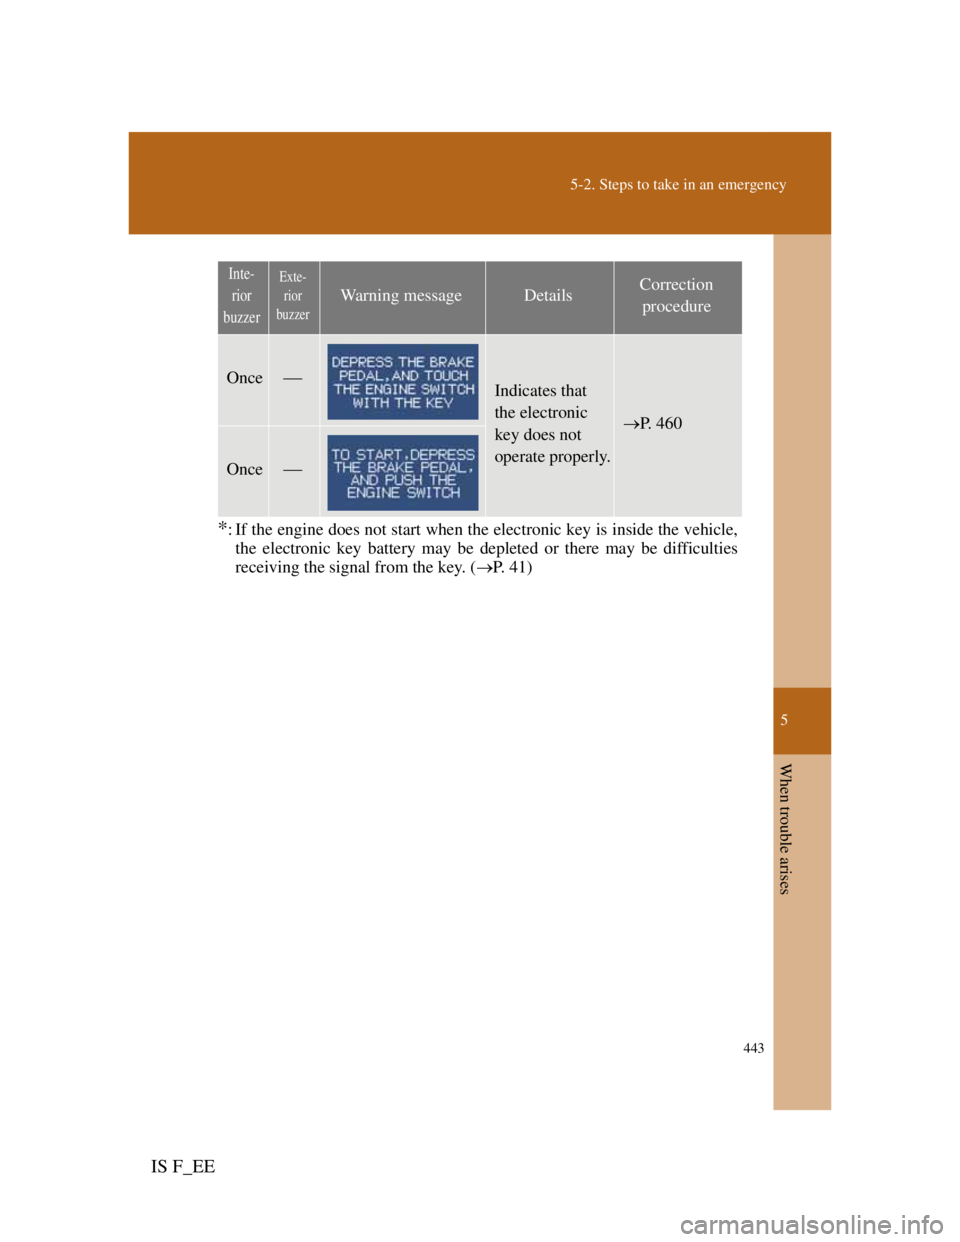
*: If the engine does not start when the electronic key is inside the vehicle,
the electronic key battery may be depleted or there may be difficulties
receiving the signal from the key. (P. 41)
OnceIndicates that
the electronic
key does not
operate properly.
P. 4 6 0
Once
Inte-
rior
buzzerExte-
rior
buzzer
Warning messageDetailsCorrection
procedure
Page 467 of 529
444
5-2. Steps to take in an emergency
IS F_EE
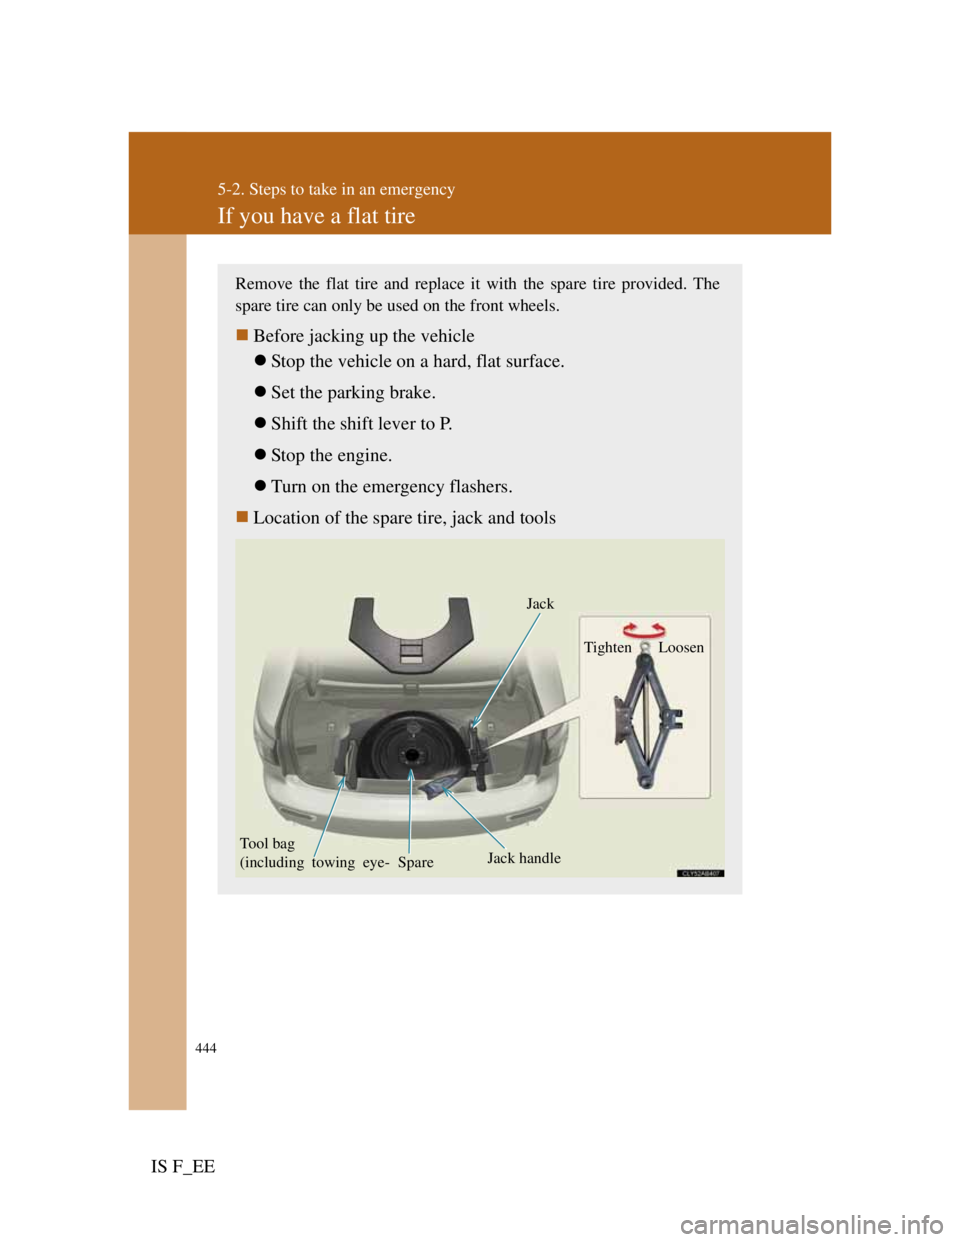
If you have a flat tire
Remove the flat tire and replace it with the spare tire provided. The
spare tire can only be used on the front wheels.
Before jacking up the vehicle
Stop the vehicle on a hard, flat surface.
Set the parking brake.
Shift the shift lever to P.
Stop the engine.
Turn on the emergency flashers.
Location of the spare tire, jack and tools
Tool bag
(including towing eye-Jack
SpareJack handleTighten Loosen
Page 468 of 529
5
445
5-2. Steps to take in an emergency
When trouble arises
IS F_EE
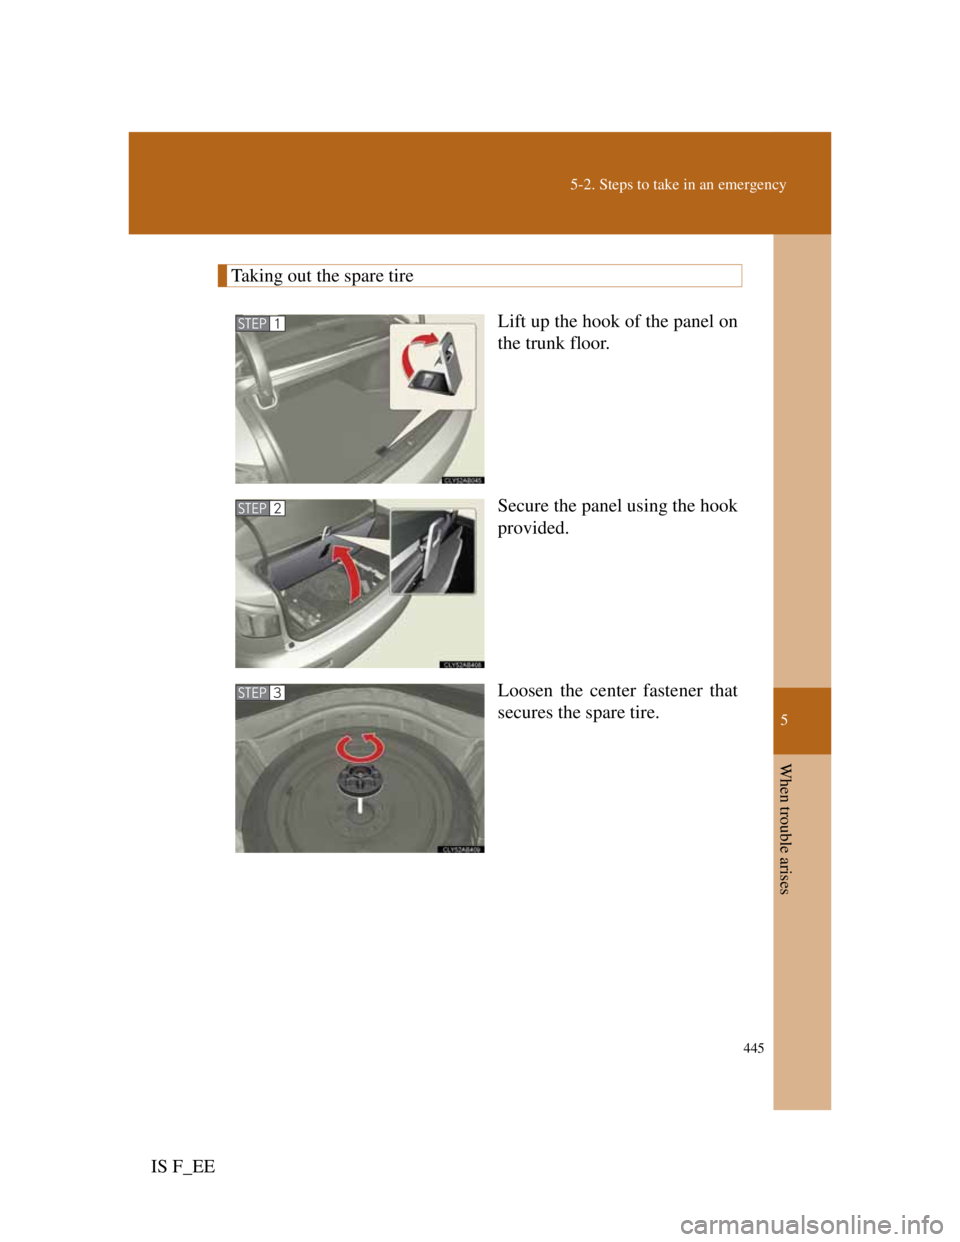
Taking out the spare tire
Lift up the hook of the panel on
the trunk floor.
Secure the panel using the hook
provided.
Loosen the center fastener that
secures the spare tire.
STEP1
STEP2
STEP3
Page 469 of 529
446
5-2. Steps to take in an emergency
IS F_EE
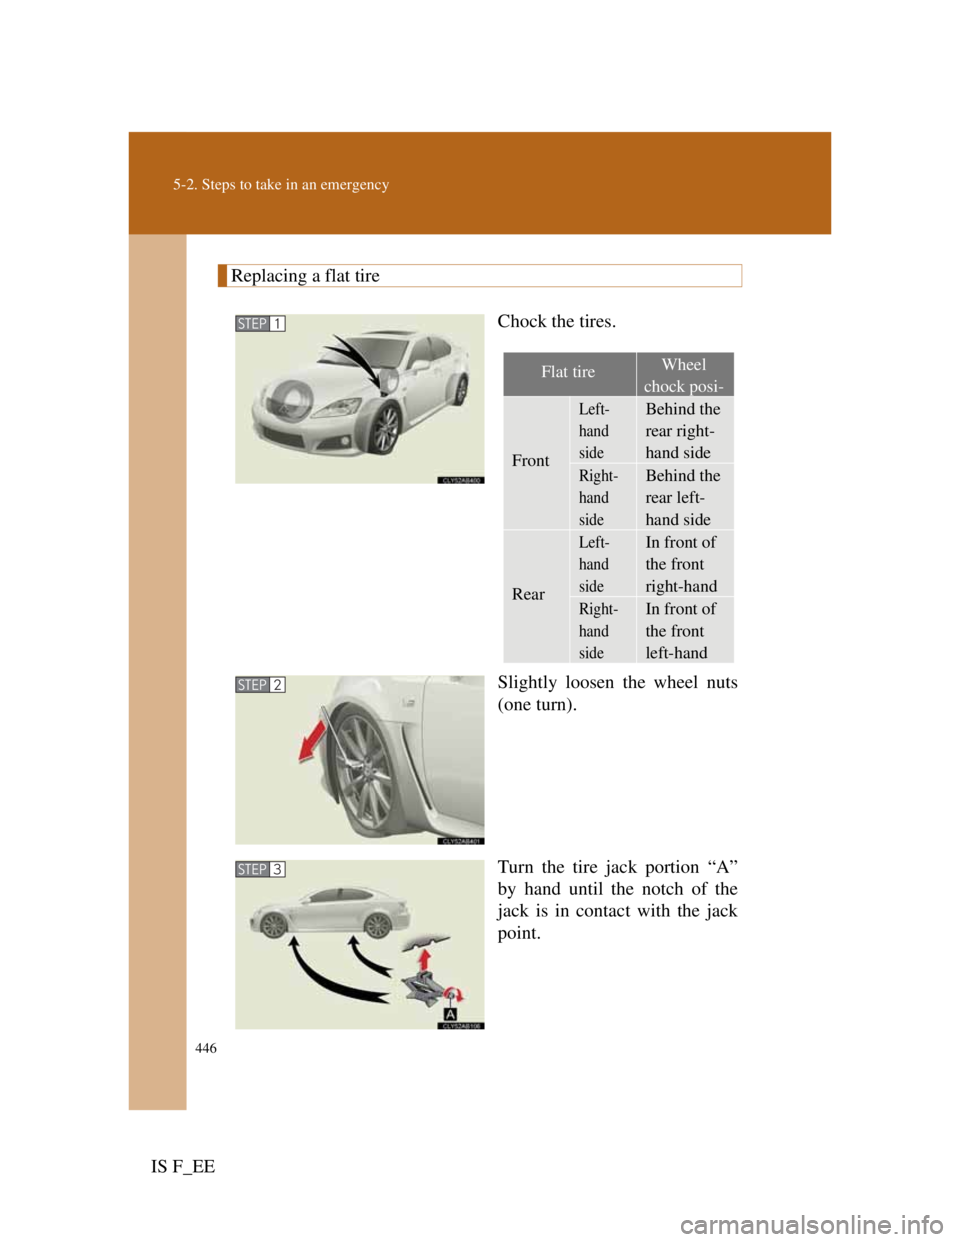
Replacing a flat tire
Chock the tires.
Slightly loosen the wheel nuts
(one turn).
Turn the tire jack portion “A”
by hand until the notch of the
jack is in contact with the jack
point.
STEP1
Flat tireWheel
chock posi-
Front
Left-
hand
sideBehind the
rear right-
hand side
Right-
hand
sideBehind the
rear left-
hand side
Rear
Left-
hand
sideIn front of
the front
right-hand
Right-
hand
sideIn front of
the front
left-hand
STEP2
STEP3
Page 470 of 529
5
447
5-2. Steps to take in an emergency
When trouble arises
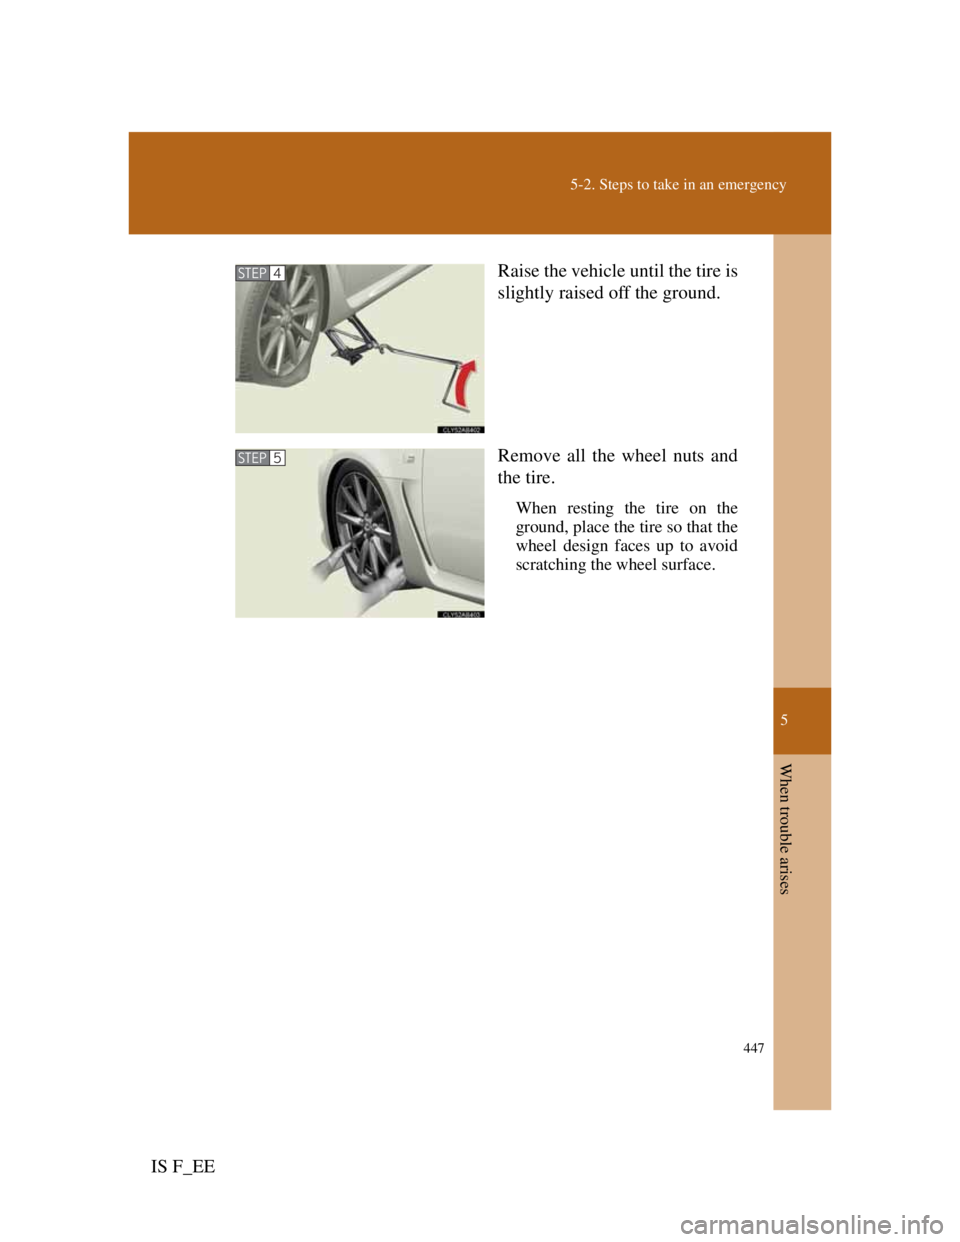
IS F_EERaise the vehicle until the tire is
slightly raised off the ground.
Remove all the wheel nuts and
the tire.
When resting the tire on the
ground, place the tire so that the
wheel design faces up to avoid
scratching the wheel surface.
STEP4
STEP5
Trending: ground clearance, fuses, jump cable, spark plugs, roof, brake sensor, tow


