tow Lexus IS200t 2015 Owner's Manual
[x] Cancel search | Manufacturer: LEXUS, Model Year: 2015, Model line: IS200t, Model: Lexus IS200t 2015Pages: 612, PDF Size: 132.21 MB
Page 3 of 612
3
1
9 8
7
6 4 3
2
IS200t_EE(OM53D19E)
5
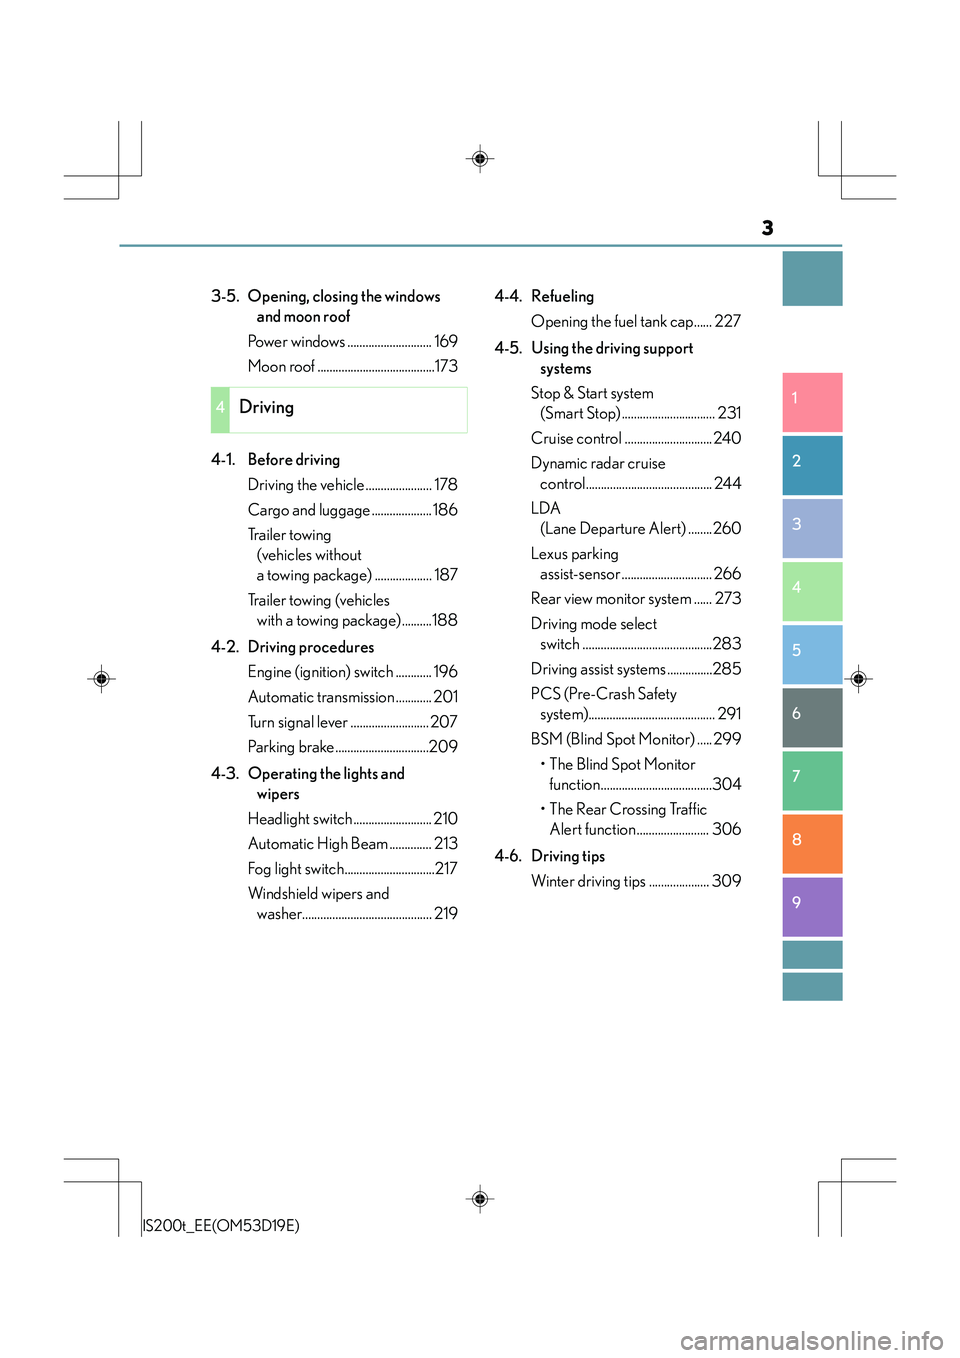
3-5. Opening, closing the windows and moon roof
Power windows ............................ 169
Moon roof .......................................173
4-1. Before driving Driving the vehicle ...................... 178
Cargo and luggage .................... 186
Tr a i l e r t o w i n g (vehicles without
a towing package) ................... 187
Trailer towing (vehicles with a towing package)..........188
4-2. Driving procedures Engine (ignition) switch ............ 196
Automatic transmission ............ 201
Turn signal lever .......................... 207
Parking brake...............................209
4-3. Operating the lights and wipers
Headlight switch .......................... 210
Automatic High Beam .............. 213
Fog light switch..............................217
Windshield wipers and washer........................................... 219 4-4. Refueling
Opening the fuel tank cap...... 227
4-5. Using the driving support systems
Stop & Start system (Smart Stop) ............................... 231
Cruise control ............................. 240
Dynamic radar cruise control.......................................... 244
LDA (Lane Departure Alert) ........260
Lexus parking assist-sensor .............................. 266
Rear view monitor system ...... 273
Driving mode select switch ...........................................283
Driving assist systems ...............285
PCS (Pre-Crash Safety system).......................................... 291
BSM (Blind Spot Monitor) ..... 299
•The Blind Spot Monitor function.....................................304
• The Rear Crossing Traffic Alert function........................ 306
4-6. Driving tips Winter driving tips .................... 309
4Driving
Page 6 of 612
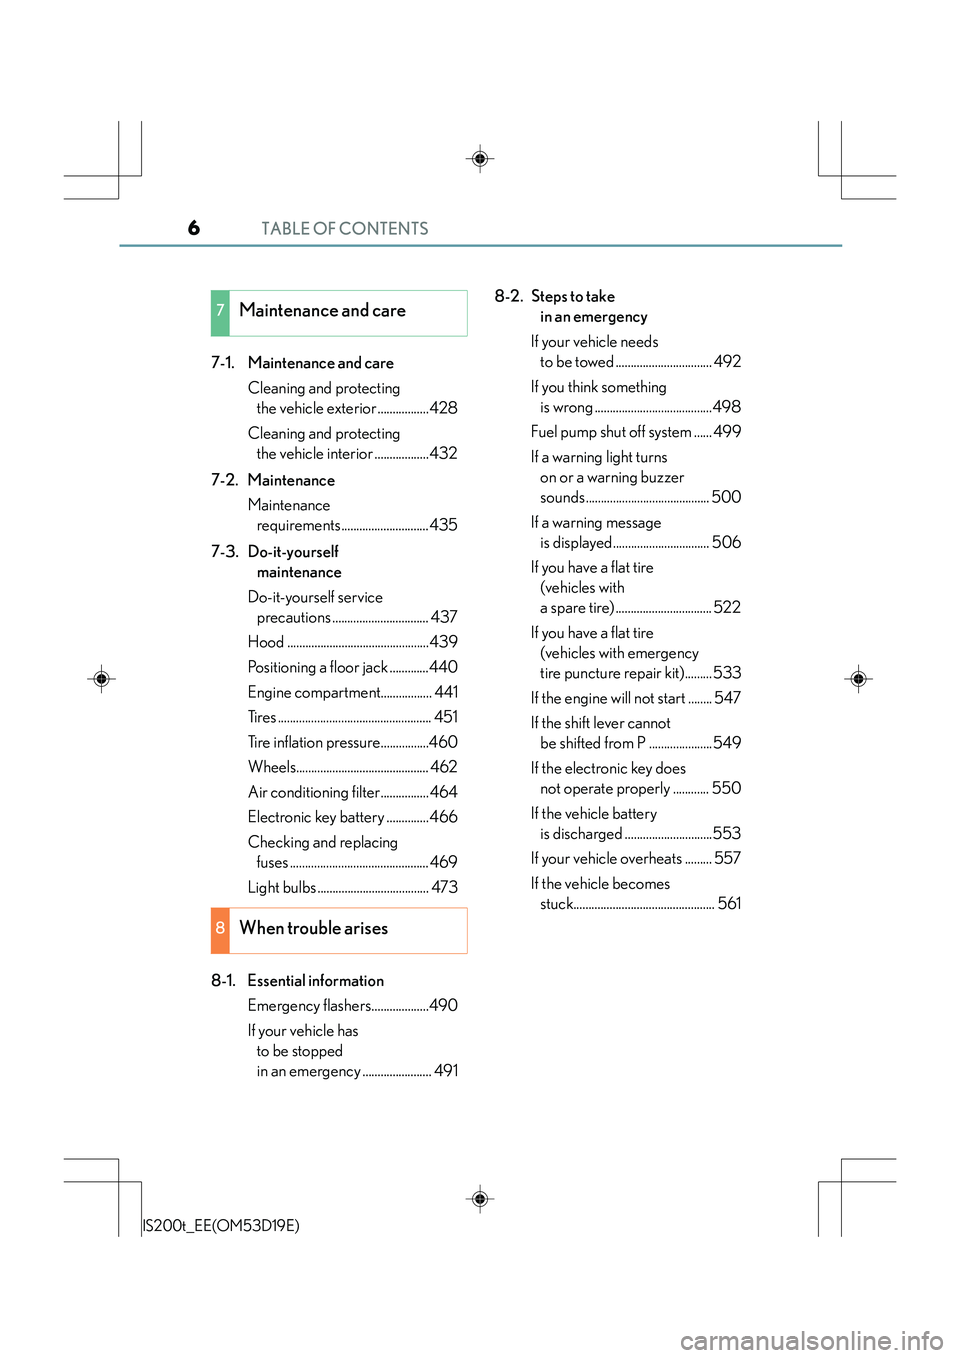
TABLE OF CONTENTS6
IS200t_EE(OM53D19E)
7-1. Maintenance and careCleaning and protecting the vehicle exterior .................428
Cleaning and protecting the vehicle interior ..................432
7-2. Maintenance Maintenance requirements.............................435
7-3. Do-it-yourself maintenance
Do-it-yourself service precautions ................................ 437
Hood ...............................................439
Positioning a floor jack .............440
Engine compartment................. 441
Tires ................................................... 451
Tire inflation pressure................460
Wheels............................................ 462
Air conditioning filter................464
Electronic key battery ..............466
Checking and replacing fuses .............................................. 469
Light bulbs ..................................... 473
8-1. Essential information Emergency flashers...................490
If your vehicle has to be stopped
in an emergency ....................... 491 8-2. Steps to take
in an emergency
If your vehicle needs to be towed ................................ 492
If you think something is wrong .......................................498
Fuel pump shut off system ...... 499
If a warning light turns on or a warning buzzer
sounds......................................... 500
If a warning message is displayed................................ 506
If you have a flat tire (vehicles with
a spare tire) ................................ 522
If you have a flat tire (vehicles with emergency
tire puncture repair kit).........533
If the engine will not start ........ 547
If the shift lever cannot be shifted from P .....................549
If the electronic key does not operate properly ............ 550
If the vehicle battery is discharged .............................553
If your vehicle overheats ......... 557
If the vehicle becomes stuck............................................... 561
7Maintenance and care
8When trouble arises
Page 14 of 612
14Pictorial index
IS200t_EE(OM53D19E)
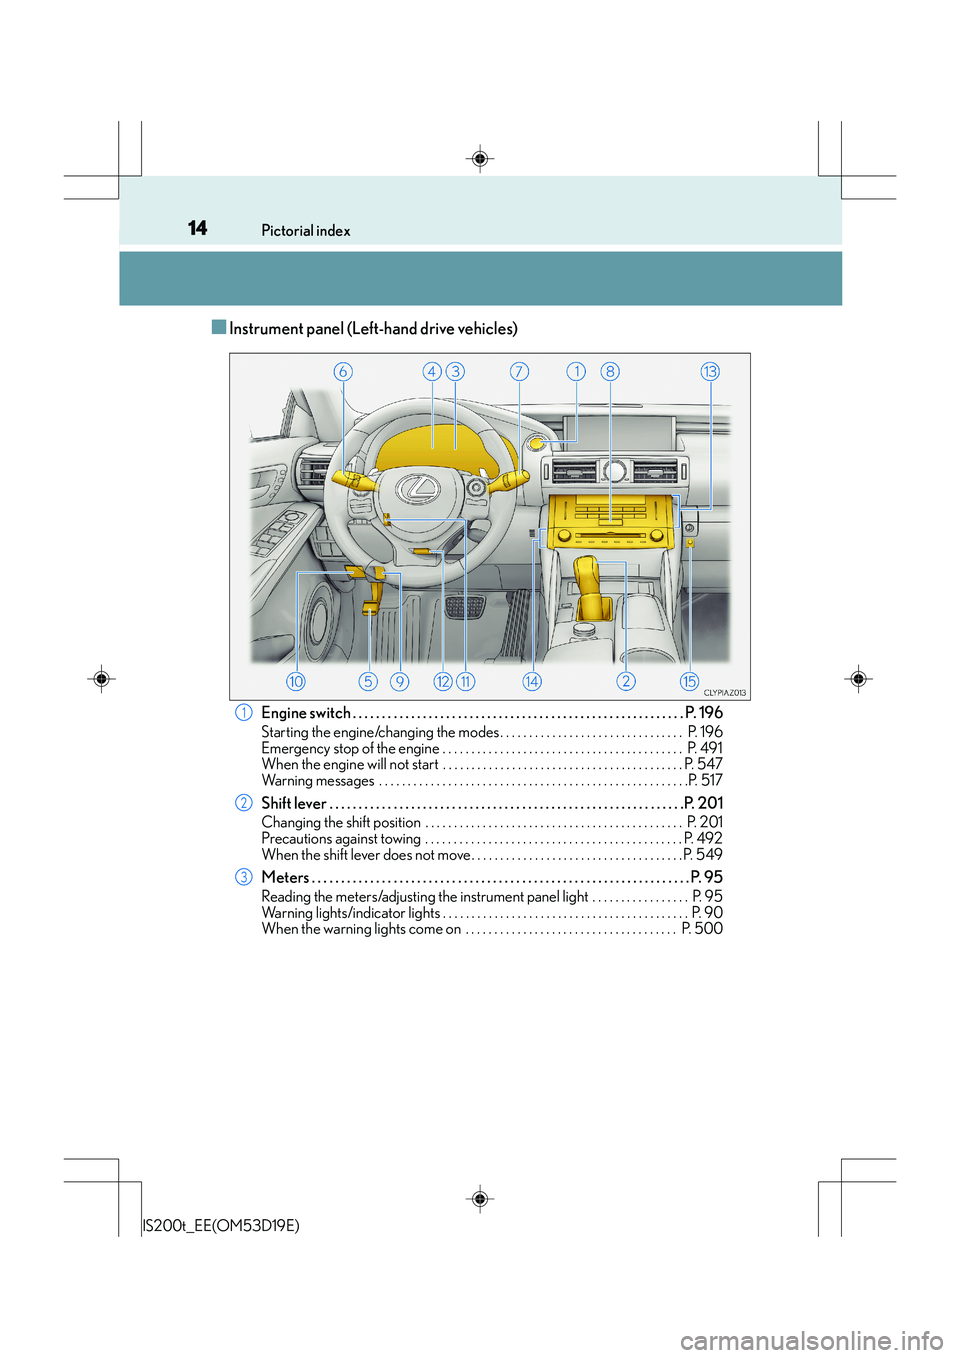
■Instrument panel (Left-hand drive vehicles)
Engine switch . . . . . . . . . . . . . . . . . . . . . . . . . . . . . . . . . . . . . . . . . . . . . . . . . . . . . . . . . P . 196
Starting the engine/changing the modes . . . . . . . . . . . . . . . . . . . . . . . . . . . . . . . . P. 196
Emergency stop of the engine . . . . . . . . . . . . . . . . . . . . . . . . . . . . . . . . . . . . . . . . . . P. 491
When the engine will not start . . . . . . . . . . . . . . . . . . . . . . . . . . . . . . . . . . . . . . . . . . P. 547
Warning messages . . . . . . . . . . . . . . . . . . . . . . . . . . . . . . . . . . . . . . . . . . . . . . . . . . . . . .P. 517
Shift lever . . . . . . . . . . . . . . . . . . . . . . . . . . . . . . . . . . . . . . . . . . . . . . . . . . . . . . . . . . . . .P. 201
Changing the shift position . . . . . . . . . . . . . . . . . . . . . . . . . . . . . . . . . . . . . . . . . . . . . P. 201
Precautions against towing . . . . . . . . . . . . . . . . . . . . . . . . . . . . . . . . . . . . . . . . . . . . . P. 492
When the shift lever does not move . . . . . . . . . . . . . . . . . . . . . . . . . . . . . . . . . . . . . P. 549
Meters . . . . . . . . . . . . . . . . . . . . . . . . . . . . . . . . . . . . . . . . . . . . . . . . . . . . . . . . . . . . . . . . . P. 95
Reading the meters/adjusting the instrument panel light . . . . . . . . . . . . . . . . . P. 95
Warning lights/indicator lights . . . . . . . . . . . . . . . . . . . . . . . . . . . . . . . . . . . . . . . . . . . P. 90
When the warning lights come on . . . . . . . . . . . . . . . . . . . . . . . . . . . . . . . . . . . . . P. 500
1
2
3
Page 22 of 612
22Pictorial index
IS200t_EE(OM53D19E)
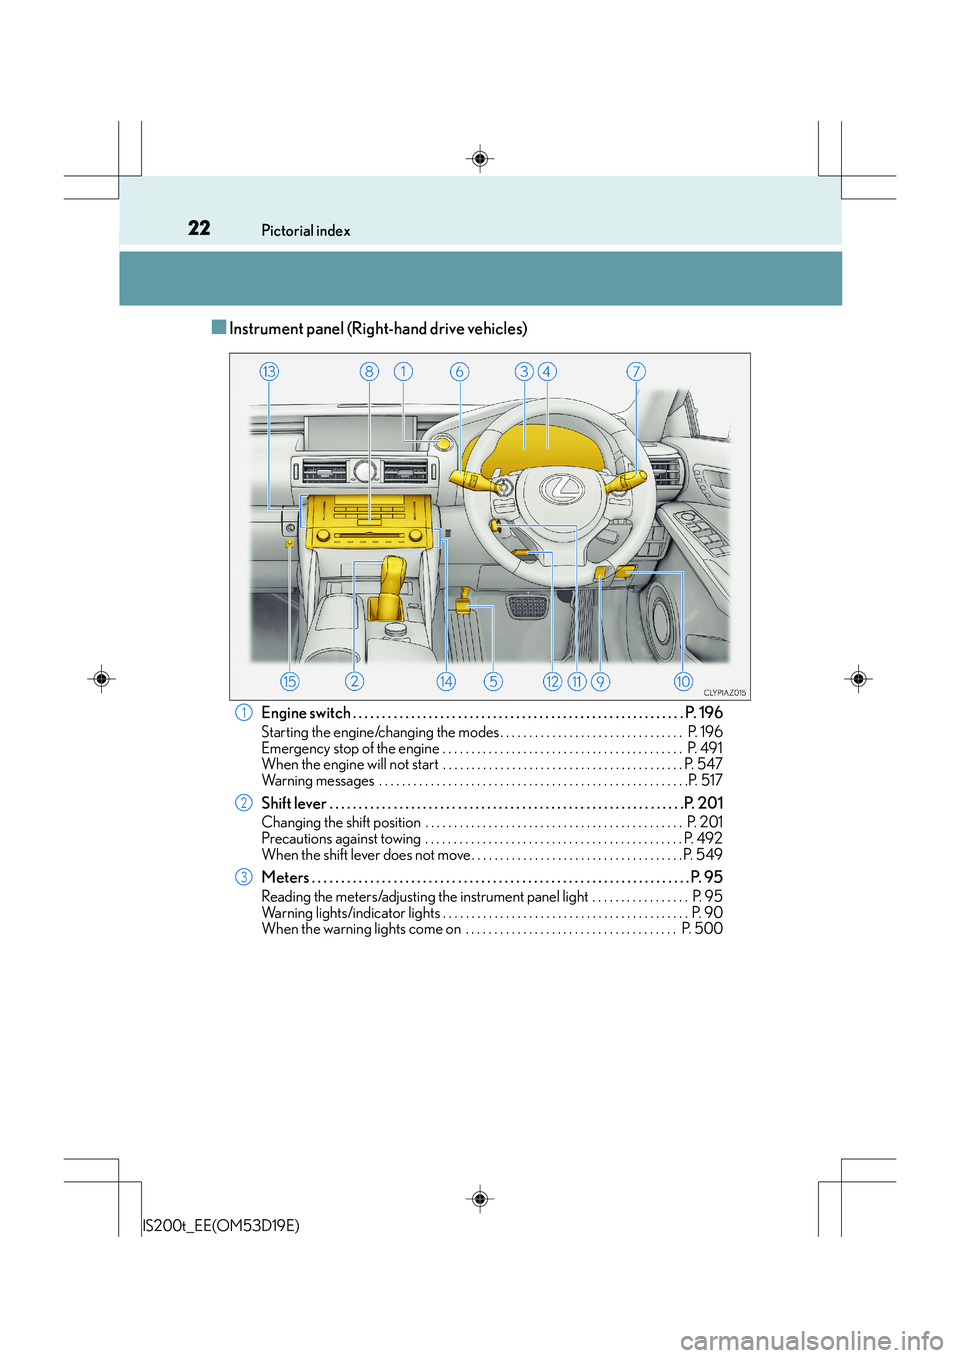
■Instrument panel (Right-hand drive vehicles)
Engine switch . . . . . . . . . . . . . . . . . . . . . . . . . . . . . . . . . . . . . . . . . . . . . . . . . . . . . . . . . P . 196
Starting the engine/changing the modes . . . . . . . . . . . . . . . . . . . . . . . . . . . . . . . . P. 196
Emergency stop of the engine . . . . . . . . . . . . . . . . . . . . . . . . . . . . . . . . . . . . . . . . . . P. 491
When the engine will not start . . . . . . . . . . . . . . . . . . . . . . . . . . . . . . . . . . . . . . . . . . P. 547
Warning messages . . . . . . . . . . . . . . . . . . . . . . . . . . . . . . . . . . . . . . . . . . . . . . . . . . . . . .P. 517
Shift lever . . . . . . . . . . . . . . . . . . . . . . . . . . . . . . . . . . . . . . . . . . . . . . . . . . . . . . . . . . . . .P. 201
Changing the shift position . . . . . . . . . . . . . . . . . . . . . . . . . . . . . . . . . . . . . . . . . . . . . P. 201
Precautions against towing . . . . . . . . . . . . . . . . . . . . . . . . . . . . . . . . . . . . . . . . . . . . . P. 492
When the shift lever does not move . . . . . . . . . . . . . . . . . . . . . . . . . . . . . . . . . . . . . P. 549
Meters . . . . . . . . . . . . . . . . . . . . . . . . . . . . . . . . . . . . . . . . . . . . . . . . . . . . . . . . . . . . . . . . . P. 95
Reading the meters/adjusting the instrument panel light . . . . . . . . . . . . . . . . . P. 95
Warning lights/indicator lights . . . . . . . . . . . . . . . . . . . . . . . . . . . . . . . . . . . . . . . . . . . P. 90
When the warning lights come on . . . . . . . . . . . . . . . . . . . . . . . . . . . . . . . . . . . . . P. 500
1
2
3
Page 38 of 612
381-1. For safe use
IS200t_EE(OM53D19E)
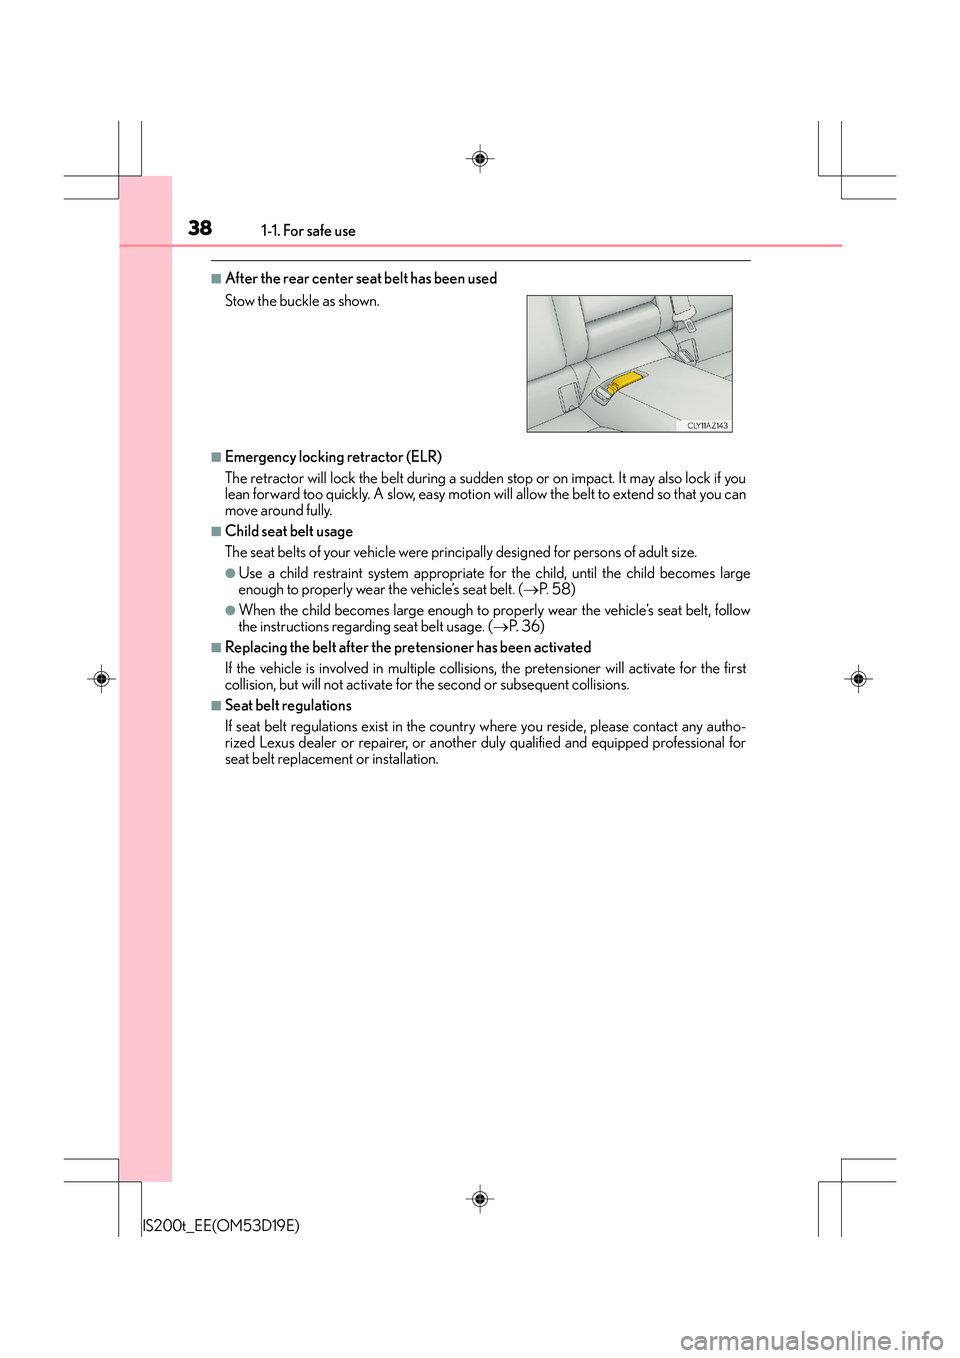
■After the rear center seat belt has been used
■Emergency locking retractor (ELR)
The retractor will lock the belt during a sudden stop or on impact. It may also lock if you
lean forward too quickly. A slow, easy motion will allow the belt to extend so that you can
move around fully.
■Child seat belt usage
The seat belts of your vehicle were princi pally designed for persons of adult size.
●Use a child restraint system appropriate fo r the child, until the child becomes large
enough to properly wear the vehicle’s seat belt. ( →P. 5 8 )
●When the child becomes large enough to prop erly wear the vehicle’s seat belt, follow
the instructions regarding seat belt usage. ( →P. 3 6 )
■Replacing the belt after the pretensioner has been activated
If the vehicle is involved in multiple collisions, the pretension er will activate for the first
collision, but will not activate for the second or subsequent collisions.
■Seat belt regulations
If seat belt regulations exist in the country where you reside, please contact any autho-
rized Lexus dealer or repairer, or another duly qualified and equipped professional for
seat belt replacement or installation. Stow the buckle as shown.
Page 43 of 612
431-1. For safe use
1
For safety and security
IS200t_EE(OM53D19E)
CAUTION
■SRS airbag precautions
Observe the following precautions regarding the SRS airbags.
Failure to do so may cause death or serious injury.
●The driver and all passengers in the vehicle must wear their seat belts properly.
The SRS airbags are supplemental devices to be used with the seat belts.
●The SRS driver airbag deploys with considerable force, and can cause death or seri-
ous injury especially if the driver is very close to the airbag.
Since the risk zone for the driver’s airbag is the first 50 - 75 mm (2 - 3 in.) of inflation,
placing yourself 250 mm (10 in.) from your driver airbag provides you with a clear
margin of safety. This distance is measured from the center of the steering wheel to
your breastbone. If you sit less than 250 mm (10 in.) away now, you can change your
driving position in several ways:
• Move your seat to the rear as far as you can while still reaching the pedals com-
fortably.
• Slightly recline the back of the seat.
Although vehicle designs vary, many drivers can achieve the 250 mm (10 in.) dis-
tance, even with the driver seat all the wa y forward, simply by reclining the back of
the seat somewhat. If reclining the back of your seat makes it hard to see the road,
raise yourself by using a firm, non-slippery cushion, or raise the seat if your vehicle
has that feature.
• If your steering wheel is adjustable, tilt it downward. This points the airbag toward
your chest instead of your head and neck.
The seat should be adjusted as recommend ed above, while still maintaining control
of the foot pedals, steering wheel, and yo ur view of the instrument panel controls.
Page 45 of 612
451-1. For safe use
1
For safety and security
IS200t_EE(OM53D19E)
CAUTION
■SRS airbag precautions
●Do not hang coat hangers or hard objects on the coat hooks. All of these items could
become projectiles and may cause death or serious injury, should the SRS curtain
shield airbags deploy.
●If a vinyl cover is put on the area where the SRS knee airbag will deploy, be sure to
remove it.
●Do not use seat accessories which cover the parts where the SRS side airbags inflate
as they may interfere with inflation of the airbags. Such accessories may prevent the
side airbags from activating correctly, disable the system or cause the side airbags to
inflate accidentally, resulting in death or serious injury.
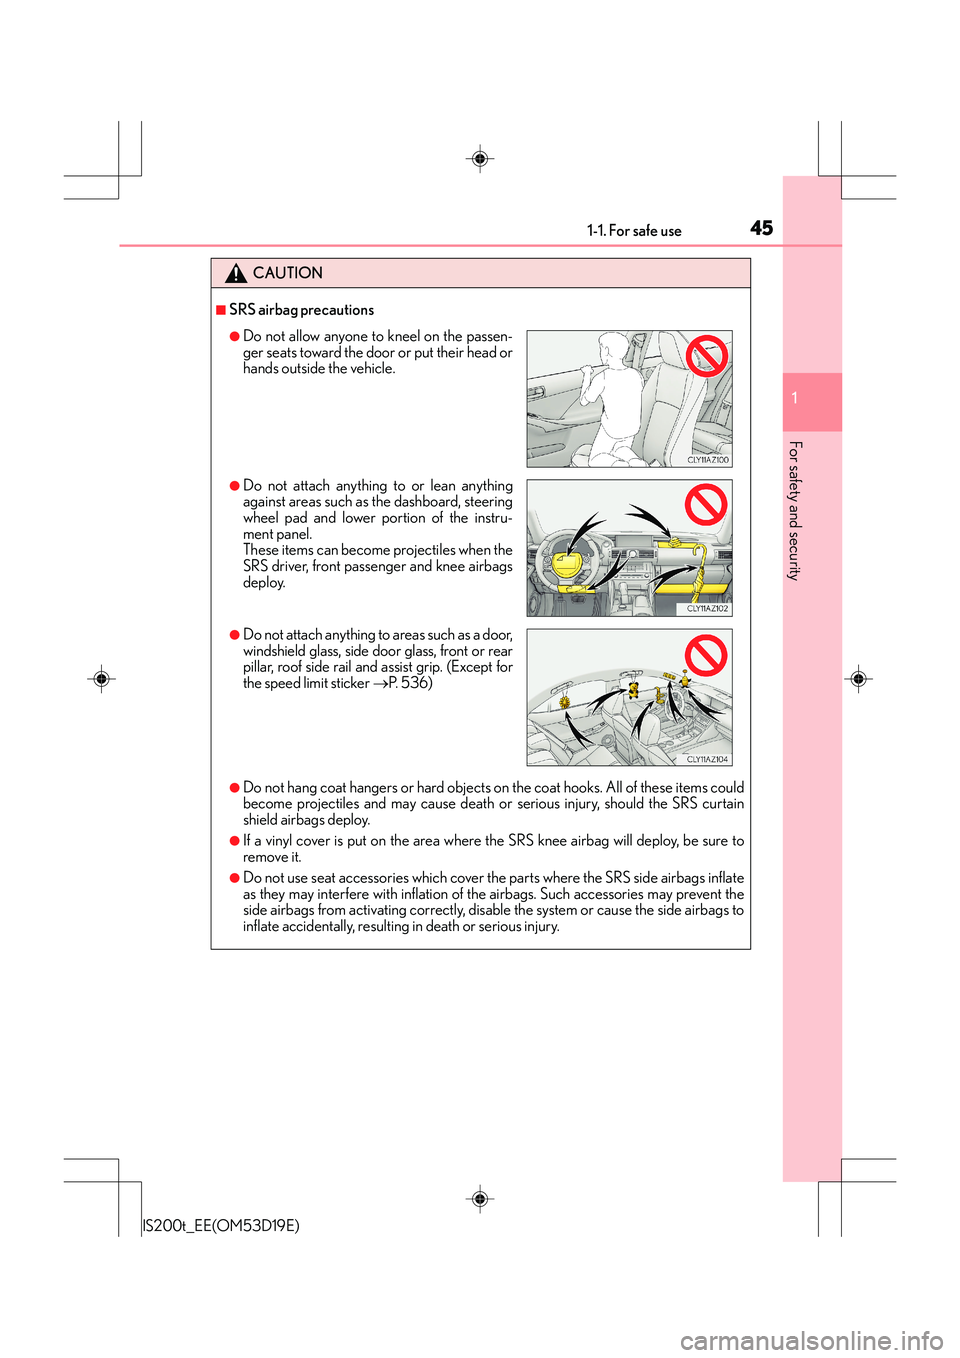
●Do not allow anyone to kneel on the passen-
ger seats toward the door or put their head or
hands outside the vehicle.
●Do not attach anything to or lean anything
against areas such as the dashboard, steering
wheel pad and lower portion of the instru-
ment panel.
These items can become projectiles when the
SRS driver, front passenger and knee airbags
deploy.
●Do not attach anything to areas such as a door,
windshield glass, side door glass, front or rear
pillar, roof side rail and assist grip. (Except for
the speed limit sticker →P. 5 3 6 )
Page 86 of 612
861-2. Theft deterrent system
IS200t_EE(OM53D19E)
●The intrusion sensor detects intruders or movement in the vehicle.
●The tilt sensor detects changes in vehicle inclination, such as when the vehicle
is towed away.
This system is designed to deter and pr event vehicle theft but does not guarantee
absolute security against all intrusions.
■Setting the intrusion sensor and tilt sensor
The intrusion sensor and tilt sensor will be set automatically when the alarm is
set. ( →P. 8 3 )
■Canceling the intrusion sensor and tilt sensor
If you are leaving pets or other moving things inside the vehicle, make sure to
disable the intrusion sensor and tilt sensor before setting the alarm, as they will
respond to movement inside the vehicle.
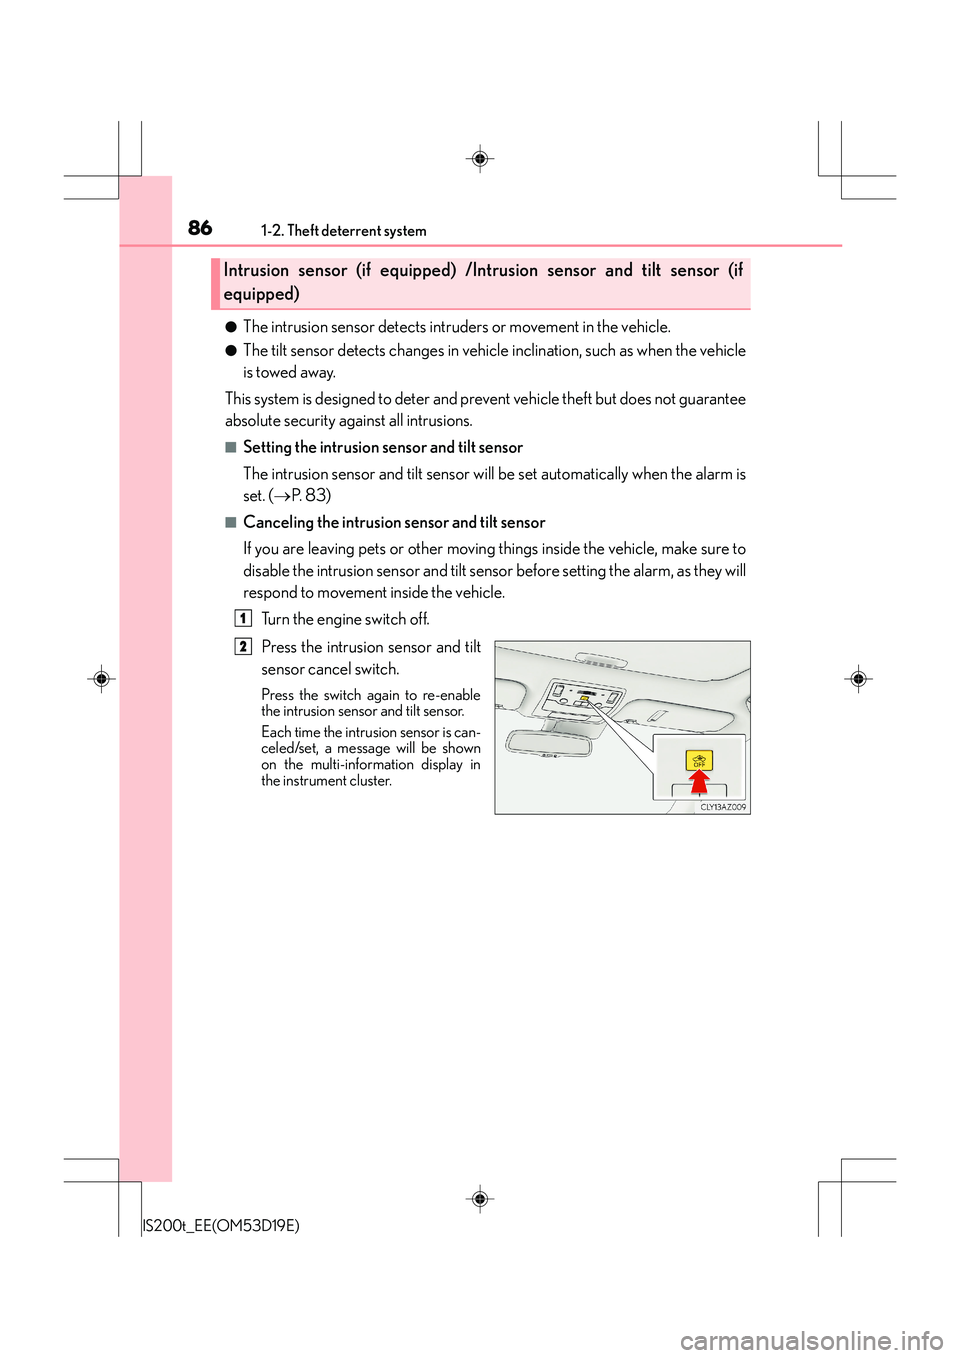
Turn the engine switch off.
Press the intrusion sensor and tilt
sensor cancel switch.
Press the switch again to re-enable
the intrusion sensor and tilt sensor.
Each time the intrusion sensor is can-
celed/set, a message will be shown
on the multi-information display in
the instrument cluster.
Intrusion sensor (if equipped) /Intrusion sensor and tilt sensor (if
equipped)
1
2
Page 136 of 612
1363-2. Opening, closing and locking the doors and trunk
IS200t_EE(OM53D19E)
■Conditions affecting operation
The smart entry & start system uses weak radio waves. In the following situations, the
communication between the electronic key and the vehicle may be affected, preventing
the smart entry & start system, wireless remote control and engine immobilizer system
from operating properly. (Ways of coping: →P. 5 5 0 )
●When the electronic key battery is depleted
●Near a TV tower, electric power plant, gas station, radio station, large display, airport or
other facility that generates strong radio waves or electrical noise
●When carrying a portable radio, cellular ph one, cordless phone or other wireless com-
munication device
●When the electronic key is in contact wi th, or is covered by the following metallic
objects
• Cards to which aluminum foil is attached
• Cigarette boxes that have aluminum foil inside
• Metallic wallets or bags
•Coins
• Hand warmers made of metal
• Media such as CDs and DVDs
●When other wireless keys (that emit radio waves) are being used nearby
●When carrying the electronic key together with the following devices that emit radio
waves
• Another vehicle’s electronic key or a wireless key that emits radio waves
• Personal computers or personal digital assistants (PDAs)
• Digital audio players
• Portable game systems
●If window tint with a metallic content or me tallic objects are attached to the rear win-
dow
Page 160 of 612
1603-3. Adjusting the seats
IS200t_EE(OM53D19E)
■Adjusting the height of the head restraints
■Adjusting the rear seat head restraint
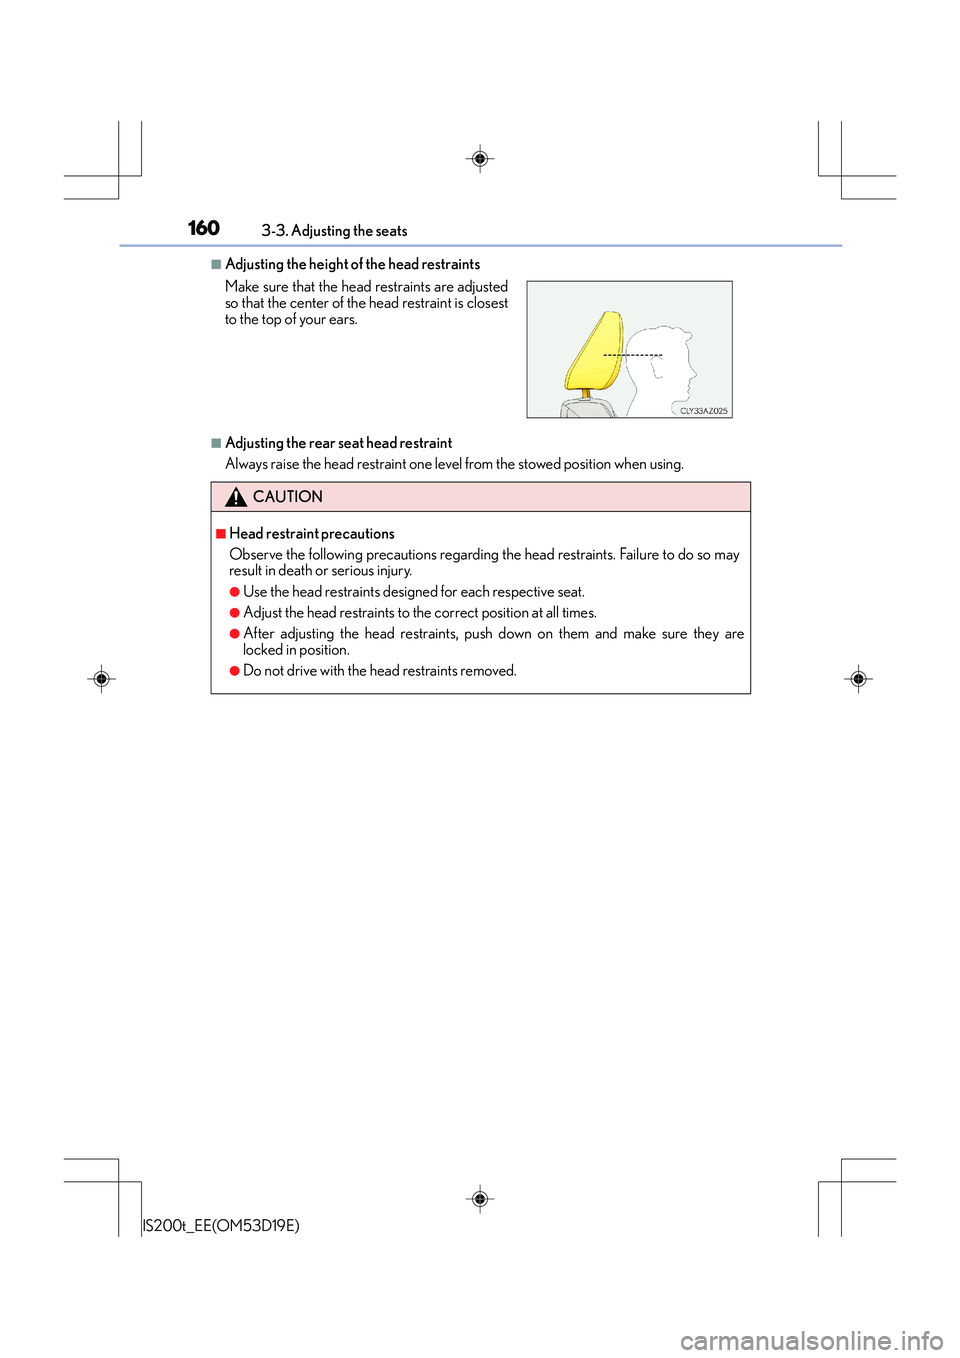
Always raise the head restraint one level from the stowed position when using. Make sure that the head restraints are adjusted
so that the center of the head restraint is closest
to the top of your ears.
CAUTION
■Head restraint precautions
Observe the following precautions regarding the head restraints. Failure to do so may
result in death or serious injury.
●Use the head restraints designed for each respective seat.
●Adjust the head restraints to the correct position at all times.
●After adjusting the head restraints, push down on them and make sure they are
locked in position.
●Do not drive with the head restraints removed.