Lexus IS250 2010 Navigation Manual
Manufacturer: LEXUS, Model Year: 2010, Model line: IS250, Model: Lexus IS250 2010Pages: 391, PDF Size: 38.06 MB
Page 31 of 391
NAVIGATION SYSTEM: BASIC FUNCTIONS
30
D
List screen operation
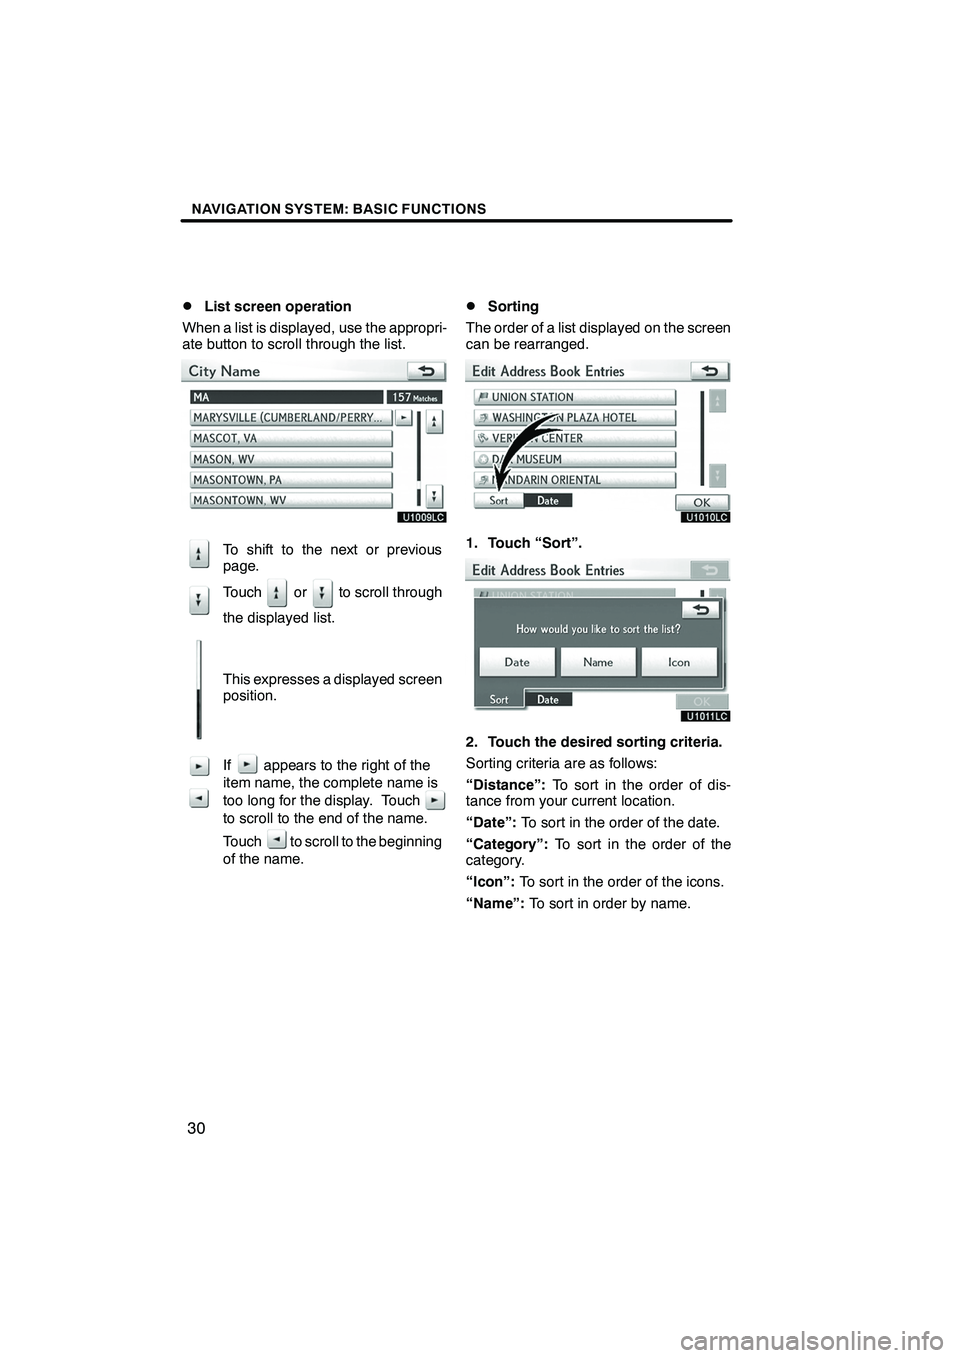
When a list is displayed, use the appropri-
ate button to scroll through the list.
To shift to the next or previous
page.
Touch or to scroll through
the displayed list.
This expresses a displayed screen
position.
If appears to the right of the
item name, the complete name is
too long for the display. Touch
to scroll to the end of the name.
Touch to scroll to the beginning
of the name.
DSorting
The order of a list displayed on the screen
can be rearranged.
1. Touch “Sort”.
2. Touch the desired sorting criteria.
Sorting criteria are as follows:
“Distance”: To sort in the order of dis-
tance from your current location.
“Date”: To sort in the order of the date.
“Category”: To sort in the order of the
category.
“Icon”: To sort in the order of the icons.
“Name”: To sort in order by name.
ISF/IS NAVI (U)
Finish
Page 32 of 391
NAVIGATION SYSTEM: BASIC FUNCTIONS
31
You can adjust the contrast, brightness,
color and tone of the screen. You can also
turn the display off, and change the screen
to either day or night mode.
DContrast, brightness, color and tone
adjustment
The contrast, brightness, color and tone of
the screen can be adjusted depending on
the brightness of your surroundings. You
can also turn the display off.
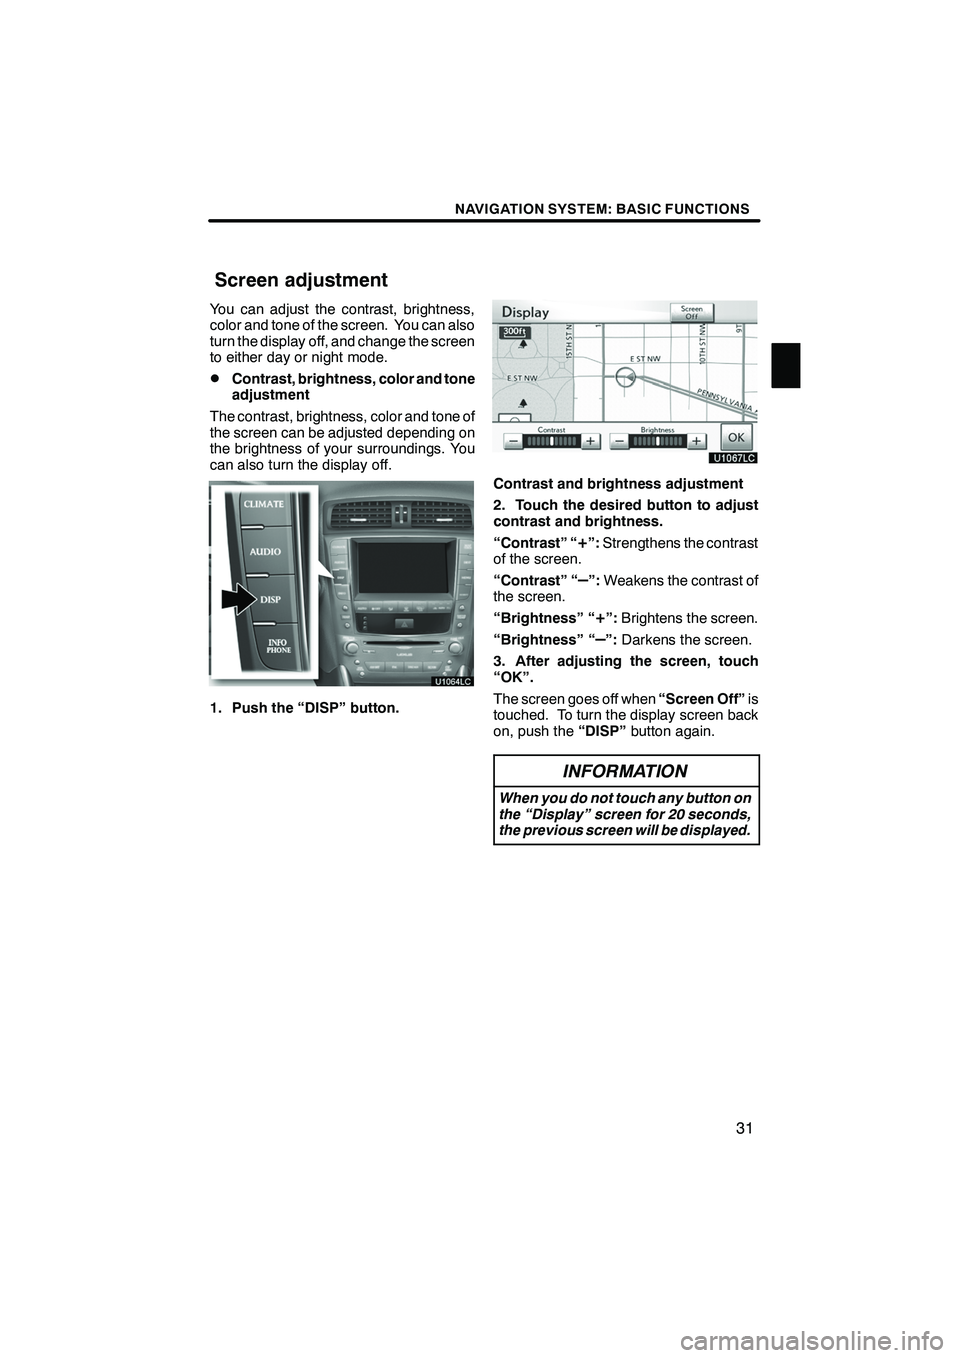
1. Push the “DISP” button.
Contrast and brightness adjustment
2. Touch the desired button to adjust
contrast and brightness.
“Contrast” “
+”: Strengthens the contrast
of the screen.
“Contrast” “
–”: Weakens the contrast of
the screen.
“Brightness” “
+”: Brightens the screen.
“Brightness” “
–”: Darkens the screen.
3. After adjusting the screen, touch
“OK”.
The screen goes off when “Screen Off”is
touched. To turn the display screen back
on, push the “DISP”button again.
INFORMATION
When you do not touch any button on
the “Display” screen for 20 seconds,
the previous screen will be displayed.
ISF/IS NAVI (U)
Finish
Screen adjustment
1
Page 33 of 391
NAVIGATION SYSTEM: BASIC FUNCTIONS
32
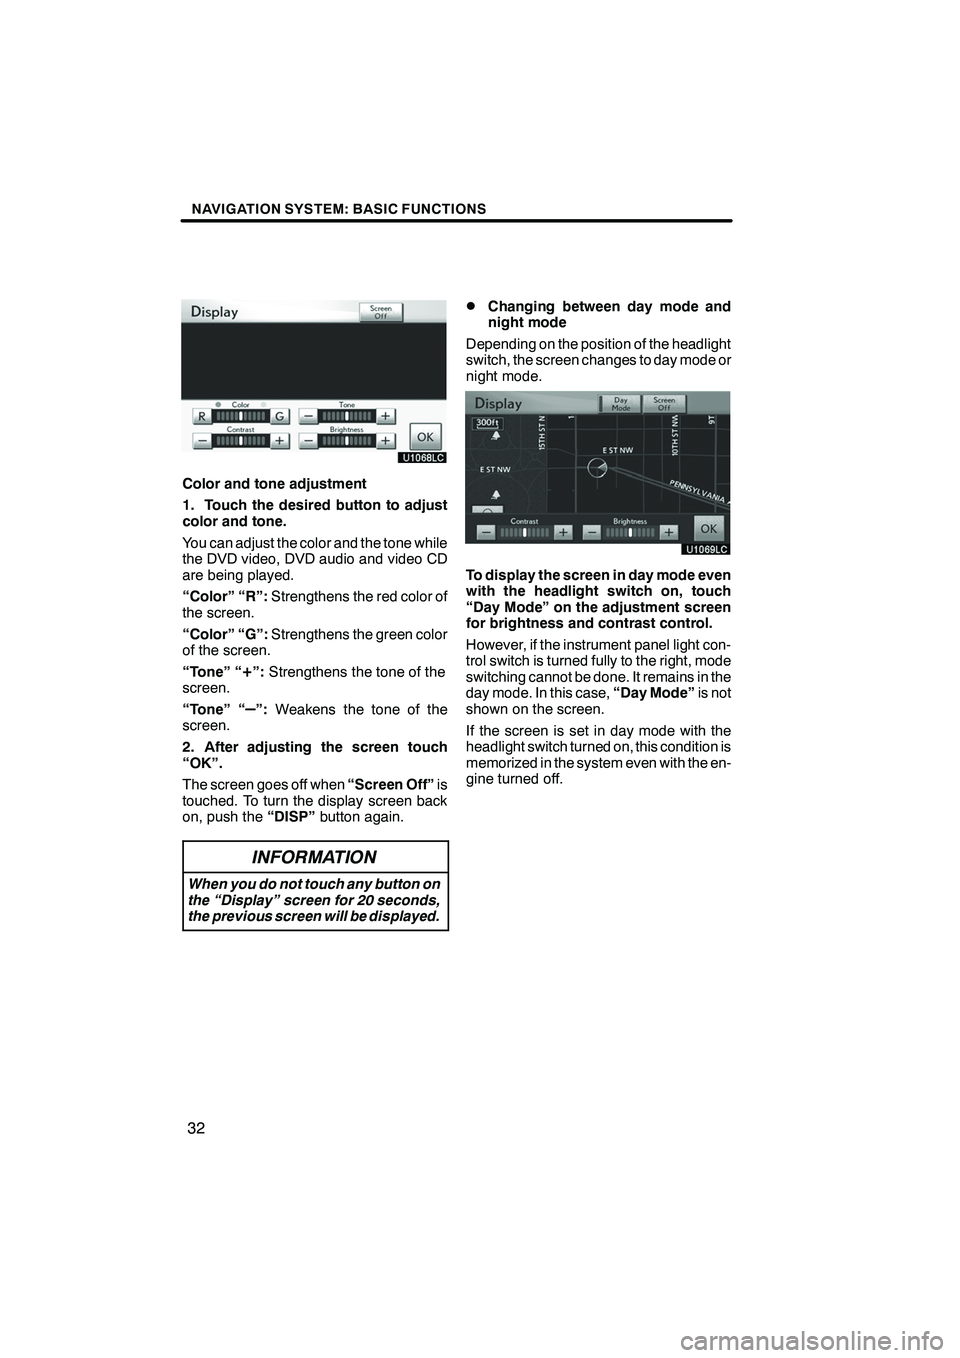
Color and tone adjustment
1. Touch the desired button to adjust
color and tone.
You can adjust the color and the tone while
the DVD video, DVD audio and video CD
are being played.
“Color” “R”:Strengthens the red color of
the screen.
“Color” “G”: Strengthens the green color
of the screen.
“Tone” “
+”: Strengthens the tone of the
screen.
“Tone” “
–”: Weakens the tone of the
screen.
2. After adjusting the screen touch
“OK”.
The screen goes off when “Screen Off”is
touched. To turn the display screen back
on, push the “DISP”button again.
INFORMATION
When you do not touch any button on
the “Display” screen for 20 seconds,
the previous screen will be displayed.
DChanging between day mode and
night mode
Depending on the position of the headlight
switch, the screen changes to day mode or
night mode.
To display the screen in day mode even
with the headlight switch on, touch
“Day Mode” on the adjustment screen
for brightness and contrast control.
However, if the instrument panel light con-
trol switch is turned fully to the right, mode
switching cannot be done. It remains in the
day mode. In this case, “Day Mode”is not
shown on the screen.
If the screen is set in day mode with the
headlight switch turned on, this condition is
memorized in the system even with the en-
gine turned off.
ISF/IS NAVI (U)
Finish
Page 34 of 391
NAVIGATION SYSTEM: BASIC FUNCTIONS
33
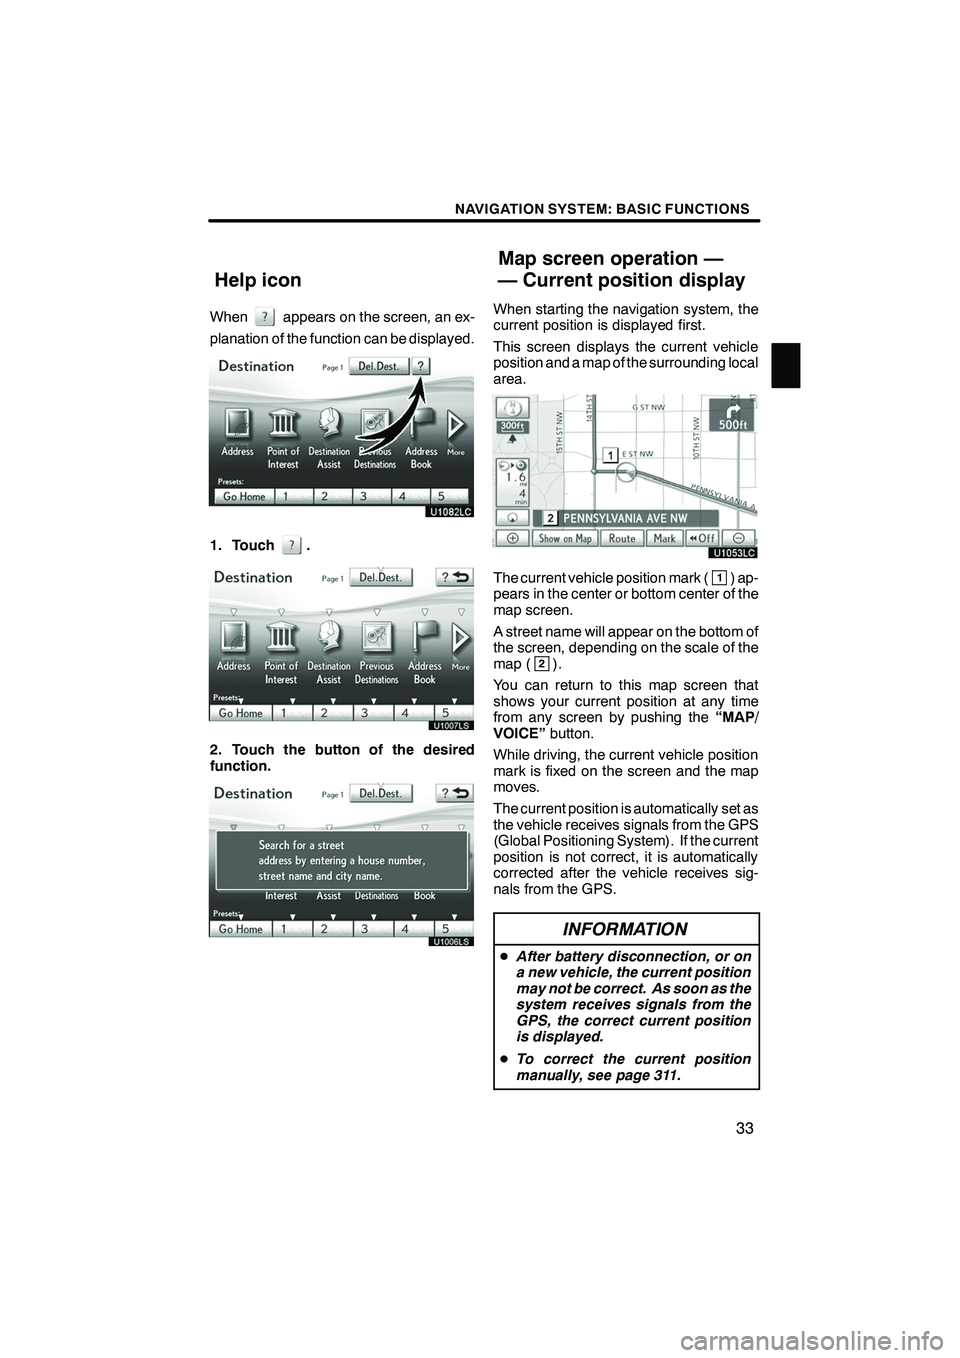
Whenappears on the screen, an ex-
planation of the function can be displayed.
1. Touch.
U1007LS
2. Touch the button of the desired
function.
U1006LS
When starting the navigation system, the
current position is displayed first.
This screen displays the current vehicle
position and a map of the surrounding local
area.
The current vehicle position mark (1) ap-
pears in the center or bottom center of the
map screen.
A street name will appear on the bottom of
the screen, depending on the scale of the
map (
2).
You can return to this map screen that
shows your current position at any time
from any screen by pushing the “MAP/
VOICE” button.
While driving, the current vehicle position
mark is fixed on the screen and the map
moves.
The current position is automatically set as
the vehicle receives signals from the GPS
(Global Positioning System). If the current
position is not correct, it is automatically
corrected after the vehicle receives sig-
nals from the GPS.
INFORMATION
D After battery disconnection, or on
a new vehicle, the current position
may not be correct. As soon as the
system receives signals from the
GPS, the correct current position
is displayed.
D To correct the current position
manually, see page 311.
ISF/IS NAVI (U)
Finish
Help icon Map screen operation —
— Current position display
1
Page 35 of 391
NAVIGATION SYSTEM: BASIC FUNCTIONS
34
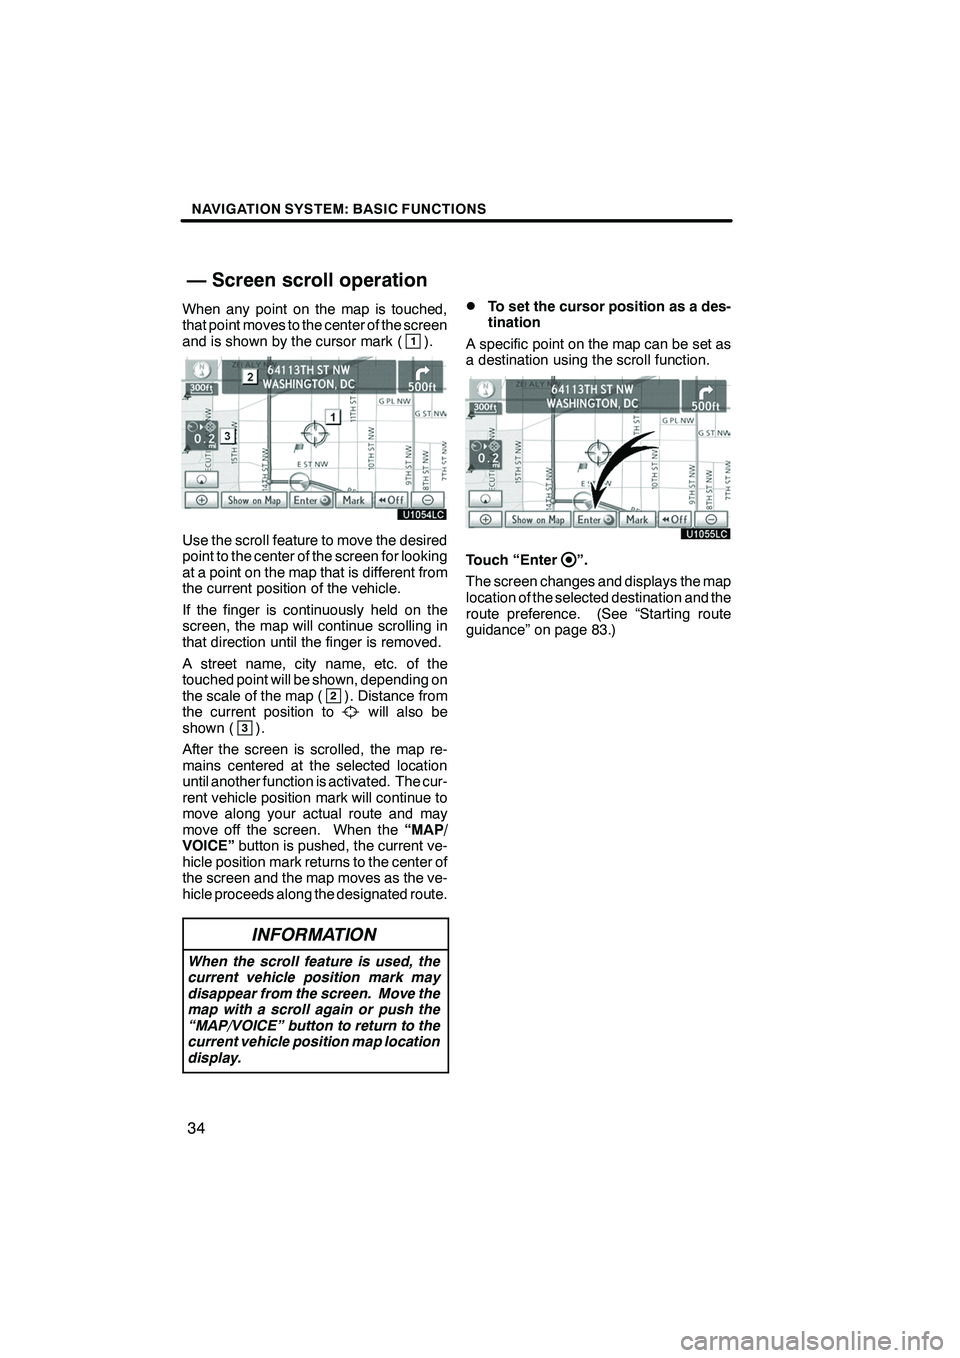
When any point on the map is touched,
that point moves to the center of the screen
and is shown by the cursor mark (
1).
Use the scroll feature to move the desired
point to the center of the screen for looking
at a point on the map that is different from
the current position of the vehicle.
If the finger is continuously held on the
screen, the map will continue scrolling in
that direction until the finger is removed.
A street name, city name, etc. of the
touched point will be shown, depending on
the scale of the map (
2). Distance from
the current position towill also be
shown (3).
After the screen is scrolled, the map re-
mains centered at the selected location
until another function is activated. The cur-
rent vehicle position mark will continue to
move along your actual route and may
move off the screen. When the “MAP/
VOICE” button is pushed, the current ve-
hicle position mark returns to the center of
the screen and the map moves as the ve-
hicle proceeds along the designated route.
INFORMATION
When the scroll feature is used, the
current vehicle position mark may
disappear from the screen. Move the
map with a scroll again or push the
“MAP/VOICE” button to return to the
current vehicle position map location
display.
DTo set the cursor position as a des-
tination
A specific point on the map can be set as
a destination using the scroll function.
Touch “Enter”.
The screen changes and displays the map
location of the selected destination and the
route preference. (See “Starting route
guidance” on page 83.)
ISF/IS NAVI (U)
Finish
— Screen scroll operation
Page 36 of 391
NAVIGATION SYSTEM: BASIC FUNCTIONS
35
D
To register the cursor position as an
address book entry
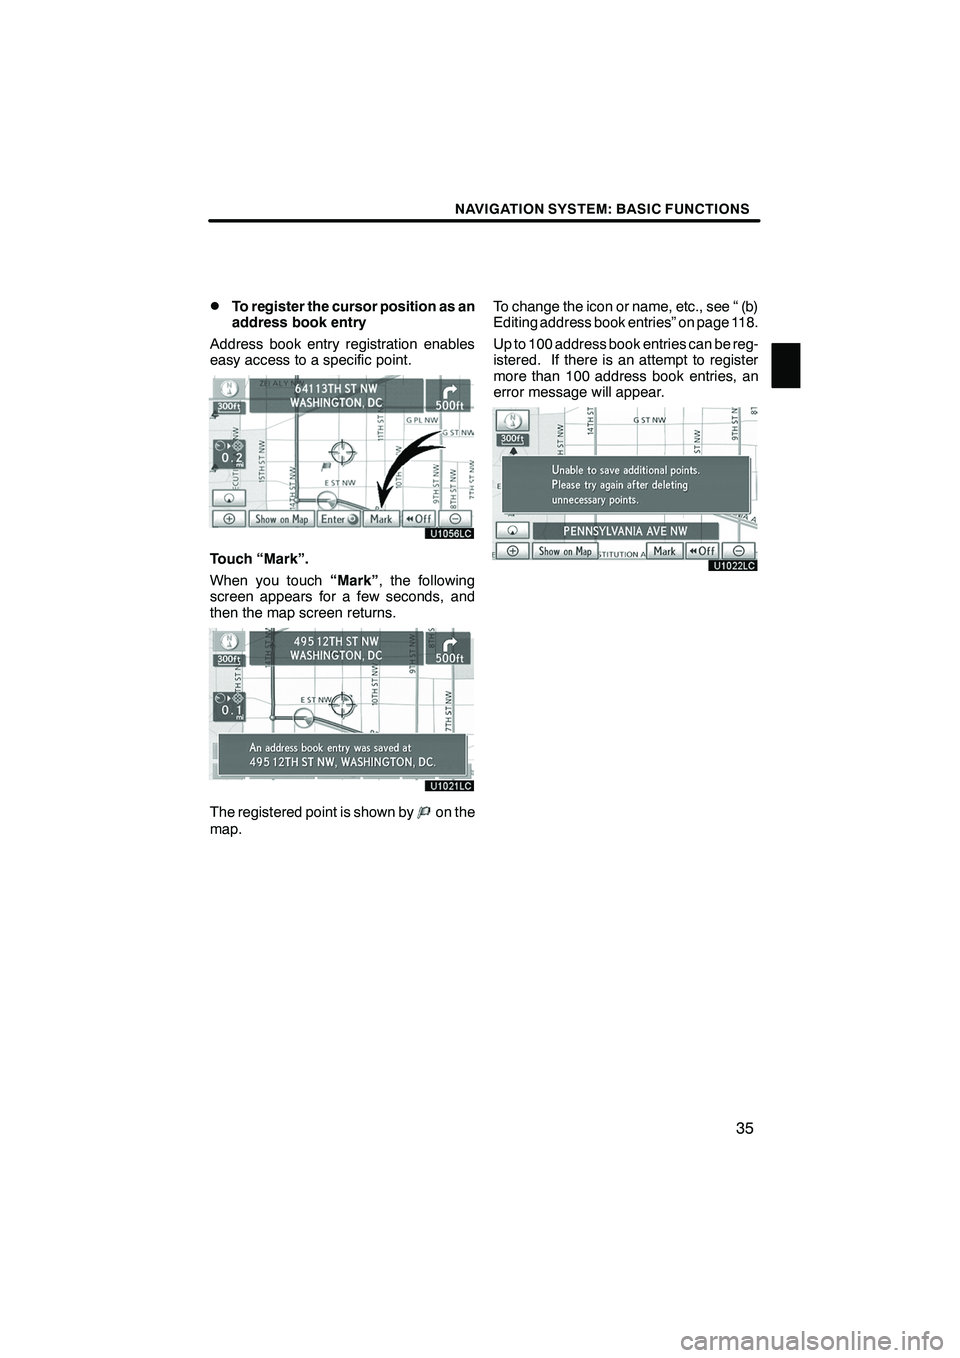
Address book entry registration enables
easy access to a specific point.
Touch “Mark”.
When you touch “Mark”, the following
screen appears for a few seconds, and
then the map screen returns.
The registered point is shown byon the
map. To change the icon or name, etc., see “ (b)
Editing address book entries” on page 118.
Up to 100 address book entries can be reg-
istered. If there is an attempt to register
more than 100 address book entries, an
error message will appear.
ISF/IS NAVI (U)
Finish
1
Page 37 of 391
NAVIGATION SYSTEM: BASIC FUNCTIONS
36
D
To see information about the icon
where the cursor is set
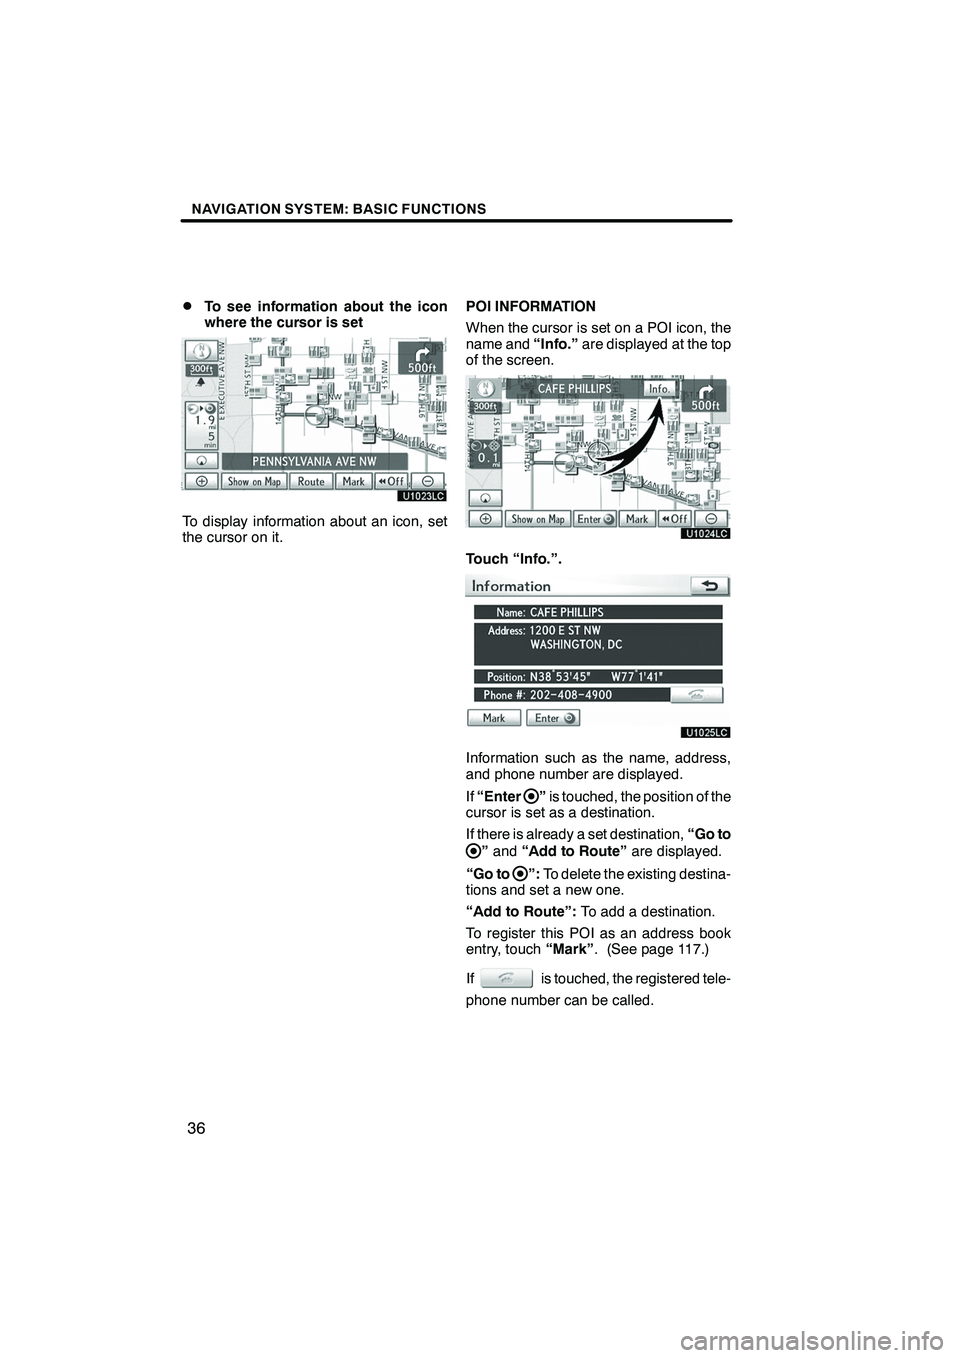
To display information about an icon, set
the cursor on it.
POI INFORMATION
When the cursor is set on a POI icon, the
name and
“Info.”are displayed at the top
of the screen.
Touch “Info.”.
Information such as the name, address,
and phone number are displayed.
If “Enter
”is touched, the position of the
cursor is set as a destination.
If there is already a set destination, “Go to
”and “Add to Route” are displayed.
“Go to
”: To delete the existing destina-
tions and set a new one.
“Add to Route”: To add a destination.
To register this POI as an address book
entry, touch “Mark”. (See page 117.)
If
is touched, the registered tele-
phone number can be called.
ISF/IS NAVI (U)
Finish
Page 38 of 391
NAVIGATION SYSTEM: BASIC FUNCTIONS
37
INFORMATION
The desired Point of Interest can be
displayed on the map screen. (See
“ — Display POI icons” on page 102.)
ADDRESS BOOK ENTRY
INFORMATION
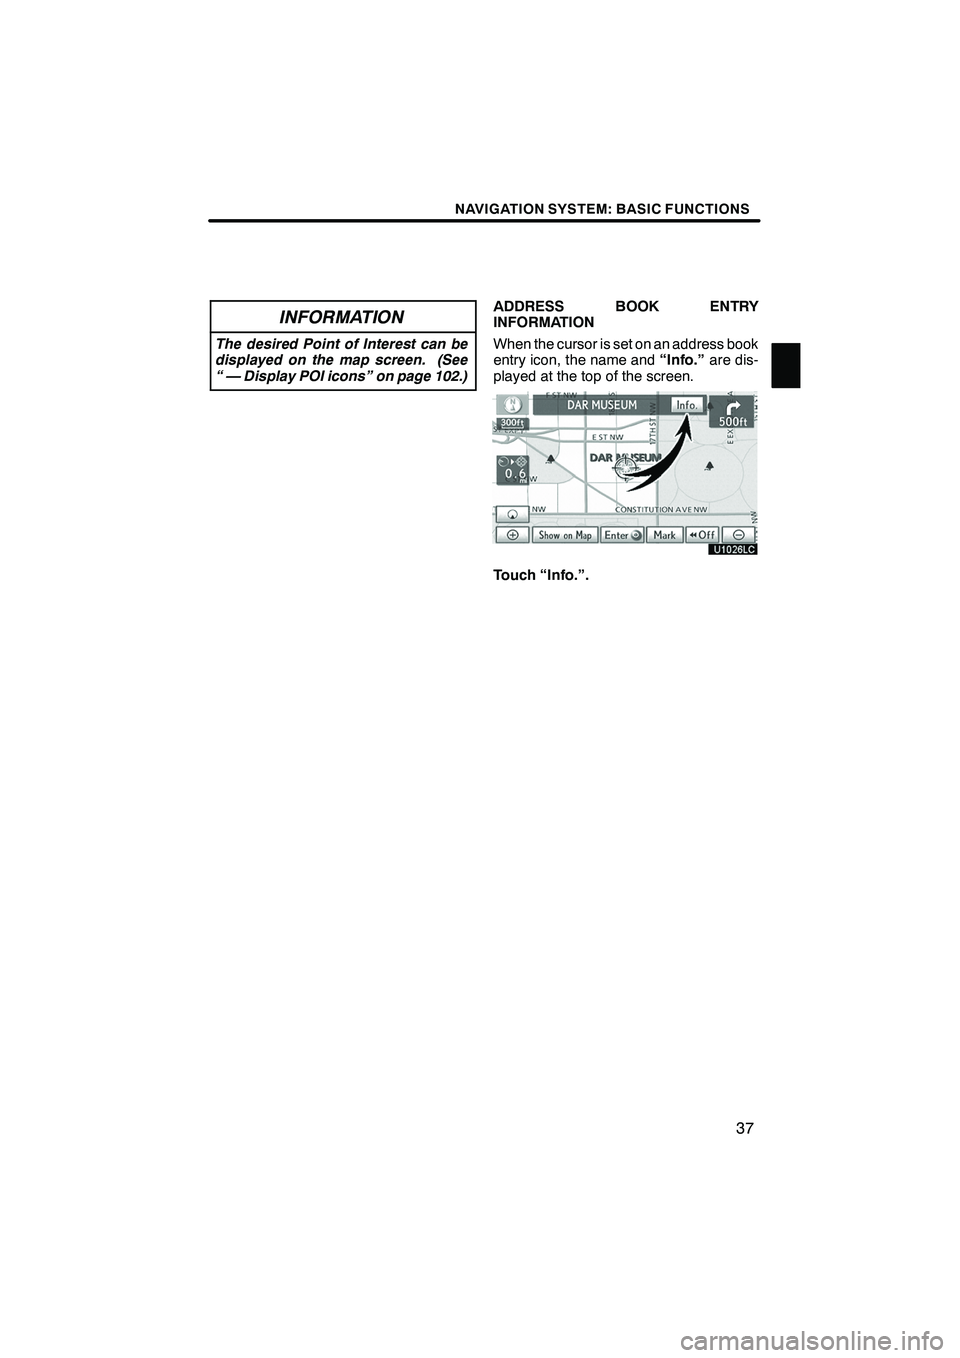
When the cursor is set on an address book
entry icon, the name and“Info.”are dis-
played at the top of the screen.
Touch “Info.”.
ISF/IS NAVI (U)
Finish
1
Page 39 of 391
NAVIGATION SYSTEM: BASIC FUNCTIONS
38
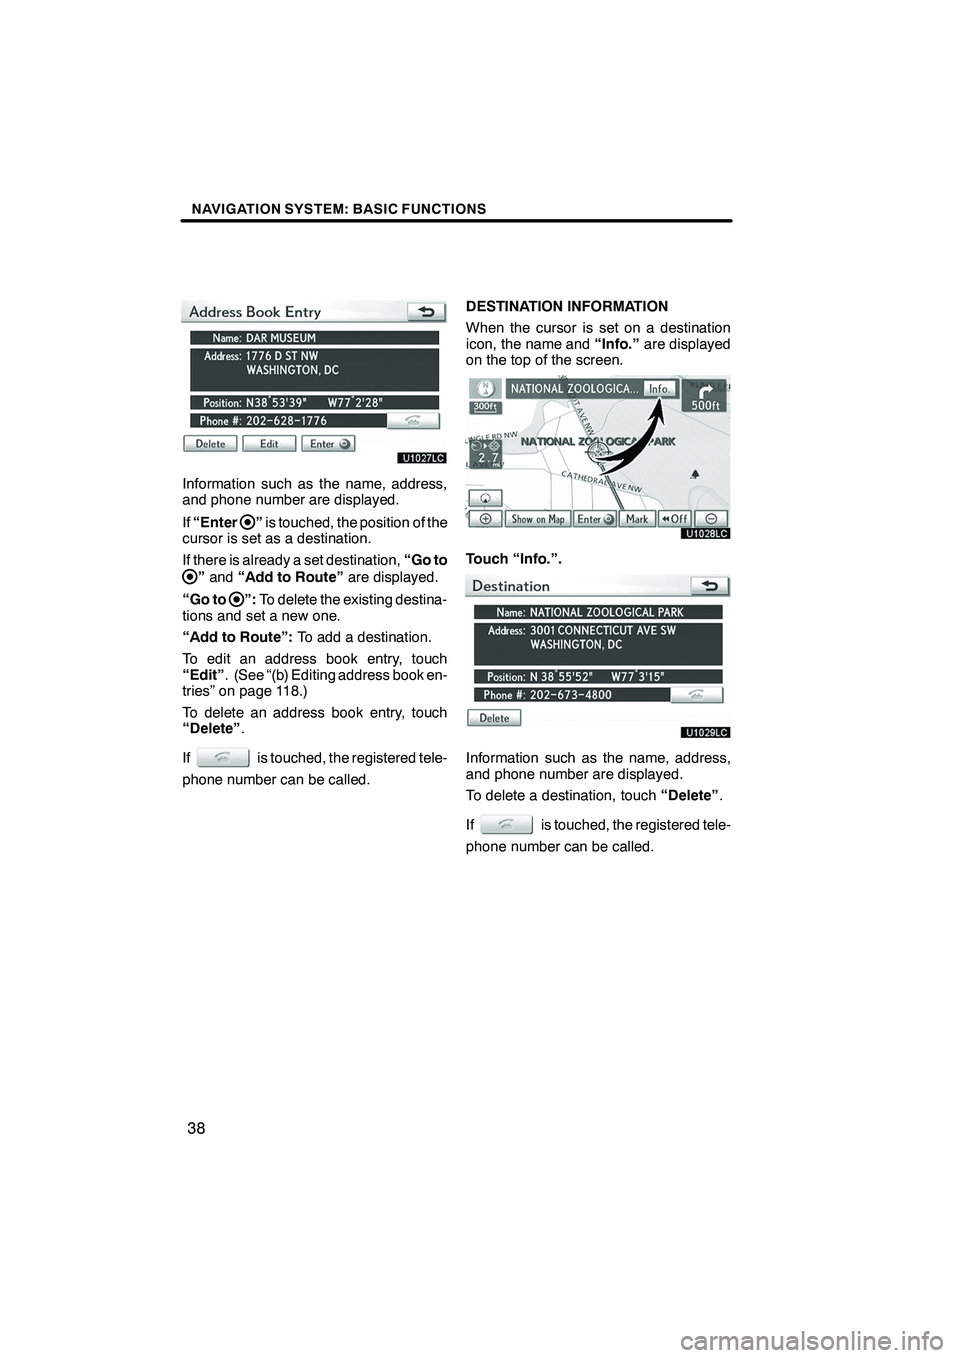
Information such as the name, address,
and phone number are displayed.
If“Enter
”is touched, the position of the
cursor is set as a destination.
If there is already a set destination, “Go to
”and “Add to Route” are displayed.
“Go to
”: To delete the existing destina-
tions and set a new one.
“Add to Route”: To add a destination.
To edit an address book entry, touch
“Edit” . (See “(b) Editing address book en-
tries” on page 118.)
To delete an address book entry, touch
“Delete” .
If
is touched, the registered tele-
phone number can be called. DESTINATION INFORMATION
When the cursor is set on a destination
icon, the name and
“Info.”are displayed
on the top of the screen.
Touch “Info.”.
Information such as the name, address,
and phone number are displayed.
To delete a destination, touch “Delete”.
If
is touched, the registered tele-
phone number can be called.
ISF/IS NAVI (U)
Finish
Page 40 of 391
NAVIGATION SYSTEM: BASIC FUNCTIONS
39
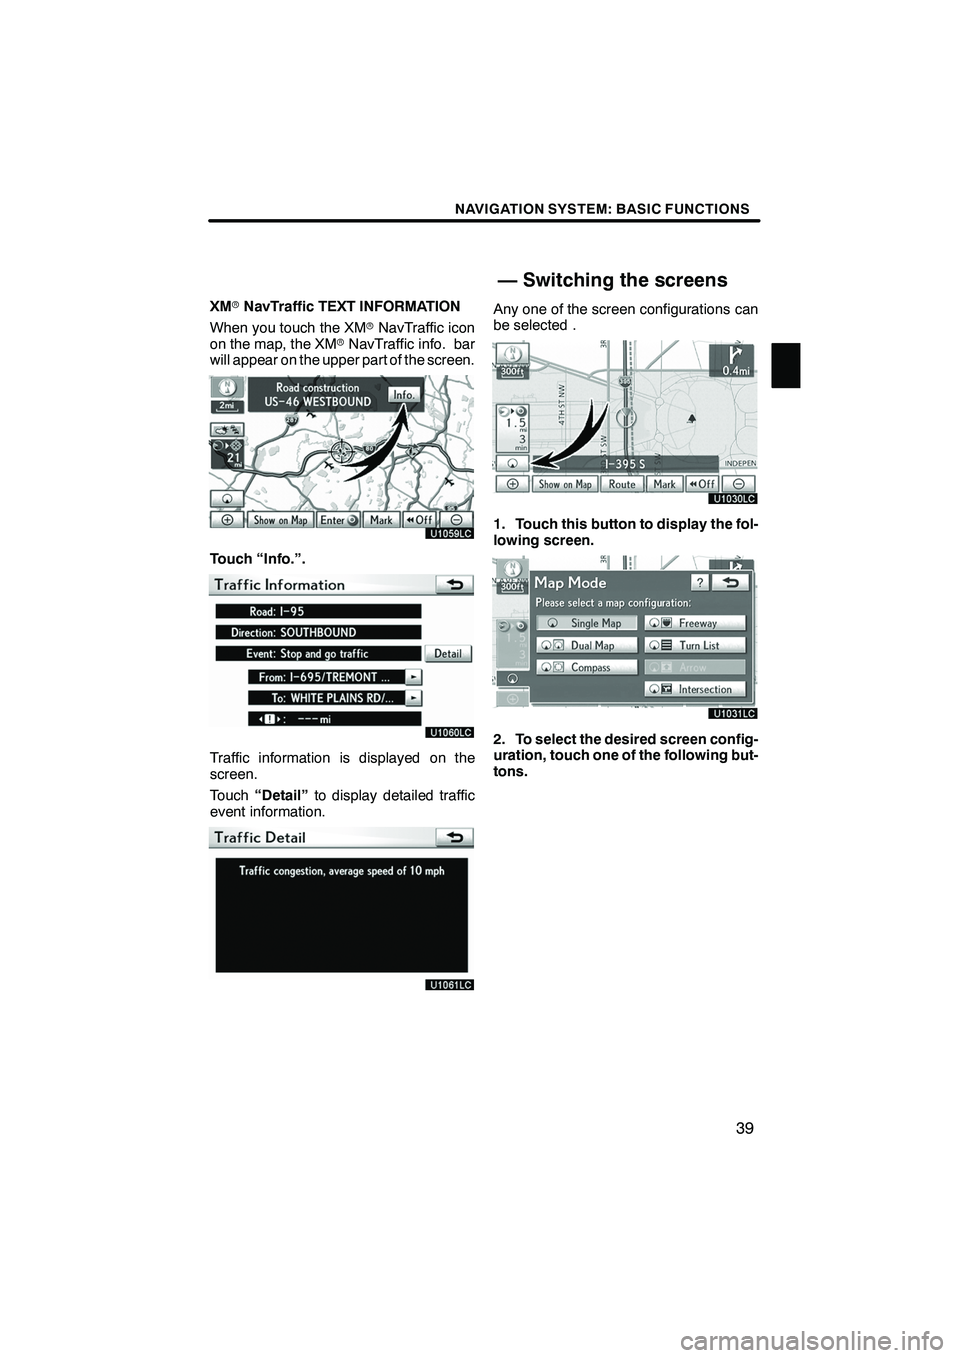
XMrNavTraffic TEXT INFORMATION
When you touch the XM rNavTraffic icon
on the map, the XM rNavTraffic info. bar
will appear on the upper part of the screen.
Touch “Info.”.
Traffic information is displayed on the
screen.
Touch “Detail” to display detailed traffic
event information.
Any one of the screen configurations can
be selected .
1. Touch this button to display the fol-
lowing screen.
2. To select the desired screen config-
uration, touch one of the following but-
tons.
ISF/IS NAVI (U)
Finish
— Switching the screens
1