replacement LEXUS LS430 2003 Factory Workshop Manual
[x] Cancel search | Manufacturer: LEXUS, Model Year: 2003, Model line: LS430, Model: LEXUS LS430 2003Pages: 4500, PDF Size: 87.45 MB
Page 273 of 4500

B: PROCEED TO NEXT CIRCUIT INSPECTION SHOWN IN PROBLEM SYMPTOMS TABLE
C: REPLACE AIR CONDITIONING AMPLIFIER (SEE REPLACEMENT )
A: Go to next step
2.INSPECT AIR CONDITIONING AMPLIFIER (TFACEDr - SG-3)
a. Remove the A/C amplifier with connectors still connected.
b. Turn the ignition switch to the ON position.
c. Measure the voltage according to the value (s) in the table below.
Standard:
AIR CONDITIONING AMPLIFIER (TFACEDr - SG-3) VOLTAGE
HINT:
As the temperature increases, the volta
ge decreases.
NGA
OK (Checking from the PROBLEM SYMPTOM TABLE)B
OK (Checking from the DTC)C
Tester connectionConditionSpecified condition
A13-15 (TFACEDr) - A13-10 (SG-3)Ignition switch ON at 25°C (77°F)1.8 to 2.2 V
A13-15 (TFACEDr) - A13-10 (SG-3)Ignition switch ON at 50°C (122°F)0.8 to 1.2 V
Page 274 of 4500

Fig. 56: Inspecting Air Conditioning Amplifier (TFACEDR - SG-3)
Courtesy of TOYOTA MOTOR SALES, U.S.A., INC.
Result:
AIR CONDITIONING AMPLIFIER (TFACEDR - SG-3) TEST RESULT
B: PROCEED TO NEXT CIRCUIT INSPECTION SHOWN IN PROBLEM SYMPTOMS TABLE
C: REPLACE AIR CONDITIONING AMPLIFIER (SEE REPLACEMENT )
A: Go to next step
3.INSPECT AIR DUCT SENSOR
a. Remove the air duct sensor.
b. Measure the resistance according to the value (s) in the table below.
Standard:
NGA
OK (Checking from the PROBLEM SYMPTOM TABLE)B
OK (Checking from the DTC)C
Page 278 of 4500
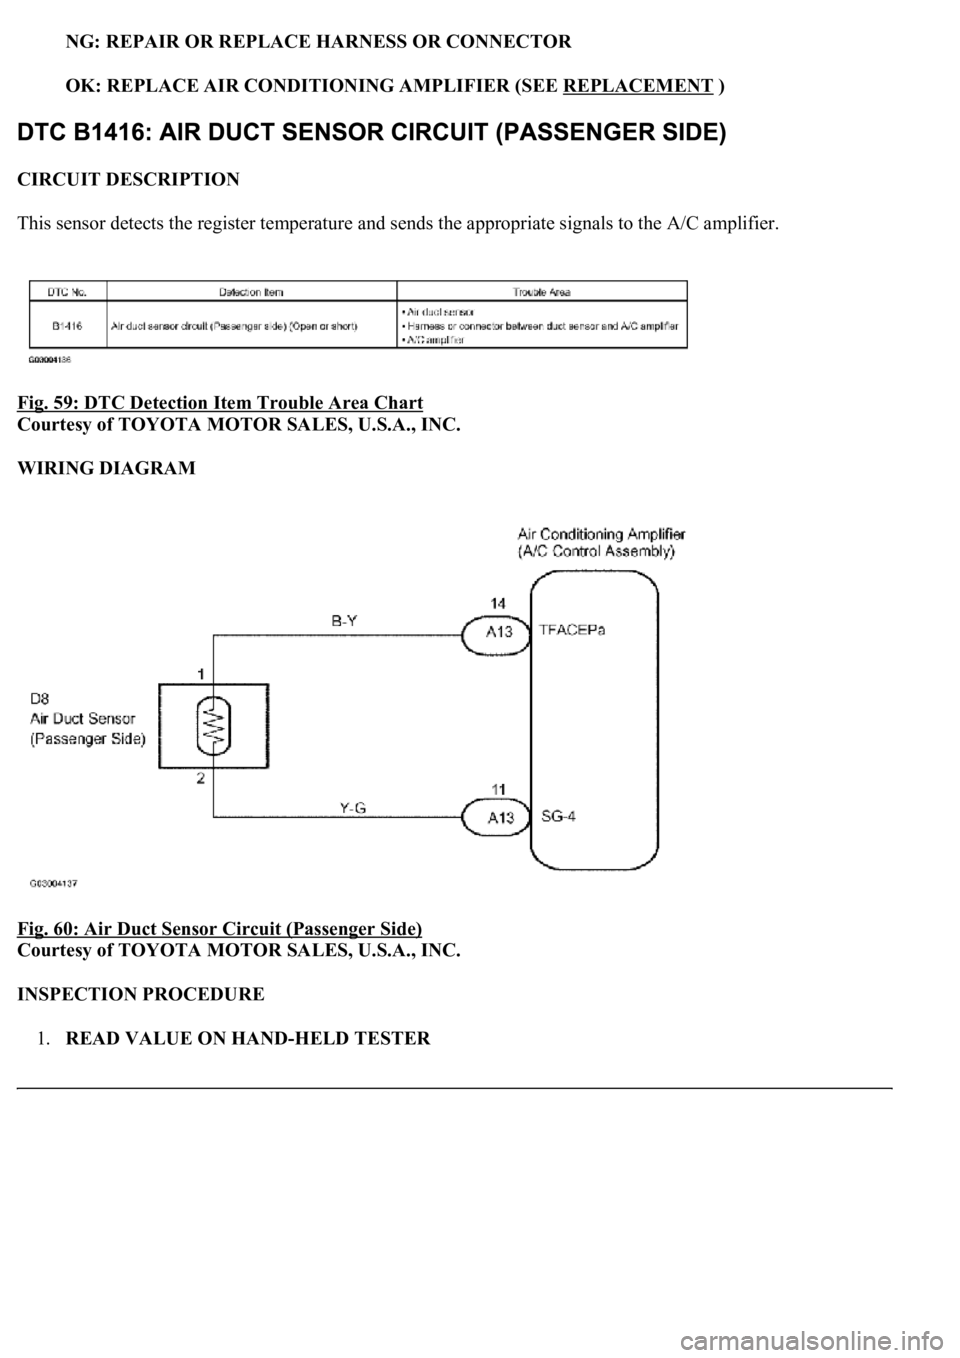
NG: REPAIR OR REPLACE HARNESS OR CONNECTOR
OK: REPLACE AIR CONDITIONING AMPLIFIER (SEE REPLACEMENT )
CIRCUIT DESCRIPTION
This sensor detects the register temperature and sends the appropriate signals to the A/C amplifier.
Fig. 59: DTC Detection Item Trouble Area Chart
Courtesy of TOYOTA MOTOR SALES, U.S.A., INC.
WIRING DIAGRAM
Fig. 60: Air Duct Sensor Circuit (Passenger Side)
Courtesy of TOYOTA MOTOR SALES, U.S.A., INC.
INSPECTION PROCEDURE
1.READ VALUE ON HAND-HELD TESTER
Page 279 of 4500

a. Connect the hand-held tester to the DLC3.
b. Turn the ignition switch to the ON position and push the hand-held tester main switch on.
c. Select the item below in the DATA LIST, and read the display on the hand-held tester.
DATA LIST / AIR CONDITIONER:
DATA LIST / AIR CONDITIONER
OK:
The display is as specified in the normal condition.
Result:
AIR CONDITIONER TEST RESULT
B: PROCEED TO NEXT CIRCUIT INSPECTION SHOWN IN PROBLEM SYMPTOMS TABLE
C: REPLACE AIR CONDITIONING AMPLIFIER (SEE REPLACEMENT )
A: Go to next step
2.INSPECT AIR CONDITIONING AMPLIFIER (TFACEPa - SG-4)
a. Remove the A/C amplifier with connectors still connected.
b. Turn the ignition switch to the ON position.
c. Measure the voltage according to the value (s) in the table below.
Standard:
AIR CONDITIONING AMPLIFIER (TFACEPa - SG-4) VOLTAGE
HINT:
As the temperature increases, the volta
ge decreases.
ItemMeasure Item/Display (Range)Normal ConditionDiagnostic
Note
DUST
TEMP-PDuct sensor (Passenger side) / min.: -12.7°C
(9.14°F) max.: 76.55°C (169.79°F)Actual duct temperature is
displayed (Passenger side)-
NGA
OK (Checking from the PROBLEM SYMPTOM TABLE)B
OK (Checking from the DTC)C
Tester connectionConditionSpecified condition
A13-14 (TFACEPa) - A13-11 (SG-4)Ignition switch ON at 25°C (77°F)1.8 to 2.2 V
A13-14 (TFACEPa) - A13-11 (SG-4)Ignition switch ON at 50°C (122°F)0.8 to 1.2 V
Page 280 of 4500

Fig. 61: Inspecting Air Conditioning Amplifier (TFACEPA - SG-4)
Courtesy of TOYOTA MOTOR SALES, U.S.A., INC.
Result:
AIR CONDITIONING AMPLIFIER (TFACEPA - SG-4) TEST RESULT
B: PROCEED TO NEXT CIRCUIT INSPECTION SHOWN IN PROBLEM SYMPTOMS TABLE
C: REPLACE AIR CONDITIONING AMPLIFIER (SEE REPLACEMENT )
A: Go to next step
3.INSPECT AIR DUCT SENSOR
a. Remove the air duct sensor.
b. Measure the resistance according to the value (s) in the table below.
Standard:
NGA
OK (Checking from the PROBLEM SYMPTOM TABLE)B
OK (Checking from the DTC)C
Page 284 of 4500
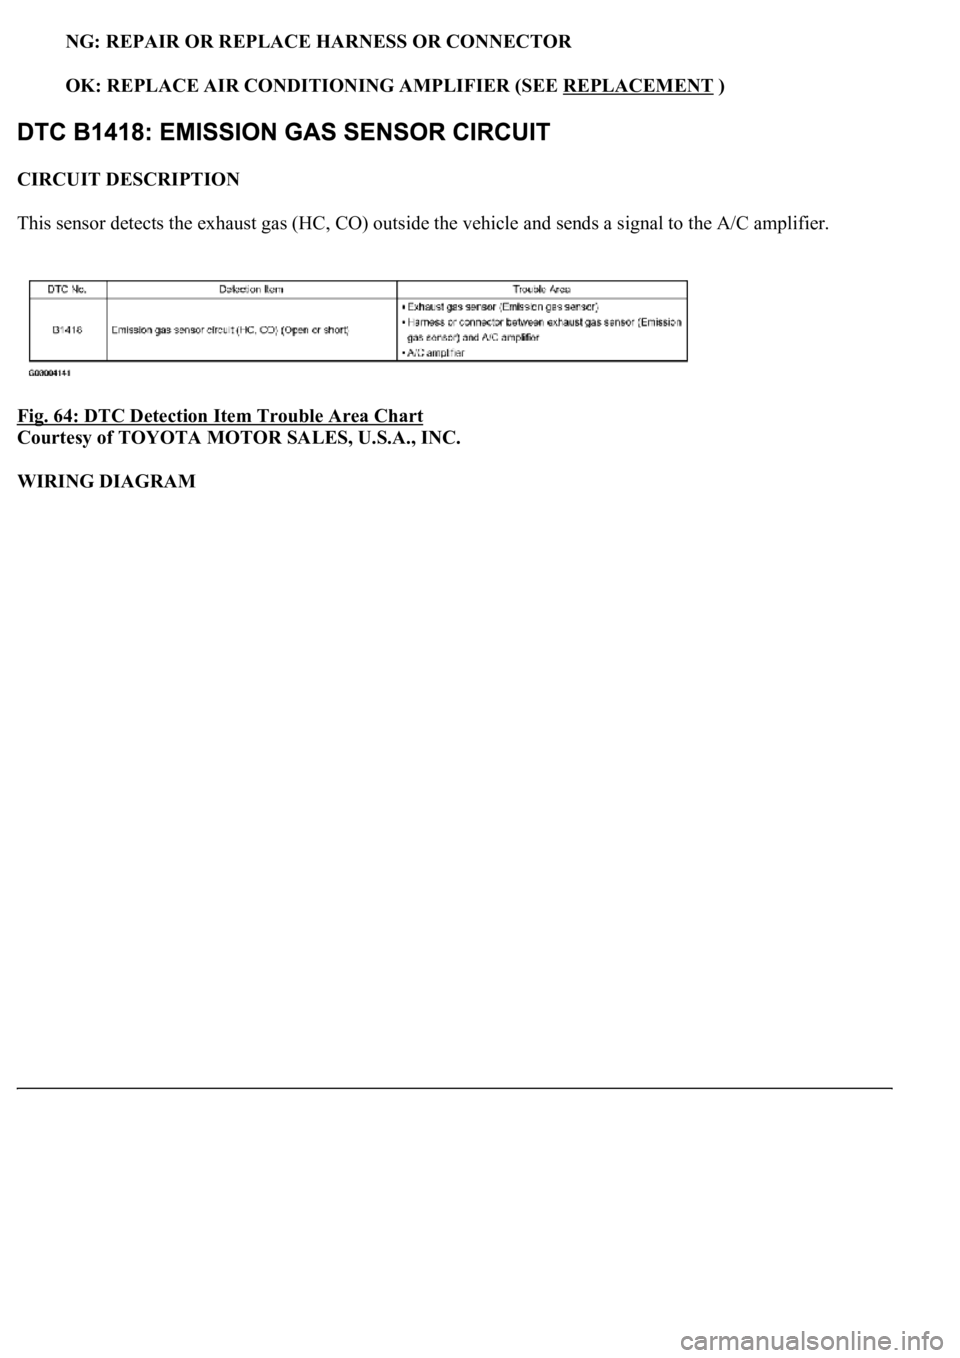
NG: REPAIR OR REPLACE HARNESS OR CONNECTOR
OK: REPLACE AIR CONDITIONING AMPLIFIER (SEE REPLACEMENT )
CIRCUIT DESCRIPTION
This sensor detects the exhaust gas (HC, CO) outside the vehicle and sends a signal to the A/C amplifier.
Fig. 64: DTC Detection Item Trouble Area Chart
Courtesy of TOYOTA MOTOR SALES, U.S.A., INC.
WIRING DIAGRAM
Page 286 of 4500

The display is as specified in the normal condition.
Result:
AIR CONDITIONER TEST RESULT
B: PROCEED TO NEXT CIRCUIT INSPECTION SHOWN IN PROBLEM SYMPTOMS TABLE
C: REPLACE AIR CONDITIONING AMPLIFIER (SEE REPLACEMENT )
A: Go to next step
2.INSPECT AIR CONDITIONING AMPLIFIER (DGS - SG-1)
a. Remove the A/C amplifier with connectors still connected.
b. Turn the ignition switch to the ON position.
c. Measure the voltage according to the value (s) in the table below.
Standard:
AIR CONDITIONING AMPLIFIER (DGS - SG-1) VOLTAGE
HINT:
As the temperature increases, the volta
ge decreases.
NGA
OK (Checking from the PROBLEM SYMPTOM TABLE)B
OK (Checking from the DTC)C
Tester connectionConditionSpecified condition
A11-29 (DGS) - A13-8 (SG-1)Ignition switch ON at 10 to 35°C (50 to 95°F)1.0 to 4.5 V
Page 287 of 4500

Fig. 66: Inspecting Air Conditioning Amplifier (DGS - SG-1)
Courtesy of TOYOTA MOTOR SALES, U.S.A., INC.
Result:
AIR CONDITIONING AMPLIFIER (DGS - SG-1) TEST RESULT
B: PROCEED TO NEXT CIRCUIT INSPECTION SHOWN IN PROBLEM SYMPTOMS TABLE
C: REPLACE AIR CONDITIONING AMPLIFIER (SEE REPLACEMENT )
A: Go to next step
3.INSPECT EXHAUST GAS SENSOR
a. Remove the exhaust gas sensor.
b. After keeping to apply battery voltage between terminals 3 and 6 for more than 30 seconds,
NGA
OK (Checking from the PROBLEM SYMPTOM TABLE)B
OK (Checking from the DTC)C
Page 291 of 4500

NG: REPAIR OR REPLACE HARNESS OR CONNECTOR
OK: REPLACE AIR CONDITIONING AMPLIFIER (SEE REPLACEMENT )
CIRCUIT DESCRIPTION
A photodiode in the A/C solar sensor detects solar radiation and sends signals to the A/C amplifier.
Fig. 69: Photodiode Resistance/Solar Radiation Strength Graph
Courtesy of TOYOTA MOTOR SALES, U.S.A., INC.
Page 293 of 4500
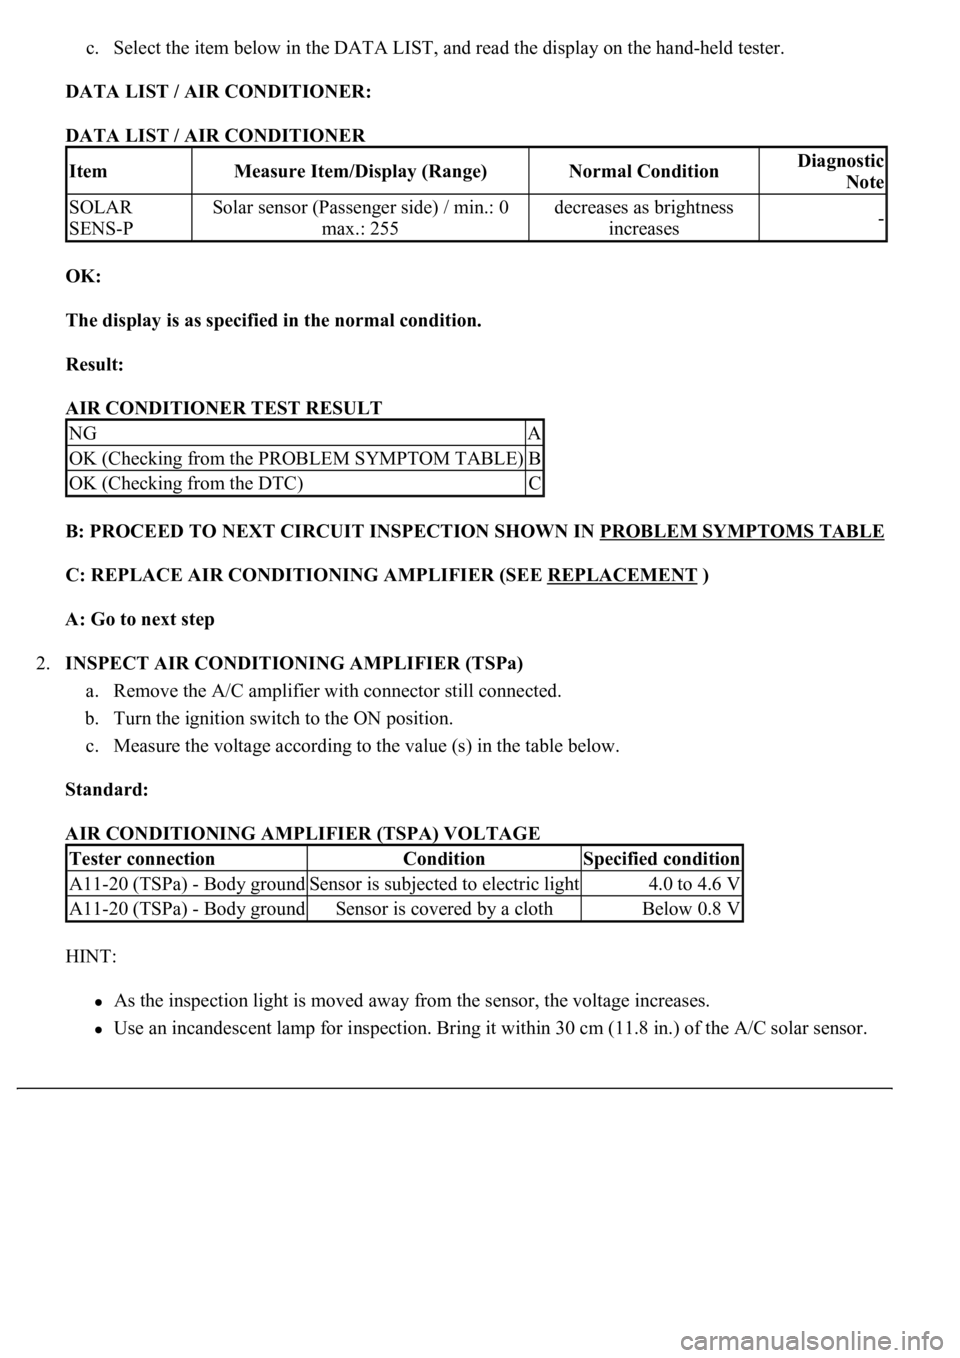
c. Select the item below in the DATA LIST, and read the display on the hand-held tester.
DATA LIST / AIR CONDITIONER:
DATA LIST / AIR CONDITIONER
OK:
The display is as specified in the normal condition.
Result:
AIR CONDITIONER TEST RESULT
B: PROCEED TO NEXT CIRCUIT INSPECTION SHOWN IN PROBLEM SYMPTOMS TABLE
C: REPLACE AIR CONDITIONING AMPLIFIER (SEE REPLACEMENT )
A: Go to next step
2.INSPECT AIR CONDITIONING AMPLIFIER (TSPa)
a. Remove the A/C amplifier with connector still connected.
b. Turn the ignition switch to the ON position.
c. Measure the voltage according to the value (s) in the table below.
Standard:
AIR CONDITIONING AMPLIFIER (TSPA) VOLTAGE
HINT:
As the inspection light is moved away from the sensor, the voltage increases.
Use an incandescent lamp for inspection. Bring it within 30 cm (11.8 in.) of the A/C solar sensor.
ItemMeasure Item/Display (Range)Normal ConditionDiagnostic
Note
SOLAR
SENS-PSolar sensor (Passenger side) / min.: 0
max.: 255decreases as brightness
increases-
NGA
OK (Checking from the PROBLEM SYMPTOM TABLE)B
OK (Checking from the DTC)C
Tester connectionConditionSpecified condition
A11-20 (TSPa) - Body groundSensor is subjected to electric light4.0 to 4.6 V
A11-20 (TSPa) - Body groundSensor is covered by a clothBelow 0.8 V