engine oil pan LEXUS LS430 2003 Factory Repair Manual
[x] Cancel search | Manufacturer: LEXUS, Model Year: 2003, Model line: LS430, Model: LEXUS LS430 2003Pages: 4500, PDF Size: 87.45 MB
Page 822 of 4500
HINT:
If you cannot add the listed amount of fluid, do the following:
1. Install the refill plug.
2. Allow the engine to idle with air conditioning OFF.
3. Move the shift lever through entire gear range to circulate fluid.
4. Wait for 30 seconds with the engine idling.
5. Stop the engine.
6. Remove the refill plug and add fluid.
7. Reinstall the refill plug.
4.FLUID CIRCULATION
a. Allow the engine to idle with the air conditioning OFF.
b. Move the shift lever through entire gear range to circulate fluid.
5.FLUID TEMPERATURE CHECK
a. With hand-held tester
1. Connect the han
d-held tester to the DLC3.
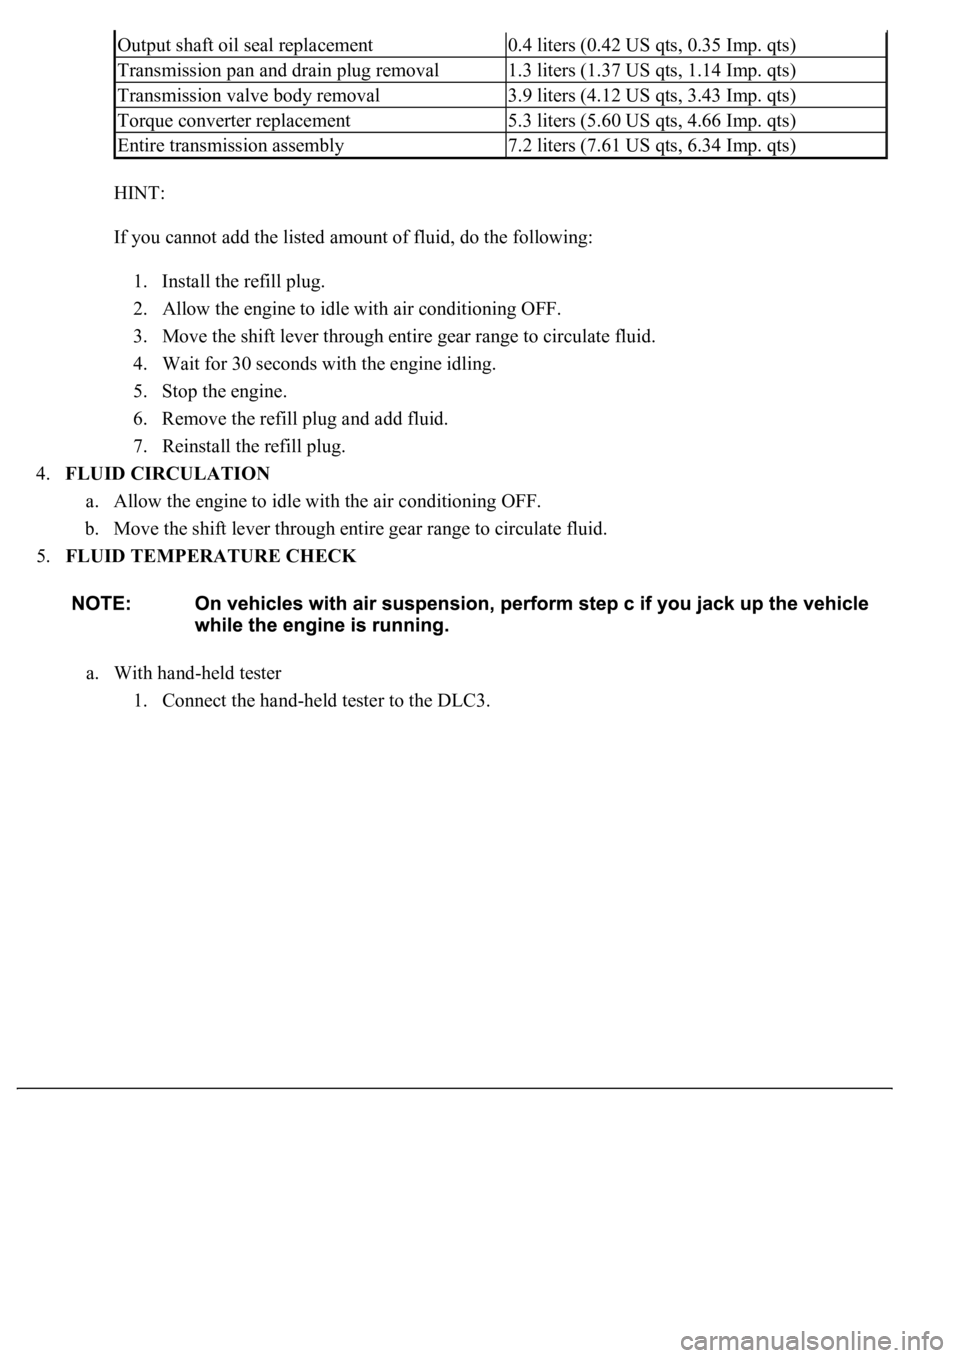
Output shaft oil seal replacement0.4 liters (0.42 US qts, 0.35 Imp. qts)
Transmission pan and drain plug removal1.3 liters (1.37 US qts, 1.14 Imp. qts)
Transmission valve body removal3.9 liters (4.12 US qts, 3.43 Imp. qts)
Torque converter replacement5.3 liters (5.60 US qts, 4.66 Imp. qts)
Entire transmission assembly7.2 liters (7.61 US qts, 6.34 Imp. qts)
Page 2010 of 4500
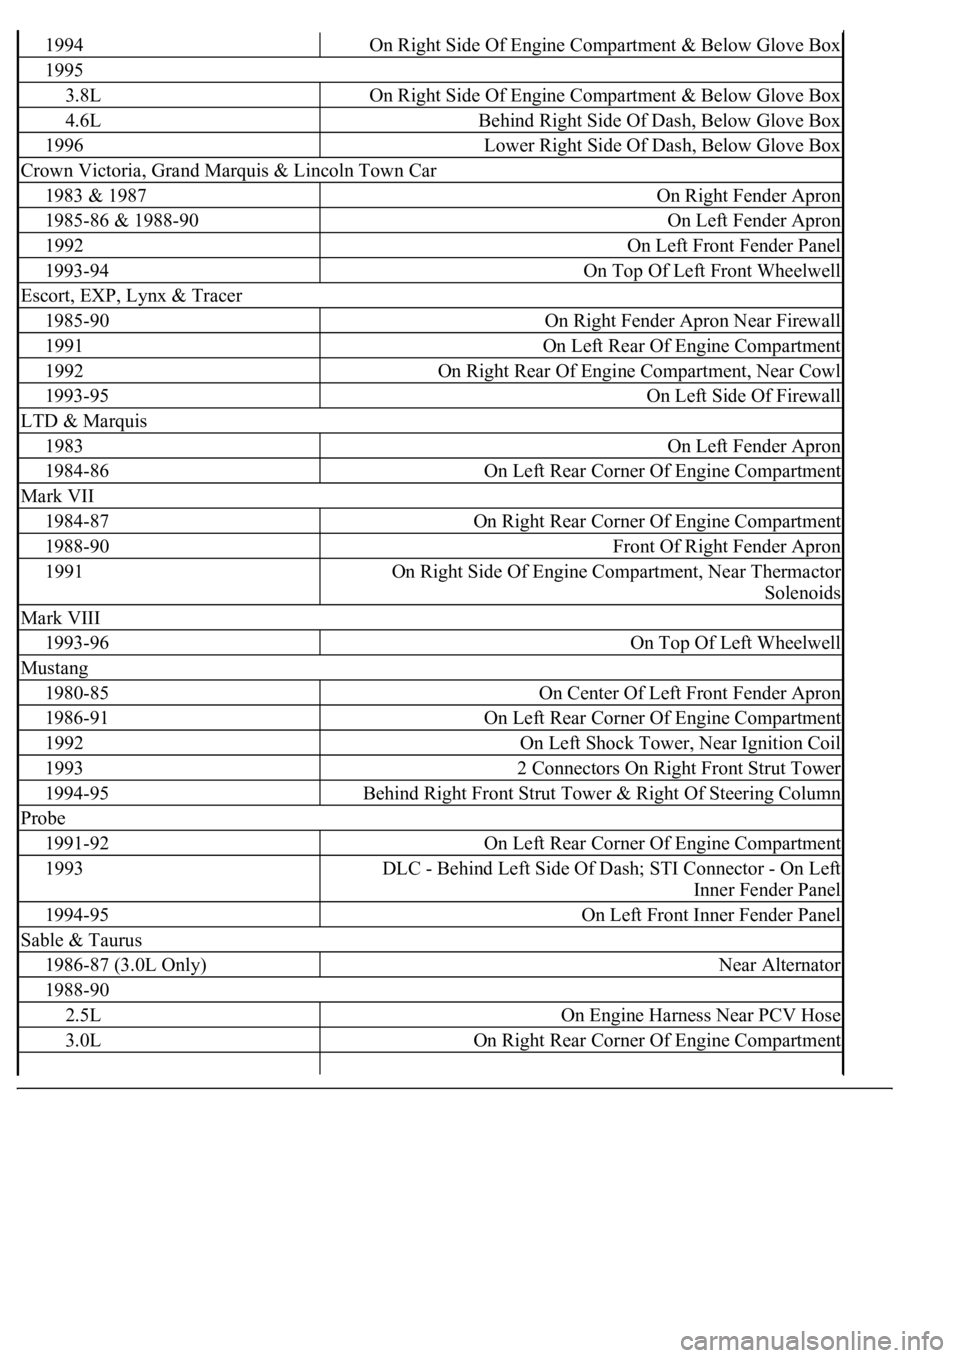
1994On Right Side Of Engine Compartment & Below Glove Box
1995
3.8LOn Right Side Of Engine Compartment & Below Glove Box
4.6LBehind Right Side Of Dash, Below Glove Box
1996Lower Right Side Of Dash, Below Glove Box
Crown Victoria, Grand Marquis & Lincoln Town Car
1983 & 1987On Right Fender Apron
1985-86 & 1988-90On Left Fender Apron
1992On Left Front Fender Panel
1993-94On Top Of Left Front Wheelwell
Escort, EXP, Lynx & Tracer
1985-90On Right Fender Apron Near Firewall
1991On Left Rear Of Engine Compartment
1992On Right Rear Of Engine Compartment, Near Cowl
1993-95On Left Side Of Firewall
LTD & Marquis
1983On Left Fender Apron
1984-86On Left Rear Corner Of Engine Compartment
Mark VII
1984-87On Right Rear Corner Of Engine Compartment
1988-90Front Of Right Fender Apron
1991On Right Side Of Engine Compartment, Near Thermactor
Solenoids
Mark VIII
1993-96On Top Of Left Wheelwell
Mustang
1980-85On Center Of Left Front Fender Apron
1986-91On Left Rear Corner Of Engine Compartment
1992On Left Shock Tower, Near Ignition Coil
19932 Connectors On Right Front Strut Tower
1994-95Behind Right Front Strut Tower & Right Of Steering Column
Probe
1991-92On Left Rear Corner Of Engine Compartment
1993DLC - Behind Left Side Of Dash; STI Connector - On Left
Inner Fender Panel
1994-95On Left Front Inner Fender Panel
Sable & Taurus
1986-87 (3.0L Only)Near Alternator
1988-90
2.5LOn Engine Harness Near PCV Hose
3.0LOn Right Rear Corner Of Engine Compartment
Page 2026 of 4500
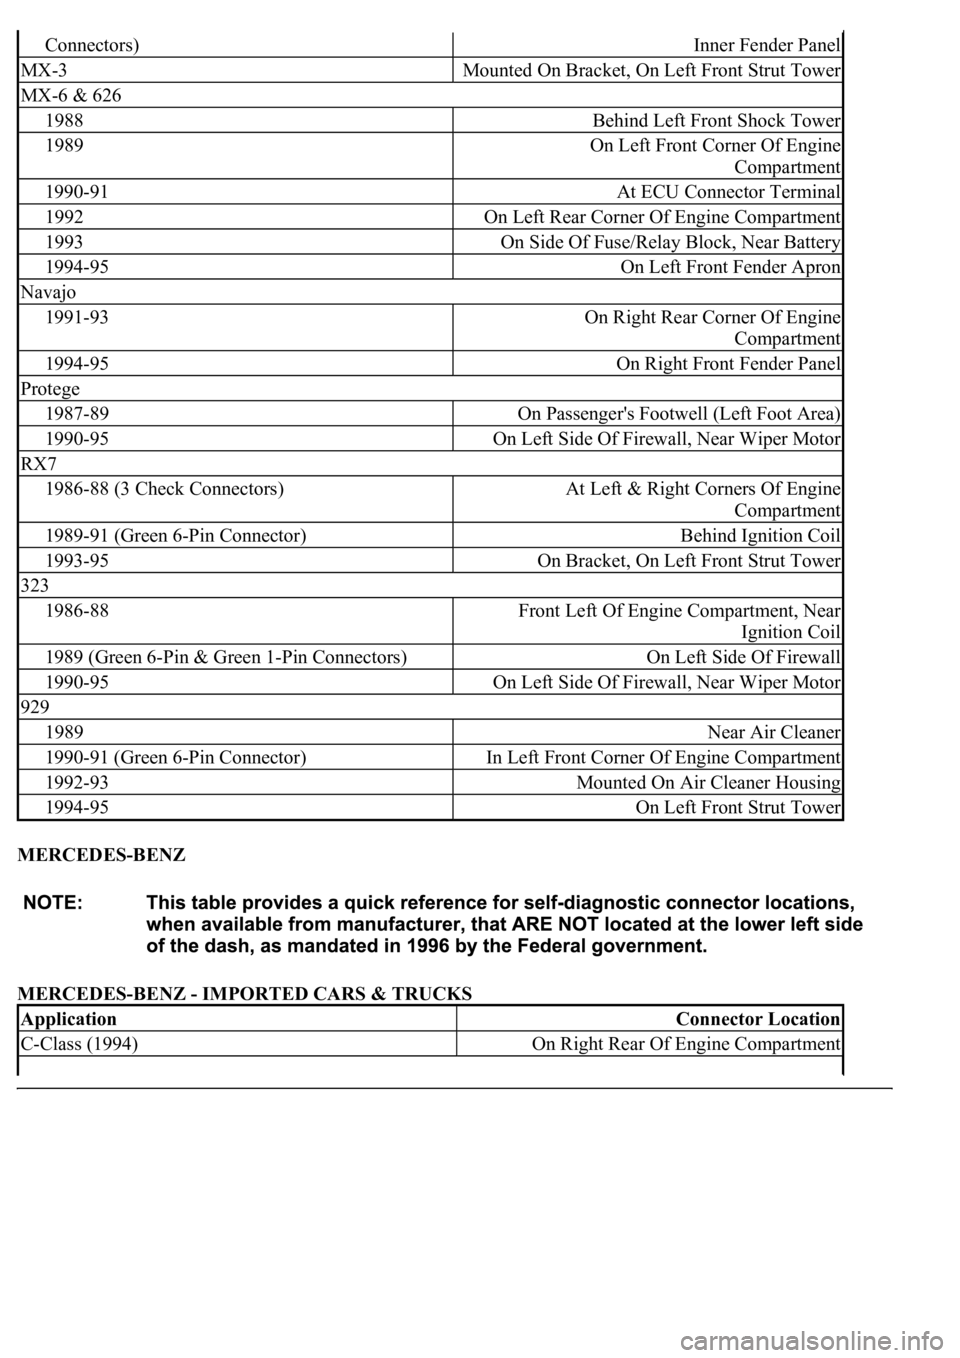
MERCEDES-BENZ
MERCEDES-BENZ - IMPORTED CARS & TRUCKS
Connectors)Inner Fender Panel
MX-3Mounted On Bracket, On Left Front Strut Tower
MX-6 & 626
1988Behind Left Front Shock Tower
1989On Left Front Corner Of Engine
Compartment
1990-91At ECU Connector Terminal
1992On Left Rear Corner Of Engine Compartment
1993On Side Of Fuse/Relay Block, Near Battery
1994-95On Left Front Fender Apron
Navajo
1991-93On Right Rear Corner Of Engine
Compartment
1994-95On Right Front Fender Panel
Protege
1987-89On Passenger's Footwell (Left Foot Area)
1990-95On Left Side Of Firewall, Near Wiper Motor
RX7
1986-88 (3 Check Connectors)At Left & Right Corners Of Engine
Compartment
1989-91 (Green 6-Pin Connector)Behind Ignition Coil
1993-95On Bracket, On Left Front Strut Tower
323
1986-88Front Left Of Engine Compartment, Near
Ignition Coil
1989 (Green 6-Pin & Green 1-Pin Connectors)On Left Side Of Firewall
1990-95On Left Side Of Firewall, Near Wiper Motor
929
1989Near Air Cleaner
1990-91 (Green 6-Pin Connector)In Left Front Corner Of Engine Compartment
1992-93Mounted On Air Cleaner Housing
1994-95On Left Front Strut Tower
ApplicationConnector Location
C-Class (1994)On Right Rear Of Engine Compartment
Page 2034 of 4500
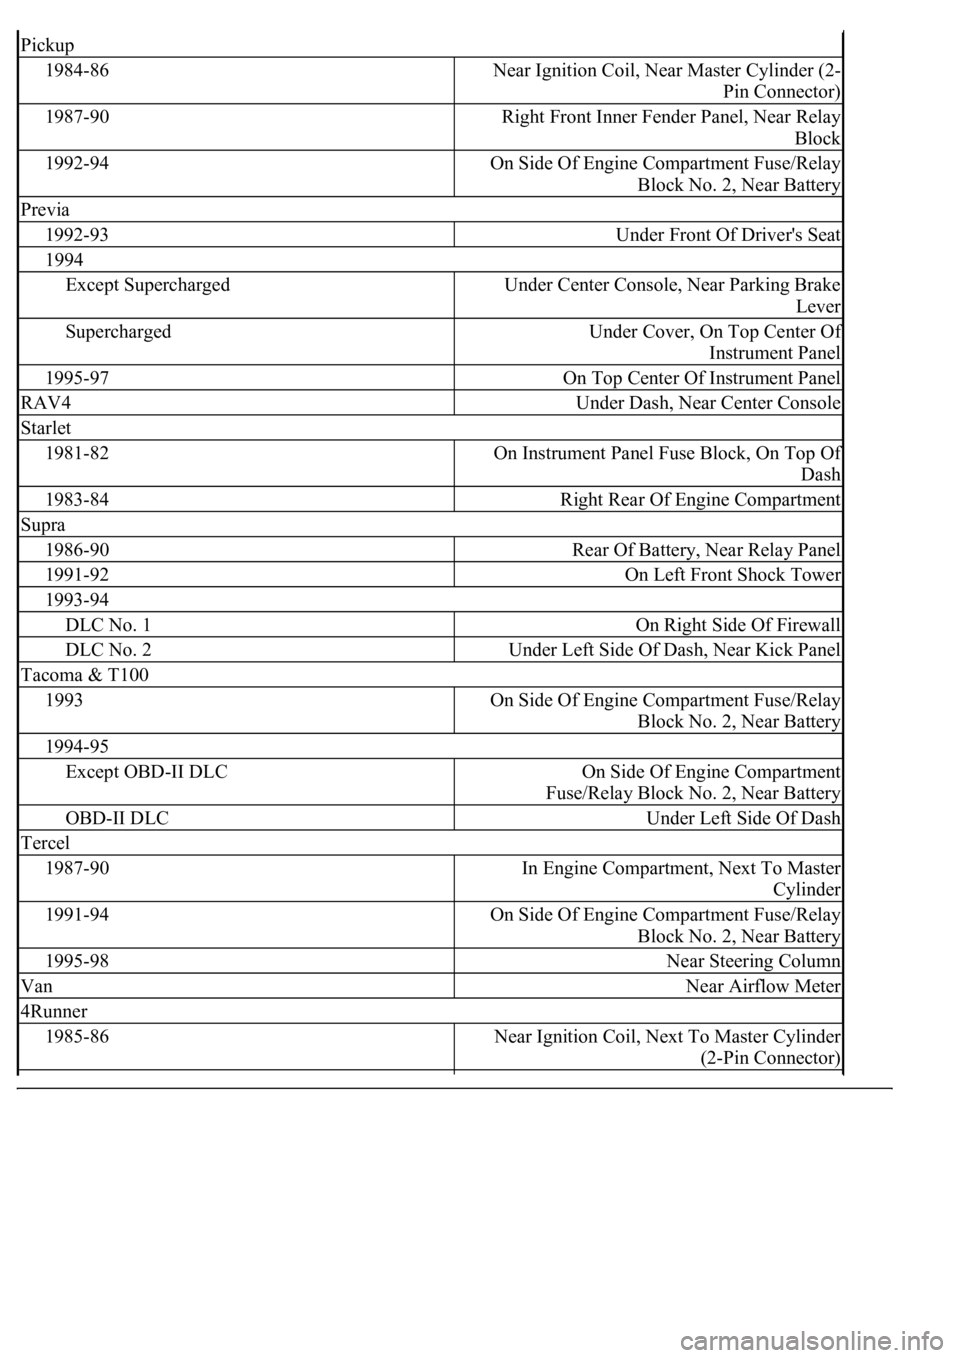
Pickup
1984-86Near Ignition Coil, Near Master Cylinder (2-
Pin Connector)
1987-90Right Front Inner Fender Panel, Near Relay
Block
1992-94On Side Of Engine Compartment Fuse/Relay
Block No. 2, Near Battery
Previa
1992-93Under Front Of Driver's Seat
1994
Except SuperchargedUnder Center Console, Near Parking Brake
Lever
SuperchargedUnder Cover, On Top Center Of
Instrument Panel
1995-97On Top Center Of Instrument Panel
RAV4Under Dash, Near Center Console
Starlet
1981-82On Instrument Panel Fuse Block, On Top Of
Dash
1983-84Right Rear Of Engine Compartment
Supra
1986-90Rear Of Battery, Near Relay Panel
1991-92On Left Front Shock Tower
1993-94
DLC No. 1On Right Side Of Firewall
DLC No. 2Under Left Side Of Dash, Near Kick Panel
Tacoma & T100
1993On Side Of Engine Compartment Fuse/Relay
Block No. 2, Near Battery
1994-95
Except OBD-II DLCOn Side Of Engine Compartment
Fuse/Relay Block No. 2, Near Battery
OBD-II DLCUnder Left Side Of Dash
Tercel
1987-90In Engine Compartment, Next To Master
Cylinder
1991-94On Side Of Engine Compartment Fuse/Relay
Block No. 2, Near Battery
1995-98Near Steering Column
VanNear Airflow Meter
4Runner
1985-86Near Ignition Coil, Next To Master Cylinder
(2-Pin Connector)
Page 3313 of 4500
13.DRAIN AUTOMATIC TRANSMISSION FLUID
14.REMOVE RADIATOR ASSY (See REPLACEMENT
)
15.DISCONNECT FUEL PIPE SUB-ASSY NO.2 (See REPLACEMENT
)
16.REMOVE FAN AND GENERATOR V BELT (See REPLACEMENT
)
17.DISCONNECT ENGINE WIRE
a. Disconnect the engine wire from the ECM box.
b. Remove the nut, and disconnect the generator wire from the generator.
c. Disconnect the wire for generator wire from the wire clamp on generator.
d. Remove the bolt, and disconnect the ground cable from the stay on the generator.
e. Remove the 2 bolts, and disconnect the PS oil hose from the No. 1 oil pan.
f. Remove the bolt, and disconnect the ground strap from the body.
18.DISCONNECT AIR HOSE NO.5
19.DISCONNECT FUEL VAPOR FEED HOSE NO.2
20.DISCONNECT HEATER WATER INLET HOSE A
21.DISCONNECT HEATER WATER OUTLET HOSE A (FROM HEATER UNIT)
22.DISCONNECT VANE PUMP OIL RESERVOIR ASSY
23.DISCONNECT VANE PUMP ASSY
a. Disconnect the 2 PS air hoses.
b. Remove the 2 screws and RH engine under cover.
c. Disconnect the PS oil pressure switch connector.
d. Remove the 2 bolts and nut, and disconnect the pump from the engine.
e. Support the pump securely.
24.DISCONNECT COOLER COMPRESSOR ASSY
a. Disconnect the compressor connector.
b. Disconnect the wire clamp from the wire bracket on the compressor.
c. Remove the bolt, nut and stay.
d. Remove the bolt, and disconnect the wire bracket from the compressor.
e. Remove the bolt, and disconnect the compressor from the engine.
f. Support the cooler compressor securely.
25.REMOVE FRONT FLOOR BRACE CENTER
a. Remove the 4 bolts and brace center.
26.REMOVE EXHAUST PIPE ASSY (See REPLACEMENT
)
27.REMOVE W/ CATALYST CONVERTER ASSY
28.REMOVE FRONT FLOOR HEAT INSULATOR NO.1
29.REMOVE PARKING BRAKE CABLE HEAT INSULATOR
30.REMOVE PROPELLER W/ CENTER BEARING SHAFT ASSY (See OVERHAUL
)
31.REMOVE FLOOR SHIFT GEAR SHIFTING ROD SUB-ASSY
32.REMOVE STEERING SLIDING W/ SHAFT YOKE SUB-ASSY
Page 3360 of 4500
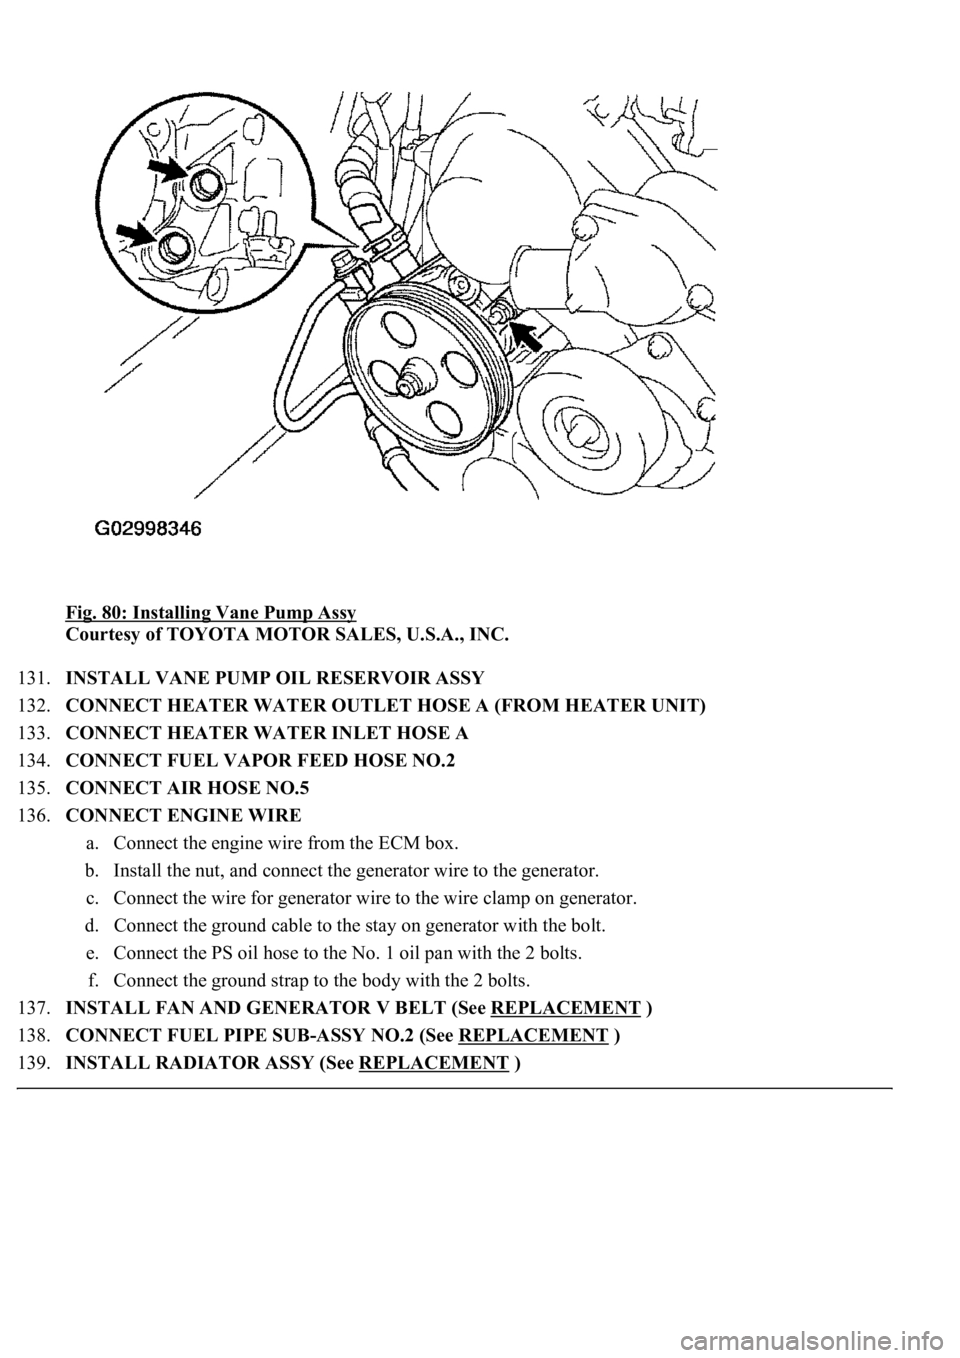
Fig. 80: Installing Vane Pump Assy
Courtesy of TOYOTA MOTOR SALES, U.S.A., INC.
131.INSTALL VANE PUMP OIL RESERVOIR ASSY
132.CONNECT HEATER WATER OUTLET HOSE A (FROM HEATER UNIT)
133.CONNECT HEATER WATER INLET HOSE A
134.CONNECT FUEL VAPOR FEED HOSE NO.2
135.CONNECT AIR HOSE NO.5
136.CONNECT ENGINE WIRE
a. Connect the engine wire from the ECM box.
b. Install the nut, and connect the generator wire to the generator.
c. Connect the wire for generator wire to the wire clamp on generator.
d. Connect the ground cable to the stay on generator with the bolt.
e. Connect the PS oil hose to the No. 1 oil pan with the 2 bolts.
f. Connect the ground strap to the body with the 2 bolts.
137.INSTALL FAN AND GENERATOR V BELT (See REPLACEMENT
)
138.CONNECT FUEL PIPE SUB-ASSY NO.2 (See REPLACEMENT
)
139.INSTALL RADIATOR ASSY (See REPLACEMENT
)
Page 3391 of 4500
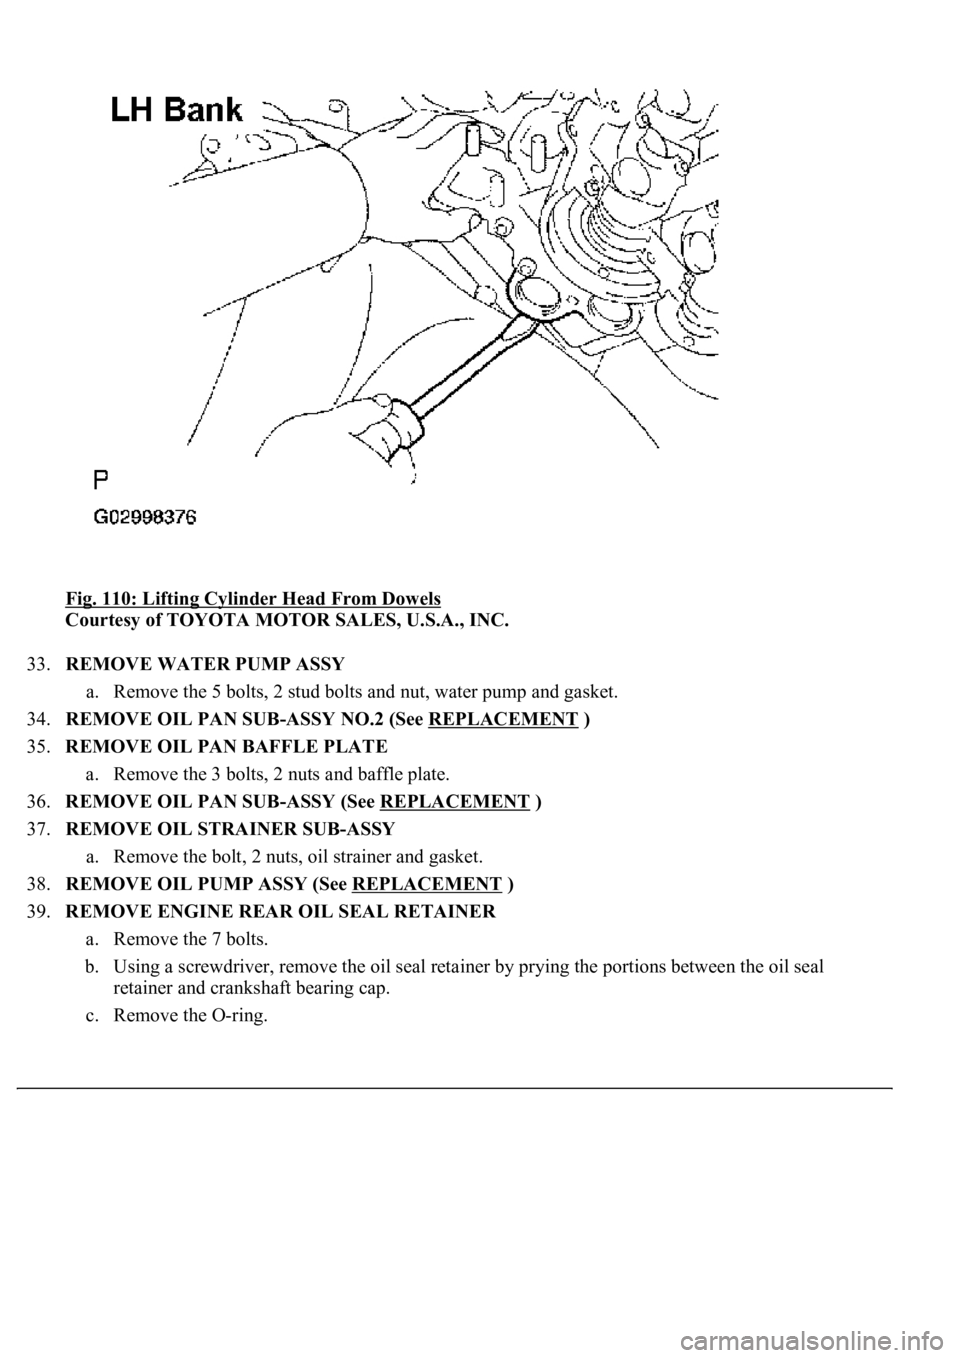
Fig. 110: Lifting Cylinder Head From Dowels
Courtesy of TOYOTA MOTOR SALES, U.S.A., INC.
33.REMOVE WATER PUMP ASSY
a. Remove the 5 bolts, 2 stud bolts and nut, water pump and gasket.
34.REMOVE OIL PAN SUB-ASSY NO.2 (See REPLACEMENT
)
35.REMOVE OIL PAN BAFFLE PLATE
a. Remove the 3 bolts, 2 nuts and baffle plate.
36.REMOVE OIL PAN SUB-ASSY (See REPLACEMENT
)
37.REMOVE OIL STRAINER SUB-ASSY
a. Remove the bolt, 2 nuts, oil strainer and gasket.
38.REMOVE OIL PUMP ASSY (See REPLACEMENT
)
39.REMOVE ENGINE REAR OIL SEAL RETAINER
a. Remove the 7 bolts.
b. Using a screwdriver, remove the oil seal retainer by prying the portions between the oil seal
retainer and crankshaft bearing cap.
c. Remove the O-ring.