set LEXUS LS500 2019 Manual Online
[x] Cancel search | Manufacturer: LEXUS, Model Year: 2019, Model line: LS500, Model: LEXUS LS500 2019Pages: 512, PDF Size: 9.71 MB
Page 259 of 512
2594-5. Using the driving support systems
LS500_OM_(U)_1810 4
Driving
■
The system can be operated when
●
The engine switch is in IGNITION ON
mode.
●
Intuitive parking assist function is on.
●
The vehicle speed is less than about 6 mph (10 km/h). ●
A shift position other than P is selected. ■
Setting the buzzer volume
The buzzer volume can be adjusted on the
multi-information display. ( P.256)■
If “Parking Assist Unavailable Clean
Parking Assist Sensor” is displayed on
the multi-information display
A sensor may be covered with ice, snow,
dirt, etc. Remove the ice, snow, dirt, etc.,
from the sensor to return the system to nor-
mal.
Also, due to ice forming on a sensor at low
temperatures, a warn ing message may be
displayed or the sensor may not be able to
detect an object. Once the ice melts, the
system will return to normal. ■
Sensor detection information ●
The following situations may occur
during use.
• The sensors may be able to only detect
objects near the fron t and rear bumpers.
• Depending on the shape of the object
and other factors, the detection distance
may shorten, or detection may be impos-
sible.
• There will be a short delay between
object detection and di splay. Even at low
speeds, there is a possibility that the
object will come within the sensor’s
detection areas befo re the display is
shown and the warning beep sounds.
• It might be difficult to hear the buzzer due
to the volume of the audio system or air
flow noise of the air conditioning system.
• It may be difficult to hear the buzzer if
buzzers for other systems are sounding.
■
Conditions under wh ich the function
may not function correctly
Certain vehicle conditions and the sur-
rounding environment may affect the ability
of a sensor to correctly detect objects. Par-
ticular instances where this may occur are
listed below.
●
There is dirt, snow or ice on a sensor.
(Cleaning the sensors will resolve this
problem.)
●
A sensor is frozen. (Thawing the area will
resolve this problem.) WARNING■
When using intuitive parking assist
In the following situations, the system
may not function correctly due to a sen-
sor malfunction, etc. Have the vehicle
checked by your Lexus dealer. ●
The intuitive parking assist operation
display flashes or shows continuously,
and a buzzer sounds when no objects
are detected.●
If the area around a sensor collides
with something, or is subjected to
strong impact.●
If the bumper or grille collides with
something.●
If the display flashes or is displayed
continuously and a buzzer does not
sound, except when the mute function
has been turned on.●
If a display error occurs, first check the
sensor.
If the error occurs even when there is
no ice, snow or mud on the sensor, it is
likely that the sensor is malfunctioning.■
Notes when washing the vehicle
Do not apply intensive bursts of water or
steam to the sensor area.
Doing so may result in the sensor mal-
functioning.
●
When using a high pressure washer to
wash the vehicle, do not spray the sen-
sors directly, as doing so may cause a
sensor to malfunction.
●
When using steam to clean the vehicle,
do not direct steam too close to the
sensors as doing so may cause a sen-
sor to malfunction.
Page 266 of 512
266 4-5. Using the driving support systems
LS500_OM_(U)_1810 ■
The RCTA function is operational when
The RCTA function operates when all of the
following conditions are met: ●
The engine switch is in IGNITION ON
mode.●
The RCTA function is on.●
The shift position is in R.●
The vehicle speed is less than approxi-
mately 5 mph (8 km/h).●
The approaching vehicle speed is
between approximately 5 mph (8 km/h)
and 18 mph (28 km/h).■
Setting the buzzer volume
The buzzer volume can be adjusted on the
multi-information display. ( P.256)■
Conditions under which the RCTA func-
tion will not detect a vehicle
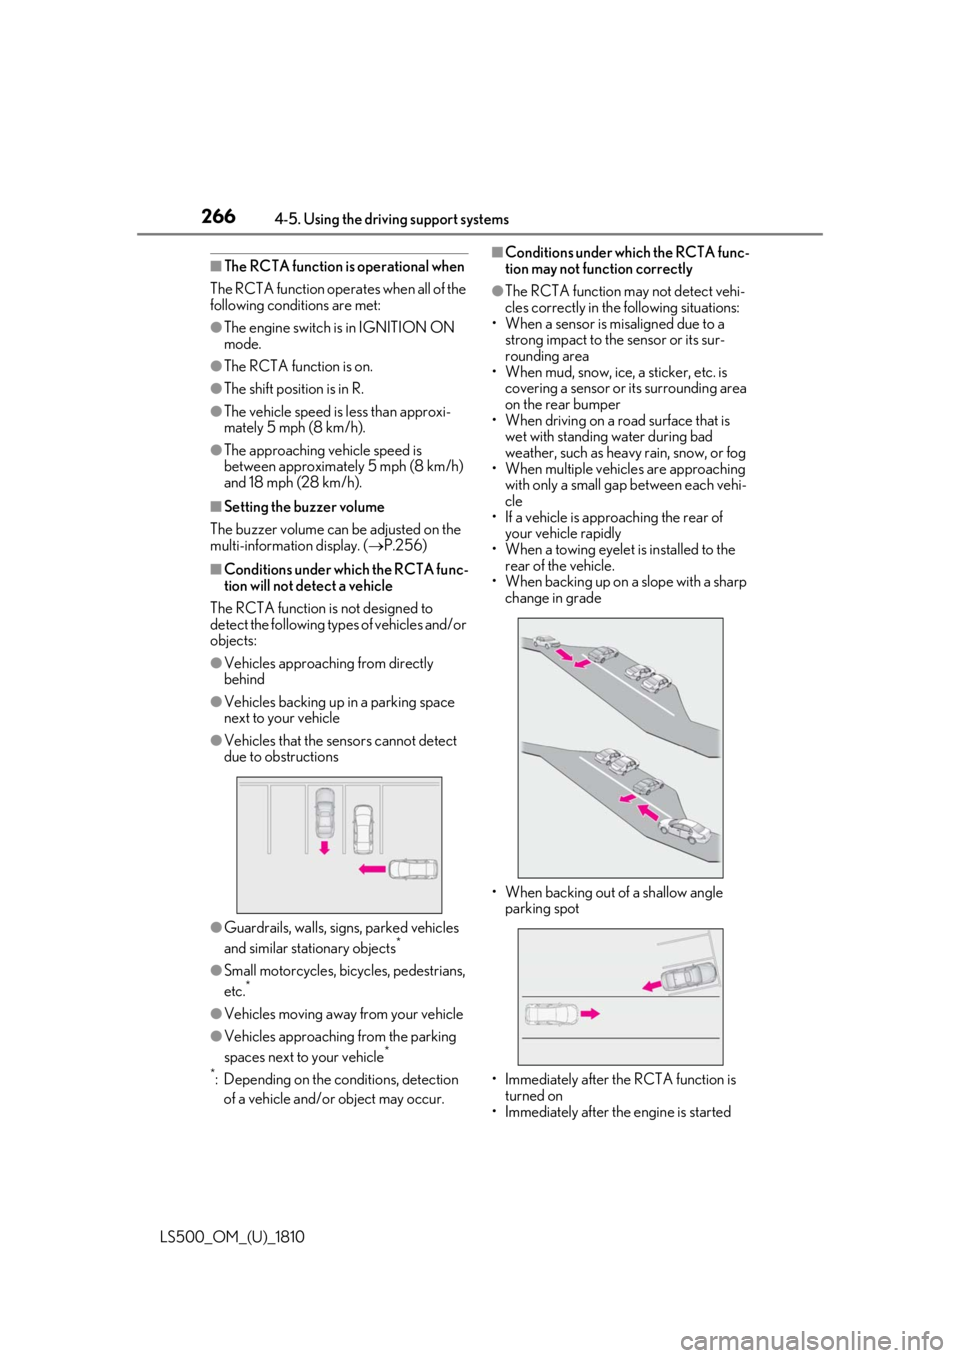
The RCTA function is not designed to
detect the following types of vehicles and/or
objects: ●
Vehicles approaching from directly
behind●
Vehicles backing up in a parking space
next to your vehicle●
Vehicles that the sensors cannot detect
due to obstructions
●
Guardrails, walls, signs, parked vehicles
and similar stationary objects *
●
Small motorcycles, bicycles, pedestrians,
etc. *
●
Vehicles moving away from your vehicle
●
Vehicles approaching from the parking
spaces next to your vehicle *
*
: Depending on the conditions, detection
of a vehicle and/or object may occur. ■
Conditions under which the RCTA func-
tion may not function correctly ●
The RCTA function may not detect vehi-
cles correctly in the following situations:
• When a sensor is misaligned due to a
strong impact to the sensor or its sur-
rounding area
• When mud, snow, ice, a sticker, etc. is
covering a sensor or its surrounding area
on the rear bumper
• When driving on a road surface that is
wet with standing water during bad
weather, such as heavy rain, snow, or fog
• When multiple vehicles are approaching
with only a small gap between each vehi-
cle
• If a vehicle is approaching the rear of
your vehicle rapidly
• When a towing eyelet is installed to the
rear of the vehicle.
• When backing up on a slope with a sharp
change in grade
• When backing out of a shallow angle
parking spot
• Immediately after the RCTA function is
turned on
• Immediately after the engine is started
Page 268 of 512
268 4-5. Using the driving support systems
LS500_OM_(U)_1810 2 Press or to select “PKSA”
and then press .
3 Press or to select “RCD”
and then press .When the RCD function is disabled, the
RCD OFF indicator ( P.68) illuminates.
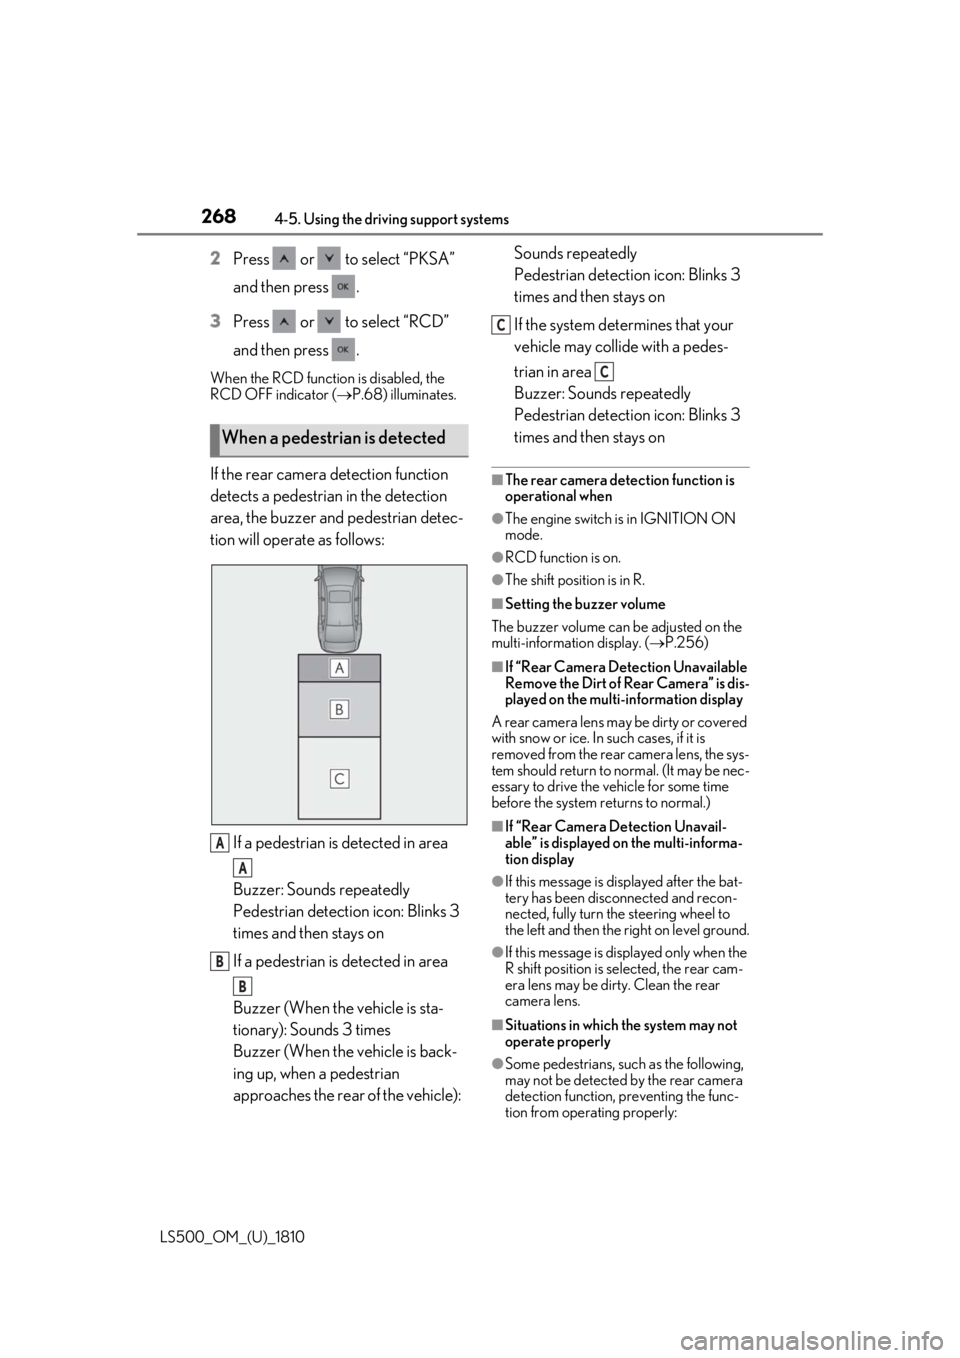
If the rear camera detection function
detects a pedestrian in the detection
area, the buzzer and pedestrian detec-
tion will operate as follows:
If a pedestrian is detected in area
Buzzer: Sounds repeatedly
Pedestrian detection icon: Blinks 3
times and then stays on
If a pedestrian is detected in area
Buzzer (When the vehicle is sta-
tionary): Sounds 3 times
Buzzer (When the vehicle is back-
ing up, when a pedestrian
approaches the rear of the vehicle): Sounds repeatedly
Pedestrian detection icon: Blinks 3
times and then stays on
If the system determines that your
vehicle may collide with a pedes-
trian in area
Buzzer: Sounds repeatedly
Pedestrian detection icon: Blinks 3
times and then stays on ■
The rear camera dete ction function is
operational when ●
The engine switch is in IGNITION ON
mode. ●
RCD function is on. ●
The shift position is in R. ■
Setting the buzzer volume
The buzzer volume can be adjusted on the
multi-information display. ( P.256)■
If “Rear Camera Detection Unavailable
Remove the Dirt of Rear Camera” is dis-
played on the multi-information display
A rear camera lens ma y be dirty or covered
with snow or ice. In such cases, if it is
removed from the rear camera lens, the sys-
tem should return to normal. (It may be nec-
essary to drive the vehicle for some time
before the system returns to normal.) ■
If “Rear Camera Detection Unavail-
able” is displayed on the multi-informa-
tion display ●
If this message is di splayed after the bat-
tery has been disconnected and recon-
nected, fully turn the steering wheel to
the left and then the right on level ground.
●
If this message is di splayed only when the
R shift position is selected, the rear cam-
era lens may be dirty. Clean the rear
camera lens.
■
Situations in which the system may not
operate properly
●
Some pedestrians, such as the following,
may not be detected by the rear camera
detection function, preventing the func-
tion from operating properly:When a pedestrian is detected
A
A
B
B C
C
Page 290 of 512

290 4-5. Using the driving support systems
LS500_OM_(U)_1810 Suitable for city driving.
When the shift position is in D, an appropri-
ate gear for sporty driving may automati-
cally be selected according to driver
performance and dr iving conditions.
•Custom mode
Allows you to drive with the powertrain,
chassis and air condit ioning system func-
tions set to your preferred settings. Cus-
tom mode settings can only be changed on
the drive mode customization display of
the Center Display. ( P.306)
2 Comfort modeBy controlling the suspension, riding com-
fort is further enhanc ed. Suitable for city
driving.
When not in comfort mode and the driving
mode select switch is turned backward, the
comfort mode indicator comes on.
3 Eco drive modeHelps the driver accelerate in an
eco-friendly manner and improve fuel
economy through modera te throttle char-
acteristics and by controlling the operation
of the air conditioning system (heat-
ing/cooling).
When in comfort mode, if the driving mode
select switch is turned backward, the Eco
drive mode indicator comes on.
4 Sport mode•Sport S mode
Controls the transmission and engine to
provide quick, powerful acceleration. This
mode is suitable for when agile driving
response is desired, such as when driving
on roads with many curves.
When not in Sport S mode, if the driving
mode select switch is turned forward, the
Sport S mode indicator comes on.
•Sport S+ mode
Helps to ensure stee ring performance and
driving stability by simultaneously con- trolling the steering and suspension in
addition to the transmission and engine.
Suitable for sportier driving.
When in Sport S mode, if the driving mode
select switch is turned forward, the Sport
S+ mode indicator comes on. ■
If the driving mode select switch is oper-
ated while the opening screen is being
displayed
If the driving mode sele ct switch is operated
while the opening screen is being displayed,
the driving mode will be changed and the
meter display will chan ge accordingly after
the opening screen operation has com-
pleted. ■
Operation of the air conditioning sys-
tem in Eco drive mode
Eco drive mode controls the heating/cool-
ing operations and fan speed of the air con-
ditioning system to en hance fuel efficiency.
To improve air condit ioning performance,
perform the following operations: ●
Turn off eco air conditioning mode
( P.318)●
Adjust the fan speed ( P.313)●
Turn off Eco drive mode ■
Automatic deactivation of sport mode
and custom mode
If the engine switch is turned off after driv-
ing in sport mode or custom mode, the
drive mode will be changed to normal
mode.
■
Driving mode pop-up display
When the driving mode is changed, the
selected driving mode will be temporarily
displayed on the side display. ( P.307)
Page 291 of 512
2914-5. Using the driving support systems
LS500_OM_(U)_1810 4
Driving *
:If equipped
■
Situations in which the vehicle height
control may not operate properly●
In the following situations, the vehicle
height may change slowly or may not
change to the correct height:
• When the vehicle comes into contact
with snow, ice, stone, etc.
• When the ambient temperature is low
• When the accumulator tank pressure is
low●
In the following situations, the vehicle
height may not change:
• If the hood or trunk is not fully closed
• If the brake pedal depressed and the
vehicle is stopped
• When the vehicle is on a significantly
uneven or undulating road
• When the vehicle is on a slanted road or a
slope
■
Operating sound of the air suspension
compressor and valves
When the vehicle height is changed, such
as due to passengers entering the vehicle or
cargo being loaded, or when the vehicle
height is changed using the vehicle height
adjustment switch, the air suspension com-
pressor and valves may operate and a sound may be heard. This does not indicate
a malfunction. ■
When the accumulator tank pressure is
low
When the accumulator tank pressure is low,
the air suspension compressor and valves
may operate repeatedly even though the
vehicle height is not being changed. This
does not indicate a malfunction.
Electronically modulated air
suspension *
The height of the vehicle when driv-
ing can be selected using the vehi-
cle height adjustment switch. The
selected height level will be main-
tained regardless of the number of
passengers or weight of cargo.
Additionally, setti ngs of the follow-
ing functions can be changed:
Enabling/Disabling controls of
access mode
Temporarily disabling vehicle
height control WARNING■
Situations in whic h the operation of
the electronically modulated air sus-
pension should be temporarily dis-
abled
In the following situations, make sure to
temporarily disable all functions of the
vehicle height control of the electroni-
cally modulated air suspension and then
stop the engine. Otherwise, the vehicle
height may change and part of your body
may be caught under the vehicle, possi-
bly causing injury. ●
When the vehicle is parked on a curb ●
If any of the wheels is not touching the
ground ●
If the vehicle needs to be jacked up
●
If the vehicle is to be tied down
●
If the vehicle is to be towed
■
Vehicle height control precautions
In the following situations, make sure to
check the safety of the area around the
vehicle, as the vehicle height may change
and part of someone’s body may be
caught in the vehicle, possibly causing
injury or the vehicle may be damaged.
●
When opening a door
●
When unlocking the doors using the
smart access system with push-button
start
●
When changing the vehicle height
using the vehicle height adjustment
switch
Page 292 of 512
292 4-5. Using the driving support systems
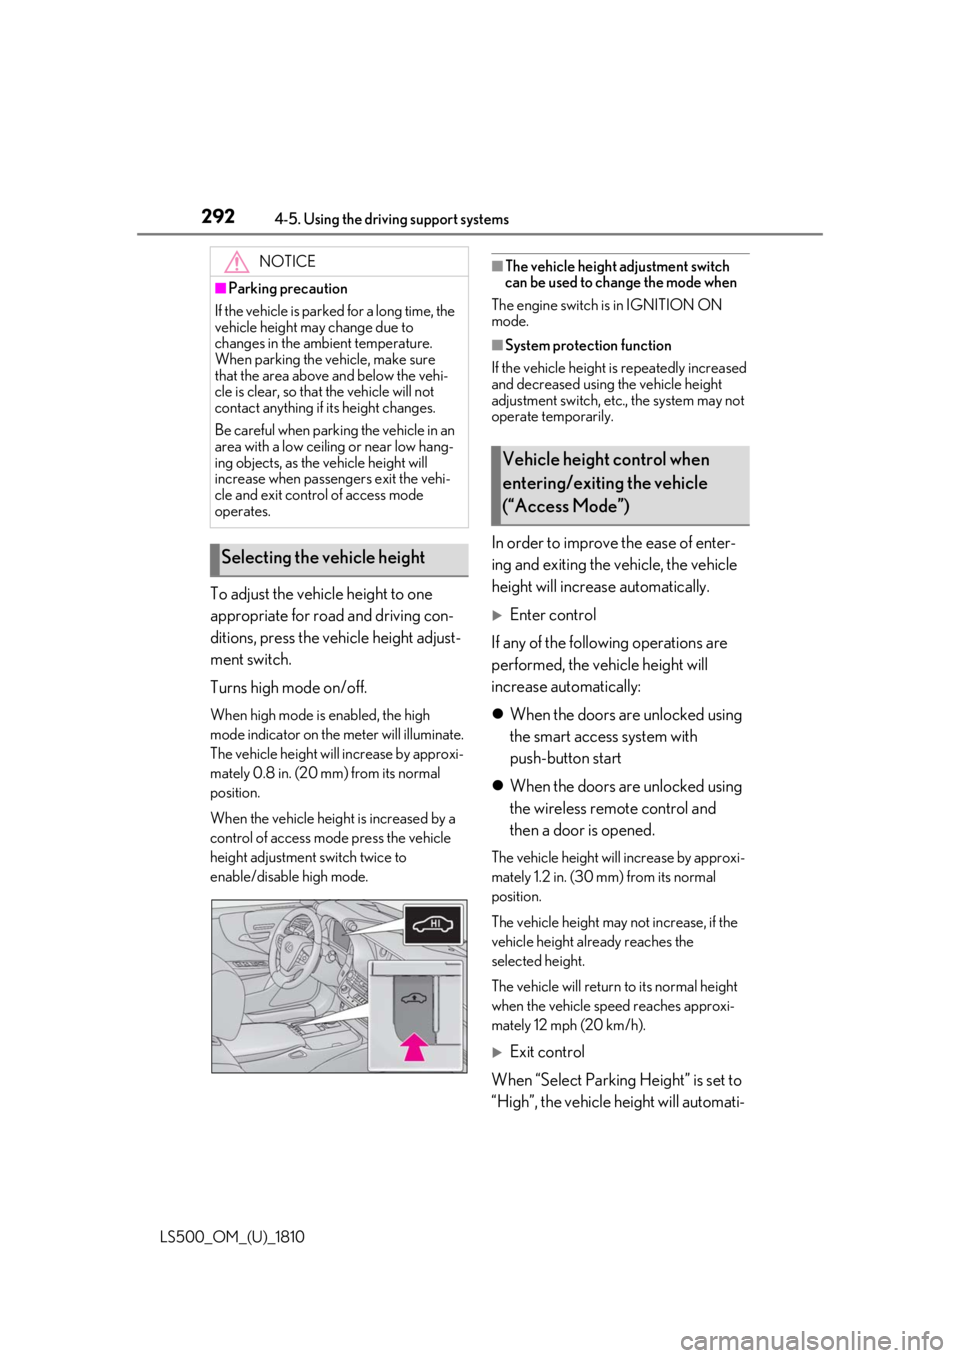
LS500_OM_(U)_1810 To adjust the vehicle height to one
appropriate for road and driving con-
ditions, press the vehicle height adjust-
ment switch.
Turns high mode on/off. When high mode is enabled, the high
mode indicator on the meter will illuminate.
The vehicle height will increase by approxi-
mately 0.8 in. (20 mm) from its normal
position.
When the vehicle height is increased by a
control of access mo de press the vehicle
height adjustment switch twice to
enable/disable high mode. ■
The vehicle height adjustment switch
can be used to change the mode when
The engine switch is in IGNITION ON
mode. ■
System protection function
If the vehicle height is repeatedly increased
and decreased using the vehicle height
adjustment switch, etc ., the system may not
operate temporarily.
In order to improve the ease of enter-
ing and exiting the vehicle, the vehicle
height will increase automatically.
Enter control
If any of the following operations are
performed, the vehicle height will
increase automatically:
When the doors are unlocked using
the smart access system with
push-button start
When the doors are unlocked using
the wireless remote control and
then a door is opened. The vehicle height will increase by approxi-
mately 1.2 in. (30 mm) from its normal
position.
The vehicle height may not increase, if the
vehicle height al ready reaches the
selected height.
The vehicle will return to its normal height
when the vehicle speed reaches approxi-
mately 12 mph (20 km/h).
Exit control
When “Select Parking Height” is set to
“High”, the vehicle height will automati-NOTICE■
Parking precaution
If the vehicle is parked for a long time, the
vehicle height may change due to
changes in the ambient temperature.
When parking the vehicle, make sure
that the area above and below the vehi-
cle is clear, so that the vehicle will not
contact anything if its height changes.
Be careful when parking the vehicle in an
area with a low ceiling or near low hang-
ing objects, as the vehicle height will
increase when passengers exit the vehi-
cle and exit control of access mode
operates.
Selecting the vehicle height Vehicle height control when
entering/exiting the vehicle
(“Access Mode”)
Page 293 of 512
2934-5. Using the driving support systems
LS500_OM_(U)_1810 4
Driving cally increase when the P shift position
is selected and a door is opened.
1 Press or to select .
2 Press or to select “Vehicle
Settings” and then press .
3 Press or to select
and then press .
4 Press or to select “Select
Parking Height” and then press
.The vehicle height will increase by approxi-
mately 0.4 in. (10 mm) from its normal
position.
The vehicle height may not increase, if the
vehicle height already reaches the
selected height.
The vehicle will return to its normal height
when the vehicle speed reaches approxi-
mately 12 mph (20 km/h). ■
Enabling/Disabling access mode
1 Press the or meter control
switch to select .
2 Press the or meter control
switch to select “Vehicle Settings”
and then press .
3 Press the or meter control
switch to select and then
press .
4 Press the or meter control
switch to select “Access Mode”
and then press .
The setting will change between enabled/disabled each time the
meter control switch is pressed. ■
When the vehicle height has been
increased by a control of access mode
Press the vehicle height adjustment switch
with the engine switch in any mode to return
the vehicle to its previous vehicle height. ■
Access mode operation ●
Access mode will not operate if the vehi-
cle is not parked on a level road surface. ●
When the P shift position is selected, if
the doors are not locked and any door is
opened from the outside, exit control will
operate.
Vehicle height control can be tempo-
rarily disabled using the meter control
switches. ( P.81)When to temporarily disable vehicle height
control: P.291
1 Press or to select .
2 Press or to select “Vehicle
Settings” and then press .
3 Press or to select
and then press .
4 Press or to select “Height
Control” and then press . This setting is memorized even if the
engine switch is turned off.
Even if the vehicle height control func-
tions are disabled, they will be enabled
automatically when the vehicle speed
reaches approximately 19 mph (30
km/h).Temporarily disabling vehicle
height control
Page 300 of 512
300 4-6. Driving tips
LS500_OM_(U)_1810 4-6.Driving tips
Use fluids that are appropriate to
the prevailing outside temperatures. •Engine oil
• Engine coolant
•Washer fluid
Have a service technician inspect
the condition of the battery.
Have the vehicle fitted with four
snow tires or purchase a set of tire
chains for the rear tires. *
Ensure that all tires are the specified size
and brand, and that chains match the size
of the tires. *
: Tire chains cannot be mounted on vehi-
cles with front and rear tires of differing
sizes.Winter driving tips Carry out the necessary prepara-
tions and inspections before driving
the vehicle in winter. Always drive
the vehicle in a manner appropriate
to the prevailing weather condi-
tions.
Preparation for winter
WARNING
■
Driving with snow tires
Observe the following precautions to
reduce the risk of accidents.
Failure to do so may result in a loss of
vehicle control and cause death or seri-
ous injury.
●
Use tires of the specified size.
●
Maintain the recommended level of air
pressure. ●
Do not drive in excess of 75 mph (120
km/h), regardless of the type of snow
tires being used. ●
Use snow tires on all, not just some
wheels. ■
When installing tire chains
Before installing tire chains, make sure to
disable all functions of the vehicle height
control of the electronically modulated
air suspension. Otherwise, the vehicle
height may change while installing the
tire chains and part or your body may be
caught under the vehicle, possibly caus-
ing injury. ( P.293)■
Driving with tire chains
Observe the following precautions to
reduce the risk of accidents.
Failure to do so may result in the vehicle
being unable to be driven safely, and may
cause death or serious injury. ●
Do not drive in excess of the speed
limit specified for the tire chains being
used, or 30 mph (50 km/h), which-
ever is lower. ●
Avoid driving on bumpy road surfaces
or over potholes. ●
Avoid sudden acceleration, abrupt
steering, sudden br aking and shifting
operations that cause sudden engine
braking.
●
Slow down sufficiently before entering
a curve to ensure that vehicle control is
maintained.
●
Do not use LTA (Lane Tracing Assist)
system.
Page 301 of 512
3014-6. Driving tips
LS500_OM_(U)_1810 4
Driving Perform the following according to the
driving conditions:
Do not try to forcib ly open a window
or move a wiper that is frozen. Pour
warm water over the frozen area to
melt the ice. Wipe away the water
immediately to prevent it from
freezing.
To ensure proper operation of the
climate control system fan, remove
any snow that has accumulated on
the air inlet vents in front of the
windshield.
Check for and remove any excess
ice or snow that may have accumu-
lated on the exterior lights, vehicle’s
roof, chassis, around the tires or on
the brakes.
Remove any snow or mud from the
bottom of your shoes before getting
in the vehicle.
Accelerate the vehicle slowly, keep a
safe distance between you and the
vehicle ahead, and drive at a reduced
speed suitable to road conditions. Park the vehicle and shift the shift posi-
tion to P without setting the parking
brake. The parking brake may freeze
up, preventing it from being released. If
the vehicle is parked without setting
the parking brake, make sure to block
the wheels.
Failure to do so may be dangerous
because it may cause the vehicle to
move unexpectedly, possibly leading to
an accident.
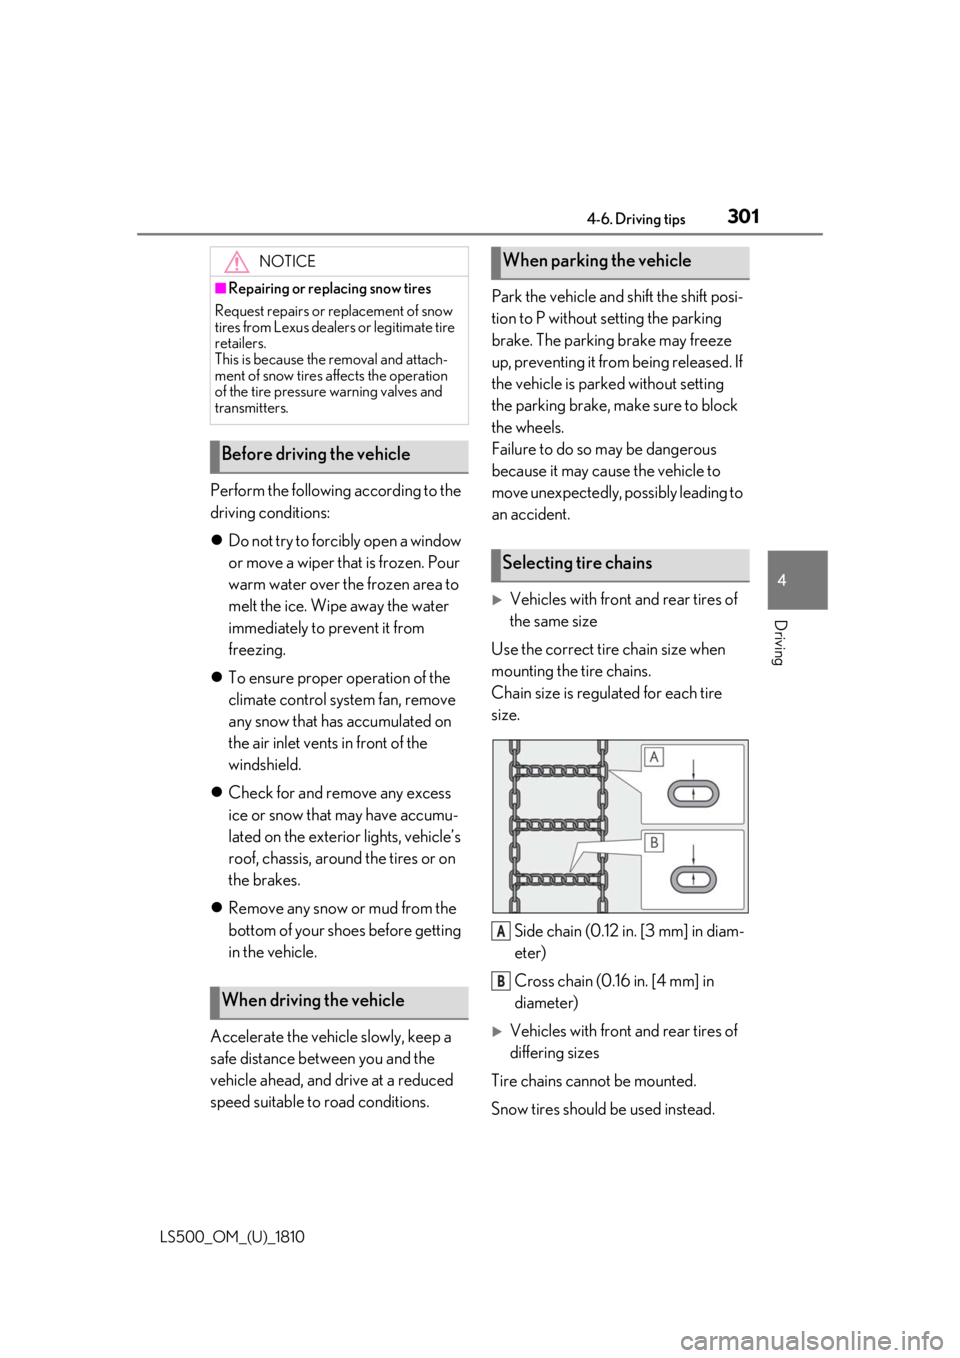
Vehicles with front and rear tires of
the same size
Use the correct tire chain size when
mounting the tire chains.
Chain size is regulated for each tire
size.
Side chain (0.12 in. [3 mm] in diam-
eter)
Cross chain (0.16 in. [4 mm] in
diameter)
Vehicles with front and rear tires of
differing sizes
Tire chains cannot be mounted.
Snow tires should be used instead.NOTICE■
Repairing or replacing snow tires
Request repairs or replacement of snow
tires from Lexus dealers or legitimate tire
retailers.
This is because the removal and attach-
ment of snow tires affects the operation
of the tire pressure warning valves and
transmitters.
Before driving the vehicle
When driving the vehicle When parking the vehicle
Selecting tire chains
A
B
Page 306 of 512
306 5-1. Remote Touch/Display
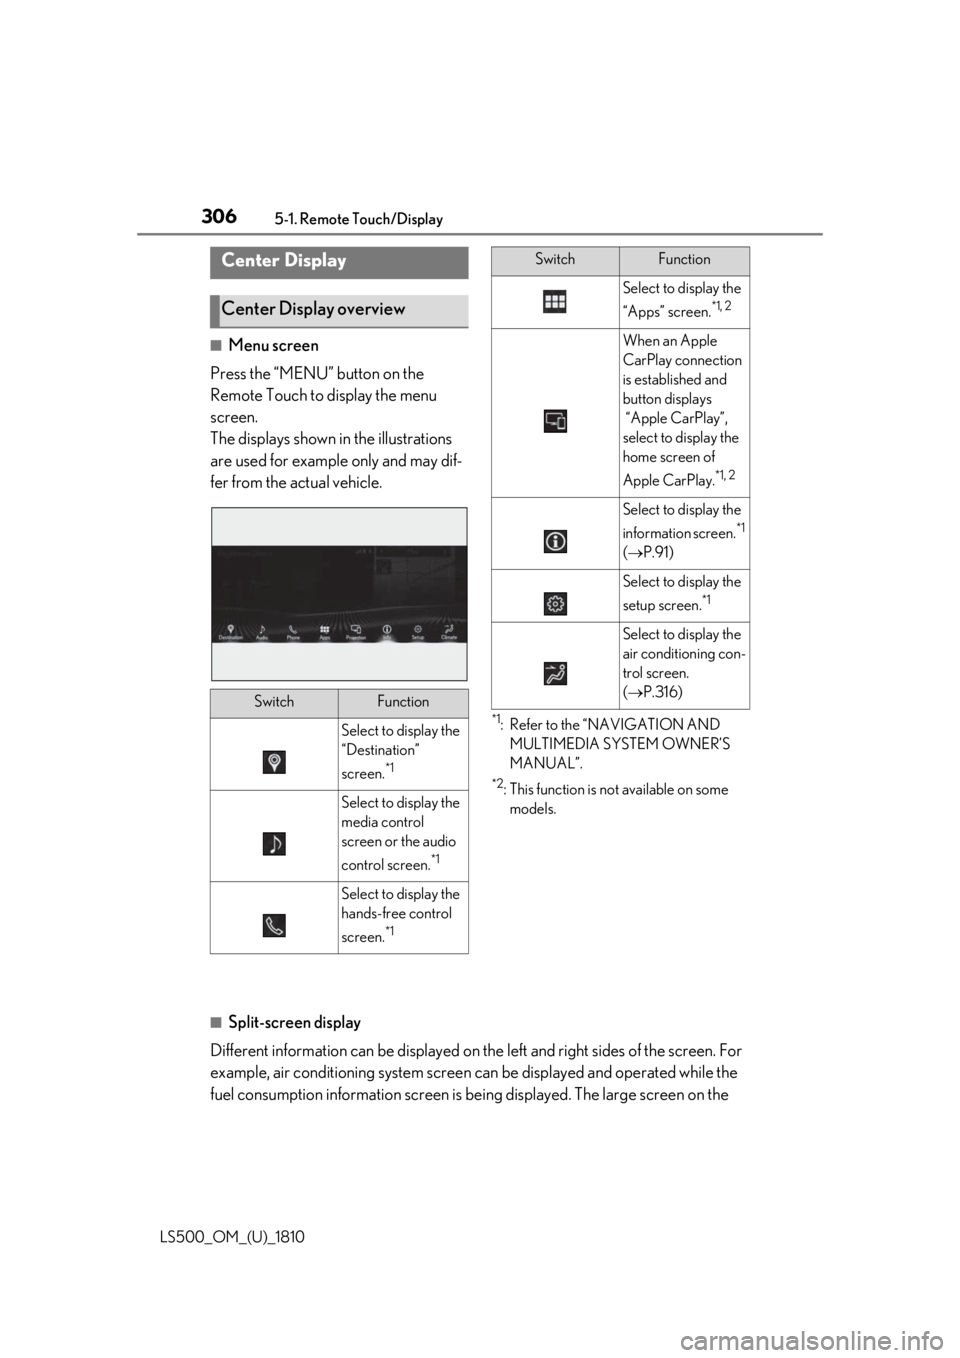
LS500_OM_(U)_1810 ■
Menu screen
Press the “MENU” button on the
Remote Touch to display the menu
screen.
The displays shown in the illustrations
are used for example only and may dif-
fer from the actual vehicle. *1
: Refer to the “NAVIGATION AND
MULTIMEDIA SYSTEM OWNER’S
MANUAL”. *2
: This function is not available on some
models.
■
Split-screen display
Different information can be displayed on the left and right sides of the screen. For
example, air conditioning system screen can be displayed and operated while the
fuel consumption information screen is be ing displayed. The large screen on the Center Display
Center Display overview
Switch Function
Select to display the
“Destination”
screen. *1
Select to display the
media control
screen or the audio
control screen. *1
Select to display the
hands-free control
screen. *1 Select to display the
“Apps” screen. *1, 2
When an Apple
CarPlay connection
is established and
button displays
“Apple CarPlay”,
select to display the
home screen of
Apple CarPlay. *1, 2
Select to display the
information screen. *1
( P.91)
Select to display the
setup screen. *1
Select to display the
air conditioning con-
trol screen.
( P.316)Switch Function