LEXUS SC400 1991 Service Repair Manual
Manufacturer: LEXUS, Model Year: 1991, Model line: SC400, Model: LEXUS SC400 1991Pages: 4087, PDF Size: 75.75 MB
Page 2391 of 4087
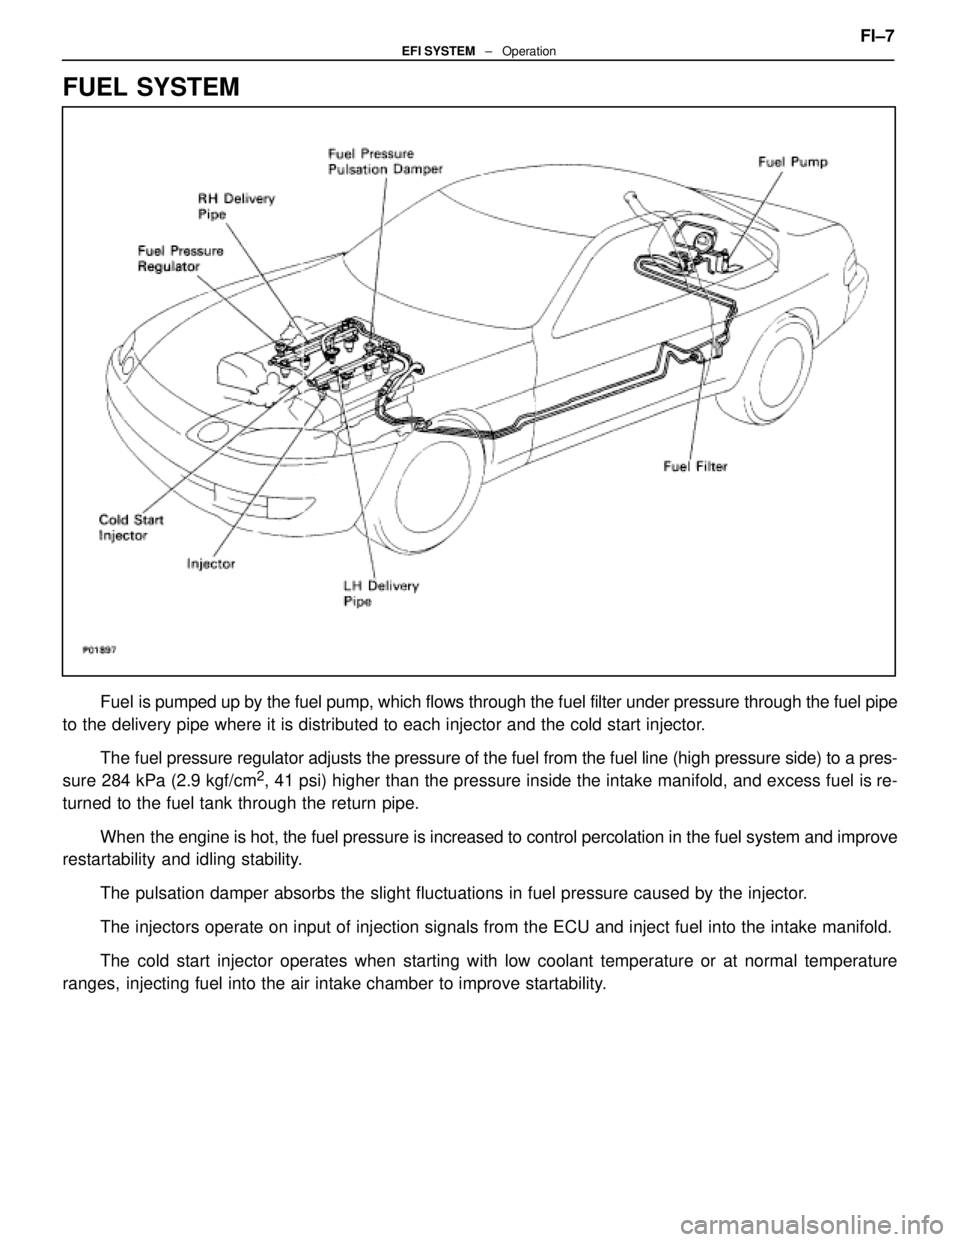
FUEL SYSTEM
Fuel is pumped up by the fuel pump, which flows through the fuel filter under pr\
essure through the fuel pipe
to the delivery pipe where it is distributed to each injector and the cold\
start injector.
The fuel pressure regulator adjusts the pressure of the fuel from the fuel \
line (high pressure side) to a pres-
sure 284 kPa (2.9 kgf/cm
2, 41 psi) higher than the pressure inside the intake manifold, and exce\
ss fuel is re-
turned to the fuel tank through the return pipe.
When the engine is hot, the fuel pressure is increased to control percolatio\
n in the fuel system and improve
restartability and idling stability.
The pulsation damper absorbs the slight fluctuations in fuel pressure ca\
used by the injector.
The injectors operate on input of injection signals from the ECU and inj\
ect fuel into the intake manifold.
The cold start injector operates when starting with low coolant temperature or at normal temperature
ranges, injecting fuel into the air intake chamber to improve startability. FI±7
EFI SYSTEM
± Operation
WhereEverybodyKnowsYourName
Page 2392 of 4087
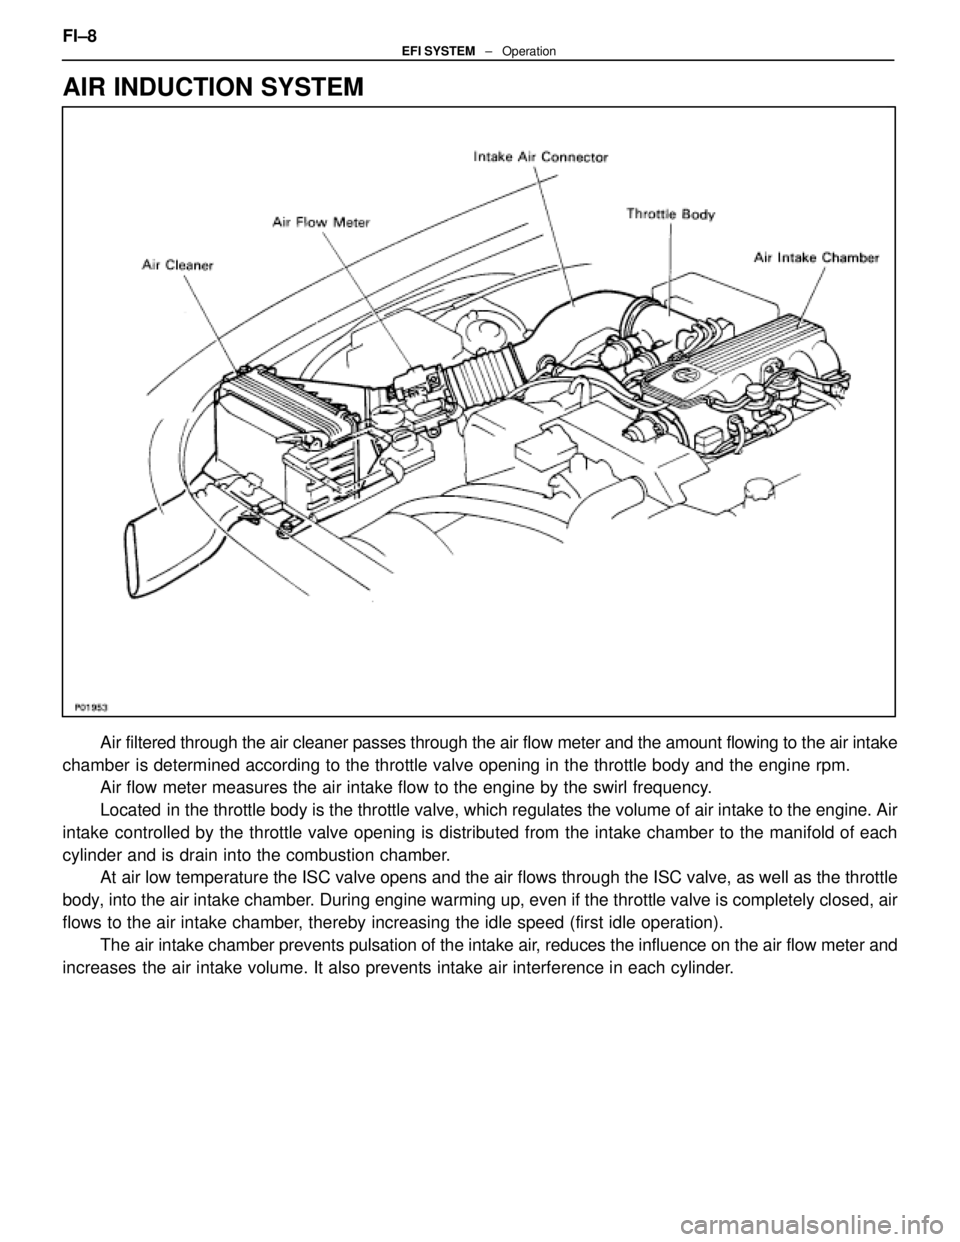
AIR INDUCTION SYSTEM
Air filtered through the air cleaner passes through the air flow meter and \
the amount flowing to the air intake
chamber is determined according to the throttle valve opening in the throttle b\
ody and the engine rpm. Air flow meter measures the air intake flow to the engine by the swirl f\
requency.
Located in the throttle body is the throttle valve, which regulates the volume \
of air intake to the engine. Air
intake controlled by the throttle valve opening is distributed from the intake\
chamber to the manifold of each
cylinder and is drain into the combustion chamber. At air low temperature the ISC valve opens and the air flows through the I\
SC valve, as well as the throttle
body, into the air intake chamber. During engine warming up, even if the throttle valve is completely clo\
sed, air
flows to the air intake chamber, thereby increasing the idle speed (first idle operation). The air intake chamber prevents pulsation of the intake air, reduces the influence on the air flow meter and
increases the air intake volume. It also prevents intake air interference in each\
cylinder. FI±8
EFI SYSTEM ± Operation
WhereEverybodyKnowsYourName
Page 2393 of 4087
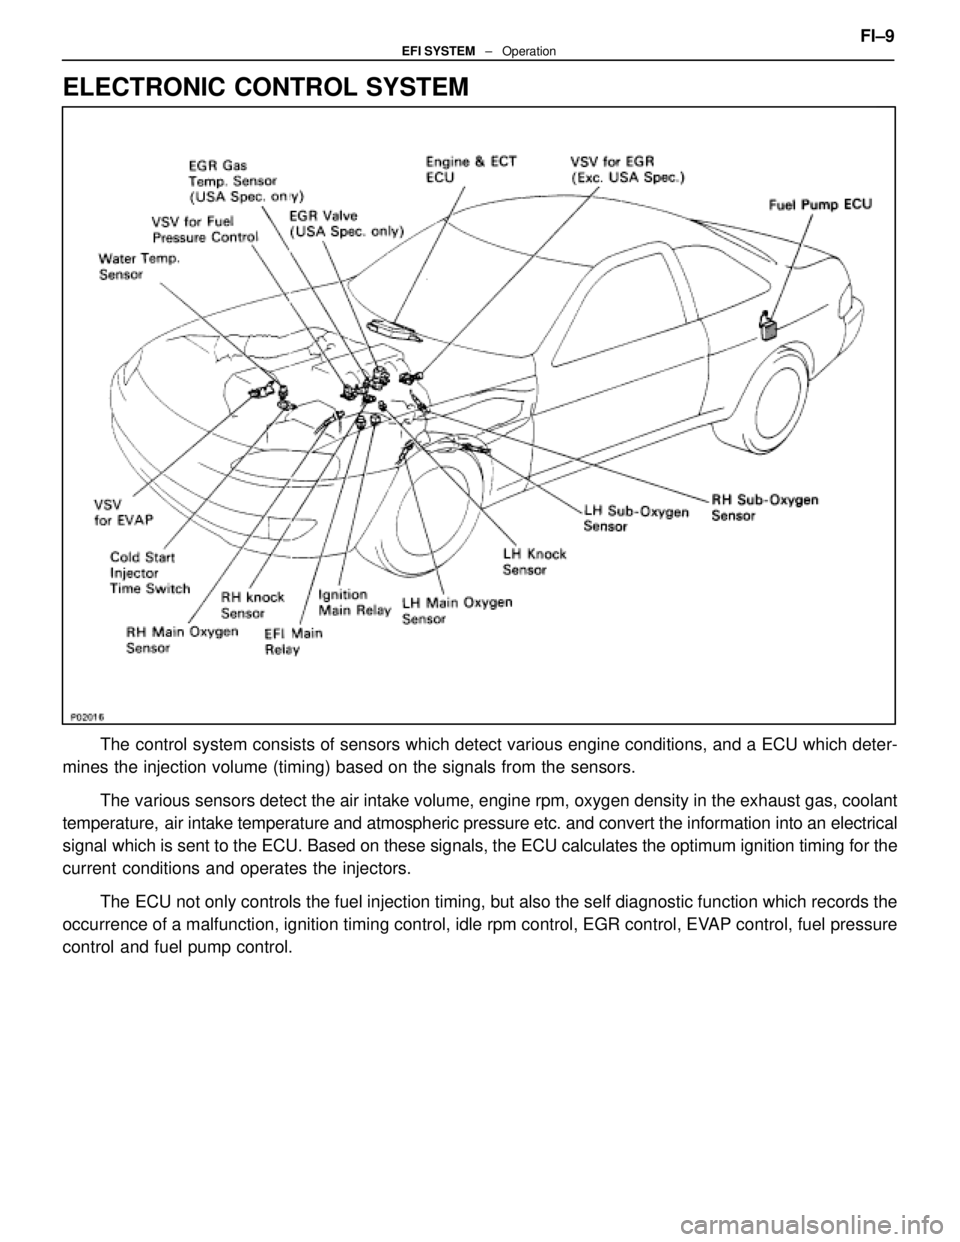
ELECTRONIC CONTROL SYSTEM
The control system consists of sensors which detect various engine conditions, and a ECU which deter\
-
mines the injection volume (timing) based on the signals from the sens\
ors.
The various sensors detect the air intake volume, engine rpm, oxygen densit\
y in the exhaust gas, coolant
temperature, air intake temperature and atmospheric pressure etc. and convert the in\
formation into an electrical
signal which is sent to the ECU. Based on these signals, the ECU calculates th\
e optimum ignition timing for the
current conditions and operates the injectors.
The ECU not only controls the fuel injection timing, but also the self diag\
nostic function which records the
occurrence of a malfunction, ignition timing control, idle rpm control, \
EGR control, EVAP control, fuel pressure
control and fuel pump control. FI±9
EFI SYSTEM
± Operation
WhereEverybodyKnowsYourName
Page 2394 of 4087
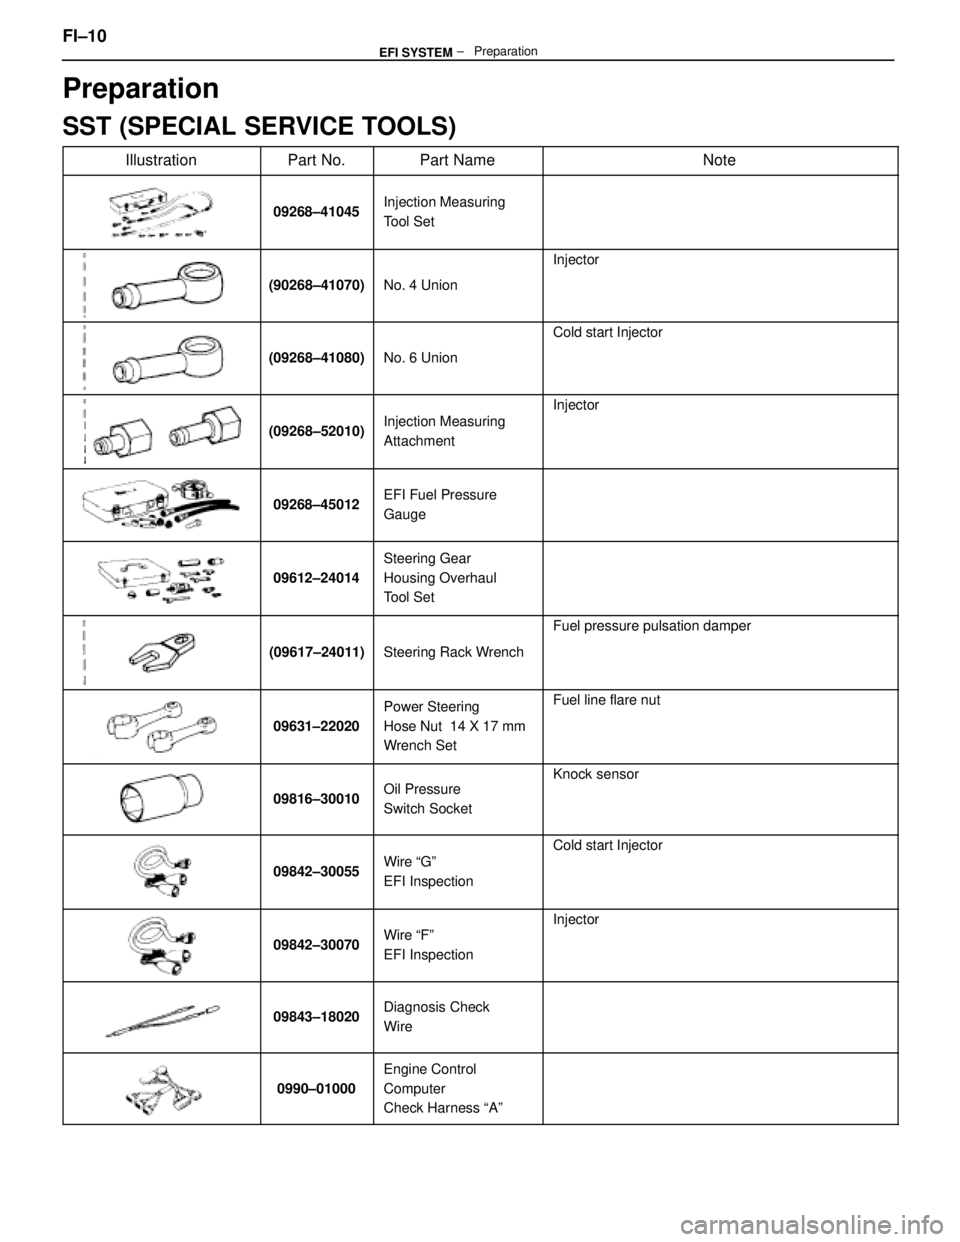
Preparation
SST (SPECIAL SERVICE TOOLS)
IllustrationPart No.Part NameNote
09268±41045Injection Measuring
Tool Set
(90268±41070)No. 4 Union
Injector
(09268±41080)No. 6 Union
Cold start Injector
(09268±52010)Injection Measuring
Attachment
Injector
09268±45012EFI Fuel Pressure
Gauge
09612±24014
Steering Gear
Housing Overhaul
Tool Set
(09617±24011)Steering Rack Wrench
Fuel pressure pulsation damper
09631±22020
Power Steering
Hose Nut 14 X 17 mm
Wrench SetFuel line flare nut
09816±30010Oil Pressure
Switch SocketKnock sensor
09842±30055Wire ªGº
EFI Inspection
Cold start Injector
09842±30070Wire ªFº
EFI Inspection
Injector
09843±18020Diagnosis Check
Wire
0990±01000
Engine Control
Computer
Check Harness ªAº
FI±10 ± PreparationEFI SYSTEM
WhereEverybodyKnowsYourName
Page 2395 of 4087
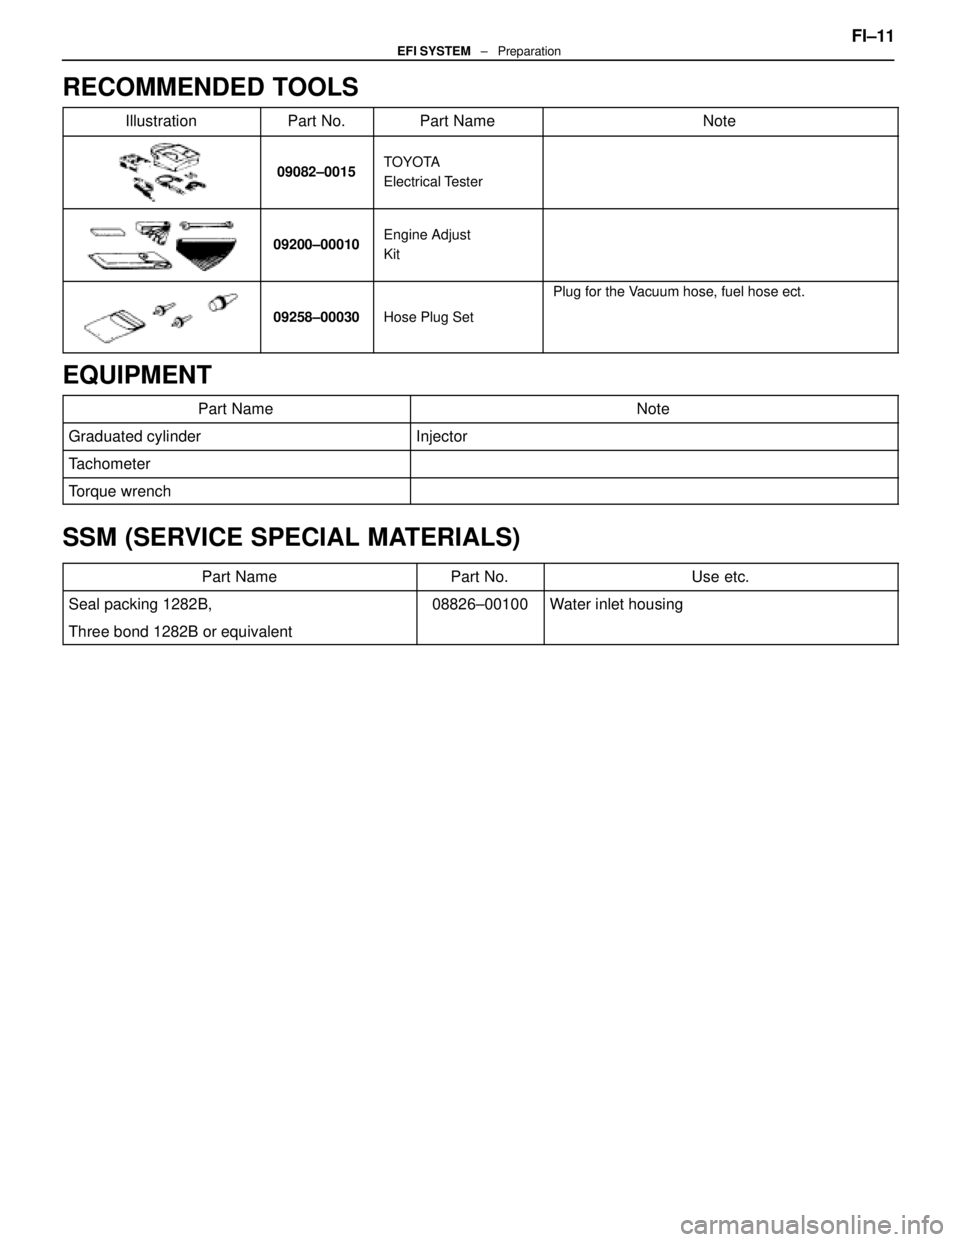
RECOMMENDED TOOLS
IllustrationPart No.Part NameNote
09082±0015TOYOTA
Electrical Tester
09200±00010Engine Adjust
Kit
09258±00030Hose Plug Set
Plug for the Vacuum hose, fuel hose ect.
EQUIPMENT
Part NameNote
Graduated cylinderInjector
Tachometer
Torque wrench
SSM (SERVICE SPECIAL MATERIALS)
Part NamePart No.Use etc.
Seal packing 1282B,08826±00100Water inlet housing
Three bond 1282B or equivalent
FI±11EFI SYSTEM ± Preparation
WhereEverybodyKnowsYourName
Page 2396 of 4087
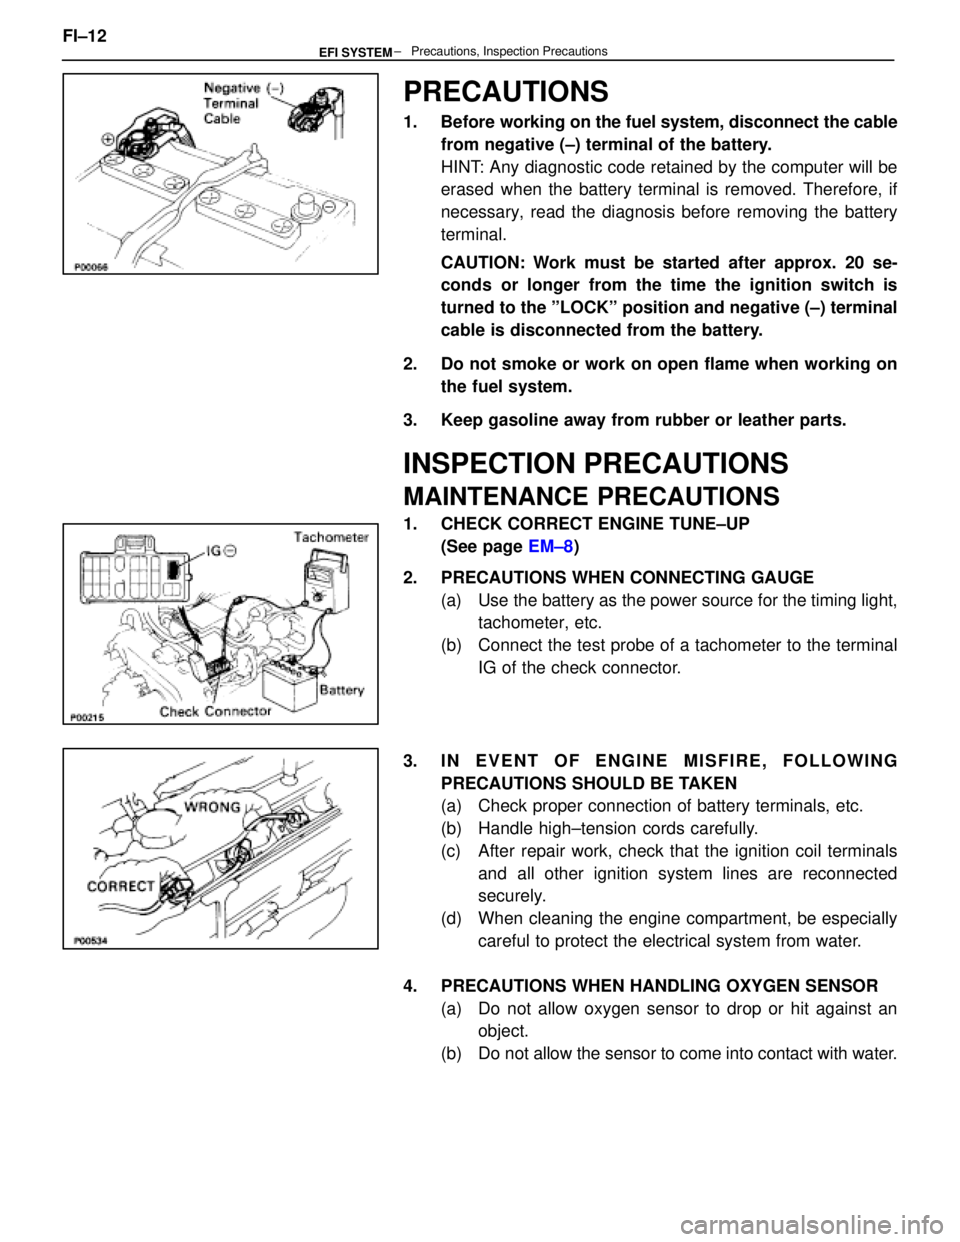
PRECAUTIONS
1. Before working on the fuel system, disconnect the cablefrom negative (±) terminal of the battery.
HINT: Any diagnostic code retained by the computer will be
erased when the battery terminal is removed. Therefore, if
necessary, read the diagnosis before removing the battery
terminal.
CAUTION: Work must be started after approx. 20 se-
conds or longer from the time the ignition switch is
turned to the ºLOCKº position and negative (±) terminal
cable is disconnected from the battery.
2. Do not smoke or work on open flame when working on the fuel system.
3. Keep gasoline away from rubber or leather parts.
INSPECTION PRECAUTIONS
MAINTENANCE PRECAUTIONS
1. CHECK CORRECT ENGINE TUNE±UP (See page EM±8)
2. PRECAUTIONS WHEN CONNECTING GAUGE (a) Use the battery as the power source for the timing light,tachometer, etc.
(b) Connect the test probe of a tachometer to the terminal IG of the check connector.
3. IN EVENT OF ENGINE MISFIRE, FOLLOWING PRECAUTIONS SHOULD BE TAKEN
(a) Check proper connection of battery terminals, etc.
(b) Handle high±tension cords carefully.
(c) After repair work, check that the ignition coil terminalsand all other ignition system lines are reconnected
securely.
(d) When cleaning the engine compartment, be especially careful to protect the electrical system from water.
4. PRECAUTIONS WHEN HANDLING OXYGEN SENSOR (a) Do not allow oxygen sensor to drop or hit against anobject.
(b) Do not allow the sensor to come into contact with water.
FI±12
± Precautions, Inspection PrecautionsEFI SYSTEM
WhereEverybodyKnowsYourName
Page 2397 of 4087
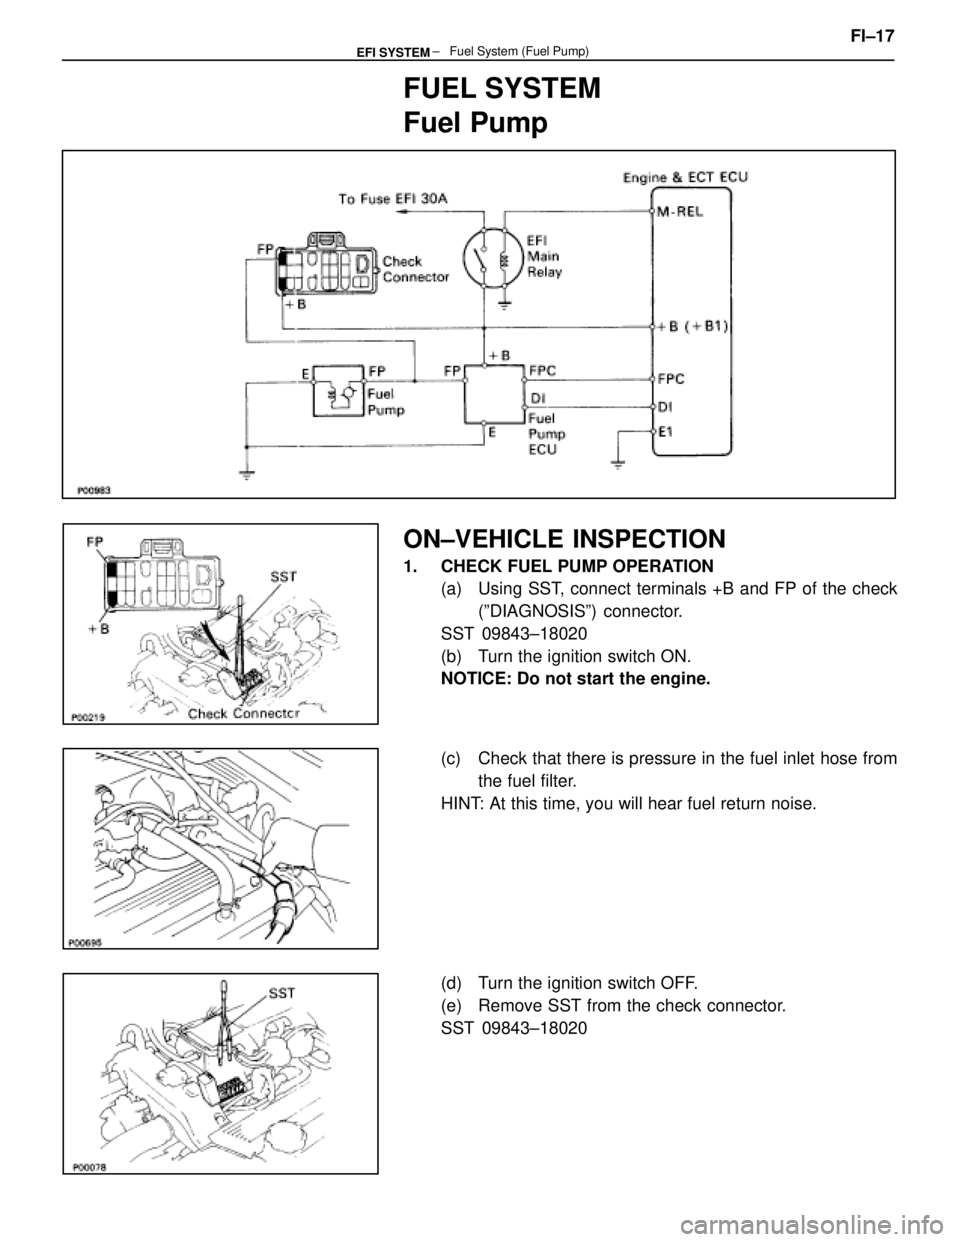
FUEL SYSTEM
Fuel Pump
ON±VEHICLE INSPECTION
1. CHECK FUEL PUMP OPERATION(a) Using SST, connect terminals +B and FP of the check
(ºDIAGNOSISº) connector.
SST 09843±18020
(b) Turn the ignition switch ON.
NOTICE: Do not start the engine.
(c) Check that there is pressure in the fuel inlet hose from the fuel filter.
HINT: At this time, you will hear fuel return noise.
(d) Turn the ignition switch OFF.
(e) Remove SST from the check connector.
SST 09843±18020 FI±17
± Fuel System (Fuel Pump)EFI SYSTEM
WhereEverybodyKnowsYourName
Page 2398 of 4087
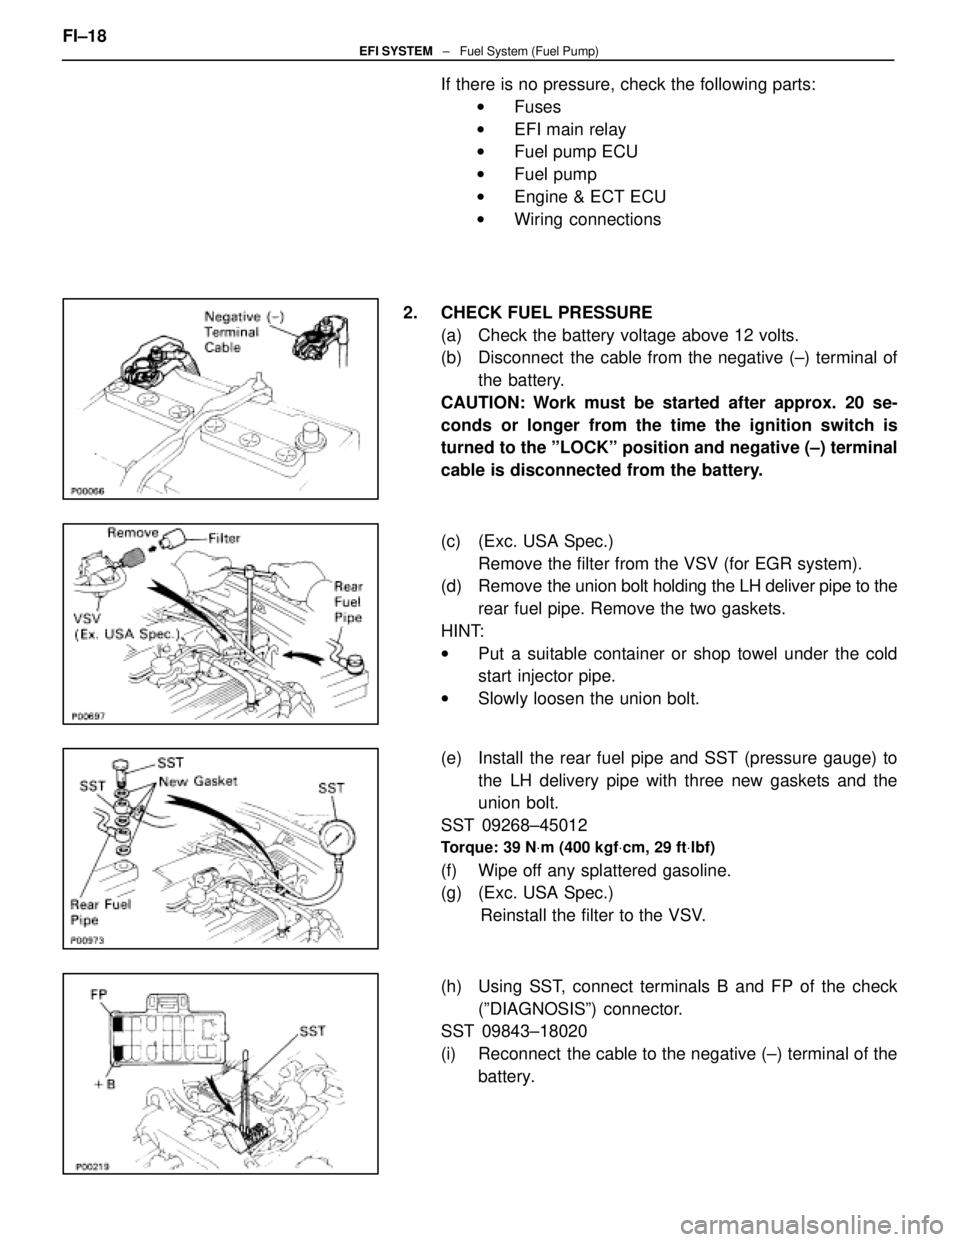
If there is no pressure, check the following parts:w Fuses
w EFI main relay
w Fuel pump ECU
w Fuel pump
w Engine & ECT ECU
w Wiring connections
2. CHECK FUEL PRESSURE (a) Check the battery voltage above 12 volts.
(b) Disconnect the cable from the negative (±) terminal ofthe battery.
CAUTION: Work must be started after approx. 20 se-
conds or longer from the time the ignition switch is
turned to the ºLOCKº position and negative (±) terminal
cable is disconnected from the battery.
(c) (Exc. USA Spec.) Remove the filter from the VSV (for EGR system).
(d) Remove the union bolt holding the LH deliver pipe to the
rear fuel pipe. Remove the two gaskets.
HINT:
w Put a suitable container or shop towel under the cold
start injector pipe.
w Slowly loosen the union bolt.
(e) Install the rear fuel pipe and SST (pressure gauge) to the LH delivery pipe with three new gaskets and the
union bolt.
SST 09268±45012
Torque: 39 N Vm (400 kgf Vcm, 29 ft Vlbf)
(f) Wipe off any splattered gasoline.
(g) (Exc. USA Spec.)
Reinstall the filter to the VSV.
(h) Using SST, connect terminals B and FP of the check (ºDIAGNOSISº) connector.
SST 09843±18020
(i) Reconnect the cable to the negative (±) terminal of the
battery.
FI±18
EFI SYSTEM
± Fuel System (Fuel Pump)
WhereEverybodyKnowsYourName
Page 2399 of 4087
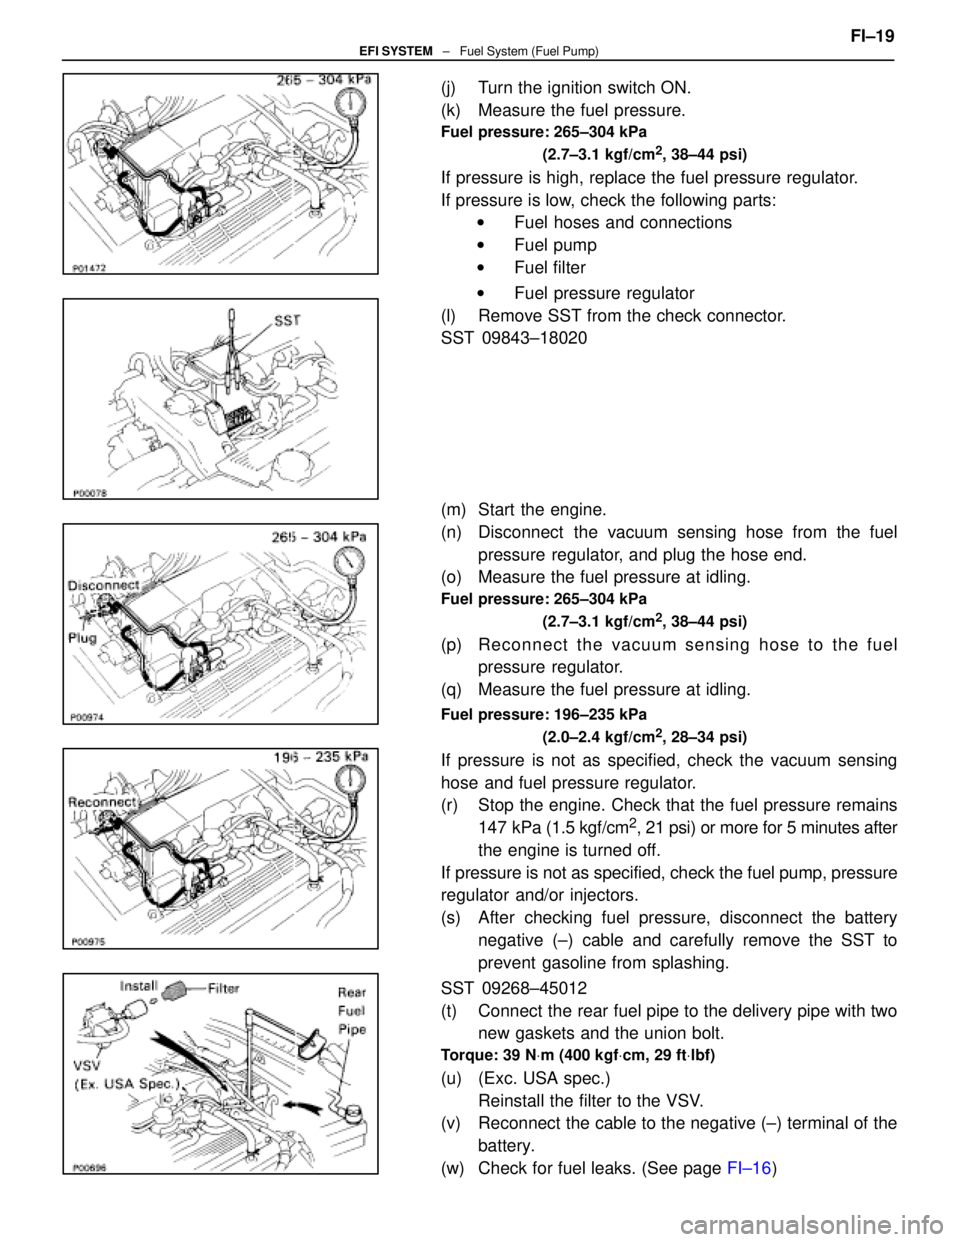
(j) Turn the ignition switch ON.
(k) Measure the fuel pressure.
Fuel pressure: 265±304 kPa(2.7±3.1 kgf/cm
2, 38±44 psi)
If pressure is high, replace the fuel pressure regulator.
If pressure is low, check the following parts:w Fuel hoses and connections
w Fuel pump
w Fuel filter
w Fuel pressure regulator
(l) Remove SST from the check connector.
SST 09843±18020
(m) Start the engine.
(n) Disconnect the vacuum sensing hose from the fuel pressure regulator, and plug the hose end.
(o) Measure the fuel pressure at idling.
Fuel pressure: 265±304 kPa
(2.7±3.1 kgf/cm
2, 38±44 psi)
(p) Re connect the vacuum sensing hose to the fuel
pressure regulator.
(q) Measure the fuel pressure at idling.
Fuel pressure: 196±235 kPa
(2.0±2.4 kgf/cm
2, 28±34 psi)
If pressure is not as specified, check the vacuum sensing
hose and fuel pressure regulator.
(r) Stop the engine. Check that the fuel pressure remains147 kPa (1.5 kgf/cm
2, 21 psi) or more for 5 minutes after
the engine is turned off.
If pressure is not as specified, check the fuel pump, pressure
regulator and/or injectors.
(s) After checking fuel pressure, disconnect the battery negative (±) cable and carefully remove the SST to
prevent gasoline from splashing.
SST 09268±45012
(t) Connect the rear fuel pipe to the delivery pipe with two new gaskets and the union bolt.
Torque: 39 N Vm (400 kgf Vcm, 29 ft Vlbf)
(u) (Exc. USA spec.)
Reinstall the filter to the VSV.
(v) Reconnect the cable to the negative (±) terminal of the
battery.
(w) Check for fuel leaks. (See page FI±16) FI±19
EFI SYSTEM
± Fuel System (Fuel Pump)
WhereEverybodyKnowsYourName
Page 2400 of 4087
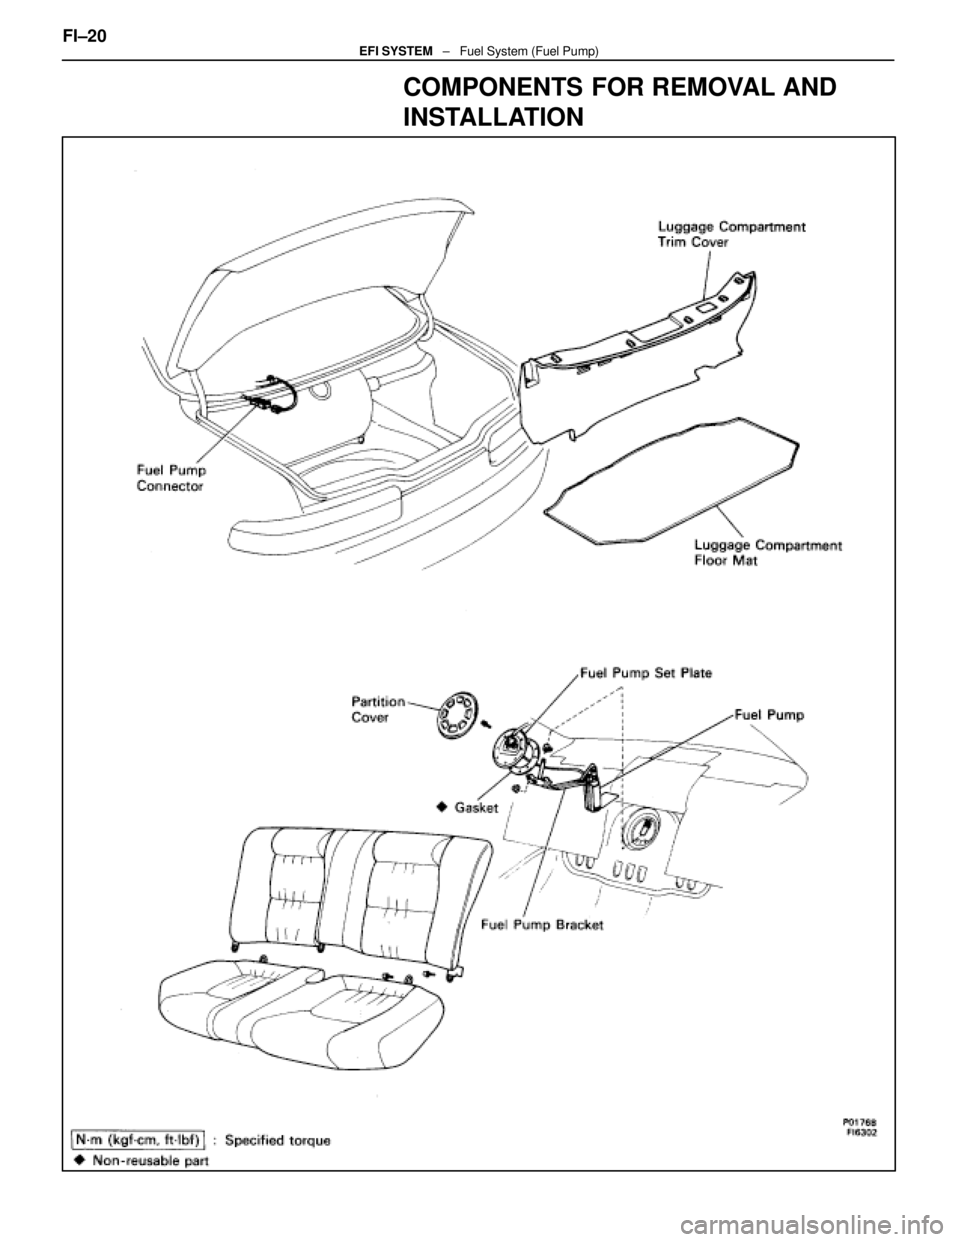
COMPONENTS FOR REMOVAL AND
INSTALLATION
FI±20EFI SYSTEM ± Fuel System (Fuel Pump)
WhereEverybodyKnowsYourName