instrument panel LINCOLN MKT 2019 User Guide
[x] Cancel search | Manufacturer: LINCOLN, Model Year: 2019, Model line: MKT, Model: LINCOLN MKT 2019Pages: 575, PDF Size: 4.66 MB
Page 129 of 575

The air currently in the passengercompartment recirculates. This may reducethe time needed to cool the interior, whenused with A/C, and reduce unwanted odorsfrom entering your vehicle.
Note:Recirculated air may turn off, orprevent you from switching on, in all air flowmodes except MAX A/C to reduce the riskof fogging. Recirculation may also turn onand off in various air distribution controlcombinations during hot weather in order toimprove cooling efficiency.
HINTS ON CONTROLLING THE
INTERIOR CLIMATE
General Hints
Note:Prolonged use of recirculated air maycause the windows to fog up.
Note:You may feel a small amount of airfrom the footwell air vents regardless of theair distribution setting.
Note:To reduce humidity build-up insideyour vehicle, do not drive with the systemswitched off or with recirculated air alwaysswitched on.
Note:Do not place objects under the frontseats as this may interfere with the airflowto the rear seats.
Note:Remove any snow, ice or leaves fromthe air intake area at the base of thewindshield.
Note:To improve the time to reach acomfortable temperature in hot weather,drive with the windows open until you feelcold air through the air vents.
Automatic Climate Control
Note:Adjusting the settings when yourvehicle interior is extremely hot or cold is notnecessary.
Note:The system adjusts to heat or cool theinterior to the temperature you select asquickly as possible.
Note:For the system to function efficiently,the instrument panel and side air ventsshould be fully open.
Note:If you select AUTO during cold outsidetemperatures, the system directs air flow tothe windshield and side window air vents. Inaddition, the blower motor may run at aslower speed until the engine warms up.
Note:If you select AUTO during hottemperatures and the inside of the vehicleis hot, the system uses recirculated air tomaximize interior cooling. Blower motorspeed may also reduce until the air cools.
Quickly Heating the Interior
1. Press and release AUTO.
2. Adjust the temperature function to thesetting you prefer.
Recommended Settings for Heating
1. Press and release AUTO.
2. Adjust the temperature function to thesetting you prefer. Use 72°F (22°C) as astarting point, then adjust the setting asnecessary.
Quickly Cooling the Interior
1. Press and release MAX A/C.
126
MKT (TP4) , enUSA, Edition date: 201803, Second-Printing
Climate Control
Page 192 of 575

PRINCIPLE OF OPERATION
The traction control system helps avoid drivewheel spin and loss of traction.
If your vehicle begins to slide, the systemapplies the brakes to individual wheels and,when needed, reduces engine power at thesame time. If the wheels spin whenaccelerating on slippery or loose surfaces,the system reduces engine power in orderto increase traction.
USING TRACTION CONTROL
WARNING: The stability and tractioncontrol light illuminates steadily if thesystem detects a failure. Make sure youdid not manually disable the tractioncontrol system using the informationdisplay controls or the switch. If the stabilitycontrol and traction control light is still
illuminating steadily, have the systemserviced by an authorized dealerimmediately. Operating your vehicle withthe traction control disabled could lead toan increased risk of loss of vehicle control,vehicle rollover, personal injury and death.
The system automatically turns on each timeyou switch the ignition on.
If your vehicle is stuck in mud or snow,switching traction control off may bebeneficial as this allows the wheels to spin.
Note:When you switch traction control off,stability control remains fully active.
Switching the System Off
When you switch the system off or on, amessage appears in the information displayshowing system status.
You can switch the system off by either usingthe information display controls or the switch.
Using the Information Display Controls
You can switch this feature off or on in theinformation display. See General Information(page 105).
Using a Switch (If Equipped)
Use the traction control switch on theinstrument panel to switch the system off oron.
System Indicator Lights and Messages
The stability and traction controllight:
•Temporarily illuminates on enginestart-up.
•Flashes when a driving conditionactivates either of the systems.
•Illuminates if a problem occurs in eitherof the systems.
The stability and traction controloff light temporarily illuminates onengine start-up and stays on whenyou switch the traction control system off.
189
MKT (TP4) , enUSA, Edition date: 201803, Second-Printing
Traction ControlE138639 E130458
Page 245 of 575
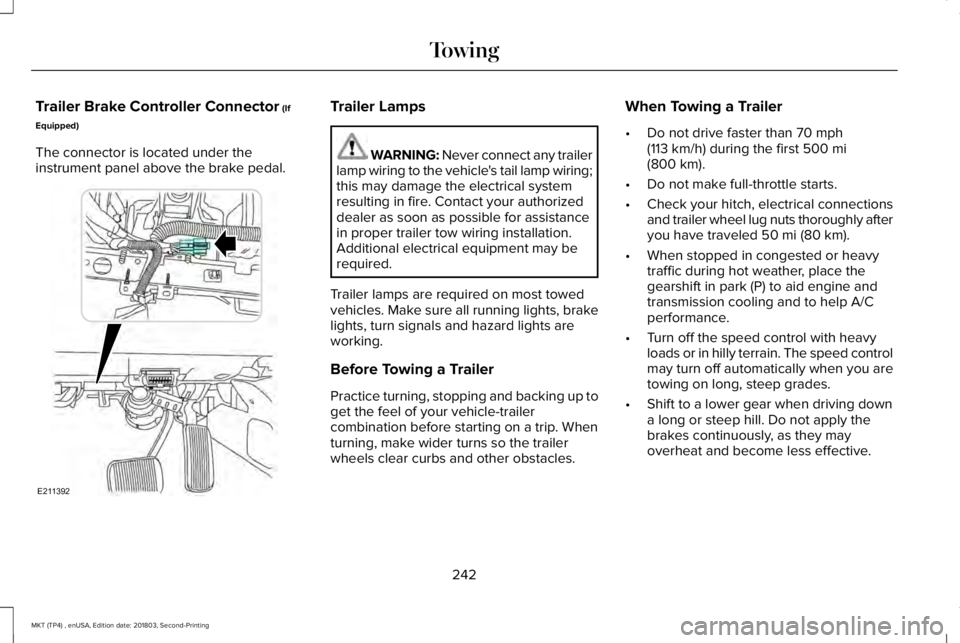
Trailer Brake Controller Connector (If
Equipped)
The connector is located under theinstrument panel above the brake pedal.
Trailer Lamps
WARNING: Never connect any trailerlamp wiring to the vehicle's tail lamp wiring;this may damage the electrical systemresulting in fire. Contact your authorizeddealer as soon as possible for assistancein proper trailer tow wiring installation.Additional electrical equipment may berequired.
Trailer lamps are required on most towedvehicles. Make sure all running lights, brakelights, turn signals and hazard lights areworking.
Before Towing a Trailer
Practice turning, stopping and backing up toget the feel of your vehicle-trailercombination before starting on a trip. Whenturning, make wider turns so the trailerwheels clear curbs and other obstacles.
When Towing a Trailer
•Do not drive faster than 70 mph(113 km/h) during the first 500 mi(800 km).
•Do not make full-throttle starts.
•Check your hitch, electrical connectionsand trailer wheel lug nuts thoroughly afteryou have traveled 50 mi (80 km).
•When stopped in congested or heavytraffic during hot weather, place thegearshift in park (P) to aid engine andtransmission cooling and to help A/Cperformance.
•Turn off the speed control with heavyloads or in hilly terrain. The speed controlmay turn off automatically when you aretowing on long, steep grades.
•Shift to a lower gear when driving downa long or steep hill. Do not apply thebrakes continuously, as they mayoverheat and become less effective.
242
MKT (TP4) , enUSA, Edition date: 201803, Second-Printing
TowingE211392
Page 252 of 575
. To obtain reimbursementin")
If you need to arrange roadside assistancefor yourself, Lincoln Motor Companyreimburses a reasonable amount for towingto the nearest Lincoln dealership within100 mi (160 km). To obtain reimbursementinformation, United States clients, call1-800-521-4140. Clients need to submit theiroriginal receipts.
Vehicles Sold in Canada: GettingRoadside Assistance
To fully assist you should you have a vehicleconcern, Lincoln Motor Company of Canada,Limited offers a complimentary roadsideassistance program. This program is eligiblewithin Canada or the continental UnitedStates.
The service is available 24 hours a day,seven days a week.
This program is separate from the NewVehicle Limited Warranty, but the coverageis concurrent with the powertrain coverageperiod of your vehicle. Canadian roadsidecoverage and benefits may differ from theU.S. coverage.
If you require more information, please callus in Canada at 1-800-387-9333, or visit ourwebsite at www.lincolncanada.com.
HAZARD FLASHERS
Note:The hazard flashers operate when theignition is in any position, or if the key is notin the ignition. If used when the vehicle is notrunning, the battery loses charge. As a result,there may be insufficient power to restartyour vehicle.
The flasher control is on theinstrument panel. Use your hazardflashers when your vehicle iscreating a safety hazard for other motorists.
•Press the flasher control and all front andrear direction indicators flash.
•Press the button again to switch them off.
FUEL SHUTOFF
WARNING: If your vehicle has beeninvolved in a crash, have the fuel systemchecked. Failure to follow this instructioncould result in fire, personal injury or death.
Note: When you try to restart your vehicleafter a fuel shutoff, the vehicle makes surethat various systems are safe to restart. Once the vehicle determines the systemsare safe, then the vehicle allows you torestart.
Note: In the event that your vehicle doesnot restart after your third attempt, contacta qualified technician.
The fuel pump shutoff stops the flow of fuelto the engine in the event of a moderate tosevere crash. Not every impact causes ashutoff.
Should your vehicle shut off after a crash,you may restart your vehicle.
249
MKT (TP4) , enUSA, Edition date: 201803, Second-Printing
Roadside Emergencies
Page 267 of 575
.40A116
110V AC power")
Protected ComponentsFuse RatingFuse or Relay Number
Starter motor relay.Relay13
Cooling fan number 2 relay.Relay14
Fuel pump relay.Relay15
B+ #2 access circuit (limousine/livery).40A116
110V AC power point.30A117
Front blower motor relay.40A118
Starter relay.30A119
Storage bin power point.20A120
Instrument panel power point / cigar lighter.20A121
Third row seat module.30A122
Memory module.30A123
Trailer tow battery charge (non-limousine/livery).30A124
Vacuum pump relay (limousine only).40A1
264
MKT (TP4) , enUSA, Edition date: 201803, Second-Printing
Fuses
Page 274 of 575

Protected ComponentsFuse RatingFuse or Relay Number
Not used.-95
Not used.-96
Not used.-97
A/C clutch relay.Relay98
1 J Case Low Profile fuse.2 Mini fuse.
Passenger Compartment Fuse Panel
The fuse panel is under the instrument panelto the left of the steering wheel. You mayneed to remove a trim panel to access it.
271
MKT (TP4) , enUSA, Edition date: 201803, Second-Printing
Fuses
Page 285 of 575

OPENING AND CLOSING THE
HOOD
Opening the Hood
1. Inside the vehicle, pull the hood releasehandle located under the left-hand sideof the instrument panel.
2. Slightly lift the hood.
3. Release the hood latch by pushing thesecondary release lever to your left-handside.
4. Open the hood. The hood strutsautomatically support the hood.
Closing the Hood
1. Lower the hood and allow it to dropunder its own weight for the last 8–12 in(20–30 cm).
Note:Make sure that the hood is correctlyclosed.
282
MKT (TP4) , enUSA, Edition date: 201803, Second-Printing
MaintenanceE235971
1 E235972 E202009
4
Page 309 of 575
 coloredtrim. The wax will discolor or stain theparts over time.
•Roof racks.
•Bumpers.
•Grained door handles.
•Side mo")
•Do not allow wax to come in contact withany non-body (low-gloss black) coloredtrim. The wax will discolor or stain theparts over time.
•Roof racks.
•Bumpers.
•Grained door handles.
•Side moldings.
•Mirror housings.
•Windshield cowl area.
•Do not apply wax to glass areas.
•After waxing, your car's paint should feelsmooth, and be free of streaks andsmudges.
CLEANING THE ENGINE
Engines are more efficient when they areclean because grease and dirt buildup keepthe engine warmer than normal.
When washing:
•Take care when using a power washerto clean the engine. The high-pressurefluid could penetrate the sealed partsand cause damage.
•Do not spray a hot engine with cold waterto avoid cracking the engine block orother engine components.
•Spray Motorcraft Engine Shampoo andDegreaser on all parts that requirecleaning and pressure rinse clean. InCanada, use Motorcraft Engine Shampoo.
•Never wash or rinse the engine while itis hot or running; water in the runningengine may cause internal damage.
•Never wash or rinse any ignition coil,spark plug wire or spark plug well, or thearea in and around these locations.
•Cover the battery, power distribution box,and air filter assembly to prevent waterdamage when cleaning the engine.
CLEANING THE WINDOWS AND
WIPER BLADES
Car wash chemicals and environmentalfallout can result in windshield and wiperblade contamination. Dirty windshield andwipers will result in poor windshield wiperoperation. Keep the windshield and wiperblades clean to maintain windshield wiperperformance.
To clean the windshield and wiper blades:
•Clean the windshield with a non-abrasiveglass cleaner. When cleaning the interiorof the windshield, avoid getting any glasscleaner on the instrument panel or doorpanels. Wipe any glass cleaner off thesesurfaces immediately.
•For windshields contaminated with treesap, chemicals, wax or bugs, clean theentire windshield using steel wool (nogreater than 0000 grade) in a circularmotion and rinse with water.
•Clean the wiper blades with isopropylrubbing alcohol or windshield washerconcentrate.
306
MKT (TP4) , enUSA, Edition date: 201803, Second-Printing
Vehicle Care
Page 312 of 575

CLEANING THE INSTRUMENT
PANEL AND INSTRUMENT
CLUSTER LENS
WARNING: Do not use chemicalsolvents or strong detergents whencleaning the steering wheel or instrumentpanel to avoid contamination of the airbagsystem.
Note:Follow the same procedure ascleaning leather seats for cleaning leatherinstrument panels and leather interior trimsurfaces. See Cleaning Leather Seats (page309).
Clean the instrument panel and cluster lenswith a clean, damp and soft cloth, then usea clean, dry and soft cloth to dry these areas.
•Avoid cleaners or polishes that increasethe gloss of the upper portion of theinstrument panel. The dull finish in thisarea helps protect you from undesirablewindshield reflection.
•Do not use any household cleaningproducts or glass cleaners as these maydamage the finish of the instrumentpanel, interior trim and cluster lens.
•Wash or wipe your hands clean if youhave been in contact with certainproducts such as insect repellent andsuntan lotion to avoid possible damageto the interior painted surfaces.
•Do not allow air fresheners and handsanitizers to spill onto interior surfaces.If a spill occurs, wipe off immediately.Your warranty may not cover thesedamages.
If a staining liquid like coffee or juice hasbeen spilled on the instrument panel or oninterior trim surfaces:
1.Wipe up spilled liquid using a clean, softcloth as quickly as possible.
2. Use Motorcraft Premium Leather andVinyl Cleaner or a commercially availableleather cleaning product for automotiveinteriors. Test any cleaner or stainremover on an inconspicuous area.
3. Alternatively, wipe the surface with aclean, soft cloth and a mild soap andwater solution. Dry the area with a clean,soft cloth.
4.If necessary, apply more soap and watersolution or cleaning product to a clean,soft cloth and press it onto the soiledarea. Allow this to set at roomtemperature for 30 minutes.
5. Remove the soaked cloth, then with aclean, damp cloth, use a rubbing motionfor 60 seconds on the soiled area.
6. Dry the area with a clean, soft cloth.
CLEANING LEATHER SEATS
Note:Follow the same procedure ascleaning leather seats for cleaning leatherinstrument panels and leather interior trimsurfaces.
309
MKT (TP4) , enUSA, Edition date: 201803, Second-Printing
Vehicle Care
Page 350 of 575

VEHICLE IDENTIFICATION
NUMBER
The vehicle identification number is locatedon the left-hand side of the instrument panel.
Please note that in the graphic, XXXX isrepresentative of your vehicle identificationnumber.
The Vehicle Identification Number containsthe following information:
World manufacturer identifierA
Brake system, Gross VehicleWeight Rating, Restraint Devicesand their locations
B
Make, vehicle line, series, bodytypeC
Engine typeD
Check digitE
Model yearF
Assembly plantG
Production sequence numberH
VEHICLE CERTIFICATION LABEL
The National Highway Traffic SafetyAdministration Regulations require that aSafety Compliance Certification Label beaffixed to a vehicle and prescribe where theSafety Compliance Certification Label maybe located. The Safety ComplianceCertification Label shall be affixed to eitherthe door hinge pillar, the door latch post, orthe edge of the door near the door latch,next to the driver's seating position.
347
MKT (TP4) , enUSA, Edition date: 201803, Second-Printing
Capacities and SpecificationsE142476 E142477 E167469