tow LINCOLN MKZ HYBRID 2014 Owners Manual
[x] Cancel search | Manufacturer: LINCOLN, Model Year: 2014, Model line: MKZ HYBRID, Model: LINCOLN MKZ HYBRID 2014Pages: 445, PDF Size: 3.8 MB
Page 4 of 445
Anti-Theft Alarm..........................................68
Steering Wheel
Adjusting the Steering Wheel.................70
Audio Control
...............................................71
Voice Control
...............................................72
Cruise Control
.............................................72
Information Display Control.....................72
Heated Steering Wheel.............................73
Wipers and Washers
Windshield Wipers......................................74
Autowipers...................................................74
Windshield Washers..................................75
Lighting
Lighting Control...........................................77
Autolamps.....................................................77
Instrument Lighting Dimmer....................78
Headlamp Exit Delay.................................78
Daytime Running Lamps...........................79
Automatic High Beam Control................79
Front Fog Lamps........................................80
Adaptive Headlamps.................................80
Direction Indicators
.....................................81
Interior Lamps
..............................................81
Windows and Mirrors
Power Windows..........................................83
Global Opening and Closing...................84
Exterior Mirrors............................................84
Interior Mirror
...............................................86
Sun Visors
....................................................86
Sun Shades..................................................86
Moonroof......................................................87 Instrument Cluster
Gauges..........................................................89
Warning Lamps and Indicators................91
Audible Warnings and Indicators...........95
Information Displays
General Information
...................................97
Information Messages
.............................109
Climate Control
Automatic Climate Control
.....................124
Hints on Controlling the Interior Climate....................................................125
Heated Windows and Mirrors................126
Cabin Air Filter
...........................................126
Remote Start...............................................127
Seats
Sitting in the Correct Position................129
Head Restraints.........................................129
Power Seats
................................................131
Memory Function......................................133
Rear Seats
...................................................135
Heated Seats
.............................................135
Ventilated Seats
.........................................137
Rear Seat Armrest
.....................................137
Universal Garage Door Opener
Universal Garage Door Opener............139
Auxiliary Power Points
Auxiliary Power Points.............................144
2
MKZ (CC9) Table of Contents
Page 5 of 445
Storage Compartments
Center Console.........................................146
Overhead Console...................................146
Starting and Stopping the Engine
General Information..................................147
Keyless Starting
.........................................147
Starting a Gasoline Engine
.....................148
Engine Block Heater................................150
Unique Driving Character- istics
Hybrid Electric Vehicle............................152
Fuel and Refueling
Safety Precautions
....................................158
Fuel Quality................................................159
Running Out of Fuel.................................159
Refueling......................................................161
Fuel Consumption
....................................163
Emission Control System........................164
High Voltage Battery
General Information..................................167
High Voltage Battery Cut-Off Switch......................................................169
Transmission
Automatic Transmission
..........................170
Brakes
General Information..................................174
Hints on Driving With Anti-Lock Brakes......................................................175 Electric Parking Brake..............................175
Hill Start Assist...........................................177
Traction Control
Principle of Operation
..............................179
Using Traction Control.............................179
Stability Control
Principle of Operation.............................180
Using Stability Control..............................181
Parking Aids
Parking Aid
.................................................182
Active Park Assist
.....................................184
Rear View Camera....................................188
Cruise Control
Principle of Operation...............................191
Using Cruise Control.................................191
Using Adaptive Cruise Control.............192
Driving Aids
Driver Alert
.................................................199
Lane Keeping System.............................200
Blind Spot Information System.............205
Steering......................................................209
Collision Warning System.......................210
Drive Control
..............................................212
Load Carrying
Load Limit
....................................................214
Towing
Towing a Trailer.........................................221
Transporting the Vehicle
.........................221
3
MKZ (CC9) Table of Contents
Page 6 of 445
Towing the Vehicle on Four
Wheels...................................................222
Driving Hints
Breaking-In................................................223
Economical Driving
..................................223
Driving Through Water...........................223
Floor Mats
..................................................224
Roadside Emergencies
Roadside Assistance...............................225
Hazard Warning Flashers
......................226
Fuel Shutoff...............................................226
Jump-Starting the Vehicle.....................226
Collision, Damage or Fire Event..........229
Post-Crash Alert System.........................231
Customer Assistance
Getting the Services You Need
............232
In California (U.S. Only)
...........................233
The Better Business Bureau (BBB) Auto Line Program (U.S. Only)....................234
Utilizing the Mediation/Arbitration Program (Canada Only)......................235
Getting Assistance Outside the U.S. and Canada...................................................235
Ordering Additional Owner's Literature................................................237
Reporting Safety Defects (U.S. Only)........................................................237
Reporting Safety Defects (Canada Only)........................................................238
Fuses
Fuse Specification Chart........................239
Changing a Fuse......................................249 Maintenance
General Information.................................251
Opening and Closing the Hood...........252
Under Hood Overview - 2.0L
Hybrid.....................................................252
Engine Oil Dipstick
..................................254
Engine Oil Check
.....................................254
Oil Change Indicator Reset
...................254
Engine Coolant Check...........................255
Automatic Transmission Fluid Check.....................................................259
Brake Fluid Check...................................260
Power Steering Fluid Check.................260
Washer Fluid Check
................................260
Fuel Filter
...................................................260
Changing the 12V Battery.....................260
Checking the Wiper Blades..................262
Changing the Wiper Blades..................262
Adjusting the Headlamps......................263
Changing a Bulb
......................................264
Bulb Specification Chart........................265
Changing the Engine Air Filter.............267
Vehicle Care
General Information
................................268
Cleaning Products...................................268
Cleaning the Exterior..............................268
Waxing........................................................269
Cleaning the Engine...............................269
Cleaning the Windows and Wiper Blades.....................................................270
Cleaning the Interior...............................270
Cleaning the Instrument Panel and Instrument Cluster Lens......................271
Cleaning Leather Seats
..........................272
4
MKZ (CC9) Table of Contents
Page 9 of 445
ABOUT THIS MANUAL
Thank you for choosing Lincoln. We
recommend that you take some time to
get to know your vehicle by reading this
manual. The more that you know about it,
the greater the safety and pleasure you
will get from driving it.
WARNING
Driving while distracted can result in
loss of vehicle control, crash and
injury. We strongly recommend that you
use extreme caution when using any
device that may take your focus off the
road. Your primary responsibility is the
safe operation of your vehicle. We
recommend against the use of any
handheld device while driving and
encourage the use of voice-operated
systems when possible. Make sure you
are aware of all applicable local laws that
may affect the use of electronic devices
while driving. Note:
This manual describes product
features and options available throughout
the range of available models, sometimes
even before they are generally available.
It may describe options not fitted to your
vehicle.
Note: Some of the illustrations in this
manual may be used for different models,
so may appear different to you on your
vehicle. However, the essential
information in the illustrations is always
correct.
Note: Always use and operate your
vehicle in line with all applicable laws and
regulations. Note:
Pass on this manual when selling
your vehicle. It is an integral part of the
vehicle.
This manual may qualify the location of a
component as left-hand side or right-hand
side. The side is determined when facing
forward in the seat. Right-hand side
A
Left-hand side
B
Protecting the Environment
You must play your part in protecting the
environment. Correct vehicle usage and
the authorized disposal of waste, cleaning
and lubrication materials are significant
steps toward this aim.
SYMBOLS GLOSSARY
These are some of the symbols you may
see on your vehicle. Safety alert
See Owner's Manual
7
MKZ (CC9) IntroductionE154903
Page 20 of 445
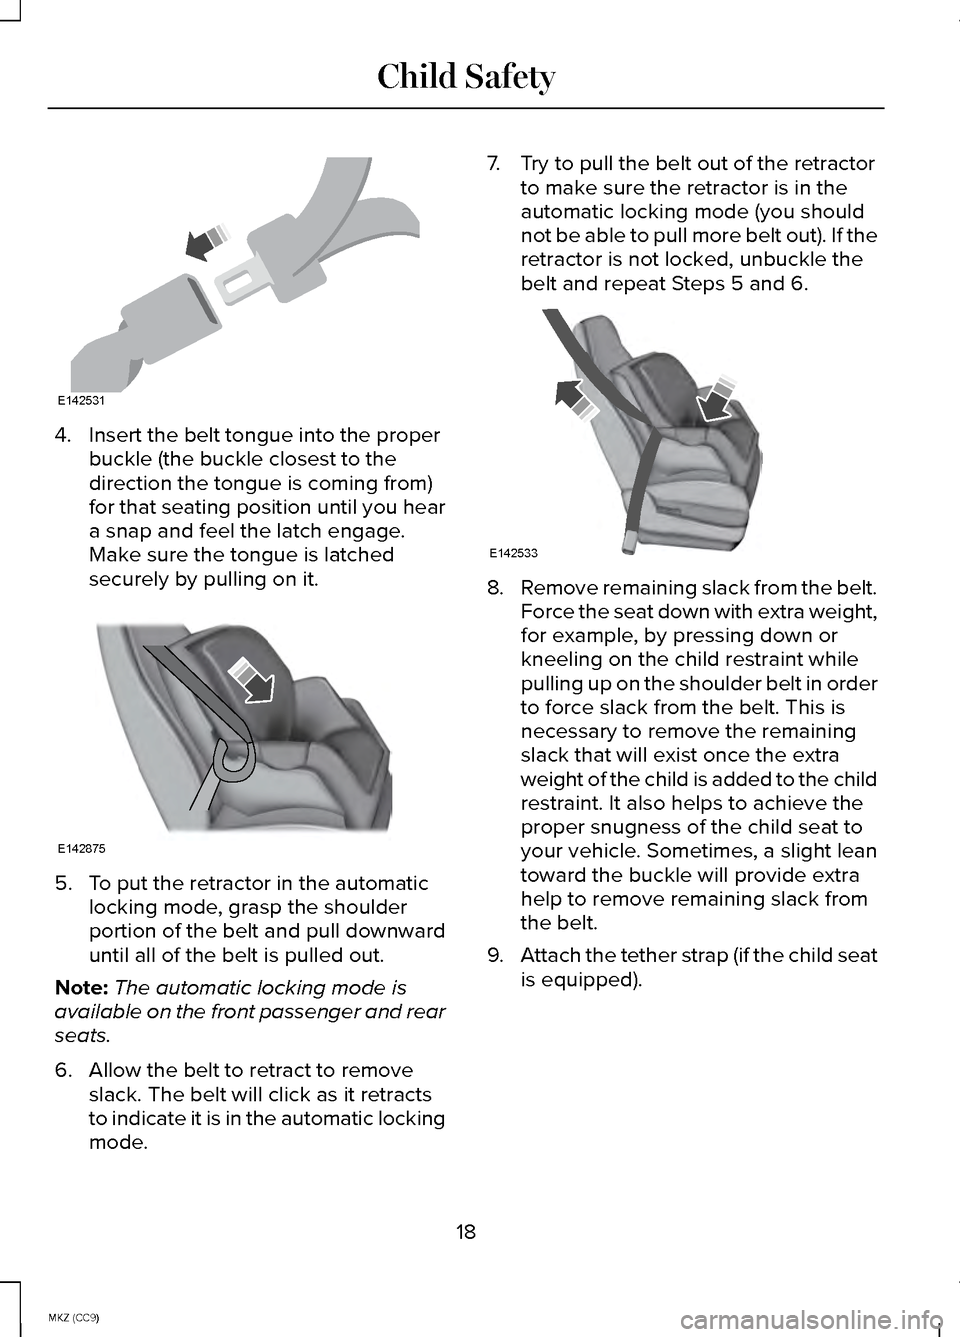
4. Insert the belt tongue into the proper
buckle (the buckle closest to the
direction the tongue is coming from)
for that seating position until you hear
a snap and feel the latch engage.
Make sure the tongue is latched
securely by pulling on it. 5. To put the retractor in the automatic
locking mode, grasp the shoulder
portion of the belt and pull downward
until all of the belt is pulled out.
Note: The automatic locking mode is
available on the front passenger and rear
seats.
6. Allow the belt to retract to remove slack. The belt will click as it retracts
to indicate it is in the automatic locking
mode. 7. Try to pull the belt out of the retractor
to make sure the retractor is in the
automatic locking mode (you should
not be able to pull more belt out). If the
retractor is not locked, unbuckle the
belt and repeat Steps 5 and 6. 8.
Remove remaining slack from the belt.
Force the seat down with extra weight,
for example, by pressing down or
kneeling on the child restraint while
pulling up on the shoulder belt in order
to force slack from the belt. This is
necessary to remove the remaining
slack that will exist once the extra
weight of the child is added to the child
restraint. It also helps to achieve the
proper snugness of the child seat to
your vehicle. Sometimes, a slight lean
toward the buckle will provide extra
help to remove remaining slack from
the belt.
9. Attach the tether strap (if the child seat
is equipped).
18
MKZ (CC9) Child SafetyE142531 E142875 E142533
Page 23 of 445
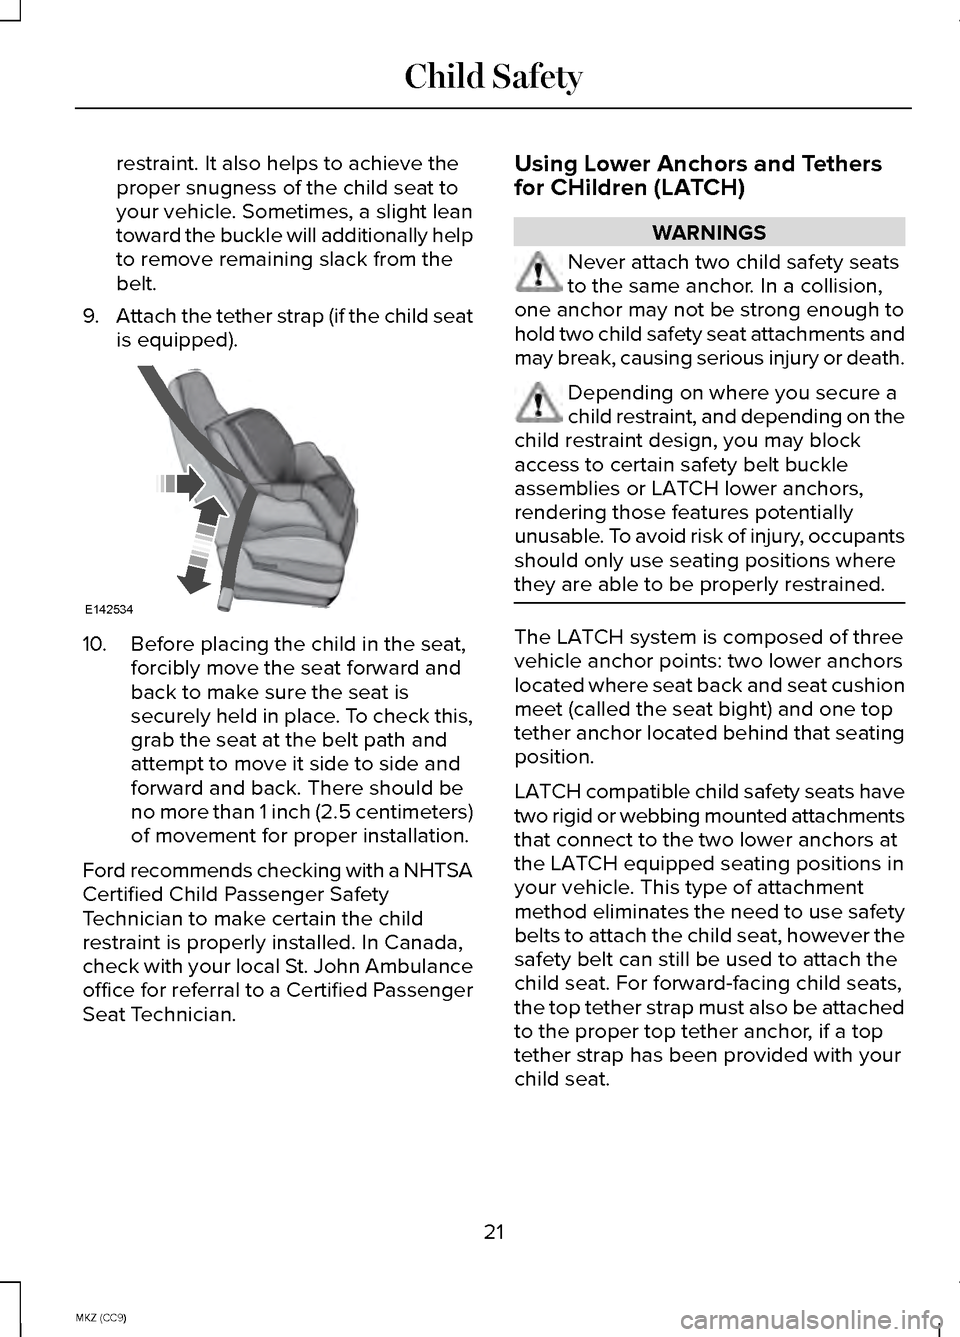
restraint. It also helps to achieve the
proper snugness of the child seat to
your vehicle. Sometimes, a slight lean
toward the buckle will additionally help
to remove remaining slack from the
belt.
9. Attach the tether strap (if the child seat
is equipped). 10. Before placing the child in the seat,
forcibly move the seat forward and
back to make sure the seat is
securely held in place. To check this,
grab the seat at the belt path and
attempt to move it side to side and
forward and back. There should be
no more than 1 inch (2.5 centimeters)
of movement for proper installation.
Ford recommends checking with a NHTSA
Certified Child Passenger Safety
Technician to make certain the child
restraint is properly installed. In Canada,
check with your local St. John Ambulance
office for referral to a Certified Passenger
Seat Technician. Using Lower Anchors and Tethers
for CHildren (LATCH) WARNINGS
Never attach two child safety seats
to the same anchor. In a collision,
one anchor may not be strong enough to
hold two child safety seat attachments and
may break, causing serious injury or death. Depending on where you secure a
child restraint, and depending on the
child restraint design, you may block
access to certain safety belt buckle
assemblies or LATCH lower anchors,
rendering those features potentially
unusable. To avoid risk of injury, occupants
should only use seating positions where
they are able to be properly restrained. The LATCH system is composed of three
vehicle anchor points: two lower anchors
located where seat back and seat cushion
meet (called the seat bight) and one top
tether anchor located behind that seating
position.
LATCH compatible child safety seats have
two rigid or webbing mounted attachments
that connect to the two lower anchors at
the LATCH equipped seating positions in
your vehicle. This type of attachment
method eliminates the need to use safety
belts to attach the child seat, however the
safety belt can still be used to attach the
child seat. For forward-facing child seats,
the top tether strap must also be attached
to the proper top tether anchor, if a top
tether strap has been provided with your
child seat.
21
MKZ (CC9) Child SafetyE142534
Page 29 of 445
WARNINGS
manufacturer. A safety seat that is
improperly installed or utilized, is
inappropriate for your child's height, age,
or weight or does not properly fit the child
may increase the risk of serious injury or
death. Never let a passenger hold a child
on his or her lap while your vehicle
is moving. The passenger cannot protect
the child from injury in a crash, which may
result in serious injury or death. Never use pillows, books, or towels
to boost a child. They can slide
around and increase the likelihood of
injury or death in a crash. WARNINGS
Always restrain an unoccupied child
seat or booster seat. These objects
may become projectiles in a crash or
sudden stop, which may increase the risk
of serious injury. Never place, or allow a child to
place, the shoulder belt under a
child's arm or behind the back because it
reduces the protection for the upper part
of the body and may increase the risk of
injury or death in a crash. To avoid risk of injury, do not leave
children or pets unattended in your
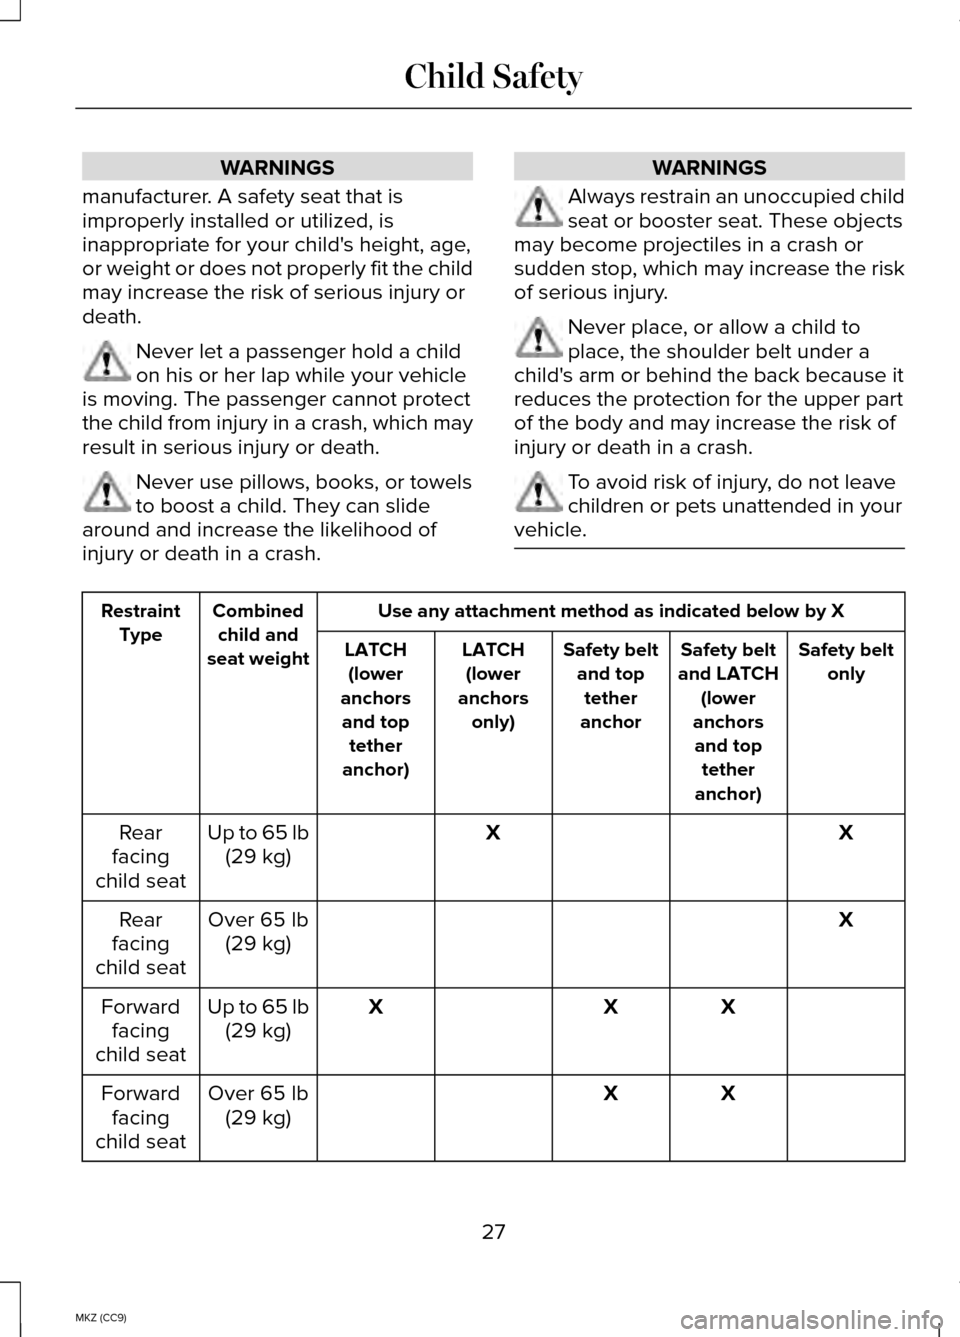
vehicle. Use any attachment method as indicated below by X
Combined
child and
seat weight
Restraint
Type Safety belt
only
Safety belt
and LATCH (lower
anchors and top tether
anchor)
Safety belt
and toptether
anchor
LATCH
(lower
anchors only)
LATCH
(lower
anchors and top tether
anchor)
X
X
Up to 65 lb
(29 kg)
Rear
facing
child seat
X
Over 65 lb
(29 kg)
Rear
facing
child seat
X
X
X
Up to 65 lb
(29 kg)
Forward
facing
child seat
X
X
Over 65 lb
(29 kg)
Forward
facing
child seat
27
MKZ (CC9) Child Safety
Page 48 of 445
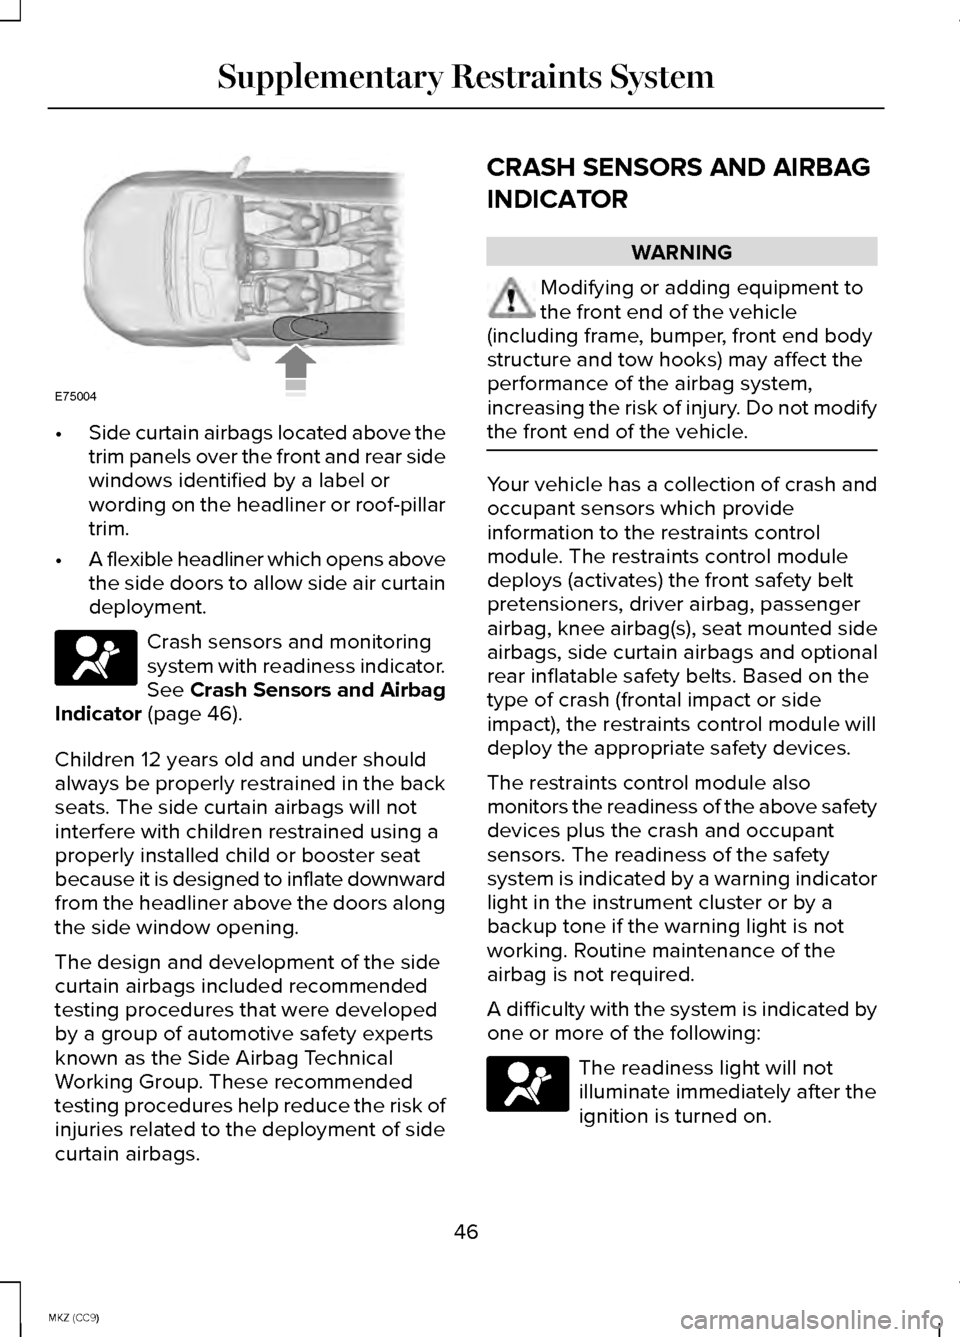
•
Side curtain airbags located above the
trim panels over the front and rear side
windows identified by a label or
wording on the headliner or roof-pillar
trim.
• A flexible headliner which opens above
the side doors to allow side air curtain
deployment. Crash sensors and monitoring
system with readiness indicator.
See Crash Sensors and Airbag
Indicator (page 46).
Children 12 years old and under should
always be properly restrained in the back
seats. The side curtain airbags will not
interfere with children restrained using a
properly installed child or booster seat
because it is designed to inflate downward
from the headliner above the doors along
the side window opening.
The design and development of the side
curtain airbags included recommended
testing procedures that were developed
by a group of automotive safety experts
known as the Side Airbag Technical
Working Group. These recommended
testing procedures help reduce the risk of
injuries related to the deployment of side
curtain airbags. CRASH SENSORS AND AIRBAG
INDICATOR WARNING
Modifying or adding equipment to
the front end of the vehicle
(including frame, bumper, front end body
structure and tow hooks) may affect the
performance of the airbag system,
increasing the risk of injury. Do not modify
the front end of the vehicle. Your vehicle has a collection of crash and
occupant sensors which provide
information to the restraints control
module. The restraints control module
deploys (activates) the front safety belt
pretensioners, driver airbag, passenger
airbag, knee airbag(s), seat mounted side
airbags, side curtain airbags and optional
rear inflatable safety belts. Based on the
type of crash (frontal impact or side
impact), the restraints control module will
deploy the appropriate safety devices.
The restraints control module also
monitors the readiness of the above safety
devices plus the crash and occupant
sensors. The readiness of the safety
system is indicated by a warning indicator
light in the instrument cluster or by a
backup tone if the warning light is not
working. Routine maintenance of the
airbag is not required.
A difficulty with the system is indicated by
one or more of the following:
The readiness light will not
illuminate immediately after the
ignition is turned on.
46
MKZ (CC9) Supplementary Restraints SystemE75004
Page 50 of 445
GENERAL INFORMATION ON
RADIO FREQUENCIES
This device complies with Part 15 of the
FCC Rules and with Industry Canada
license-exempt RSS standard(s). Operation
is subject to the following two conditions:
(1) This device may not cause harmful
interference, and (2) This device must
accept any interference received,
including interference that may cause
undesired operation.
Note:
Changes or modifications not
expressively approved by the party
responsible for compliance could void the
user's authority to operate the equipment.
The term IC before the radio certification
number only signifies that Industry Canada
technical specifications were met.
The typical operating range for your
transmitter is approximately 33 feet (10
meters). Vehicles with the remote start
feature will have a greater range. One of
the following could cause a decrease in
operating range:
• weather conditions
• nearby radio towers
• structures around the vehicle
• other vehicles parked next to your
vehicle
The radio frequency used by your remote
control can also be used by other short
distance radio transmissions, for example
amateur radios, medical equipment,
wireless headphones, remote controls and
alarm systems. If the frequencies are
jammed, you will not be able to use your
remote control. You can lock and unlock
the doors with the key. Note:
Make sure to lock your vehicle
before leaving it unattended.
Note: If you are in range, the remote
control will operate if you press any button
unintentionally.
Intelligent Access
The system uses a radio frequency signal
to communicate with your vehicle and
authorize your vehicle to unlock when one
of the following conditions are met:
• You touch the inside of the front
exterior door handle.
• You press the luggage compartment
button.
• You press a button on the transmitter.
If excessive radio frequency interference
is present in the area or if the transmitter
battery is low, you may need to
mechanically unlock your door. You can
use the mechanical key blade in your
intelligent access key to open the driver
door in this situation. See Remote Control
(page
48).
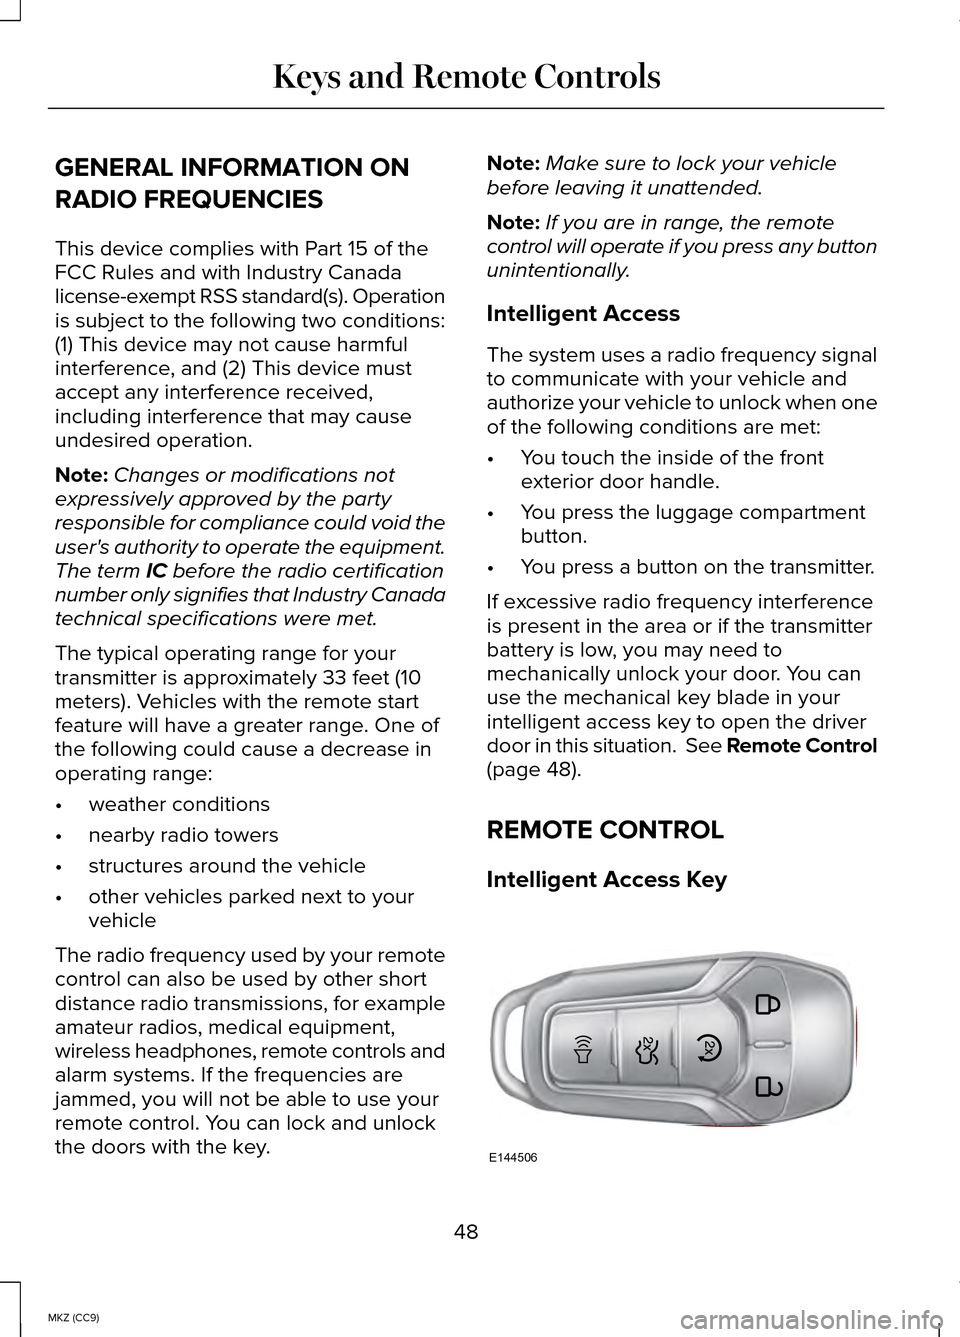
REMOTE CONTROL
Intelligent Access Key 48
MKZ (CC9) Keys and Remote ControlsE144506
Page 69 of 445
PASSIVE ANTI-THEFT SYSTEM
Note:
The system is not compatible with
non-Ford aftermarket remote start
systems. Use of these systems may result
in vehicle starting problems and a loss of
security protection.
Note: Metallic objects, electronic devices
or a second coded key on the same key
chain may cause vehicle starting problems
if they are too close to the key when
starting your vehicle. Prevent these
objects from touching the coded key while
starting your vehicle. Switch the ignition
off, move all objects on the key chain
away from the coded key and restart your
vehicle if a problem occurs.
Note: Do not leave a duplicate coded key
in your vehicle. Always take your keys and
lock all doors when leaving your vehicle.
SecuriLock
The system helps prevent your vehicle
from starting unless you use a coded key
programmed to your vehicle. Using the
wrong key may prevent your vehicle from
starting. A message may appear in the
information display.
If you are unable to start your vehicle with
a correctly coded key, it is not operating
properly. A message may appear in the
information display.
Automatic Arming
Your vehicle arms immediately after
switching the ignition off. Automatic Disarming
Switching the ignition on with a coded key
disarms your vehicle.
Replacement Keys
Note:
Your vehicle comes equipped with
two intelligent access keys.
The intelligent access key functions as a
programmed key that operates the driver
door lock and activates the intelligent
access with push button start system, as
well as a remote control.
If your programmed transmitters are lost
or stolen and you do not have an extra
coded key, you will need to have your
vehicle towed to an authorized dealer. You
need to erase the key codes from your
vehicle and program new coded keys.
Store an extra programmed key away from
your vehicle in a safe place to help prevent
any inconveniences. See your authorized
dealer to purchase additional spare or
replacement keys.
Programming a Spare Intelligent Access
Key
Note: You can program a maximum of four
intelligent access keys to your vehicle.
You must have two previously
programmed intelligent access keys inside
your vehicle and the new unprogrammed
intelligent access keys readily accessible.
See an authorized dealer to have the
spare key programmed if two previously
programmed keys are not available.
67
MKZ (CC9) Security