ECU LINCOLN NAUTILUS 2022 Owner's Manual
[x] Cancel search | Manufacturer: LINCOLN, Model Year: 2022, Model line: NAUTILUS, Model: LINCOLN NAUTILUS 2022Pages: 586, PDF Size: 13.97 MB
Page 264 of 586
ADAPTIVE CRUISE CONTROL
AUTOMATIC CANCELLATION
The system may cancel if:
•The tires lose traction.
•You apply the parking brake.
The system may cancel and set the parkingbrake if:
•You unbuckle the seatbelt and open thedriver door after you stop your vehicle.
•Your vehicle is at a stop continuously formore than three minutes.
The system may deactivate or preventactivating when requested if:
•The vehicle has a blocked sensor.
•The brake temperature is too high.
•There is a failure in the system or arelated system.
SETTING THE ADAPTIVE CRUISE
CONTROL SPEED
Drive to the speed you prefer.
Press either button to set thecurrent speed.
Take your foot off the accelerator pedal.
The indicator, current gap setting and setspeed appear in the information display.
A vehicle image illuminates if there is avehicle detected in front of you.
Note:When adaptive cruise control is active,the speedometer may vary slightly from theset speed displayed in the informationdisplay.
Setting the Adaptive Cruise Speedfrom a Complete Stop
Press and release either buttonwhile keeping the brake pedal fullypressed.
The set speed adjusts to 20 mph (30 km/h).
The indicator, current gap setting and setspeed appear in the information display.
Note:The system will activate from acomplete stop only when it detects a leadvehicle in close proximity.
Manually Changing the Set Speed
Press and release to increase theset speed in small increments.
Press and hold to increase the set speed inlarge increments. Release the button whenyou reach the speed you prefer.
Press and release to decrease theset speed in small increments.
260
2022 Nautilus (CD9) Canada/United States of America, enUSA, Edition date: 202108, First-PrintingAdaptive Cruise Control (If Equipped)E265299 E255686 E265299 E265299
Page 302 of 586
ROOF RACK (IF EQUIPPED)
ROOF RACK PRECAUTIONS
WARNING: Read and follow themanufacturer's instructions when you arefitting a roof rack.
WARNING: When loading the roofracks, we recommend you evenly distributethe load, as well as maintain a low centerof gravity. Loaded vehicles, with highercenters of gravity, may handle differentlythan unloaded vehicles. Take extraprecautions, such as slower speeds andincreased stopping distance, when drivinga heavily loaded vehicle.
Note:If you use a roof rack, the fuelconsumption of your vehicle will be higherand you may experience different drivingcharacteristics.
You must place loads directly on thecrossbars fitted to the roof rack side rails.When using the roof rack system, werecommend that you use genuine Ford MotorCompany accessory crossbars specificallydesigned for your vehicle.
Make sure that you securely fasten the load. Check the tightness of the load beforedriving and at each fuel stop.
ROOF RACK LOAD CAPACITIES
Do not install crossbars if your vehicle has amoonroof. Do not place any load on yourvehicle if it has a moonroof. Using crossbarsor loading the vehicle roof may void yourvehicle's warranty.
Maximum Recommended LoadDescription
0 lb (0 kg)Vehicles with a moonroof
100 lb (45 kg)Vehicles without a moonroof
Note:The maximum roof load is based onthe load being evenly distributed on thecrossbars.
298
2022 Nautilus (CD9) Canada/United States of America, enUSA, Edition date: 202108, First-PrintingLoad Carrying
Page 317 of 586

Note:Do not rock your vehicle if the engineis not at normal operating temperature, asdamage to the transmission could occur.
Note:Do not rock your vehicle for more thana minute, as damage to the transmissionand tires could occur or the engine couldoverheat
DRIVING THROUGH SHALLOW
WATER
WARNING: Do not attempt to crossa deep or flowing body of water. Failure tofollow this instruction could result in theloss of control of your vehicle, personalinjury or death.
Note:Driving through standing water cancause vehicle damage.
Note:Engine damage can occur if waterenters the air filter.
Before driving through standing water, checkthe depth. Never drive through water that ishigher than the bottom of the front rockerarea of your vehicle.
When driving through standing water, drivevery slowly and do not stop your vehicle. Your brake performance and traction couldbe limited. After driving through water andas soon as it is safe to do so:
•Lightly press the brake pedal to dry thebrakes and to check that they work.
•Turn the steering wheel to check that thesteering power assist works.
Check the function of the following:
•Horn
•Exterior lights
FLOOR MATS
WARNING: Use a floor mat designedto fit the footwell of your vehicle that doesnot obstruct the pedal area. Failure tofollow this instruction could result in theloss of control of your vehicle, personalinjury or death.
WARNING: Pedals that cannot movefreely can cause loss of vehicle control andincrease the risk of serious personal injury.
WARNING: Secure the floor mat toboth retention devices so that it cannot slipout of position and interfere with thepedals. Failure to follow this instructioncould result in the loss of control of yourvehicle, personal injury or death.
313
2022 Nautilus (CD9) Canada/United States of America, enUSA, Edition date: 202108, First-PrintingDriving Hints E266447
Page 318 of 586
WARNING: Do not place additionalfloor mats or any other covering on top ofthe original floor mats. This could result inthe floor mat interfering with the operationof the pedals. Failure to follow thisinstruction could result in the loss ofcontrol of your vehicle, personal injury ordeath.
WARNING: Always make sure thatobjects cannot fall into the driver foot wellwhile your vehicle is moving. Objects thatare loose can become trapped under thepedals causing a loss of vehicle control.
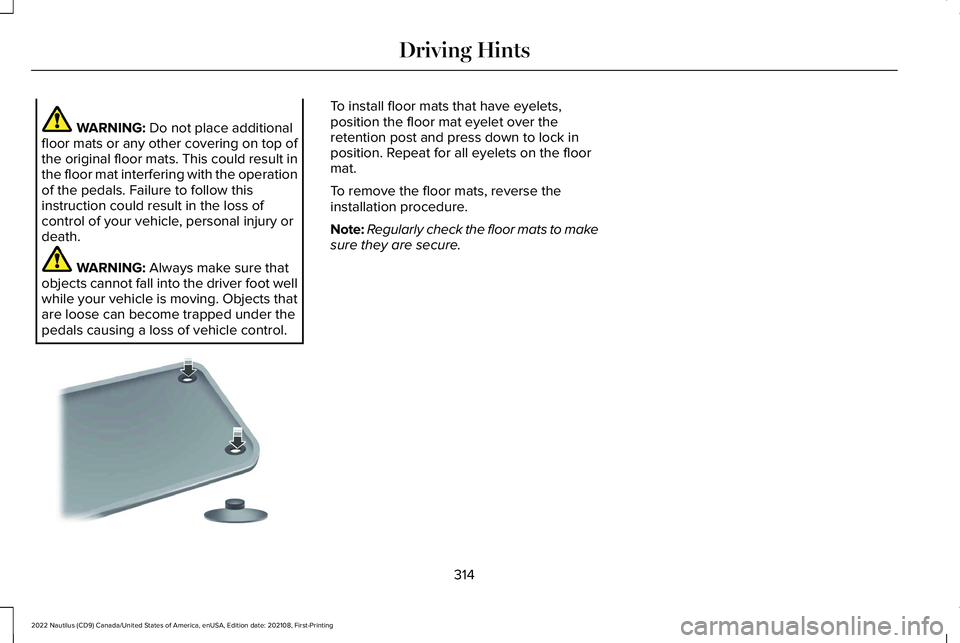
To install floor mats that have eyelets,position the floor mat eyelet over theretention post and press down to lock inposition. Repeat for all eyelets on the floormat.
To remove the floor mats, reverse theinstallation procedure.
Note:Regularly check the floor mats to makesure they are secure.
314
2022 Nautilus (CD9) Canada/United States of America, enUSA, Edition date: 202108, First-PrintingDriving HintsE142666
Page 325 of 586
TOWING YOUR VEHICLE
PRECAUTIONS
Use the following guidelines when towingyour vehicle. Failure to follow this instructioncould result in vehicle damage not coveredby the vehicle warranty.
Note:Make sure you properly secure yourvehicle to the tow vehicle.
Note:If you are unsure of the vehicle’sconfiguration, contact an authorized dealer.
RECREATIONALLY TOWING YOUR
VEHICLE - 2.0L, AWD
You cannot recreational tow your vehiclewith all wheels on the ground becausevehicle or transmission damage could occur.You must recreational tow your vehicle withall four wheels off the ground, such as whenusing a car-hauling trailer. Otherwise, youcannot recreational tow your vehicle.
RECREATIONALLY TOWING YOUR
VEHICLE - 2.0L, FWD
You cannot recreational tow your vehiclewith all wheels on the ground becausevehicle or transmission damage could occur.Place the front wheels on a two-wheel towdolly. If you are using a tow dolly, follow theinstructions specified by the equipmentprovider.
Note:Release the parking brake beforetowing your vehicle. See ManuallyReleasing the Electric Parking Brake (page223).
RECREATIONALLY TOWING YOUR
VEHICLE - 2.7L
Note:Put your climate control system inrecirculated air mode to prevent exhaustfumes from entering the vehicle. SeeClimate Control (page 156).
Follow these guidelines if you have a needfor recreational towing. An example ofrecreational towing would be towing yourvehicle behind a motorhome. We designedthese guidelines to prevent damage to yourtransmission.
You can recreational tow your vehicle withall four wheels on the ground using theManual Park Release procedure, or with allfour wheels off the ground using a vehicletransport trailer. If you are using a vehicletransport trailer, follow the instructionsspecified by the equipment provider.
If you recreational tow your vehicle with allfour wheels on the ground:
•Only tow your vehicle in the forwarddirection.
•Use the manual park release procedure.See Using Manual Park Release (page214). Failure to do so may result indamage to the transmission.
•Do not exceed 65 mph (105 km/h).
321
2022 Nautilus (CD9) Canada/United States of America, enUSA, Edition date: 202108, First-PrintingTowing Your Vehicle
Page 339 of 586
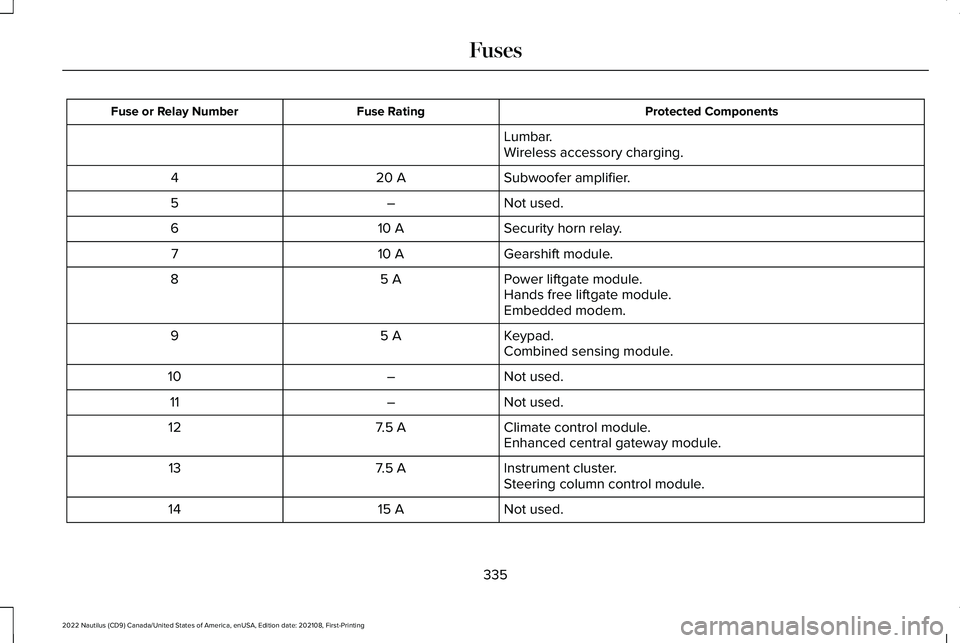
Protected ComponentsFuse RatingFuse or Relay Number
Lumbar.Wireless accessory charging.
Subwoofer amplifier.20 A4
Not used.–5
Security horn relay.10 A6
Gearshift module.10 A7
Power liftgate module.5 A8Hands free liftgate module.Embedded modem.
Keypad.5 A9Combined sensing module.
Not used.–10
Not used.–11
Climate control module.7.5 A12Enhanced central gateway module.
Instrument cluster.7.5 A13Steering column control module.
Not used.15 A14
335
2022 Nautilus (CD9) Canada/United States of America, enUSA, Edition date: 202108, First-PrintingFuses
Page 355 of 586
If the coolant temperature gauge moves fullyinto the red zone, or if the coolanttemperature warning or service engine soonmessages appear in your information display,do the following:
1.Stop your vehicle as soon as it is safe todo so. Fully apply the parking brake, shiftinto park (P) or neutral (N).
2.Leave the engine running until thecoolant temperature gauge needlereturns to the normal position. If thetemperature does not drop after severalminutes, follow the remaining steps.
3.Switch the engine off and wait for it tocool. Check the coolant level.
4.If the coolant level is at or below theminimum mark, add prediluted coolantimmediately.
5.If the coolant level is normal, restart theengine and continue.
CHANGING THE ENGINE AIR
FILTER
WARNING: To reduce the risk ofvehicle damage and personal burn injuries,do not start your engine with the aircleaner removed and do not remove itwhile the engine is running.
When changing the air filter element, useonly the air filter element listed. SeeCapacities and Specifications (page 404).
For turbocharged equipped vehicles: Whenservicing the air cleaner, it is important thatno foreign material enter the air inductionsystem. The engine and turbocharger aresusceptible to damage from even smallparticles.
Change the air filter element at the properinterval. See Scheduled Maintenance (page463).
Note: Failure to use the correct air filterelement may result in severe enginedamage. The customer warranty may bevoid for any damage to the engine if thecorrect air filter element is not used.
1.Release the clamps that secure the airfilter housing cover.
2.Carefully lift the air filter housing cover.
3.Remove the air filter element from the airfilter housing.
4.Wipe any dirt or debris from the air filterhousing and cover to make sure no dirtgets in the engine and to make sure youhave a good seal.
351
2022 Nautilus (CD9) Canada/United States of America, enUSA, Edition date: 202108, First-PrintingMaintenanceE144365
Page 356 of 586
5.Install a new air filter element. Be carefulnot to crimp the filter element edgesbetween the air filter housing and cover.This could cause filter damage and allowunfiltered air to enter the engine if notproperly seated.
6.Install the air filter housing cover.
7.Engage the clamps to secure the air filterhousing cover to the air filter housing.
CHANGING THE FUEL FILTER
Your vehicle has a lifetime fuel filter thatintegrates with the fuel tank. It does not needregular maintenance or replacement.
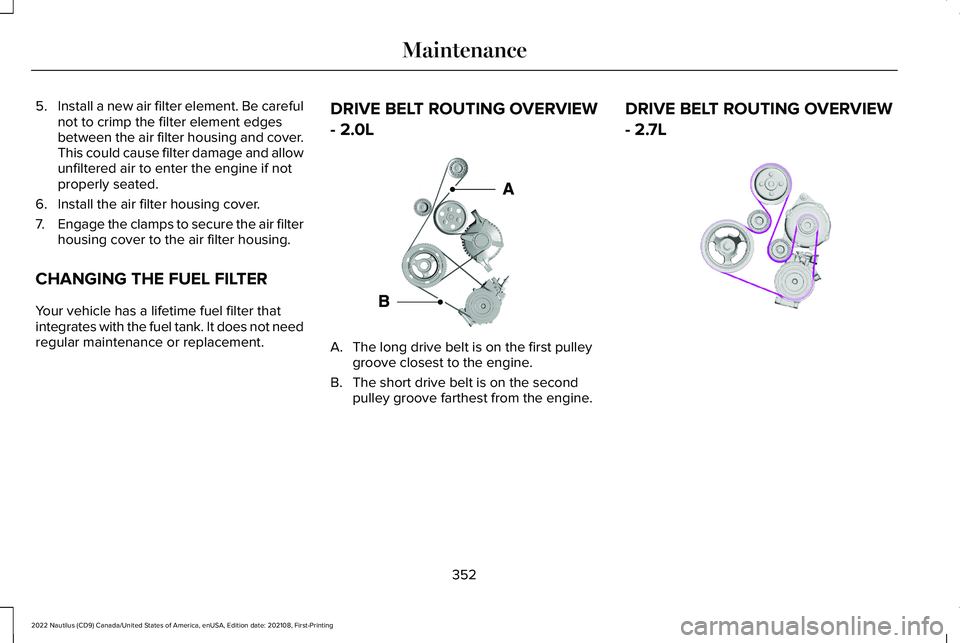
DRIVE BELT ROUTING OVERVIEW
- 2.0L
A.The long drive belt is on the first pulleygroove closest to the engine.
B.The short drive belt is on the secondpulley groove farthest from the engine.
DRIVE BELT ROUTING OVERVIEW
- 2.7L
352
2022 Nautilus (CD9) Canada/United States of America, enUSA, Edition date: 202108, First-PrintingMaintenance E161383 E191903
Page 358 of 586
We recommend that you disconnect thenegative battery cable terminal from thebattery if you plan to store your vehicle foran extended period.
Note:If you only disconnect the negativebattery cable terminal, make sure it isisolated or placed away from the batteryterminal to avoid unintended connection orarcing.
To maintain correct operation of the batterymanagement system, if you add anyelectrical devices to your vehicle, do notconnect the ground connection directly tothe negative battery terminal. A connectionat the negative battery terminal can causeinaccurate measurements of the batterycondition and potential incorrect systemoperation.
Note:If you add electrical accessories orcomponents to your vehicle this mayadversely affect battery performance,durability and the performance of otherelectrical systems on your vehicle.
If you replace the battery make sure itmatches the electrical requirements of yourvehicle.
If you disconnect or replace the battery andyour vehicle has an automatic transmission,it must relearn its adaptive strategy. Becauseof this, the transmission may shift firmly whenfirst driven. This is normal operation whilethe transmission fully updates its operationto optimum shift feel.
Remove and Reinstall the Battery
To disconnect or remove the battery, do thefollowing:
1.Apply the parking brake and switch theignition off.
2.Switch all electrical equipment off, forexample lights and radio.
3.Wait a minimum of two minutes beforedisconnecting the battery.
Note:The engine management system hasa power hold function and remains poweredfor a period of time after you switch theignition off. This is to allow diagnostic andadaptive tables to be stored. Disconnectingthe battery without waiting can causedamage not covered by the vehicleWarranty.
4.Disconnect the negative battery cableterminal.
5.Disconnect the positive battery cableterminal.
6.Remove the battery securing clamp.
7.Remove the battery.
8.To install, reverse the removal procedure.
Note:Before reconnecting the battery, makesure the ignition remains switched off.
Note:Make sure the battery cable terminalsare fully tightened.
Note:After cleaning or replacing the battery,make sure you reinstall the battery cover orshield.
If you disconnect or replace the vehiclebattery, you must reset the followingfeatures:
•Window bounce-back. See Windows(page 131).
•Clock Settings.
•Pre-set radio stations.
•Steering Angle Sensor.
354
2022 Nautilus (CD9) Canada/United States of America, enUSA, Edition date: 202108, First-PrintingMaintenance
Page 391 of 586
•In the first stage, the tire will be reinflatedwith a sealing compound and air. Afterthe tire has been inflated, you will needto drive the vehicle a short distanceapproximately 4 mi (6 km) to distributethe sealant in the tire.
•In the second stage, you will need tocheck the tire pressure and adjust, ifnecessary, to the vehicle's specified tireinflation pressure.
First Stage: Reinflating the Tire withsealing compound and air
WARNING: Do not stand directly overthe kit while inflating the tire. If you noticeany unusual bulges or deformations in thetire's sidewall during inflation, stop and callroadside assistance.
WARNING: If the tire does not inflateto the recommended tire pressure within15 minutes, stop and call roadsideassistance.
Park the vehicle in a safe, level and securearea, away from moving traffic.
Turn the hazard lights on. Apply the parkingbrake and power off the vehicle. Inspect theflat tire for visible damage.
If a puncture is located in the tire sidewall,stop and call roadside assistance.
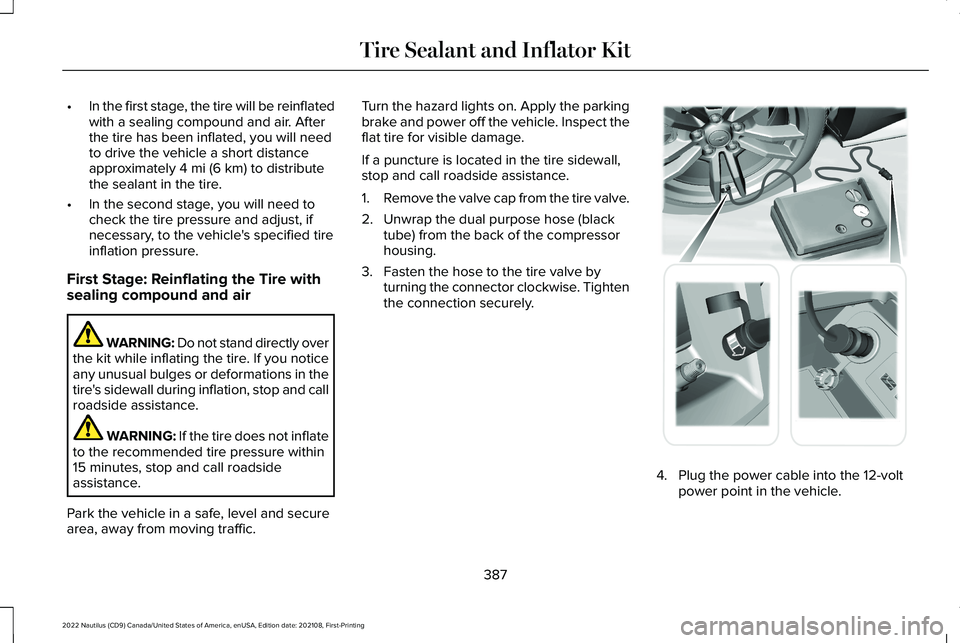
1.Remove the valve cap from the tire valve.
2.Unwrap the dual purpose hose (blacktube) from the back of the compressorhousing.
3.Fasten the hose to the tire valve byturning the connector clockwise. Tightenthe connection securely.
4.Plug the power cable into the 12-voltpower point in the vehicle.
387
2022 Nautilus (CD9) Canada/United States of America, enUSA, Edition date: 202108, First-PrintingTire Sealant and Inflator Kit E175979