LINCOLN NAVIGATOR 2014 Owners Manual
Manufacturer: LINCOLN, Model Year: 2014, Model line: NAVIGATOR, Model: LINCOLN NAVIGATOR 2014Pages: 506, PDF Size: 5.72 MB
Page 271 of 506
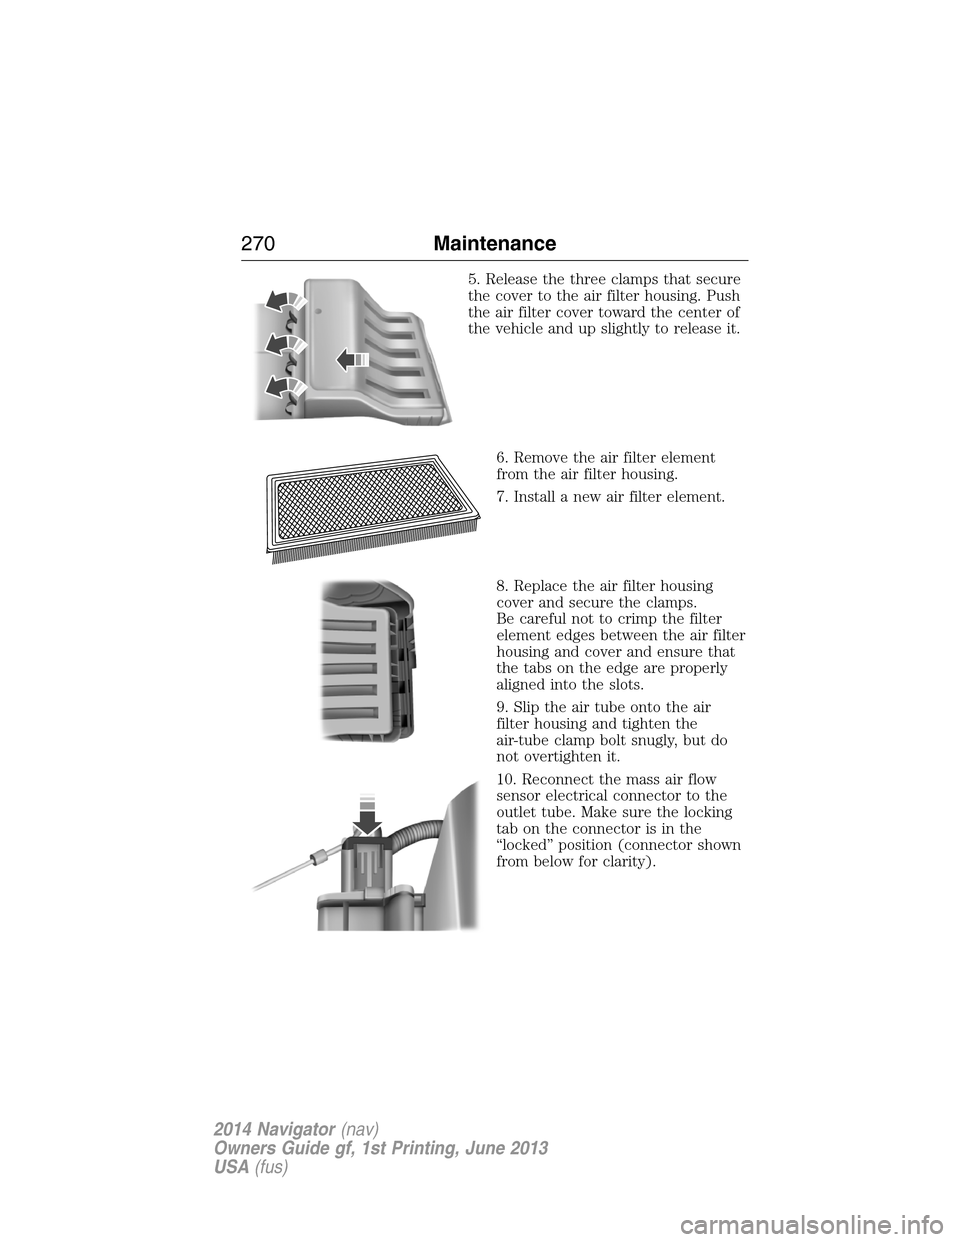
5. Release the three clamps that secure
the cover to the air filter housing. Push
the air filter cover toward the center of
the vehicle and up slightly to release it.
6. Remove the air filter element
from the air filter housing.
7. Install a new air filter element.
8. Replace the air filter housing
cover and secure the clamps.
Be careful not to crimp the filter
element edges between the air filter
housing and cover and ensure that
the tabs on the edge are properly
aligned into the slots.
9. Slip the air tube onto the air
filter housing and tighten the
air-tube clamp bolt snugly, but do
not overtighten it.
10. Reconnect the mass air flow
sensor electrical connector to the
outlet tube. Make sure the locking
tab on the connector is in the
“locked” position (connector shown
from below for clarity).
270Maintenance
2014 Navigator(nav)
Owners Guide gf, 1st Printing, June 2013
USA(fus)
Page 272 of 506
ADJUSTING THE HEADLAMPS
The headlamps on your vehicle are properly aimed at the assembly plant.
If your vehicle has been in an accident, an authorized dealer should
check the alignment of your headlamps.
Vertical Aim Adjustment
Before aim adjustment, disable the air suspension system. Refer to
Message centerin theDriver Controlschapter.
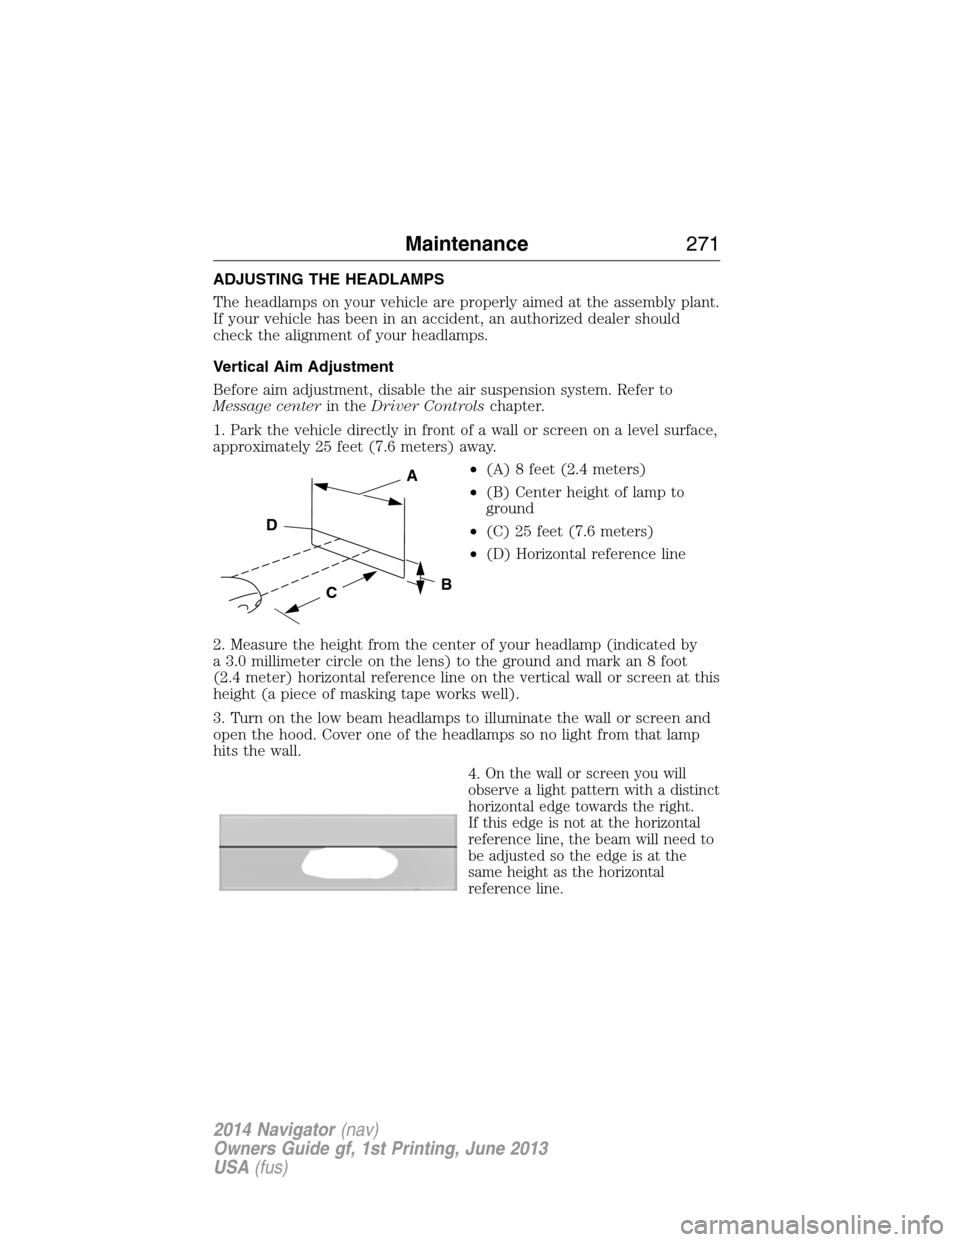
1. Park the vehicle directly in front of a wall or screen on a level surface,
approximately 25 feet (7.6 meters) away.
•(A) 8 feet (2.4 meters)
•(B) Center height of lamp to
ground
•(C) 25 feet (7.6 meters)
•(D) Horizontal reference line
2. Measure the height from the center of your headlamp (indicated by
a 3.0 millimeter circle on the lens) to the ground and mark an 8 foot
(2.4 meter) horizontal reference line on the vertical wall or screen at this
height (a piece of masking tape works well).
3. Turn on the low beam headlamps to illuminate the wall or screen and
open the hood. Cover one of the headlamps so no light from that lamp
hits the wall.
4.
On the wall or screen you will
observe a light pattern with a distinct
horizontal edge towards the right.
If this edge is not at the horizontal
reference line, the beam will need to
be adjusted so the edge is at the
same height as the horizontal
reference line.
C
A
B
D
Maintenance271
2014 Navigator(nav)
Owners Guide gf, 1st Printing, June 2013
USA(fus)
Page 273 of 506
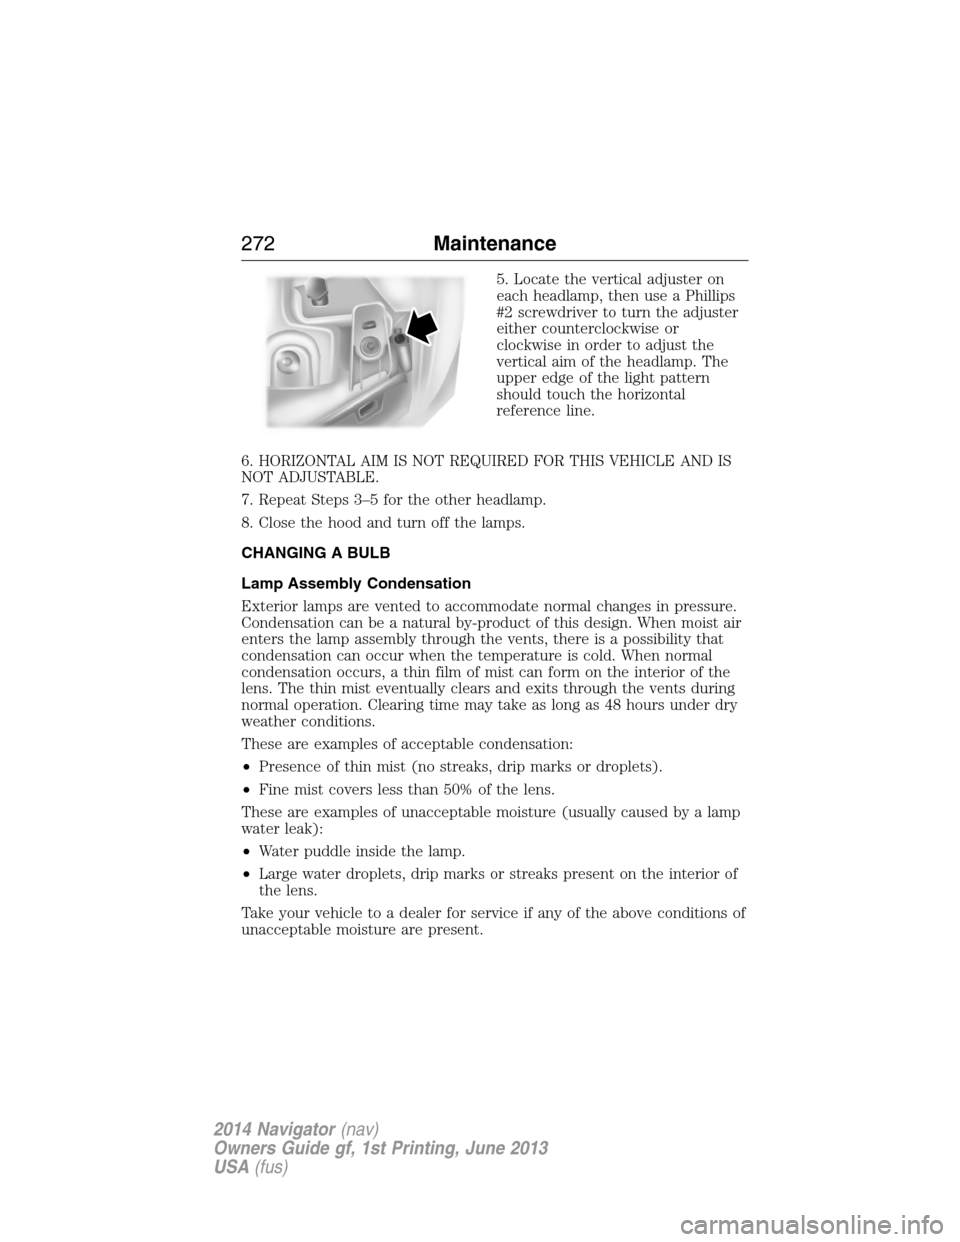
5. Locate the vertical adjuster on
each headlamp, then use a Phillips
#2 screwdriver to turn the adjuster
either counterclockwise or
clockwise in order to adjust the
vertical aim of the headlamp. The
upper edge of the light pattern
should touch the horizontal
reference line.
6. HORIZONTAL AIM IS NOT REQUIRED FOR THIS VEHICLE AND IS
NOT ADJUSTABLE.
7. Repeat Steps 3–5 for the other headlamp.
8. Close the hood and turn off the lamps.
CHANGING A BULB
Lamp Assembly Condensation
Exterior lamps are vented to accommodate normal changes in pressure.
Condensation can be a natural by-product of this design. When moist air
enters the lamp assembly through the vents, there is a possibility that
condensation can occur when the temperature is cold. When normal
condensation occurs, a thin film of mist can form on the interior of the
lens. The thin mist eventually clears and exits through the vents during
normal operation. Clearing time may take as long as 48 hours under dry
weather conditions.
These are examples of acceptable condensation:
•Presence of thin mist (no streaks, drip marks or droplets).
•Fine mist covers less than 50% of the lens.
These are examples of unacceptable moisture (usually caused by a lamp
water leak):
•Water puddle inside the lamp.
•Large water droplets, drip marks or streaks present on the interior of
the lens.
Take your vehicle to a dealer for service if any of the above conditions of
unacceptable moisture are present.
272Maintenance
2014 Navigator(nav)
Owners Guide gf, 1st Printing, June 2013
USA(fus)
Page 274 of 506
Replacing HID Headlamp Bulbs
The low/high beam headlamps on your vehicle use a “high intensity
discharge” source. These lamps operate at a high voltage. For bulb
replacement, see your authorized dealer.
Replacing Front Parking Lamp, Turn Signal, and Side Marker Bulbs
The front parking lamp, turn signal, and side marker bulbs are located in
the headlamp assembly. Follow the same steps to replace any of these
bulbs.
1. Make sure the headlamp control is in the off position.
2. Open the hood.
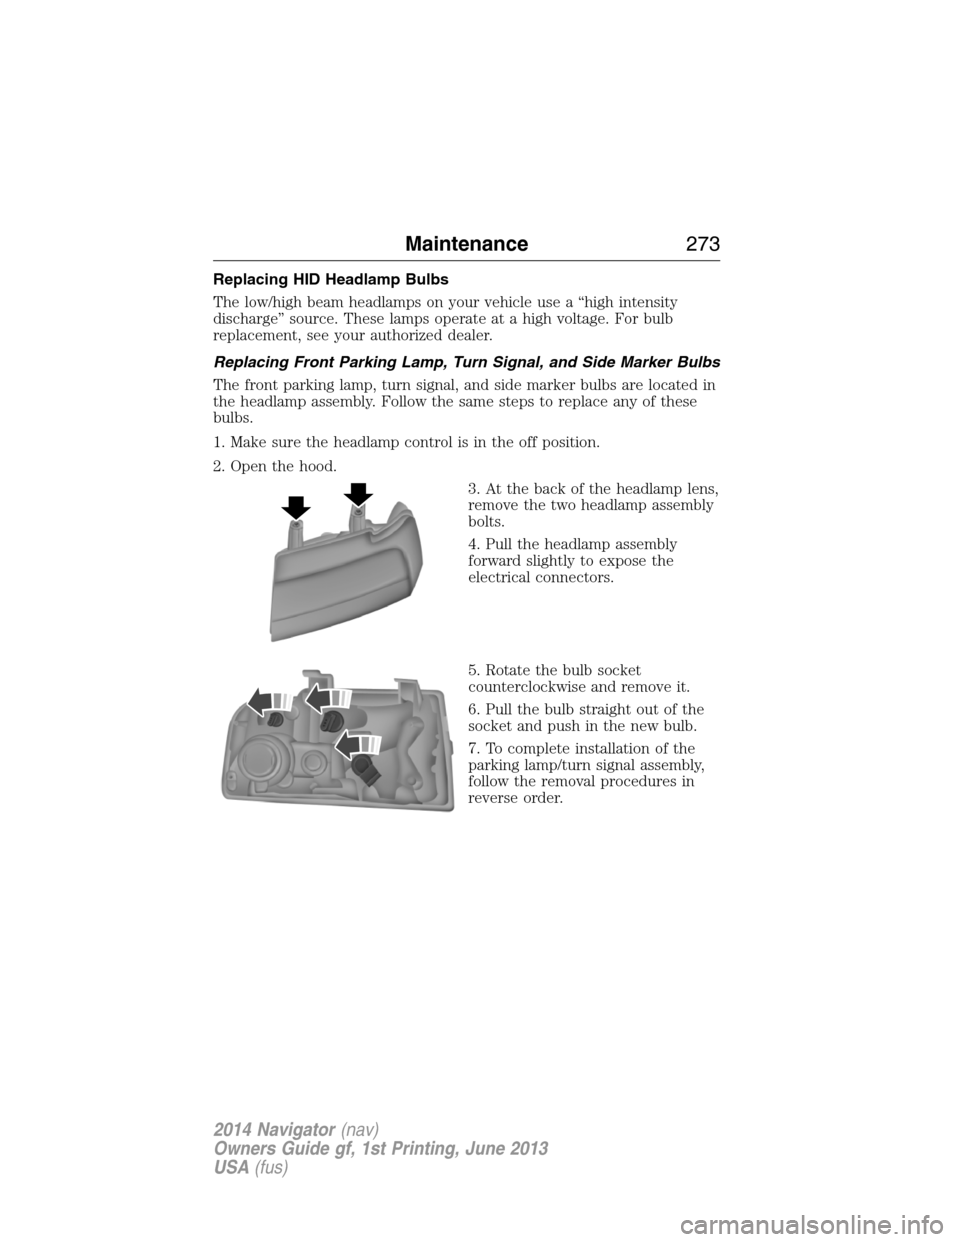
3. At the back of the headlamp lens,
remove the two headlamp assembly
bolts.
4. Pull the headlamp assembly
forward slightly to expose the
electrical connectors.
5. Rotate the bulb socket
counterclockwise and remove it.
6. Pull the bulb straight out of the
socket and push in the new bulb.
7. To complete installation of the
parking lamp/turn signal assembly,
follow the removal procedures in
reverse order.
Maintenance273
2014 Navigator(nav)
Owners Guide gf, 1st Printing, June 2013
USA(fus)
Page 275 of 506
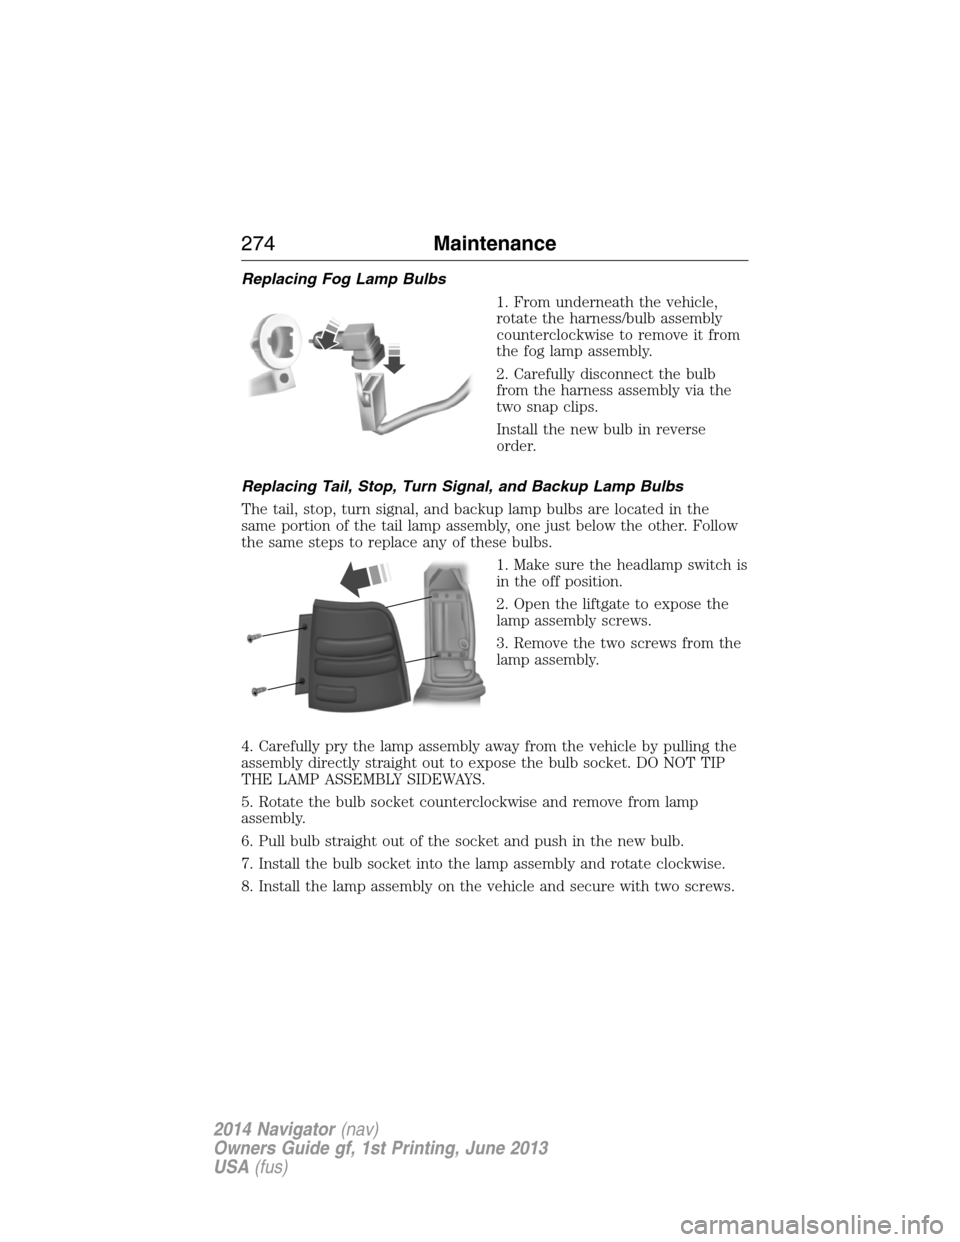
Replacing Fog Lamp Bulbs
1. From underneath the vehicle,
rotate the harness/bulb assembly
counterclockwise to remove it from
the fog lamp assembly.
2. Carefully disconnect the bulb
from the harness assembly via the
two snap clips.
Install the new bulb in reverse
order.
Replacing Tail, Stop, Turn Signal, and Backup Lamp Bulbs
The tail, stop, turn signal, and backup lamp bulbs are located in the
same portion of the tail lamp assembly, one just below the other. Follow
the same steps to replace any of these bulbs.
1. Make sure the headlamp switch is
in the off position.
2. Open the liftgate to expose the
lamp assembly screws.
3. Remove the two screws from the
lamp assembly.
4. Carefully pry the lamp assembly away from the vehicle by pulling the
assembly directly straight out to expose the bulb socket. DO NOT TIP
THE LAMP ASSEMBLY SIDEWAYS.
5. Rotate the bulb socket counterclockwise and remove from lamp
assembly.
6. Pull bulb straight out of the socket and push in the new bulb.
7. Install the bulb socket into the lamp assembly and rotate clockwise.
8. Install the lamp assembly on the vehicle and secure with two screws.
274Maintenance
2014 Navigator(nav)
Owners Guide gf, 1st Printing, June 2013
USA(fus)
Page 276 of 506
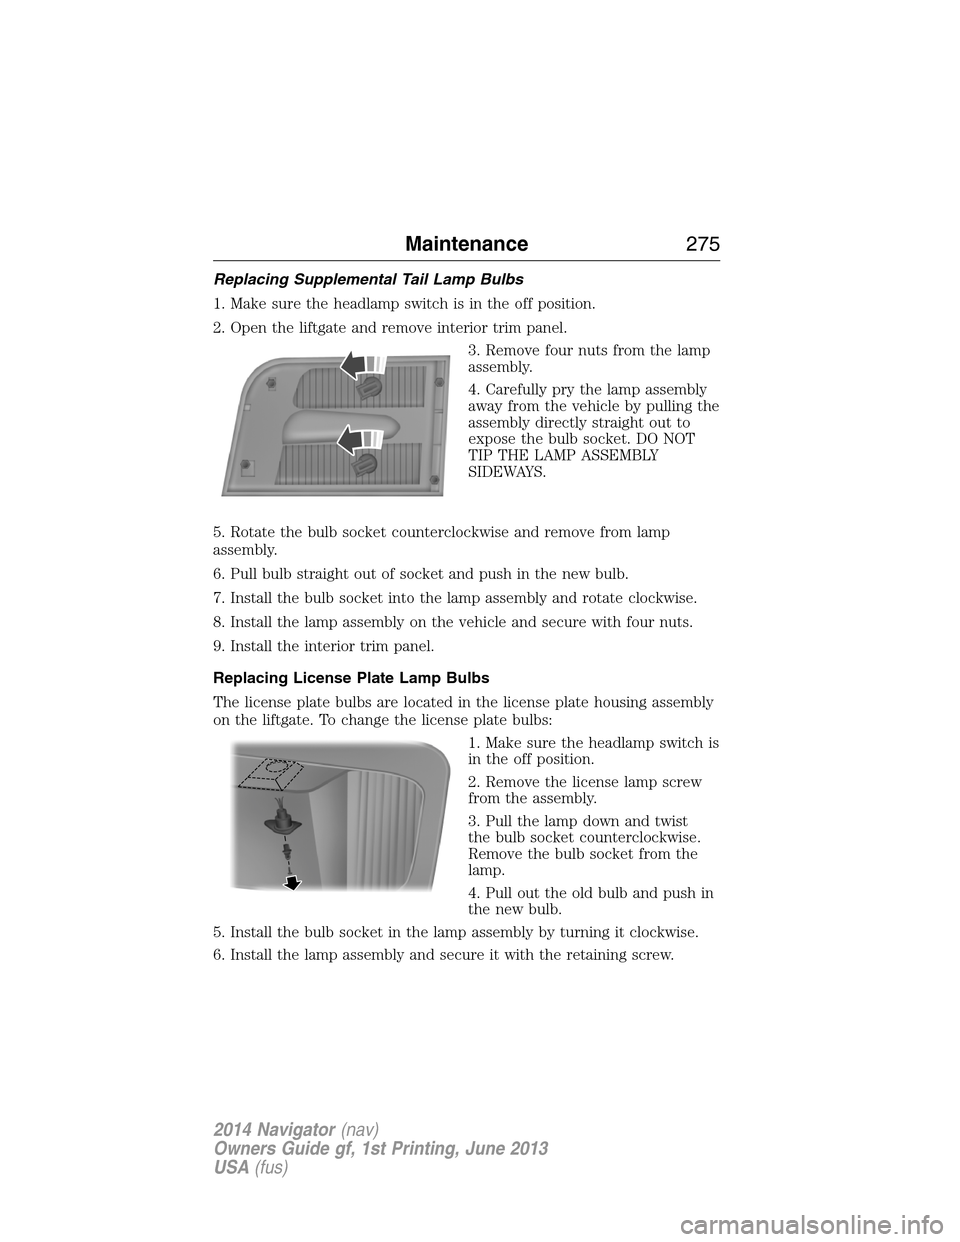
Replacing Supplemental Tail Lamp Bulbs
1. Make sure the headlamp switch is in the off position.
2. Open the liftgate and remove interior trim panel.
3. Remove four nuts from the lamp
assembly.
4. Carefully pry the lamp assembly
away from the vehicle by pulling the
assembly directly straight out to
expose the bulb socket. DO NOT
TIP THE LAMP ASSEMBLY
SIDEWAYS.
5. Rotate the bulb socket counterclockwise and remove from lamp
assembly.
6. Pull bulb straight out of socket and push in the new bulb.
7. Install the bulb socket into the lamp assembly and rotate clockwise.
8. Install the lamp assembly on the vehicle and secure with four nuts.
9. Install the interior trim panel.
Replacing License Plate Lamp Bulbs
The license plate bulbs are located in the license plate housing assembly
on the liftgate. To change the license plate bulbs:
1. Make sure the headlamp switch is
in the off position.
2. Remove the license lamp screw
from the assembly.
3. Pull the lamp down and twist
the bulb socket counterclockwise.
Remove the bulb socket from the
lamp.
4. Pull out the old bulb and push in
the new bulb.
5. Install the bulb socket in the lamp assembly by turning it clockwise.
6. Install the lamp assembly and secure it with the retaining screw.
Maintenance275
2014 Navigator(nav)
Owners Guide gf, 1st Printing, June 2013
USA(fus)
Page 277 of 506
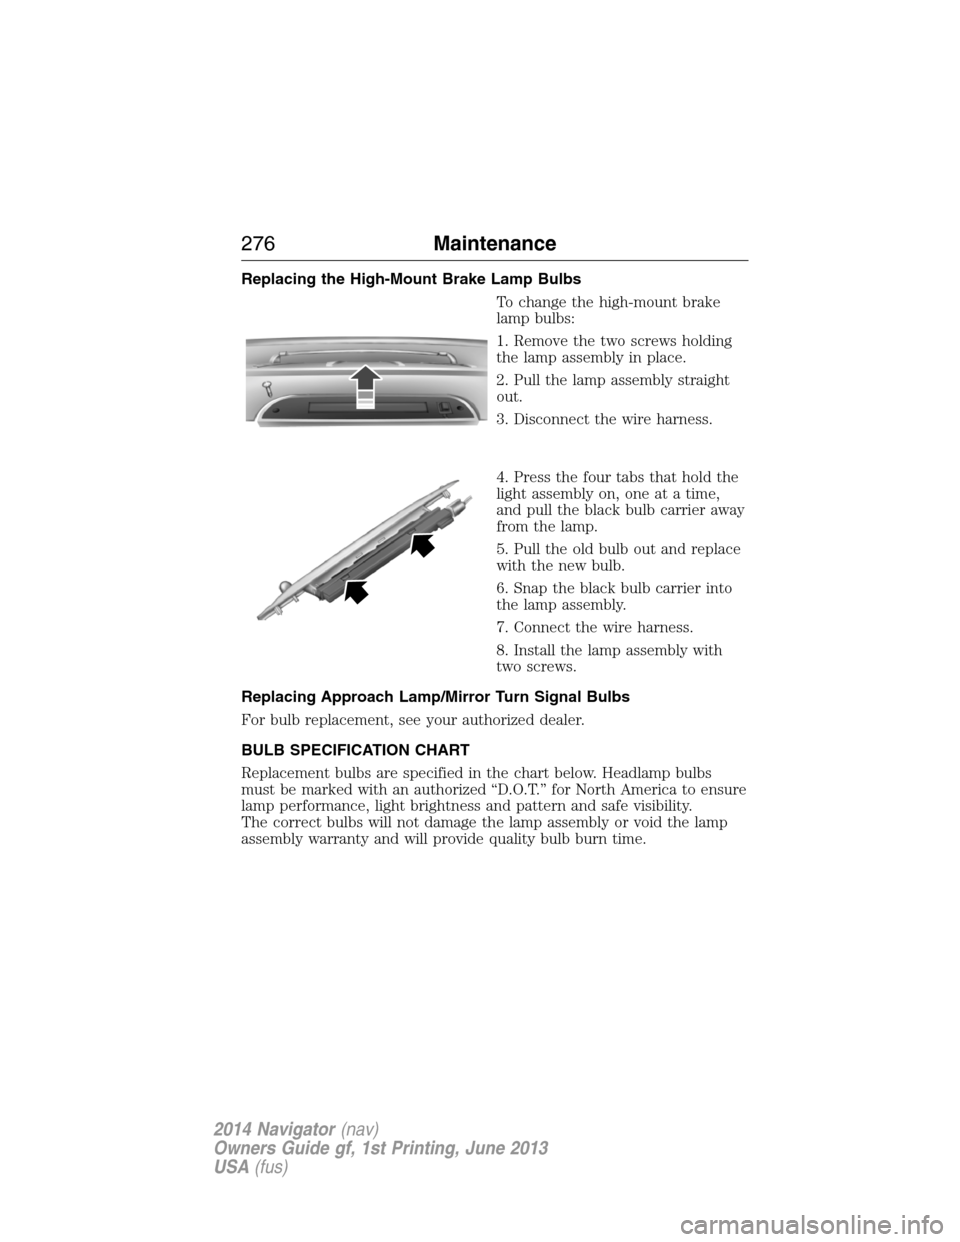
Replacing the High-Mount Brake Lamp Bulbs
To change the high-mount brake
lamp bulbs:
1. Remove the two screws holding
the lamp assembly in place.
2. Pull the lamp assembly straight
out.
3. Disconnect the wire harness.
4. Press the four tabs that hold the
light assembly on, one at a time,
and pull the black bulb carrier away
from the lamp.
5. Pull the old bulb out and replace
with the new bulb.
6. Snap the black bulb carrier into
the lamp assembly.
7. Connect the wire harness.
8. Install the lamp assembly with
two screws.
Replacing Approach Lamp/Mirror Turn Signal Bulbs
For bulb replacement, see your authorized dealer.
BULB SPECIFICATION CHART
Replacement bulbs are specified in the chart below. Headlamp bulbs
must be marked with an authorized “D.O.T.” for North America to ensure
lamp performance, light brightness and pattern and safe visibility.
The correct bulbs will not damage the lamp assembly or void the lamp
assembly warranty and will provide quality bulb burn time.
276Maintenance
2014 Navigator(nav)
Owners Guide gf, 1st Printing, June 2013
USA(fus)
Page 278 of 506
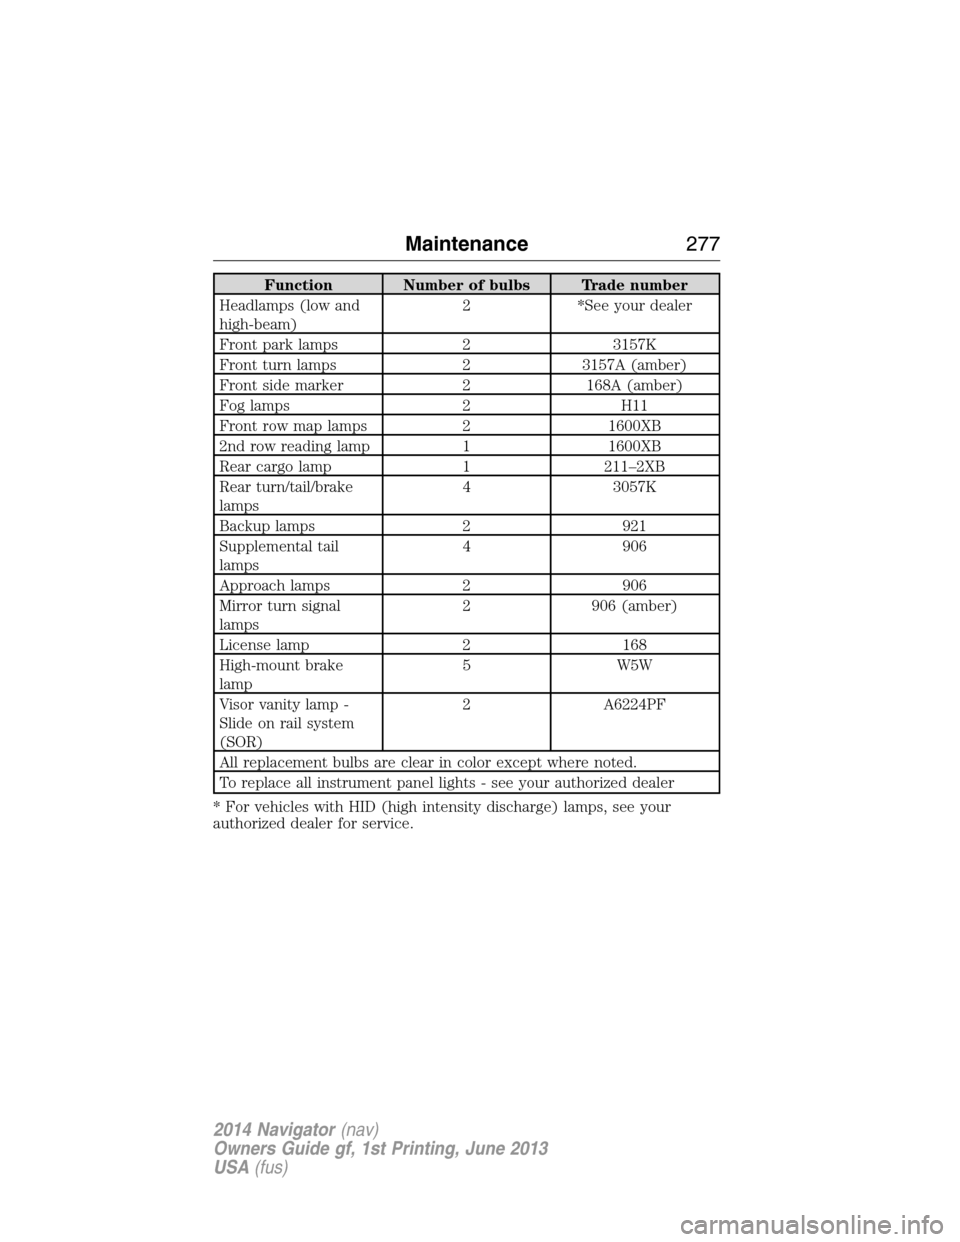
Function Number of bulbs Trade number
Headlamps (low and
high-beam)2 *See your dealer
Front park lamps 2 3157K
Front turn lamps 2 3157A (amber)
Front side marker 2 168A (amber)
Fog lamps 2 H11
Front row map lamps 2 1600XB
2nd row reading lamp 1 1600XB
Rear cargo lamp 1 211–2XB
Rear turn/tail/brake
lamps4 3057K
Backup lamps 2 921
Supplemental tail
lamps4 906
Approach lamps 2 906
Mirror turn signal
lamps2 906 (amber)
License lamp 2 168
High-mount brake
lamp5 W5W
Visor vanity lamp -
Slide on rail system
(SOR)2 A6224PF
All replacement bulbs are clear in color except where noted.
To replace all instrument panel lights - see your authorized dealer
* For vehicles with HID (high intensity discharge) lamps, see your
authorized dealer for service.
Maintenance277
2014 Navigator(nav)
Owners Guide gf, 1st Printing, June 2013
USA(fus)
Page 279 of 506
GENERAL INFORMATION
Your Ford or Lincoln authorized dealer has many quality products
available to clean your vehicle and protect its finishes.
CLEANING PRODUCTS
For best results, use the following products or products of equivalent
quality:
Motorcraft Bug and Tar Remover (ZC-42)
Motorcraft Custom Bright Metal Cleaner (ZC-15)
Motorcraft Detail Wash (ZC-3-A)
Motorcraft Dusting Cloth (ZC-24)
Motorcraft Engine Shampoo and Degreaser (United States only) (ZC-20)
Motorcraft Engine Shampoo (Canada only) (CXC-66-A)
Motorcraft Multi-Purpose Cleaner (Canada only) (CXC-101)
Motorcraft Premium Glass Cleaner (Canada only) (CXC-100)
Motorcraft Premium Quality Windshield Washer Fluid (Canada only)
[CXC-37-(A, B, D or F)]
Motorcraft Premium Windshield Wash Concentrate with Bitterant
(United States only) ZC-32-B1)
Motorcraft Professional Strength Carpet & Upholstery Cleaner (ZC-54)
Motorcraft Spot and Stain Remover (United States only) (ZC-14)
Motorcraft Ultra-Clear Spray Glass Cleaner (ZC-23)
Motorcraft Wheel and Tire Cleaner (ZC-37-A)
CLEANING THE EXTERIOR
Wash your vehicle regularly with cool or lukewarm water and a neutral
pH shampoo, such as Motorcraft® Detail Wash.
•Do not use a commercial or high-pressure wand on the surface or
edge of stripes and graphics. This can cause damage to the film and
cause the edge of the film to peel away from the vehicle surface.
•Never use strong household detergents or soap, such as dish washing
or laundry liquid. These products can discolor and spot painted
surfaces.
•Never wash a vehicle that is hot to the touch or during exposure to
strong, direct sunlight.
278Vehicle Care
2014 Navigator(nav)
Owners Guide gf, 1st Printing, June 2013
USA(fus)
Page 280 of 506
•Dry the vehicle with a chamois or soft terry cloth towel in order to
eliminate water spotting.
•Immediately remove items such as gasoline, diesel fuel, bird droppings
and insect deposits because they can cause damage to the vehicle’s
paintwork and trim over time. Use Motorcraft Bug and Tar Remover.
•Note:Suntan lotions and insect repellents can damage any painted
surface; if these substances come in contact with your vehicle, wash it
off as soon as possible.
•Remove any exterior accessories before entering a car wash.
Stripes or Graphics (if equipped)
Do not use a commercial or high-pressure wand on the surface or edge
of stripes and graphics. This can cause damage to the film and cause the
edge of the film to peel away from the vehicle surface.
Exterior Chrome
Note:Never use abrasive materials such as steel wool or plastic pads as
they can scratch the chrome surface.
Note:Do not use chrome cleaner, metal cleaner or polish on wheels and
wheel covers.
•Wash the vehicle first, using cool or lukewarm water and a neutral pH
shampoo, such as Motorcraft Detail Wash.
•Use Motorcraft Custom Bright Metal Cleaner. Apply the product as
you would a wax to clean bumpers and other chrome parts; allow the
cleaner to dry for a few minutes, then wipe off the haze with a clean,
dry rag.
•Do not apply cleaning product to hot surfaces and do not leave
cleaning product on chrome surfaces for a period of time exceeding
that which is recommended.
•Note:Using other non-recommended cleaners can result in severe
and permanent cosmetic damage.
Underbody
Flush the complete underside of your vehicle frequently. Keep body and
door drain holes free from packed dirt.
Vehicle Care279
2014 Navigator(nav)
Owners Guide gf, 1st Printing, June 2013
USA(fus)