sensor MAZDA 6 2002 Workshop Manual Suplement
[x] Cancel search | Manufacturer: MAZDA, Model Year: 2002, Model line: 6, Model: MAZDA 6 2002Pages: 909, PDF Size: 17.16 MB
Page 500 of 909
AUTOMATIC TRANSAXLE
K2–85
K2
TRANSAXLE FLUID TEMPERATURE (TFT) SENSOR REMOVAL/INSTALLATIONA6E5714190102031. Remove the automatic transaxle. (See K2–99 AUTOMATIC TRANSAXLE AND TRANSFER REMOVAL/
INSTALLATION.)
2. Disassemble the automatic transaxle, and then remove the TFT sensor. (See Automatic Transaxle Workshop
Manual JA5A-EL)
3. Install a TFT sensor, and then assemble the automatic transaxle. (See Automatic Transaxle Workshop Manual
JA5A-EL)
4. Remove the automatic transaxle. (See K2–99 AUTOMATIC TRANSAXLE AND TRANSFER REMOVAL/
INSTALLATION.)
5. Carry out the line pressure test. (See K2–72 Line Pressure Test.)
6. Inspect the operation of the TR switch. (See K2–80 TRANSAXLE RANGE (TR) SWITCH INSPECTION.)
7. Inspect the operation of the selector lever. (See K2–117 SELECTOR LEVER INSPECTION.)
8. Carry out the mechanical system test. (See K2–72 MECHANICAL SYSTEM TEST.)
9. Carry out the road test. (See K2–75 ROAD TEST.)
End Of Sie
INPUT/TURBINE SPEED SENSOR INSPECTIONA6E571421550202On-Vehicle Inspection
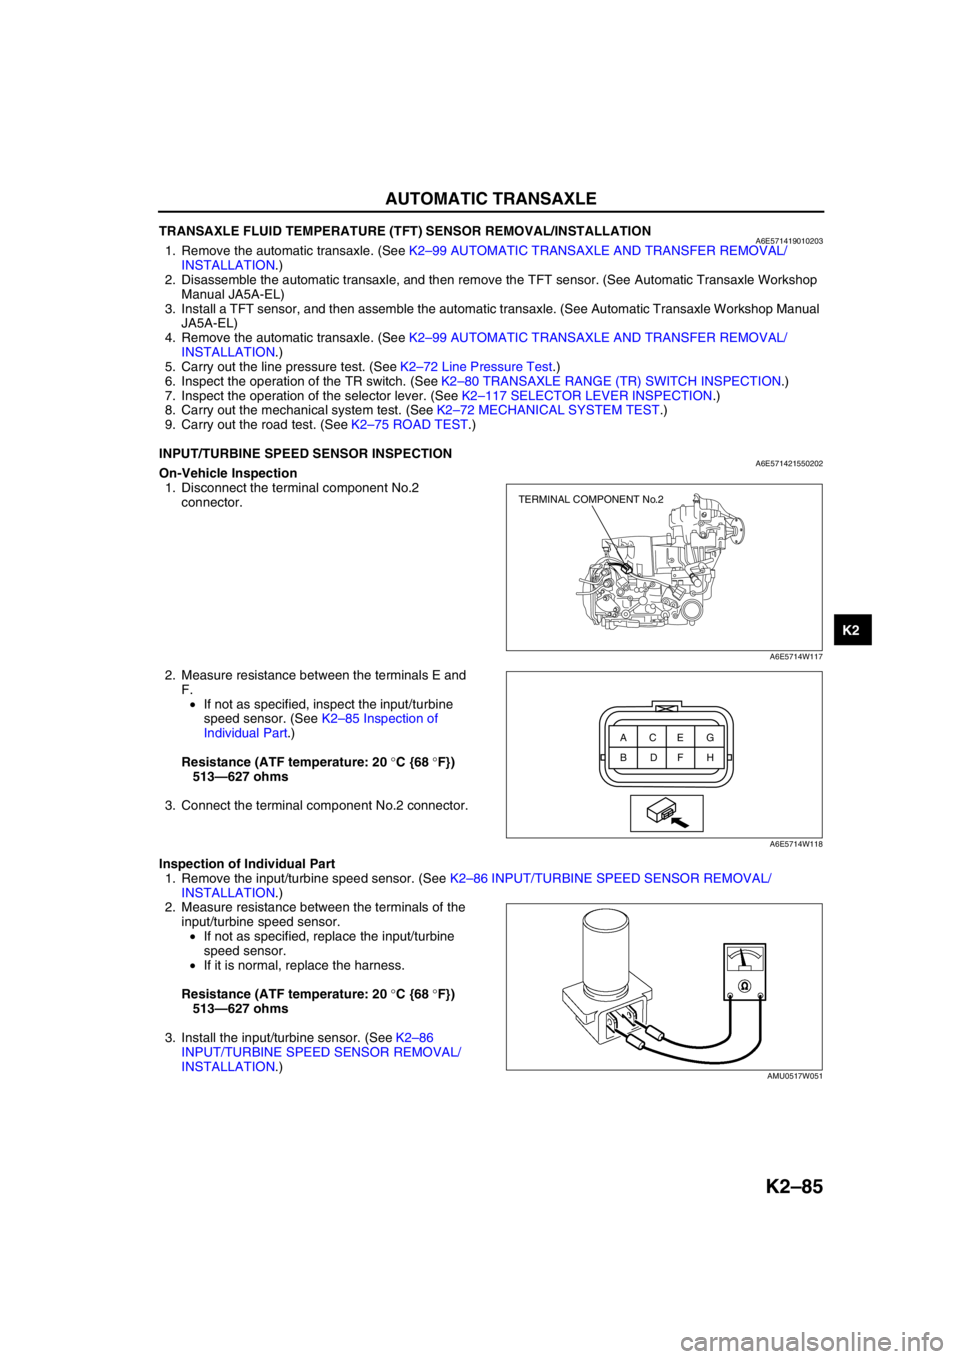
1. Disconnect the terminal component No.2
connector.
2. Measure resistance between the terminals E and
F.
•If not as specified, inspect the input/turbine
speed sensor. (See K2–85 Inspection of
Individual Part.)
Resistance (ATF temperature: 20 °C {68 °F})
513—627 ohms
3. Connect the terminal component No.2 connector.
Inspection of Individual Part
1. Remove the input/turbine speed sensor. (See K2–86 INPUT/TURBINE SPEED SENSOR REMOVAL/
INSTALLATION.)
2. Measure resistance between the terminals of the
input/turbine speed sensor.
•If not as specified, replace the input/turbine
speed sensor.
•If it is normal, replace the harness.
Resistance (ATF temperature: 20 °C {68 °F})
513—627 ohms
3. Install the input/turbine sensor. (See K2–86
INPUT/TURBINE SPEED SENSOR REMOVAL/
INSTALLATION.)
End Of Sie
TERMINAL COMPONENT No.2
A6E5714W117
ACEG
BDFH
A6E5714W118
AMU0517W051
Page 501 of 909
K2–86
AUTOMATIC TRANSAXLE
INPUT/TURBINE SPEED SENSOR REMOVAL/INSTALLATIONA6E5714215502031. Remove the automatic transaxle. (See K2–99 AUTOMATIC TRANSAXLE AND TRANSFER REMOVAL/
INSTALLATION.)
2. Remove the input/turbine speed sensor. (See Automatic Transaxle Workshop Manual JA5A-EL.)
3. Install the input/turbine speed sensor. (See Automatic Transaxle Workshop Manual JA5A-EL.)
4. Install the automatic transaxle. (See K2–99 AUTOMATIC TRANSAXLE AND TRANSFER REMOVAL/
INSTALLATION.)
End Of Sie
INTERMEDIATE SENSOR INSPECTIONA6E571417400202On-Vehicle Inspection
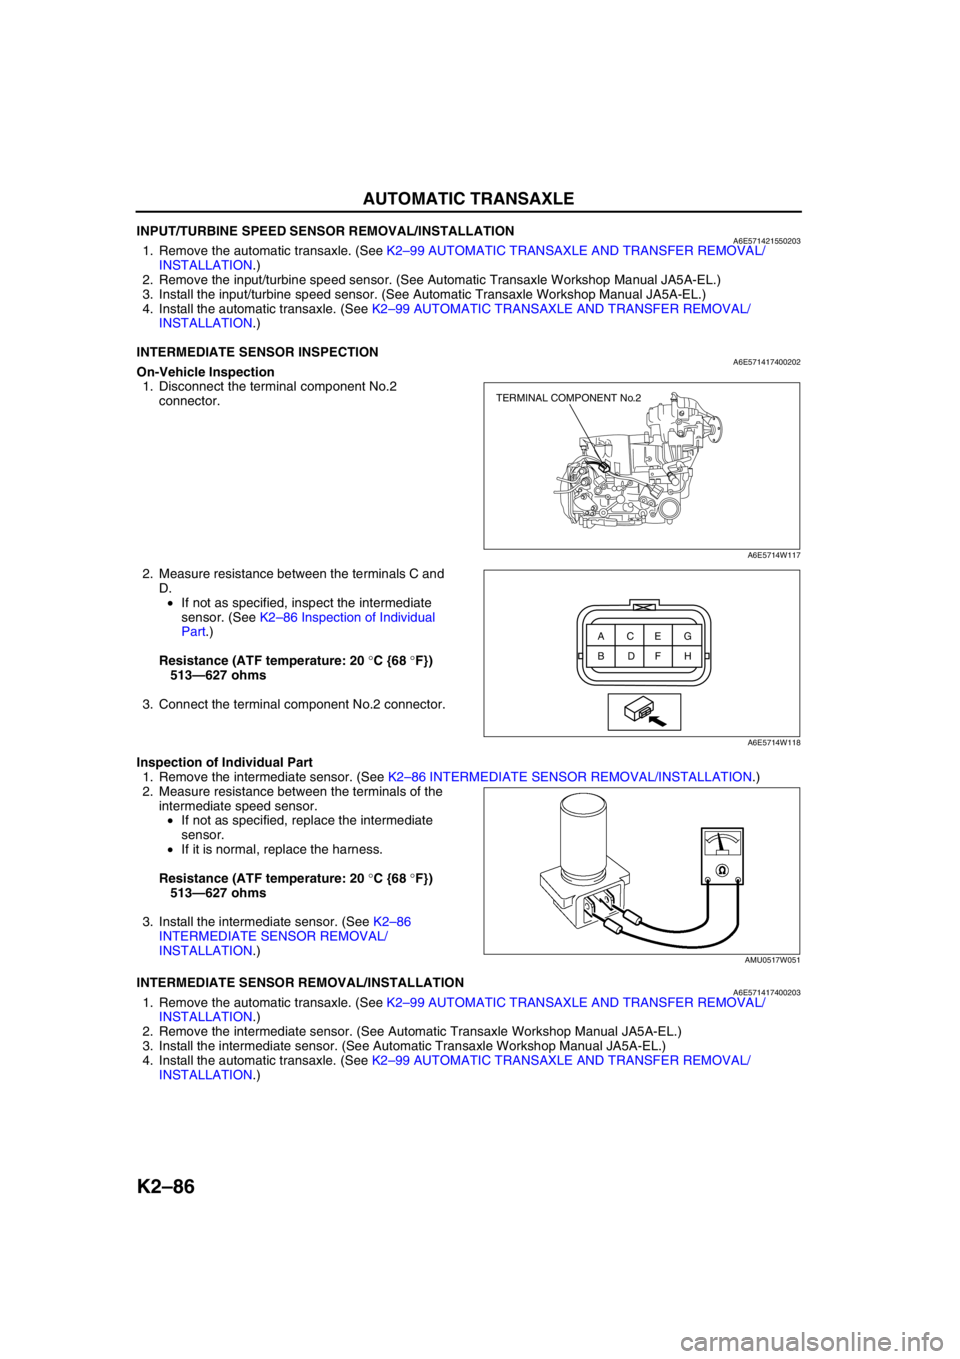
1. Disconnect the terminal component No.2
connector.
2. Measure resistance between the terminals C and
D.
•If not as specified, inspect the intermediate
sensor. (See K2–86 Inspection of Individual
Part.)
Resistance (ATF temperature: 20 °C {68 °F})
513—627 ohms
3. Connect the terminal component No.2 connector.
Inspection of Individual Part
1. Remove the intermediate sensor. (See K2–86 INTERMEDIATE SENSOR REMOVAL/INSTALLATION.)
2. Measure resistance between the terminals of the
intermediate speed sensor.
•If not as specified, replace the intermediate
sensor.
•If it is normal, replace the harness.
Resistance (ATF temperature: 20 °C {68 °F})
513—627 ohms
3. Install the intermediate sensor. (See K2–86
INTERMEDIATE SENSOR REMOVAL/
INSTALLATION.)
End Of SieINTERMEDIATE SENSOR REMOVAL/INSTALLATIONA6E5714174002031. Remove the automatic transaxle. (See K2–99 AUTOMATIC TRANSAXLE AND TRANSFER REMOVAL/
INSTALLATION.)
2. Remove the intermediate sensor. (See Automatic Transaxle Workshop Manual JA5A-EL.)
3. Install the intermediate sensor. (See Automatic Transaxle Workshop Manual JA5A-EL.)
4. Install the automatic transaxle. (See K2–99 AUTOMATIC TRANSAXLE AND TRANSFER REMOVAL/
INSTALLATION.)
End Of Sie
TERMINAL COMPONENT No.2
A6E5714W117
ACEG
BDFH
A6E5714W118
AMU0517W051
Page 502 of 909
AUTOMATIC TRANSAXLE
K2–87
K2
VEHICLE SPEEDOMETER SENSOR (VSS) INSPECTIONA6E571417400204On-Vehicle Inspection
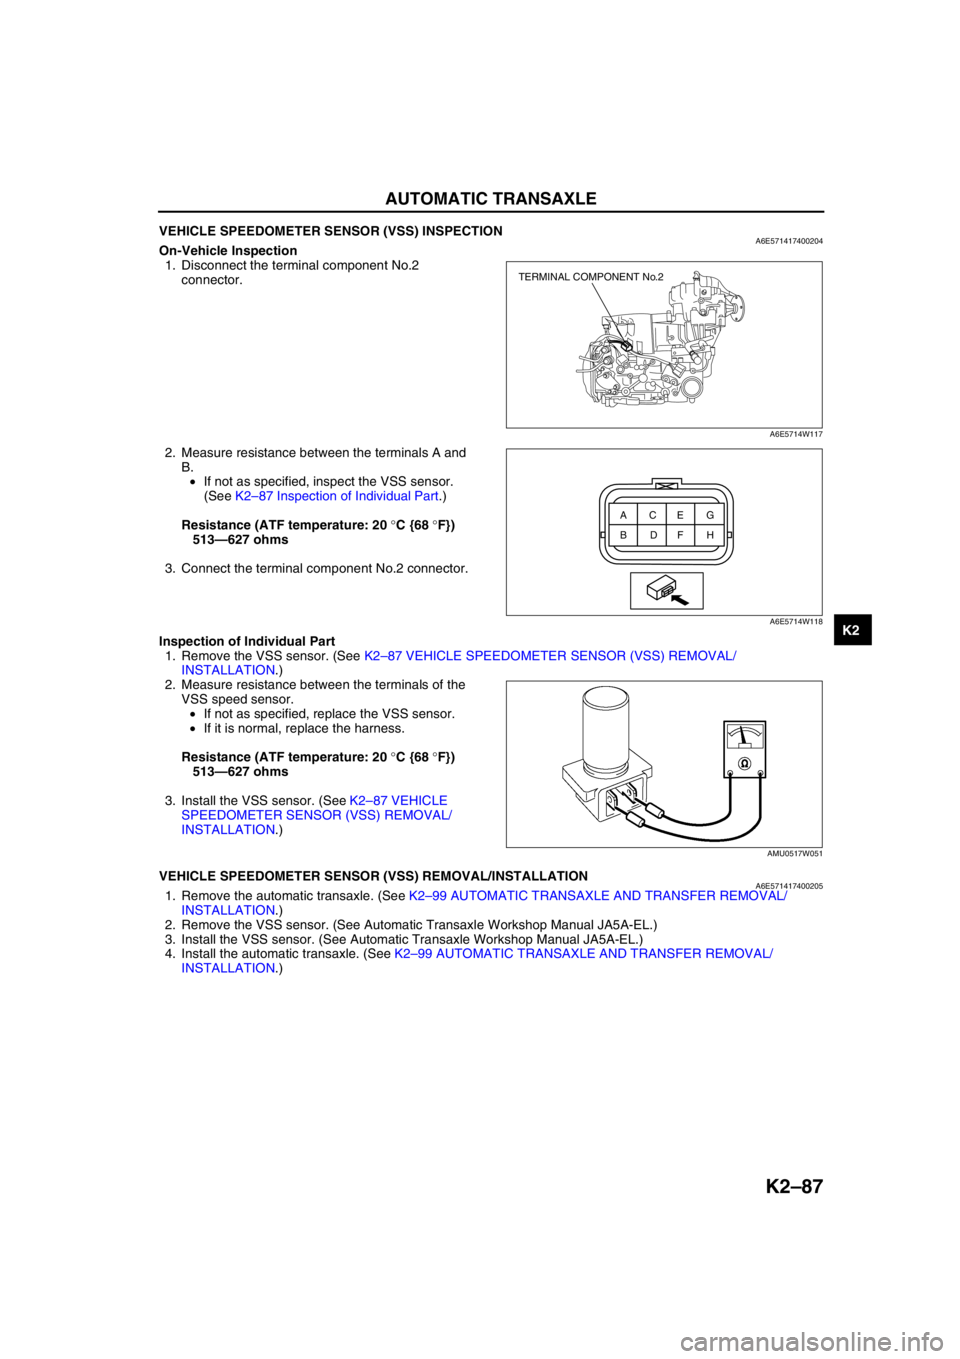
1. Disconnect the terminal component No.2
connector.
2. Measure resistance between the terminals A and
B.
•If not as specified, inspect the VSS sensor.
(See K2–87 Inspection of Individual Part.)
Resistance (ATF temperature: 20 °C {68 °F})
513—627 ohms
3. Connect the terminal component No.2 connector.
Inspection of Individual Part
1. Remove the VSS sensor. (See K2–87 VEHICLE SPEEDOMETER SENSOR (VSS) REMOVAL/
INSTALLATION.)
2. Measure resistance between the terminals of the
VSS speed sensor.
•If not as specified, replace the VSS sensor.
•If it is normal, replace the harness.
Resistance (ATF temperature: 20 °C {68 °F})
513—627 ohms
3. Install the VSS sensor. (See K2–87 VEHICLE
SPEEDOMETER SENSOR (VSS) REMOVAL/
INSTALLATION.)
End Of SieVEHICLE SPEEDOMETER SENSOR (VSS) REMOVAL/INSTALLATIONA6E5714174002051. Remove the automatic transaxle. (See K2–99 AUTOMATIC TRANSAXLE AND TRANSFER REMOVAL/
INSTALLATION.)
2. Remove the VSS sensor. (See Automatic Transaxle Workshop Manual JA5A-EL.)
3. Install the VSS sensor. (See Automatic Transaxle Workshop Manual JA5A-EL.)
4. Install the automatic transaxle. (See K2–99 AUTOMATIC TRANSAXLE AND TRANSFER REMOVAL/
INSTALLATION.)
End Of Sie
TERMINAL COMPONENT No.2
A6E5714W117
ACEG
BDFH
A6E5714W118
AMU0517W051
Page 506 of 909
AUTOMATIC TRANSAXLE
K2–91
K2
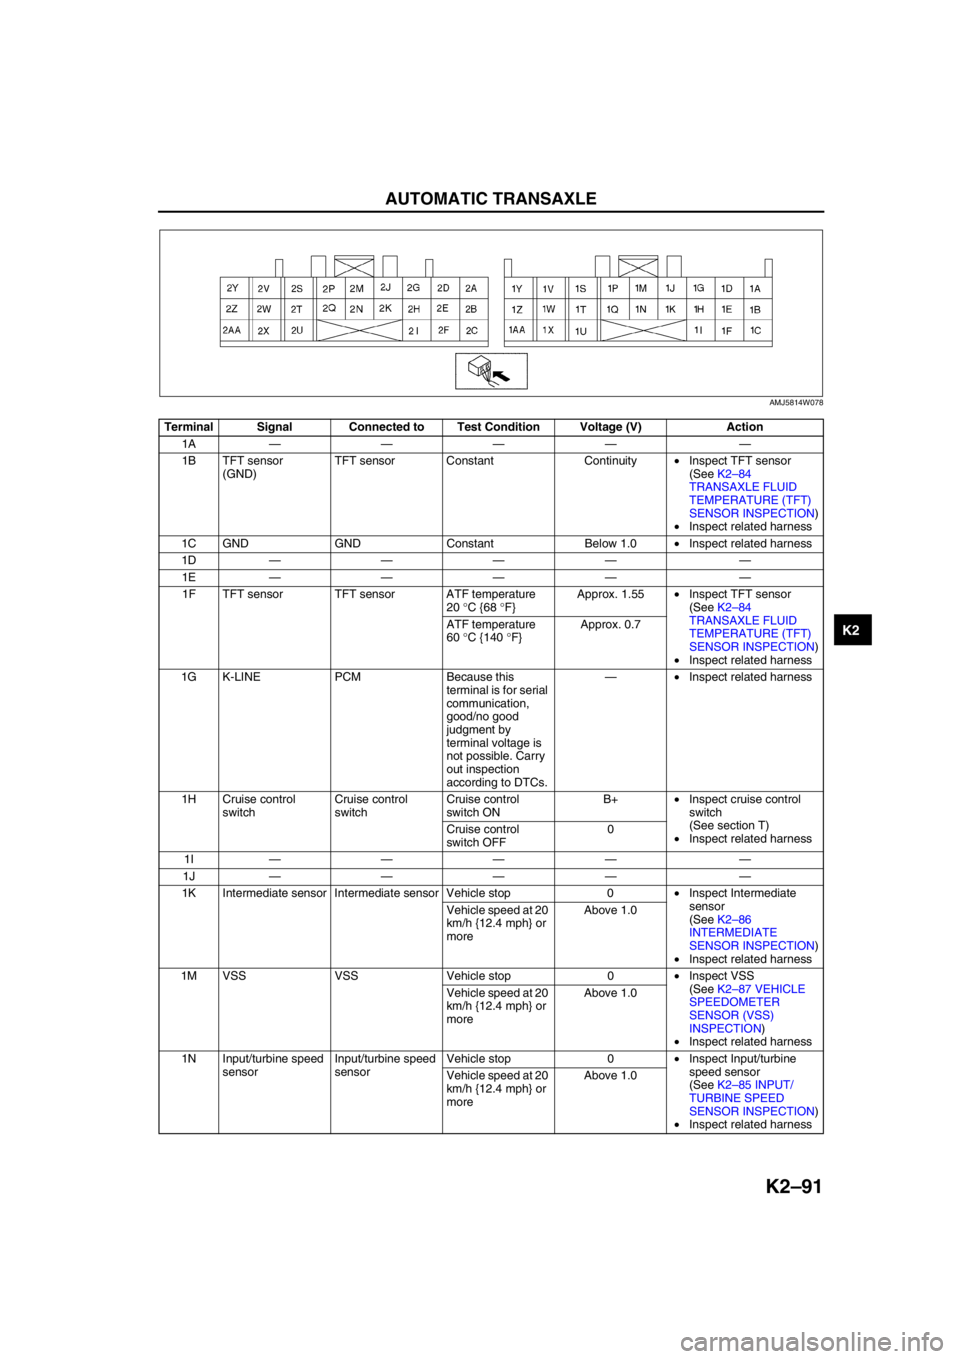
Terminal Signal Connected to Test Condition Voltage (V) Action
1A———— —
1B TFT sensor
(GND)TFT sensor Constant Continuity•Inspect TFT sensor
(See K2–84
TRANSAXLE FLUID
TEMPERATURE (TFT)
SENSOR INSPECTION)
•Inspect related harness
1C GND GND Constant Below 1.0•Inspect related harness
1D———— —
1E———— —
1F TFT sensor TFT sensor ATF temperature
20 °C {68 °F}Approx. 1.55•Inspect TFT sensor
(See K2–84
TRANSAXLE FLUID
TEMPERATURE (TFT)
SENSOR INSPECTION)
•Inspect related harness ATF temperature
60 °C {140 °F}Approx. 0.7
1G K-LINE PCM Because this
terminal is for serial
communication,
good/no good
judgment by
terminal voltage is
not possible. Carry
out inspection
according to DTCs.—•Inspect related harness
1H Cruise control
switchCruise control
switchCruise control
switch ONB+•Inspect cruise control
switch
(See section T)
•Inspect related harness Cruise control
switch OFF0
1I———— —
1J———— —
1K Intermediate sensor Intermediate sensor Vehicle stop 0•Inspect Intermediate
sensor
(See K2–86
INTERMEDIATE
SENSOR INSPECTION)
•Inspect related harness Vehicle speed at 20
km/h {12.4 mph} or
moreAbove 1.0
1M VSS VSS Vehicle stop 0•Inspect VSS
(See K2–87 VEHICLE
SPEEDOMETER
SENSOR (VSS)
INSPECTION)
•Inspect related harness Vehicle speed at 20
km/h {12.4 mph} or
moreAbove 1.0
1N Input/turbine speed
sensorInput/turbine speed
sensorVehicle stop 0•Inspect Input/turbine
speed sensor
(See K2–85 INPUT/
TURBINE SPEED
SENSOR INSPECTION)
•Inspect related harness Vehicle speed at 20
km/h {12.4 mph} or
moreAbove 1.0
AMJ5814W078
Page 507 of 909
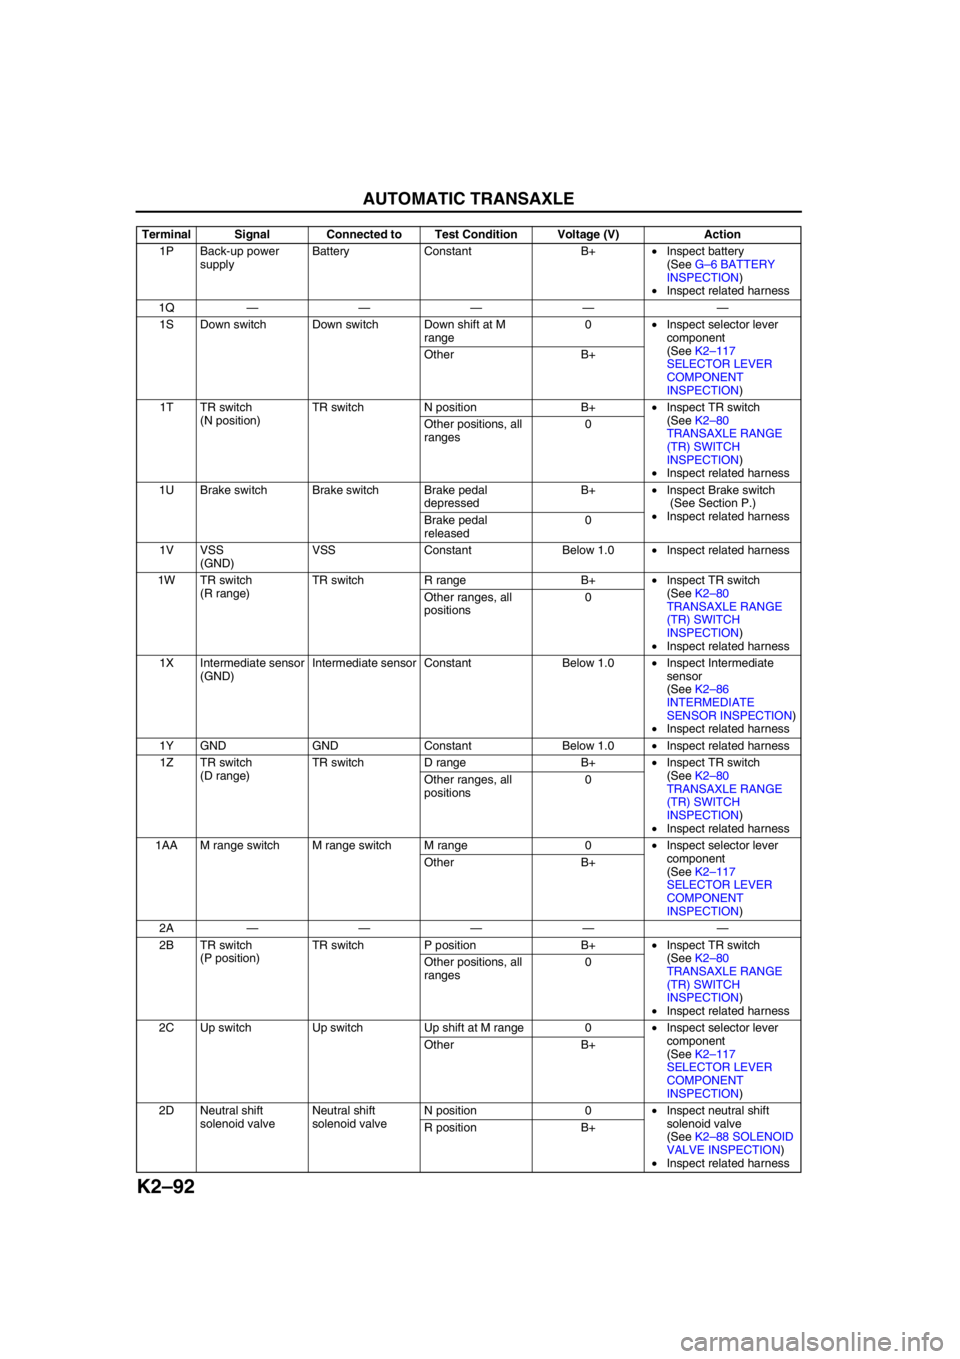
K2–92
AUTOMATIC TRANSAXLE
1P Back-up power
supplyBattery Constant B+•Inspect battery
(See G–6 BATTERY
INSPECTION)
•Inspect related harness
1Q———— —
1S Down switch Down switch Down shift at M
range0•Inspect selector lever
component
(See K2–117
SELECTOR LEVER
COMPONENT
INSPECTION) Other B+
1T TR switch
(N position)TR switch N position B+•Inspect TR switch
(See K2–80
TRANSAXLE RANGE
(TR) SWITCH
INSPECTION)
•Inspect related harness Other positions, all
ranges0
1U Brake switch Brake switch Brake pedal
depressedB+•Inspect Brake switch
(See Section P.)
•Inspect related harness
Brake pedal
released0
1V VSS
(GND)VSS Constant Below 1.0•Inspect related harness
1W TR switch
(R range)TR switch R range B+•Inspect TR switch
(See K2–80
TRANSAXLE RANGE
(TR) SWITCH
INSPECTION)
•Inspect related harness Other ranges, all
positions0
1X Intermediate sensor
(GND)Intermediate sensor Constant Below 1.0•Inspect Intermediate
sensor
(See K2–86
INTERMEDIATE
SENSOR INSPECTION)
•Inspect related harness
1Y GND GND Constant Below 1.0•Inspect related harness
1Z TR switch
(D range)TR switch D range B+•Inspect TR switch
(See K2–80
TRANSAXLE RANGE
(TR) SWITCH
INSPECTION)
•Inspect related harness Other ranges, all
positions0
1AA M range switch M range switch M range 0•Inspect selector lever
component
(See K2–117
SELECTOR LEVER
COMPONENT
INSPECTION) Other B+
2A———— —
2B TR switch
(P position)TR switch P position B+•Inspect TR switch
(See K2–80
TRANSAXLE RANGE
(TR) SWITCH
INSPECTION)
•Inspect related harness Other positions, all
ranges0
2C Up switch Up switch Up shift at M range 0•Inspect selector lever
component
(See K2–117
SELECTOR LEVER
COMPONENT
INSPECTION) Other B+
2D Neutral shift
solenoid valveNeutral shift
solenoid valveN position 0•Inspect neutral shift
solenoid valve
(See K2–88 SOLENOID
VALVE INSPECTION)
•Inspect related harness R position B+ Terminal Signal Connected to Test Condition Voltage (V) Action
Page 508 of 909
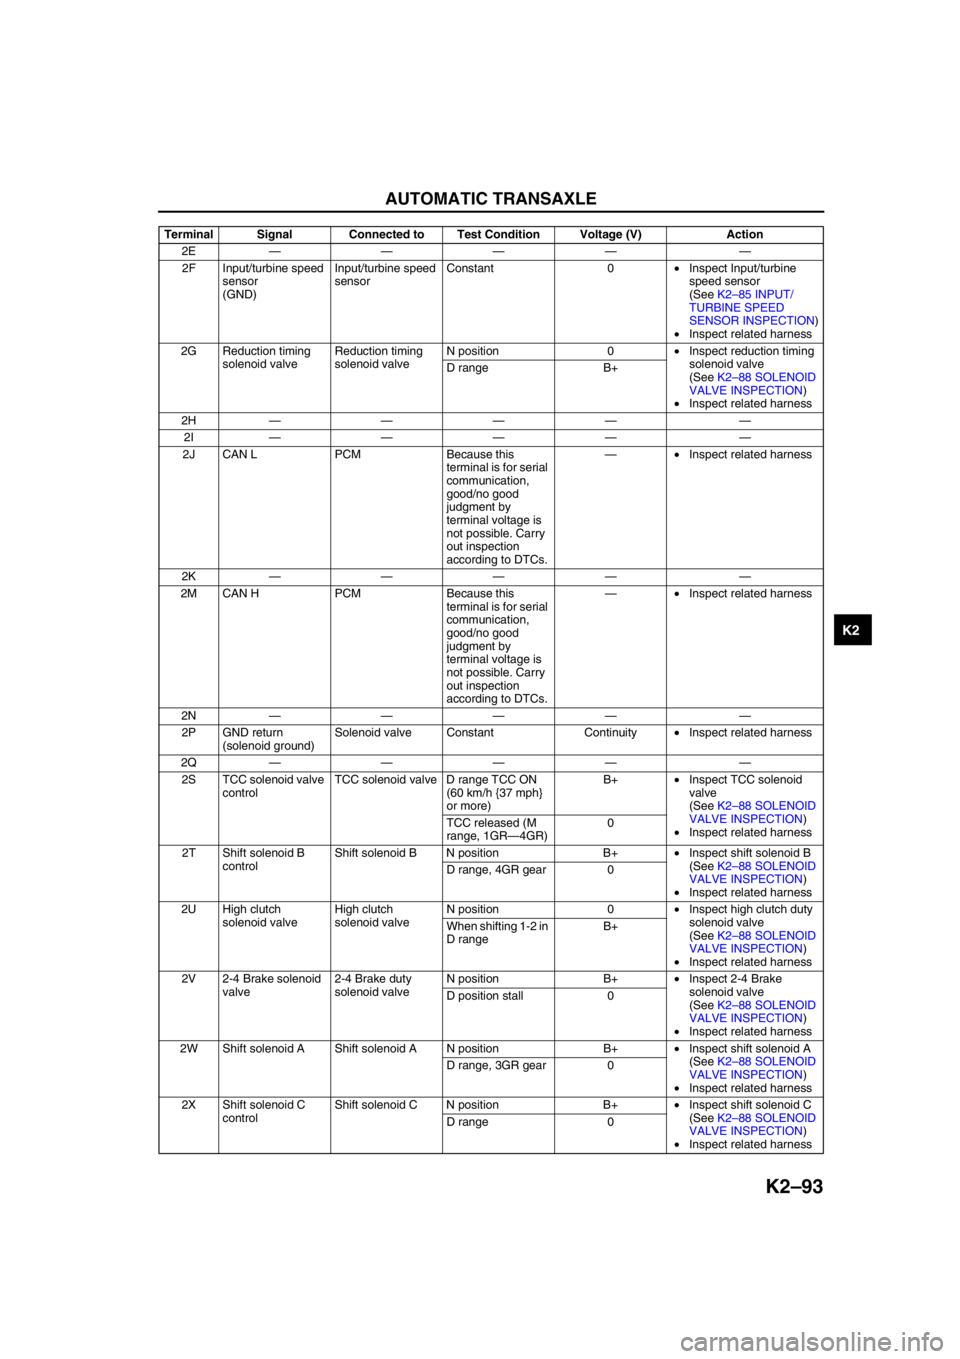
AUTOMATIC TRANSAXLE
K2–93
K2
2E———— —
2F Input/turbine speed
sensor
(GND)Input/turbine speed
sensorConstant 0•Inspect Input/turbine
speed sensor
(See K2–85 INPUT/
TURBINE SPEED
SENSOR INSPECTION)
•Inspect related harness
2G Reduction timing
solenoid valveReduction timing
solenoid valveN position 0•Inspect reduction timing
solenoid valve
(See K2–88 SOLENOID
VALVE INSPECTION)
•Inspect related harness D range B+
2H———— —
2I———— —
2J CAN L PCM Because this
terminal is for serial
communication,
good/no good
judgment by
terminal voltage is
not possible. Carry
out inspection
according to DTCs.—•Inspect related harness
2K———— —
2M CAN H PCM Because this
terminal is for serial
communication,
good/no good
judgment by
terminal voltage is
not possible. Carry
out inspection
according to DTCs.—•Inspect related harness
2N———— —
2P GND return
(solenoid ground)Solenoid valve Constant Continuity•Inspect related harness
2Q———— —
2S TCC solenoid valve
controlTCC solenoid valve D range TCC ON
(60 km/h {37 mph}
or more)B+•Inspect TCC solenoid
valve
(See K2–88 SOLENOID
VALVE INSPECTION)
•Inspect related harness TCC released (M
range, 1GR—4GR)0
2T Shift solenoid B
controlShift solenoid B N position B+•Inspect shift solenoid B
(See K2–88 SOLENOID
VALVE INSPECTION)
•Inspect related harness D range, 4GR gear 0
2U High clutch
solenoid valveHigh clutch
solenoid valveN position 0•Inspect high clutch duty
solenoid valve
(See K2–88 SOLENOID
VALVE INSPECTION)
•Inspect related harness When shifting 1-2 in
D rangeB+
2V 2-4 Brake solenoid
valve2-4 Brake duty
solenoid valveN position B+•Inspect 2-4 Brake
solenoid valve
(See K2–88 SOLENOID
VALVE INSPECTION)
•Inspect related harness D position stall 0
2W Shift solenoid A Shift solenoid A N position B+•Inspect shift solenoid A
(See K2–88 SOLENOID
VALVE INSPECTION)
•Inspect related harness D range, 3GR gear 0
2X Shift solenoid C
controlShift solenoid C N position B+•Inspect shift solenoid C
(See K2–88 SOLENOID
VALVE INSPECTION)
•Inspect related harness D range 0 Terminal Signal Connected to Test Condition Voltage (V) Action
Page 509 of 909
K2–94
AUTOMATIC TRANSAXLE
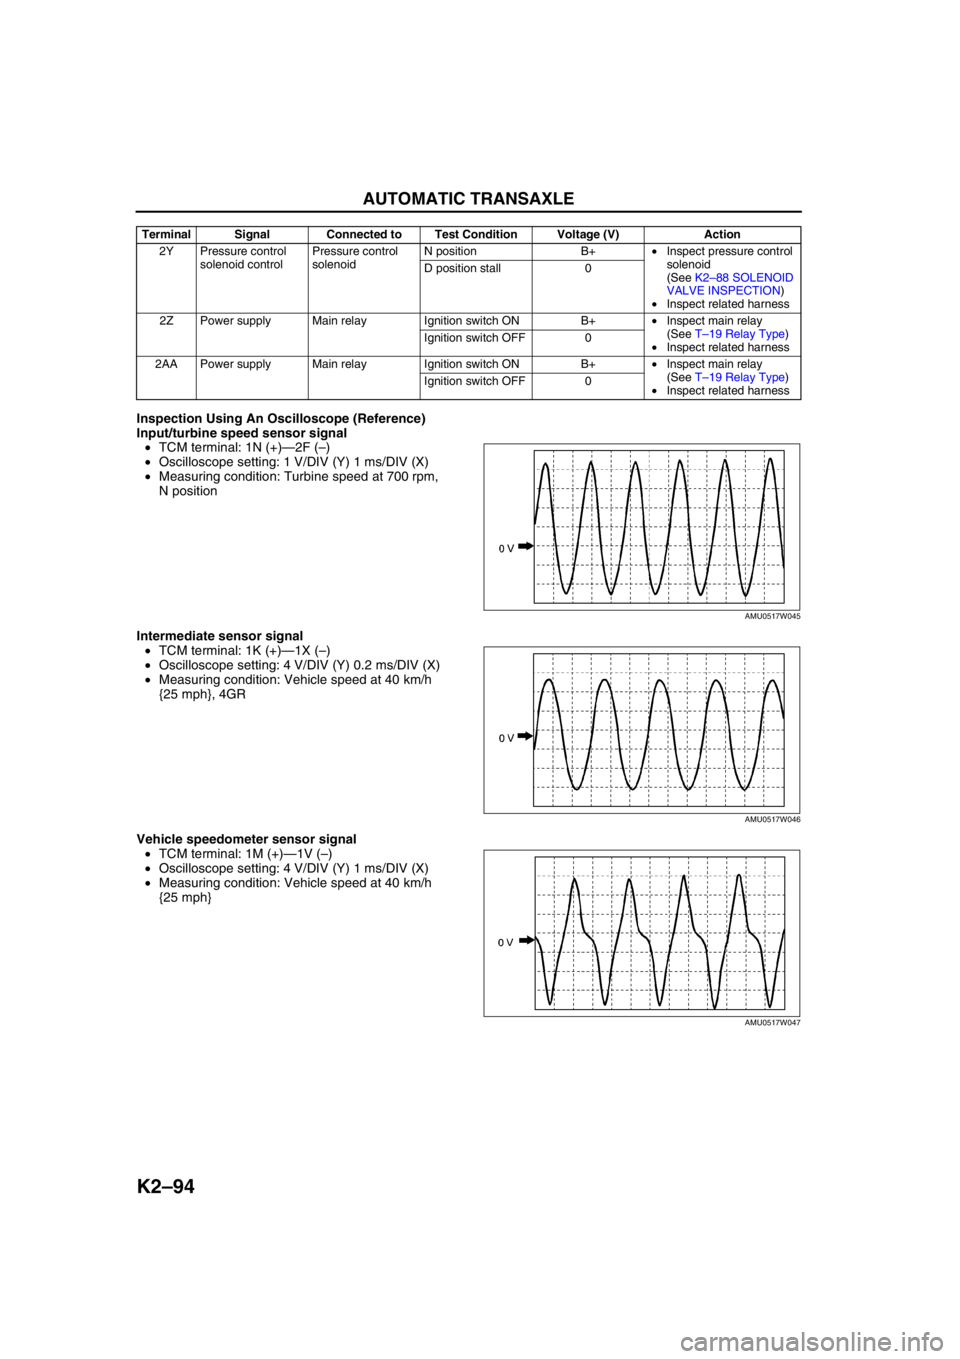
Inspection Using An Oscilloscope (Reference)
Input/turbine speed sensor signal
•TCM terminal: 1N (+)—2F (–)
•Oscilloscope setting: 1 V/DIV (Y) 1 ms/DIV (X)
•Measuring condition: Turbine speed at 700 rpm,
N position
Intermediate sensor signal
•TCM terminal: 1K (+)—1X (–)
•Oscilloscope setting: 4 V/DIV (Y) 0.2 ms/DIV (X)
•Measuring condition: Vehicle speed at 40 km/h
{25 mph}, 4GR
Vehicle speedometer sensor signal
•TCM terminal: 1M (+)—1V (–)
•Oscilloscope setting: 4 V/DIV (Y) 1 ms/DIV (X)
•Measuring condition: Vehicle speed at 40 km/h
{25 mph}
2Y Pressure control
solenoid controlPressure control
solenoidN position B+•Inspect pressure control
solenoid
(See K2–88 SOLENOID
VALVE INSPECTION)
•Inspect related harness D position stall 0
2Z Power supply Main relay Ignition switch ON B+•Inspect main relay
(See T–19 Relay Type)
•Inspect related harness Ignition switch OFF 0
2AA Power supply Main relay Ignition switch ON B+•Inspect main relay
(See T–19 Relay Type)
•Inspect related harness Ignition switch OFF 0 Terminal Signal Connected to Test Condition Voltage (V) Action
AMU0517W045
AMU0517W046
AMU0517W047
Page 514 of 909
AUTOMATIC TRANSAXLE
K2–99
K2
AUTOMATIC TRANSAXLE AND TRANSFER REMOVAL/INSTALLATIONA6E5714190902011. Disconnect the negative battery cable.
2. Remove the battery and battery tray.
3. Remove the aircleaner component. (See Sectin F.)
4. Remove the front tires and splash shield.
5. Remove the under cover.
6. Separate the steering shaft and steering hose. (See N–13 STEERING GEAR AND LINKAGE (4WD)
REMOVAL/INSTALLATION.)
7. Remove the front auto leveling sensor. (See Section T.)
8. Drain the ATF. (See K2–80 AUTOMATIC TRANSAXLE FLUID (ATF) REPLACEMENT.)
Warning
•Improperly jacking a transaxle is dangerous. It can slip off the jack and may cause serious injury.
Caution
•To prevent the torque converter and transaxle from separating, remove the transaxle without
tilting it toward the torque converter.
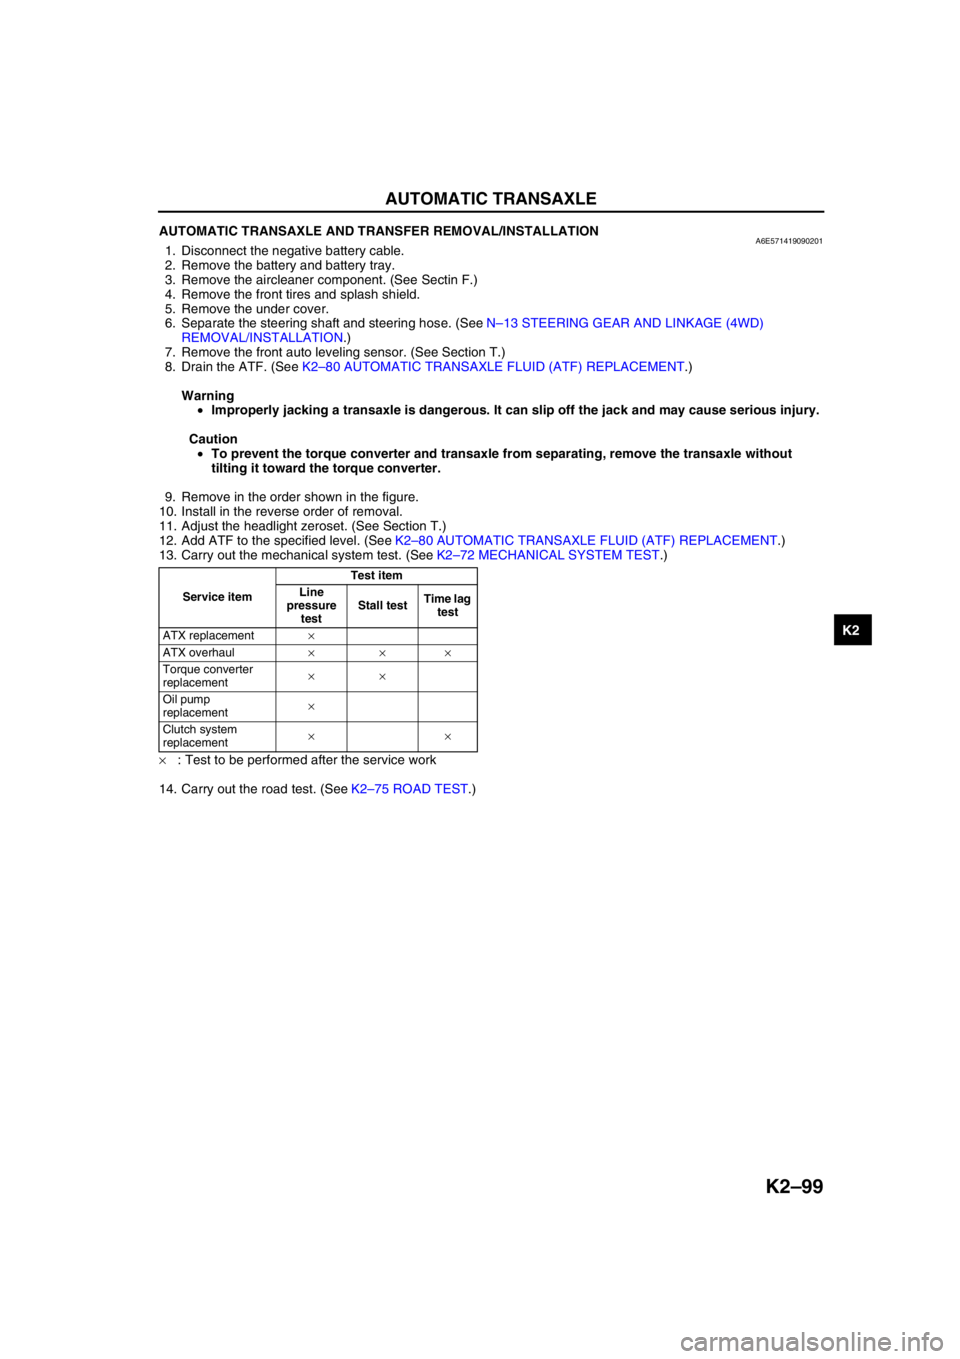
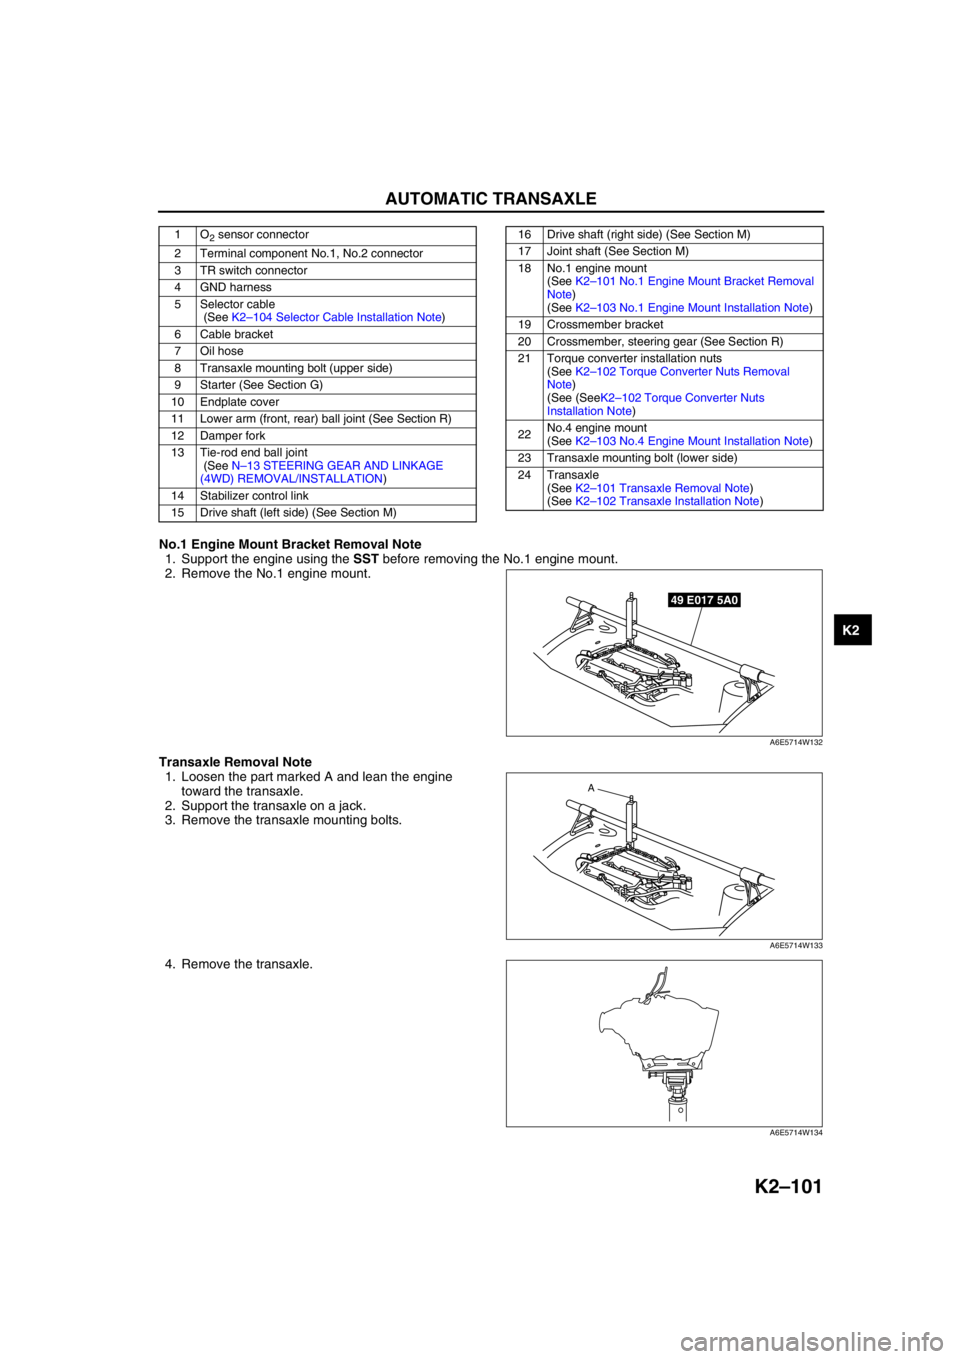
9. Remove in the order shown in the figure.
10. Install in the reverse order of removal.
11. Adjust the headlight zeroset. (See Section T.)
12. Add ATF to the specified level. (See K2–80 AUTOMATIC TRANSAXLE FLUID (ATF) REPLACEMENT.)
13. Carry out the mechanical system test. (See K2–72 MECHANICAL SYSTEM TEST.)
×: Test to be performed after the service work
14. Carry out the road test. (See K2–75 ROAD TEST.)
Service itemTest item
Line
pressure
testStall testTime lag
test
ATX replacement×
ATX overhaul×××
Torque converter
replacement××
Oil pump
replacement×
Clutch system
replacement××
Page 516 of 909
AUTOMATIC TRANSAXLE
K2–101
K2
No.1 Engine Mount Bracket Removal Note
1. Support the engine using the SST before removing the No.1 engine mount.
2. Remove the No.1 engine mount.
Transaxle Removal Note
1. Loosen the part marked A and lean the engine
toward the transaxle.
2. Support the transaxle on a jack.
3. Remove the transaxle mounting bolts.
4. Remove the transaxle.
1O2 sensor connector
2 Terminal component No.1, No.2 connector
3 TR switch connector
4 GND harness
5 Selector cable
(See K2–104 Selector Cable Installation Note)
6 Cable bracket
7 Oil hose
8 Transaxle mounting bolt (upper side)
9 Starter (See Section G)
10 Endplate cover
11 Lower arm (front, rear) ball joint (See Section R)
12 Damper fork
13 Tie-rod end ball joint
(See N–13 STEERING GEAR AND LINKAGE
(4WD) REMOVAL/INSTALLATION)
14 Stabilizer control link
15 Drive shaft (left side) (See Section M)16 Drive shaft (right side) (See Section M)
17 Joint shaft (See Section M)
18 No.1 engine mount
(See K2–101 No.1 Engine Mount Bracket Removal
Note)
(See K2–103 No.1 Engine Mount Installation Note)
19 Crossmember bracket
20 Crossmember, steering gear (See Section R)
21 Torque converter installation nuts
(See K2–102 Torque Converter Nuts Removal
Note)
(See (SeeK2–102 Torque Converter Nuts
Installation Note)
22No.4 engine mount
(See K2–103 No.4 Engine Mount Installation Note)
23 Transaxle mounting bolt (lower side)
24 Transaxle
(See K2–101 Transaxle Removal Note)
(See K2–102 Transaxle Installation Note)
49 E017 5A0
A6E5714W132
A
A6E5714W133
A6E5714W134
Page 541 of 909
K2–126
ON-BOARD DIAGNOSTIC
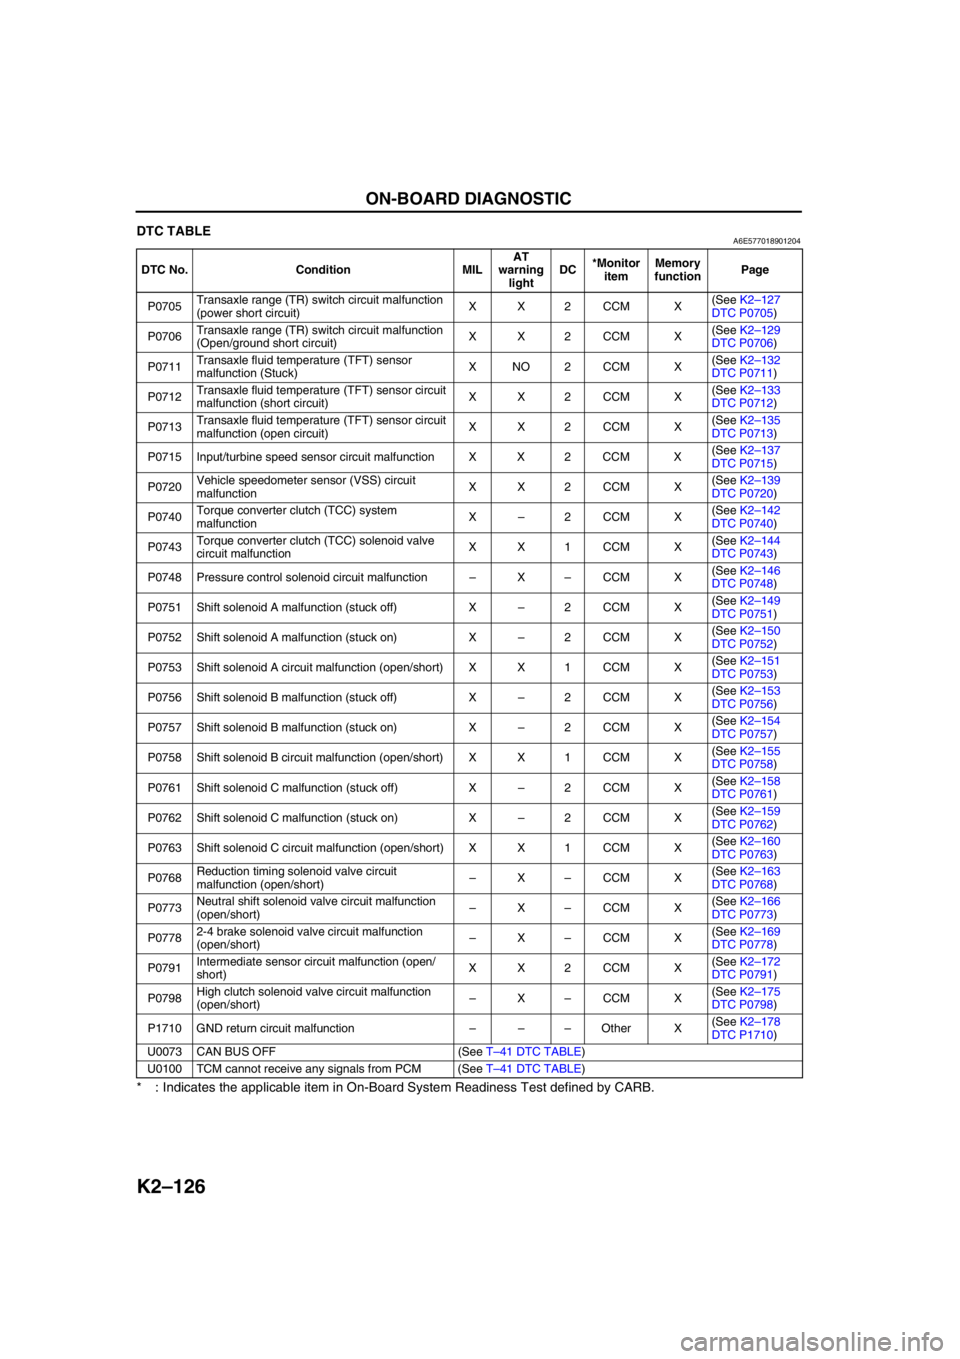
DTC TABLEA6E577018901204
* : Indicates the applicable item in On-Board System Readiness Test defined by CARB.
End Of Sie
DTC No. Condition MILAT
warning
lightDC*Monitor
itemMemory
functionPage
P0705Transaxle range (TR) switch circuit malfunction
(power short circuit)XX2CCM X(See K2–127
DTC P0705)
P0706Transaxle range (TR) switch circuit malfunction
(Open/ground short circuit)XX2CCM X(See K2–129
DTC P0706)
P0711Transaxle fluid temperature (TFT) sensor
malfunction (Stuck)XNO2CCM X(See K2–132
DTC P0711)
P0712Transaxle fluid temperature (TFT) sensor circuit
malfunction (short circuit)XX2CCM X(See K2–133
DTC P0712)
P0713Transaxle fluid temperature (TFT) sensor circuit
malfunction (open circuit)XX2CCM X(See K2–135
DTC P0713)
P0715 Input/turbine speed sensor circuit malfunction X X 2 CCM X(See K2–137
DTC P0715)
P0720Vehicle speedometer sensor (VSS) circuit
malfunctionXX2CCM X(See K2–139
DTC P0720)
P0740Torque converter clutch (TCC) system
malfunctionX–2CCM X(See K2–142
DTC P0740)
P0743Torque converter clutch (TCC) solenoid valve
circuit malfunctionXX1CCM X(See K2–144
DTC P0743)
P0748 Pressure control solenoid circuit malfunction–X–CCM X(See K2–146
DTC P0748)
P0751 Shift solenoid A malfunction (stuck off) X–2CCM X(See K2–149
DTC P0751)
P0752 Shift solenoid A malfunction (stuck on) X–2CCM X(See K2–150
DTC P0752)
P0753 Shift solenoid A circuit malfunction (open/short) X X 1 CCM X(See K2–151
DTC P0753)
P0756 Shift solenoid B malfunction (stuck off) X–2CCM X(See K2–153
DTC P0756)
P0757 Shift solenoid B malfunction (stuck on) X–2CCM X(See K2–154
DTC P0757)
P0758 Shift solenoid B circuit malfunction (open/short) X X 1 CCM X(See K2–155
DTC P0758)
P0761 Shift solenoid C malfunction (stuck off) X–2CCM X(See K2–158
DTC P0761)
P0762 Shift solenoid C malfunction (stuck on) X–2CCM X(See K2–159
DTC P0762)
P0763 Shift solenoid C circuit malfunction (open/short) X X 1 CCM X(See K2–160
DTC P0763)
P0768Reduction timing solenoid valve circuit
malfunction (open/short)–X–CCM X(See K2–163
DTC P0768)
P0773Neutral shift solenoid valve circuit malfunction
(open/short)–X–CCM X(See K2–166
DTC P0773)
P07782-4 brake solenoid valve circuit malfunction
(open/short)–X–CCM X(See K2–169
DTC P0778)
P0791Intermediate sensor circuit malfunction (open/
short)XX2CCM X(See K2–172
DTC P0791)
P0798High clutch solenoid valve circuit malfunction
(open/short)–X–CCM X(See K2–175
DTC P0798)
P1710 GND return circuit malfunction–––Other X(See K2–178
DTC P1710)
U0073 CAN BUS OFF (See T–41 DTC TABLE)
U0100 TCM cannot receive any signals from PCM (See T–41 DTC TABLE)