brake light MAZDA 6 2002 Suplement Owner's Guide
[x] Cancel search | Manufacturer: MAZDA, Model Year: 2002, Model line: 6, Model: MAZDA 6 2002Pages: 909, PDF Size: 17.16 MB
Page 602 of 909

TROUBLESHOOTING
K2–187
K2
End Of Sie
Vehicle dose not move in D range, or in R position
X
X
X
XXX X
XX X
XX X
XX X XX
X
X
X X XX
XX
X XXXXXXXXX
XXX
X
X
X X
XX XXX
X
X
XX X
X
X
X X
X
X
X X
XX
X XXX X XXX
XX X 1
Excessive creep 4
No creep at all 5
Low maximum speed and poor acceleration 6
No shifting 7
Does not shift to fifth gear (5GR) 8
Abnormal shifting 9
Frequent shifting 10
Shift point is high or low 11
Torque converter clutch (TCC) non-operation 12
No kickdown 13
Engine flares up or slips when upshifting or downshifting 14
Engine flares up or slip when accelerating vehicle 15
Judder upon torque converter clutch (TCC) operation 16
Excessive shift shock from N to D or N to R position/range 17
Excessive shift shock on torque converter clutch (TCC) 19
No engine braking in 1GR position of M range 22
Transaxle overheats 23
Engine stalls when shifted to D range, or in R position 24
Engine stalls when driving at slow speeds or stopping 25
Starter does not work 26Excessive shift shock is given when upshifting and
downshifting 18
Noise occurs at idle when vehicle is stopped in all
positions/ranges 20
Noise occurs at idle when vehicle is stopped in D
range, or in R position 21
Gear position indicator light illuminates in D range or P, N,
R positions 28Gear position indicator light does not illuminate in M range
Hydraulic system
components
Control valve bodyPowertrain 27
Does not shift up in M range
29
Does not shift down in M range
Symptom item
Cause of trouble
Reduction accumulator is not operating properly
Clogging
Clogging
Clogging
Clogging
Clogging
Clogging
Clogging Clogging
Clogging
Slipping (clutch, brake) Oil cooler is not operating properly
Torque converter is not operating properly Burned (clutch, brake)
TCC piston is not operating properly TCC piston is cracking or peeling2-4 brake solenoid valve hydraulic circuit Pressure control solenoid hydraulic circuit
TCC solenoid valve hydraulic circuit
High clutch solenoid valve hydraulic circuit
Shift solenoid A hydraulic circuit
Shift solenoid B hydraulic circuit
Shift solenoid C hydraulic circuit
Neutral shift solenoid valve
Reducation timing solenoid valve
30Vehicle moves in N position 2
Vehicle moves in P position, or parking gear does not
disengage when P is disengaged 3
A6E5780W003
Page 615 of 909

K2–200
TROUBLESHOOTING
Diagnostic procedure
End Of SieNO.25 ENGINE STALLS WHEN DRIVING AT SLOW SPEED OR STOPPINGA6E578001030228
Diagnostic procedure
End Of SieNO.26 STARTER DOES NOT WORKA6E578001030229
End Of SieNO.27 GEAR POSITION INDICATOR LIGHT DOES NOT ILLUMINATE IN M RANGEA6E578001030230
Diagnostic procedure
STEP INSPECTION ACTION
1•Go to symptom troubleshooting No.4
“Engine stalls-after start/at idle”.
(See Section F.)
•Is engine control system okay?Yes Go to next step.
No Repair or replace any defective parts according to
inspection results.
2•Remove torque converter.
•Inspect torque converter.
(See ATX Workshop Manual.)
•Is torque converter okay?Yes•Inspect for bend, damage or kinks of oil cooler line
pipes. If okay, overhaul control valve body and repair or
replace any defective parts.
(See ATX Workshop Manual.)
•If problem remains, replace or overhaul transaxle and
repair or replace any defective parts.
(See ATX Workshop Manual.)
No Replace torque converter.
3•Verify test results.
—If okay, return to diagnostic index to service any additional symptoms.
—If malfunction remains, inspect related Service Informations and perform repair or diagnosis.
—If vehicle repaired, troubleshooting completed.
—If vehicle not repaired or additional diagnostic information not available, replace TCM.
25 Engine stalls when driving at slow speeds or stopping
DESCRIPTION•Engine stalls when brake pedal depressed while driving at low speed or stopping.
POSSIBLE
CAUSE•Malfunction is on engine control side (e.g. Fuel injection control, IAC system)
Note
•Before following troubleshooting steps, make sure that Automatic Transaxle On-Board Diagnostic
and Automatic Transaxle Basic Inspection are conducted.
STEP INSPECTION ACTION
1•Go to symptom troubleshooting No.10 “Low
idle/stalls during deceleration”.
(See Section F.)
•Is engine control system okay?Yes Go to symptom troubleshooting No.24 “Engine stalls when
shifted to D range, or in R position”.
No Repair or replace any defective parts according to
inspection results.
2•Verify test results.
—If okay, return to diagnostic index to service any additional symptoms.
—If malfunction remains, inspect related Service Informations and perform repair or diagnosis.
—If vehicle repaired, troubleshooting completed.
—If vehicle not repaired or additional diagnostic information not available, replace TCM.
26Starter does not work
DESCRIPTION•Starter does not work even when P or N position.
POSSIBLE
CAUSE•Selector lever misadjustment.
•TR switch misadjustment.
•Open or short circuit in TR switch.
27 Gear position indicator light does not illuminate in M range
DESCRIPTION•Gear position indicator light in instrument cluster does not illuminate in M range and ignition switch at
on.
POSSIBLE
CAUSE•M range switch, gear position indicator light or related wiring harness malfunction.
Note
•Before following troubleshooting steps, make sure that Automatic Transaxle On-Board Diagnostic
and Automatic Transaxle Basic Inspection are conducted.
STEP INSPECTION ACTION
1•Are other indicator lights illuminated with
ignition switch on? Yes Go to next step.
No Inspect meter fuse.
Page 643 of 909
ELECTRONIC 4WD CONTROL SYSTEM
M–13
M
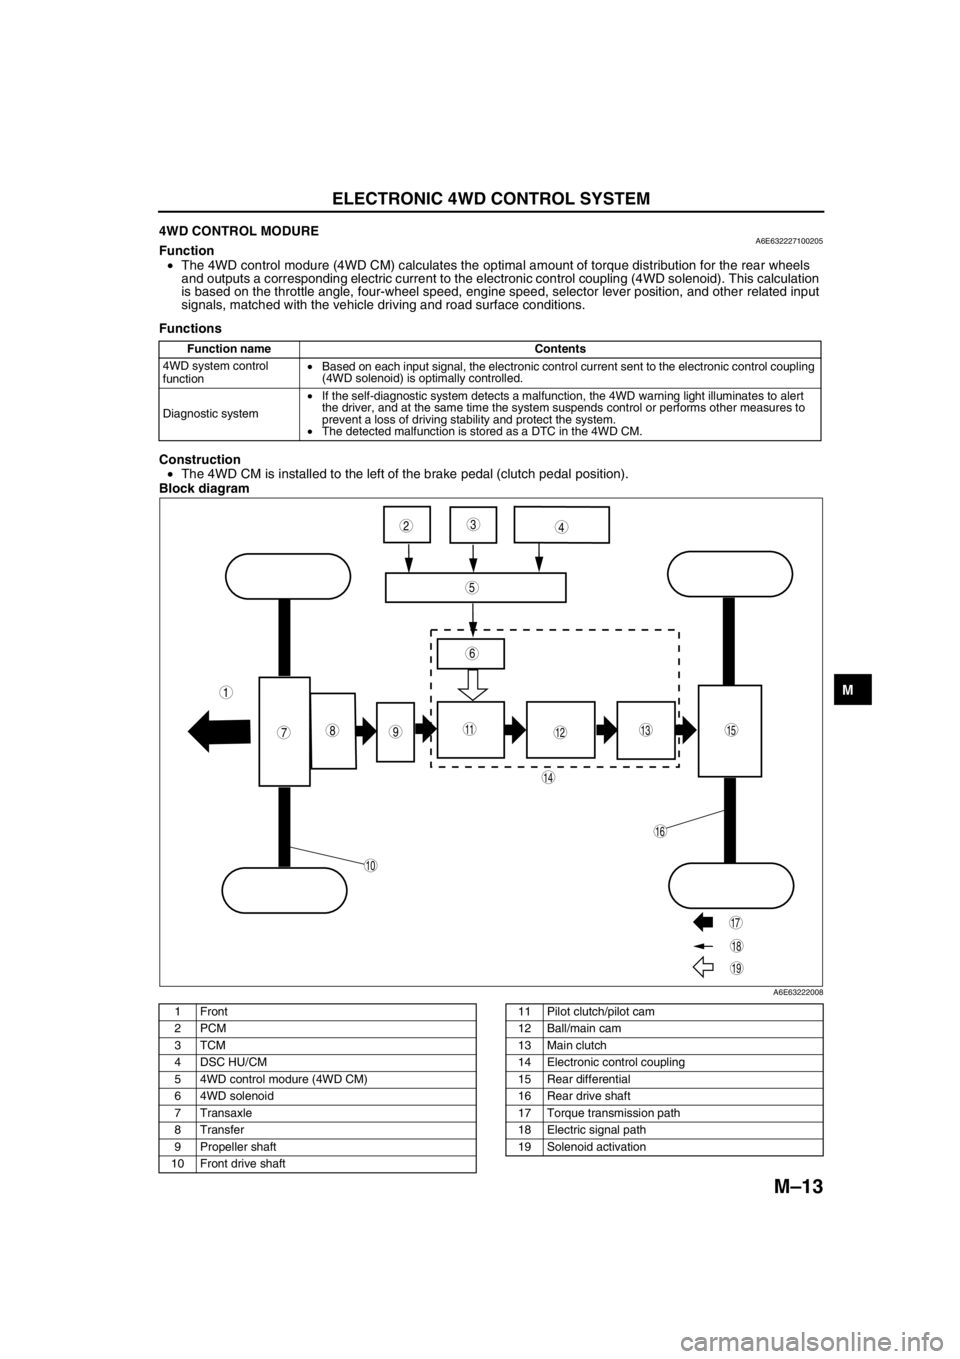
4WD CONTROL MODUREA6E632227100205Function
•The 4WD control modure (4WD CM) calculates the optimal amount of torque distribution for the rear wheels
and outputs a corresponding electric current to the electronic control coupling (4WD solenoid). This calculation
is based on the throttle angle, four-wheel speed, engine speed, selector lever position, and other related input
signals, matched with the vehicle driving and road surface conditions.
Functions
Construction
•The 4WD CM is installed to the left of the brake pedal (clutch pedal position).
Block diagram
.
Function name Contents
4WD system control
function•Based on each input signal, the electronic control current sent to the electronic control coupling
(4WD solenoid) is optimally controlled.
Diagnostic system•If the self-diagnostic system detects a malfunction, the 4WD warning light illuminates to alert
the driver, and at the same time the system suspends control or performs other measures to
prevent a loss of driving stability and protect the system.
•The detected malfunction is stored as a DTC in the 4WD CM.
987
5
43
10
19
18
17
15
16
14
131112
6
1
2
A6E63222008
1Front
2PCM
3TCM
4 DSC HU/CM
5 4WD control modure (4WD CM)
6 4WD solenoid
7Transaxle
8Transfer
9 Propeller shaft
10 Front drive shaft11 Pilot clutch/pilot cam
12 Ball/main cam
13 Main clutch
14 Electronic control coupling
15 Rear differential
16 Rear drive shaft
17 Torque transmission path
18 Electric signal path
19 Solenoid activation
Page 652 of 909
M–22
REAR AXLE
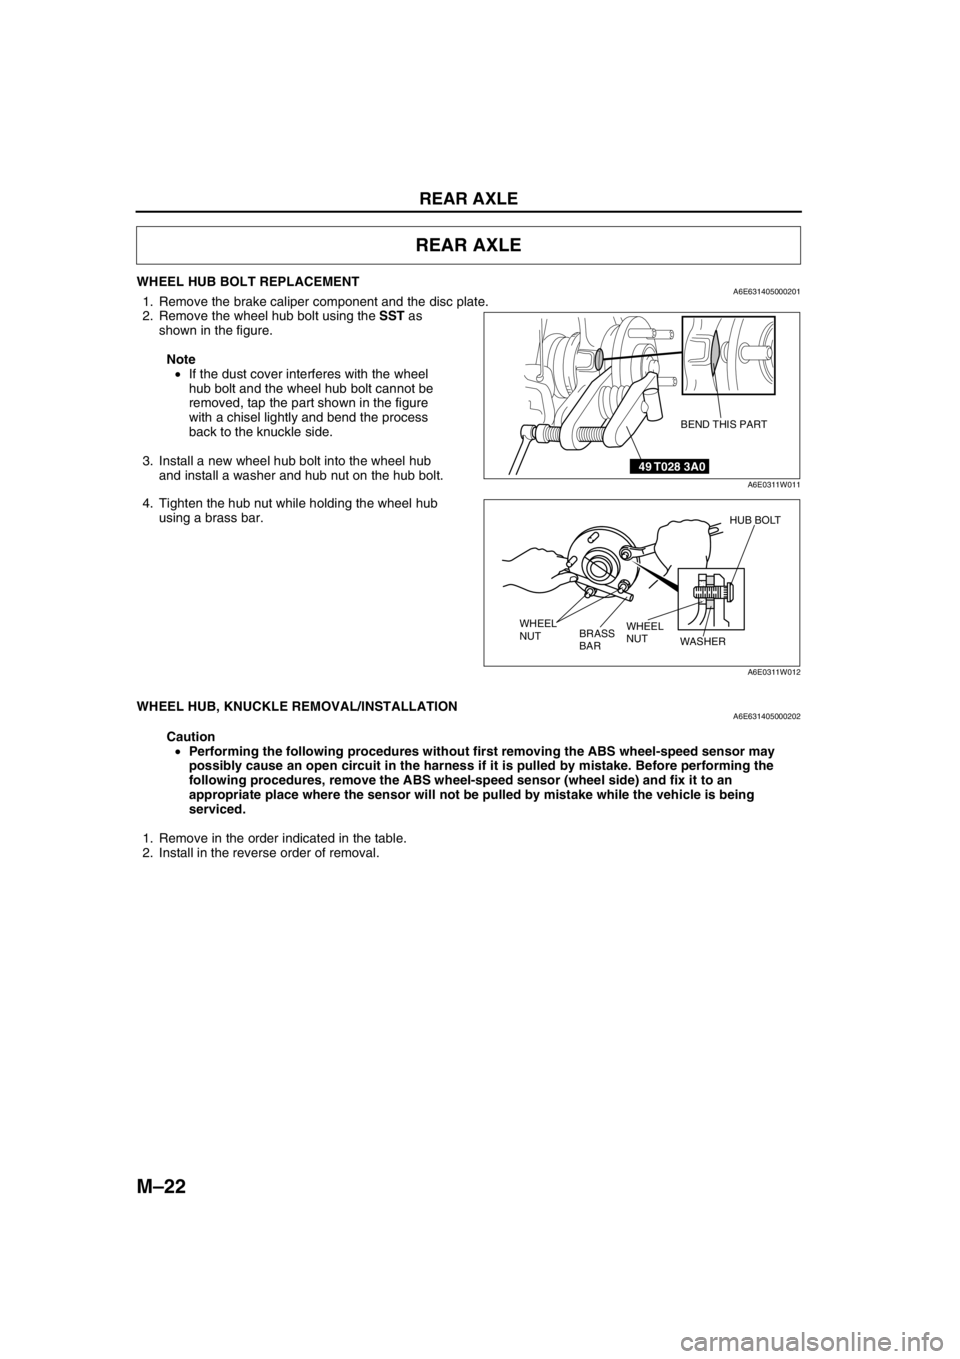
WHEEL HUB BOLT REPLACEMENTA6E6314050002011. Remove the brake caliper component and the disc plate.
2. Remove the wheel hub bolt using the SST as
shown in the figure.
Note
•If the dust cover interferes with the wheel
hub bolt and the wheel hub bolt cannot be
removed, tap the part shown in the figure
with a chisel lightly and bend the process
back to the knuckle side.
3. Install a new wheel hub bolt into the wheel hub
and install a washer and hub nut on the hub bolt.
4. Tighten the hub nut while holding the wheel hub
using a brass bar.
End Of Sie
WHEEL HUB, KNUCKLE REMOVAL/INSTALLATIONA6E631405000202
Caution
•Performing the following procedures without first removing the ABS wheel-speed sensor may
possibly cause an open circuit in the harness if it is pulled by mistake. Before performing the
following procedures, remove the ABS wheel-speed sensor (wheel side) and fix it to an
appropriate place where the sensor will not be pulled by mistake while the vehicle is being
serviced.
1. Remove in the order indicated in the table.
2. Install in the reverse order of removal.
REAR AXLE
49 T028 3A0
BEND THIS PART
A6E0311W011
HUB BOLT
WHEEL
NUT WHEEL
NUT
WASHER
BRASS
BAR
A6E0311W012
Page 713 of 909
TROUBLESHOOTING
M–83
M
Diagnostic procedure
End Of Sie
NO.2 TIGHT CORNER BRAKINGA6E638027100205
Diagnostic procedure
STEP INSPECTION ACTION
1VERIFY DSC, PCM, TCM, AND 4WD SYSTEM
DTCs
•Verify DSC, PCM, TCM, and 4WD system
DTCs using WDS or equivalent.
•Are there any DTCs present?Yes Go to applicable DTC inspection.
No Go to next step.
2VERIFY TIRE AIR PRESSURE
•Inspect tire air pressure.
•Is it within specification?Yes Go to next step.
No Adjust tire air pressure, then go to next step.
3COMPARE WITH SAME MODEL TIRES
•Install tires of the same model.
•Perform simulation driving.
•Does malfunction recur?Yes Go to next step.
No 4WD system is okay.
4COMPARE WITH SAME MODEL VEHICLE
•Install tires of malfunctioning vehicle to
another same model vehicle.
•Perform simulation driving.
•Does malfunction recur?Yes 4WD system is okay.
No Go to next step.
5INSPECT 4WD SOLENOID
•Inspect 4WD solenoid.
(See M–66 4WD SOLENOID INSPECTION)
•Is coupling component solenoid okay?Yes Inspect harness between 4WD solenoid and 4WD CM, then
go to next step.
No Replace coupling component.
6INSPECT WHEEL ALIGNMENT
•Inspect wheel alignment.
•Is it okay?Yes Replace coupling component.
No Inspect wheel alignment, and adjust it if necessary.
2 Tight corner braking
[TROUBLESHOOTING HINTS]
•Because the coupling component locks up easily (similar to direct 4WD), rotational difference between the front
and rear wheels cannot be absorbed and brake-like phenomenon occurs.
•Due to the coupling component construction, slight tight corner braking effect occurs during tight cornering on a
paved road. (4WD system is okay. Compare with another same model vehicle to determine malfunction.)
•Coupling component malfunction
•4WD solenoid malfunction
STEP INSPECTION ACTION
1VERIFY DSC, PCM, TCM, AND 4WD SYSTEM
DTCS
•Verify DSC, PCM, TCM, and 4WD system
DTCs using WDS or equivalent.
•Are there any DTCs present?Yes Go to applicable DTC inspection.
No Go to next step.
2VERIFY TIRE AIR PRESSURE
•Inspect tire air pressure.
•Is it within specification?Yes Go to next step.
No Adjust tire air pressure, then go to next step.
3INSPECT ABS WHEEL-SPEED SENSOR
•Inspect ABS wheel-speed sensor.
•Is it okay?Yes Go to next step.
No Repair or replace malfunctioning part.
4COMPARE WITH SAME MODEL VEHICLE
•Perform simulation driving with another
same model vehicle.
•Does malfunction recur on the same model
vehicle?Yes 4WD system is okay.
No Go to next step.
5PERFORM SIMULATION DRIVING WITH 4WD
SOLENOID CONNECTOR DISCONNECTED
•Turn ignition key OFF.
•Disconnect 4WD solenoid connector.
•Perform simulation driving. (Clear DTC after
simulation driving.)
•Does malfunction recur?Yes Replace coupling component.
No Go to next step.
Page 737 of 909
P–4
ABS/TCS
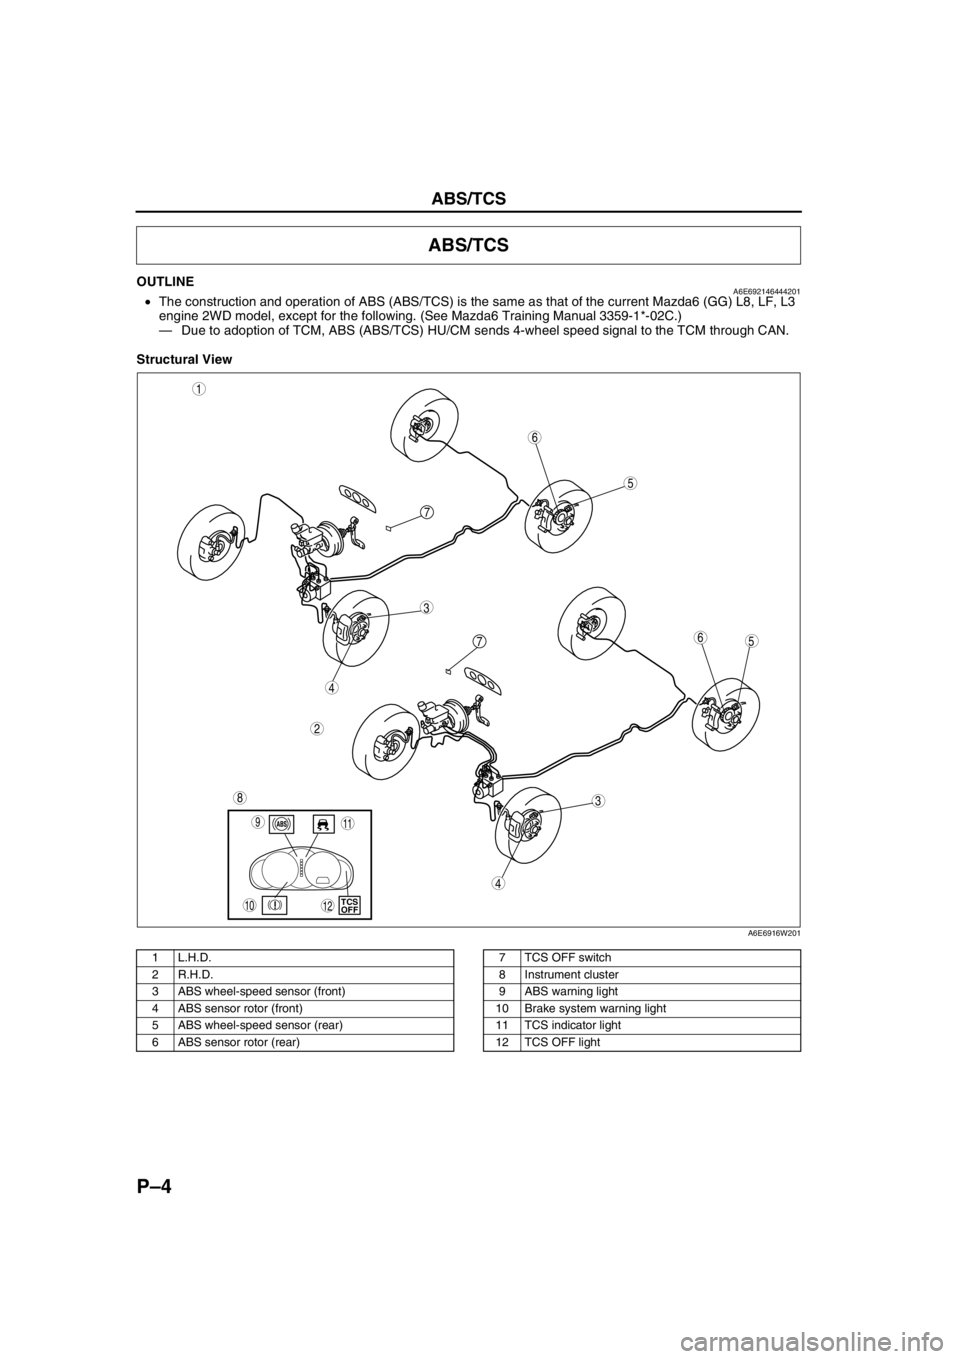
OUTLINEA6E692146444201•The construction and operation of ABS (ABS/TCS) is the same as that of the current Mazda6 (GG) L8, LF, L3
engine 2WD model, except for the following. (See Mazda6 Training Manual 3359-1*-02C.)
—Due to adoption of TCM, ABS (ABS/TCS) HU/CM sends 4-wheel speed signal to the TCM through CAN.
Structural View
.
ABS/TCS
5
3
1
2
6
7
5
3
6
8
4
4
7
9
10TCS
OFF
11
12
A6E6916W201
1 L.H.D.
2 R.H.D.
3 ABS wheel-speed sensor (front)
4 ABS sensor rotor (front)
5 ABS wheel-speed sensor (rear)
6 ABS sensor rotor (rear)7 TCS OFF switch
8 Instrument cluster
9 ABS warning light
10 Brake system warning light
11 TCS indicator light
12 TCS OFF light
Page 738 of 909

ABS/TCS
P–5
P
System Diagram
.
End Of Sie
9
9
8
7
5
43
12
6
18
17
15
16
14
13
11
12
RF
FL
RR
RL
PCMG
E
FI Z
U
D
A
B
C
Y
AC
X
V O
R ADAB AA
ABS/TCS HU/CM
pP
9
10
19
920
A6E6921W201
1 IG switch
2SUS 15 A fuse
3 ABS 60 A fuse
4 Meter
5 ABS warning light
6 Brake system warning light
7 TCS OFF light
8 TCS indicator light
9CAN driver
10 Brake light11 Cruise actuator
12 TCS OFF switch
13 DLC-2
14 CAN-H
15 CAN-L
16 ABS Wheel-speed sensor
17 Battery
18 Brake switch
19 Audio unit, Wiper and washer switch, Car-navigation
unit, Auto leveling control unit
20 TCM, 4WD CM
Page 739 of 909
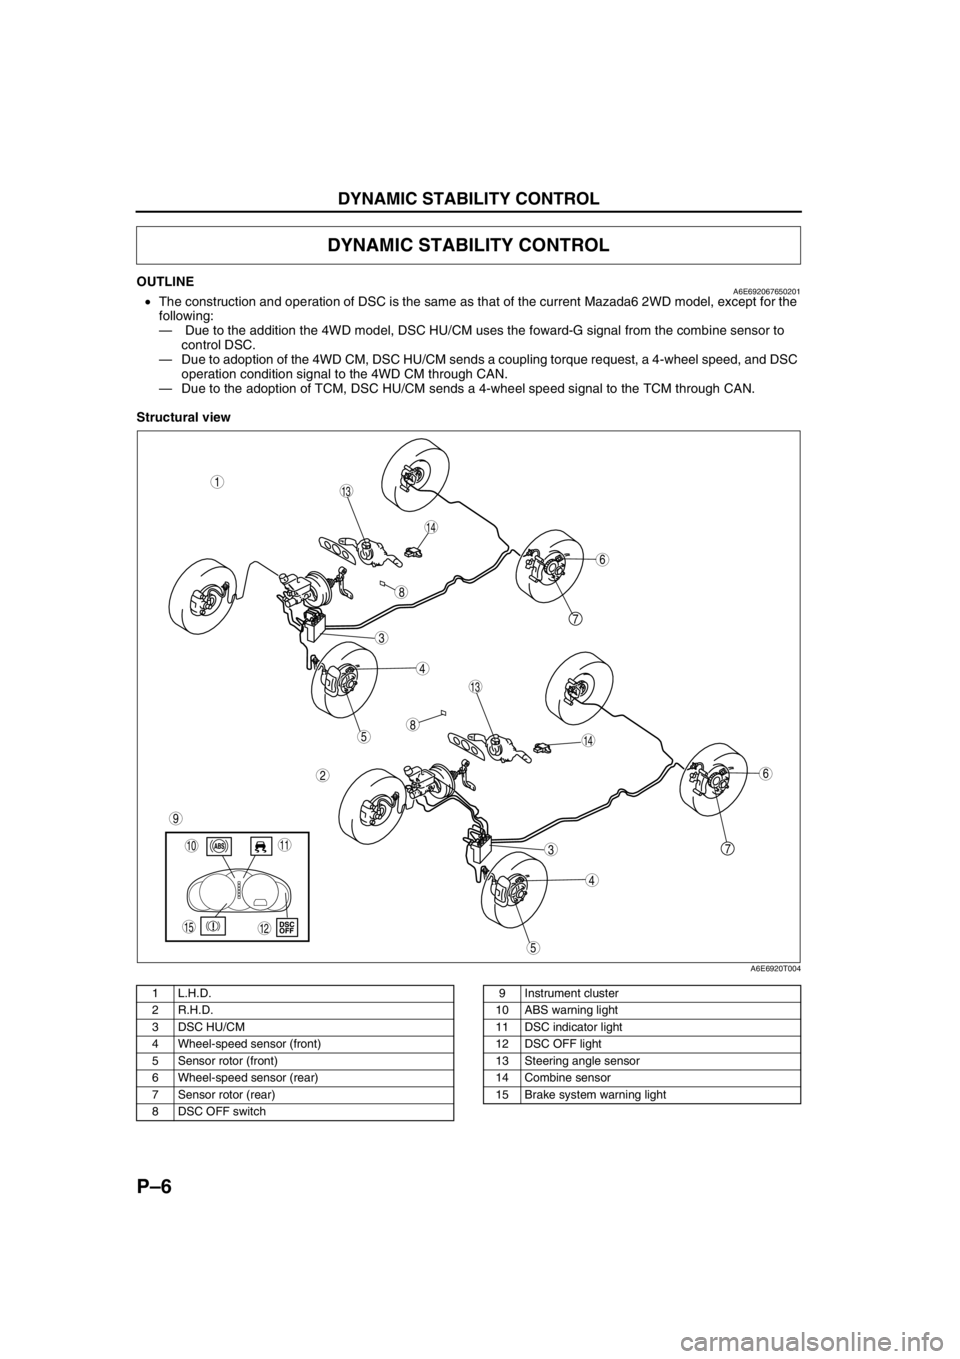
P–6
DYNAMIC STABILITY CONTROL
OUTLINEA6E692067650201•The construction and operation of DSC is the same as that of the current Mazada6 2WD model, except for the
following:
— Due to the addition the 4WD model, DSC HU/CM uses the foward-G signal from the combine sensor to
control DSC.
—Due to adoption of the 4WD CM, DSC HU/CM sends a coupling torque request, a 4-wheel speed, and DSC
operation condition signal to the 4WD CM through CAN.
—Due to the adoption of TCM, DSC HU/CM sends a 4-wheel speed signal to the TCM through CAN.
Structural view
.
DYNAMIC STABILITY CONTROL
7
5
4
3
1
2
14
13
6
13
12
5
4
3
7
6
1011
9
14
8
8
15
A6E6920T004
1 L.H.D.
2 R.H.D.
3 DSC HU/CM
4 Wheel-speed sensor (front)
5 Sensor rotor (front)
6 Wheel-speed sensor (rear)
7 Sensor rotor (rear)
8 DSC OFF switch9 Instrument cluster
10 ABS warning light
11 DSC indicator light
12 DSC OFF light
13 Steering angle sensor
14 Combine sensor
15 Brake system warning light
Page 740 of 909

DYNAMIC STABILITY CONTROL
P–7
P
Wiring Diagram
.
9
RF
FL
RR
RL
PCM
G
E
M
I
F
K
H
Q
NJ
P
S
T
V
O
Y
X
W
U
R
L
Z
AC
D
B
AG
AF
AE
AC
AA
AB
C
F
D
A
B
EDSC HU/CM
A
B
C
D
F
1
3
2
8
7
5
4
6
9
9
9
10
11
13
12
15
14
18
17
16
1920
2122
24
23
A6E6921W203
1 IG switch
2SUS 15A fuse
3 ABS 60 A fuse
4 Meter
5 ABS warning light
6 Brake system warning light
7 DSC OFF light
8 DSC indicator light
9CAN driver
10 Battery
11 Cruise actuator
12 DSC OFF switch13 DLC-2
14 CAN-H
15 CAN-L
16 Wheel-speed sensor
17 Combine sensor
18 Steering angle sensor
19 Brake switch
20 Brake light
21 Back-up light switch (MTX only)
22 Back-up light (MTX only)
23 Audio unit, Wiper and washer switch, Car-navigation
unit, Auto leveling control unit
24 TCM, 4WD CM
Page 742 of 909

ON-BOARD DIAGNOSTIC
P–9
P
OUTLINEA6E697043000201•The operation of the on-board diagnostic system for ABS (ABS/TCS) or DSC is the same as that of the current
Mazda6 (GG) L8, LF, L3 engine 2WD model, except for the following. (See Mazda6 Training Manual
3359-1*-02C.)
— Due to the addition of the 4WD model, DTCs and PID data monitor has been added.
—Due to the addition of the MZR-CD (RF Turbo) engine model, the DTC C1119 fail-safe function and the
detection condition have been changed.
Fail-safe Function
Fail-safe function table
*1: When engine speed signal through CAN is out of specification, the light illuminates.*2: When engine speed signal through CAN is out of specification, the system is suspended.*3: When engine speed signal value through CAN is invalid, only brake TCS is available.*4: When fuel injection information through CAN is out of specification or invalid, only brake TCS is available.*5: When engine speed signal value through CAN is invalid, only brake DSC is available.*6: When the engine control system has a malfunction, only brake DSC is available.
PID/DATA Monitor Table
End Of Sie
ON-BOARD DIAGNOSTIC
Malfunc-
tion
locationDTC Fail-safe function
WDS
or
equiva-
lentWarning light illumination condition Control condition
ABS
warning
lightBRAKE
system
warning
light
(when
parking
brake is
released)DSC
(TCS)
OFF lightDSC
(TCS)
indicator
light ABS
controlEBD
controlTCS
controlDSC
controlBrake
assist
control
PCM and/
or engine
speed
signal lineC1119Not
Illuminated Not
Illuminated Not
Illuminated
*1Illuminated Available AvailableAvailable*2, *3, *4Available*2, *5, *6Available
Combine
sensor
(forward-
G) lineC1949
Illuminated Not
Illuminated Illuminated IlluminatedNot
availableAvailable—Not
availableNot
available
C1950
CAN line U2511Not
Illuminated Not
Illuminated Not
Illuminated Illuminated Available Available—Available Available
PID name input/output part Operation/unit
ACCLMTR Accelerometer ACCELERATION