engine MAZDA 6 2002 Workshop Manual Suplement
[x] Cancel search | Manufacturer: MAZDA, Model Year: 2002, Model line: 6, Model: MAZDA 6 2002Pages: 909, PDF Size: 17.16 MB
Page 720 of 909

N–6
ENGINE SPEED SENSING POWER STEERING
POWER STEERING FLUID INSPECTIONA6E661432040201Fluid Level Inspection
1. Inspect the power steering fluid level.
•Add fluid to the specified level as necessary.
Fluid specification
ATF M-III or equivalent (e.g. Dexron
®II)
Fluid Leakage Inspection
Caution
•If the steering wheel is kept in the fully turned position for more than 5 seconds, the fluid
temperature will rise excessively and adversely affect the oil pump.
1. Start the engine and let it idle.
2. Turn the steering wheel fully to the left and right to apply fluid pressure.
Note
•The points where fluid leakage may occur are indicated in the figure.
3. Inspect for fluid leakage.
•If fluid leakage is found, replace the related pipe or hose.
ENGINE SPEED SENSING POWER STEERING
L.H.D.
ATX
MTX
R.H.D.
ATX
MTX MZR-CD (RF Turbo)
EXCEPT MZR-CD (RF Turbo)L.H.D
R.H.D
A6E66142001
Page 721 of 909

ENGINE SPEED SENSING POWER STEERING
N–7
N
Fluid Pressure Inspection
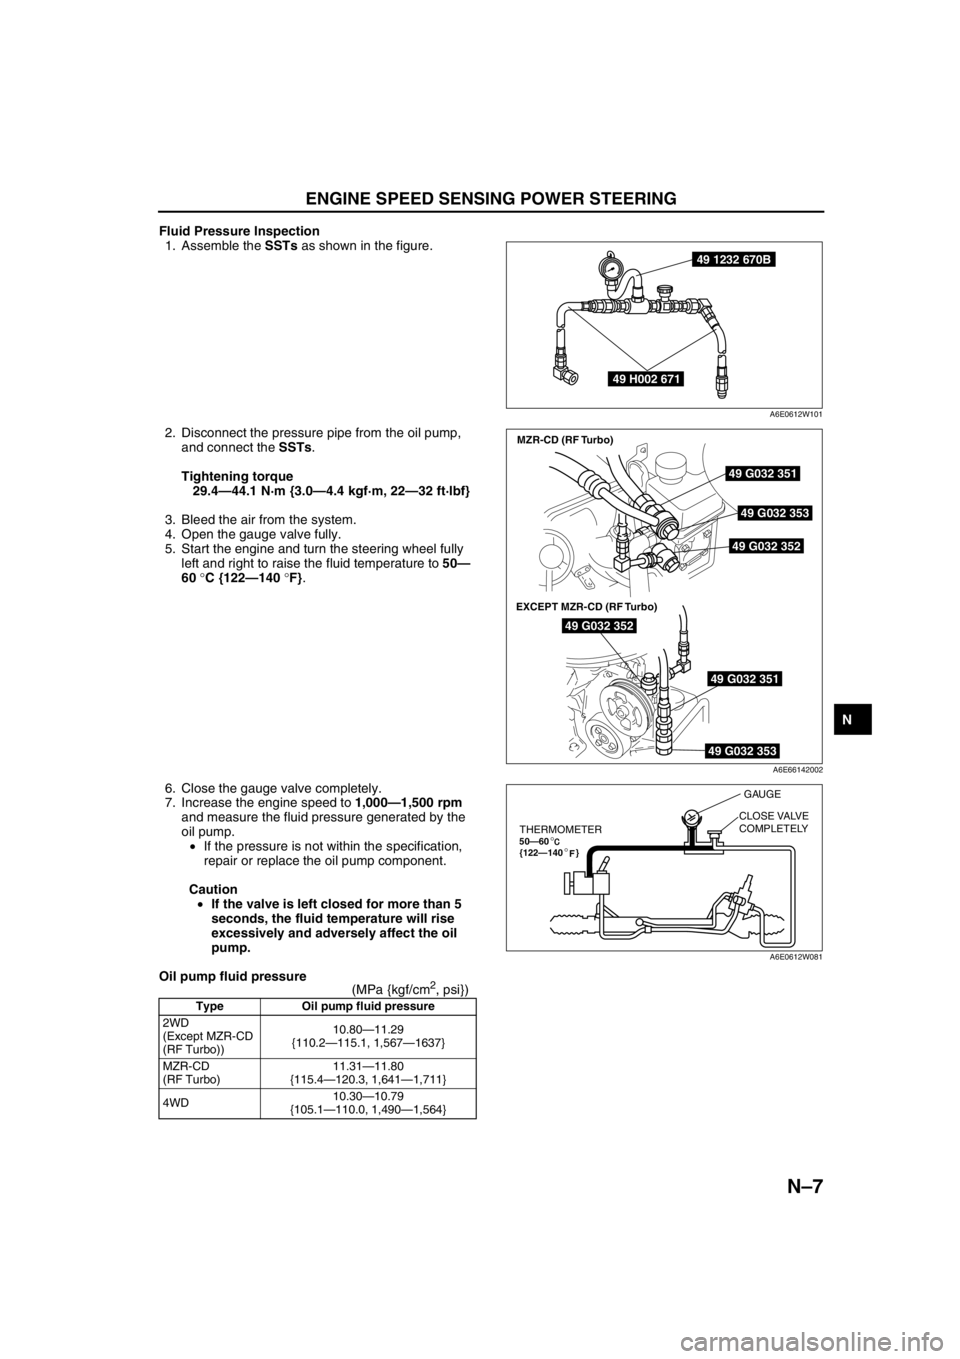
1. Assemble the SSTs as shown in the figure.
2. Disconnect the pressure pipe from the oil pump,
and connect the SSTs.
Tightening torque
29.4—44.1 N·m {3.0—4.4 kgf·m, 22—32 ft·lbf}
3. Bleed the air from the system.
4. Open the gauge valve fully.
5. Start the engine and turn the steering wheel fully
left and right to raise the fluid temperature to 50—
60 °C {122—140 °F}.
6. Close the gauge valve completely.
7. Increase the engine speed to 1,000—1,500 rpm
and measure the fluid pressure generated by the
oil pump.
•If the pressure is not within the specification,
repair or replace the oil pump component.
Caution
•If the valve is left closed for more than 5
seconds, the fluid temperature will rise
excessively and adversely affect the oil
pump.
Oil pump fluid pressure
(MPa {kgf/cm
2, psi})
Type Oil pump fluid pressure
2WD
(Except MZR-CD
(RF Turbo))10.80—11.29
{110.2—115.1, 1,567—1637}
MZR-CD
(RF Turbo)11.31—11.80
{115.4—120.3, 1,641—1,711}
4WD10.30—10.79
{105.1—110.0, 1,490—1,564}
49 1232 670B
49 H002 671
A6E0612W101
49 G032 351
49 G032 353
49 G032 352
49 G032 352
49 G032 351
49 G032 353
MZR-CD (RF Turbo)
EXCEPT MZR-CD (RF Turbo)
A6E66142002
THERMOMETER50—60
{122—140 }°
°F
GAUGE
CLOSE VALVE
COMPLETELY
A6E0612W081
Page 722 of 909

N–8
ENGINE SPEED SENSING POWER STEERING
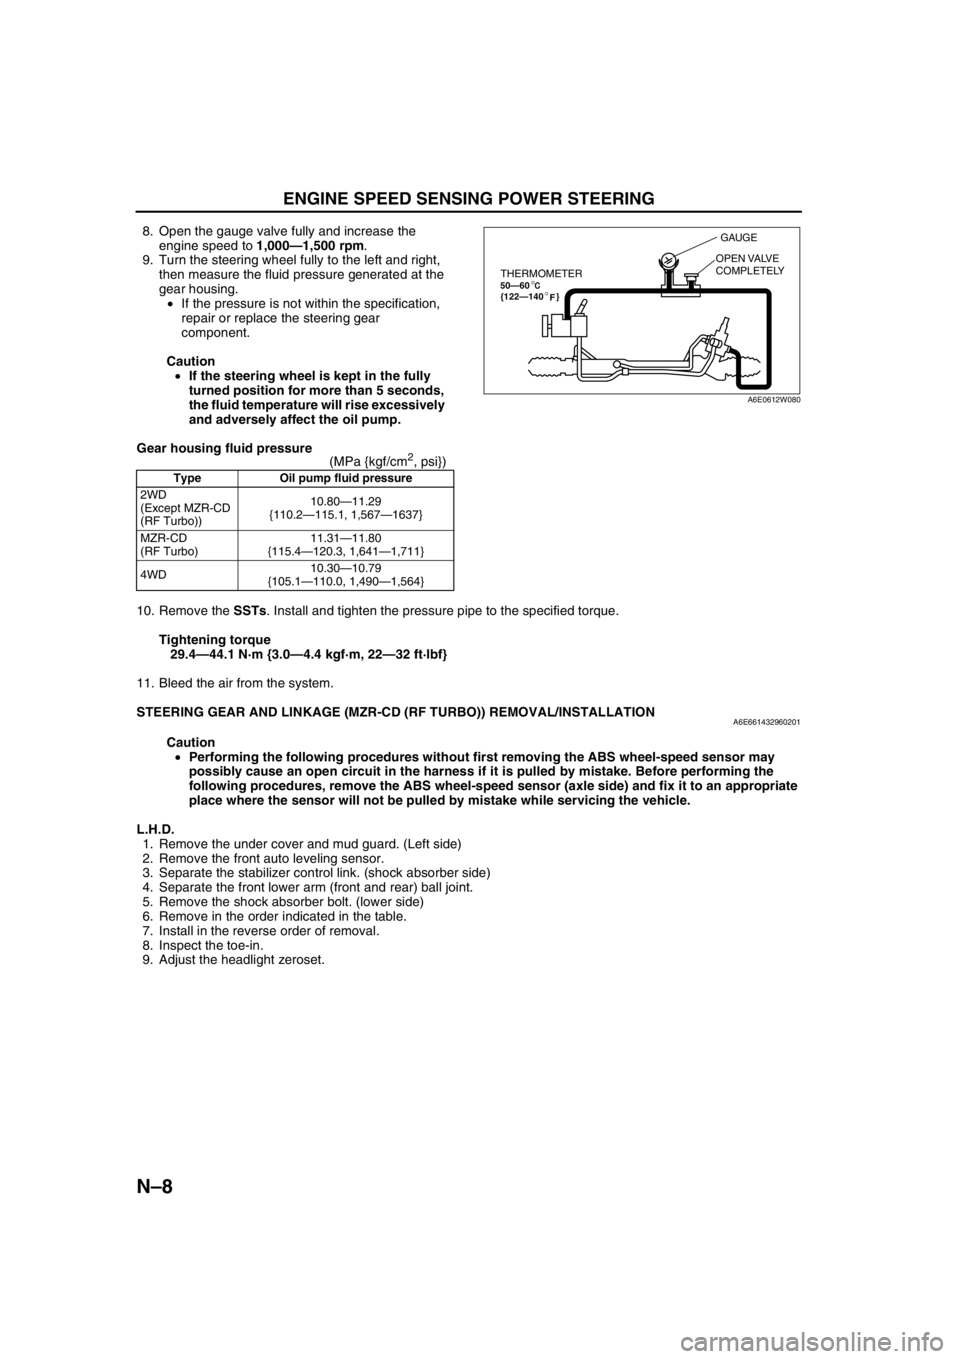
8. Open the gauge valve fully and increase the
engine speed to 1,000—1,500 rpm.
9. Turn the steering wheel fully to the left and right,
then measure the fluid pressure generated at the
gear housing.
•If the pressure is not within the specification,
repair or replace the steering gear
component.
Caution
•If the steering wheel is kept in the fully
turned position for more than 5 seconds,
the fluid temperature will rise excessively
and adversely affect the oil pump.
Gear housing fluid pressure
(MPa {kgf/cm
2, psi})
10. Remove the SSTs. Install and tighten the pressure pipe to the specified torque.
Tightening torque
29.4—44.1 N·m {3.0—4.4 kgf·m, 22—32 ft·lbf}
11. Bleed the air from the system.
End Of Sie
STEERING GEAR AND LINKAGE (MZR-CD (RF TURBO)) REMOVAL/INSTALLATIONA6E661432960201
Caution
•Performing the following procedures without first removing the ABS wheel-speed sensor may
possibly cause an open circuit in the harness if it is pulled by mistake. Before performing the
following procedures, remove the ABS wheel-speed sensor (axle side) and fix it to an appropriate
place where the sensor will not be pulled by mistake while servicing the vehicle.
L.H.D.
1. Remove the under cover and mud guard. (Left side)
2. Remove the front auto leveling sensor.
3. Separate the stabilizer control link. (shock absorber side)
4. Separate the front lower arm (front and rear) ball joint.
5. Remove the shock absorber bolt. (lower side)
6. Remove in the order indicated in the table.
7. Install in the reverse order of removal.
8. Inspect the toe-in.
9. Adjust the headlight zeroset.
Type Oil pump fluid pressure
2WD
(Except MZR-CD
(RF Turbo))10.80—11.29
{110.2—115.1, 1,567—1637}
MZR-CD
(RF Turbo)11.31—11.80
{115.4—120.3, 1,641—1,711}
4WD10.30—10.79
{105.1—110.0, 1,490—1,564}
THERMOMETER50—60
{122—140 }°
°F
GAUGE
OPEN VALVE
COMPLETELY
A6E0612W080
Page 723 of 909

ENGINE SPEED SENSING POWER STEERING
N–9
N
.
9
6
88
4
4
3
3
6
2
2
10
SST
SST
7
SST
R
R
R
R
R
1
18.6—26.5
{1.9—2.7,
13.8—19.5}
33.0—44.1
{3.3—4.4,
21.7—32.5} 74.4—104.8
{7.6—10.6,
54.9—77.23} 74.4—104.8
{7.6—10.6,
54.9—77.2}
33.0—44.1
{3.3—4.4,
21.7—32.5}
29.4—44.1
{3.0—4.4,
21.7—32.5}
7.8—10.8
{0.8—1.1,
5.8—7.9}
7.8—10.8
{0.8—1.1,
5.8—7.9}93.1—116.6
{9.5—11.8,
68.7—85.9}
93.1—131.3
{9.5—13.3,
68.7—96.8}119.6—154.8
{9.5—15.7,
68.7—114.1}119.6—154.8
{9.5—15.7,
68.7—114.1}93.1—131.3
{9.5—13.3,
68.7—96.8}
N·m {kgf·m, ft·lbf}
7.8—10.8
{0.8—1.1,
5.8—7.9}
5
R
A6E66142003
1 Bolt (intermediate shaft)
(See N–10 Bolt (intermediate shaft) removal note)
(See N–11 Bolt (intermediate shaft) installation
note)
2 Cotter pin
3 Nut (tie-rod end ball joint)
4 Tie-rod end ball joint
(See N–10 Tie-rod end ball joint removal note)
5 Pressure pipe
6 Return hose7 No.1 engine mount center bolt
(See N–10 No.1 engine mount center bolt removal
note)
8 Crossmember bracket
(See N–11 Crossmember bracket removal note)
9 Crossmember component, steering gear and
linkage
(See N–11 Crossmember component, steering gear
and linkage removal note)
10 Steering gear and linkage
(See N–11 Steering gear and linkage installation
note)
Page 724 of 909

N–10
ENGINE SPEED SENSING POWER STEERING
Bolt (intermediate shaft) removal note
1. Mark the pinion shaft and gear housing for proper
installation.
Tie-rod end ball joint removal note
1. Remove the tie rod-nut.
2. Separate the tie-rod end from the steering
knuckle using the SSTs.
No.1 engine mount center bolt removal note
1. Suspend the engine using the SST.
2. Remove the No.1 engine mount center bolt.
MARK
A6E0612W084
49 T028 3A0
A6E0612W085
49 E017 5A0
A6E2316W101
Page 725 of 909

ENGINE SPEED SENSING POWER STEERING
N–11
N
Crossmember bracket removal note
Warning
•Removing the crossmember is dangerous. The crossmember component could fall and cause
serious injury or death. Verify that the jack securely supports the crossmember component before
removing the crossmember bracket.
1. Support the crossmember component with a jack
and remove the nuts.
2. Remove the crossmember bracket.
Crossmember component, steering gear and linkage removal note
Warning
•Removing the crossmember is dangerous. The crossmember component could fall and cause
serious injury or death. Verify that the jack securely supports the crossmember component before
removing the crossmember bracket.
1. Remove the crossmember component, steering gear and linkage.
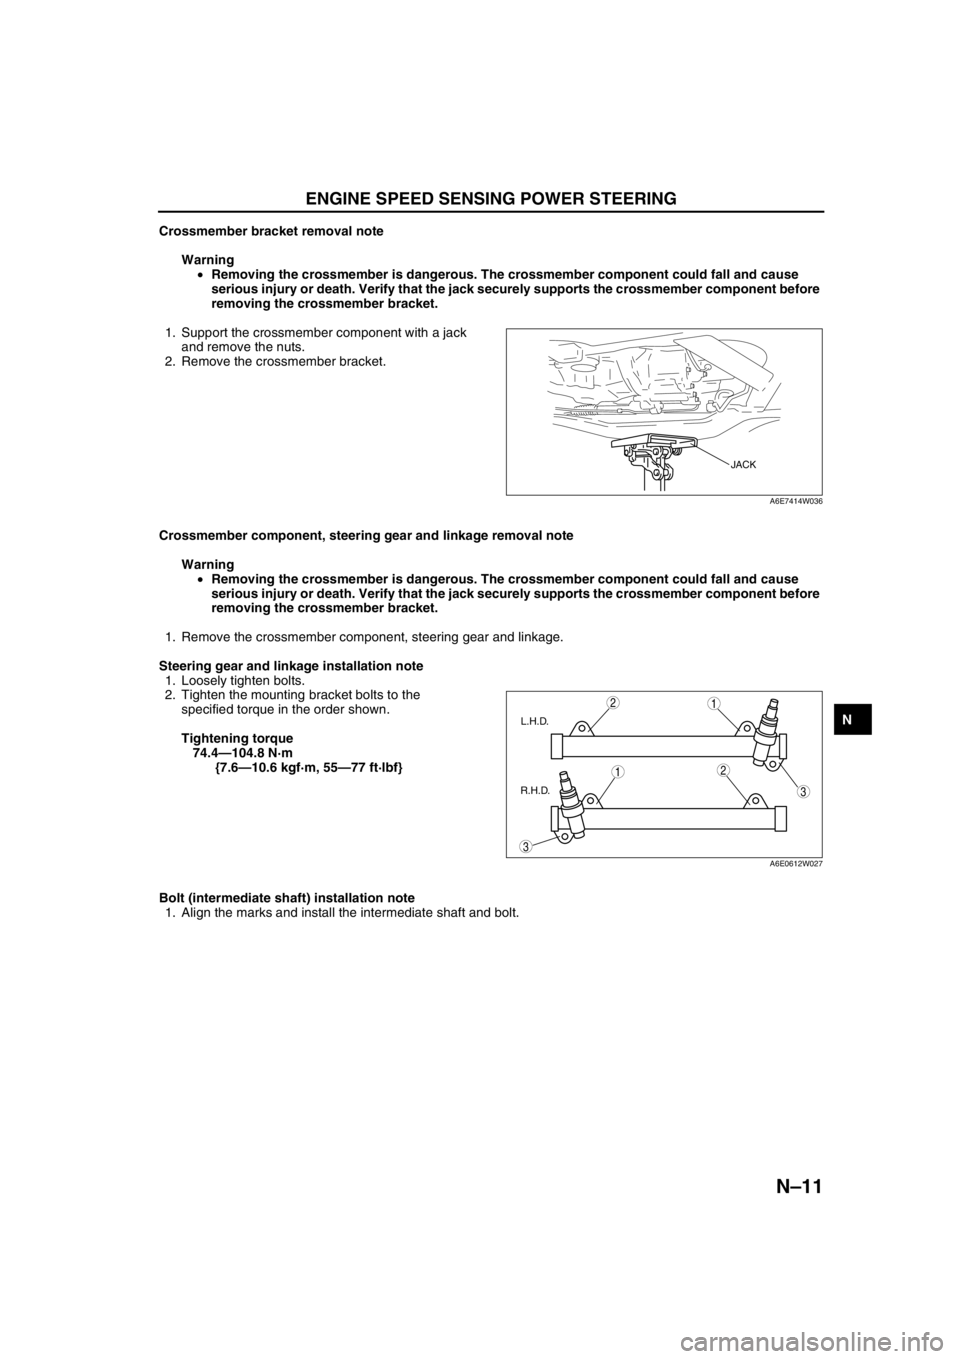
Steering gear and linkage installation note
1. Loosely tighten bolts.
2. Tighten the mounting bracket bolts to the
specified torque in the order shown.
Tightening torque
74.4—104.8 N·m
{7.6—10.6 kgf·m, 55—77 ft·lbf}
Bolt (intermediate shaft) installation note
1. Align the marks and install the intermediate shaft and bolt.
JACK
A6E7414W036
3
3
1
1
2
2
L.H.D.
R.H.D.
A6E0612W027
Page 726 of 909

N–12
ENGINE SPEED SENSING POWER STEERING
R.H.D.
1. Remove in the order indicated in the table.
2. Install in the reverse order of removal.
3. After installation, inspect the toe-in.
.
End Of Sie
4
5
4
3
3
6
2
2SST
SST
R
R
R
1
8
74.4—104.8
{7.6—10.6,
54.9—77.2}18.6—26.5
{1.9—2.7,
13.8—19.5}
7.8—10.8
{0.8—1.1,
5.8—7.9}
33.0—44.1
{3.3—4.4,
21.7—32.5}
74.4—104.8
{7.6—10.6,
54.9—77.23} 33.0—44.1
{3.3—4.4,
21.7—32.5}
29.4—44.1
{3.0—4.4,
21.7—32.5}
7
R
R
A6E66142004
1 Bolt (intermediate shaft)
(See N–10 Bolt (intermediate shaft) removal note)
(See N–11 Bolt (intermediate shaft) installation
note)
2 Cotter pin
3Nut
4 Tie-rod end ball joint
(See N–10 Tie-rod end ball joint removal note)5 Pressure pipe
6 Return hose
7 Return pipe
8 Steering gear and linkage
(See N–11 Steering gear and linkage installation
note)
Page 727 of 909

ENGINE SPEED SENSING POWER STEERING
N–13
N
STEERING GEAR AND LINKAGE (4WD) REMOVAL/INSTALLATIONA6E661432960202
Caution
•Performing the following procedures without first removing the ABS wheel-speed sensor may
possibly cause an open circuit in the harness if it is pulled by mistake. Before performing the
following procedures, remove the ABS wheel-speed sensor (axle side) and fix it to an appropriate
place where the sensor will not be pulled by mistake while servicing the vehicle.
1. Remove the under cover and mud guard. (Left side)
2. Remove the front auto leveling sensor.
3. Separate the stabilizer control link. (shock absorber side)
4. Separate the front lower arm (front and rear) ball joint.
5. Remove the shock absorber bolt. (lower side)
6. Remove in the order indicated in the table.
7. Install in the reverse order of removal.
8. Inspect the toe-in.
9. Adjust the headlight zeroset.
Page 728 of 909

N–14
ENGINE SPEED SENSING POWER STEERING
9
6
88
5
4
4
3
36
22
10
SST
SST7
SST
R
R
R
R
R
R
R
R1
5
B
A
A
B
BC
E
E
DC
C
D
E
10
6
74.4—104.8
{7.6—10.6, 54.9—77.2}
7.8—10.8
{0.8—1.1,
5.8—7.9}
7.8—10.8
{0.8—1.1,
5.8—7.9}
29.4—44.1
{3.0—4.4,
21.7—32.5}74.4—104.8
{7.6—10.6,
54.9—77.2}18.6—26.5
{1.9—2.7,
13.8—19.5}
7.8—10.8
{0.8—1.1,
5.8—7.9}
33.0—44.1
{3.4—4.4,
24.4—32.5}
74.4—104.8
{7.6—10.6,
54.9—77.2} 33.0—44.1
{3.4—4.4,
24.4—32.5}
93.1—116.6
{9.5—11.8,
68.7—85.9}
93.1—131.3
{9.5—13.3,
68.7—96.8}119.6—154.8
{9.5—15.7,
68.7—114.1}119.6—154.8
{9.5—15.7,
68.7—114.1}93.1—131.3
{9.5—13.3,
68.7—96.8} 29.4—44.1
{3.0—4.4,
21.7—32.5}L.H.D
R.H.D
N·m {kgf·m, ft·lbf}
11
A6E66142005
Page 729 of 909

ENGINE SPEED SENSING POWER STEERING
N–15
N
.
No.1 Engine Mount Center Bolt Removal Note
1. Suspend the engine using the SST.
2. Remove the No.1 engine mount center bolt.
End Of Sie
1 Bolt (intermediate shaft)
(See N–10 Bolt (intermediate shaft) removal note)
(See N–11 Bolt (intermediate shaft) installation
note)
2 Cotter pin
3 Nut (tie-rod end ball joint)
4 Tie-rod end ball joint
(See N–10 Tie-rod end ball joint removal note)
5 Pressure pipe
6 Return hose7 No.1 engine mount center bolt
(See N–15 No.1 Engine Mount Center Bolt Removal
Note)
8 Crossmember bracket
(See N–11 Crossmember bracket removal note)
9 Crossmember component, steering gear and
linkage
(See N–11 Crossmember component, steering gear
and linkage removal note)
10 Steering gear and linkage
(See N–11 Steering gear and linkage installation
note)
49 E017 5A0
A6E7414W016