engine MAZDA 626 1987 Workshop Manual
[x] Cancel search | Manufacturer: MAZDA, Model Year: 1987, Model line: 626, Model: MAZDA 626 1987Pages: 1865, PDF Size: 94.35 MB
Page 274 of 1865

1 C ASSEMBLY (CYLINDER BLOCK)
ASSEMBLY
1. Clean all parts before reinstallation.
2. Apply new engine oil to all sliding and rotating parts.
3. Replace plain bearings if they are peeling, burned, or otherwise damaged.
4. Tighten all bolts and nuts to the specified torques.
Caution
Do not reuse gaskets or oil seals.
CYLINDER BLOCK—I
Torque Specifications
69G01A-139
1C—62
Page 275 of 1865

ASSEMBLY (CYLINDER BLOCK) 1 C
Cavity
"F" mark
o
/-Matching mark
76G01C-147
76G01C-252
Top ring and — 90° •v. Second ring expanders. •v. Second ring
457//
iW
\ /
-J^/ \Oil ring
4BG01B-153
RF-CX RF-N
—ll Br1 &Top
GO [IP 2nd
fa? r® oil
Piston ring
Connecting Rod
1. Align the piston cavity and matching mark in the
large end of the connecting rod.
2. Apply engine oil to the circumference of each pis-
ton pin and to the small end of each connecting
rod.
3. Insert a snap ring into one of the piston pin holes
in the piston.
4. Install the piston pin using the SST.
5. Connect the piston and connecting rod by the pis-
ton pin, and lock the snap ring.
Note
Heat the piston to 50—70°C (120—170°F) for
installation.
Piston Ring
1. Apply a liberal coat of engine oil to the piston rings.
2. Install the oil ring expander and the oil ring.
3. Install the second ring.
4. Install the top ring.
5. Align the piston ring end gaps, as shown in the
figure.
Caution
The rings must be mounted so the "R" or "N"
marks face upward.
76G01C-148
1C—63
Page 277 of 1865

ASSEMBLY (CYLINDER BLOCK) 1 C
Cylinder block side Crankshaft side
Lower side
4BG01B-159
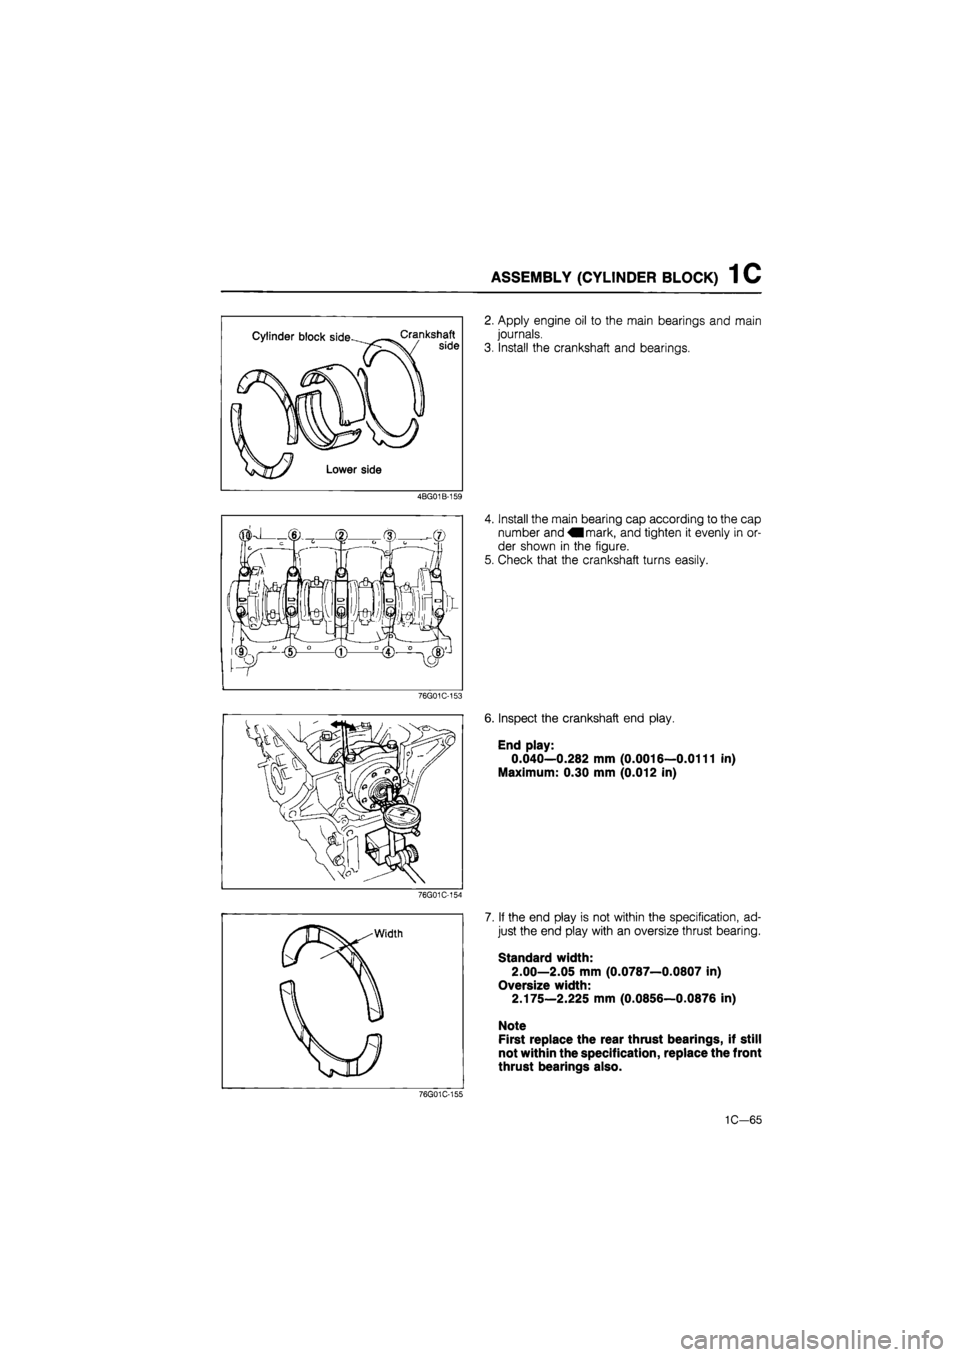
2. Apply engine oil to the main bearings and main
journals.
3. Install the crankshaft and bearings.
4. Install the main bearing cap according to the cap
number and mark, and tighten it evenly in or-
der shown in the figure.
5. Check that the crankshaft turns easily.
76G01C-153
6. Inspect the crankshaft end play.
End play:
0.040—0.282 mm (0.0016—0.0111 in)
Maximum: 0.30 mm (0.012 in)
76G01C-154
76G01C-155
7. If the end play is not within the specification, ad-
just the end play with an oversize thrust bearing.
Standard width:
2.00—2.05 mm (0.0787—0.0807 in)
Oversize width:
2.175—2.225 mm (0.0856—0.0876 in)
Note
First replace the rear thrust bearings, if still
not within the specification, replace the front
thrust bearings also.
1C-65
Page 278 of 1865

1C ASSEMBLY (CYLINDER BLOCK)
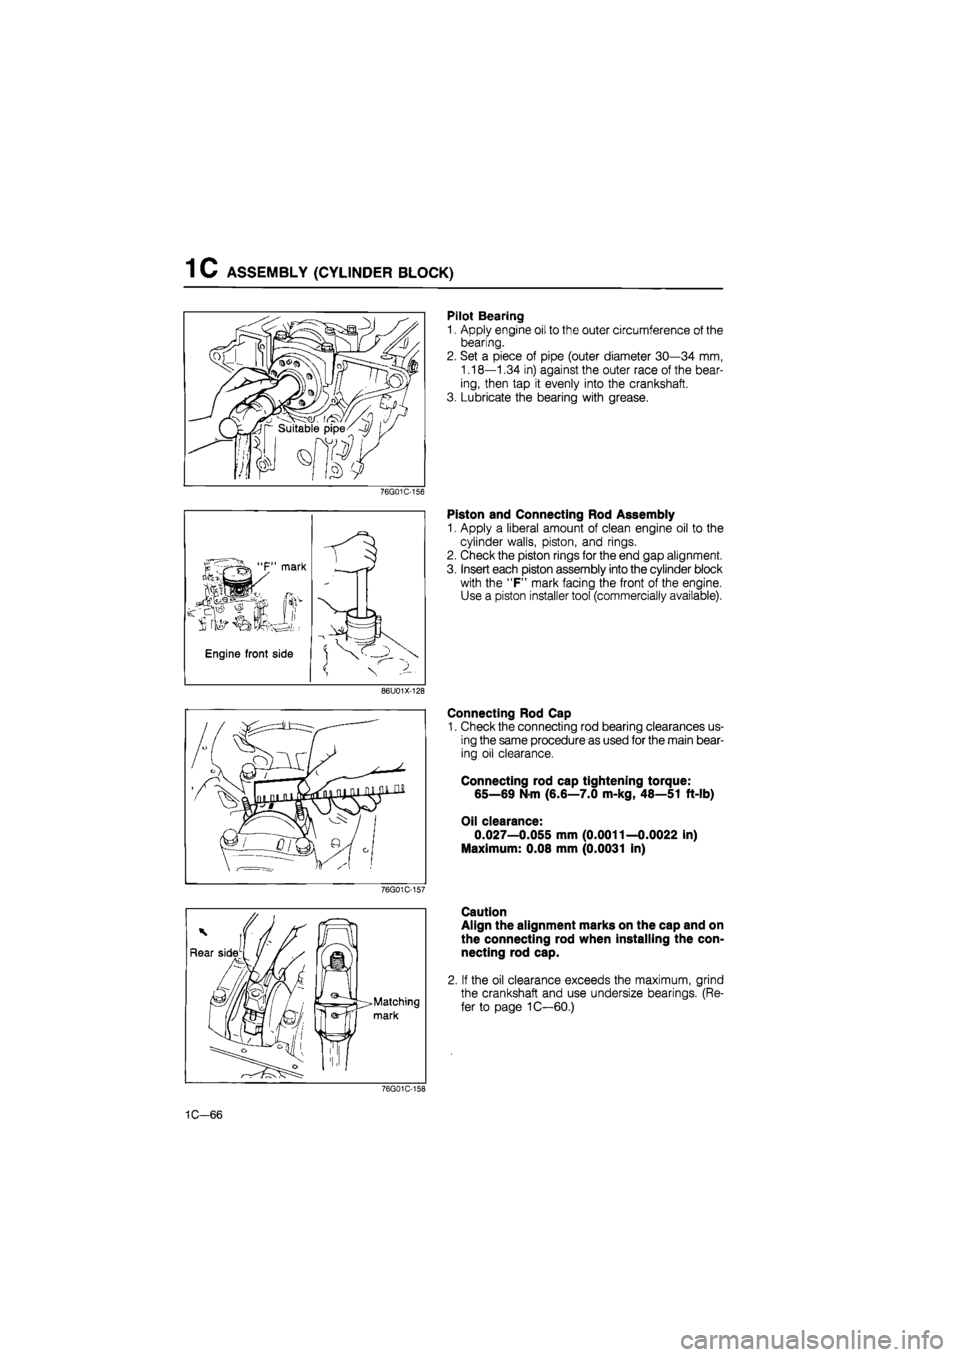
Pilot Bearing
1. Apply engine oil to the outer circumference of the
bearing.
2. Set a piece of pipe (outer diameter 30—34 mm,
1.18—1.34 in) against the outer race of the bear-
ing, then tap it evenly into the crankshaft.
3. Lubricate the bearing with grease.
76G01C-156
Piston and Connecting Rod Assembly
1. Apply a liberal amount of clean engine oil to the
cylinder walls, piston, and rings.
2. Check the piston rings for the end gap alignment.
3. Insert each piston assembly into the cylinder block
with the "F" mark facing the front of the engine.
Use a piston installer tool (commercially available).
86U01X-128
Connecting Rod Cap
1. Check the connecting rod bearing clearances us-
ing the same procedure as used for the main bear-
ing oil clearance.
Connecting rod cap tightening torque:
65—69 N-m (6.6—7.0 m-kg, 48—51 ft-lb)
Oil clearance:
0.027—0.055 mm (0.0011—0.0022 in)
Maximum: 0.08 mm (0.0031 in)
76G01C-157
Caution
Align the alignment marks on the cap and on
the connecting rod when installing the con-
necting rod cap.
If the oil clearance exceeds the maximum, grind
the crankshaft and use undersize bearings. (Re-
fer to page 1C—60.)
76G01C-158
1C-66
Page 279 of 1865

ASSEMBLY (CYLINDER BLOCK) 1 C
3. Check the side clearance of each connecting rod
without the cap installed.
Side clearance:
0.11—0.262 mm (0.0043—0.0103 in)
Maximum: 0.30 mm (0.012 in)
If the clearance exceeds the maximum, replace the
connecting rod.
76G01C-159
4. Apply a liberal amount of engine oil to the crank-
pin journal and connecting rod bearing.
5. Install the connecting rod cap with the alignment
marks aligned.
Tightening torque:
65—69 Nm (6.6—7.0 m-kg, 48—51 ft-lb)
86U01X-130
Oil jet
Install the oil jet into the cylinder block.
Tightening torque: 12—18 N-m
(1.2—1.8 m-kg, 104—156 in-lb)
76G01C-160
1C-67
Page 280 of 1865

1 C ASSEMBLY (CYLINDER BLOCK)
CYLINDER BLOCK—II
Torque Specifications
179—193 N m (18.3—19.7 m-kg, 132—142 ft-lb)
—
I iu
uii-nn, 69—95 in-tb)
69G01A-166
Rear Cover
1. Apply engine oil to the rear cover, oil seal and oil
seal lip.
2. Press the oil seal into the rear cover.
4BG01A-158
1C-68
Page 281 of 1865

ASSEMBLY (CYLINDER BLOCK) 1 C
86U01X-131
86U01X-132
76G01C-161
3. Install the rear cover and a new gasket.
Tightening torque:
8—12 Nm (80—120 cm-kg, 69—104 in-lb)
4. Cut away the portion of the gasket that projects out
from the rear cover assembly toward the oil pan
side.
Caution
Do not scratch the rear cover assembly.
End Plate
Install the end plate.
Tightening torque:
19—26
N
m (1.9—2.6 m-kg, 14—19 ft-lb)
Oil Pump
1. Apply engine oil to a new oil pump oil seal and the
oil pump body.
2. Press the oil seal into the oil pump body.
79G01C-085
1C-69
Page 282 of 1865

1 C ASSEMBLY (CYLINDER BLOCK)
86U01X-133
76G01C-162
76G01C-163
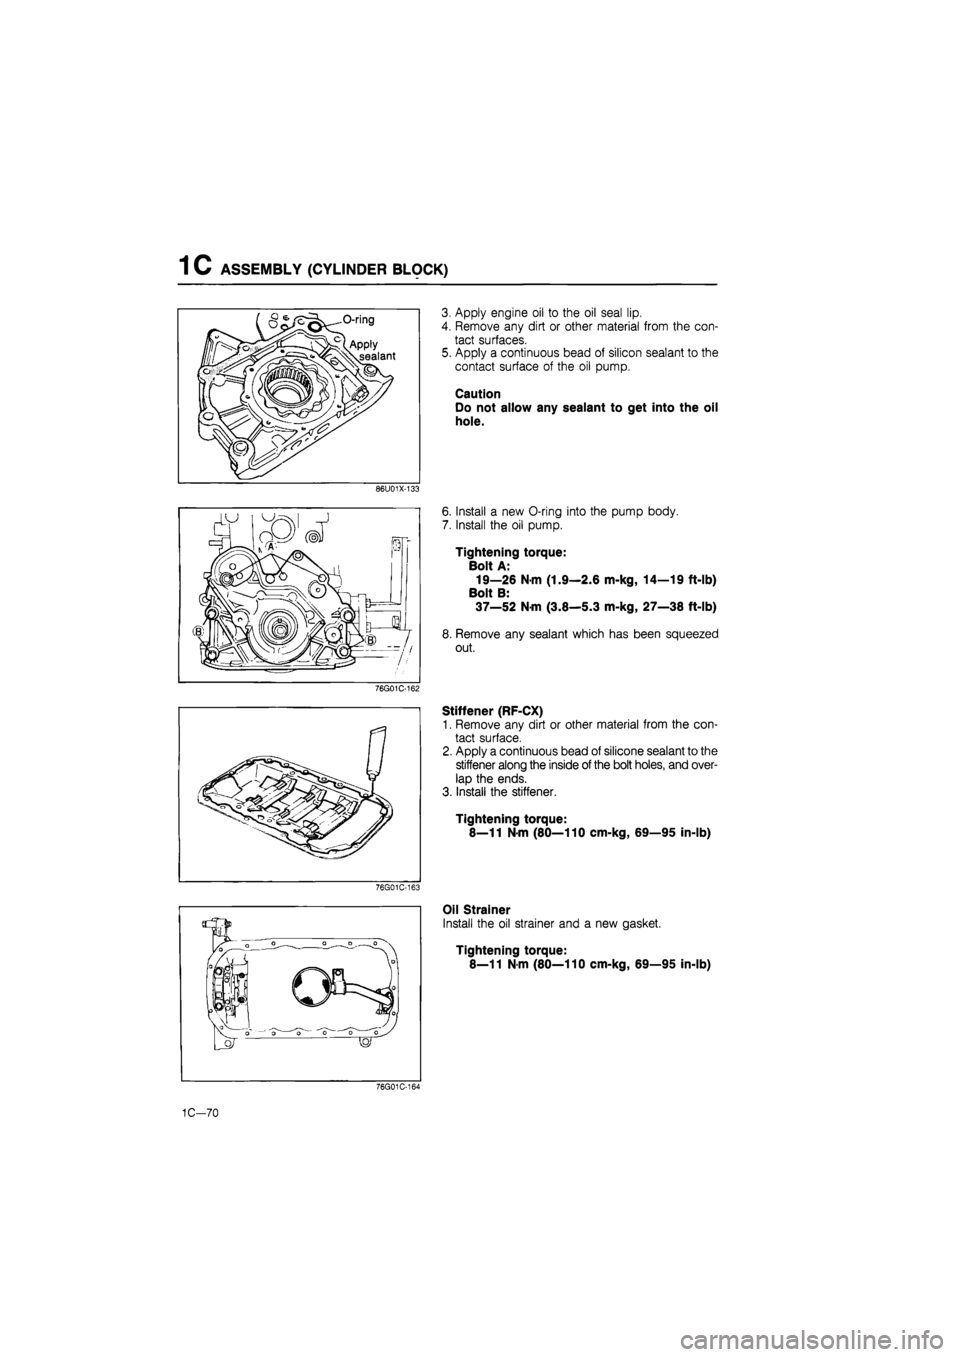
3. Apply engine oil to the oil seal lip.
4. Remove any dirt or other material from the con-
tact surfaces.
5. Apply a continuous bead of silicon sealant to the
contact surface of the oil pump.
Caution
Do not allow any sealant to get into the oil
hole.
6. Install a new O-ring into the pump body.
7. Install the oil pump.
Tightening torque:
Bolt A:
19—26 N-m (1.9—2.6 m-kg, 14—19 ft-lb)
Bolt B:
37—52 Nfli (3.8—5.3 m-kg, 27—38 ft-lb)
8. Remove any sealant which has been squeezed
out.
Stiffener (RF-CX)
1. Remove any dirt or other material from the con-
tact surface.
2. Apply a continuous bead of silicone sealant to the
stiffener along the inside of the bolt holes, and over-
lap the ends.
3. Install the stiffener.
Tightening torque:
8—11 N-m (80—110 cm-kg, 69—95 in-lb)
Oil Strainer
Install the oil strainer and a new gasket.
Tightening torque:
8—11 N-m (80—110 cm-kg, 69—95 in-lb)
76G01C-171
1C-70
Page 285 of 1865

ASSEMBLY (CYLINDER HEAD) 1 C
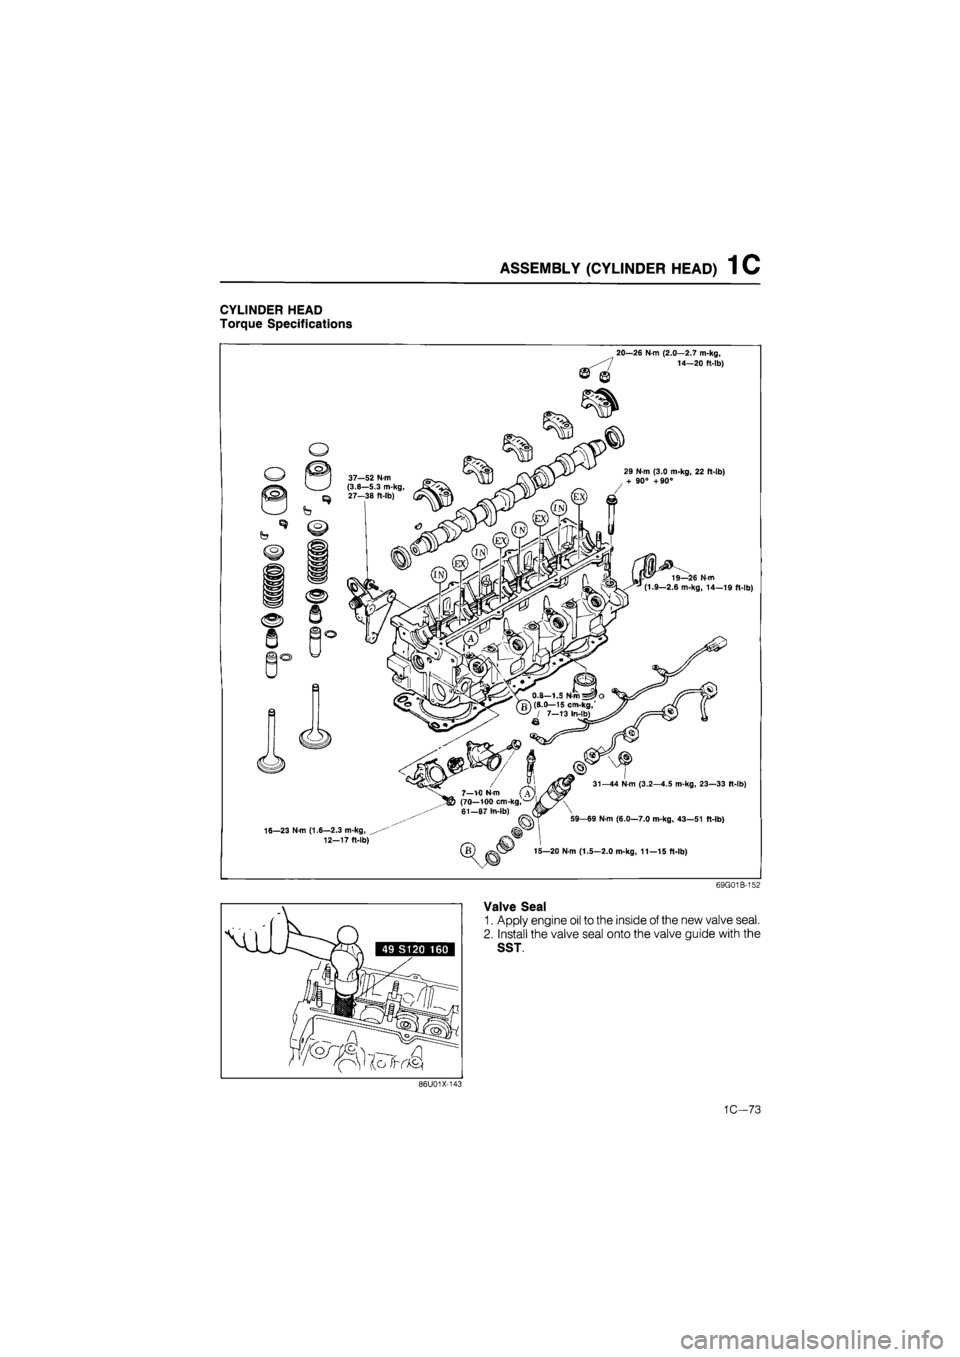
CYLINDER HEAD
Torque Specifications
20—26 N-m (2.0—2.7 m-kg, 14—20 ft-lb)
o
29 N-m (3.0 m-kg, 22 ft-lb) + 90° +90°
b
b
19—26 N-m (1.9—2.6 m-kg, 14—19 ft-lb)
16—23 N-m (1.6—2.3 m-kg, 12-17 ft-lb)
31—44 N-m (3.2—4.5 m-kg, 23—33 ft-lb)
59—69 N-m (6.0—7.0 m-kg, 43—51 ft-lb)
15—20 N-m (1.5—2.0 m-kg, 11—15 ft-lb)
69G01 B-152
Valve Seal
1. Apply engine oil to the inside of the new valve seal.
2. Install the valve seal onto the valve guide with the
SST.
86U01X-143
1C—73
Page 286 of 1865

1 C ASSEMBLY (CYLINDER
BLOCK)
76G01C-170
Adjusting
disc
Tappet -
Apply engine oil
4BG01B-150
4BG01B-182
Apply engine oil
1.
Cylinder head bolt
below head length
Valve and Valve Spring
1. Install the lower spring seat.
2. Apply molybdenum disulphide grease to the valve
stem.
3. Install the valve.
4. Install the valve springs and the upper spring seat.
5. Compress the valve spring with the SST; then in-
stall the valve keepers.
6. Tap the end of the valve stem lightly two or three
times with a plastic hammer to confirm that the
keepers are all fully seated.
Tappet and Adjusting Disc
1. Apply engine oil to the tappets.
2. Install the tappets in the hole.
3. Install the adjusting discs.
Cylinder Head
1. Thoroughly remove all dirt and grease from the top
of the cylinder block with a rag.
2. Place the new cylinder head gasket in position.
3. Remove any dirt or grease from the bottom sur-
face of the cylinder head.
4. Place the cylinder head in position.
5. Measure the length of the cylinder head bolt be-
low the head. If the length exceeds the maximum,
replace the bolt.
Length: 113.2—113.8 mm (4.457—4.480 in)
Maximum: 114.5 mm (4.508 in)
76G01C-171
1C-74