display MAZDA 626 1987 User Guide
[x] Cancel search | Manufacturer: MAZDA, Model Year: 1987, Model line: 626, Model: MAZDA 626 1987Pages: 1865, PDF Size: 94.35 MB
Page 886 of 1865

7B TROUBLESHOOTING (G4A-EL)
No. 12 code display (Throttle sensor)
76G07B-018
No. 55 code display (Pulse generator)
Is there poor connection at connector? YES Repair or replace.
NO
Does EC-AT Tester display drum speed? (Refer to STEP 3-Signal Inspection)
YES Pulse generator OK.
Cancel memory of code number.
NO
NO Is there 200—400 12 between terminals of pulse generator connector? (Refer to page 7B—68)
NO Replace pulse generator. Is there 200—400 12 between terminals of pulse generator connector? (Refer to page 7B—68)
YES YES Check for open or short-circuit in wiring. Check for open or short-circuit in wiring.
76G07B-019
No. 60, 61, 62, or 64 code display (1-2 shift, 2-3 shift, or 3-4 shift solenoid valve)
7B-20
Page 887 of 1865

TROUBLESHOOTING (G4A-EL) 7B
76G07B-020
No. 63 code display (Lock-up solenoid valve)
76G07B-021
7B—21
Page 890 of 1865

7B TROUBLESHOOTING (G4A-EL)
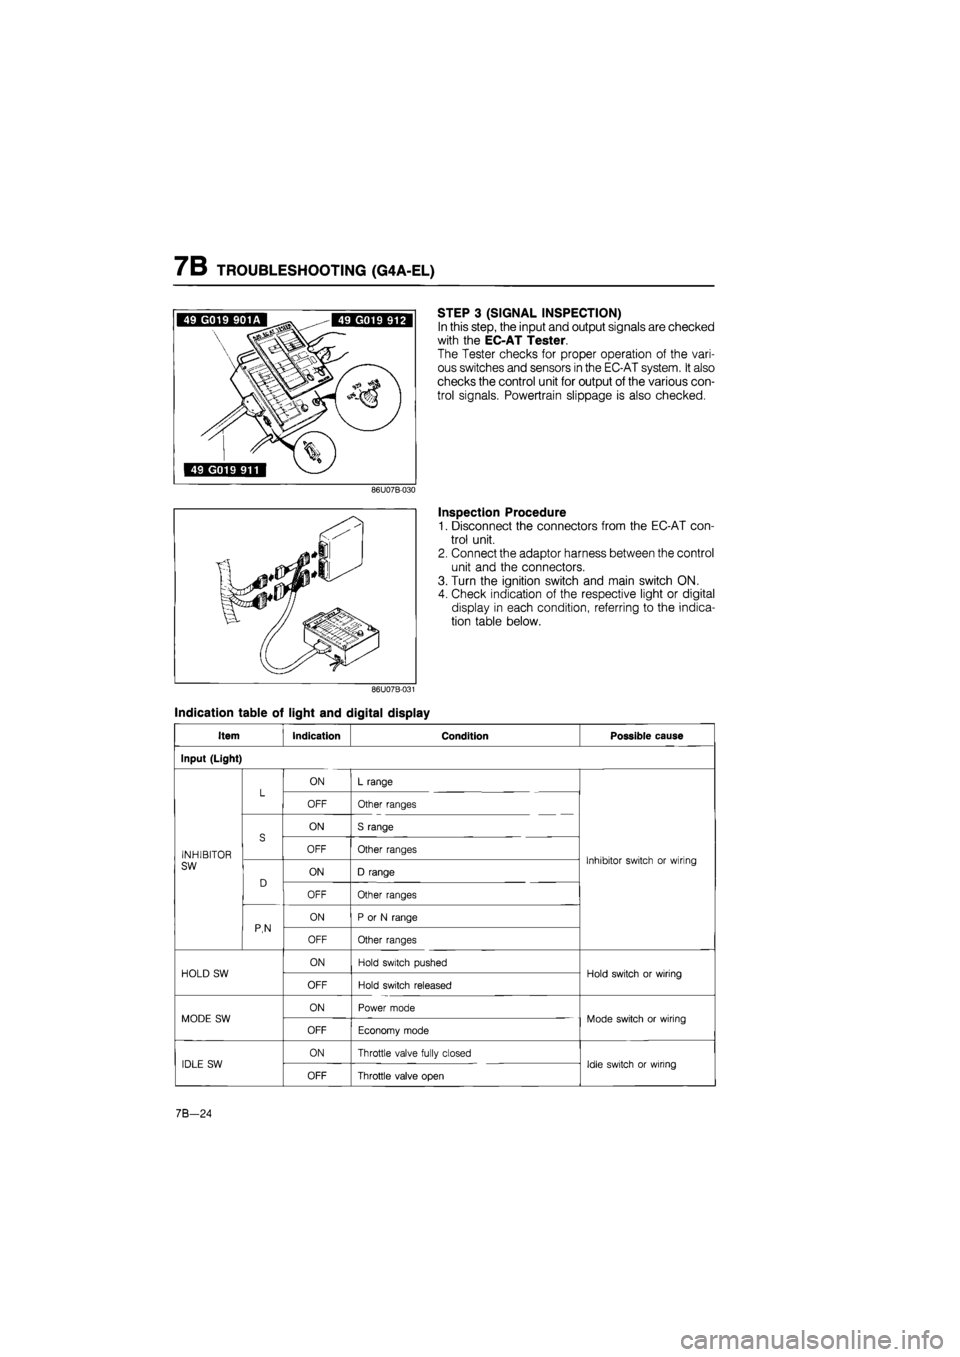
STEP 3 (SIGNAL INSPECTION)
In this step, the input and output signals are checked
with the EC-AT Tester.
The Tester checks for proper operation of the vari-
ous switches and sensors in the EC-AT system. It also
checks the control unit for output of the various con-
trol signals. Powertrain slippage is also checked.
Inspection Procedure
1. Disconnect the connectors from the EC-AT con-
trol unit.
2. Connect the adaptor harness between the control
unit and the connectors.
3. Turn the ignition switch and main switch ON.
4. Check indication of the respective light or digital
display in each condition, referring to the indica-
tion table below.
Indication table of light and digital display
Item Indication Condition Possible cause
Input (Light)
L ON L range L OFF Other ranges
S
ON S range
INHIBITOR
S OFF Other ranges Inhibitor switch or wiring SW
D ON D range
Inhibitor switch or wiring
D
OFF Other ranges
P,N
ON P or N range P,N OFF Other ranges
HOLD SW ON Hold switch pushed Hold switch or wiring HOLD SW
OFF Hold switch released
Hold switch or wiring
MODE SW ON Power mode Mode switch or wiring MODE SW
OFF Economy mode
Mode switch or wiring
IDLE SW ON Throttle valve fully closed Idle switch or wiring IDLE SW
OFF Throttle valve open
Idle switch or wiring
7B-24
Page 891 of 1865

TROUBLESHOOTING (G4A-EL) 7B
Item Indication Condition Possible cause
BRAKE LIGHT SW ON Brake pedal depressed Brake light switch or
wiring BRAKE LIGHT SW
OFF Brake pedal released
Brake light switch or
wiring
WATER TEMP SW ON Coolant temperature 72°C (162°F) or above Water temp switch or wiring WATER TEMP SW
OFF Coolant temperature lower than 65°C (149°F)
Water temp switch or wiring
ATF TEMP SW ON ATF temperature 150°C (302°F) or above Fluid temperature switch or wiring ATF TEMP SW
OFF ATF temperature lower than 143°C (289°F)
Fluid temperature switch or wiring
CRUISE CONTROL SW Not used — —
Input (Digital display)
THROTTLE SENSOR
EC-AT control unit terminal voltage All the time Throttle sensor, idle switch or wirings
VEHICLE SPEED*
Vehicle speed calculated from speed sensor signal
All the time Vehicle speed sensor, speedometer cable, or wiring
DRUM SPEED* Drum speed All the time Pulse generator or wirings
Output (Light)
1-2 SOLENOID VALVE*
ON
Refer to page 7B—26 solenoid valve operation table
Control unit, 1-2 shift sol., or wiring 1-2 SOLENOID VALVE* OFF
Refer to page 7B—26 solenoid valve operation table
Control unit, 1-2 shift sol., or wiring
2-3 SOLENOID VALVE*
ON Refer to page 7B—26 solenoid valve operation table Control unit, 2-3 shift sol., or wiring 2-3 SOLENOID VALVE* OFF
Refer to page 7B—26 solenoid valve operation table Control unit, 2-3 shift sol., or wiring
3-4 SOLENOID VALVE*
ON
Refer to page 7B—26 solenoid valve operation table
Control unit, 3-4 shift sol., or wiring 3-4 SOLENOID VALVE* OFF
Refer to page 7B—26 solenoid valve operation table
Control unit, 3-4 shift sol., or wiring
LOCK-UP SOLE-NOID VALVE*
ON Lock-up condition Control unit, lock-up sol., or wiring LOCK-UP SOLE-NOID VALVE* OFF Non-lock-up condition
Control unit, lock-up sol., or wiring
HOLD INDICATOR ON Hold mode Control unit, Hold switch, or wiring HOLD INDICATOR OFF Other modes
Control unit, Hold switch, or wiring
MODE INDICATOR ON Power or economy mode Control unit, hold switch, mode switch, or wiring MODE INDICATOR
OFF Hold mode
Control unit, hold switch, mode switch, or wiring
NO LOAD SIGNAL Not used — —
76G07B-028
7B-25
Page 892 of 1865

7B TROUBLESHOOTING (G4A-EL)
Item Indication Condition
OUTPUT (Digital display)
1
1
st gear position
GEAR* 2 2nd gear position GEAR*
3 3rd gear position
4 Overdrive (OD) gear position
86U07B-033
Note
a) The back-up condition is as following condition
S range, hold mode, and the accelerator pedal depressed fully.
b)The * marked items should be checked during the engine running or driving.
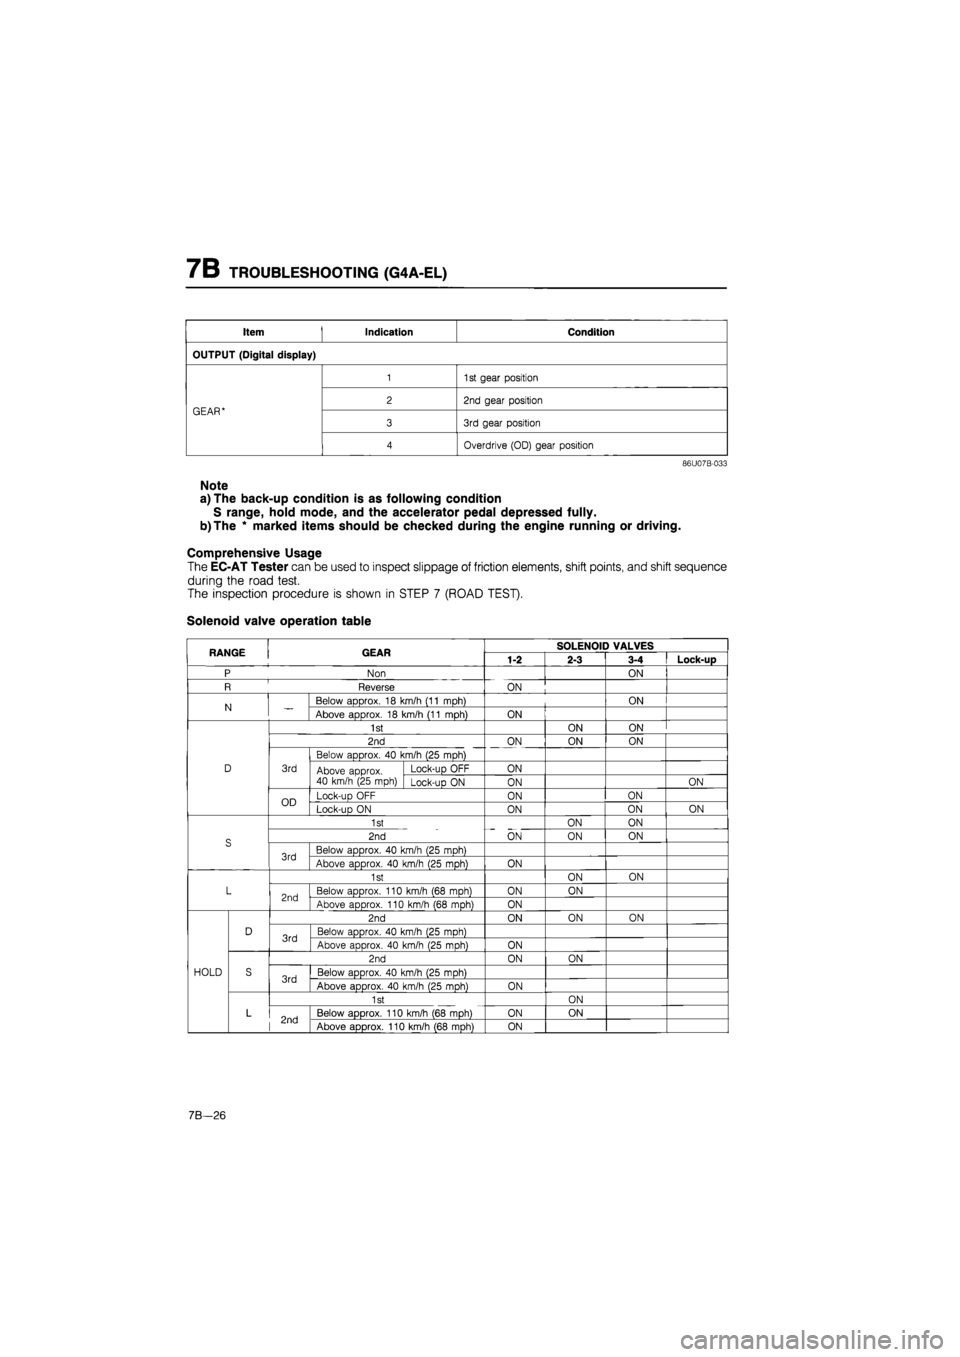
Comprehensive Usage
The EC-AT Tester can be used to inspect slippage of friction elements, shift points, and shift sequence
during the road test.
The inspection procedure is shown in STEP 7 (ROAD TEST).
Solenoid valve operation table
RANGE GEAR SOLENOID VALVES RANGE GEAR 1-2 2-3 3-4 Lock-up
P Non ON
R Reverse ON
N Below aDDrox. 18 km/h (11 mDh) ON N Above approx. 18 km/h (11 mph) ON
1st ON ON
2nd ON ON ON
Below approx. 40 km/h (25 mph)
D 3rd Above approx. 40 km/h (25 mph)
Lock-uo OFF ON Above approx. 40 km/h (25 mph) Lock-up ON ON ON
OD Lock-up OFF ON ON OD Lock-uo ON ON ON ON
1st ON ON
S 2nd ON ON ON S
3rd Below approx. 40 km/h (25 mph) 3rd Above approx. 40 km/h (25 mph) ON
1st ON ON
L 2nd Below approx. 110 km/h (68 mph) ON ON 2nd Above approx. 110 km/h (68 moh) ON
2nd ON ON ON
D 3rd Below approx. 40 km/h (25 moh) 3rd Above approx. 40 km/h (25 moh) ON
2nd ON ON
HOLD S 3rd Below approx. 40 km/h (25 mph) 3rd Above approx. 40 km/h (25 mph) ON
1st ON
L 2nd Below approx. 110 km/h (68 mph) ON ON 2nd Above approx. 110 km/h (68 mph) ON
7B—26
Page 1677 of 1865

15 METER
METER
STRUCTURAL VIEW
DIGITAL ELECTRONIC DISPLAY METER
ANALOG DISPLAY METER
76G15X-007
1. Speedometer 5. Warning and indicator lights
2. Tachometer 6. Tripmeter
3. Water temperature gauge 7. Twin tripmeter change switch
4. Fuel gauge 8. Fuel garge scale change switch
15—22
Page 1682 of 1865
![MAZDA 626 1987 User Guide
METER 15
86U15X-033
86U15X-034
104.1t! 21
2330 16.10
a £] U \JEMP j n
JJ
86U15X-035
Standard indication
(km/h)
Allowable range
(km/h)
60 60-63
Standard indication
(mph)
Allowable ran MAZDA 626 1987 User Guide
METER 15
86U15X-033
86U15X-034
104.1t! 21
2330 16.10
a £] U \JEMP j n
JJ
86U15X-035
Standard indication
(km/h)
Allowable range
(km/h)
60 60-63
Standard indication
(mph)
Allowable ran](/img/28/57059/w960_57059-1681.png)
METER 15
86U15X-033
86U15X-034
104.1t! 21
2330 16.10
a £] U \JEMP j n
JJ
86U15X-035
Standard indication
(km/h)
Allowable range
(km/h)
60 60-63
Standard indication
(mph)
Allowable range
(mph)
60 60-63
86U15X-036
3. Set the SST to the resistance values shown in the
figure.
4. Turn the ignition switch ON, and check that the
needle indicator displays the correct values.
If the needle displays correctly, check the gauge
unit. If not, replace the fuel gauge in the meter or
repair the wiring harness.
Caution
a) Continue the above checks for at least two
minutes each to correctly judge the con-
dition.
b)The allowable indication error is twice the
width of the needle.
Water Temperature Gauge
1. Disconnect the connector from the water thermo
sensor.
2. Connect the red lead of the SST to the connec-
tor, and the black lead to a body ground.
3. Set the SST to the resistance values shown in the
figure.
4. Turn the ignition switch ON, and check that the
needle indicator displays the correct values.
If the needle displays the correct values, the trou-
ble is in the gauge unit; if not, the trouble is in the
meter or the wiring harness.
Caution
a) Continue the above checks for at least two
minutes each to correctly judge the con-
dition.
b)The allowable indication error is twice the
width of the needle.
INSPECTION OF DIGITAL METER
Speedometer
1. Using a speedometer tester, check the speedom-
eter for allowable indication error, and check the
operation of the odometer. Replace the meter as-
sembly if necessary.
2. Check the speedometer for fluctuation and/or ab-
normal noise.
Caution
a) If significant fluctuation occurs or the
speedometer does not move at all, remove
the speedometer cable. If normal, replace
the digital meter assembly.
b)Tire wear and improper inflation will in-
crease speedometer error.
15—27
Page 1683 of 1865

15 METER
Standard Indication
(rpm)
Allowable range
(rpm)
1000
900—
950
2000 1900-1950
3000 2900—2950
4000 3900-3950
5000 4900—4950
6000 5900-5950
86U15X-037
86U15X-038
86U15X-039
Standard display Expanded display
E ©FUEL F E © FUEL F
"io — •
QJ1QOOODDOOOD
Tachometer
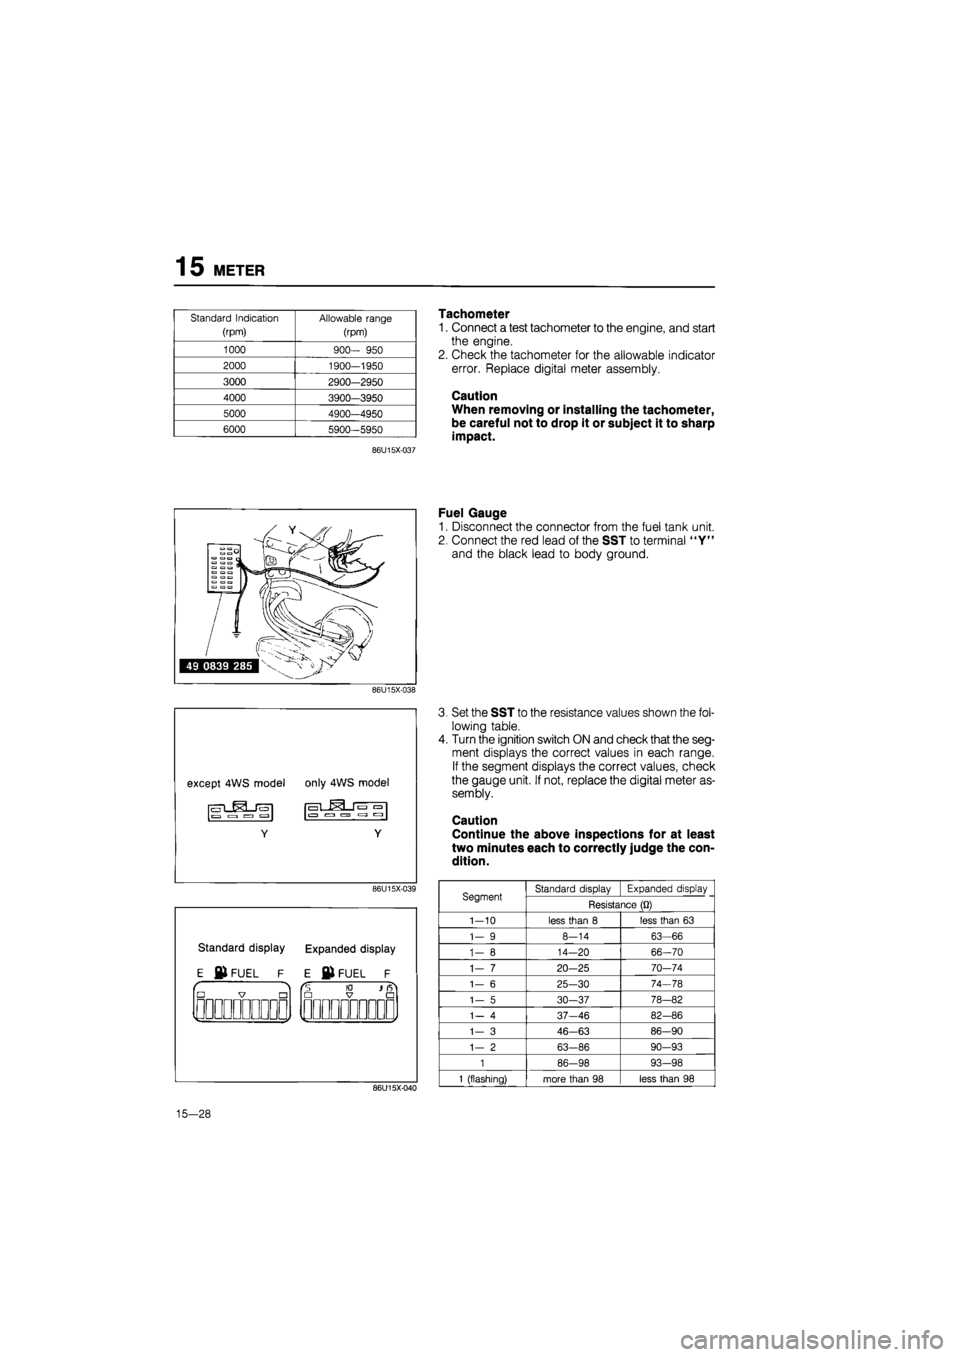
1. Connect a test tachometer to the engine, and start
the engine.
2. Check the tachometer for the allowable indicator
error. Replace digital meter assembly.
Caution
When removing or installing the tachometer,
be careful not to drop it or subject it to sharp
impact.
Fuel Gauge
1. Disconnect the connector from the fuel tank unit.
2. Connect the red lead of the SST to terminal "Y"
and the black lead to body ground.
86U15X-040
Set the SST to the resistance values shown the fol-
lowing table.
Turn the ignition switch ON and check that the seg-
ment displays the correct values in each range.
If the segment displays the correct values, check
the gauge unit. If not, replace the digital meter as-
sembly.
Caution
Continue the above inspections for at least
two minutes each to correctly judge the con-
dition.
Segment Standard display Expanded display Segment Resistance
(Q)
1-10
less than
8
less than
63
1-
9
8-14
63-66
1-
8
14—20 66-70
1-
7
20-25 70-74
1-
6
25-30 74-78
1-
5
30—37 78-82
1-
4
37-46 82-86
1—
3
46-63 86-90
1-
2
63-86 90-93
1
86-98 93-98
1
(flashing) more than
98
less than
98
15-28
Page 1684 of 1865

METER 15
Water Temperature Gauge
1. Remove the connector from the water thermo
sensor.
2. Connect the red lead of the SST to the connec-
tor, and the black lead to a body ground.
86U15X-041
C -&TEMP H
r
•
|
7 •
V i y
86U15X-042
3. Set the SST to the resistance values shown in the
following table.
4. Turn the ignition switch ON and check that the seg-
ment displays the correct values. If the segment
displays the correct values, check the gauge unit.
If not, replace the digital meter assembly or repair
wiring harness.
Caution
Continue the above checks for at least two
minutes each to correctly judge the condition.
Segment Resistance
(Q)
Segment Resistance
(Q)
1-10
less than
17
1-5
33-89
1-
9
17—20
1-4
89-120
1—
8
20—26
1-3
120-145
1—
7
26-28
1-2
145-177
1-
6
28-33
1
more than
177
INSPECTION OF METER SENDER
Fuel tank unit (except 4WS model)
1. Disconnect the connector from the fuel tank unit.
2. Remove the fuel tank unit from the tank.
3. Connect an ohmmeter to terminal "b" of con-
nector.
4. Move the unit arm slowly from point (F) to point
(E), and read the resistance values. If not as speci-
fied, replace the unit.
86U15X-043
15—29