fuse MAZDA 626 1987 Owner's Manual
[x] Cancel search | Manufacturer: MAZDA, Model Year: 1987, Model line: 626, Model: MAZDA 626 1987Pages: 1865, PDF Size: 94.35 MB
Page 816 of 1865

7A REMOVAL
REMOVAL
Fl except DOHC
76G07A-008
1. Battery
2. Main fuse block
3. Air cleaner assembly
4. Ventilation hose
5. Air hose
6. Ground(s)
7. Speedometer cable
8. Clutch release cylinder
9. Canister hose
10. Wheel
11. Splash sheild
12. Extension bar
13. Control rod
14. Stabilizer
15. Joint shaft
16. Gusset plate (rear)
17. Gusset plate (front)
18. Surge tank bracket
19. Starter
20. Under cover
21. Engine mount No.4
22. Engine mount No.2
23. Hunger rubber
24. Crossmember
7 A—10
Page 817 of 1865

REMOVAL 7A
DOHC
76G07A-009
1. Battery
2. Main fuse block
3. Air cleaner assembly
4. Ventilation hose
5. Air hose
6. Ground(s)
7. Speedometer cable
8. Clutch release cylinder
9. Canister hose
10. Wheel
11. Splash sheild
12. Extension bar
13. Control rod
14. Stabilizer
15. Joint shaft
16. Surge tank bracket
17. Starter
18. Engine mount No.4
19. Engine mount No.2
20. Rear member (4WS)
21. Hunger rubber
22. Crossmember
7A—11
Page 820 of 1865

7A REMOVAL
1. Remove the battery and battery carrier.
2. Disconnect the main fuse block. (Fl)
3. Disconnect the distributor lead.
4. Remove the air cleaner assembly.
76G07A-012
5. Remove the vacuum hose, the intercooler hose
(RF-CX) and the electric fan. (RF-N and RF-CX)
86U07A-021
8. Remove the front wheels.
9. Remove the splash shields.
10. Drain the transaxle oil.
86U07A-022
7A—14
Page 863 of 1865

INSTALLATION 7A
25. Install the grounds to the transaxle case.
Tightening torque:
8—11 N-m (80—115 cm-kg, 69—100 in-lb)
26. Connect the speedometer cable.
76G07A-067
76G07A-068
76G07A-069
76G07A-070
27. Install the intercooler pipe and hose. (RF-CX)
Tightening torque:
19—26 Nm (1.9—2.6 m-kg, 14—19 ft-lb)
28. Install the brake vacuum pipe. (RF-CX)
Tightening torque:
8—11
N
m (80—110 cm-kg, 69—95 in-lb)
29. Connect the brake vacuum hose. (RF-CX)
30. Install the air cleaner assembly and connect the
air flow meter connector.
Tightening torque:
16—27 Nm (1.6—2.8 m-kg, 12—20 ft-lb)
31. Connect the distributor lead.
32. Connect the main fuse block.
Tightening torque:
8—11 N-m (80—110 cm-kg, 69—95 in-lb)
33. Install the battery carrier and battery.
34. Add the correct quantity of the specified transaxle
oil.
Specified
Type
A.T.F.: DEXRON II
Above 0°F:
API: GL-4 or GL-5
SAE 80W-90 or SAE 90
Capacity:
3.35 liters (3.6 US qt, 3.0 Imp qt)
7A-57
Page 939 of 1865

ON-VEHICLE MAINTENANCE 7B
76F07B-024
5. Turn locknut A by hand until it just touches the
spacer.
6. Tighten locknut B to the specified torque.
Tightening torque:
8—11 N m (80—110 cm-kg, 67—96 in-lb)
7. Shift the selector lever to N range.
8. With the button on the selector lever knob pressed,
push the selector toward R range with a force of
20 N (2 kg, 4.4 lb) and check the amount of move-
ment (a) at the selector lever knob.
9. Pull the selector lever toward D range in the same
manner and check the amount of movement (b).
10. Verify the stroke difference of (a) and (b) is as
specified.
Stroke difference: 8 mm (0.315 in) max.
Note
If not with in specification, readjust locknuts
A and B.
11. Check the selector lever operation.
(Refer to Inspection section.)
76F07B-025
THROTTLE CABLE
Inspection
1. Check the inner and outer cable for damage.
2. Make sure that the accelerator operates smoothly.
86U07B-066
Removal
1. Remove the battery and battery carrier.
2. Disconnect the main fuse block. (G4A-EL)
76G07B-090
7B—73
Page 941 of 1865

ON-VEHICLE MAINTENANCE 7B
'mfm^i! kfOl iff t—
76G07B-093
76G07B-094
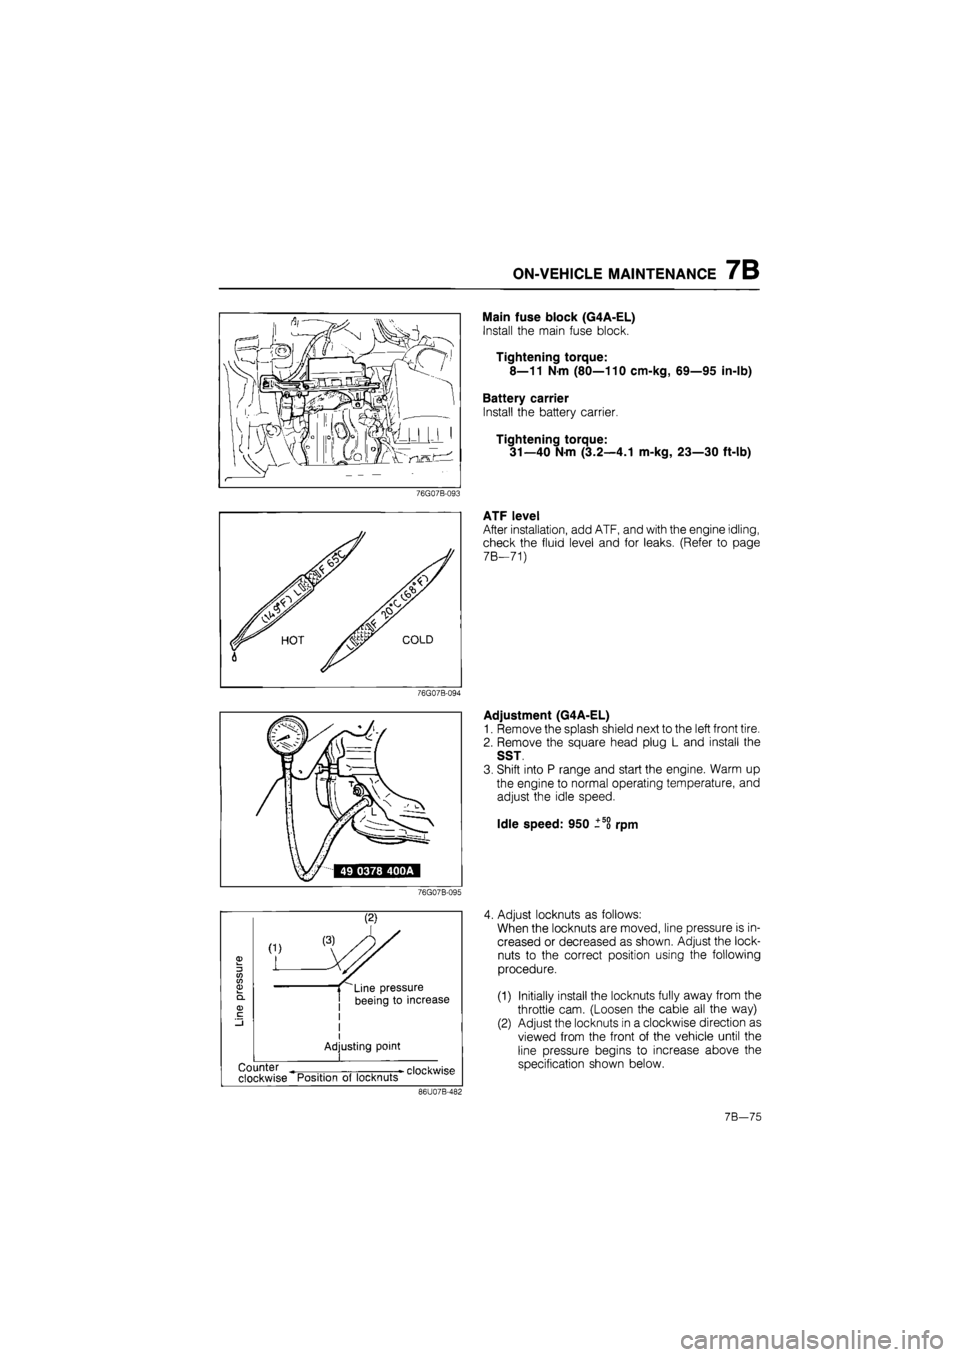
Main fuse block (G4A-EL)
Install the main fuse block.
Tightening torque:
8—11 Nm (80—110 cm-kg, 69—95 in-lb)
Battery carrier
Install the battery carrier.
Tightening torque:
31—40 Nm (3.2—4.1 m-kg, 23—30 ft-lb)
ATF level
After installation, add ATF, and with the engine idling,
check the fluid level and for leaks. (Refer to page
7 B—71)
Adjustment (G4A-EL)
1. Remove the splash shield next to the left front tire.
2. Remove the square head plug L and install the
SST
3. Shift into P range and start the engine. Warm up
the engine to normal operating temperature, and
adjust the idle speed.
Idle speed: 950 ±5o rpm
76G07B-095
3 CO CO 03
(1)
L
Line pressure
beeing to increase
I
Adjusting point
•
clockwise Counter
clockwise Position of locknuts
86U07B-482
4. Adjust locknuts as follows:
When the locknuts are moved, line pressure is in-
creased or decreased as shown. Adjust the lock-
nuts to the correct position using the following
procedure.
(1) Initially install the locknuts fully away from the
throttle cam. (Loosen the cable all the way)
(2) Adjust the locknuts in a clockwise direction as
viewed from the front of the vehicle until the
line pressure begins to increase above the
specification shown below.
7B—75
Page 949 of 1865

REMOVAL 7B
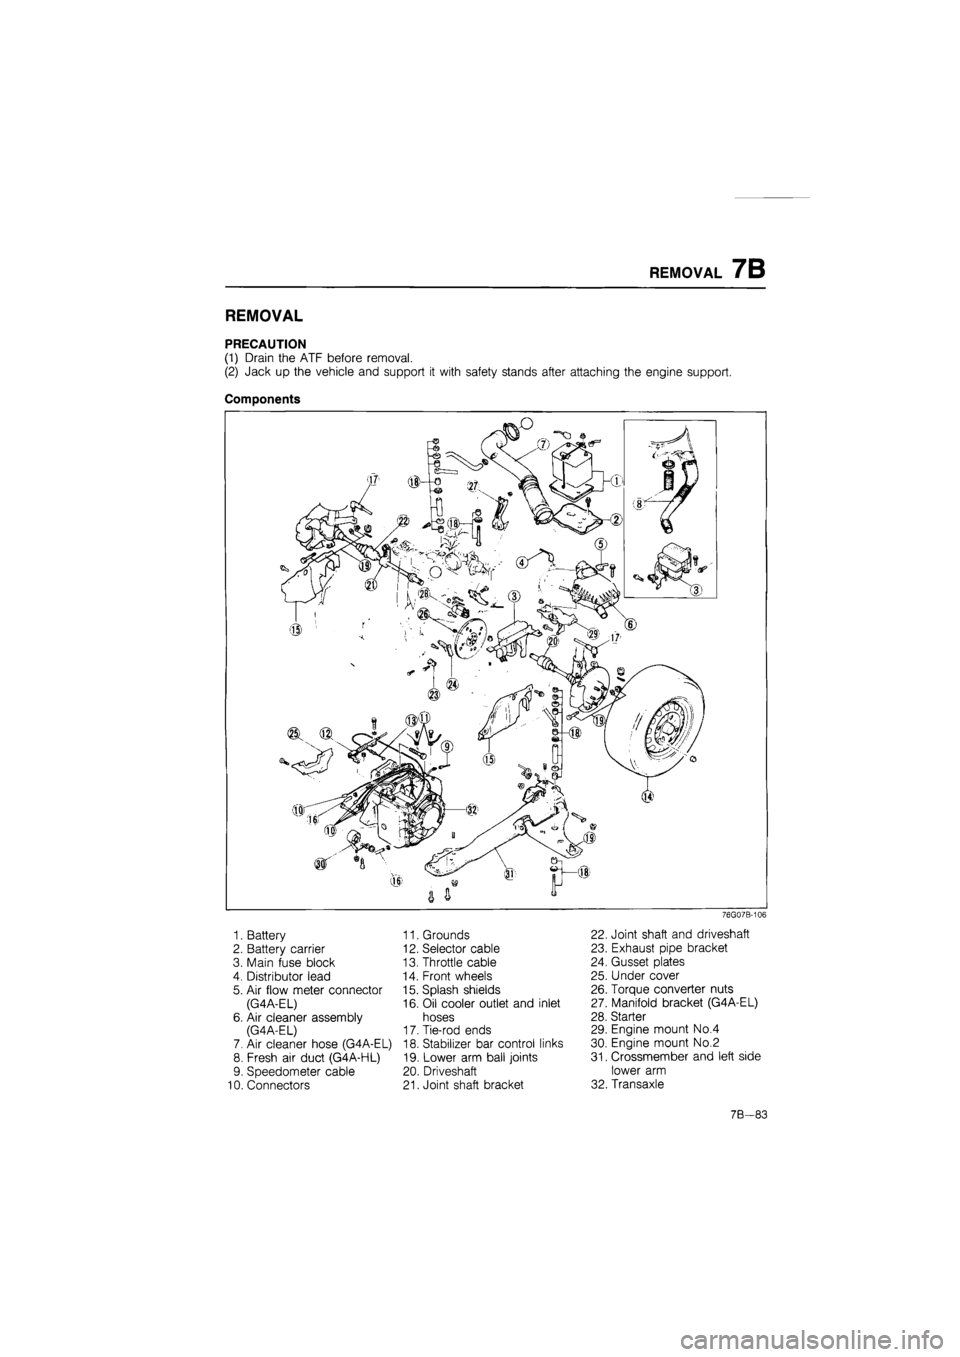
REMOVAL
PRECAUTION
(1) Drain the ATF before removal.
(2) Jack up the vehicle and support it with safety stands after attaching the engine support.
Components
1. Battery
2. Battery carrier
3. Main fuse block
4. Distributor lead
5. Air flow meter connector
(G4A-EL)
6. Air cleaner assembly
(G4A-EL)
7. Air cleaner hose (G4A-EL)
8. Fresh air duct (G4A-HL)
9. Speedometer cable
10. Connectors
11. Grounds
12. Selector cable
13. Throttle cable
14. Front wheels
15. Splash shields
16. Oil cooler outlet and inlet
hoses
17. Tie-rod ends
18. Stabilizer bar control links
19. Lower arm ball joints
20. Driveshaft
21. Joint shaft bracket
76G07B-106
22. Joint shaft and driveshaft
23. Exhaust pipe bracket
24. Gusset plates
25. Under cover
26. Torque converter nuts
27. Manifold bracket (G4A-EL)
28. Starter
29. Engine mount No.4
30. Engine mount No.2
31. Crossmember and left side
lower arm
32. Transaxle
7B—83
Page 950 of 1865

7B REMOVAL
76G07B-107
G4A-EL
76G07B-108
76G07B-109
1. Remove the battery and battery carrier.
2. Disconnect the main fuse block.
3. Disconnect the distributor lead.
4. Disconnect the air flow meter connector and re-
move the air cleaner assembly. (G4A-EL)
5. Remove the air cleaner hose. (G4A-EL)
6. Remove the fresh air duct. (G4A-HL)
7. Disconnect the speedometer cable.
8. Disconnect the connectors.
(1) Inhibitor switch
(2) Solenoid valve
(3) Pulse generator (G4A-EL)
(4) Fluid temperature switch (G4A-EL)
9. Disconnect the grounds from the transaxle case.
10. Disconnect the selector cable.
11. Disconnect the throttle cable.
76G07B-110
7B—84
Page 1086 of 1865

7B INSTALLATION
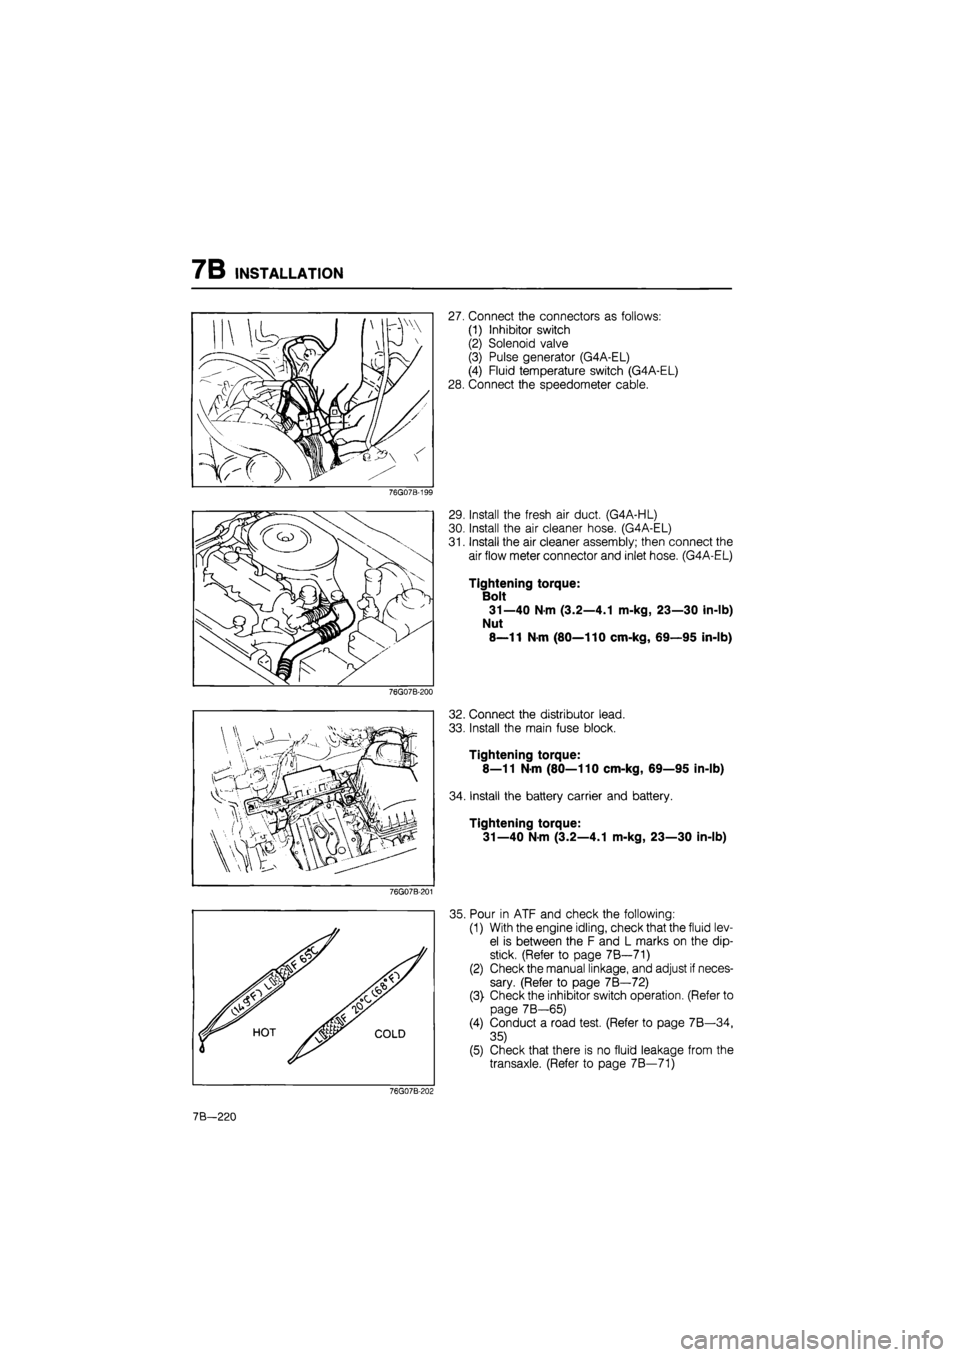
27. Connect the connectors as follows:
(1) Inhibitor switch
(2) Solenoid valve
(3) Pulse generator (G4A-EL)
(4) Fluid temperature switch (G4A-EL)
28. Connect the speedometer cable.
76G07B-199
76G07B-200
76G07B-201
29. Install the fresh air duct. (G4A-HL)
30. Install the air cleaner hose. (G4A-EL)
31. Install the air cleaner assembly; then connect the
air flow meter connector and inlet hose. (G4A-EL)
Tightening torque:
Bolt
31—40 N-m (3.2—4.1 m-kg, 23—30 in-lb)
Nut
8—11 N-m (80—110 cm-kg, 69—95 in-lb)
32. Connect the distributor lead.
33. Install the main fuse block.
Tightening torque:
8—11 N-m (80—110 cm-kg, 69—95 in-lb)
34. Install the battery carrier and battery.
Tightening torque:
31—40 N-m (3.2—4.1 m-kg, 23—30 in-lb)
35. Pour in ATF and check the following:
(1) With the engine idling, check that the fluid lev-
el is between the F and L marks on the dip-
stick. (Refer to page 7B—71)
(2) Check the manual linkage, and adjust if neces-
sary. (Refer to page 7B—72)
(3) Check the inhibitor switch operation. (Refer to
page 7B—65)
(4) Conduct a road test. (Refer to page 7B—34,
35)
(5) Check that there is no fluid leakage from the
transaxle. (Refer to page 7B—71)
76G07B-202
7B—220
Page 1144 of 1865

7C REMOVAL
REMOVAL
PREPARATION
(1) Drain the ATF before removal.
(2) Attach the engine support.
(3) Jack up the vehicle and support it with safety stands.
Components
1. Battery
2. Battery carrier
3. Fresh air duct
4. Main fuse block
5. Distributor leads
6. Speedometer cable
7. Cnnectors
8. Ground wires
9. Selector cable
10. Vacuum hose
11. Front wheels
12. Splash shields
13. Oil cooler outlet and inlet
hoses
14. Tie-rod ends
15. Stabilizer bar control links
16. Lower arm ball joints
17. Driveshaft
18. Joint shaft bracket
76G07C-056
19. Joint shaft and driveshaft
20. Under cover
21. Torque converter bolts
22. Starter
23. Engine mount No.4
24. Engine mount No.2
25. Crossmember and left side
lower arm
26. Transaxle
7C-30