electrical MAZDA MIATA 1991 Factory User Guide
[x] Cancel search | Manufacturer: MAZDA, Model Year: 1991, Model line: MIATA, Model: MAZDA MIATA 1991Pages: 392, PDF Size: 29.45 MB
Page 253 of 392

Fig. 5: Testing Alternator Rectifier & Diodes
Courtesy of MAZDA MOTORS CORP.
Fig. 6: Testing Alternator Rectifier & Diodes (1992)
Courtesy of MAZDA MOTORS CORP.
Rotor & Slip Rings
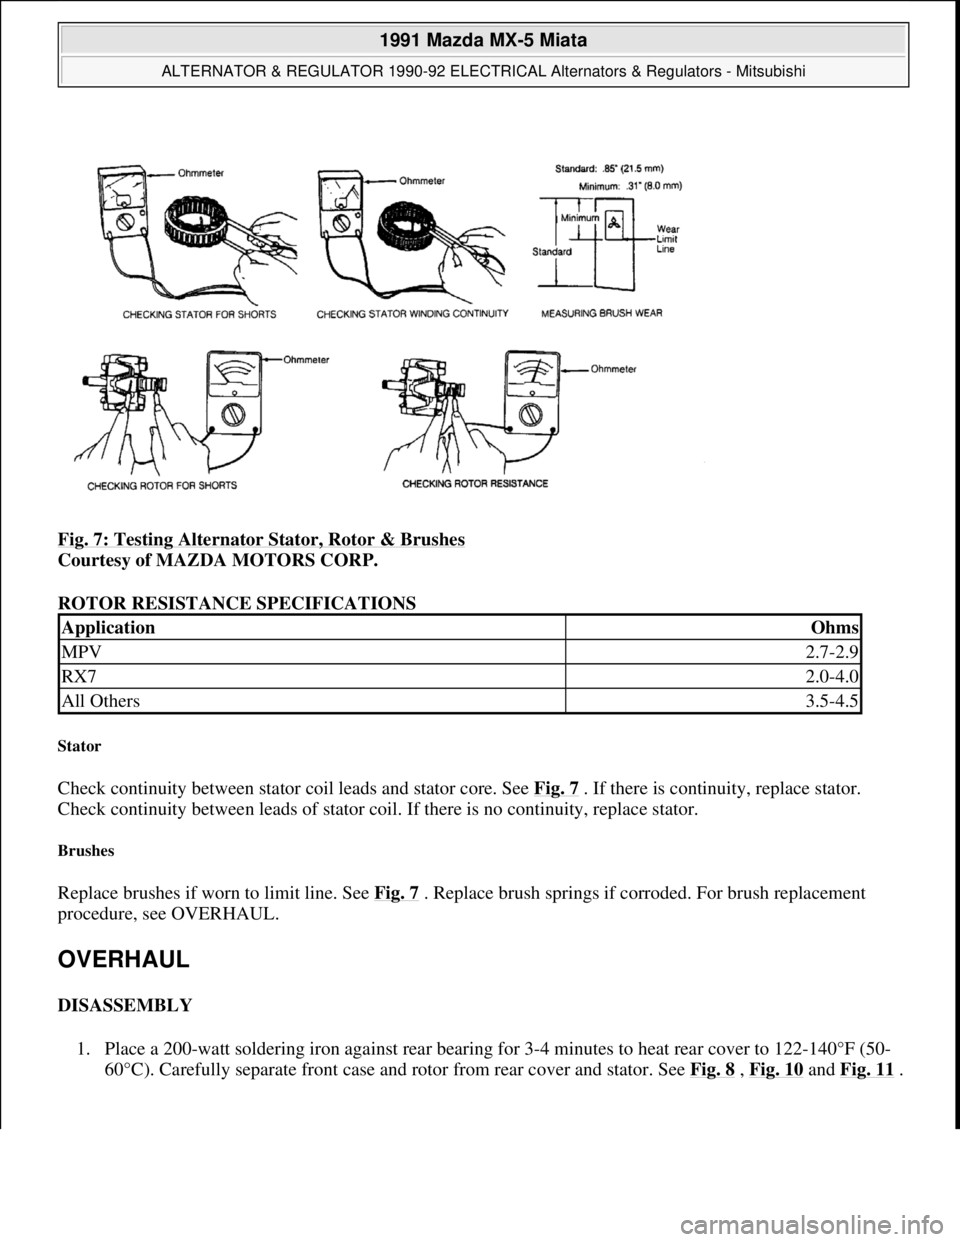
Measure resistance between rotor slip ring contacts. See Fig. 7 . If resistance is not within specification, replace
rotor. See ROTOR RESISTANCE SPECIFICATIONS table. Check continuity between individual slip rings
and rotor core/shaft. If there is continuit
y, replace rotor.
1991 Mazda MX-5 Miata
ALTERNATOR & REGULATOR 1990-92 ELECTRICAL Alternators & Regulators - Mitsubishi
Microsoft
Sunday, July 05, 2009 2:14:54 PMPage 9 © 2005 Mitchell Repair Information Company, LLC.
Page 254 of 392

Fig. 7: Testing Alternator Stator, Rotor & Brushes
Courtesy of MAZDA MOTORS CORP.
ROTOR RESISTANCE SPECIFICATIONS
Stator
Check continuity between stator coil leads and stator core. See Fig. 7 . If there is continuity, replace stator.
Check continuity between leads of stator coil. If there is no continuity, replace stator.
Brushes
Replace brushes if worn to limit line. See Fig. 7 . Replace brush springs if corroded. For brush replacement
procedure, see OVERHAUL.
OVERHAUL
DISASSEMBLY
1. Place a 200-watt soldering iron against rear bearing for 3-4 minutes to heat rear cover to 122-140°F (50-
60°C). Carefull
y separate front case and rotor from rear cover and stator. See Fig. 8 , Fig. 10and Fig. 11.
ApplicationOhms
MPV2.7-2.9
RX72.0-4.0
All Others3.5-4.5
1991 Mazda MX-5 Miata
ALTERNATOR & REGULATOR 1990-92 ELECTRICAL Alternators & Regulators - Mitsubishi
Microsoft
Sunday, July 05, 2009 2:14:54 PMPage 10 © 2005 Mitchell Repair Information Company, LLC.
Page 255 of 392

Fig. 8: Overhauling Alternators
Courtesy of MAZDA MOTORS CORP.
2. Position rotor in vise. Remove pulley. Disassemble pulley, rotor and front case. Remove front bearing
from front case. Using a bearing puller, remove rear bearing.
3. Remove "B" terminal nut and bushing from rear cover. Remove screws from brush holder and rectifier.
Separate rear cover and stator. When unsoldering rectifier and stator leads, disconnect as quickly as
possible (5 seconds maximum) to avoid damage to rectifier. To remove brushes from holder, unsolder
pigtail from terminal.
REASSEMBLY
Brush Installation
1. Install brush and spring into holder. Allow brush to extend out of holder until wear limit line extends .08-
.16" (2-4 mm) beyond end of brush holder. See Fig. 9
. Solder pigtail onto brush holder.
2. Insert spring and brush into brush holder. Using a spring scale, pull brush into holder until end of brush
protrudes .08" (2.0 mm) from holder. See Fig. 9
. Note reading on spring scale. Replace spring if tension
is not 5.6-15.5 ozs. (160-440 g).
1991 Mazda MX-5 Miata
ALTERNATOR & REGULATOR 1990-92 ELECTRICAL Alternators & Regulators - Mitsubishi
Microsoft
Sunday, July 05, 2009 2:14:54 PMPage 11 © 2005 Mitchell Repair Information Company, LLC.
Page 256 of 392

Fig. 9: Measuring Installed Depth of Brush
Courtesy of MAZDA MOTORS CORP.
Fig. 10: Exploded View of Alternators
Courtesy of MAZDA MOTORS CORP.
1991 Mazda MX-5 Miata
ALTERNATOR & REGULATOR 1990-92 ELECTRICAL Alternators & Regulators - Mitsubishi
Microsoft
Sunday, July 05, 2009 2:14:54 PMPage 12 © 2005 Mitchell Repair Information Company, LLC.
Page 257 of 392

Fig. 11: Exploded View of Alternators
Courtesy of MAZDA MOTORS CORP.
1991 Mazda MX-5 Miata
ALTERNATOR & REGULATOR 1990-92 ELECTRICAL Alternators & Regulators - Mitsubishi
Microsoft
Sunday, July 05, 2009 2:14:54 PMPage 13 © 2005 Mitchell Repair Information Company, LLC.
Page 293 of 392

ELECTRICAL COMPONENT LOCATOR
1991 MAZDA ELECTRICAL COMPONENTS
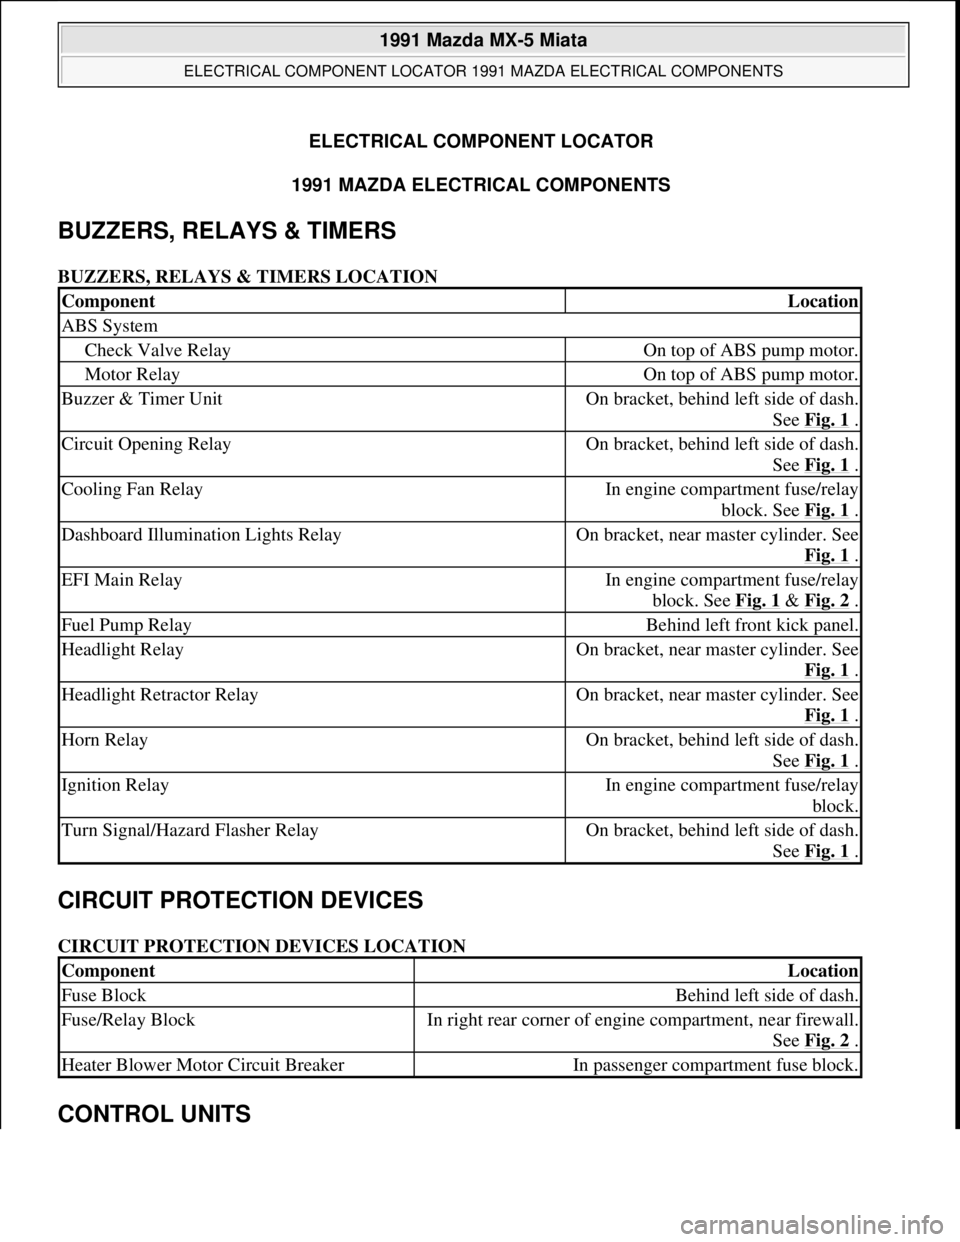
BUZZERS, RELAYS & TIMERS
BUZZERS, RELAYS & TIMERS LOCATION
CIRCUIT PROTECTION DEVICES
CIRCUIT PROTECTION DEVICES LOCATION
CONTROL UNITS
ComponentLocation
ABS System
Check Valve RelayOn top of ABS pump motor.
Motor RelayOn top of ABS pump motor.
Buzzer & Timer UnitOn bracket, behind left side of dash.
See Fig. 1
.
Circuit Opening RelayOn bracket, behind left side of dash.
See Fig. 1
.
Cooling Fan RelayIn engine compartment fuse/relay
block. See Fig. 1
.
Dashboard Illumination Lights RelayOn bracket, near master cylinder. See
Fig. 1
.
EFI Main RelayIn engine compartment fuse/relay
block. See Fig. 1
& Fig. 2 .
Fuel Pump RelayBehind left front kick panel.
Headlight RelayOn bracket, near master cylinder. See
Fig. 1
.
Headlight Retractor RelayOn bracket, near master cylinder. See
Fig. 1
.
Horn RelayOn bracket, behind left side of dash.
See Fig. 1
.
Ignition RelayIn engine compartment fuse/relay
block.
Turn Signal/Hazard Flasher RelayOn bracket, behind left side of dash.
See Fig. 1
.
ComponentLocation
Fuse BlockBehind left side of dash.
Fuse/Relay BlockIn right rear corner of engine compartment, near firewall.
See Fig. 2
.
Heater Blower Motor Circuit BreakerIn passenger compartment fuse block.
1991 Mazda MX-5 Miata
ELECTRICAL COMPONENT LOCATOR 1991 MAZDA ELECTRICAL COMPONENTS
1991 Mazda MX-5 Miata
ELECTRICAL COMPONENT LOCATOR 1991 MAZDA ELECTRICAL COMPONENTS
Microsoft
Sunday, July 05, 2009 2:15:23 PMPage 1 © 2005 Mitchell Repair Information Company, LLC.
Microsoft
Sunday, July 05, 2009 2:15:28 PMPage 1 © 2005 Mitchell Repair Information Company, LLC.
Page 294 of 392

CONTROL UNITS LOCATION
SENDING UNITS & SENSORS
SENDING UNITS & SENSORS LOCATION
MOTORS
MOTORS LOCATION
SOLENOIDS & SOLENOID VALVES
SOLENOIDS & SOLENOID VALVES LOCATION
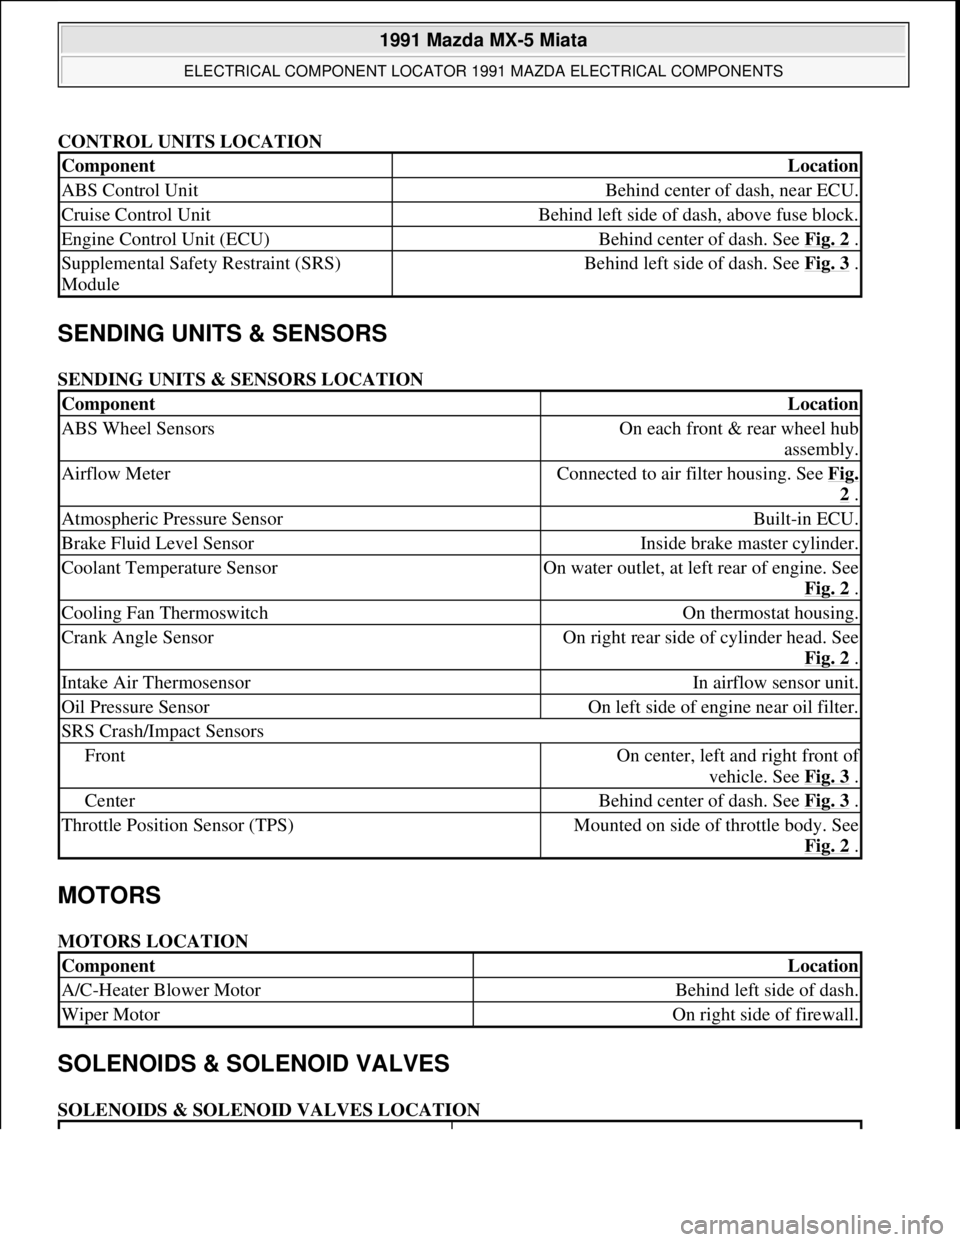
ComponentLocation
ABS Control UnitBehind center of dash, near ECU.
Cruise Control UnitBehind left side of dash, above fuse block.
Engine Control Unit (ECU)Behind center of dash. See Fig. 2 .
Supplemental Safety Restraint (SRS)
ModuleBehind left side of dash. See Fig. 3 .
ComponentLocation
ABS Wheel SensorsOn each front & rear wheel hub
assembly.
Airflow MeterConnected to air filter housing. See Fig.
2 .
Atmospheric Pressure SensorBuilt-in ECU.
Brake Fluid Level SensorInside brake master cylinder.
Coolant Temperature SensorOn water outlet, at left rear of engine. See
Fig. 2
.
Cooling Fan ThermoswitchOn thermostat housing.
Crank Angle SensorOn right rear side of cylinder head. See
Fig. 2
.
Intake Air ThermosensorIn airflow sensor unit.
Oil Pressure SensorOn left side of engine near oil filter.
SRS Crash/Impact Sensors
FrontOn center, left and right front of
vehicle. See Fig. 3
.
CenterBehind center of dash. See Fig. 3 .
Throttle Position Sensor (TPS)Mounted on side of throttle body. See
Fig. 2
.
ComponentLocation
A/C-Heater Blower MotorBehind left side of dash.
Wiper MotorOn right side of firewall.
1991 Mazda MX-5 Miata
ELECTRICAL COMPONENT LOCATOR 1991 MAZDA ELECTRICAL COMPONENTS
Microsoft
Sunday, July 05, 2009 2:15:23 PMPage 2 © 2005 Mitchell Repair Information Company, LLC.
Page 295 of 392

SWITCHES
SWITCHES LOCATION
MISCELLANEOUS
MISCELLANEOUS LOCATION
COMPONENT LOCATION GRAPHICS
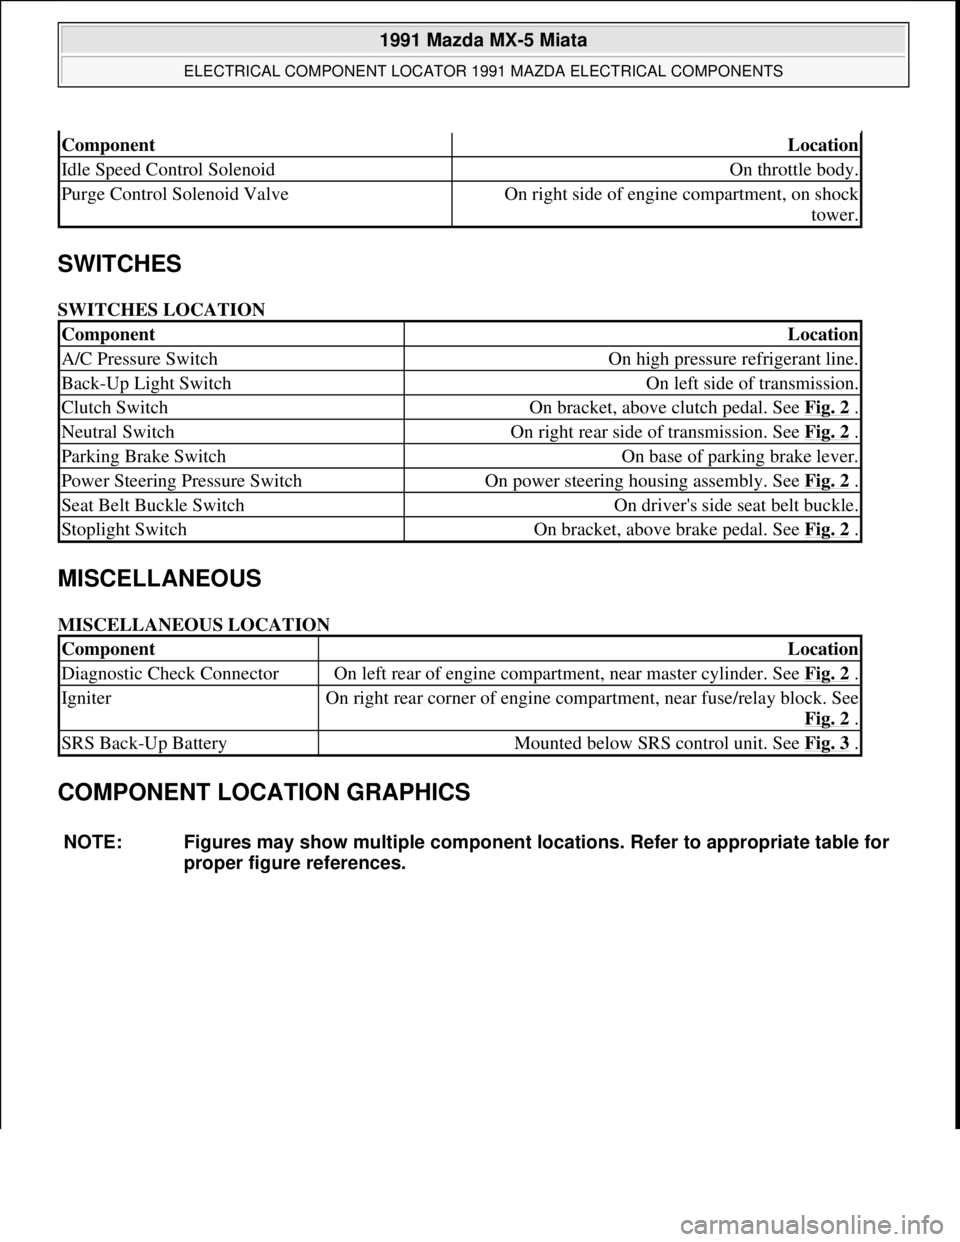
ComponentLocation
Idle Speed Control SolenoidOn throttle body.
Purge Control Solenoid ValveOn right side of engine compartment, on shock
tower.
ComponentLocation
A/C Pressure SwitchOn high pressure refrigerant line.
Back-Up Light SwitchOn left side of transmission.
Clutch SwitchOn bracket, above clutch pedal. See Fig. 2 .
Neutral SwitchOn right rear side of transmission. See Fig. 2 .
Parking Brake SwitchOn base of parking brake lever.
Power Steering Pressure SwitchOn power steering housing assembly. See Fig. 2 .
Seat Belt Buckle SwitchOn driver's side seat belt buckle.
Stoplight SwitchOn bracket, above brake pedal. See Fig. 2 .
ComponentLocation
Diagnostic Check ConnectorOn left rear of engine compartment, near master cylinder. See Fig. 2 .
IgniterOn right rear corner of engine compartment, near fuse/relay block. See
Fig. 2
.
SRS Back-Up BatteryMounted below SRS control unit. See Fig. 3 .
NOTE: Figures may show multiple component locations. Refer to appropriate table for
proper figure references.
1991 Mazda MX-5 Miata
ELECTRICAL COMPONENT LOCATOR 1991 MAZDA ELECTRICAL COMPONENTS
Microsoft
Sunday, July 05, 2009 2:15:23 PMPage 3 © 2005 Mitchell Repair Information Company, LLC.
Page 296 of 392

Fig. 1: Component Locations (1 Of 3)
1991 Mazda MX-5 Miata
ELECTRICAL COMPONENT LOCATOR 1991 MAZDA ELECTRICAL COMPONENTS
Microsoft
Sunday, July 05, 2009 2:15:23 PMPage 4 © 2005 Mitchell Repair Information Company, LLC.
Page 297 of 392

Fig. 2: Component Locations (2 Of 3)
1991 Mazda MX-5 Miata
ELECTRICAL COMPONENT LOCATOR 1991 MAZDA ELECTRICAL COMPONENTS
Microsoft
Sunday, July 05, 2009 2:15:23 PMPage 5 © 2005 Mitchell Repair Information Company, LLC.