MAZDA MODEL 6 2009 Smart Start Guide (in English)
Manufacturer: MAZDA, Model Year: 2009, Model line: MODEL 6, Model: MAZDA MODEL 6 2009Pages: 26, PDF Size: 4.83 MB
Page 11 of 26
10
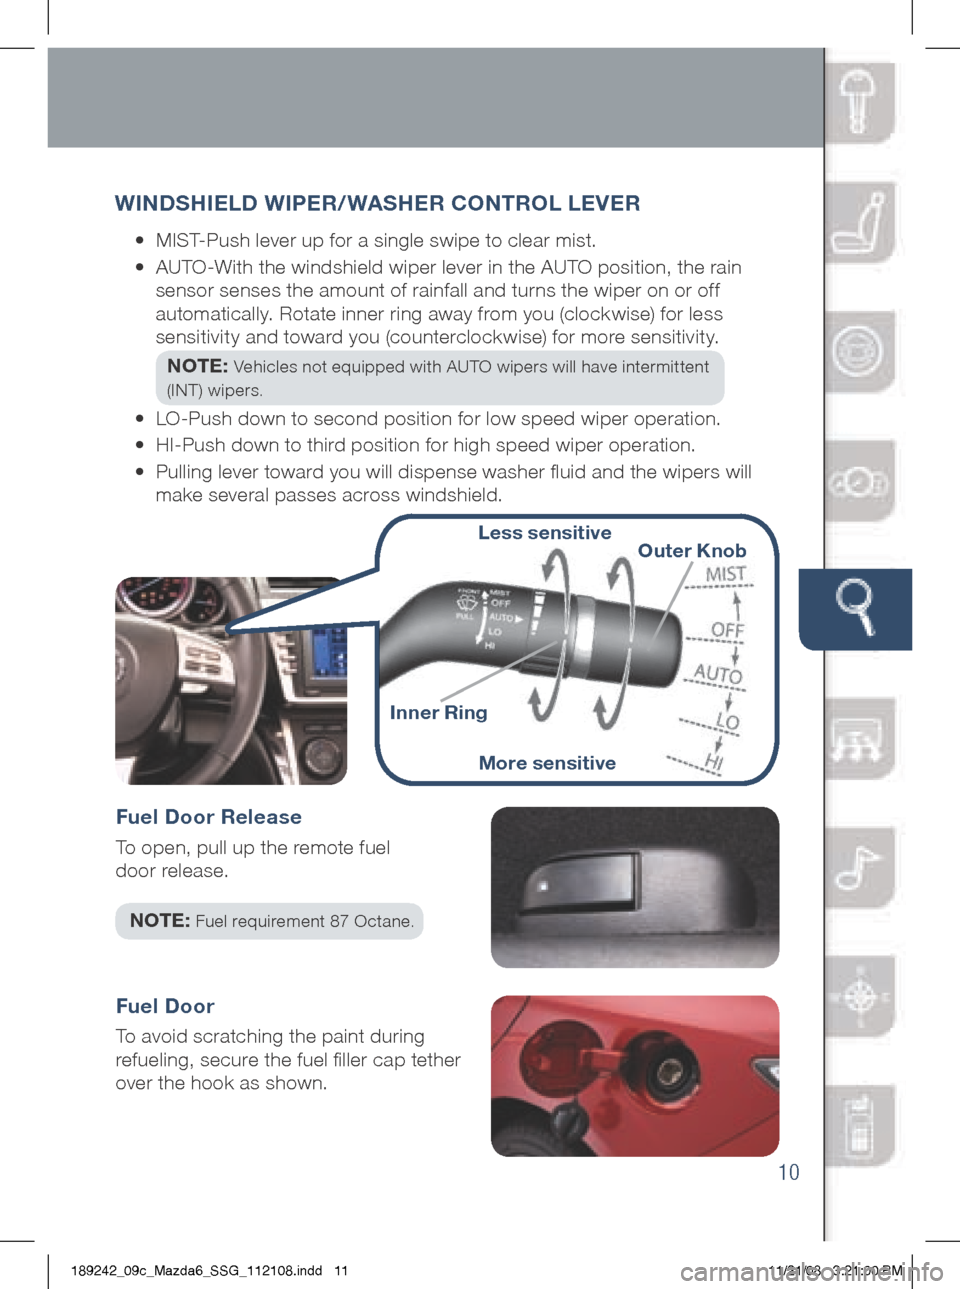
Fuel Door Release
To open, pull up the remote fuel
door release.
NOTE :
Fuel requirement 87 Octane.
Fuel Door
To avoid scratching the paint during
refueling, secure the fuel filler cap tether
over the hook as shown.
wi NDSH iELD wi PER/wASHER CONTROL LEVER
•
MIST-Push lever up for a single swipe to clear mist.
•
AUTO-With the windshield wiper lever in the AUTO position, the rain
sensor senses the amount of rainfall and turns the wiper on or off
automatically. Rotate inner ring away from you (clockwise) for less
sensitivity and toward you (counterclockwise) for more sensitivity.
NOTE:
Vehicles not equipped with AUTO wipers will have intermittent
(INT) wipers.
• LO-Push down to second position for low speed wiper operation.
• HI-Push down to third position for high speed wiper operation.
• Pulling lever toward you will dispense washer fluid and the wipers will
make several passes across windshield.
More sensitive Less sensitive
Outer Knob
i nner Ring
189242_09c_Mazda6_SSG_112108.indd 1111/21/08 3:21:00 PM
Page 12 of 26
Feature Highlights
11
NOTE: Do not rely completely on the BSM system and be sure to look over
your shoulder before changing lanes:
• The BSM system can assist the driver in confirming the safety of the surroundings,
but is not a complete substitute.
• The driver is responsible for assuring lane changes and other maneuvers.
• Always pay attention to the direction in which the vehicle is traveling and the
vehicle’s surroundings.
• The BSM system does not operate when the vehicle speed is lower than about
20 mph (32 km/h).
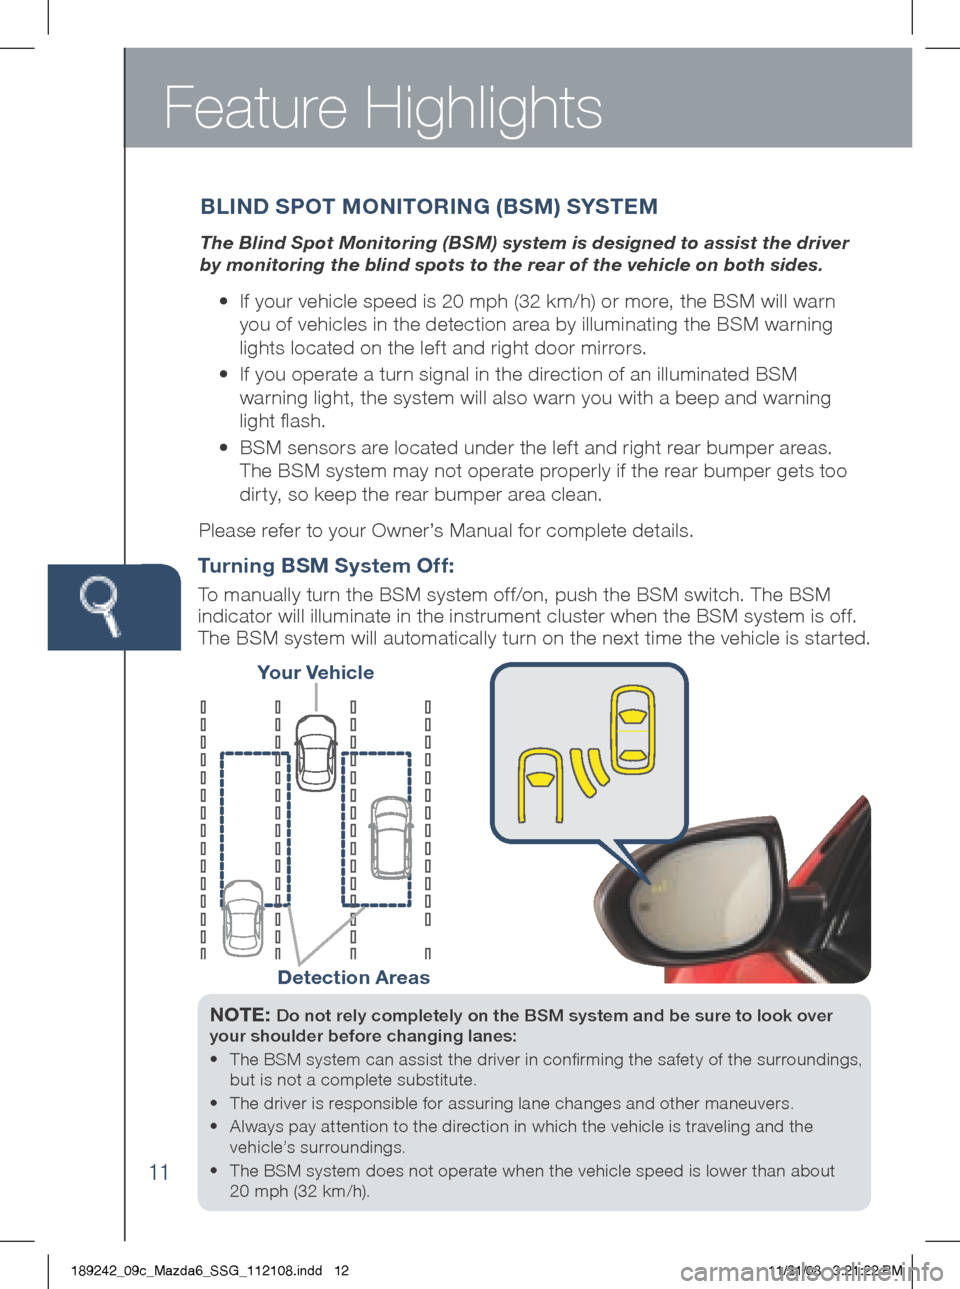
Your Vehicle
Detection Areas
Turning BSM System Off :
To manually turn the BSM system off/on, push the BSM switch. The BSM
indicator will illuminate in the instrument cluster when the BSM system is off.
The BSM system will automatically turn on the next time the vehicle is started.
B LiND S POT M ONiTOR iN g (BSM) S YSTEM
The Blind Spot Monitoring (BSM) system is designed to assist the driver
by monitoring the blind spots to the rear of the vehicle on both sides.
• If your vehicle speed is 20 mph (32 km/h) or more, the BSM will warn
you of vehicles in the detection area by illuminating the BSM warning
lights located on the left and right door mirrors.
•
If you operate a turn signal in the direction of an illuminated BSM
warning light, the system will also warn you with a beep and warning
light flash.
•
BSM sensors are located under the left and right rear bumper areas.
The BSM system may not operate properly if the rear bumper gets too
dirty, so keep the rear bumper area clean.
Please refer to your Owner’s Manual for complete details.
189242_09c_Mazda6_SSG_112108.indd 1211/21/08 3:21:22 PM
Page 13 of 26
12
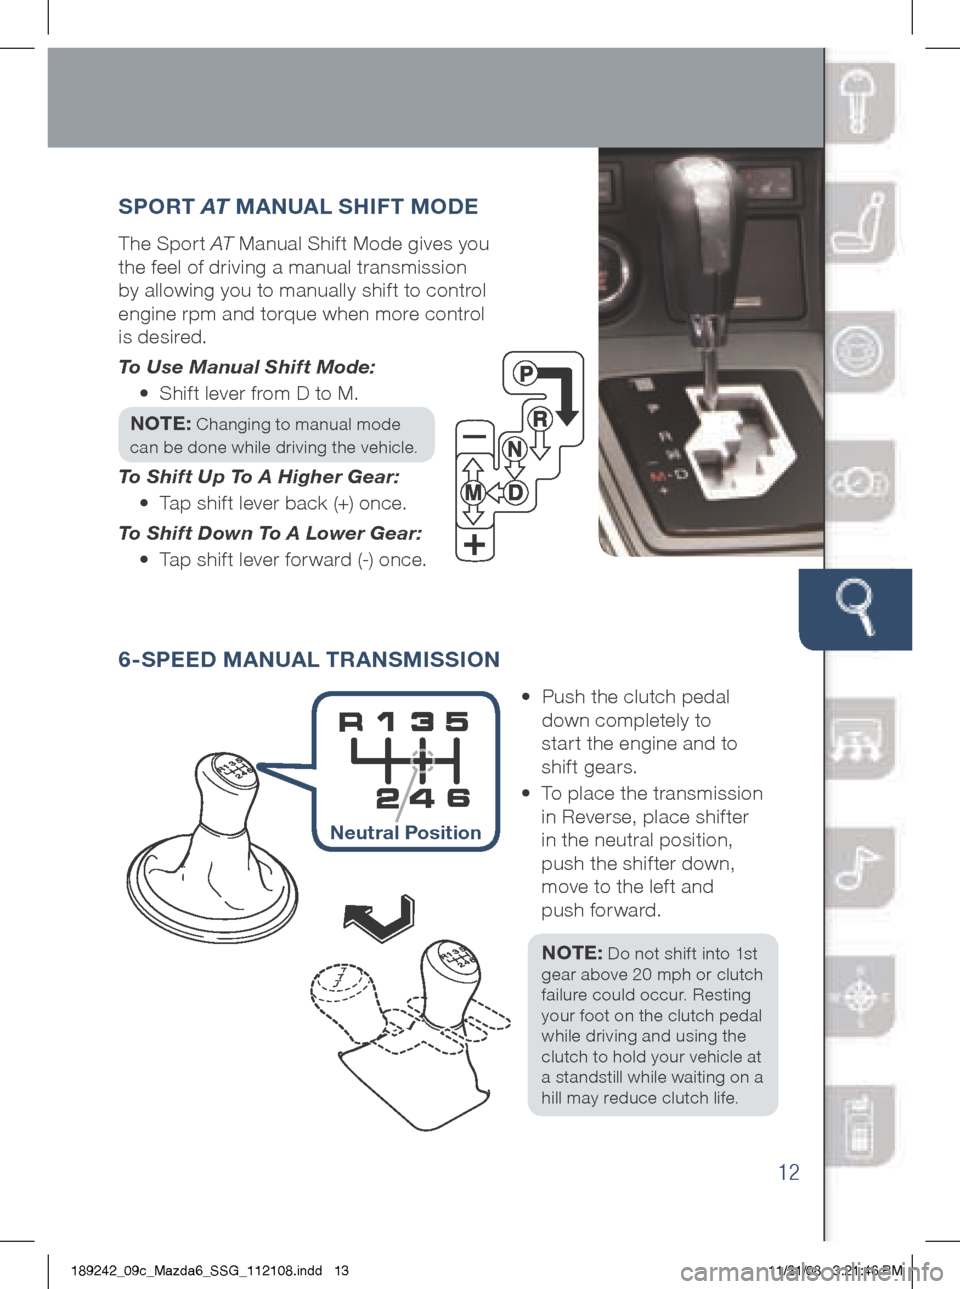
SPORT AT MANUAL S HiFT M ODE
The Sport AT Manual Shif t Mode gives you
the feel of driving a manual transmission
by allowing you to manually shif t to control
engine rpm and torque when more control
is desired.
To Use Manual Shift Mode:
• Shift lever from D to M.
NOTE:
Changing to manual mode
can be done while driving the vehicle.
To Shift Up To A Higher Gear:
• Tap shift lever back (+) once.
To Shift Down To A Lower Gear:
• Tap shift lever forward (-) once.
•
Push the clutch pedal
down completely to
star t the engine and to
shift gears.
•
To place the transmission
in Reverse, place shifter
in the neutral position,
push the shifter down,
move to the left and
push forward.
NOTE:
Do not shift into 1st
gear above 20 mph or clutch
failure could occur. Resting
your foot on the clutch pedal
while driving and using the
clutch to hold your vehicle at
a standstill while waiting on a
hill may reduce clutch life.
6-S PEED MANUAL TRANSM iSS iON
Neutral Position
189242_09c_Mazda6_SSG_112108.indd 1311/21/08 3:21:46 PM
Page 14 of 26
Manual Climate Control
13
NOTE: Applies to Manual and Automatic Climate Control Systems: With
any type of defroster operation (even in the FLOOR mode where some air goes to
defrost to keep the windows defrosted), the system turns on the A /C compressor
and selects the FRESH AIR mode. This helps defrost the windows more efficiently
by dehumidifying the air. The A /C compressor will always be on in defroster mode,
but the defroster (and floor) will deliver warm air when the temperature dial is set to
a warmer temperature and the engine warms up.
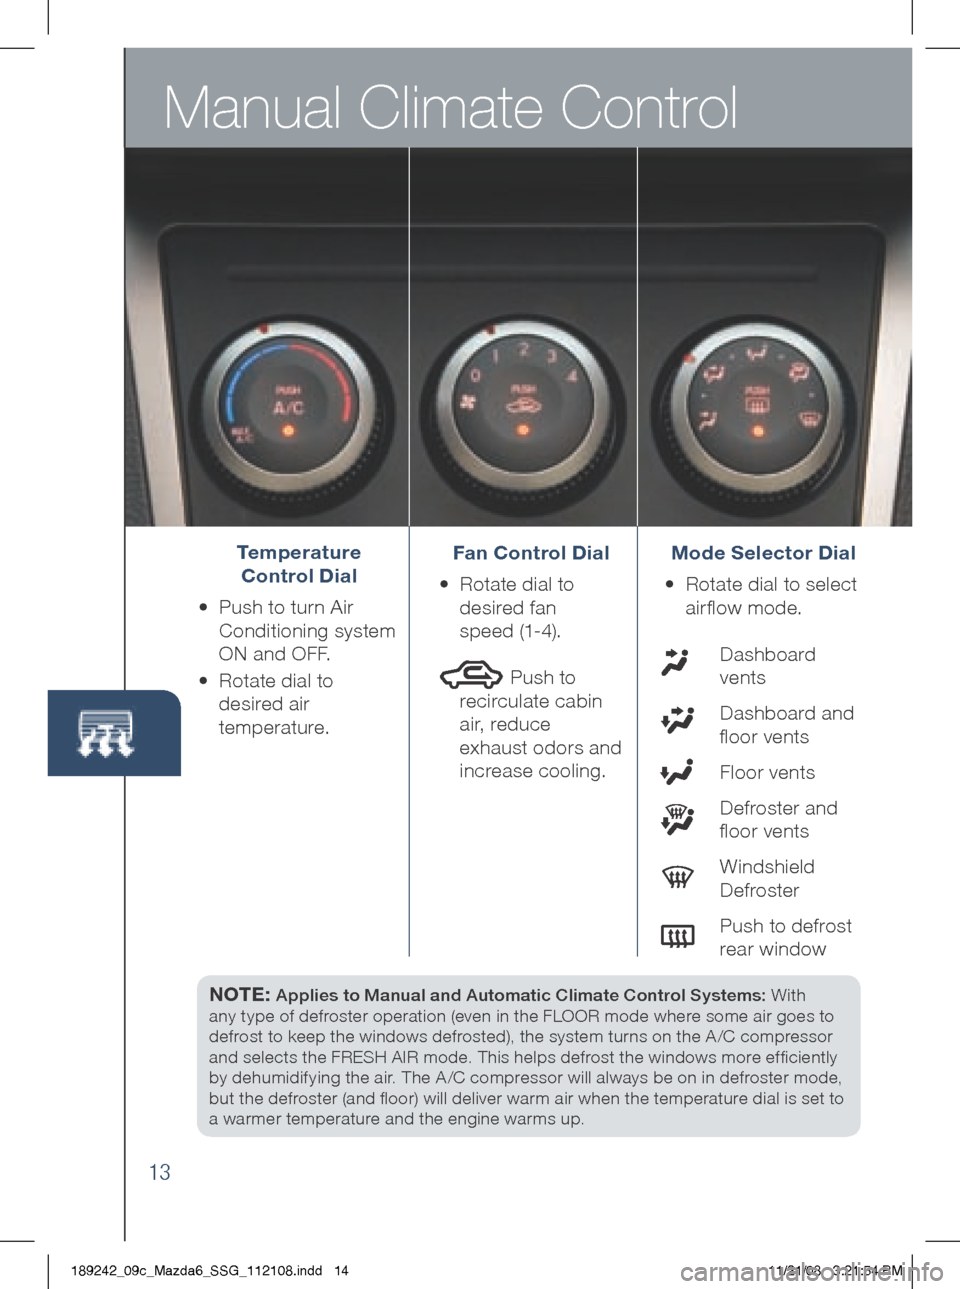
Temperature
Control Dial
•
Push to turn Air
Conditioning system
ON and OFF.
•
Rotate dial to
desired air
temperature. Fan Control Dial
•
Rotate dial to
desired fan
speed (1-4).
Push to
recirculate cabin
air, reduce
exhaust odors and
increase cooling. Mode Selector Dial
• Rotate dial to select
airflow mode.
Dashboard
vents
Dashboard and
floor vents
Floor vents
Defroster and
floor vents
Windshield
Defroster
Push to defrost
rear window
189242_09c_Mazda6_SSG_112108.indd 1411/21/08 3:21:54 PM
Page 15 of 26
Automatic Climate Control
14
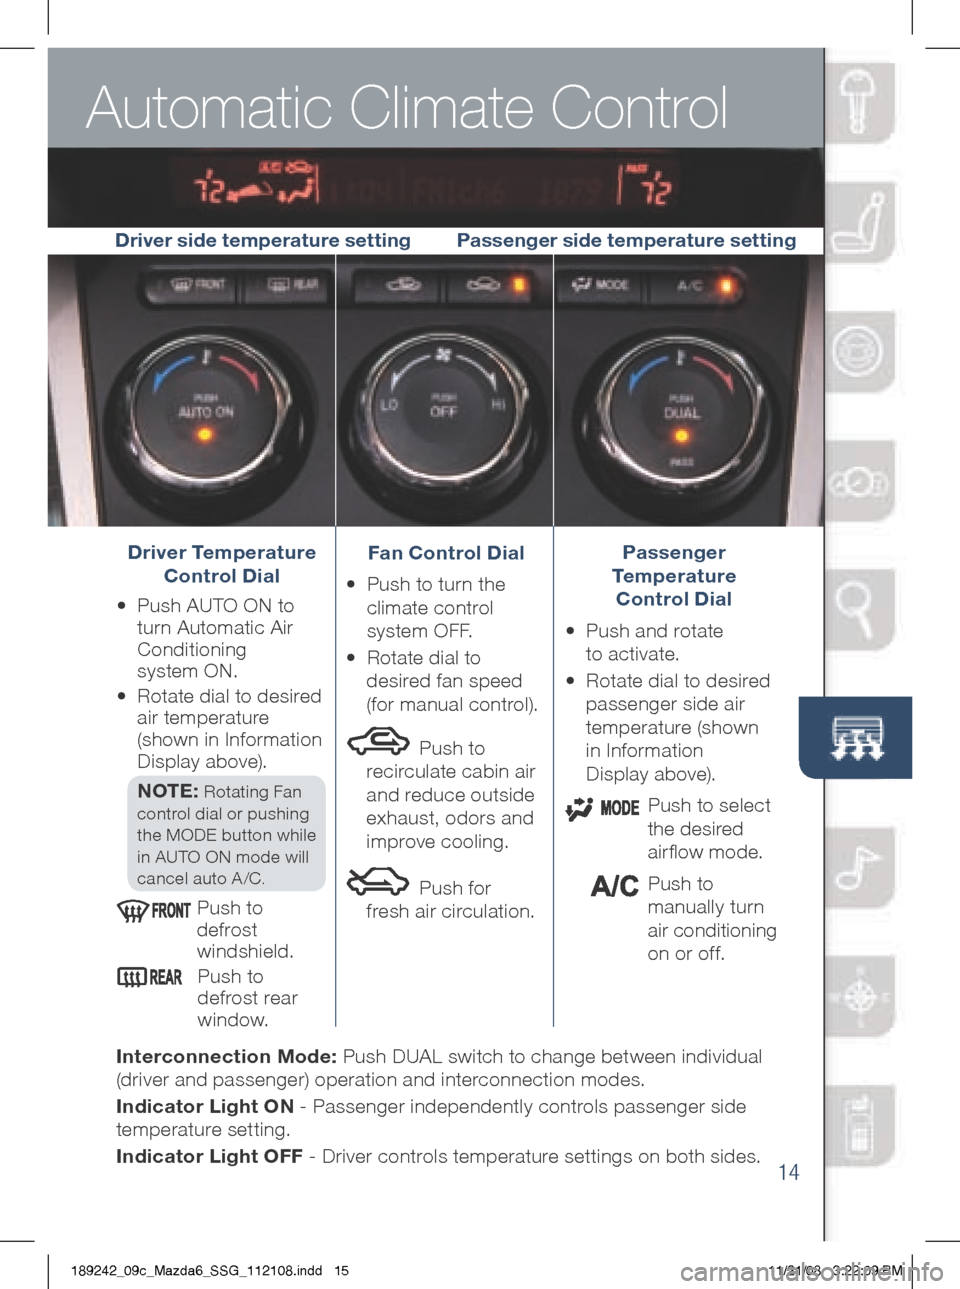
Driver Temperature
Control Dial
•
Push AUTO ON to
turn Automatic Air
Conditioning
system ON.
•
Rotate dial to desired
air temperature
(shown in Information
Display above).
NOTE:
Rotating Fan
control dial or pushing
the MODE button while
in AUTO ON mode will
cancel auto A /C.
Push to
defrost
windshield.
Push to
defrost rear
window. Fan Control Dial
• Push to turn the
climate control
system OFF.
•
Rotate dial to
desired fan speed
(for manual control).
Push to
recirculate cabin air
and reduce outside
exhaust, odors and
improve cooling.
Push for
fresh air circulation. Passenger
Temperature
Control Dial
•
Push and rotate
to activate.
•
Rotate dial to desired
passenger side air
temperature (shown
in Information
Display above).
Push to select
the desired
airflow mode.
Push to
manually turn
air conditioning
on or off.
i nterconnection Mode: Push DUAL switch to change between individual
(driver and passenger) operation and interconnection modes.
i ndicator Light ON - Passenger independently controls passenger side
temperature setting.
i ndicator Light OFF - Driver controls temperature settings on both sides.
Driver side temperature setting
Passenger side temperature setting
189242_09c_Mazda6_SSG_112108.indd 1511/21/08 3:22:09 PM
Page 16 of 26
Audio Controls Without Navigation
15
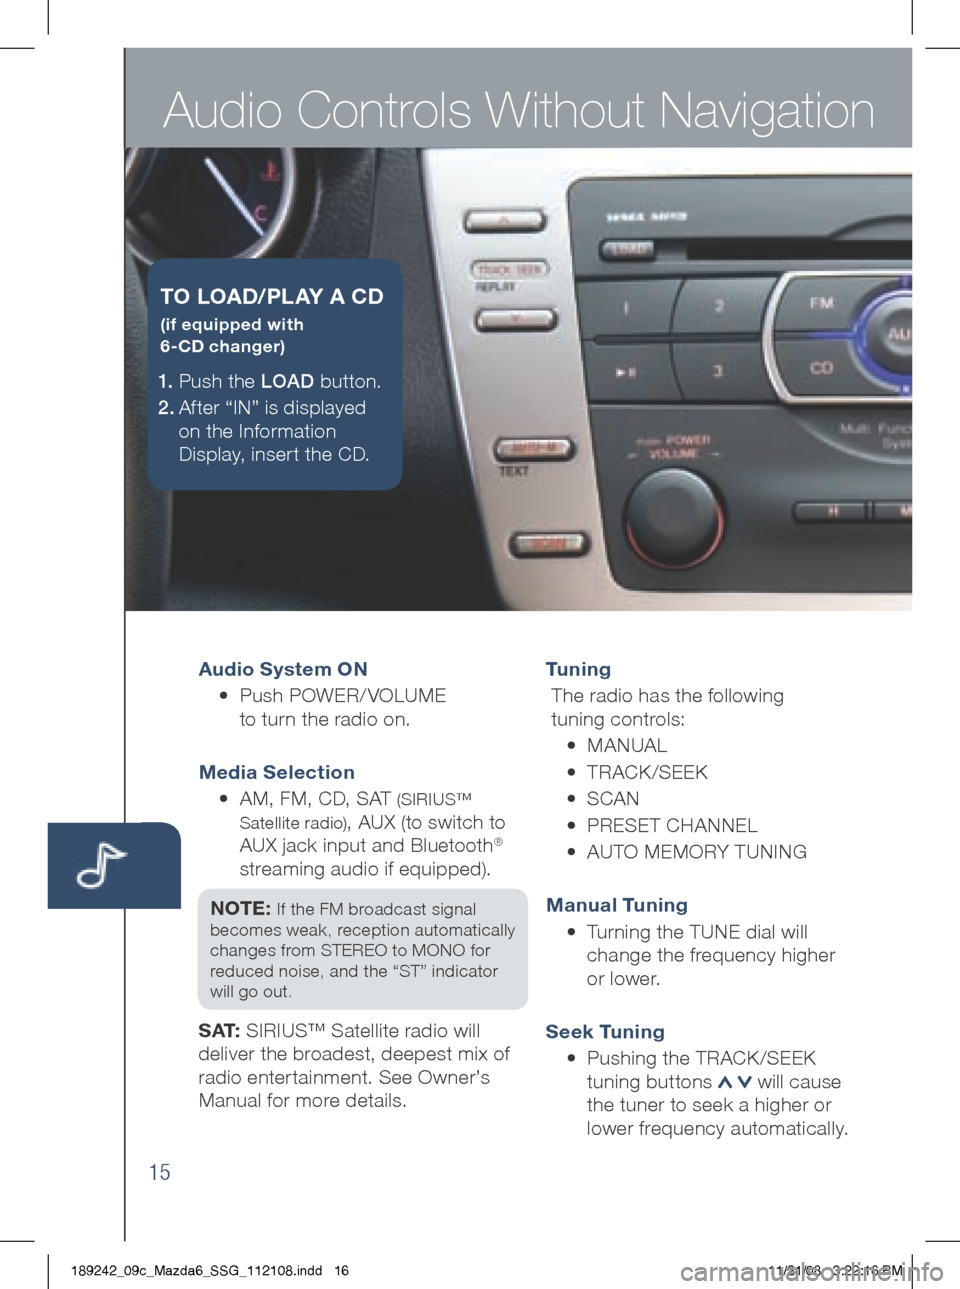
Audio System ON
• Push POWER/ VOLUME
to turn the radio on.
Media Selection
• AM, FM, CD, SAT
(SIRIUS™
Satellite radio)
, AUX (to switch to
AUX jack input and Bluetooth®
streaming audio if equipped).
NOTE:
If the FM broadcast signal
becomes weak, reception automatically
changes from STEREO to MONO for
reduced noise, and the “ST” indicator
will go out.
S AT: SIRIUS™ Satellite radio will
deliver the broadest, deepest mix of
radio enter tainment. See Owner’s
Manual for more details. Tu n i n g
The radio has the following
tuning controls:
• M ANUAL
• T RACk /SEEk
• S CAN
• P RESET CHANNEL
• A UTO MEMORY TUNIN g
Manual Tuning
• Turning the TUNE dial will
change the frequency higher
or lower.
Seek Tuning
• Pushing the TRAC k/SEE k
tuning buttons
will cause
the tuner to seek a higher or
lower frequency automatically.
1.
Push the LOAD button.
2 . After “IN” is displayed
on the Information
Display, insert the CD.
T O LOAD /PLAY A CD
(if equipped with
6-CD changer)
189242_09c_Mazda6_SSG_112108.indd 1611/21/08 3:22:16 PM
Page 17 of 26
16
Scan Tu ning
•
Push the SCAN button
to automatically sample
strong stations.
•
To hold a station, push
the SCAN button again
during this inter val.
Preset Channel Tuning
The 6 preset channels can be used
to store 6 AM and 12 FM stations.
• To set a channel first select AM,
FM1, or FM2.
• Tune to the desired station.
•
Push a channel preset button
for about 2 seconds until a
beep is heard.
•
Repeat this operation for the
other stations and bands you
want to store. Auto-Memor y Tuning
When driving in an area where
the local stations are not known,
additional AM/FM stations can
be stored without disturbing the
previously set channels. Refer
to your Owner’s Manual for
complete details.
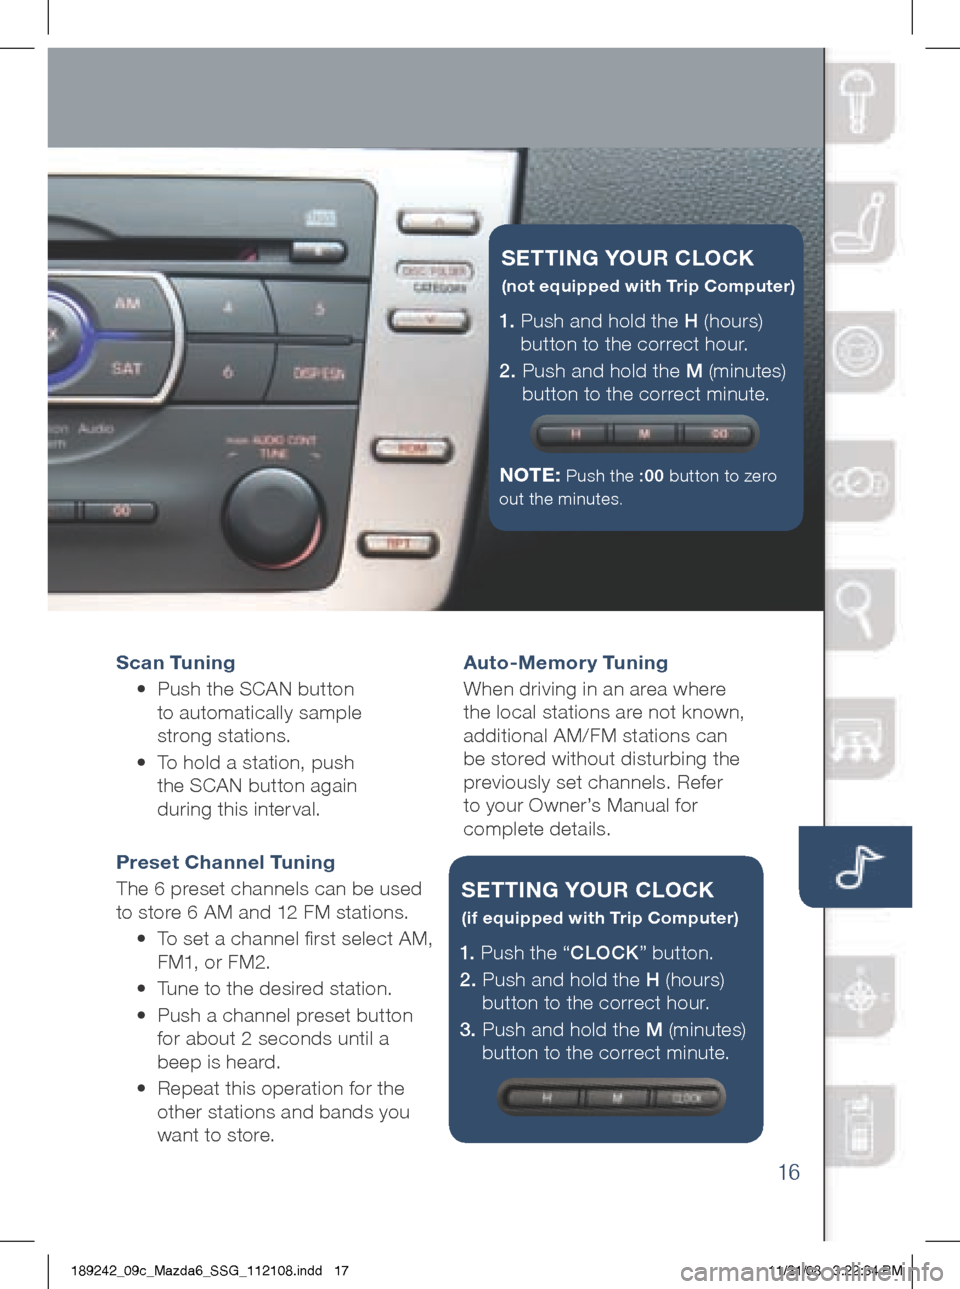
1. Push and hold the H (hours)
button to the correct hour.
2. Push and hold the M (minutes)
button to the correct minute.
NOTE:
Push the :00 button to zero
out the minutes.
SETT iN g YOUR CLOCK
(not equipped with Trip Computer)
1. Push the “ CLOCK” button.
2. Push and hold the H (hours)
button to the correct hour.
3. Push and hold the M (minutes)
button to the correct minute.
SETT iN g YOUR CLOCK
(if equipped with Trip Computer)
189242_09c_Mazda6_SSG_112108.indd 1711/21/08 3:22:34 PM
Page 18 of 26
Audio Controls With Navigation
17
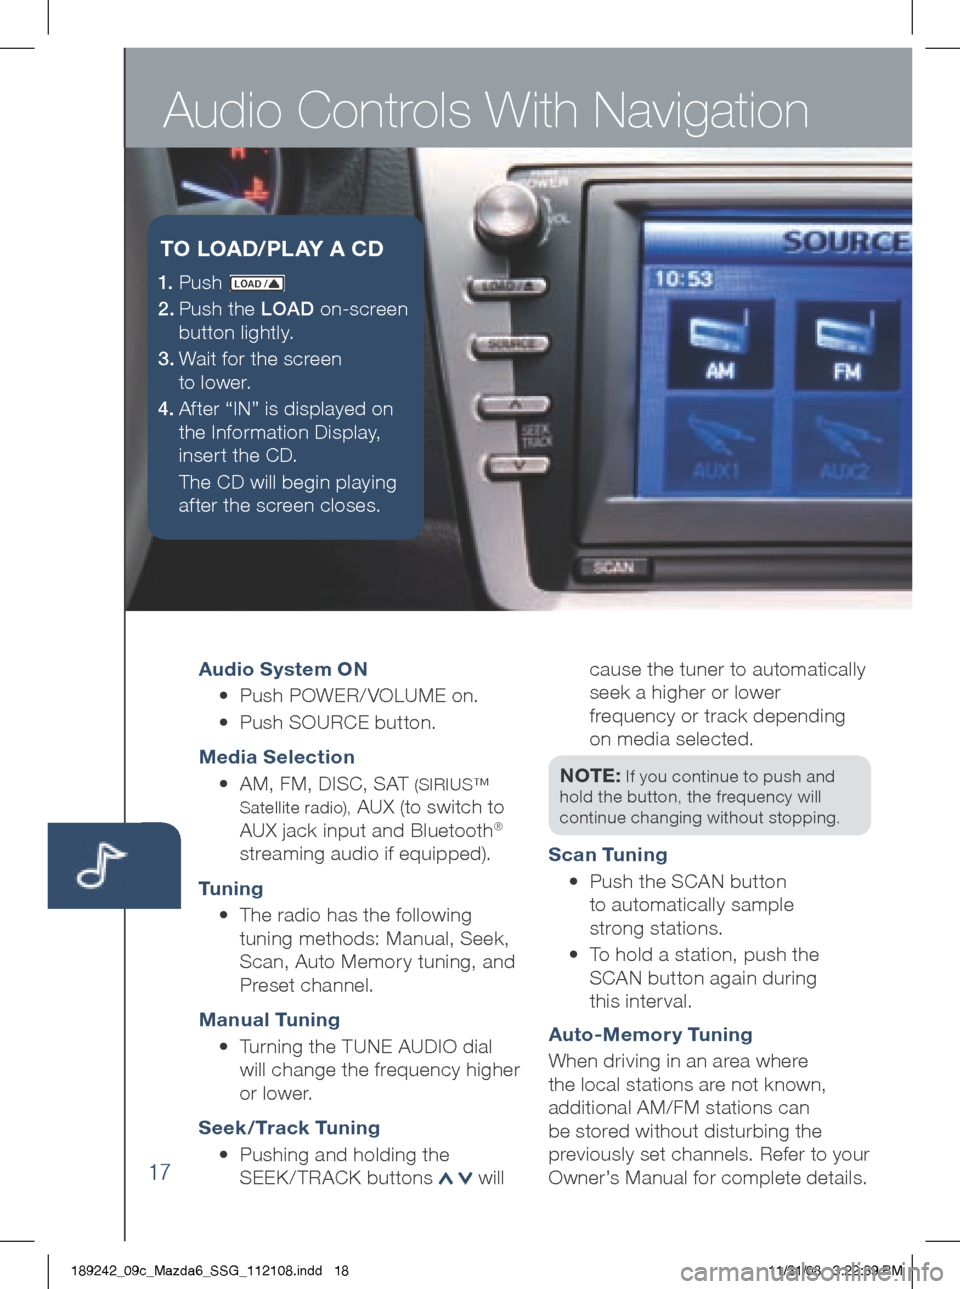
Audio System ON
• Push POWER/ VOLUME on.
• Push SOURCE button.
Media Selection
• AM, FM, DISC, SAT
(SIRIUS™
Satellite radio),
AUX (to switch to
AUX jack input and Bluetooth®
streaming audio if equipped).
Tu n i n g
• The radio has the following
tuning methods: Manual, Seek,
Scan, Auto Memory tuning, and
Preset channel.
Manual Tuning
• Turning the TUNE AUDIO dial
will change the frequency higher
or lower.
Seek / Track Tuning
• Pushing and holding the
SEE k/TRACk buttons
will cause the tuner to automatically
seek a higher or lower
frequency or track depending
on media selected.
NOTE:
If you continue to push and
hold the button, the frequency will
continue changing without stopping.
Scan Tuning
• Push the SCAN button
to automatically sample
strong stations.
•
To hold a station, push the
SCAN button again during
this inter val.
Auto-Memor y Tuning
When driving in an area where
the local stations are not known,
additional AM/FM stations can
be stored without disturbing the
previously set channels. Refer to your
Owner’s Manual for complete details.
1. P u s h LOAD /
2.
Push the LOAD on-screen
button lightly.
3.
Wait for the screen
to lower.
4 . Af ter “IN” is displayed on
the Information Display,
insert the CD.
The CD will begin playing
after the screen closes.
T O LOAD /PLAY A CD
189242_09c_Mazda6_SSG_112108.indd 1811/21/08 3:22:39 PM
Page 19 of 26
18
Preset Channel Tuning
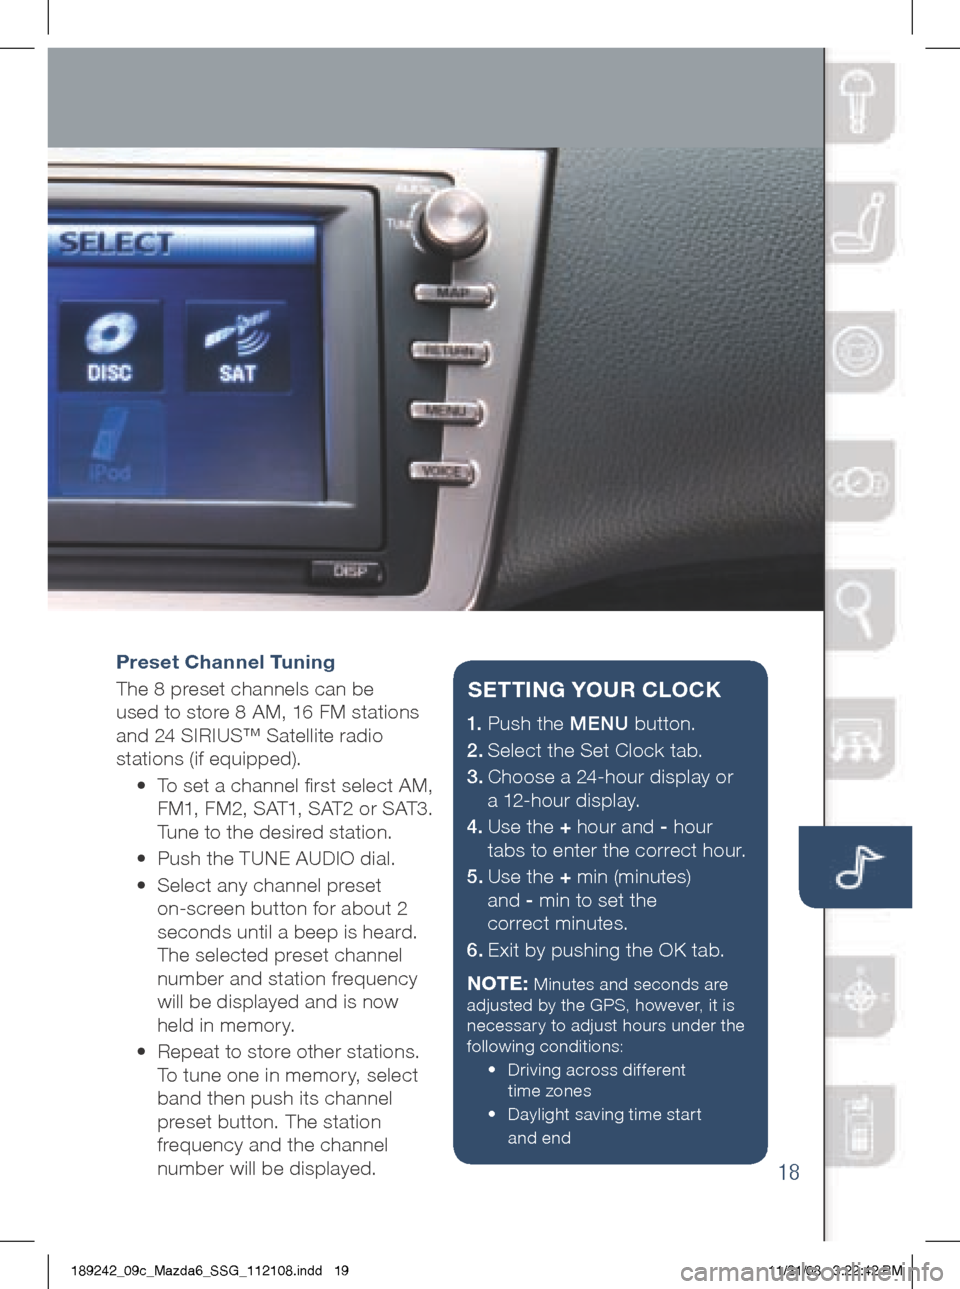
The 8 preset channels can be
used to store 8 AM, 16 FM stations
and 24 SIRIUS™ Satellite radio
stations (if equipped).
• To set a channel first select AM,
FM1, FM2, SAT1, SAT2 or SAT3.
Tune to the desired station.
• Push the TUNE AUDIO dial.
•
Select any channel preset
on-screen button for about 2
seconds until a beep is heard.
The selected preset channel
number and station frequency
will be displayed and is now
held in memory.
•
Repeat to store other stations.
To tune one in memor y, select
band then push its channel
preset button. The station
frequency and the channel
number will be displayed.
1.
Push the MENU button.
2.
Select the Set Clock tab.
3.
Choose a 24-hour display or
a 12-hour display.
4.
Use the + hour and - hour
tabs to enter the correct hour.
5.
Use the + min (minutes)
and - min to set the
correct minutes.
6.
Exit by pushing the O k tab.
NOTE:
Minutes and seconds are
adjusted by the gPS, however, it is
necessary to adjust hours under the
following conditions:
•
Driving across different
time zones
•
Daylight saving time start
and end
SETT iN g YOUR CLOCK
189242_09c_Mazda6_SSG_112108.indd 1911/21/08 3:22:42 PM
Page 20 of 26
Navigation System
19
insert Map Disc into lower DVD slot
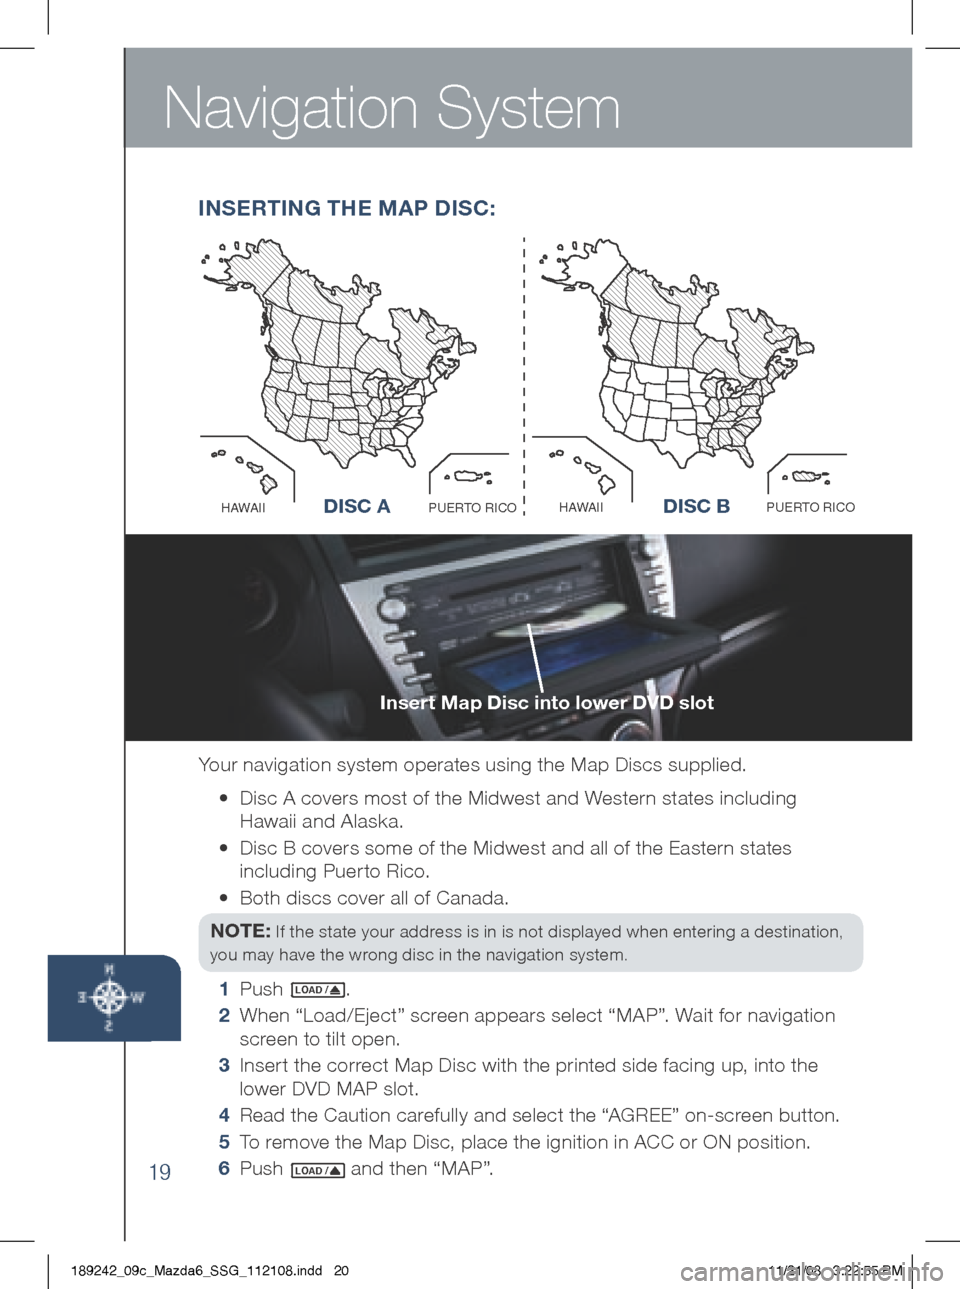
Your navigation system operates using the Map Discs supplied.
•
Disc A covers most of the Midwest and Western states including
Hawaii and Alaska.
•
Disc B covers some of the Midwest and all of the Eastern states
including Puerto Rico.
• Both discs cover all of Canada.
NOTE:
If the state your address is in is not displayed when entering a destination,
you may have the wrong disc in the navigation system.
1 Push LO AD /.
2
When “Load/Eject” screen appears select “MAP”. Wait for navigation
screen to tilt open.
3
Insert the correct Map Disc with the printed side facing up, into the
lower DVD MAP slot.
4 Read the Caution carefully and select the “ AgREE” on-screen button.
5
To remove the Map Disc, place the ignition in ACC or ON position.
6 Push
LO AD / and then “MAP”.
iNSERT iN g THE M AP DiSC:
Disc AO
C
I
R
O
T
R
E
U
P
I
I
A
W
A
HDisc B
O
C
I
R
O
T
R
E
U
P
I
I
A
W
A
HD iSC AD iSC B
189242_09c_Mazda6_SSG_112108.indd 2011/21/08 3:22:55 PM