MAZDA MODEL 6 2017 Quick Start Guide (in English)
Manufacturer: MAZDA, Model Year: 2017, Model line: MODEL 6, Model: MAZDA MODEL 6 2017Pages: 46, PDF Size: 5.45 MB
Page 31 of 46
29
Headlights (cont’d from pg. 25)
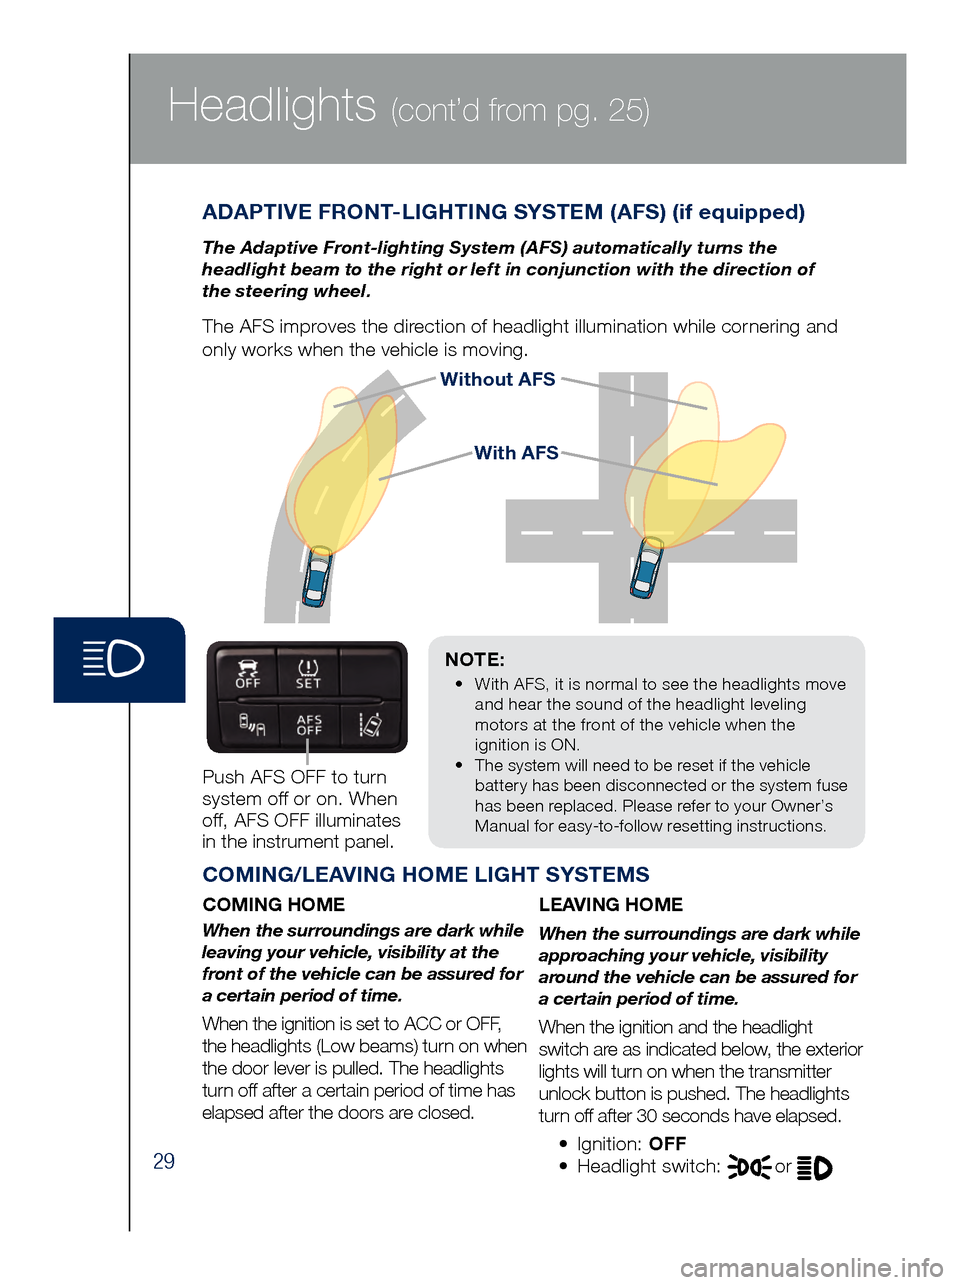
Without AFS
NOTE:
•
Wit
h AFS, it is normal to see the headlights move
and hear the sound of the headlight leveling
motors at the front of the vehicle when the
ignition is ON.
•
The s
ystem will need to be reset if the vehicle
battery has been disconnected or the system fuse
has been replaced. Please refer to your Owner’s
Manual for easy-to-follow resetting instructions.
ADAPTIVE FRONT-LIGHTING SYSTEM (AFS) (if equipped)
The Adaptive Front-lighting System (AFS) automatically turns the
headlight beam to the right or left in conjunction with the direction of
the steering wheel.
The AFS improves the direction of headlight illumination while cornering and
only works when the vehicle is moving.
Push AFS OFF to turn
system off or on. When
off, AFS OFF illuminates
in the instrument panel.
COMING/LEAVING HOME LIGHT SYSTEMS
COMING HOME
When the surroundings are dark while
leaving your vehicle, visibility at the
front of the vehicle can be assured for
a certain period of time.
When the ignition is set to ACC or OFF,
the headlights (Low beams) turn on when
the door lever is pulled. The headlights
turn off after a certain period of time has
elapsed after the doors are closed.
LEAVING HOME
When the surroundings are dark while
approaching your vehicle, visibility
around the vehicle can be assured for
a certain period of time.
When the ignition and the headlight
switch are as indicated below, the exterior
lights will turn on when the transmitter
unlock button is pushed. The headlights
turn off after 30 seconds have elapsed.
•
Ignition: OFF
• Headlight switch: or
With AFS
Page 32 of 46
30
Headlights (cont’d from pg. 25)High Beam Control
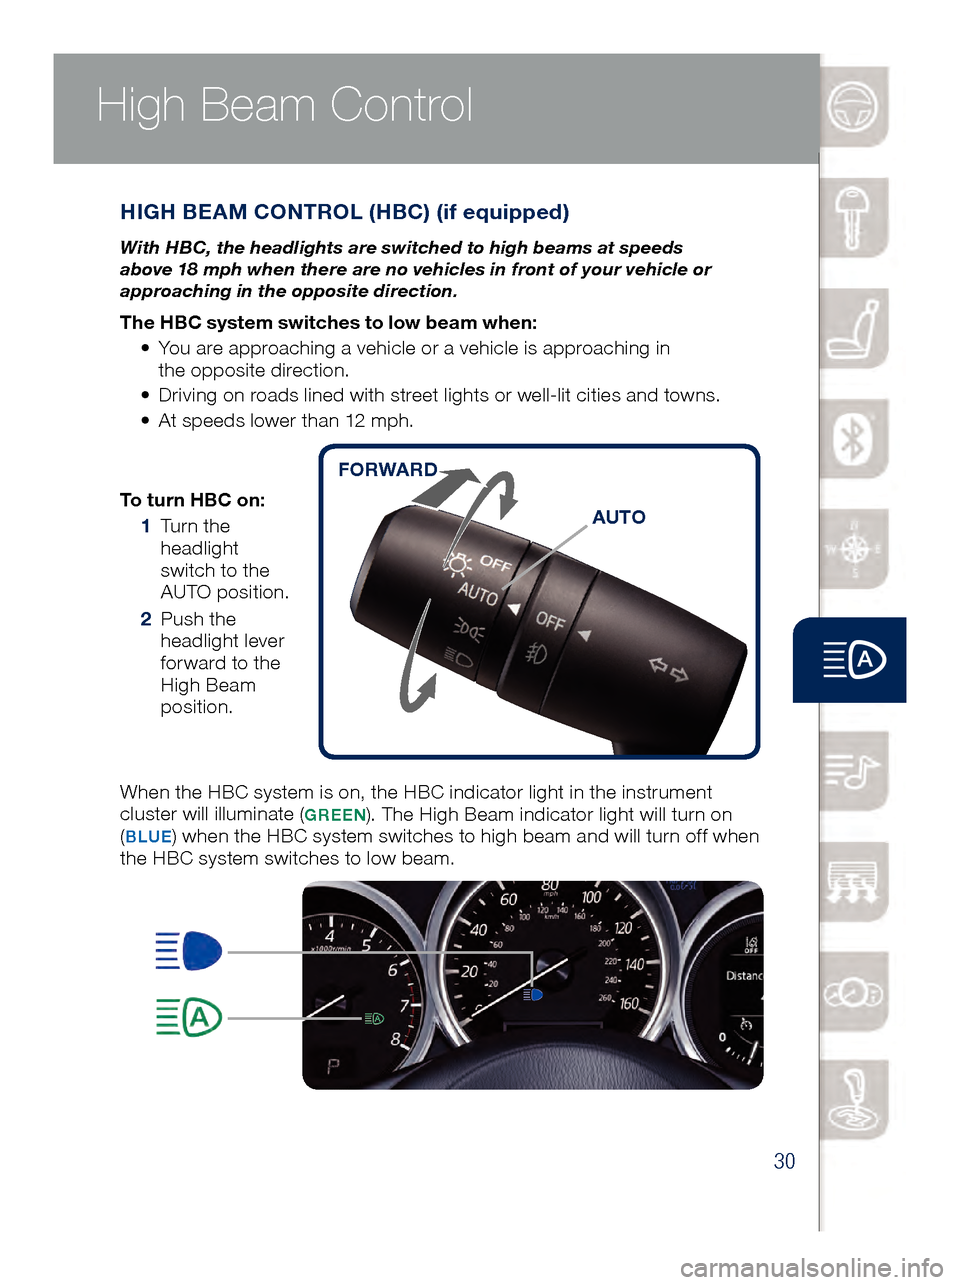
To turn HBC on:
1 Tur
n the
headlight
switch to the
AUTO position.
2 Push
the
headlight lever
forward to the
High Beam
position.
When the HBC system is on, the HBC indicator light in the instrument
cluster will illuminate (
GREEN). The High Beam indicator light will turn on
(BLUE) when the HBC system switches to high beam and will turn off when
the HBC system switches to low beam.
HIGH BEAM CONTROL (HBC) (if equipped)
With HBC, the headlights are switched to high beams at speeds
above 18 mph when there are no vehicles in front of your vehicle or
approaching in the opposite direction.
The HBC system switches to low beam when:
•
You a
re approaching a vehicle or a vehicle is approaching in
the opposite direction.
•
Dri
ving on roads lined with street lights or well-lit cities and towns.
•
At sp
eeds lower than 12 mph. AUTO
FORWARD
www.MazdaUSA.com
Page 33 of 46
31
Audio Controls (with Mazda Connect)
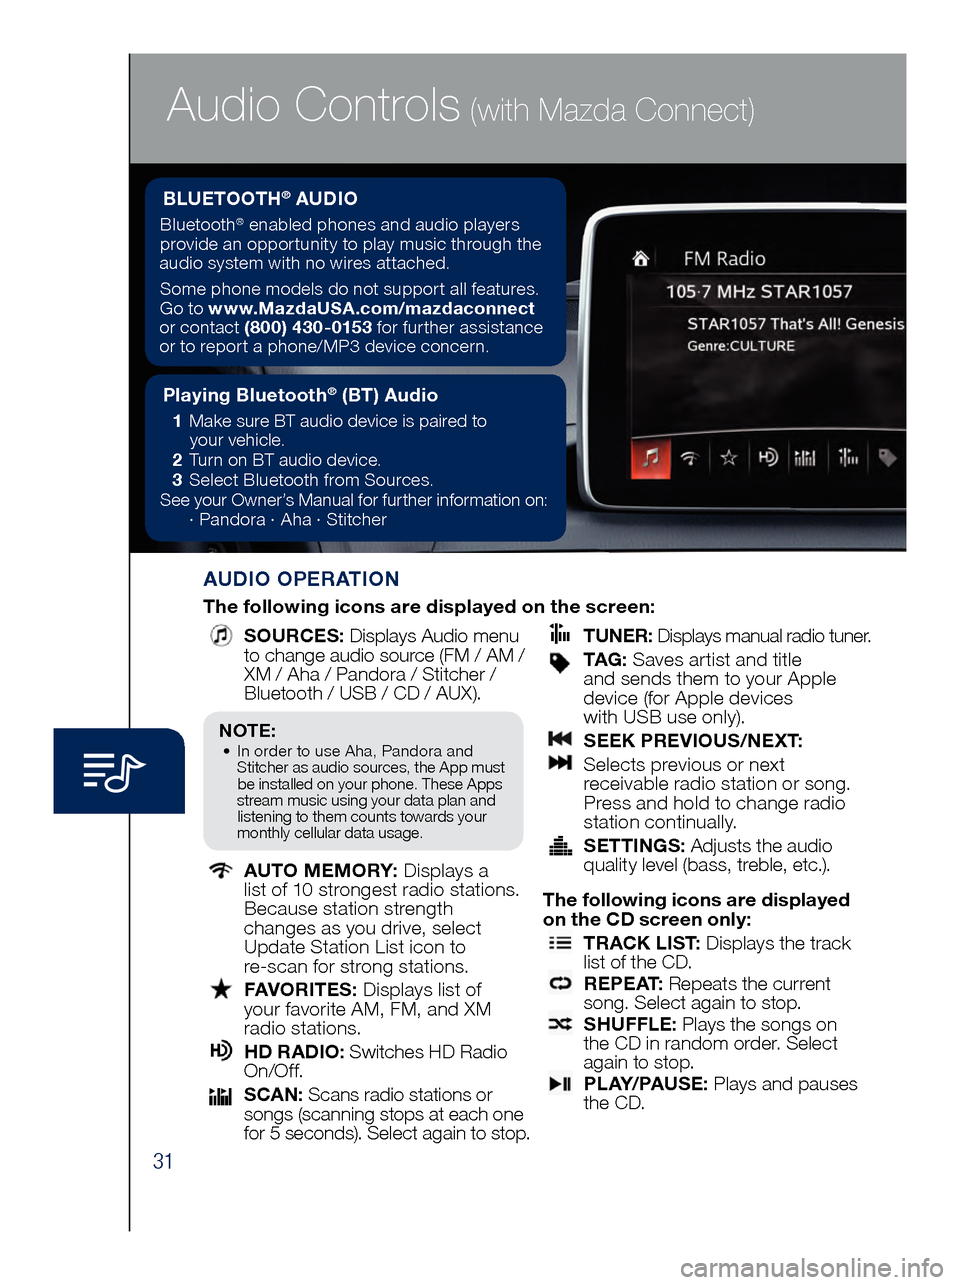
AUDIO OPERATION
The following icons are displayed on the screen:
SOURCES
: Displays Audio menu
to change audio source (FM / AM /
XM / Aha / Pandora / Stitcher /
Bluetooth / USB / CD / AUX).
AUTO MEMORY:
Displays a
list of 10 strongest radio stations.
Because station strength
changes as you drive, select
Update Station List icon to
re-scan for strong stations.
FAV ORITES:
Displays list of
your favorite AM, FM, and XM
radio stations.
HD RA DIO:
Switches HD Radio
On/O f f.
SCA N:
Scans radio stations or
songs (scanning stops at each one
for 5 seconds). Select again to stop.
TUNER
:
Displays manual radio tuner.
TAG : S aves artist and title
and sends them to your Apple
device (for Apple devices
with USB use only).
SEE K PREVIOUS/NEXT:
Sele cts previous or next
receivable radio station or song.
Press and hold to change radio
station continually.
SET TINGS:
Adjusts the audio
quality level (bass, treble, etc.).
The following icons are displayed
on the CD screen only:
TRAC K LIST
: Displays the track
list of the CD.
R E P E AT
: Repeats the current
song. Select again to stop.
SHU FFLE
: Plays the songs on
the CD in random order. Select
again to stop.
P L AY / PAU S E
: Plays and pauses
the CD.
Playing Bluetooth® (BT) Audio
1 Make sure BT audio device is paired to
you r vehicle.
2 Tur
n on BT audio device.
3 Sele
ct Bluetooth from Sources.
See your Owner’s Manual for further information on:
· Pand
ora · Aha · Stitcher
BLUETOOTH® AUDIO
Bluetooth® enabled phones and audio players
provide an opportunity to play music through the
audio system with no wires attached.
Some phone models do not support all features.
Go to www.MazdaUSA.com/mazdaconnect
or contact (800) 430-0153 for further assistance
or to report a phone/MP3 device concern.
NOTE:• In order to use Aha, Pandora and
St itcher as audio sources, the App must
be installed on your phone. These Apps
stream music using your data plan and listening to them counts towards your
monthly cellular data usage.
Page 34 of 46
32
Audio Controls (with Mazda Connect)
AUDIO OPERATION USING VOICE
Audio operation and media selection
can be done using voice recognition. Push the TALK button on the steering
wheel, wait for a beep, then say a
command in a clear, natural voice (not too fast or too slow). Some common
commands are listed below.
Play (and any of the following):
AM, FM, XM, CD, Bluetooth, Aha, Pandora, Stitcher, USB, AUX
Play or Resume / Pause or
Stop / Next or Previous
Play (and any of the following):
Song, Playlist
Artist
Tune to Station
Tune to Channel Number (XM)
HD RADIO
HD radio has a special
receiver which allows it to
receive digital broadcasts (where available) in addition to the analog broadcasts it already receives. Digital broadcasts have better sound
quality than analog broadcasts as digital broadcasts provide free, crystal clear audio.
When the HD radio button is ON (red), there could be a
noticeable difference in sound
quality and volume when a change from digital to analog signals occurs. If the sound
quality and volume become noticeably diminished or cut
off, select the HD button to turn OFF HD radio (not red).
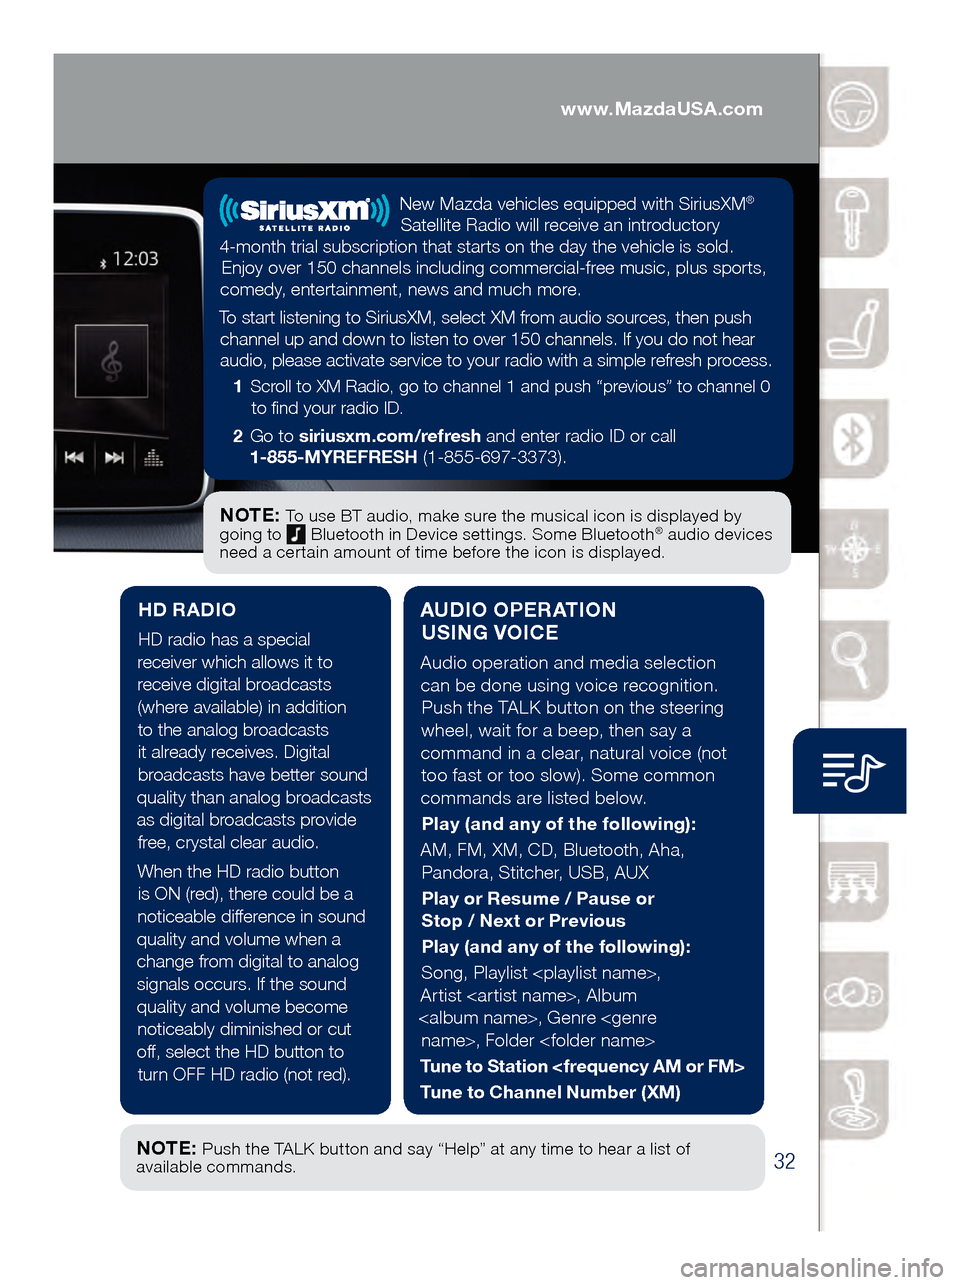
NOTE: To use BT audio, make sure the musical icon is displayed by
going to Bluetooth in Device settings. Some Bluetooth® audio devices
need a certain amount of time before the icon is displayed.
NOTE: Push the TALK button and say “Help” at any time to hear a list of
available commands.
New Mazda vehicles equipped with SiriusXM®
Satellite Radio will receive an introductory
4-month trial subscription that starts on the day the vehicle is sold. Enjoy over 150 channels including commercial-free music, plus sports,
comedy, entertainment, news and much more.
To start listening to SiriusXM, select XM from audio sources, then push channel up and down to listen to over 150 channels. If you do not hear audio, please activate service to your radio with a simple refresh process.
1 Scroll to XM Radio, go to channel 1 and push “previous” to channel 0
to find your radio ID.
2 Go to siriusxm.com/refresh and enter radio ID or call
1-855-MYREFRESH (1-855-697-3373).
www.MazdaUSA.com
Page 35 of 46
33
NOTE: You will need an audio cable with an 1/8 inch (3.5 mm)
mini stereo plug (available as a Genuine Mazda accessory) to
connect your portable audio player into the AUX jack.
I M P O R TA N T: • Set the volume level on your portable audio player to the highest level before
dis
tortion starts, then use the vehicle’s audio system to adjust the volume.
•
Unpl
ug any device from the USB port and accessory socket before turning off
the vehicle. Leaving devices plugged in can drain the battery and cause issues
during the Bluetooth pairing process at start-up. Wait about 15 seconds after
starting the vehicle before plugging anything into the USB port.
1 Locate the USB port or AUX jack.
2
Connect t
he device plug into the portable audio player and into the
USB port or AUX jack.
3
Turn t
he vehicle audio system on.
4
• Audi
o Controls (without Mazda Connect) : Push the MEDIA
butt
on on the audio unit to switch to the AUX or USB mode.
• Audi
o Controls (with Mazda Connect) : Select AUX or USB from
the Sources menu.
5
• USB Po
rt: Use the vehicle’s audio system or steering wheel controls
to con
trol the connected USB device.
• AUX Ja
ck: Use the portable audio player controls to play music.
Refer to the Owner’s Manual for additional information.
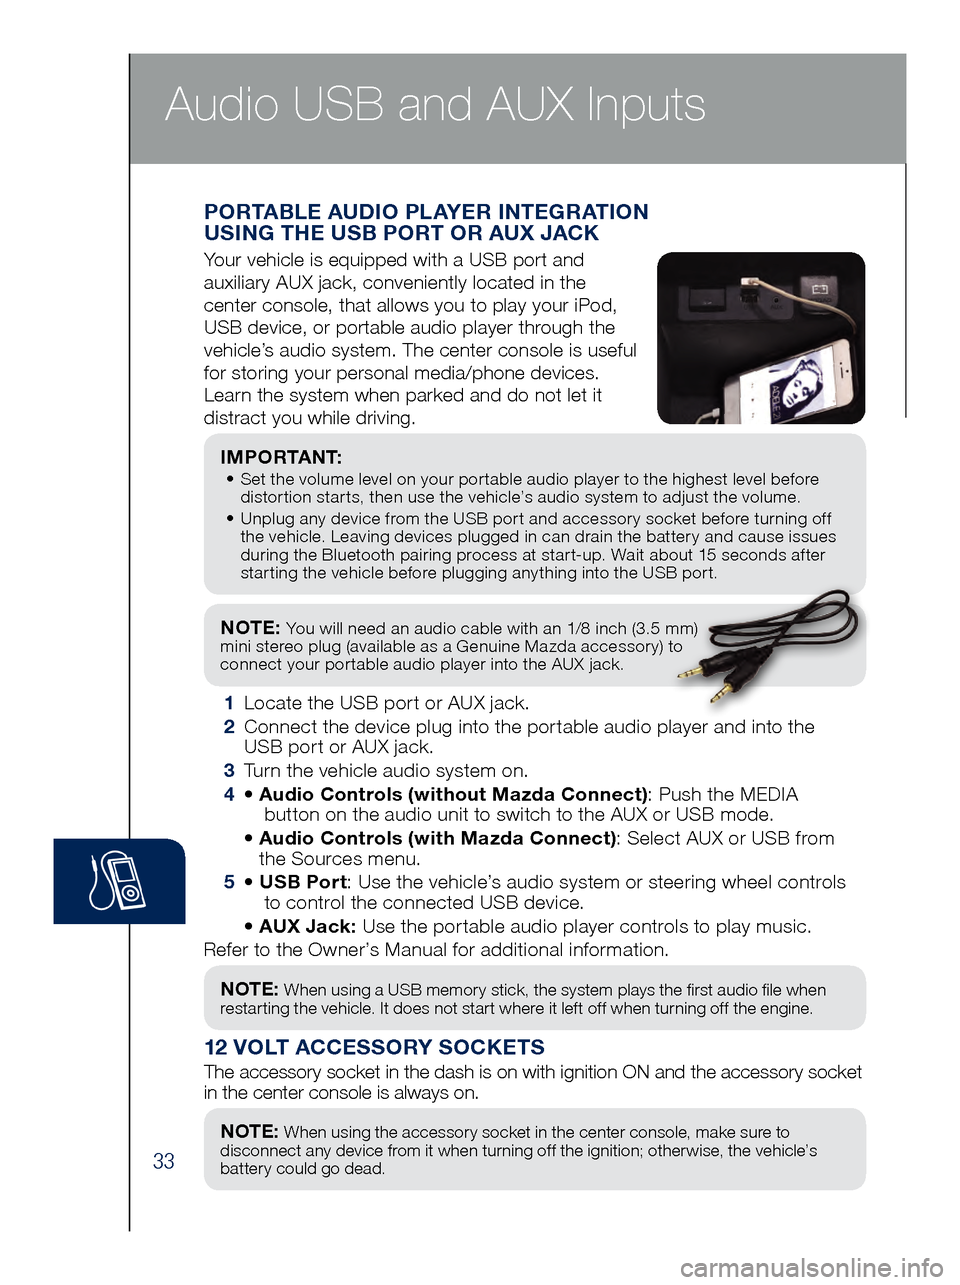
PORTABLE AUDIO PLAYER INTEGRATION
USING THE USB PORT OR AUX JACK
Your vehicle is equipped with a USB port and
auxiliary AUX jack, conveniently located in the
center console, that allows you to play your iPod,
USB device, or portable audio player through the
vehicle’s audio system. The center console is useful
for storing your personal media/phone devices.
Learn the system when parked and do not let it
distract you while driving.
12 VOLT ACCESSORY SOCKETS
The accessory socket in the dash is on with ignition ON and the accessor\
y socket
in the center console is always on.
NOTE: When using a USB memory stick, the system plays the first audio file when
restarting the vehicle. It does not start where it left off when turning off the engine.
NOTE: When using the accessory socket in the center console, make sure to
disconnect any device from it when turning off the ignition; otherwise, the vehicle’s
battery could go dead.
Audio USB and AUX Inputs
Page 36 of 46
34
Dashboard vents
Dashboard
and floor vents
Floor vents
Defroster
and
floor vents
Push to defrost
the windshield.
Push to
manually turn
air conditioning
on or off.
Automatic Climate Control
NOTE: A/C indicator
will illuminate when
AUTO ON is active.
The air conditioning
cycles on/off as
necessary to maintain
the set temperature.
The A /C may operate
even while heating
is desired - this is
to prevent excess
humidity and
fogging while the
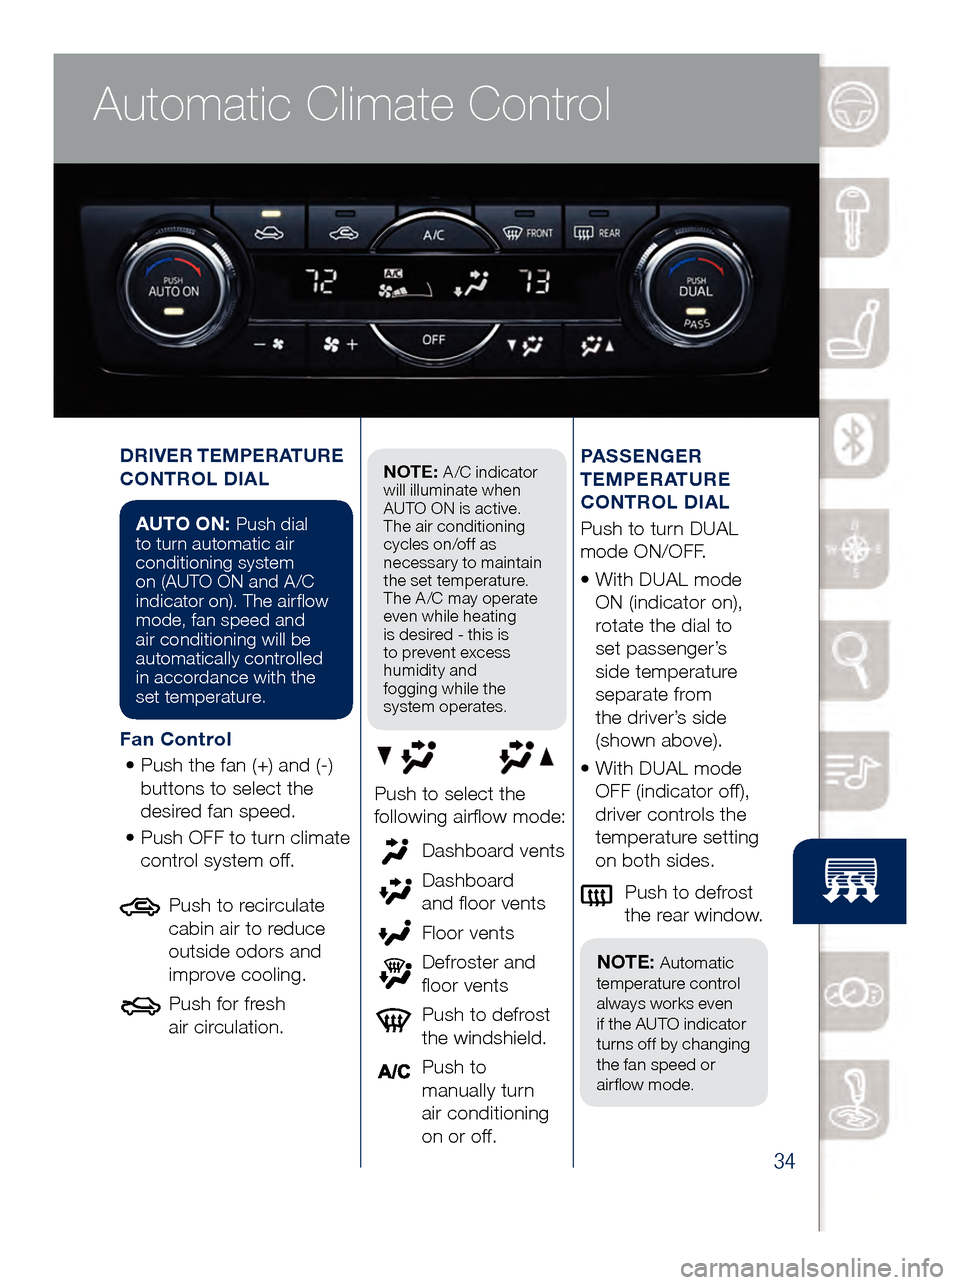
system operates.DRIVER TEMPERATURE
CONTROL DIAL
Push to defrost
the rear window.PASSENGER
TEMPERATURE
CONTROL DIAL
Push to turn DUAL
mode ON/OFF.
•
With DUAL mode
ON (indicator on),
rotate the dial to
set passenger’s
side temperature
separate from
the driver’s side
(shown above).
•
With DUAL mode
OFF (indicator of
f),
driver controls the
temperature setting
on both sides.
Push to select the
following airflow mode:
NOTE: Automatic
temperature control
always works even
if the AUTO indicator
turns off by changing
the fan speed or
airflow mode.
Fan Control
•
Push the fan (+) and (-)
buttons to select the
desir
ed fan speed.
•
Push OFF to turn climate
contr
ol system off.
Push to recirculate
cabin air to reduce
outside odors and
improve cooling.
Push for fresh
air circulation.
AUTO ON: Push dial
to turn automatic air
conditioning system
on (AUTO ON and A /C
indicator on). The airflow
mode, fan speed and
air conditioning will be
automatically controlled
in accordance with the
set temperature.
Audio USB and AUX Inputs
Page 37 of 46
35
TACHOMETERSPEEDMETER
Lane Departure War ning System
(LDWS) and Lane-keep Assist
System (LAS) System On (WHITE)/
Lane Detected (GREEN)
(pp. 23)
AFS
OFF
Adaptive Front-Lighting System
(AFS) OFF
(p. 29)TCS
OFF
Traction Control System (TCS) OFF
Traction Control System (TCS)/
Dynamic Stability Contr
ol (DSC) On: TCS/DSC malfunction
Flashing: TCS/DSC operating
Blind Spot Monitoring (BSM) OFF/
Rear Cross Traf fic Alert
(RCTA) System (pp. 25-26)
SPORT Mode On (p. 38)
Lights On (Exterior)
High Beam Control On
Headlight High Beams On
Air Bag/Front Seat Belt
Pretensioner System Malfunction
Check Engine
Seat Belt Unbuckled/Malfunction
Engine Oil Level
LED Headlight
Brake Pedal Operation Demand
Turn Signals/Hazar d
Tire Pressur e Monitoring System
(TPMS) (p. 6) On/Warning Beep: Low tire pressure in one
or more tires. Flashing: TPMS Malfunction
Cruise Main On (WHITE)
Cruise Set On (GREEN)
Mazda Radar Cruise Control
On ( AMBER), Set (GREEN) (pp. 19-20)
Anti-lock Brake System
(ABS) Malfunction
Shift Position
Security System
Smart Brake Support (SBS) and
Smart City Brake Support (SCBS)
Flashing Red: SBS and SCBS are operating.
Amber: SBS and/or SCBS malfunction.
SBS and SCBS are turned of f.
TPMS NOTE: Low ambient temperature and/or high altitude may cause tire pressures to
change and turn the TPMS warning light on. If the warning light comes on, see p. 6.
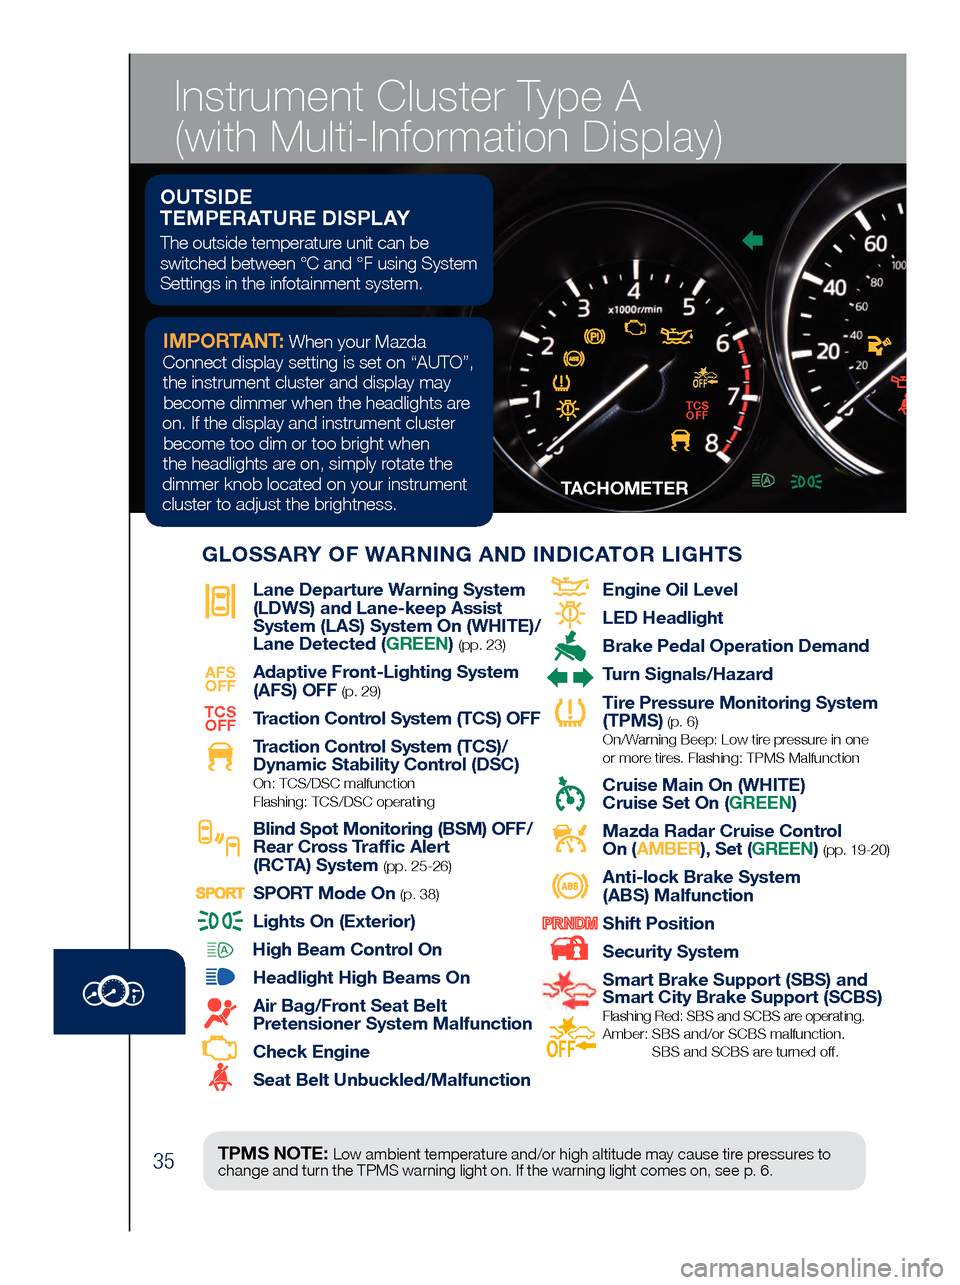
OUTSIDE
TEMPERATURE DISPLAY
The outside temperature unit can be
switched between °C and °F using System
Settings in the infotainment system.
IMPORTANT: When your Mazda
Connect display setting is set on “AUTO”, the instrument cluster and display may become dimmer when the headlights are
on. If the display and instrument cluster become too dim or too bright when
the headlights are on, simply rotate the
dimmer knob located on your instrument cluster to adjust the brightness.
GLOSSARY OF WARNING AND INDICATOR LIGHTS
TCS OFF
Instrument Cluster Type A
(with Multi-Information Display)
Page 38 of 46
36
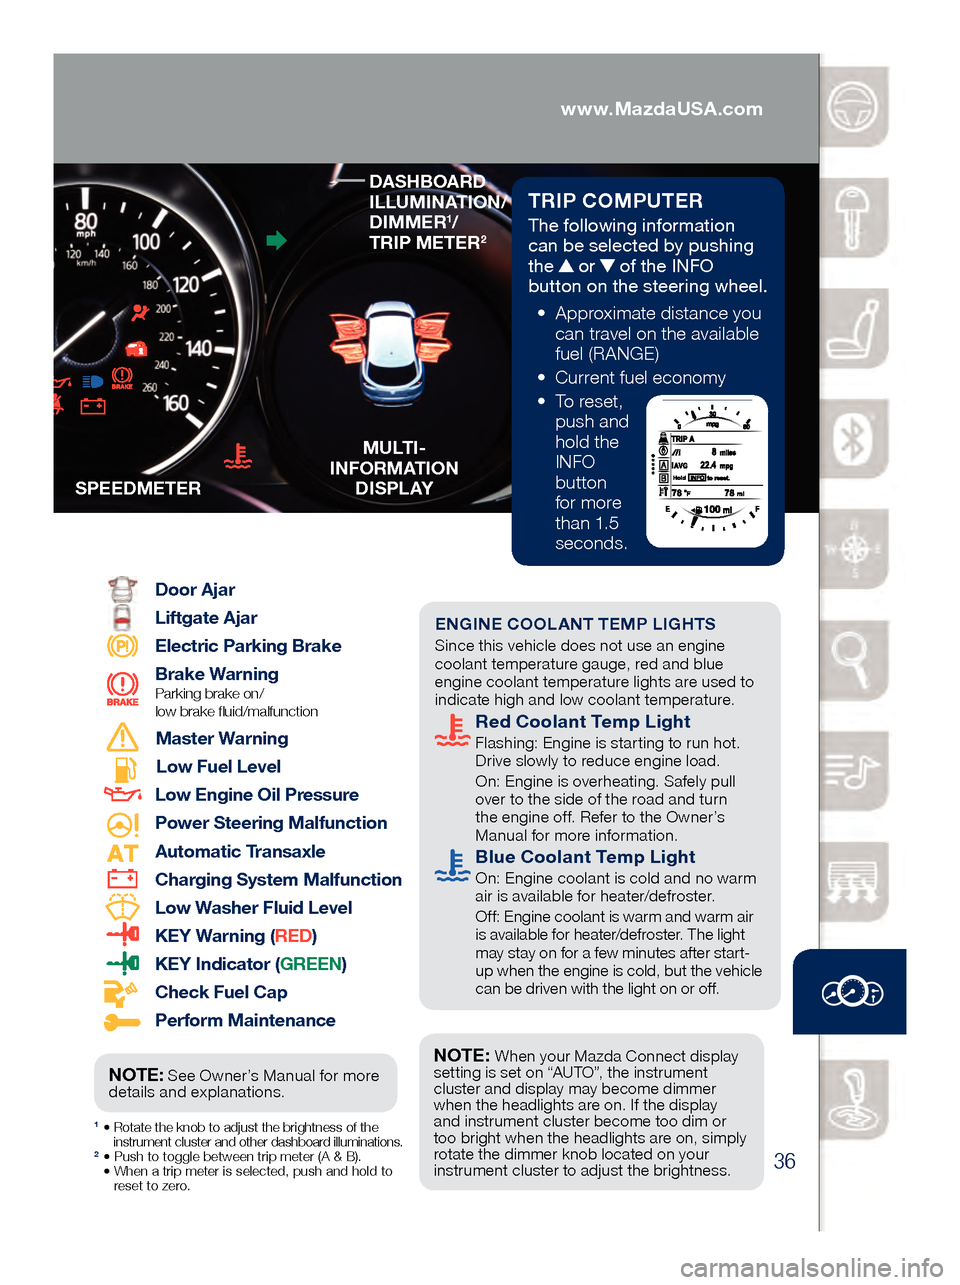
TRIP COMPUTER
The following information
can be selected by pushing
the
or of the INFO
button on the steering wheel.
• App
roximate distance you
can travel on the available
fuel (RANGE)
• Cu
rrent fuel economy
• To
reset,
push and
hold the
INFO
button
for more
than 1.5
seconds.
1 • Rotate the knob to adjust the brightness of the
instrument cluster and other dashboard illuminations.
2 • Push to toggle between trip meter (A & B). • When a trip meter is selected, push and hold to
reset to zer
o.
Door Ajar
Liftgate Ajar
Electric Parking Brake
Brake Warning
Parking brake on/
low brake fluid/malfunction
Master Warning
Low Fuel Level
Low Engine Oil Pressure
Power Steering Malfunction
Automatic Transaxle
Charging System Malfunction
Low Washer Fluid Level
KEY Warning ( RED)
KEY Indicator (GREEN)
Check Fuel Cap
Perform Maintenance
S
PEEDMETER
MULTI-
INFORMATION D I S P L AY
Engine Oil Level
LED Headlight
Brake Pedal Operation Demand
Turn Signals/Hazard
Tire Pressure Monitoring System
(TPMS) (p. 6) On/Warning Beep: Low tire pressure in one
or more tires. Flashing: TPMS Malfunction
Cruise Main On (WHITE)
Cruise Set On (GREEN)
Mazda Radar Cruise Control
On (AMBER), Set (GREEN) (pp. 19-20)
Anti-lock Brake System
(ABS) Malfunction
Shift Position
Security System
Smart Brake Support (SBS) and
Smart City Brake Support (SCBS)
Flashing Red: SBS and SCBS are operating.
Amber: SBS and/or SCBS malfunction.
SBS and SCBS are turned off.
ENGINE COOLANT TEMP LIGHTS Since this vehicle does not use an engine
coolant temperature gauge, red and blue
engine coolant temperature lights are used to
indicate high and low coolant temperature.
Red Coolant Temp Light Flashing: Engine is starting to run hot.
Drive slowly to reduce engine load.
On: E
ngine is overheating. Safely pull
over to the side of the road and turn
the engine off. Refer to the Owner’s
Manual for more information.
Blue Coolant Temp Light On: Engine coolant is cold and no warm
air is available for heater/defroster.
Off
: Engine coolant is warm and warm air
is available for heater/defroster. The light
may stay on for a few minutes after start-
up when the engine is cold, but the vehicle
can be driven with the light on or off.
NOTE: When your Mazda Connect display
setting is set on “AUTO”, the instrument
cluster and display may become dimmer
when the headlights are on. If the display
and instrument cluster become too dim or
too bright when the headlights are on, simply
rotate the dimmer knob located on your
instrument cluster to adjust the brightness.
DASHBOARD
ILLUMINATION/
DIMMER
1/
TRIP METER2
NOTE: See Owner’s Manual for more
details and explanations.
www.MazdaUSA.com
Page 39 of 46
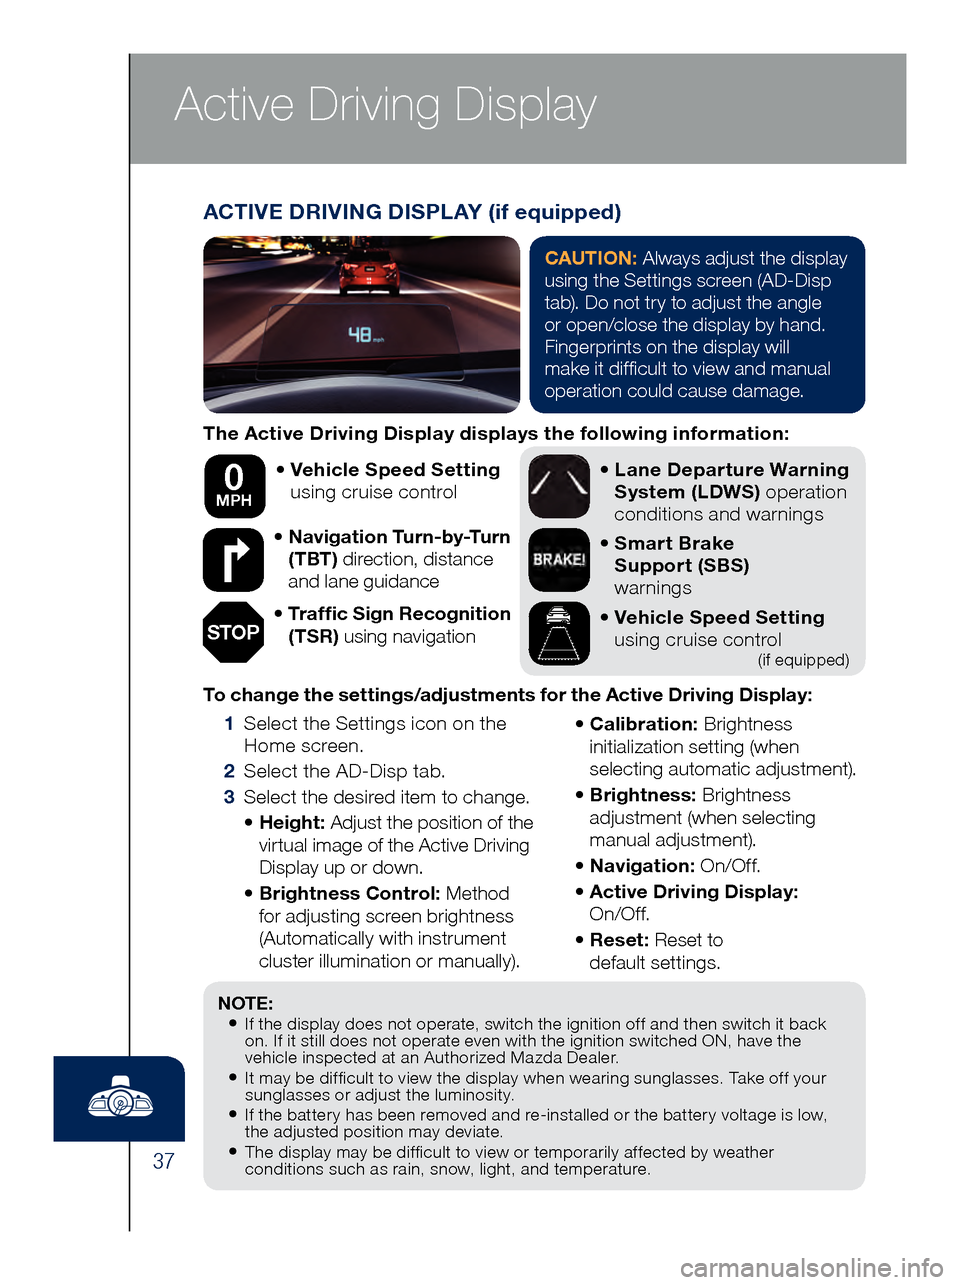
37
Active Driving Display
The Active Driving Display displays the following information:•
Vehicl
e Speed Setting
using cruise control
•
Navi
gation Turn-by-Turn
(TBT) direction, distance
and lane guidance
•
Tra
ffic Sign Recognition
(TSR) using navigation •
Lane
Departure Warning
System (LDWS) operation
conditions and warnings
•
Smar
t Brake
Support (SBS)
warnings
•
Vehicl
e Speed Setting
using cruise control
(if equipped)
To change the settings/adjustments for the Active Driving Display:
1 Sele
ct the Settings icon on the
Home screen.
2 Sel
ect the AD-Disp tab.
3 Sele
ct the desired item to change.
• He
ight: Adjust the position of the
virtual image of the Active Driving
Display up or down.
• Bri
ghtness Control: Method
for adjusting screen brightness
(Automatically with instrument
cluster illumination or manually).
• Ca
libration: Brightness
initialization setting (when
selecting automatic adjustment).
• Bri
ghtness: Brightness
adjustment (when selecting
manual adjustment).
• Na
vigation: On/O f f.
• Act
ive Driving Display:
On/O f f.
• Re
set: Reset to
default settings.
50 mph
0 MPH
NOTE:• If the display does not operate, switch the ignition off and then switch it back
on. If it still does not operate even with the ignition switched ON, have the
vehicle inspected at an Authorized Mazda Dealer.
• It may be difficult to view the display when wearing sunglasses. Take off your
sunglasses or adjust the luminosity.
• If the battery has been removed and re-installed or the battery voltage is low,
the adjusted position may deviate.
• The display may be difficult to view or temporarily affected by weather
conditions such as rain, snow, light, and temperature.
ACTIVE DRIVING DISPLAY (if equipped)
CAUTION: Always adjust the display
using the Settings screen (AD-Disp
tab). Do not try to adjust the angle
or open/close the display by hand.
Fingerprints on the display will
make it difficult to view and manual
operation could cause damage.
STOP
Page 40 of 46
38
NOTE: The HL A system will hold the vehicle for a maximum of 2.0 seconds
while the driver is changing from the brake pedal to the accelerator pedal.
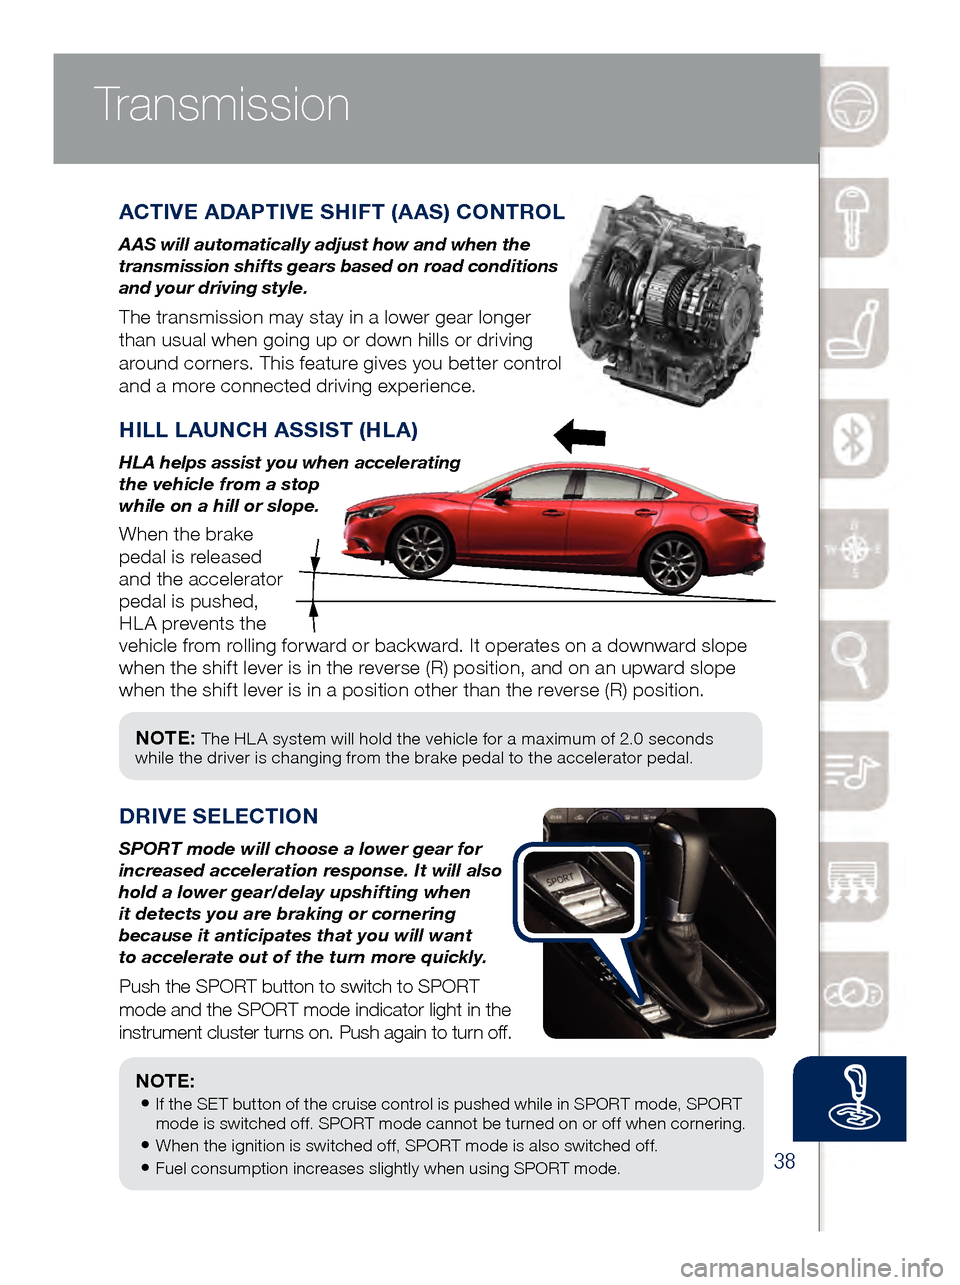
Transmission
ACTIVE ADAPTIVE SHIFT (AAS) CONTROL
A AS will automatically adjust how and when the
transmission shifts gears based on road conditions
and your driving style.
The transmission may stay in a lower gear longer
than usual when going up or down hills or driving
around corners. This feature gives you better control
and a more connected driving experience.
HILL LAUNCH ASSIST (HLA)
HLA helps assist you when accelerating
the vehicle from a stop
while on a hill or slope.
When the brake
pedal is released
and the accelerator
pedal is pushed,
HLA prevents the
vehicle from rolling forward or backward. It operates on a downward slope
when the shift lever is in the reverse (R) position, and on an upward slope
when the shift lever is in a position other than the reverse (R) position.
DRIVE SEL ECTION
SPORT mode will choose a lower gear for
increased acceleration response. It will also
hold a lower gear/delay upshifting when
it detects you are braking or cornering
because it anticipates that you will want
to accelerate out of the turn more quickly.
Push the SPORT button to switch to SPORT
mode and the SPORT mode indicator light in the
instrument cluster turns on. Push again to turn off.
NOTE:
• If the SET button of the cruise control is pushed while in SPORT mode, SPORT
mode is switched off. SPORT mode cannot be turned on or off when cornering.
• When the ignition is switched off, SPORT mode is also switched off.
• Fuel consumption increases slightly when using SPORT mode.
www.MazdaUSA.com