turn signal MAZDA MODEL CX-5 2013 (in English) User Guide
[x] Cancel search | Manufacturer: MAZDA, Model Year: 2013, Model line: MODEL CX-5, Model: MAZDA MODEL CX-5 2013Pages: 488, PDF Size: 8.75 MB
Page 179 of 488

Black plate (179,1)
NOTE
If the HomeLink indicator light does not
change to a rapidly blinking light, contact
HomeLink atwww.homelink.comor call1-
800-355-3515for assistance.
4. Firmly press and hold the programmed
HomeLink button for five seconds, and
then release it. Perform this operation
two times to activate the door. If the
door does not activate, press and hold
the just-trained HomeLink button and
observe the indicator light.
If the indicator lightstays on constantly,
programming is completeand your
device should activate when the
HomeLink button is pressed and released.
NOTE
To program the remaining two HomeLink
buttons, begin with“Programming”―step 1.
If the indicator light blinksrapidly for
two seconds and then turns to a
constant light, continue with
“Programming”steps 5―7to complete
the programming of a rolling code
equipped device (most commonly a
garage door opener).
5. At the garage door opener receiver
(motor-head unit) in the garage, locate
the“learn”or“smart”button. This can
usually be found where the hanging
antenna wire is attached to the motor-
head unit.
6. Firmly press and release the“learn”or
“smart”button. (The name and color of
the button may vary by manufacturer.)
NOTE
There are 30 seconds in which to initiate step
7.
7. Return to the vehicle and firmlypress,
hold for two seconds and releasethe
programmed HomeLink button. Repeat
the“press/hold/release”sequence a
second time, and, depending on the
brand of the garage door opener (or
other rolling code equipped device),
repeat this sequence a third time to
complete the programming process.
HomeLink should now activate your
rolling code equipped device.
NOTE
To program the remaining two HomeLink
buttons, begin with“Programming”―step 1.
For questions or comments, please contact
HomeLink atwww.homelink.comor1-
800-355-3515.
qGate operator/Canadian
Programming
Canadian radio-frequency laws require
transmitter signals to“time-out”(or quit)
after several seconds of transmission―
which may not be long enough for
HomeLink to pick up the signal during
programming. Similar to this Canadian
law, some U.S. gate operators are
designed to“time-out”in the same
manner.
If you live in Canada or you are having
difficulties programming a gate operator
by using the“Programming”procedures
(regardless of where you live),replace
“Programming HomeLink”step 2with
the following:
NOTE
If programming a garage door opener or gate
operator, it is advised to unplug the device
during the“cycling”process to prevent
possible overheating.
When Driving
Switches and Controls
4-55
CX-5_8CA5-EA-11L_Edition3 Page179
Friday, June 22 2012 3:45 PM
Form No.8CA5-EA-11L
Page 199 of 488

Black plate (199,1)
Blind Spot Monitoring (BSM) Systemí
The Blind Spot Monitoring (BSM) system is designed to assist the driver by monitoring
blind spots on both sides of the vehicle to the rear in certain situations such as when
changing lanes on roads and freeways.
The BSM system monitors the detection areas on both sides of the vehicle to the rear when
the vehicle speed is about 32 km/h (20 mph) or more, and notifies the driver of vehicles in
the detection area by illuminating the BSM warning light.
If the turn signal lever is operated in the direction the BSM warning light is illuminated, the
system warns the driver of the vehicle in the detection area with a beep sound.
A system malfunction or operation conditions are indicated by a warning. Refer to
Warning/Indicator Lights on page 4-15.Refer to Blind Spot Monitoring (BSM) System
Warning Beep on page 7-34.
Detection areas
Your vehicle
WARNING
Do not rely completely on the BSM system and be sure to look over your shoulder
before changing lanes:
The BSM system can assist the driver in confirming the safety of the surroundings
but is not a complete substitute. The driver is responsible for assuring lane changes
and other maneuvers. Always pay attention to the direction in which the vehicle is
traveling and the vehicle's surroundings.
NOTE
lThe BSM system does not operate when the vehicle speed is lower than about 32 km/h (20 mph).lThe radar sensors are equipped inside the rear bumper. (page 4-78)lThe system may not operate normally when towing a trailer. Turn off the system by operating the
BSM OFF switch when towing a trailer.
When Driving
Blind Spot Monitoring (BSM) System
4-75íSome models. CX-5_8CA5-EA-11L_Edition3 Page199
Friday, June 22 2012 3:45 PM
Form No.8CA5-EA-11L
Page 242 of 488

Black plate (242,1)
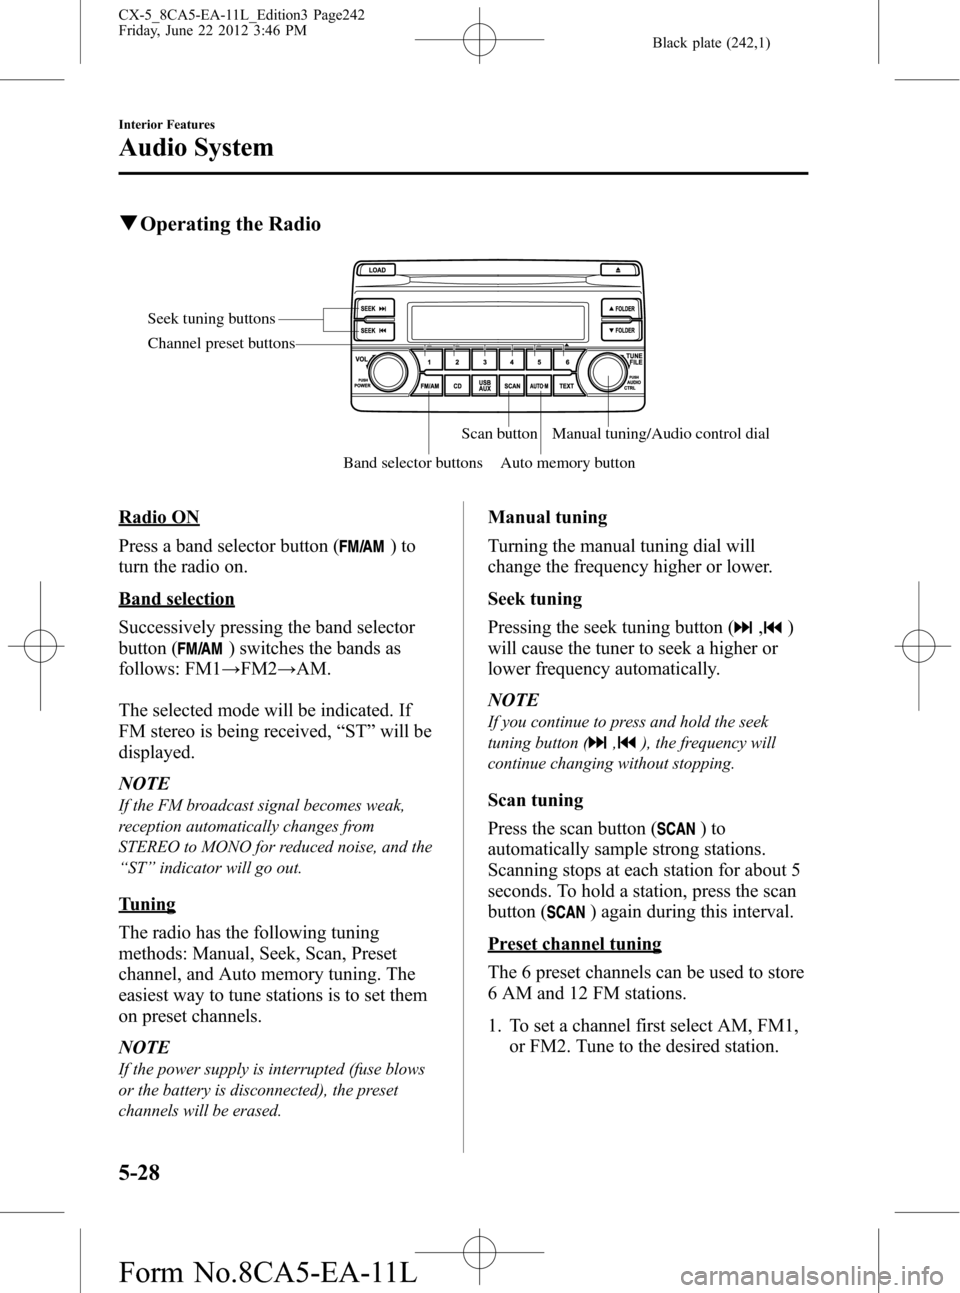
qOperating the Radio
Seek tuning buttons
Band selector buttonsScan button
Auto memory buttonManual tuning/Audio control dial Channel preset buttons
Radio ON
Press a band selector button (
)to
turn the radio on.
Band selection
Successively pressing the band selector
button (
) switches the bands as
follows: FM1→FM2→AM.
The selected mode will be indicated. If
FM stereo is being received,“ST”will be
displayed.
NOTE
If the FM broadcast signal becomes weak,
reception automatically changes from
STEREO to MONO for reduced noise, and the
“ST”indicator will go out.
Tuning
The radio has the following tuning
methods: Manual, Seek, Scan, Preset
channel, and Auto memory tuning. The
easiest way to tune stations is to set them
on preset channels.
NOTE
If the power supply is interrupted (fuse blows
or the battery is disconnected), the preset
channels will be erased.
Manual tuning
Turning the manual tuning dial will
change the frequency higher or lower.
Seek tuning
Pressing the seek tuning button (
,)
will cause the tuner to seek a higher or
lower frequency automatically.
NOTE
If you continue to press and hold the seek
tuning button (
,), the frequency will
continue changing without stopping.
Scan tuning
Press the scan button (
)to
automatically sample strong stations.
Scanning stops at each station for about 5
seconds. To hold a station, press the scan
button (
) again during this interval.
Preset channel tuning
The 6 preset channels can be used to store
6 AM and 12 FM stations.
1. To set a channel first select AM, FM1,
or FM2. Tune to the desired station.
5-28
Interior Features
Audio System
CX-5_8CA5-EA-11L_Edition3 Page242
Friday, June 22 2012 3:46 PM
Form No.8CA5-EA-11L
Page 244 of 488

Black plate (244,1)
qOperating the Compact Disc (CD) Player
Track up/Fast-forward buttonLoad button
Track down/Reverse buttonFolder up button
Folder down button
Text button
Scan button CD play buttonCD eject button Repeat buttonRandom button
CD slot
File dial
Type Playable data
Music/MP3/WMA/
AAC CD player
lMusic data (CD-DA)lMP3/WMA/AAC file
NOTE
If a disc has both music data (CD-DA) and
MP3/WMA/AAC files, playback of the two or
three file types differs depending on how the
disc was recorded.
Inserting the CD
Insert the CD into the slot, label-side up.
The auto-loading mechanism will set the
CD and begin play.
NOTE
There will be a short lapse before play begins
while the player reads the digital signals on
the CD.
Ejecting the CD
Press the CD eject button (
) to eject the
CD.
Playback
Press the CD play button (
) to start
play when a CD is in the unit. If a CD is
not in the unit when the CD play button
(
) is pressed,“NO DISC”will flash on
and off.NOTE
When the load button () is pressed, the
CD will load and play.
Fast-forward/Reverse
Press and hold the fast-forward button
(
) to advance through a track at high
speed. Press and hold the reverse button
(
) to reverse through a track at high
speed.
Track search
Press the track up button (
) or turn the
file dial clockwise once to skip forward to
the beginning of the next track.
Press the track down button (
) or turn
the file dial counterclockwise within a few
seconds after playback begins to track
down to the beginning of the previous
track.
Press the track down button (
) or turn
the file dial counterclockwise after a few
seconds have elapsed to start playback
from the beginning of the current track.
5-30
Interior Features
Audio System
CX-5_8CA5-EA-11L_Edition3 Page244
Friday, June 22 2012 3:46 PM
Form No.8CA5-EA-11L
Page 254 of 488

Black plate (254,1)
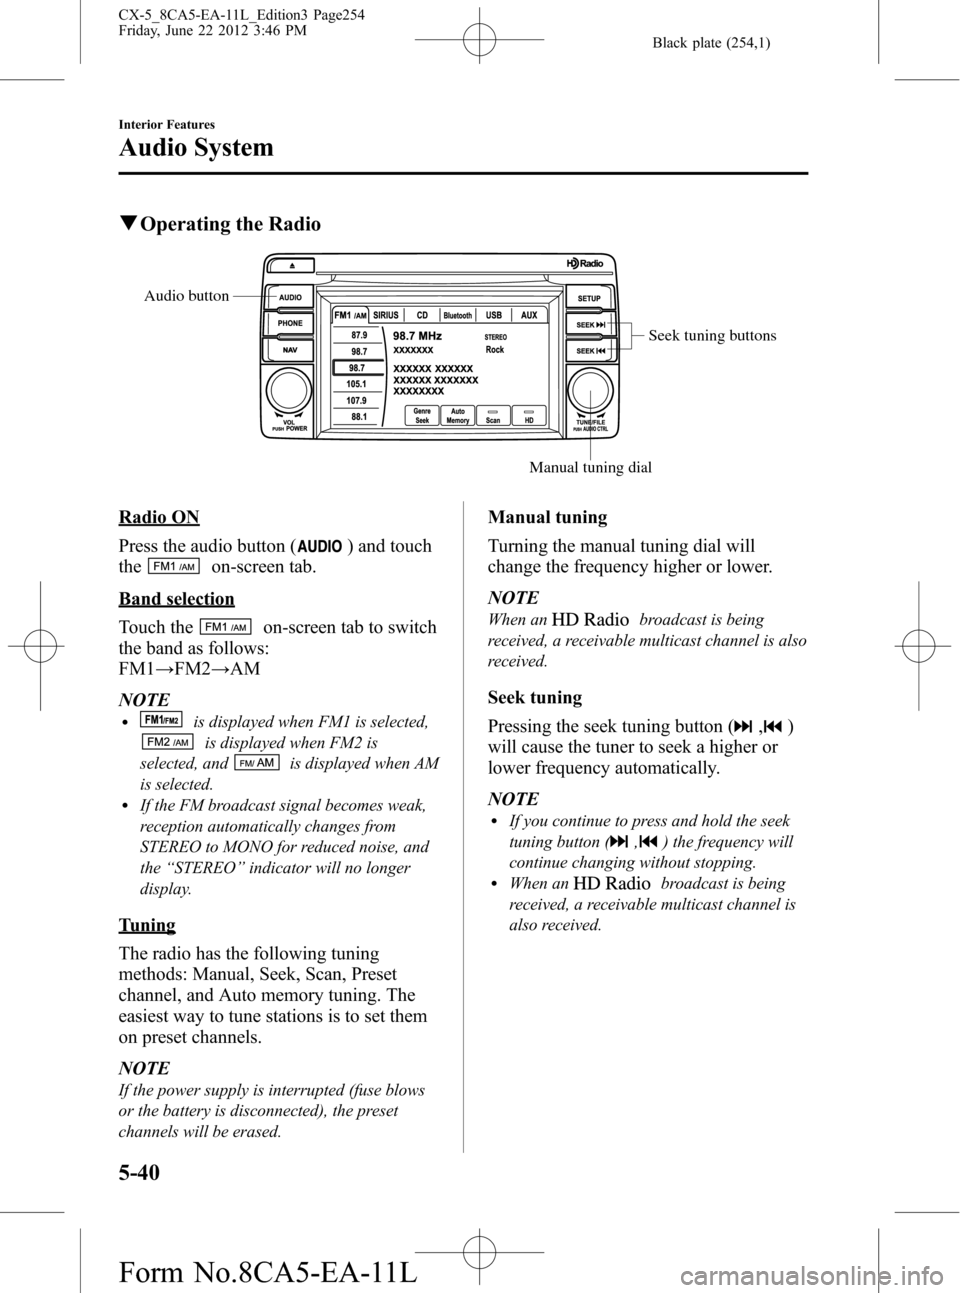
qOperating the Radio
Seek tuning buttons
Manual tuning dial Audio button
Radio ON
Press the audio button (
) and touch
the
on-screen tab.
Band selection
Touch the
on-screen tab to switch
the band as follows:
FM1→FM2→AM
NOTE
lis displayed when FM1 is selected,
is displayed when FM2 is
selected, and
is displayed when AM
is selected.
lIf the FM broadcast signal becomes weak,
reception automatically changes from
STEREO to MONO for reduced noise, and
the“STEREO”indicator will no longer
display.
Tuning
The radio has the following tuning
methods: Manual, Seek, Scan, Preset
channel, and Auto memory tuning. The
easiest way to tune stations is to set them
on preset channels.
NOTE
If the power supply is interrupted (fuse blows
or the battery is disconnected), the preset
channels will be erased.
Manual tuning
Turning the manual tuning dial will
change the frequency higher or lower.
NOTE
When anbroadcast is being
received, a receivable multicast channel is also
received.
Seek tuning
Pressing the seek tuning button (
,)
will cause the tuner to seek a higher or
lower frequency automatically.
NOTE
lIf you continue to press and hold the seek
tuning button (
,) the frequency will
continue changing without stopping.
lWhen anbroadcast is being
received, a receivable multicast channel is
also received.
5-40
Interior Features
Audio System
CX-5_8CA5-EA-11L_Edition3 Page254
Friday, June 22 2012 3:46 PM
Form No.8CA5-EA-11L
Page 360 of 488

Black plate (360,1)
Light Bulbs
With xenon fusion headlights With halogen headlights
Rear map lights
Overhead light (Front)/
Map lights Luggage compartment light
Daytime running lights
Rear side-marker lights
Rear turn signal lights
Brake lights/Taillights Taillights (Liftgate side) Reverse lights
License plate lightsHeadlights (Low/High beam)
High-mount brake light
Side turn signal lights Front turn signal lights/Parking lights
(Front side-marker lights)
Fog lights
Headlights (High beam)/
Day time running lights Headlights (Low beam) Front turn signal lights/
Parking lights (Front side-
marker lights)
Fog lights Vanity mirror lightsRear map lights
Overhead light (Front)/
Map lights Luggage compartment light
Vanity mirror lights
Some models.
6-40
Maintenance and Care
Owner Maintenance
CX-5_8CA5-EA-11L_Edition3 Page360
Friday, June 22 2012 3:47 PM
Form No.8CA5-EA-11L
Page 363 of 488

Black plate (363,1)
Low-beam bulbs
High-beam bulbs/Daytime running
lights
6. Install the new bulb in the reverse order
of the removal procedure.
Front turn signal lights/Parking lights
(Front side-marker lights)
1. Make sure the ignition is switched off,
and the headlight switch is off.
2. If you are changing the right bulb, start
the engine, turn the steering wheel all
the way to the right, and turn off
engine. If you are changing the left
bulb, turn the steering wheel to the left.3. Pull the center of each plastic retainer
and remove the retainers.
InstallationRemoval
4. Turn the screw counterclockwise and
remove it, and then partially peel back
the mudguard.
5. Turn the socket and bulb assembly
counterclockwise and remove it.
Maintenance and Care
Owner Maintenance
6-43
CX-5_8CA5-EA-11L_Edition3 Page363
Friday, June 22 2012 3:47 PM
Form No.8CA5-EA-11L
Page 365 of 488

Black plate (365,1)
6. Turn the socket and bulb assembly to
remove it. Carefully remove the bulb
from its socket in the reflector by
gently pulling it straight back out of the
socket.
7. Install the new bulb in the reverse order
of the removal procedure.
Side-turn signal lights
Due to the complexity and difficulty of
the procedure, the LED bulbs must be
replaced by an Authorized Mazda Dealer.
NOTE
LED bulb replacement is not possible because
it is built into the unit. Replace the unit.
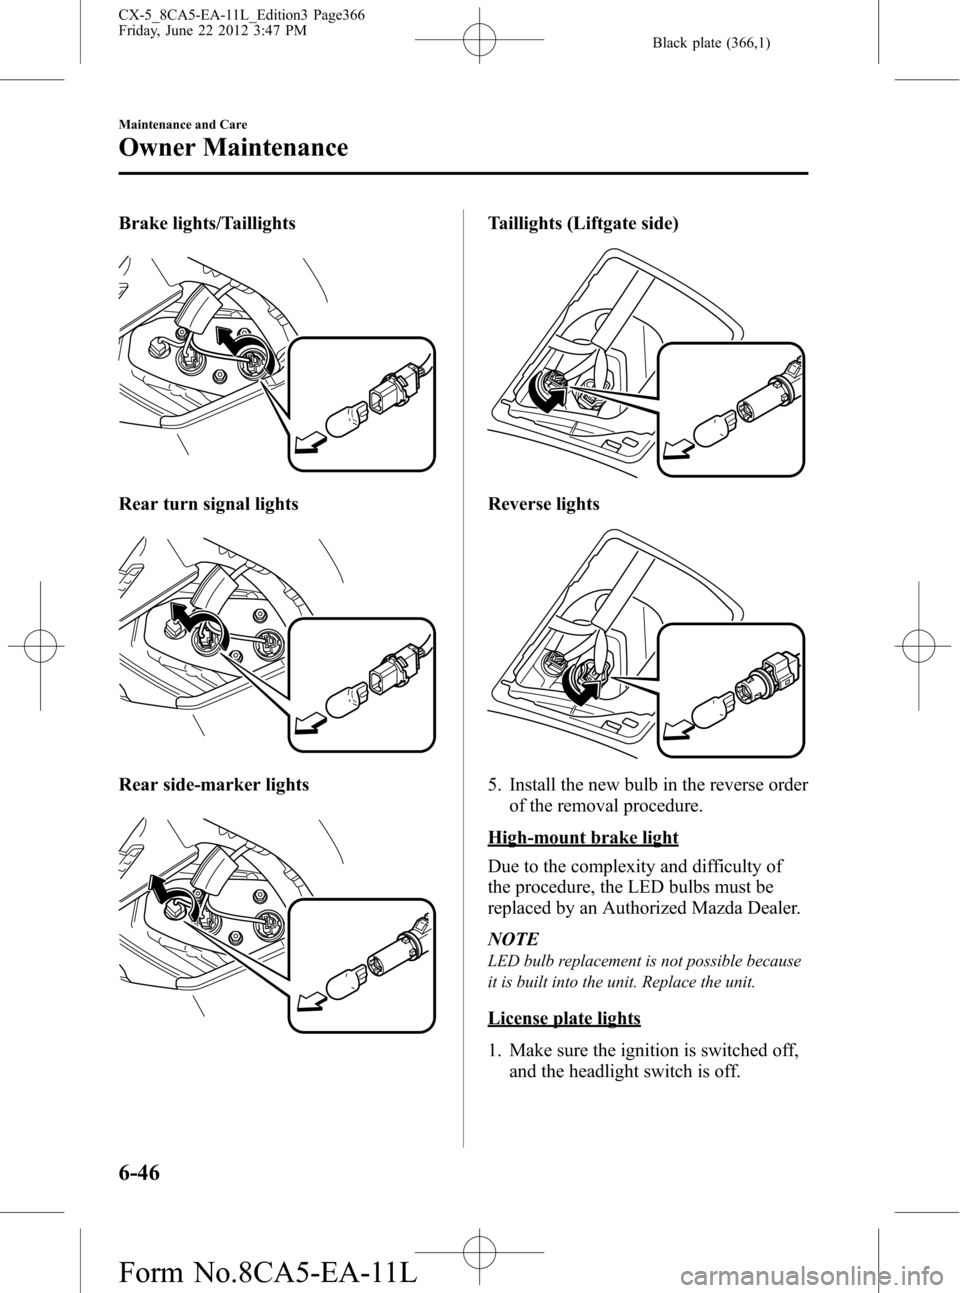
Brake lights/Taillights, Rear turn signal
lights, Rear side-marker lights,
Taillights (Liftgate side), Reverse lights
1. Make sure the ignition is switched off,
and the headlight switch is off.
2. Remove the cover with a cloth-
wrapped flathead screwdriver to the
cover.Brake lights/Taillights, Rear turn signal
lights, Rear side-marker lights
Taillights (Liftgate side), Reverse lights
3. Turn the socket and bulb assembly
counterclockwise and remove it.
4. Disconnect the bulb from the socket.
Maintenance and Care
Owner Maintenance
6-45
CX-5_8CA5-EA-11L_Edition3 Page365
Friday, June 22 2012 3:47 PM
Form No.8CA5-EA-11L
Page 366 of 488

Black plate (366,1)
Brake lights/Taillights
Rear turn signal lights
Rear side-marker lights
Taillights (Liftgate side)
Reverse lights
5. Install the new bulb in the reverse order
of the removal procedure.
High-mount brake light
Due to the complexity and difficulty of
the procedure, the LED bulbs must be
replaced by an Authorized Mazda Dealer.
NOTE
LED bulb replacement is not possible because
it is built into the unit. Replace the unit.
License plate lights
1. Make sure the ignition is switched off,
and the headlight switch is off.
6-46
Maintenance and Care
Owner Maintenance
CX-5_8CA5-EA-11L_Edition3 Page366
Friday, June 22 2012 3:47 PM
Form No.8CA5-EA-11L
Page 372 of 488

Black plate (372,1)
DESCRIPTIONFUSE
RATINGPROTECTED COMPONENT
18 WIPER 20 A Front window wiper and washer
19 HEATER 40 A Air conditioner
20 DCDC REG――
21 ENGINE.IG1 7.5 A Engine control system
22 C/U IG1 15 A For protection of various circuits
23H/L LOW L
HID L15 A Headlight (LH)
*1, Headlight low beam (LH)*2
24 H/L LOW R 15 A Headlight low beam (RH)*2
25 ENGINE3 15 A Engine control system
26 ENGINE2 15 A Engine control system
27 ENGINE1 15 A Engine control system
28 AT 15 A Transaxle control system
29 H/CLEAN――
30 A/C 7.5 A Air conditioner
31 AT PUMP――
32 STOP 10 A Brake lights
33 R.WIPER 15 A Rear window wiper
34 H/L HI 20 A Headlight high beam
*2
35 HID R 15 A Headlight (RH)*1
36 FOG 15 A Fog lightsí
377.5 A Engine control system
38 AUDIO2 7.5 A Audio system
39―― ―
40 METER2――
41 METER1 10 A Instrument cluster
42 SRS1 7.5 A Air bag
43 BOSE 25 A Bose
®Sound System-equipped model
44 AUDIO1 15 A Audio system
45 ABS/DSC S 30 A ABS, Dynamic stability control system
46 FUEL PUMP 15 A Fuel system
47 FUEL WARM――
48 TAIL 15 A Taillights, License plate lights
49―― ―
50 HAZARD 25 AHazard warning flashers, Turn signal lights, Parking lights
(Front side-marker lights)
51 DRL 15 A Daytime running lights
í
52 R.OUTLET2 15 A Accessory sockets
6-52
Maintenance and Care
íSome models.
Owner Maintenance
CX-5_8CA5-EA-11L_Edition3 Page372
Friday, June 22 2012 3:47 PM
Form No.8CA5-EA-11L