MAZDA MODEL MX-30 EV 2022 Owners Manual
Manufacturer: MAZDA, Model Year: 2022, Model line: MODEL MX-30 EV, Model: MAZDA MODEL MX-30 EV 2022Pages: 547, PDF Size: 79.35 MB
Page 451 of 547

6. Pull out the air compressor hoseand the air compressor plug from
the air compressor.
1. Compressor hose
7. Install the air compressor hose which was pulled out of the air
compressor to the injection valve of
the bottle.
1. Compressor hose
2. Valve
3. Injection hose
CAUTION
Make sure that the air compressor
switch is off before inserting the air
compressor hose to the injection
valve of the bottle. If the air
compressor hose is not installed to
the injection valve of the bottle
securely, the sealant may leak.
8. Remove the valve cap from the valve of the flat tire, install the
injection hose to the tire valve, turn
the sleeve to the right, and tighten
it.
1. Valve
2. Valve cap
3. Injection hose
9. Install the bottle to the air
compressor and press it in until the
left and right tabs are engaged
securely.
1. Tabs
10.Insert the air compressor plug into the accessory socket inside the
vehicle and switch the power
switch to ACC.
If Trouble Arises
Flat Tire
7-6
MX -30_8JD4-EA -21G_Edition2_new 2021-5-18 14:38:07
Page 452 of 547

Refer to Accessory Sockets on page
5-39.
1. Compressor plug
2. Compressor
CAUTION
When inserting the air compressor
plug into or removing it from the
accessory socket, make sure that
the air compressor switch is off.
When turning the air compressor
on/o ff, use the air compressor
switch.
11.The sealant is injected into the tire when the air compressor is
switched on. After the sealant is
injected completely, wait until the
tire in flation pressure increases to
the specified tire in flation pressure.
NOTE
The infl ation pressure may increase
to about 300 kPa (3.1 kgf/cm2, 3
bar, 43.5 psi) temporarily to inject
the sealant through the valve.
Normally, the in flation pressure
decreases gradually and it reaches
the actual infl ation pressure after
about 30 seconds.
WARNING
Never use the air compressor
above 300 kPa (3.1 kgf/cm2, 3
bar, 43.5 psi):
Using the air compressor at an
in flation pressure above 300 kPa
(3.1 kgf/cm
2, 3 bar, 43.5 psi)
continuously is dangerous. If the air
compressor overheats, hot air will
be exhausted and you could get
burned.
NOTE
Check the tire in flation pressure
label rear door on the driver's
side for the correct tire in flation
pressure.
Do not operate the air
compressor for a continuous 10
minutes or longer because using
it for long periods could cause a
malfunction.
If the tire in flation pressure does
not increase, repair of the tire is
not possible. If the tire does not
reach the speci fied tire inflation
pressure within 10 minutes, it
may have received extensive
damage. In this case, the repair
using the emergency flat tire
repair kit was not successful.
Contact an Authorized Mazda
Dealer.
If Trouble Arises
Flat Tire
7-7
MX -30_8JD4-EA -21G_Edition2_new 2021-5-18 14:38:07
Page 453 of 547

12.Adhere the speed restriction stickerto an area where it can be viewed
easily by the driver.
13.Adhere the repaired tire sticker tothe wheel of the flat tire.
WARNING
Do not adhere the speed
restriction sticker to the padded
area on the steering wheel:
Adhering the speed restriction
sticker to the padded area on the
steering wheel is dangerous
because the air bag may not
operate (deploy) normally resulting
in serious injury. In addition, do not
adhere the sticker to areas where
warning lights or the speedometer
cannot be viewed.
14.When the tire in flates to the
specified tire in flation pressure, turn
the air compressor switch o ff, turn
the sleeve of the injection hose to
the left, and pull it out of the tire
valve.
15.Remove the air compressor hose from the injection valve of the
bottle. After that, install the
injection hose to the injection valve
of the bottle to prevent leakage of
any remaining sealant.
CAUTION
The remaining sealant in the hose
may spray out when the hose is
removed. Remove the hose
carefully because you may not be
able to remove the sealant
contacting clothing or other
objects.
16.Install the tire valve cap.
17.Put the emergency flat tire repair kit
into the trunk.
18.Start driving immediately to spread the sealant in the tire.
CAUTION
Carefully drive the vehicle at a
speed of 80 km/h (50 mph) or less.
If the vehicle is driven at a speed of
80 km/h (50 mph) or more, the
vehicle may vibrate.
If Trouble Arises
Flat Tire
7-8
MX -30_8JD4-EA -21G_Edition2_new 2021-5-18 14:38:07
Page 454 of 547

NOTE
If the tire is not properly inflated,
the tire pressure monitoring system
warning light will illuminate (page
4-180).
19.After driving the vehicle for about 10 minutes or 5 km (3 miles),
connect the air compressor to the
tire using Step 8 of the procedure,
and check the tire in flation pressure
using the tire pressure gauge on the
air compressor. If the tire in flation
pressure is lower than the speci fied
tire in flation pressure, turn the air
compressor on and wait until it
reaches the speci fied tire inflation
pressure.
WARNING
If the tire in flation pressure has
decreased below 130 kPa (1.3
kgf/cm
2 or bar, 18.9 psi), stop
driving and contact an Authorized
Mazda Dealer:
The repair using the emergency flat
tire repair kit was not successful.
If you see a decrease in the tire
infl ation pressure, even if Steps 8
to 19 of the procedure are
performed repeatedly, stop
driving:
Contact an Authorized Mazda
Dealer.
CAUTION
Before checking the tire in flation
pressure using the tire pressure
gauge, turn the air compressor
switch o ff.
20.The emergency flat tire repair is
completed successfully if the tire
in flation pressure does not
decrease. Carefully drive the vehicle
to the nearest Authorized Mazda
Dealer immediately and have the
fl at tire replaced. Replacement with
a new tire is recommended. If the
tire is to be repaired or reused,
consult an Authorized Mazda
Dealer.
NOTE
If an emergency flat tire repair has
been performed using the
emergency flat tire repair kit,
Mazda recommends that the tire
be replaced with a new one as
soon as possible. If the tire is to
be repaired or reused, consult an
Authorized Mazda Dealer.
The wheel can be reused if the
sealant adhering to it is removed.
However, replace the valve with a
new one.
▼ Inspecting the Emergency Flat Tire
Repair Kit
Inspect the emergency
flat tire repair
kit at regular intervals.
Check the tire sealant period of
e ff ective use.
Check the operation of the tire
compressor.
NOTE
The tire sealant has a period of
e
ff ective use. Check the period of
e ff ective use indicated on the bottle
label and do not use it if it has expired.
Have the tire sealant replaced at an
Authorized Mazda Dealer before the
period of eff ective use has expired.
If Trouble Arises
Flat Tire
7-9
MX-30_8JD4-EA -21G_Edition2_new 2021-5-18 14:38:07
Page 455 of 547

Changing a Flat Tire
▼Locking Lug Nuts
If your Mazda is equipped with the
optional antitheft wheel lug nuts, a
special key must be
used to unlock the
locking lug nut for each wheel. The key
is stored in the glove compartment,
center console storage, storage box, or
trunk. Register the key and lug nuts
with the lock manufacturer by filling
out the registration card and mailing it
in using the accompanying envelope. If
the key is lost, consult an Authorized
Mazda Dealer or use the lock
manufacturer’s order form to order a
new key.
Antitheft wheel lug nuts cannot be
installed on a steel wheel spare tire.
When installing a temporary spare tire,
use one of the original lug nuts in place
of the locking lug nut. The original lug
nuts are stored inside your Mazda.
1. Antitheft lug nut
2. Special key
To remove an antitheft lug nut
1. Obtain the special key for the antitheft lug nut.
2. Place the special key on top of the antitheft lug nut, and be sure to
hold the key square to it. If you
hold the key at an angle, you may
damage both key and nut. Do not
use a power impact wrench.
3. Place the lug wrench on top of the key and apply pressure. Turn the
wrench counterclockwise.
To install the antitheft lug nut
1. Place the special key on top of the
nut, and be sure to hold the key
square to it. If you hold the key at
an angle, you may damage both key
and nut. Do not use a power
impact wrench.
2. Place the lug wrench on top of the special key, apply pressure, and
turn it clockwise.
Nut tightening torque
N·m (kgf·m, ft·lbf) 108
―147 (12 ―14,
80 ―108)
If Trouble Arises
Flat Tire
7-10
MX -30_8JD4-EA -21G_Edition2_new 2021-5-18 14:38:07
Page 456 of 547

What to do when
charging is not possible
▼ What to do when charging is not
possible
If trouble arises while charging such as
not being able to charge the high
voltage battery, refer to the following
table. If the problem cannot be solved
even after checking the following table,
there may be a problem with the
vehicle or charger. Contact an
Authorized Mazda Dealer.
Charging is not possible.
Cause
Action
The selector
lever is in a
position
other than P. Shift the selector lever to the P
position.
The high
voltage bat-
tery is al-
ready fully
charged. Charging is not performed when
the high voltage battery is al-
ready fully charged.
The high
voltage bat-
tery temper-
ature is ex-
tremely high
or low. Check the high voltage battery
temperature gauge in the instru-
ment cluster. If the high voltage
battery temperature gauge is in
the red or blue range, charging
may not be possible.
The
Lead-acid
battery is
depleted. If the instrument cluster does not
turn on even if the power switch
is switched ON, the Lead-acid
battery may be depleted. Charge
or replace the Lead-acid battery.
Normal charging is not possible.
Cause
Action
The outlet
has no pow-
er. Check if a ground-fault circuit in-
terrupter has operated or if a
power outage occurred. If the
power source has a timer func-
tion, electrical power may not be
supplied to the outlet until the
time set to supply power.
The charge
plug is not
properly
plugged into
the outlet. Check if the charge plug is prop-
erly plugged into the outlet.
The charge
connector is
not properly
connected. Check if the charge connector is
properly connected.
Charging
timer is set. Cancel the charging timer using
EV Settings in Mazda Connect,
or the charging timer cancella-
tion function.
Troubleshooting for functions using a
Smartphone or computer
If you are having trouble with the
remote function service, such as when
the remote function does not work,
refer to the Connected Service owner’s
manual.
If Trouble Arises
Troubleshooting for Charging
7-11
MX
-30_8JD4-EA -21G_Edition2_new 2021-5-18 14:38:07
Page 457 of 547

Jump-Starting
▼Jump-Starting
The lead-acid battery might be depleted
if the following conditions occur.
The EV system does not start.The selector lever cannot be shifted to a position other than P.The horn sound is weak or it does not sound.The brightness of the lights is extremely low.
Jump-starting is dangerous if done incorrectly. So follow the procedure carefully. If
you feel unsure about jump-starting, we strongly recommend that you have a
competent service technician do the work.
Using commercially available booster cables, connect the lead-acid battery of the
booster vehicle’s battery to the lead-acid battery of your vehicle and start the EV
system.
WARNING
Follow These Precautions Carefully:
To ensure safe and correct handling of the lead-acid battery, read the following
precautions carefully before using the lead-acid battery or inspecting it.
Keep flames and sparks away from open lead-acid battery cells and do not
allow metal tools to contact the positive (+) or negative (–) terminal of the
lead-acid battery when working near a lead-acid battery. Do not allow the
positive (+) terminal to contact the vehicle body:
Flames and sparks near open lead-acid battery cells are dangerous. Hydrogen gas,
produced during normal lead-acid battery operation, could ignite and cause the
lead-acid battery to explode. An exploding lead-acid battery can cause serious burns
and injuries. Keep all flames including cigarettes and sparks away from open
lead-acid battery cells.
If Trouble Arises
Depleted Lead-acid Battery
7-12
MX -30_8JD4-EA -21G_Edition2_new 2021-5-18 14:38:07
Page 458 of 547

Keep all flames and sparks away from open
lead-acid battery cells because
hydrogen gas is produced from open le ad-acid battery cells while charging the
lead-acid battery or adding lead-acid battery fluid:
Flames and sparks near open lead-acid ba ttery cells are dangerous. Hydrogen gas,
produced during normal lead-acid battery operation, could ignite and cause the
lead-acid battery to explode. An explodin g lead-acid battery can cause serious burns
and injuries. Keep all fl ames including cigarettes and sparks away from open
lead-acid battery cells.
Do not jump-start a frozen lead-acid battery or one with a low fluid level:
Jump-starting a frozen lead-acid battery or one with a low fluid level is dangerous. It
may rupture or explode, causing serious injury.
Connect the negative cable to a good ground point away from the lead-acid
battery:
Connecting the end of the second jumper ca ble to the negative (–) terminal of the
depleted lead-acid battery is dangerous.
A spark could cause the gas around the lead-acid battery to explode and injure
someone.
Route the jumper cables away from parts that will be moving:
Connecting a jumper cable near or to moving part (cooling fans) is dangerous. The
cable could get caught when the EV system starts and cause serious injury.
CAUTION
Connect the booster cables with extreme care.
Do not jump-start the vehicle with the charging cable connected to your vehicle.
Otherwise, the vehicle could be damaged.
Do not use your vehicle as a booster vehicle.
NOTE
If your lead-acid battery is depleted, make sure that the booster vehicle's battery is
a lead-acid battery.
1. Move the booster vehicle so that its lead-acid battery is as close as possible to your vehicle's lead-acid battery.
2. Make sure that the power switch is switched OFF.
If Trouble Arises
Depleted Lead-acid Battery
7-13
MX -30_8JD4-EA -21G_Edition2_new 2021-5-18 14:38:07
Page 459 of 547

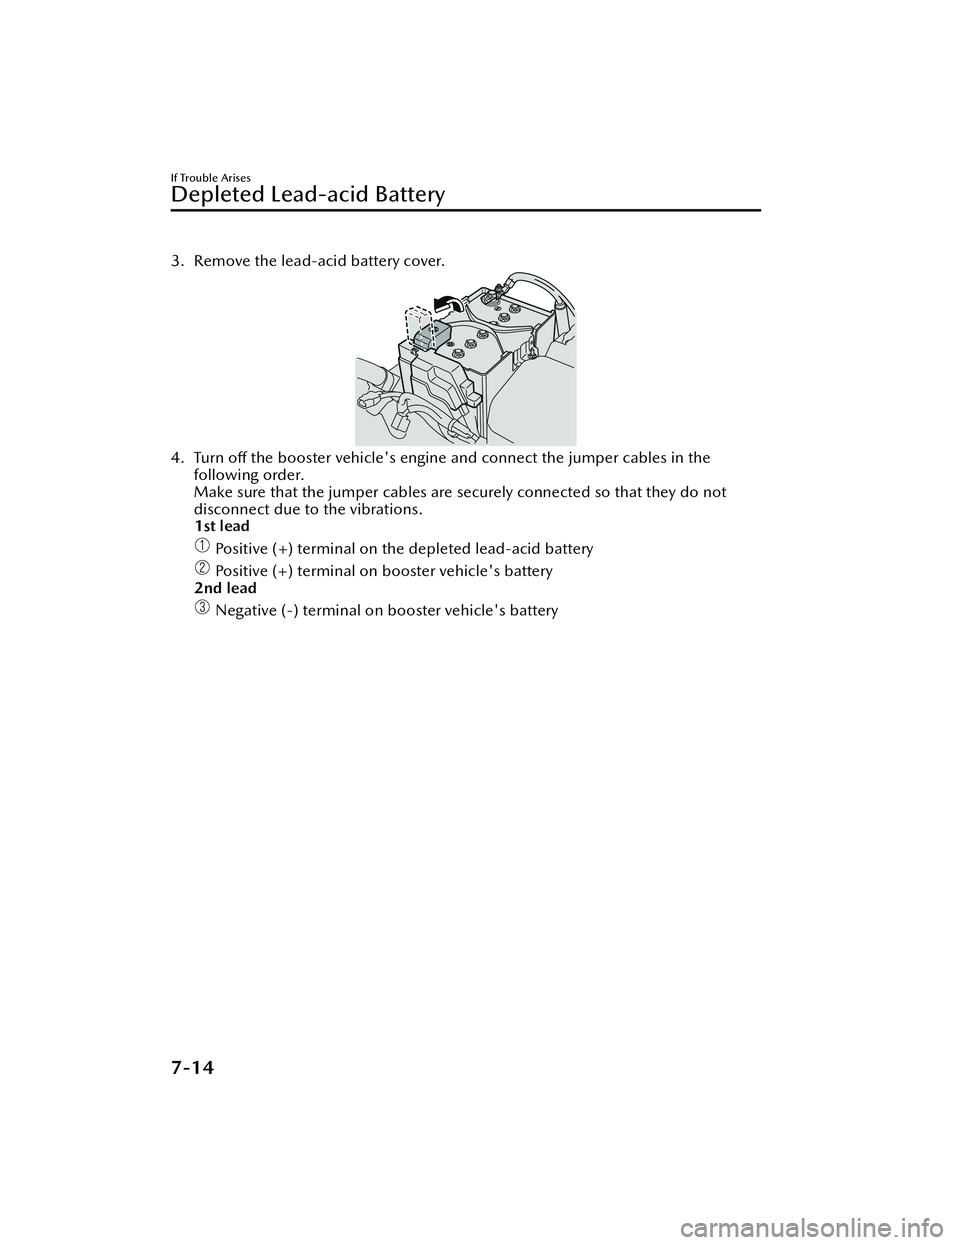
3. Remove the lead-acid battery cover.
4. Turn off the booster vehicle's engine and connect the jumper cables in the
following order.
Make sure that the jumper cables are se curely connected so that they do not
disconnect due to the vibrations.
1st lead
Positive (+) terminal on the depleted lead-acid battery
Positive (+) terminal on booster vehicle's battery
2nd lead
Negative (-) terminal on booster vehicle's battery
If Trouble Arises
Depleted Lead-acid Battery
7-14
MX -30_8JD4-EA -21G_Edition2_new 2021-5-18 14:38:07
Page 460 of 547

Location shown in the figure (do not connect to the negative (-) terminal of
the lead-acid battery)
5. Start the booster vehicle's engine and rev the engine.
6. Start the EV system of your vehicle.
7. Disconnect the booster cables in the reverse order of their connection after the EV system is started.
8. Install the lead-acid battery cover.
9. Have your vehicle inspected by an Author ized Mazda Dealer as soon as possible.
If Trouble Arises
Depleted Lead-acid Battery
7-15
MX-30_8JD4-EA -21G_Edition2_new 2021-5-18 14:38:07