fuel MAZDA MX-5 1994 Owners Manual
[x] Cancel search | Manufacturer: MAZDA, Model Year: 1994, Model line: MX-5, Model: MAZDA MX-5 1994Pages: 1708, PDF Size: 82.34 MB
Page 271 of 1708

PRESSURE REGULATOR CONTROL SYSTEM PRESSURE REGULATOR CONTROL SYSTEM DATA LINK CONNECTOR - CLUTCH SWITCH (MT) (TEN TERMINAL) PARKINEUTRAL SWITCH (PCMT) (AT) THROTTLE POSITION SENSOR L 1 ,,,, INTAKE AIR TEMPERATURE 1 SENSOR (IN MASS AIRFLOW SENSOR) -;- ENGINE COOLANT TEMPERATURE SENSOR PRC SOLENOID VALVE CRANKSHAFT POSITION SENSOR PRESSURE REGULATOR PCME I Above 90°C {194OF} ( Above 70°C {158'F} I Throttle valve closed throttle position or no load condition I Approx. 150 1 I Operating condition Coolant temperature I Intake air temperature I Engine condition I I To prevent percolation of the fuel during hot restart idle, vacuum to the pressure regulator is momentarily cut, and the fuel injection pressure is increased to slightly more than 284 kPa (2.9 kgf/cm2, 41.2 psi}. Operating time (sec) Gartner Banana
Page 278 of 1708

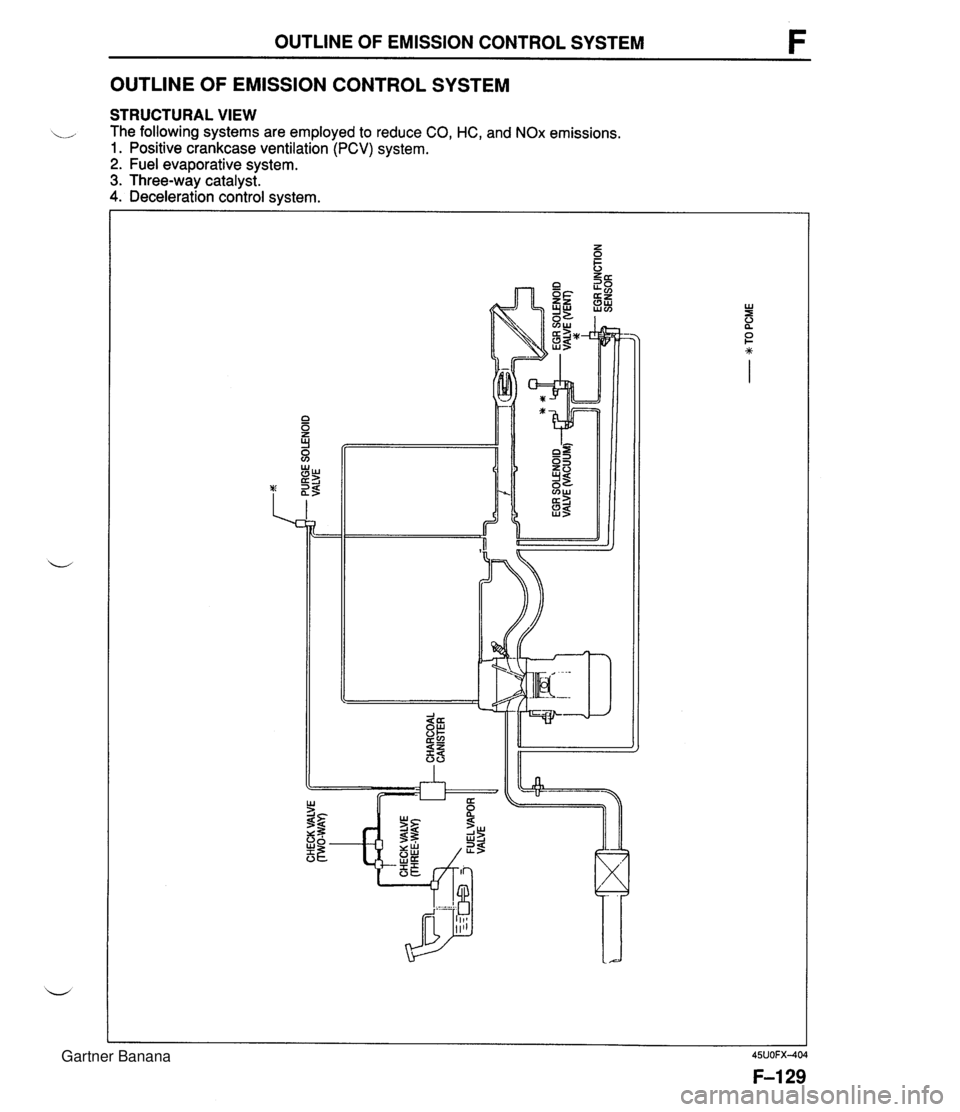
OUTLINE OF EMISSION CONTROL SYSTEM F OUTLINE OF EMISSION CONTROL SYSTEM STRUCTURAL VIEW .,, The following systems are employed to reduce CO, HC, and NOx emissions. 1. Positive crankcase ventilation (PCV) system. 2. Fuel evaporative system. 3. Three-way catalyst. 4. Deceleration control system. Gartner Banana
Page 280 of 1708

FUEL EVAPORATIVE SYSTEM FUEL EVAPORATIVE SYSTEM DESCRIPTION The fuel evaporative system consists of the fuel vapor valve, the two-way check valve, the charcoal can- ister, the purge solenoid valve, the powertrain control module (engine), and the input devices. The amount of evaporative fumes introduced into the engine and burned is controlled by the solenoid valve in relation to the engine's operating conditions. To maintain the best engine performance, the solenoid valve is controlled by the powertrab control module (engine). THROTTLE 1-1 POSITION SENSOR I1 I I (IDLE SWITCH) 7 BAROMETIC ABSOLUTE PRESSURE SENSOR PARWNEUTRAL SWITCH (AT) MASS AIRFLOW SENSOR CRANKSHAFT POSITION SENSOR (SGT-SIGNAL) n - DUTY - LOW HIGH (ENGINE) CHARCOAL PURGE SOLENOID VALVE CANISTER HEATED OXYGEN SENSOR ENGINE COOLANT POWERTRAIN TEMPERATURE SENSOR CONTROL MODULE CHECK VALVE # 11 FUEL VAPOR VALVE Operation The purge solenoid valve is controlled by duty signals from the powertrain control module (engine) to per- form purging of the charcoal canister. Purging is done when these conditions are met: i/ 1. After warm-up. 2. Driving in gear. 3. Accelerator pedal depressed (idle switch OFF). 4. Heated oxygen sensor functioning normally. Gartner Banana
Page 281 of 1708

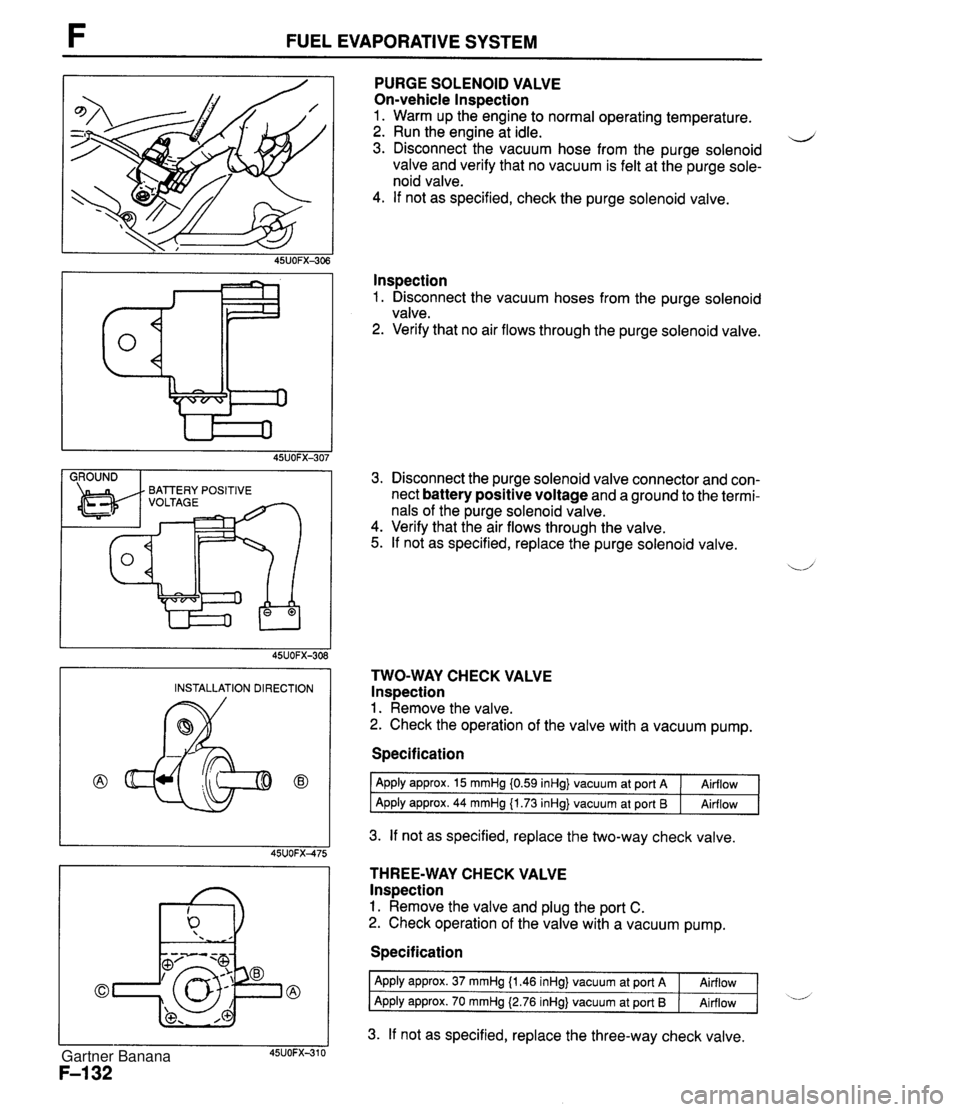
FUEL EVAPORATIVE SYSTEM I GROUND I PURGE SOLENOID VALVE On-vehicle lnspection 1. Warm up the engine to normal operating temperature. 2. Run the engine at idle. d 3. Disconnect the vacuum hose from the purge solenoid valve and verify that no vacuum is felt at the purge sole- noid valve. 4. If not as specified, check the purge solenoid valve. lnspection 1. Disconnect the vacuum hoses from the purge solenoid valve. 2. Verify that no air flows through the purge solenoid valve. 3. Disconnect the purge solenoid valve connector and con- nect battery positive voltage and a ground to the termi- nals of the purge solenoid valve. 4. Verify that the air flows through the valve. 5. If not as specified, replace the purge solenoid valve. TWO-WAY CHECK VALVE lnspection 1. Remove the valve. 2. Check the operation of the valve with a vacuum pump. INSTALLATION DIRECTION Specification I Apply approx. 15 mmHg i0.59 inHg} vacuum at port A 1 Airflow I 1 Agply apgrox. 44 mmH~ (1.73 inHd vacuum at Port 6 1 Airflow 1 3. If not as specified, replace the two-way check valve. THREE-WAY CHECK VALVE lnspection 1. Remove the valve and plug the port C. 2. Check operation of the valve with a vacuum pump. Specification 3. If not as specified, replace the three-way check valve. Apply approx. 37 mmHg {I -46 inHg} vacuum at port A Apply approx. 70 mmHg (2.76 inHg} vacuum at port I3 Airflow Airflow -d Gartner Banana
Page 282 of 1708

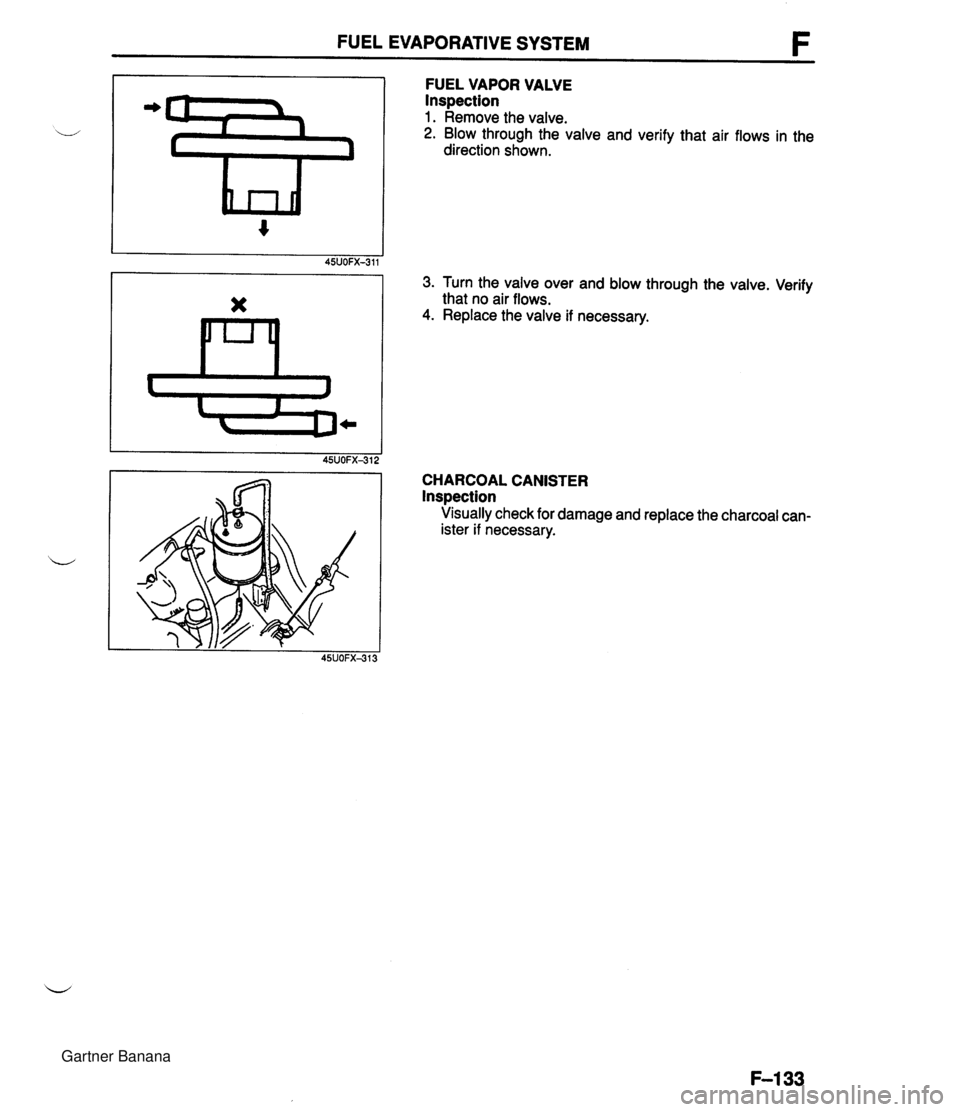
FUEL EVAPORATIVE SYSTEM FUEL VAPOR VALVE Inspection 1. Remove the valve. 2. Blow through the valve and verify that air flows in the direction shown. 3. Turn the valve over and blow through the valve. Verify that no air flows. 4. Replace the valve if necessary. CHARCOAL CANISTER lnspection Visually check for damage and replace the charcoal can- ister if necessary. Gartner Banana
Page 286 of 1708

DECHOKE CONTROL SYSTEM DECHOKE CONTROL SYSTEM DESCRIPTION To clean out excess fuel in cylinders, as in the case of engine flooding, when the engine is cold, no fuel will be injected when the accelerator is held fully depressed while cranking the engine. CRANKSHAFT POSITION SENSOR (NE-SIGNAL) n POWERTRAIN CONTROL MODULE ENGINE COOLANT TEMPERATURE SENSOR I (ENGINE) 1 DETERMINA- TION OF FUEL CUT SPEED Gartner Banana
Page 296 of 1708

CONTROL SYSTEM F Connection to I Test condition I Hot condition: Enaine coolant Input - temp. above 70°C (1 58"~) and in- PRC solenoid valve take air temp. above 50°C (122°F) for 150 sec. after enaine startina Output 0 0 0 0 0 0 0 0 0 " " Other conditions lanition switch On - Condenser fan relay Engine coolant temp. Idle above 108°C 1226°F) I I Other conditions ' I lgnition switch ON Fuel pump relay ldle I I lanition switch ON Fuel injector No.1 1,900 rpm (After warm-UD) I lgnition switch ON Fuel injector No.2 ldle Deceleration from 3,000 rprn to 1,900 rpm (After warm-up) lgnition switch ON IAC valve ldle lgnition switch ON Purge solenoid valve ldle Fuel injector No.3 lgnition switch ON ldle Deceleration from 3,000 rpm to 1,900 rpm (After warm-up) lanition switch ON Fuel injector No.4 Idle Deceleration from 3,000 rpm to 1,900 rpm (After warm-up) Below 1 .OV -1 Below 1 .OV B+ - Approx. OV Engine Signal Moni- * Engine Signal Moni- tor: Green and red Approx. 12V I lamps flash B+: Battery positive voltage Voltage I Remark * Engine Signal Moni- tor: Green and red Engine Signal Moni- Gartner Banana
Page 300 of 1708

CONTROL SYSTEM B+: Battery positive voltage Terminal Connection to Abnormal voltaae Possible cause Mass airflow sensor (Intake air temperature sensor) Refer to Code No.10 troubleshooting (Refer to page F-87) Always OV or approx. 5V Intake air temperature sensor malfunction (Refer to page F-152) Refer to Code No.09 troubleshooting (Refer to page F-87) Engine coolant temper- ature sensor Always OV or approx. 5V r Engine coolant temperature sensor malfunction (Refer to page F-154) Refer to Code No.25 Troubleshooting (Refer to page F-91) Always OV or B+ PRC solenoid valve r Open or short circuit in wiring from condenser fan relay to PCME terminal 25 PCME malfunction Open or short circuit in wiring from fuel pump relay to PCME terminal 2T Condenser fan relay Always below 2.OV Fuel pump relay Always below 1 .OV Main relay malfunction (Refer to page F-156) r Open or short circuit in wiring from fuel injector to PCME terminal 2U or 2V Always OV Fuel injector ldle air control valve Purge solenoid valve Always B+ Always OV or B+ Always OV or B+ PCME malfunction r Refer to Code No.34 troubleshooting (Refer to page F-93) ldle air control solenoid valve malfunction (Refer to page F-I 06) r Refer to Code No.26 troubleshooting (Refer to page F-91) r Purge solenoid valve malfunction (Refer to pane F-132) -- Fuel injector Always OV Main relay malfunction (Refer to page F-156) Open or short circuit in wiring from fuel injector to PCME terminal 2Y or 22 Always B+ PCME malfunction Gartner Banana
Page 302 of 1708

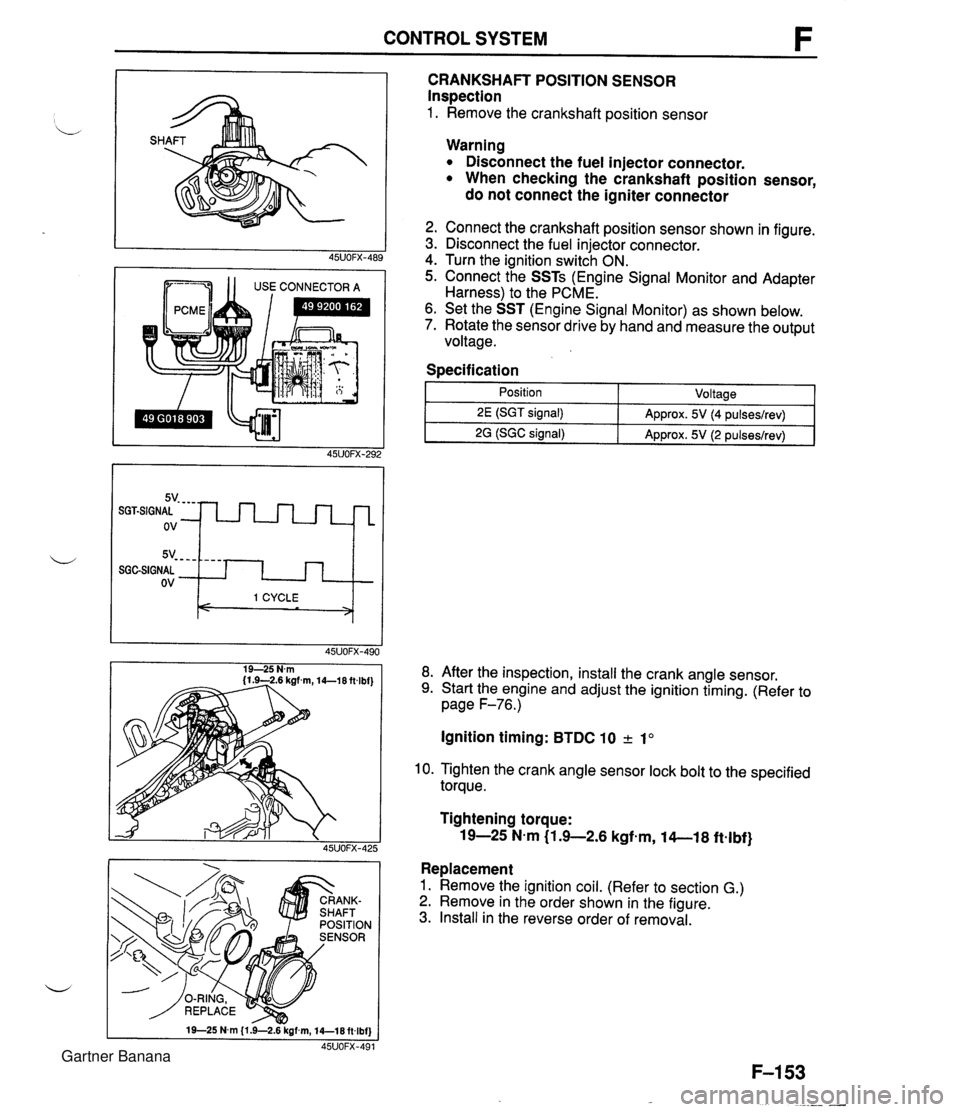
CONTROL SYSTEM 1 1 USE CONNECTOR A CRANKSHAFT POSITION SENSOR Inspection 1. Remove the crankshaft position sensor 5v- - - - SGGSIGNAL ov Warning Disconnect the fuel injector connector. When checking the crankshaft position sensor, do not connect the igniter connector - - - - I 1 CYCLE < > 2. Connect the crankshaft position sensor shown in figure. 3. Disconnect the fuel injector connector. 4. Turn the ignition switch ON. 5. Connect the SSTs (Engine Signal Monitor and Adapter Harness) to the PCME. 6. Set the SST (Engine Signal Monitor) as shown below. 7. Rotate the sensor drive by hand and measure the output voltage. Specification I 1 - Position - ~oltaael 8. After the inspection, install the crank angle sensor. 9. Start the engine and adjust the ignition timing. (Refer to page F-76.) 2E (SGT signal) 2G (SGC signal) Ignition timing: BTDC 10 2 1" Approx. 5V (4 pulseslrev) Approx. 5V (2 pulseslrev) 10. Tighten the crank angle sensor lock bolt to the specified torque. Tightening torque: 19-25 N-m (1 .+2.6 kgfem, 14-1 8 ftelbf} Replacement 1. Remove the ignition coil. (Refer to section G.) 2. Remove in the order shown in the figure. 3. Install in the reverse order of removal. Gartner Banana
Page 305 of 1708

CONTROL SYSTEM SENSOR CONNECTOR EATED OXYGEN Specification Fully closed: 0.1-1.1 V Fully open: 3.14.5V (Verify that the voltage increase is directly d propotioned to the throttle valve opening angle.) 8. Tighten the attaching screws. Tightening torque: 1.6-2.3 N.m (16-24 kgfmm, 14-20 in-lbf} 9. If not adjusted, replace the throttle position sensor. 45UOFX-495 Replacement 1. Turn the ignition switch OFF. 2. Remove the throttle position sensor screws. 3. Remove the throttle position sensor . 4. Replace a new throttle position sensor and adjust it. (Refer to page F-155.) 5. Tighten the throttle position sensor screws. Tightening torque: 1.6-2.3 N.m (16-24 kgf-cm, 14-20 in-lbf} HEATED OXYGEN SENSOR Inspection On-vehicle 1. Warm-up the engine to normal operating temperature and run it at idle. 2. Disconnect the heated oxygen sensor connector. -.-' 3. Measure the voltage at terminal A. 4. If not as specified, check the intake air system, the fuel system and run the on-board diagnosis test. 5. If these system are OK, replace the heated oxygen sen- sor. Specification Heater 1. Disconnect the heated oxygen sensor connector. 2. Measure resistance between terminals C and D. Resistance: Approx. 13R (20°C (68°F)) Engine condition Terminal A 3. Replace the heater if not as specified. Increasing engine speed (V) 0.&1 .O Idle Below 1.0 Replacement 1. Disconnect the heated oxygen sensor connector. 2. Remove the heated oxygen sensor. 3. Install in the reverse order of removal. Decreasing engine speed (V) 0-0.4 Tightening torque: 3049 N-m (3.0-5.0 kgf-m, 22-36 ftlbf) Gartner Banana