oil MAZDA MX-5 1994 Workshop Manual
[x] Cancel search | Manufacturer: MAZDA, Model Year: 1994, Model line: MX-5, Model: MAZDA MX-5 1994Pages: 1708, PDF Size: 82.34 MB
Page 601 of 1708

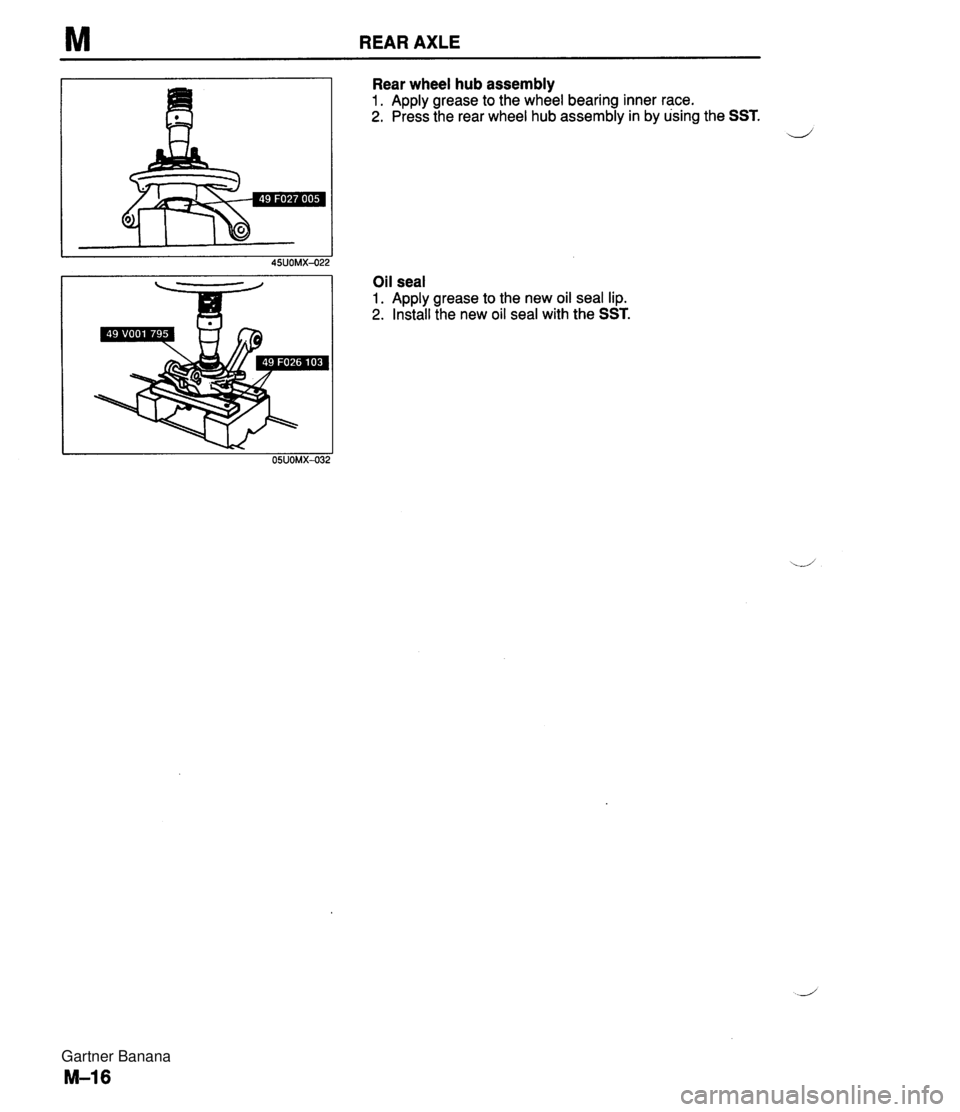
M REAR AXLE Rear wheel hub assembly 1. Apply grease to the wheel bearing inner race. 2. Press the rear wheel hub assembly in by using the SST. Oil seal 1. Apply grease to the new oil seal lip. 2. Install the new oil seal with the SST. Gartner Banana
Page 608 of 1708

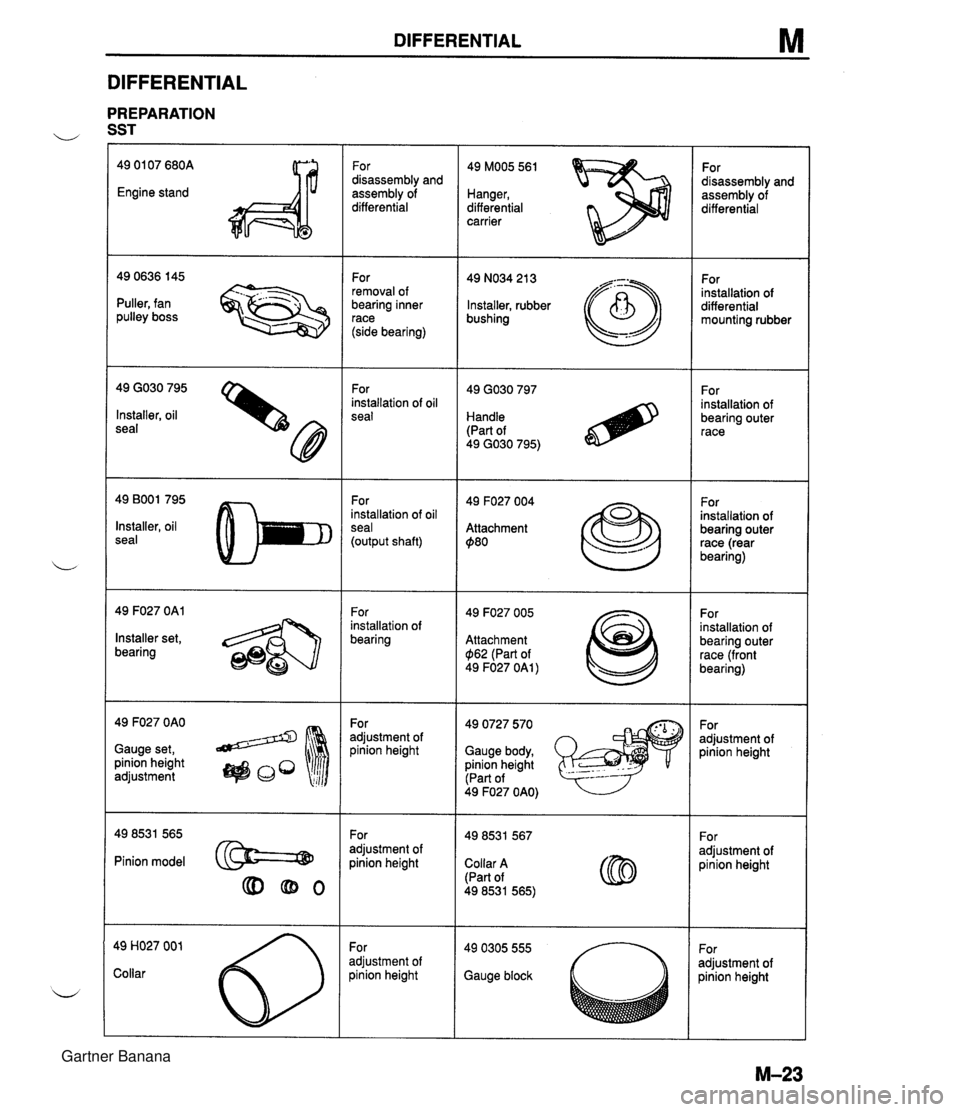
DIFFERENTIAL M DIFFERENTIAL PREPARATION u SST 49 01 07 680A Engine stand For disassembly and assembly of differential 49 MOO5 561 Hanger, differential carrier For disassembly and assembly of differential For removal of bearing inner race (side bearing) 49 NO34 21 3 Installer, rubber bushing For installation of differential mounting rubber - --.. - Puller, fan pulley boss 49 GO30 795 Installer, oil seal For installation of oil seal For installation of bearing outer race Handle (Part of 49 GO30 795) 49 BOO1 795 Installer, oil seal For installation of oil seal (output shaft) 49 F027 004 Attachment $80 For installation of bearing outer race (rear bearing) 49 F027 OAl For installation of bearing 49 F027 005 Attachment $I62 (Part of 49 F027 OAl ) For installation of bearing outer race (front bearing) Installer set, bearing 49 F027 OAO Gauge set, pinion height adjustment 49 0727 570 Gauge body, pinion height (Part of For adjustment of pinion height For adjustment of pinion height 49 F027 OAO) For adjustment of pinion height For adjustment of oinion height Pinion model @==@ Collar A (Part of 49 8531 565) For adjustment of oinion height adjustment of )inion height Gauge block Gartner Banana
Page 609 of 1708

M DIFFERENTIAL 49 DO1 7 2A1 Installer set, bearing 49 F401 331 Body (Part of 49 DO17 2A1) 49 GO30 338 Attachment E (Part of 49 DO1 7 2A1) Puller set, bearing 49 0259 720 Wrench, differential side bearing adjusting nut For installation of bearing For installation of bearing inner race (rear bearing) For installation of bearing inner race (side bearing) For removal and installation of companion flange For adjustment of drive pinion and ring gear backlash 49 F401 337A Attachment C (Part of 49 DO17 2A1) Holder, main shaft Holder, coupling flange 49 U027 003 Installer, oil seal For installation of bearing inner race (rear bearing) For prevention of oil leakage For removal and installation of companion flange For installation of oil seal (companion flange) Gartner Banana
Page 610 of 1708

DIFFERENTIAL M DIFFERENTIAL OIL Inspection 1. Remove the filler plug. 2. Verify that the oil is at the bottom of the filler plug hole. If it is low, add the specified oil. 3. Install the filler plug. Tightening torque: 39-54 N.m (4.0-5.5 kgf.m, 29-40 ft4bf) Replacement 1. Remove the filler and drain plugs. 2. Drain the differential oil into a suitable container. 3. Wipe the plugs clean. 4. Install the drain plug and a new washer. Tightening torque: 39-54 N.m (4.0-5.5 kgf-m, 29-40 ft4bf) 5. Add the specified oil from the filler plug until the level reaches the bottom of the plug hole. Specified oil TY pe Above -18°C (0°F): API GL-5, SAE 90 Below -18°C (0°F): API GL-5, SAE 80 Capacity: 1 .OO L {I .06 US qt, 0.88 Imp qt) 6. lnstall the filler plug. Tightening torque: 39-54 N.m (4.0-5.5 kgf.m, 29--40 ft.lbf) OIL SEAL (OUTPUT SHAFT) Replacement 1. On level ground, Jack up the vehicle and support it on safety stands. 2. Drain the differential gear oil. 3. Mark the drive shaft and output shaft flanges for proper reassembly. 4. Remove the upper arm installation bolt and nut. Gartner Banana
Page 611 of 1708

M DIFFERENTIAL 5. Separate the driveshaft from the differential and sus- pend it. 6. Remove the output shaft by using two pry bars as shown in the figure. J 7. Remove the oil seal. 8. Apply lithium-based grease to the new oil seal lip and install it by using'the SST. 9. Install the new clips. 10. Install the output shaft into the side gears by lightly tap- ping with a plastic hammer. 11. Verify that the output shaft is hooked into the side gears by pulling it by hand. ./ 12. Align the marks and install the drive shaft. Tightening torque: 54-64 N.m (5.5--6.5 kgf.m, 40-47 ft-lbf) 13. Install the upper arm installation bolt and nut. Tightening torque: 46-67 N.m (4.7-6.8 kgf.m, 34--49 ftlbf) 14. Add the specified oil. 15. Adjust the rear wheel alignment. (Refer to section R.) I Gartner Banana
Page 612 of 1708

DIFFERENTIAL M DIFFERENTIAL, STANDARD; DIFFERENTIAL, TORQUE SENSING LIMITED SLIP ("TORSEN" LSD) Removal 1 lnstallation 1. Drain the differential oil. ,, 2. Remove in the order shown in the figure, referring to Removal Note. 3. Install in the reverse order of removal, referring to lnstallation Note. 4. Add the specified oil to the specified level. 1. Rear wheels 7. Drive shafts 2. Differential mounting pipe Removal Note ............. page M-29 3. Exhaust pipe 8. Differential 4. Propeller shaft Removal Note ............. page M-29 Service ..................... section L Installation Note ........... page M-30 ' 5. Speedometer cable Overhaul .................. page M-32 ,, 6. Power plant frame (PPF), Differential mounting spacer Removal Note ............. page M-28 Installation Note ........... page M-30 Gartner Banana
Page 618 of 1708

DIFFERENTIAL M 1. Output shafts Disassembly Note .......... page M-34 Assembly Note ............ page M-42 u 2. Differential case Disassembly Note .......... page M-34 Assembly Note ............ page M-42 3. Differential gear assembly Disassembly Note .......... page M-34 4. Lock plates 5. Bearing caps Disassembly Note .......... page M-34 Assembly Note ............ page M-42 6. Adjusting nuts Disassembly Note .......... page M-34 7. Bearing outer races (Side bearing) 8. Gear case assembly ("TORSEN" LSD) 9. Ring gear lnspect individual gear teeth for wear and cracks 10. Knock pin (Standard) Disassembly Note .......... page M-34 11. Pinion shaft (Standard) 12. Pinion gears (Standard) lnspect individual gear teeth for wear and cracks 13. Thrust washers (Standard) 14. Side gears (Standard) lnspect individual gear teeth for wear and cracks b 15. Thrust washers (Standard) Assembly Note ............ page M-40 16. Bearing inner races (Side bearing) Disassembly Note .......... page M-34 lnspect for damage and rough rotation 17. Gear case 18. Locknut (Companion flange) Disassembly Note .......... page M-35 19. Washer 20. Companion flange Disassembly Note .......... page M-35 lnspect splines for wear and damage 21. Oil seal (Companion flange) 22. Washer 23. Drive pinion Disassembly Note .......... page M-35 lnspect splines for wear and damage lnspect individual gear teeth for wear and cracks 24. Spacer Assembly Note ............ page M-37 25. Bearing inner race (Front bearing) lnspect for damage and rough rotation ............ Assembly Note page M-38 26. Collapsible spacer 27. Bearing outer race (Rear bearing) Disassembly Note .......... page M-35 Assembly Note ............ page M-37 28. Bearing outer race (Front bearing) Disassembly Note .......... page M-35 Assembly Note ............ page M-36 29. Bearing inner race (Rear bearing) Disassembly Note .......... page M-35 lnspect for damage and rough rotation Assembly Note ............ page M-37 30. Differential carrier 31. Oil seal (Output shaft) Assembly Note ............ page M-36 32. Baffle 33. Breather 34. Differential mount Disassembly Note .......... page M-36 Assembly Note ............ page M-36 45UOMX-053 Gartner Banana
Page 621 of 1708

M DIFFERENTIAL Differential mount 1. Drill holes around the differential mount. 2. Hit the edge of the differential mount to remove it. Assembly note Differential mounting rubber 1. Install the new differential mount with the voids facing front and rear. 2. Press in the differential mount by using the SST. Press force: 19600 N (2000 kgf, 4400 Ibf) Oil seal (Output shaft) Apply lithium based grease to the new oil seal lip and install it by using the SST. Bearing outer race (front bearing) Instdl the bearing outer race (front bearing) by using the SST. Gartner Banana
Page 624 of 1708

DIFFERENTIAL M 4. Without installing the oil seal, Install the drive pinion, spacer, new collapsible spacer, front bearing, washer, and companion flange to the carrier, and temporarily tighten the locknut by using the SST. Tightening torque: 128 N-m (13.0 kgf-m, 94.1 ft-lbf) 5. Turn the companion flange several turns by hand to seat the bearing. 6. Measure the drive pinion preload. Adjust the preload by tightening the locknut, and record the tightening torque. STANDARD "TORSEN" 45UOMX-07; Preload: 0.9-1.3 N.m (9-1 4 kgf.cm, 7.9-1 2.1 in4bf) Tightening torque: 128-284 N.m (13.0-29.0 kgf.m, 94.1-209.7 ft-lbf) 7. Remove the locknut, washer, and companion flange. 8. T~D a new oil seal into the differential carrier with the 9. Apply a light coat of grease to the end face of the com- panion flange. 10. Install the companion flange and washer; while holding the flange with the SST, and tighten a new locknut to the tightening torque recorded in step 6. Gartner Banana
Page 628 of 1708

Before beginning any service procedure. refer to section T of this manual for I air bag system service warnings and audio antitheft system alarm conditions . STEERING SYSTEM INDEX ....................................... N- 2 OUTLINE ..................................... N- 4 SPECIFICATIONS ........................... N- 4 MANUAL STEERING .......................... N- 4 PREPARATION ............................. N- 4 ................ TROUBLESHOOTING GUIDE N- 5 BOOT ...................................... N- 6 STEERING WHEEL AND COLUMN ........... N- 8 ............. STEERING GEAR AND LINKAGE N-12 ENGINE SPEED SENSING POWER STEERING .......................... N-18 PREPARATION ............................. N-18 TROUBLESHOOTING GUIDE ................ N-20 AIR BLEEDING ............................. N-21 POWER STEERING FLUID ................... N-22 STEERING WHEEL AND COLUMN ........... N-24 STEERING GEAR AND LINKAGE ............. N-25 POWER STEERING OIL PUMP ............... N-33 DRIVE BELT ................................ N-37 25UONX-001 Gartner Banana