seat adjustment MAZDA MX-5 1994 Workshop Manual
[x] Cancel search | Manufacturer: MAZDA, Model Year: 1994, Model line: MX-5, Model: MAZDA MX-5 1994Pages: 1708, PDF Size: 82.34 MB
Page 730 of 1708

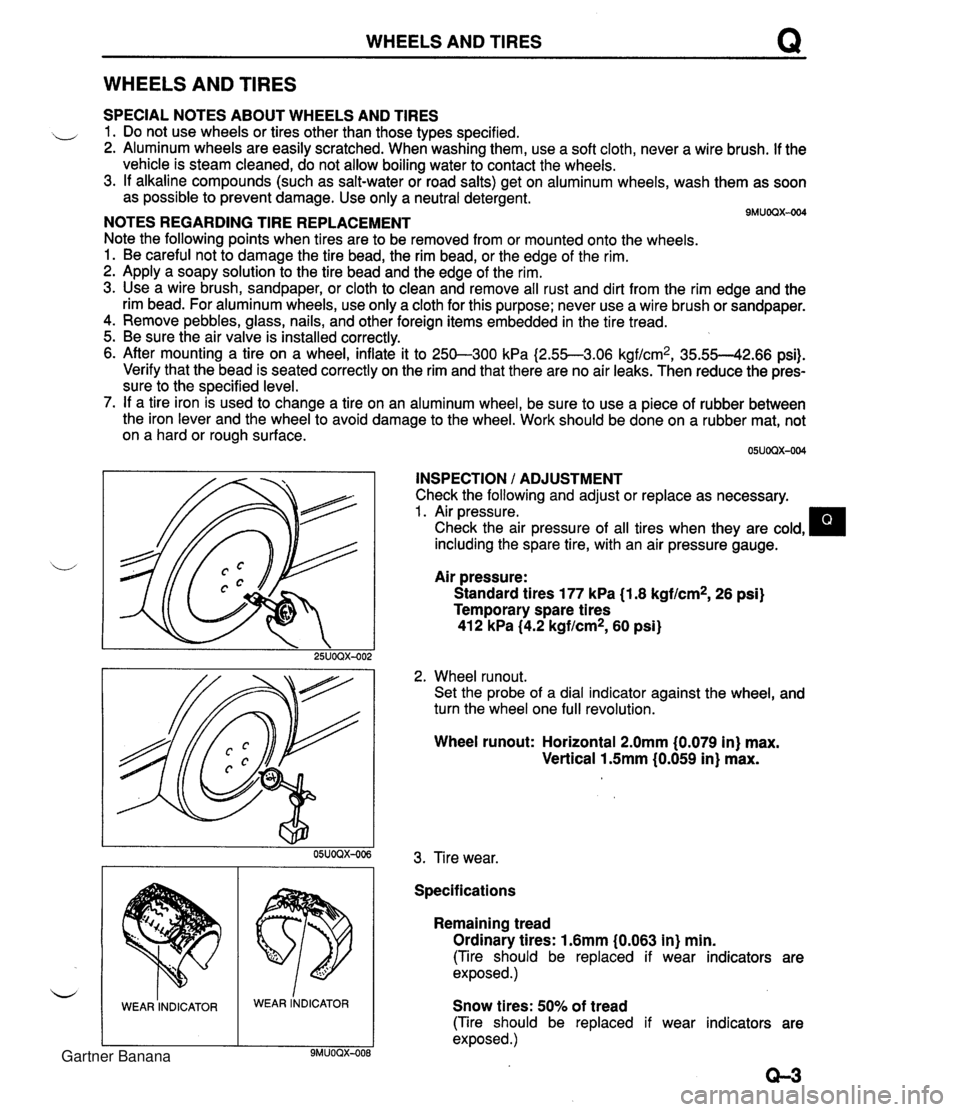
WHEELS AND TIRES Q WHEELS AND TIRES SPECIAL NOTES ABOUT WHEELS AND TIRES ,, 1. Do not use wheels or tires other than those types specified. 2. Aluminum wheels are easily scratched. When washing them, use a soft cloth, never a wire brush. If the vehicle is steam cleaned, do not allow boiling water to contact the wheels. 3. If alkaline compounds (such as salt-water or road salts) get on aluminum wheels, wash them as soon as possible to prevent damage. Use only a neutral detergent. - - 9MUOQX-004 NOTES REGARDING TIRE REPLACEMENT Note the following points when tires are to be removed from or mounted onto the wheels. 1. Be careful not to damage the tire bead, the rim bead, or the edge of the rim. 2. Apply a soapy solution to the tire bead and the edge of the rim. 3. Use a wire brush, sandpaper, or cloth to clean and remove all rust and dirt from the rim edge and the rim bead. For aluminum wheels, use only a cloth for this purpose; never use a wire brush or sandpaper. 4. Remove pebbles, glass, nails, and other foreign items embedded in the tire tread. 5. Be sure the air valve is installed correctly. 6. After mounting a tire on a wheel, inflate it to 250-300 kPa I2.55--3.06 kgf/cm2, 35.55--42.66 psi). Verify that the bead is seated correctly on the rim and that there are no air leaks. Then reduce the pres- sure to the specified level. 7. If a tire iron is used to change a tire on an aluminum wheel, be sure to use a piece of rubber between the iron lever and the wheel to avoid damage to the wheel. Work should be done on a rubber mat, not on a hard or rough surface. INSPECTION / ADJUSTMENT Check the following and adjust or replace as necessary. 1. Air pressure. Check the air pressure of all tires when they are cold, including the spare tire, with an air pressure gauge. u Air pressure: Standard tires 177 kPa (1.8 kgf/cm2, 26 psi) Temporary spare tires 412 kPa (4.2 kgf/cm2, 60 psi) 2. Wheel runout. Set the probe of a dial indicator against the wheel, and turn the wheel one full revolution. WEAR INDICATOR Wheel runout: Horizontal 2.0mm (0.079 in) max. Vertical 1.5mm (0.059 in) max. WEAR lNDICAToR 3. Tire wear. Specifications Remaining tread Ordinary tires: 1.6mm (0.063 in) min. (Tire should be replaced if wear indicators are exposed.) Snow tires: 50% of tread (Tire should be replaced if wear indicators are exposed .) Gartner Banana
Page 762 of 1708

s INDEX 1. Power window system ............. Structural view page S-19 ............ Troubleshooting page S-20 ................. Inspection page S-22 2. Fuel-filler lid opener ....... Removal / Installation page $23 3. Dashboard and console ....... Removal / Installation page S-56 ................. Adjustment page S-58 4. Trim ....... Removal / Installation page S-59 5. Floor covering ....... Removal / Installation page S-62 6. Seat belt ....... Removal / Installation page $63 ................. Inspection page S-64 7. Seat ....... Removal 1 Installation page S-65 Disassembly / Assembly .... page S-66 'd' ................. Inspection page S-65 8. Brace bar Removal / Installation ....... page S-84 Gartner Banana
Page 823 of 1708

SEAT SEAT COMPONENTS - Removal / Installation 1. Remove in the order shown in the figure. If a headrest speaker is installed, disconnect the speaker con- - nectar to remove the seat. 2. Install in the reverse order of removal. 1. Seat lnspection . . . . . . . . . . . . . . . . . . . . . . below SEAT SEAT lnspection 1. Verify that the seat adjuster lever and reclining knuckle move smoothly. 2. Check the adjustment lever for wear. 3. Check the front seat mounting bolts for looseness. 4. Check grease on the seat slides. Gartner Banana
Page 964 of 1708

AUDIO Clock The clock can be adjusted during radio, tape, or CD play. I Name I Illustration Clock button (clock display) ALC (Auto level controller) Name 1 Illustration ALCJbodysonic volume control knob I Mute button Roof mode button I Stereo-wide button Operation Press button to display present radio frequency or operation mode If power supply to unit is broken (burnt fuse or disconnected battery), clock setup will be canceled When clock button is pushed for 2 seconds, clock display flashes. At this point, press H button to advance hours and M button to advance minutes Press clock button again to return to normal display If clock button is pressed again while clock display is flashing and time has not been adjusted (that is, H and M buttons have not been pressed), min- utes will be set at :00. If time before adjustment showed 30-59 minutes, time will be set at next hour For example, Operation Press knob to turn ALC on or off 1. At ON, ALC adjusts sound corresponding to vehicle speed; ALC indica- tor light turns on 2. To adjust seat vibration, turn knob to right or left Right -t Seat vibration increases Left + Seat vibration decreases Turn knob right or left to transfer sound Right -+ Door speakers Left -t Headrest speakers Press button to lower overall volume by 10dB Press button to switch between roof-open mode and roof-closed mode; sound quality is adjusted depending on whether roof is opened or closed Press button to turn stereo-wide function on or off At ON, stereo-wide mode improves sound quality Gartner Banana