MAZDA MX-5 1997 Factory Repair Manual
Manufacturer: MAZDA, Model Year: 1997, Model line: MX-5, Model: MAZDA MX-5 1997Pages: 514, PDF Size: 17.89 MB
Page 211 of 514
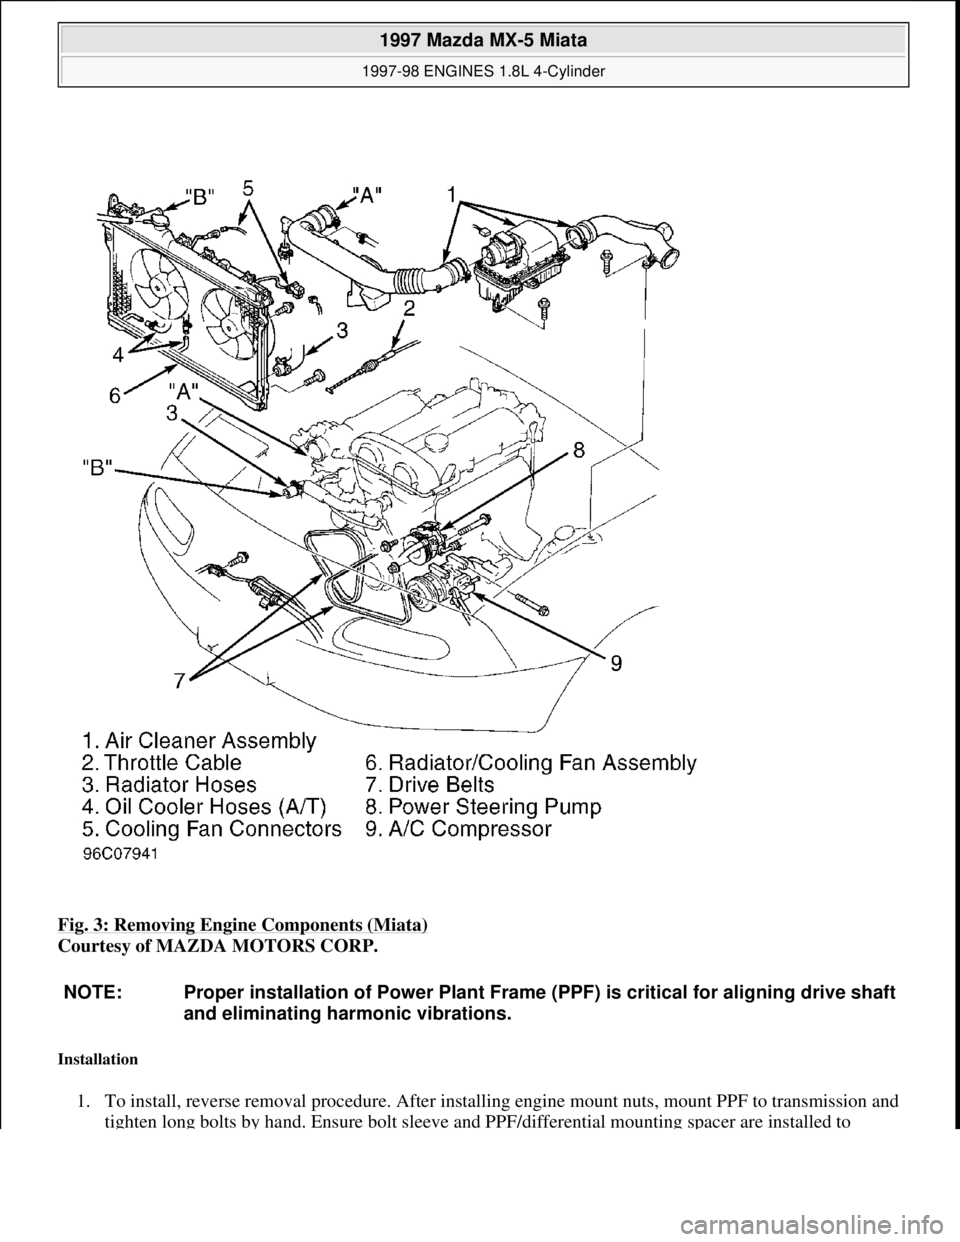
Fig. 3: Removing Engine Components (Miata)
Courtesy of MAZDA MOTORS CORP.
Installation
1. To install, reverse removal procedure. After installing engine mount nuts, mount PPF to transmission and
tighten long bolts by hand. Ensure bolt sleeve and PPF/differential mounting spacer are installed to
NOTE: Proper installation of Power Plant Frame (PPF) is critical for aligning drive shaft
and eliminating harmonic vibrations.
1997 Mazda MX-5 Miata
1997-98 ENGINES 1.8L 4-Cylinder
Microsoft
Sunday, July 05, 2009 1:55:15 PMPage 5 © 2005 Mitchell Repair Information Company, LLC.
Page 212 of 514
differential housing block.
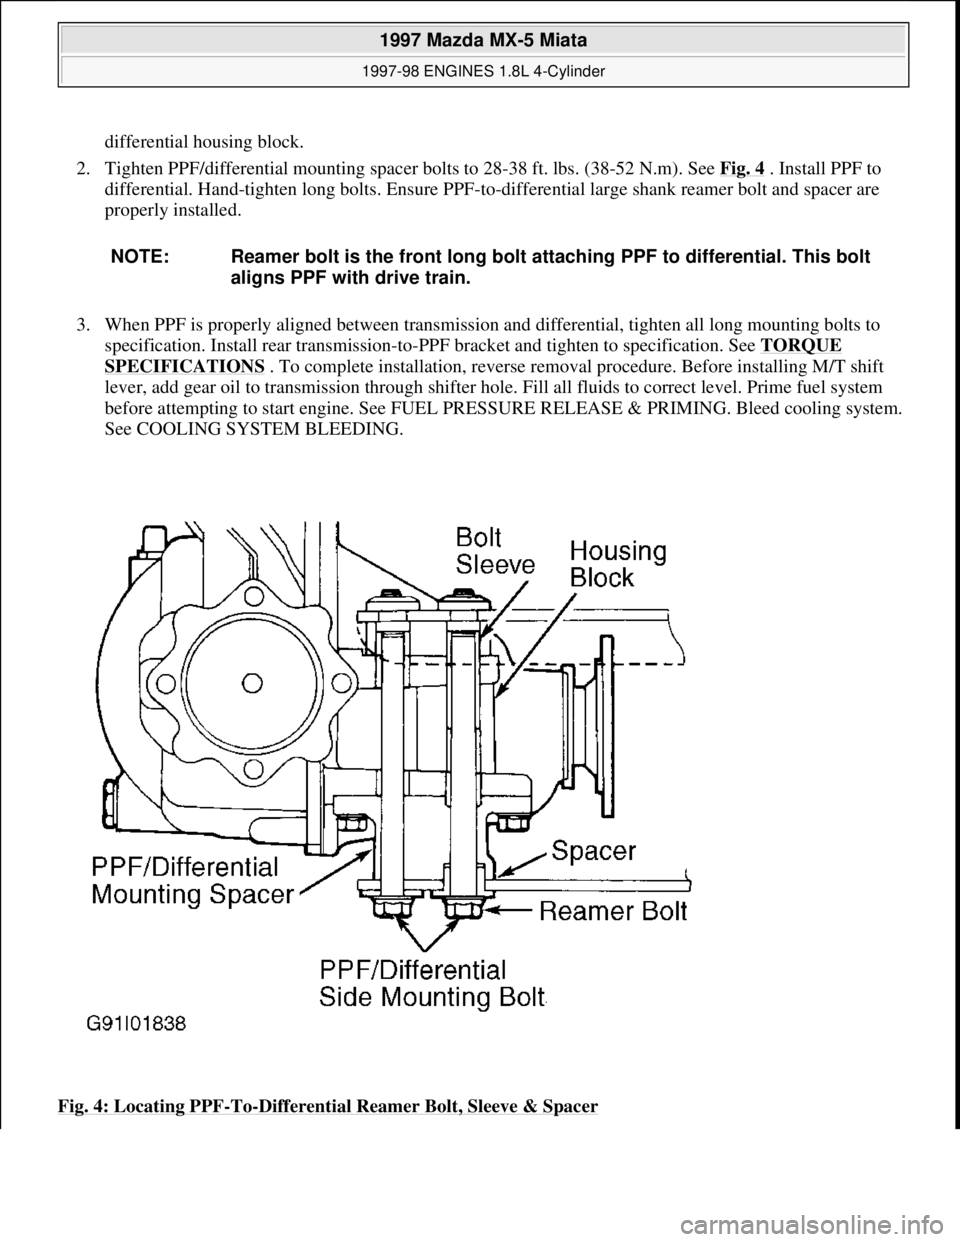
2. Tighten PPF/differential mounting spacer bolts to 28-38 ft. lbs. (38-52 N.m). See Fig. 4
. Install PPF to
differential. Hand-tighten long bolts. Ensure PPF-to-differential large shank reamer bolt and spacer are
properly installed.
3. When PPF is properly aligned between transmission and differential, tighten all long mounting bolts to
specification. Install rear transmission-to-PPF bracket and tighten to specification. See TORQUE
SPECIFICATIONS . To complete installation, reverse removal procedure. Before installing M/T shift
lever, add gear oil to transmission through shifter hole. Fill all fluids to correct level. Prime fuel system
before attempting to start engine. See FUEL PRESSURE RELEASE & PRIMING. Bleed cooling system.
See COOLING SYSTEM BLEEDING.
Fig. 4: Locating PPF
-To-Differential Reamer Bolt, Sleeve & Spacer
NOTE: Reamer bolt is the front long bolt attaching PPF to differential. This bolt
aligns PPF with drive train.
1997 Mazda MX-5 Miata
1997-98 ENGINES 1.8L 4-Cylinder
Microsoft
Sunday, July 05, 2009 1:55:15 PMPage 6 © 2005 Mitchell Repair Information Company, LLC.
Page 213 of 514
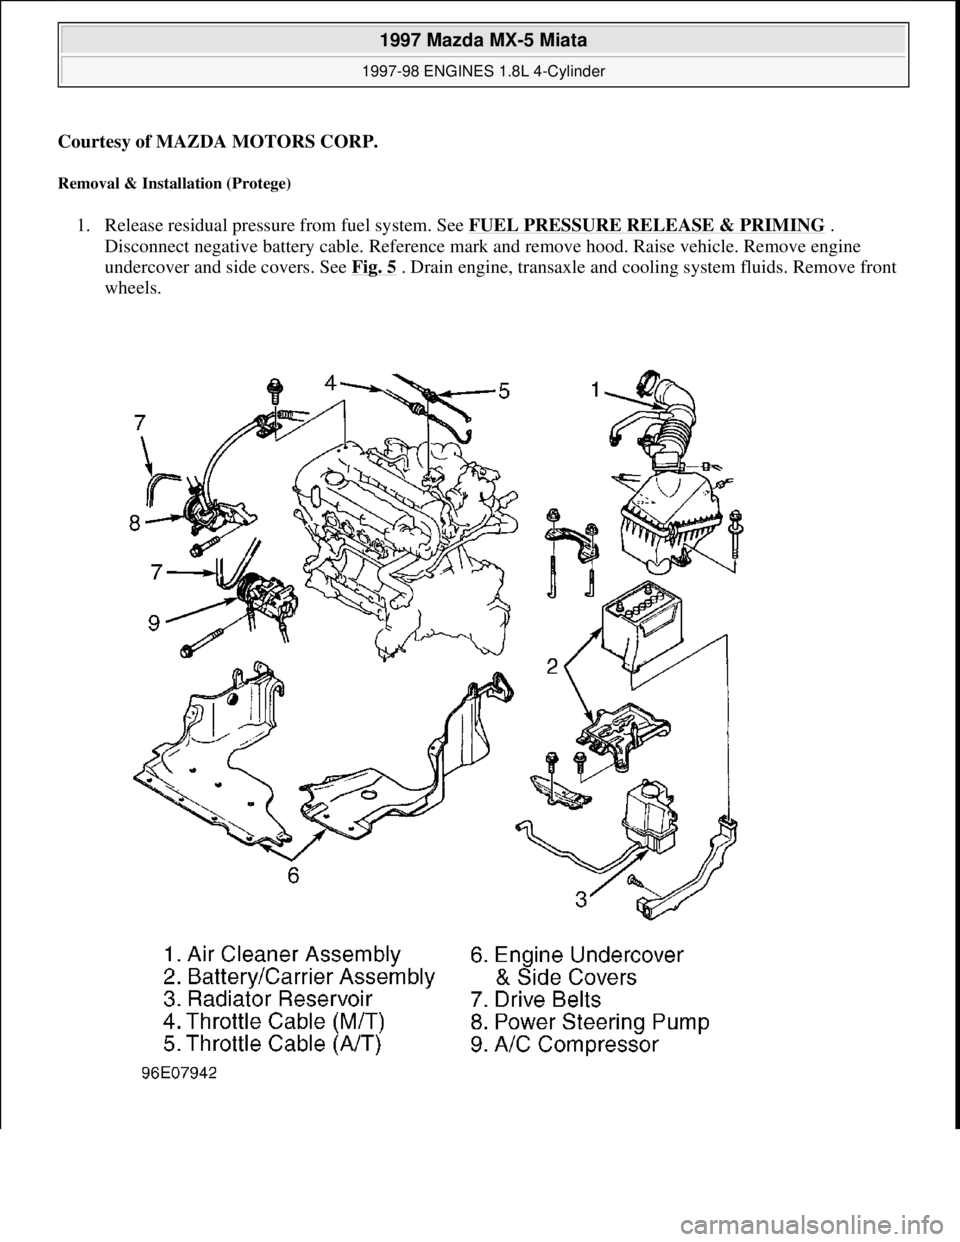
Courtesy of MAZDA MOTORS CORP.
Removal & Installation (Protege)
1. Release residual pressure from fuel system. See FUEL PRESSURE RELEASE & PRIMING .
Disconnect negative battery cable. Reference mark and remove hood. Raise vehicle. Remove engine
undercover and side covers. See Fig. 5
. Drain engine, transaxle and cooling system fluids. Remove front
wheels.
1997 Mazda MX-5 Miata
1997-98 ENGINES 1.8L 4-Cylinder
Microsoft
Sunday, July 05, 2009 1:55:15 PMPage 7 © 2005 Mitchell Repair Information Company, LLC.
Page 214 of 514
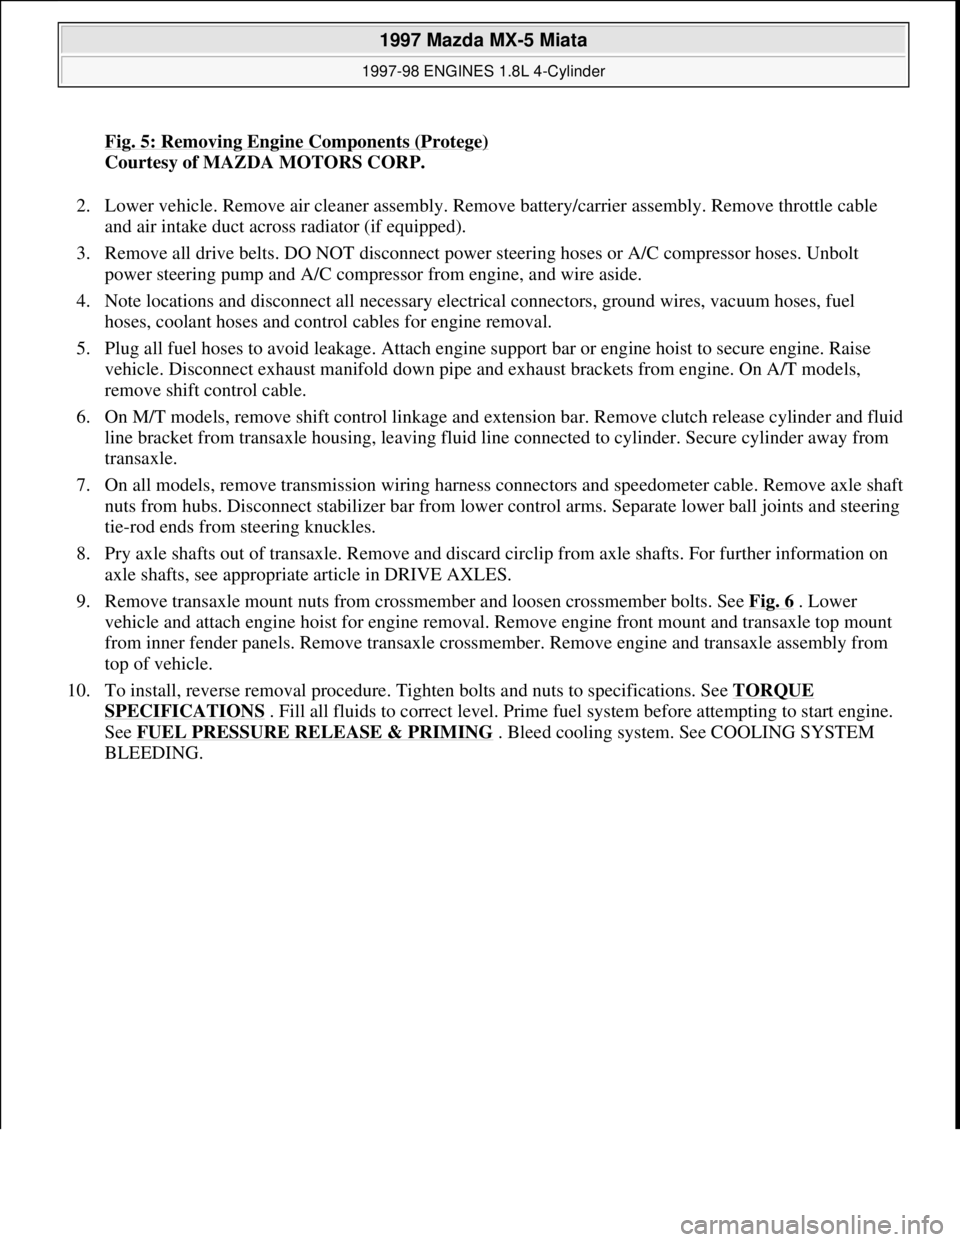
Fig. 5: Removing Engine Components (Protege)
Courtesy of MAZDA MOTORS CORP.
2. Lower vehicle. Remove air cleaner assembly. Remove battery/carrier assembly. Remove throttle cable
and air intake duct across radiator (if equipped).
3. Remove all drive belts. DO NOT disconnect power steering hoses or A/C compressor hoses. Unbolt
power steering pump and A/C compressor from engine, and wire aside.
4. Note locations and disconnect all necessary electrical connectors, ground wires, vacuum hoses, fuel
hoses, coolant hoses and control cables for engine removal.
5. Plug all fuel hoses to avoid leakage. Attach engine support bar or engine hoist to secure engine. Raise
vehicle. Disconnect exhaust manifold down pipe and exhaust brackets from engine. On A/T models,
remove shift control cable.
6. On M/T models, remove shift control linkage and extension bar. Remove clutch release cylinder and fluid
line bracket from transaxle housing, leaving fluid line connected to cylinder. Secure cylinder away from
transaxle.
7. On all models, remove transmission wiring harness connectors and speedometer cable. Remove axle shaft
nuts from hubs. Disconnect stabilizer bar from lower control arms. Separate lower ball joints and steering
tie-rod ends from steering knuckles.
8. Pry axle shafts out of transaxle. Remove and discard circlip from axle shafts. For further information on
axle shafts, see appropriate article in DRIVE AXLES.
9. Remove transaxle mount nuts from crossmember and loosen crossmember bolts. See Fig. 6
. Lower
vehicle and attach engine hoist for engine removal. Remove engine front mount and transaxle top mount
from inner fender panels. Remove transaxle crossmember. Remove engine and transaxle assembly from
top of vehicle.
10. To install, reverse removal procedure. Tighten bolts and nuts to specifications. See TORQUE
SPECIFICATIONS . Fill all fluids to correct level. Prime fuel system before attempting to start engine.
See FUEL PRESSURE RELEASE & PRIMING
. Bleed cooling system. See COOLING SYSTEM
BLEEDING.
1997 Mazda MX-5 Miata
1997-98 ENGINES 1.8L 4-Cylinder
Microsoft
Sunday, July 05, 2009 1:55:15 PMPage 8 © 2005 Mitchell Repair Information Company, LLC.
Page 215 of 514
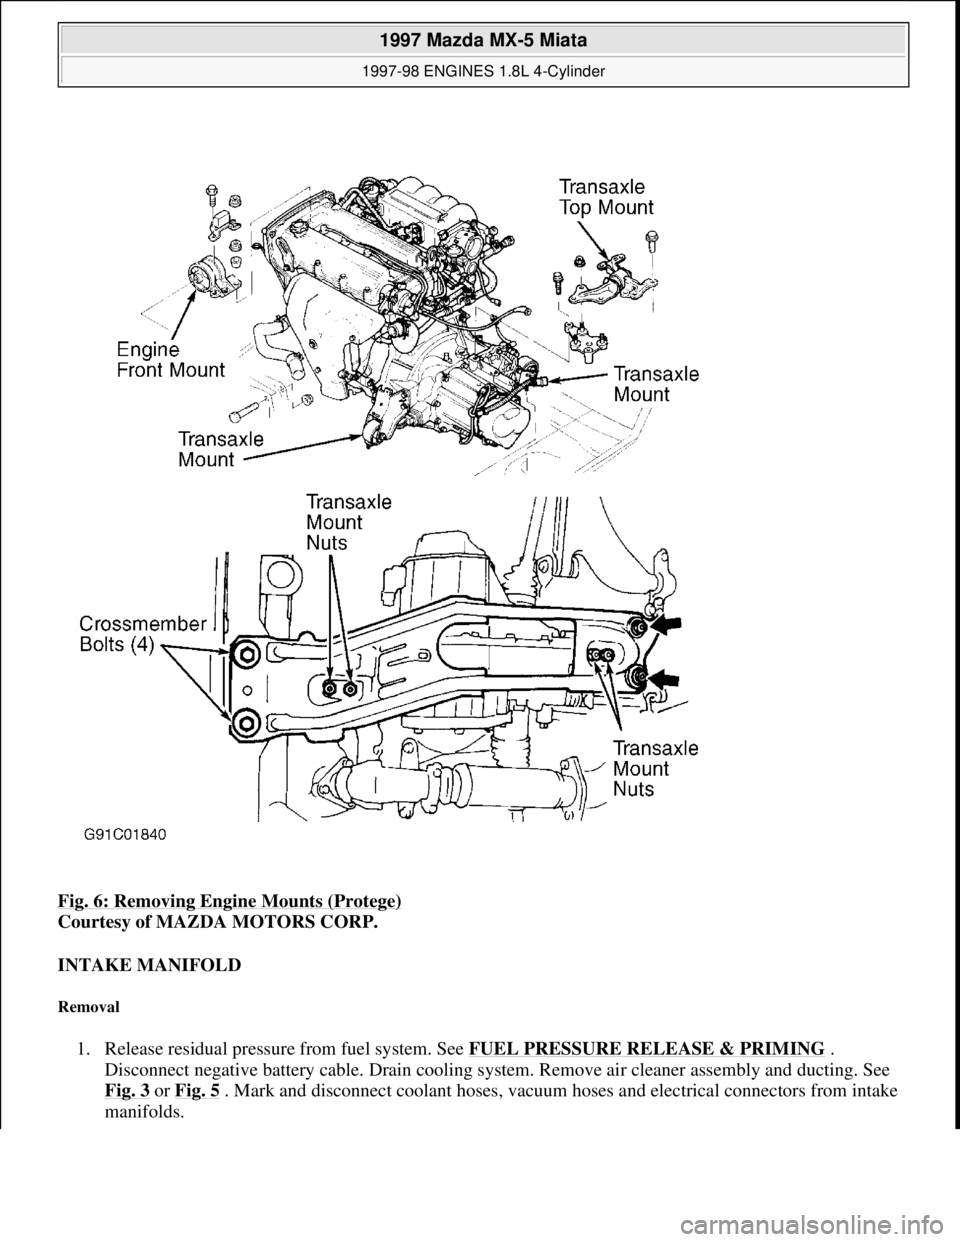
Fig. 6: Removing Engine Mounts (Protege)
Courtesy of MAZDA MOTORS CORP.
INTAKE MANIFOLD
Removal
1. Release residual pressure from fuel system. See FUEL PRESSURE RELEASE & PRIMING .
Disconnect negative battery cable. Drain cooling system. Remove air cleaner assembly and ducting. See
Fig. 3
or Fig. 5 . Mark and disconnect coolant hoses, vacuum hoses and electrical connectors from intake
manifolds.
1997 Mazda MX-5 Miata
1997-98 ENGINES 1.8L 4-Cylinder
Microsoft
Sunday, July 05, 2009 1:55:15 PMPage 9 © 2005 Mitchell Repair Information Company, LLC.
Page 216 of 514
2. Disconnect throttle cable. Remove fuel lines from fuel rail and pressure regulator. Remove throttle body
intake duct housing and throttle body. Remove by-pass air control valve and solenoid valves. Remove
upper intake manifold (if equipped).
3. Remove intake manifold support bracket from underneath manifold. Disconnect injector harness
connectors, and remove injectors/fuel rail assembly. Remove intake manifold and gasket.
Installation
1. Ensure all gasket surfaces are clean and flat. Using NEW gasket, install intake manifold to cylinder head.
Tighten manifold bolts/nuts evenly to specification, starting from center bolt and alternating outward. See
TORQUE SPECIFICATIONS
. Install support bracket underneath intake manifold.
2. Install gasket and upper intake manifold (if equipped). Tighten bolts/nuts evenly to specification,
alternating from top to bottom. See TORQUE SPECIFICATIONS
.
3. To complete installation, reverse removal procedure. Ensure throttle cable has .04-.12" (1-3 mm) free
play. Ensure injectors twist freely and are not cocked in insulator "O" rings. Refill engine with coolant.
EXHAUST MANIFOLD
Removal & Installation
1. Remove air cleaner intake duct from top of radiator/fan assembly (if equipped). Disconnect oxygen
sensor. Remove heat shields. Disconnect down pipe from exhaust manifold. Remove exhaust manifold.
2. To install, reverse removal procedure. Ensure all mating surfaces are clean and flat. Install NEW exhaust
manifold gasket to cylinder head. Tighten manifold bolts evenly to specification, starting from center bolt
and alternating outward. See TORQUE SPECIFICATIONS
.
CYLINDER HEAD
Removal
1. Release residual pressure from fuel system. See FUEL PRESSURE RELEASE & PRIMING . Drain
engine coolant. Note locations and disconnect all necessary electrical connectors, ground wires, vacuum
hoses, fuel hoses, coolant hoses and control cables for cylinder head removal. Plug all fuel hoses to avoid
leakage.
2. Remove spark plug wires from spark plugs. Remove all drive belts. Remove water pump pulley. Remove
timing belt. See TIMING BELT
. Remove camshaft/rocker cover.
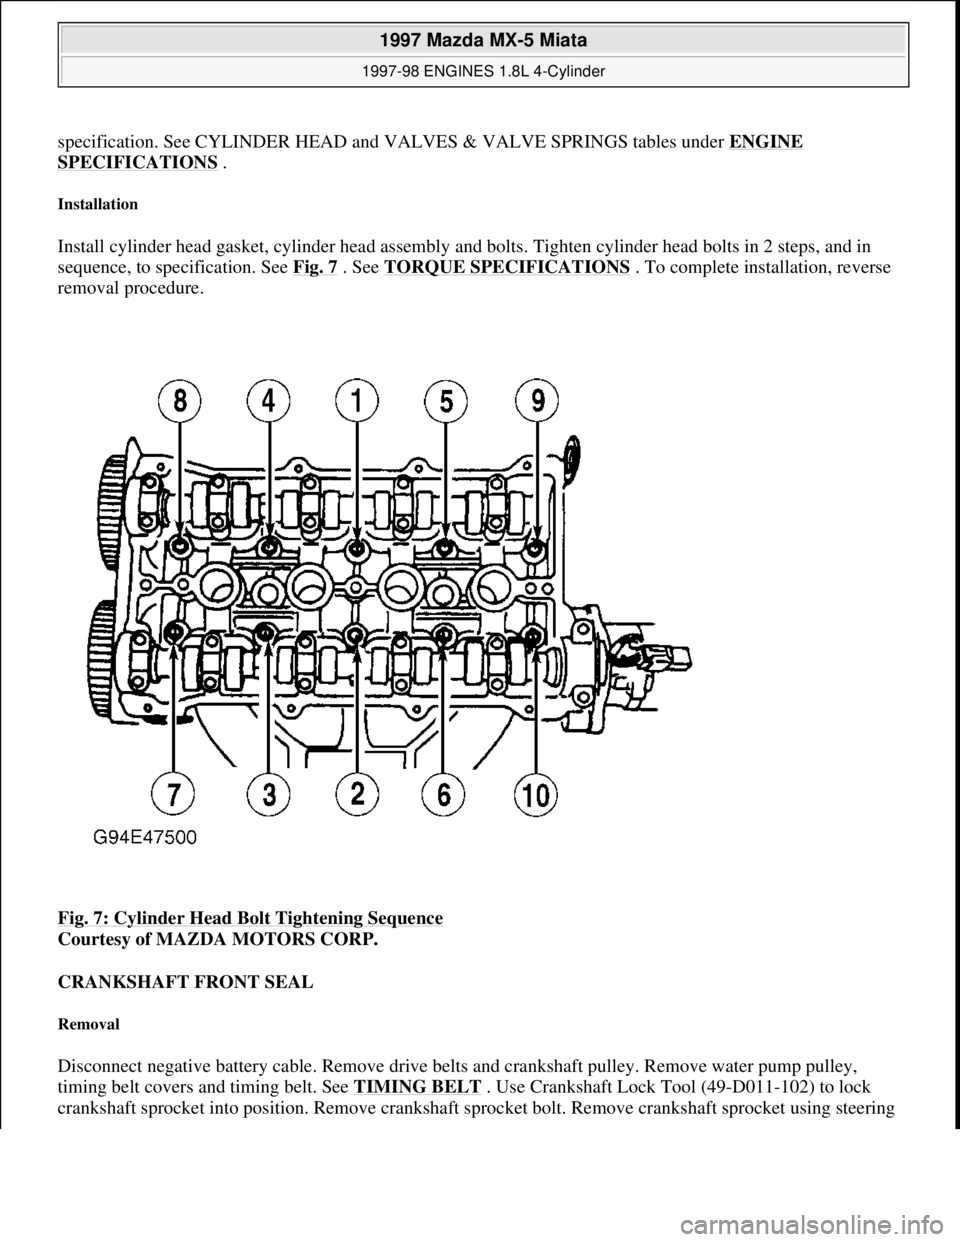
3. Remove front exhaust pipe. Remove intake manifold support bracket. Loosen all cylinder head bolts
evenly, in 3 steps, in reverse of tightening sequence. See Fig. 7
. Remove bolts and cylinder head
assembly.
Inspection
Carefully clean carbon and gasket material from all mating surfaces. Clean threads of cylinder head bolts. Use a
tap to clean threads in engine block. Check cylinder head for warpage. Resurface or replace head if it is not
within specification. Check valve train components. Replace or resurface components if they are not within
1997 Mazda MX-5 Miata
1997-98 ENGINES 1.8L 4-Cylinder
Microsoft
Sunday, July 05, 2009 1:55:15 PMPage 10 © 2005 Mitchell Repair Information Company, LLC.
Page 217 of 514
specification. See CYLINDER HEAD and VALVES & VALVE SPRINGS tables under ENGINE
SPECIFICATIONS .
Installation
Install cylinder head gasket, cylinder head assembly and bolts. Tighten cylinder head bolts in 2 steps, and in
sequence, to specification. See Fig. 7
. See TORQUE SPECIFICATIONS . To complete installation, reverse
removal procedure.
Fig. 7: Cylinder Head Bolt Tightening Sequence
Courtesy of MAZDA MOTORS CORP.
CRANKSHAFT FRONT SEAL
Removal
Disconnect negative battery cable. Remove drive belts and crankshaft pulley. Remove water pump pulley,
timing belt covers and timing belt. See TIMING BELT
. Use Crankshaft Lock Tool (49-D011-102) to lock
crankshaft sprocket into position. Remove crankshaft sprocket bolt. Remove crankshaft sprocket usin
g steering
1997 Mazda MX-5 Miata
1997-98 ENGINES 1.8L 4-Cylinder
Microsoft
Sunday, July 05, 2009 1:55:15 PMPage 11 © 2005 Mitchell Repair Information Company, LLC.
Page 218 of 514
wheel puller. Pry out seal.
Installation
1. Apply light oil coat to seal lip. Using a hammer and seal installer, tap seal into oil pump body until it is
flush with edge of pump body. DO NOT bottom seal in pump body. Align keyway slots, and install
crankshaft sprocket and Woodruff key with tapered side toward oil pump body. Install crankshaft
sprocket bolt.
2. Using Crankshaft Lock Tool (49-D011-102), lock crankshaft sprocket into position. Tighten lock bolt to
specification. See TORQUE SPECIFICATIONS
.
3. Install timing belt. See TIMING BELT
under REMOVAL & INSTALLATION. Install timing belt
covers, pulleys and drive belts. Reconnect negative battery cable and ensure timing is correct.
TIMING BELT
Removal (Miata)
1. Disconnect negative battery cable. Drain cooling system. Remove radiator hose and by-pass hoses from
thermostat housing. Remove air cleaner intake duct assembly from between throttle body and air cleaner
filter housing.
2. Remove drive belts and water pump pulley. Align crankshaft pulley timing mark with cylinder No. 1 at
TDC of compression stroke. Hold crankshaft pulley stationary. Remove crankshaft pulley bolts and
pulley. Remove crankshaft pulley hub bolt and hub.
3. Remove cylinder head cover. Remove upper, center and lower timing belt cover. If timing belt is to be
reused, mark timing belt rotation direction. Ensure timing marks on camshaft sprockets are aligned. See
Fig. 8
. Loosen timing belt tensioner lock bolt, and move tensioner away from belt with spring fully
expanded. Remove timing belt.
Removal (Protege)
1. Disconnect negative battery cable. Raise and support vehicle. Remove right front wheel. Remove right
side cover and undercover.
2. Remove drive belts and water pump pulley. Align crankshaft pulley timing mark with cylinder No. 1 at
TDC of compression stroke. Hold crankshaft stationary. Remove crankshaft pulley bolts and pulley.
Remove crankshaft pulley hub bolt and hub.
3. Remove cylinder head cover. Remove upper, center and lower timing belt cover. If timing belt is to be
reused, mark timing belt rotation direction. Ensure timing marks on camshaft sprockets are aligned. See
Fig. 8
. Loosen timing belt tensioner lock bolt, and move tensioner away from belt with spring fully
expanded. Remove timin
g belt. NOTE: For 1997-98 vehicles, the manufacturer recommends the belt be replaced at
60,000 mile intervals for vehicles sold outside of California and Massachusetts.
For vehicles sold in California and Massachusetts, inspect timing belt at 60,000
and 90,000 miles, and replace timing belt at 105,000 miles.
1997 Mazda MX-5 Miata
1997-98 ENGINES 1.8L 4-Cylinder
Microsoft
Sunday, July 05, 2009 1:55:15 PMPage 12 © 2005 Mitchell Repair Information Company, LLC.
Page 219 of 514
Inspection (All Models)
Check timing belt for cracks, peeling, abrasion or other damage. Check tensioner bearing for looseness or
roughness of rotation. Inspect tensioner spring for stretching. Replace parts as necessary.
Installation (All Models)
1. Position notch on crankshaft sprocket to 12 o'clock position (aligned with mark on oil pump). Align
timing marks on camshaft sprockets. See Fig. 8
. Ensure crankshaft timing mark is at TDC. Install belt
around crankshaft sprocket, then working in a counterclockwise direction, route belt around camshaft
sprockets.
2. Loosen timing belt tensioner lock bolt and allow spring to apply tension on belt. Snug tensioner lock bolt.
Rotate crankshaft 2 complete turns in direction of normal engine rotation. Ensure timing marks align. If
timing marks are not aligned, remove belt, realign all timing marks, and repeat installation procedure.
3. Check timing belt deflection with 22 lbs. (10 kg) of pressure applied to belt. See Fig. 9
. Ensure timing
belt deflection is within specification. See TIMING BELT DEFLECTION
.
TIMING BELT DEFLECTION
Application(1) Deflection In. (mm)
Miata & Protege.35-.45 (9.0-11.5)
(1)Deflection measurement is with 22 lbs. (10 kg) of pressure applied to timing belt. See Fig. 9 .
1997 Mazda MX-5 Miata
1997-98 ENGINES 1.8L 4-Cylinder
Microsoft
Sunday, July 05, 2009 1:55:15 PMPage 13 © 2005 Mitchell Repair Information Company, LLC.
Page 220 of 514
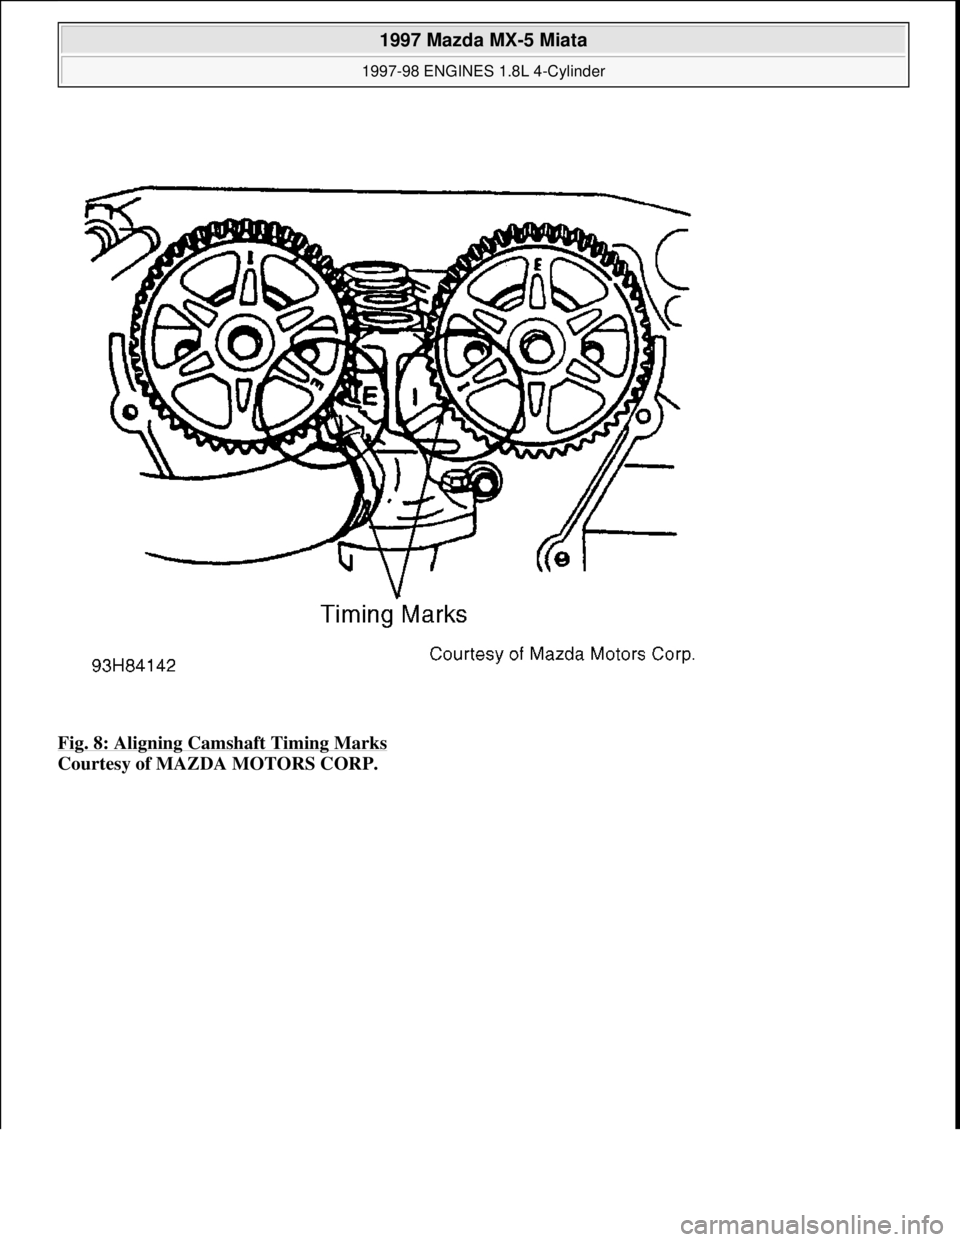
Fig. 8: Aligning Camshaft Timing Marks
Courtesy of MAZDA MOTORS CORP.
1997 Mazda MX-5 Miata
1997-98 ENGINES 1.8L 4-Cylinder
Microsoft
Sunday, July 05, 2009 1:55:15 PMPage 14 © 2005 Mitchell Repair Information Company, LLC.