heater MAZDA PROTEGE 1992 User Guide
[x] Cancel search | Manufacturer: MAZDA, Model Year: 1992, Model line: PROTEGE, Model: MAZDA PROTEGE 1992Pages: 1164, PDF Size: 81.9 MB
Page 870 of 1164
T FUSE AND JOINT BOX
Specifications (Cont’d)
Fuse Color
METER 15A Blue
WIPER 20A Yellow
STOP 20A Yellow
TAIL 15A
Blue
SUNROOF 15A Blue
DEFOG 20A Yellow
HEATER 30A Light green Protected circuit Instrument panel (gauges and warning lamps), Back-up light, Turn signal,
Cruise control system
Windshield wiper and washer
Stoplight, Horn
Taillight, Side marker light, Parking light, Illumination light, License plate light
Sunroof
Rear window defroster
Blower motor
13UOTX-067
L
r 03UOTX-01
1 BL
PULLER
t
L 03UOTX-01
CIRCUIT
BREAKER
RESET BUTTON
03UOTX.01
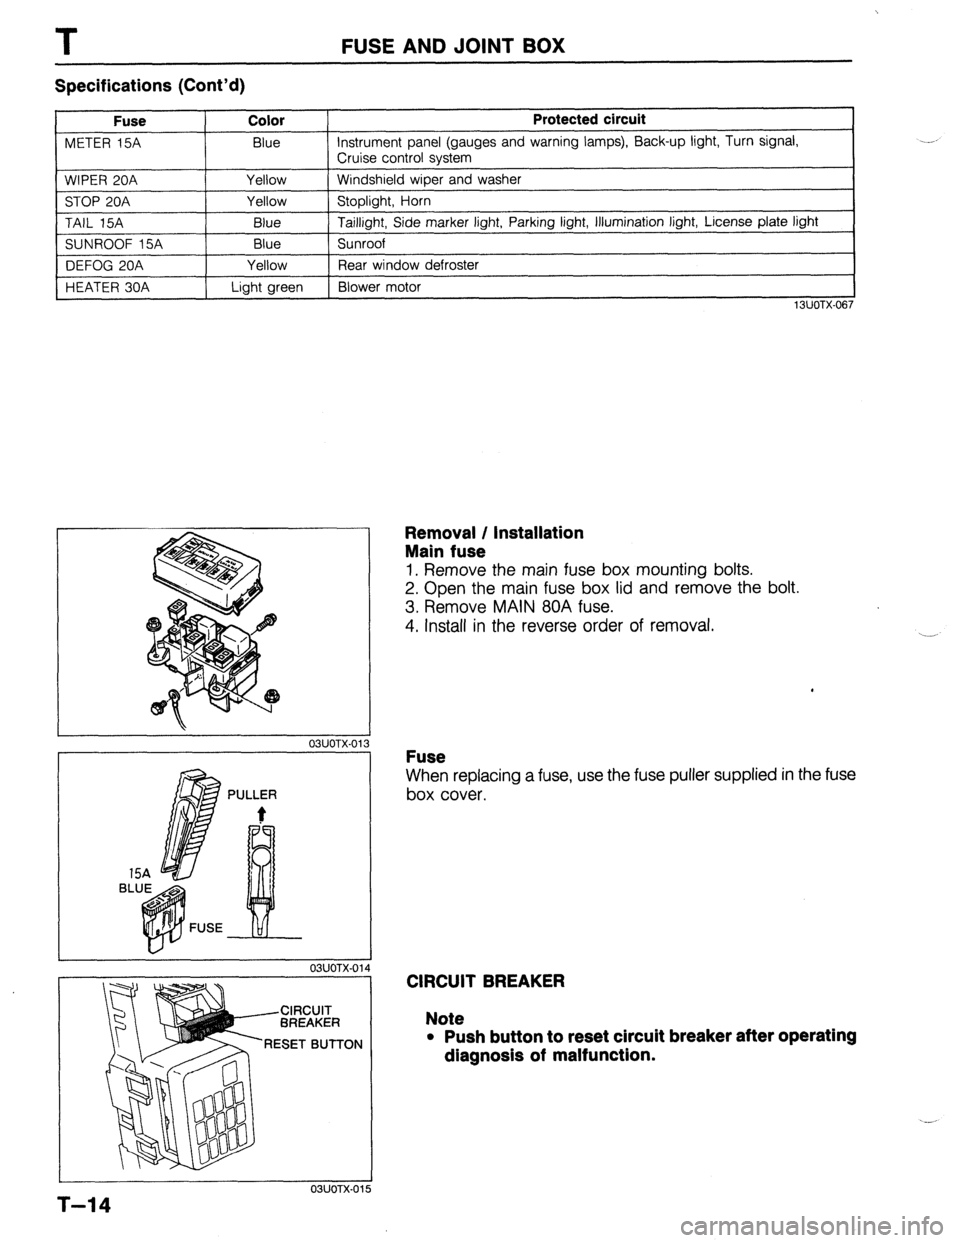
Removal / Installation
Main fuse
1. Remove the main fuse box mounting bolts.
2. Open the main fuse box lid and remove the bolt.
3. Remove MAIN 80A fuse.
4. Install in the reverse order of removal.
Fuse
When replacing a fuse, use the fuse puller supplied in the fuse
box cover.
CIRCUIT BREAKER
Note
l Push button to reset circuit breaker after operating
dlagnosls of malfunction.
5
T-14
Page 957 of 1164

U
HEATER AND
AIR CONDITIONER SYSTEMS
INDEX ...................................................... u- 2
HEATER ................................................
AIR CONDITIONER ................................. ;r ;
TROUBLESHOOTING GUIDE.. .................... U- 4
CIRCUIT DIAGRAM ................................. u- 4
ELECTRICAL TROUBLESHOOTING TOOLS. U- 5
HEATER ................................................... u-20
STRUCTURAL VIEW ................................ u-20
HEATER UNIT ........................................ u-21
BLOWER UNIT ....................................... U-23
HEATER CONTROL UNIT.. ....................... U-26
AIR CONDITIONER .................................... u-30
STRUCTURAL VIEW ................................ u-30
REFRIGERANT SYSTEM ........................... u-31
COOLING UNIT ...................................... U-38
COMPRESSOR ....................................... u-41
MAGNETIC CLUTCH ............................... u-51
RECEIVER/DRIER .................................... U-52
CONDENSER ......................................... u-53
REFRIGERANT LINES .............................. u-54
REFRIGERANT PRESSURE SWITCH No.1.. . U-55
REFRIGERANT PRESSURE SWITCH No.2.. . U-55
A/C RELAY ............................................ U-56
CONDENSER FAN RELAY.. ......................
CONDENSER FAN .................................. z-f;
-
A/C SWITCH .......................................... u-57
23UOUX-001
Page 958 of 1164

U INDEX
INDEX
HEATER
1. Heater unit
Removal I Installation . . . . . . . page U-21
Disassembly / Assembly.. page U-22
2. Blower unit
Removal / Installation ,,.....,.....,.... page U-23
Disassembly / Assembly.. . page U-24
Blower motor (in blower unit)
Inspection. ,...._. . . . . . . . page U-25
Resistor assembly (in blower unit)
Inspection . . . . . . . . . . . . . . . . . . . . . . . . . . . . . . . . . . . page U-25
K!JOUX 00
3, Heater control unit
Removal / Installation .
Disassembly / Assembly
Blower switch
Inspection .., . ,, ,.
Ret-Fresh wire
Adjustment
Mode wire page U-26
page U-27
page U-28
page U-28
Adjustment ,.,...,...,.,........ . . page U--28
Mix wire
Adjustment .~.. . . I. page U-28
u-2
Page 960 of 1164

C
b l HEATER 6 AIR CONDITIONER 1 G
MAIN
I3 Fl
AD FAN
JB-06
4
B/R (F)
1,
1 I
t
G-07
REAR WIPER
IOA
-L/G (F) _fcoJI)
a-07
63
ENGINE
CONTROL UNIT
(SECTION 6-1~. 2bl A/C SWITCH 6 BLOWER SWITCH ILLUMINATION
LAMPS’REFER TO SECTION I-4
RESISTOR ASSEMBLY L/B
-1
r
BjG L)B
(AC9 (AC)
4NT
A/C SWITCH -L/B
4)
6 33
;~~l-bJG FAN
(SECTION B-3.
i-01 CONDENSER FAN (AC) -03 DIODE (AC) G-04 REFRIGERANT G-05 REFRIGERANT G-06 MAGNETIC CLUTCH (AC) G-07 IE) - (AC) CONNECTOR
PRESSURE SWITCH NO.2 (AC) PRESSURE SWITCH NO. 1 (AC)
I I I I
s-10 A/C SWITCH(ACl G-12 BLOWER MOTOR (F) G-13 RESISTOR ASSEMBLY (II
I
I j-14 BLOWER SWITCH (I)
Page 962 of 1164
U TROUBLESHOOTING GUIDE
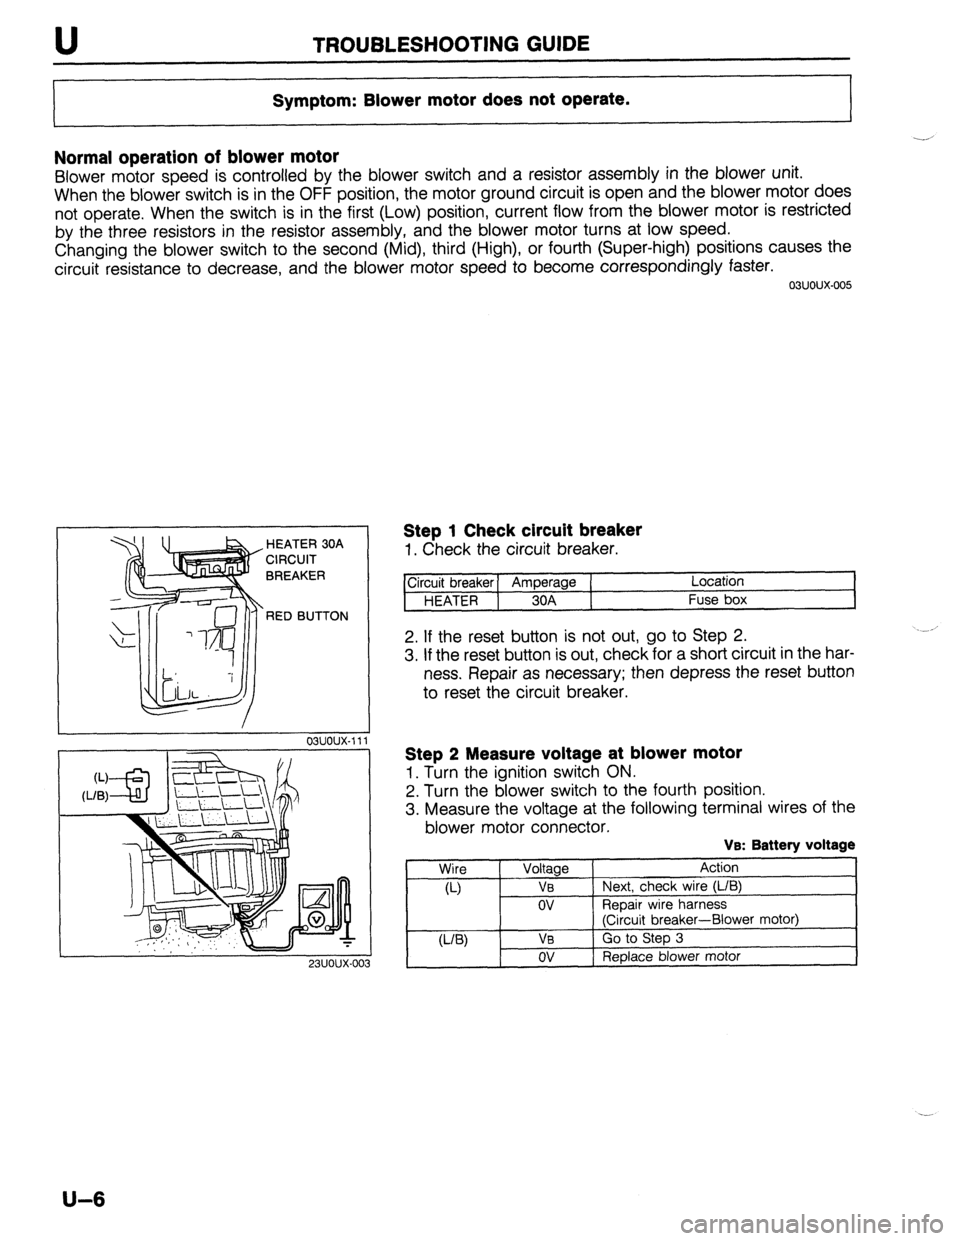
Symptom: Blower motor does not operate.
Normal operation of blower motor
Blower motor speed is controlled by the blower switch and a resistor assembly in the blower unit.
When the blower switch is in the OFF position, the motor ground circuit is open and the blower motor does
not operate. When the switch is in the first (Low) position, current flow from the blower motor is restricted
by the three resistors in the resistor assembly, and the blower motor turns at low speed.
Changing the blower switch to the second (Mid), third (High), or fourth (Super-high) positions causes the
circuit resistance to decrease, and the blower motor speed to become correspondingly faster.
03uoux-005
. HEATER 30A
CIRCUIT
BREAKER
RED BUTTON
23UOUX-01
Step 1 Check circuit breaker
1. Check the circuit breaker.
ircuit breaker] Amperage ( Location
HEATER 1 30A Fuse box
2. If the reset button is not out, go to Step 2.
3. If the reset button is out, check for a short circuit in the har-
ness. Repair as necessary; then depress the reset button
to reset the circuit breaker.
Step 2 Measure voltage at blower motor
1. Turn the ignition switch ON.
2. Turn the blower switch to the fourth position.
3. Measure the voltage at the following terminal wires of the
blower motor connector.
VB: Battery voltage
Wire
Voltage Action
a-) VB Next, check wire (L/B)
ov ReDair wire harness
(Ciicuit breaker-Blower motor)
U-W VB Go to Step 3
ov Replace blower motor
U-6
Page 976 of 1164
U HEATER
HEATER
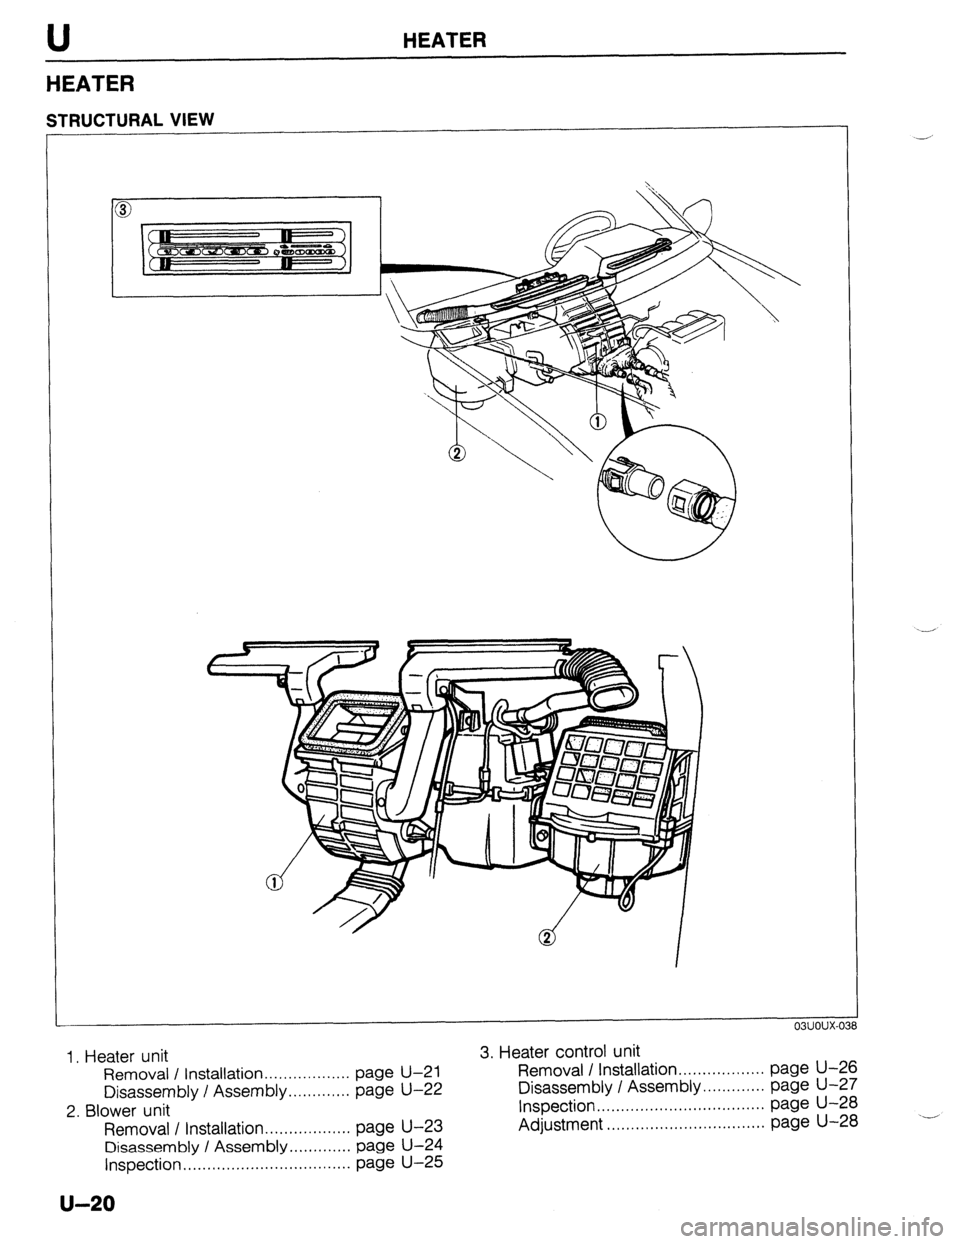
STRUCTURAL VIEW
1, Heater unit 3. Heater control unit
Removal / Installation.. page U-21 Removal / Installation.. ................ page U-26
................
Disassembly I Assembly.. ........... page U-22 Disassembly I Assembly.. ........... page U-27
2. Blower unit inspection ................................... page U-28
Removal I Installation.. page U-23 Adjustment ................................. page U-28
................
Disassembly / Assembly ............. page U-24
Inspection
................................... page U-25
u-20
Page 977 of 1164
HEATER U
HEATER UNIT
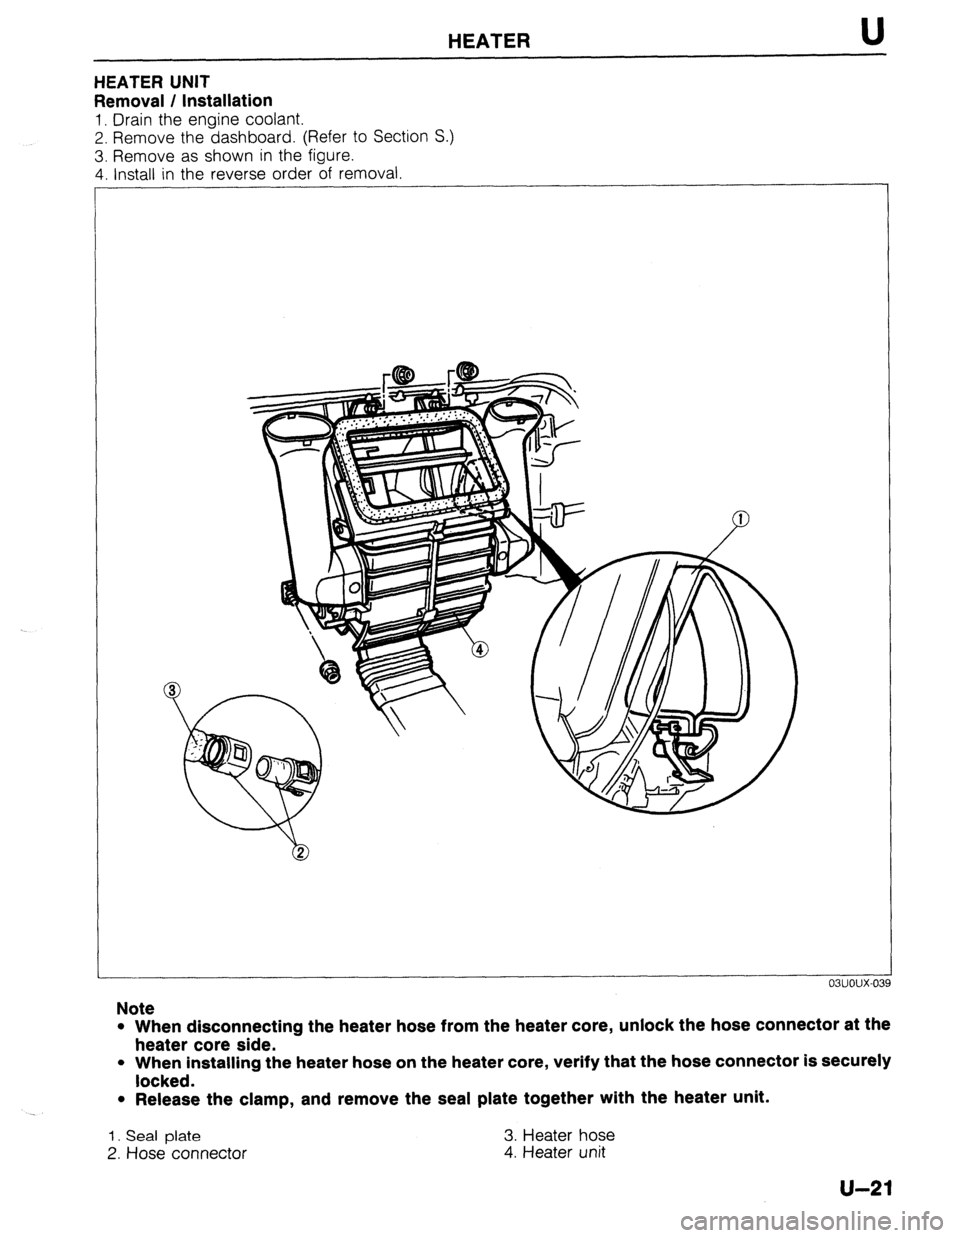
Removal / Installation
1. Drain the engine coolant.
2. Remove the dashboard. (Refer to Section S.)
3. Remove as shown in the figure.
4. Install in the reverse order of removal
Note
l When disconnecting the heater hose from the heater core, unlock the hose connector at the
heater core side.
l When installing the heater hose on the heater core, verify that the hose connector is securely
locked.
l Release the clamp, and remove the seal plate together with the heater unit.
1. Seal plate 3. Heater hose
2. Hose connector
4. Heater unit
u-21
Page 978 of 1164
U HEATER
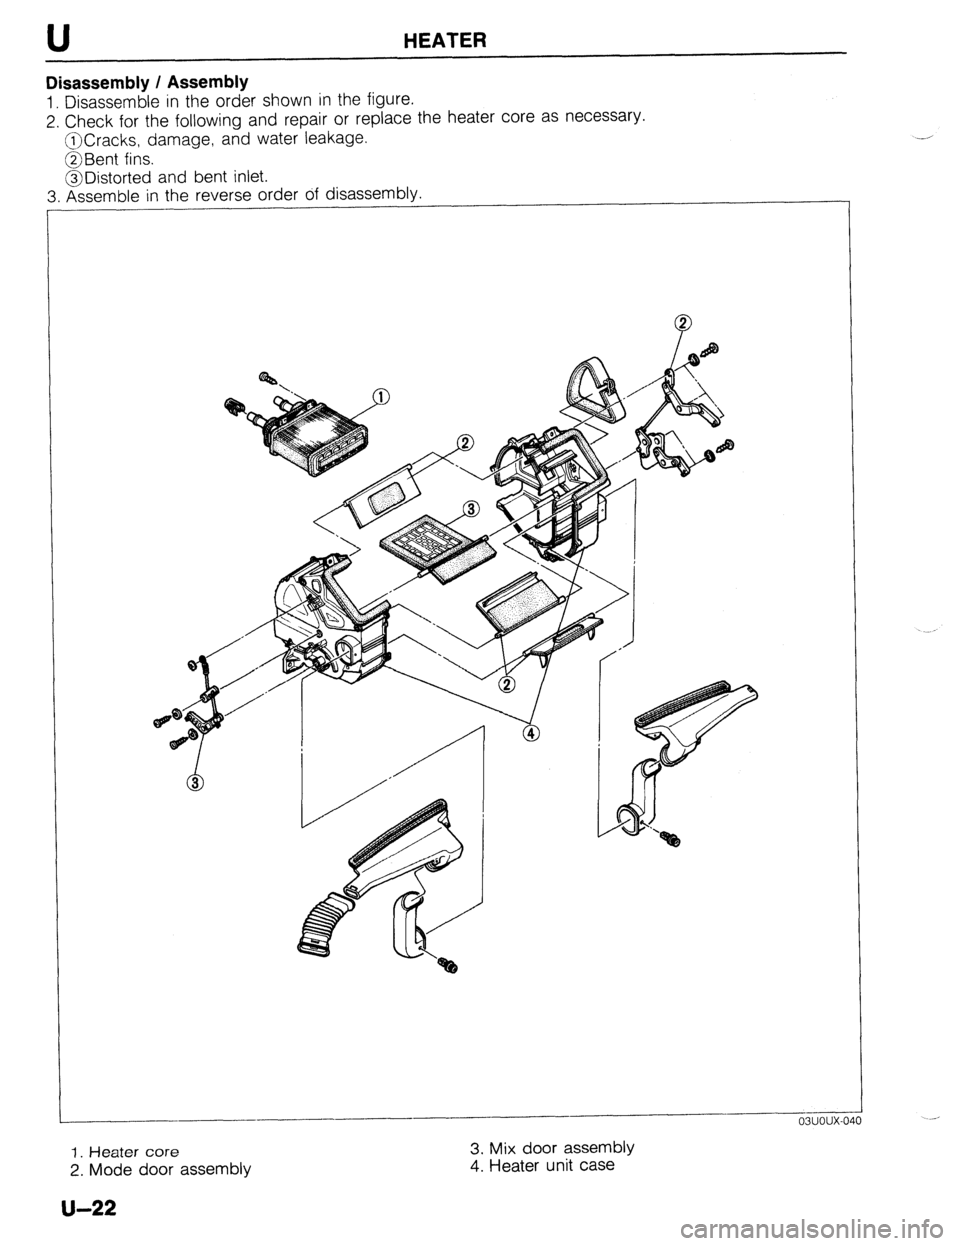
Disassembly / Assembly
1. Disassemble in the order shown in the figure.
2. Check for the following and repair or replace the heater core as necessary.
@Cracks, damage, and water leakage.
@Bent fins.
@Distorted and bent inlet.
3. Assemble in the reverse order of disassembly.
1
-
1. Heater core 3. Mix door assembly
2. Mode door assembly 4. Heater unit case
u-22
Page 979 of 1164
HEATER U
BLOWER UNIT
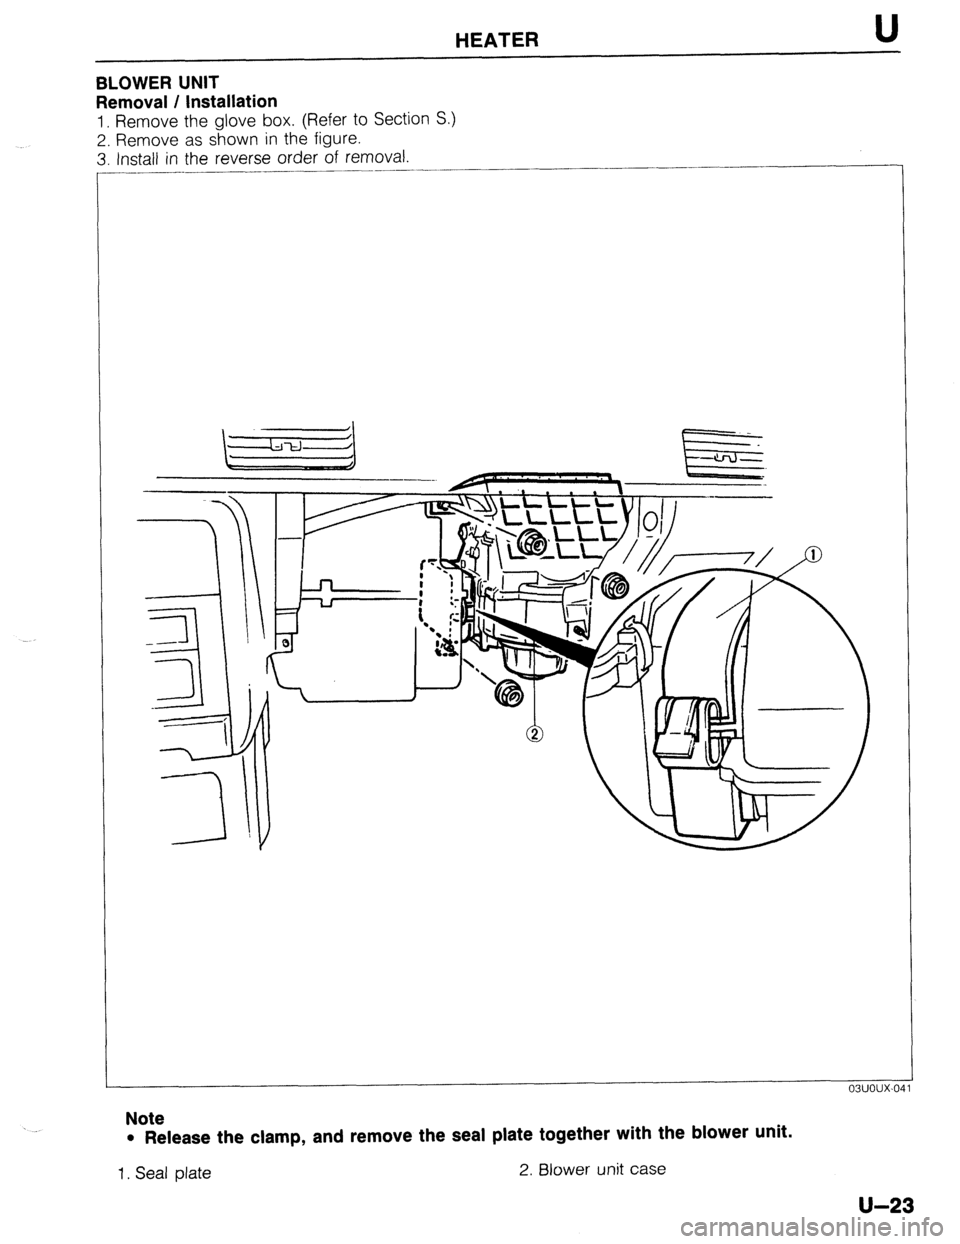
Removal / Installation
1. Remove the glove box. (Refer to Section S.)
2. Remove as shown in the figure.
3. Install in the reverse order of removal.
____..
Note
l Release the clamp, and remove the seal plate together with the blower unit.
1. Seal plate 2. Blower unit case
U-23
Page 980 of 1164
U HEATER
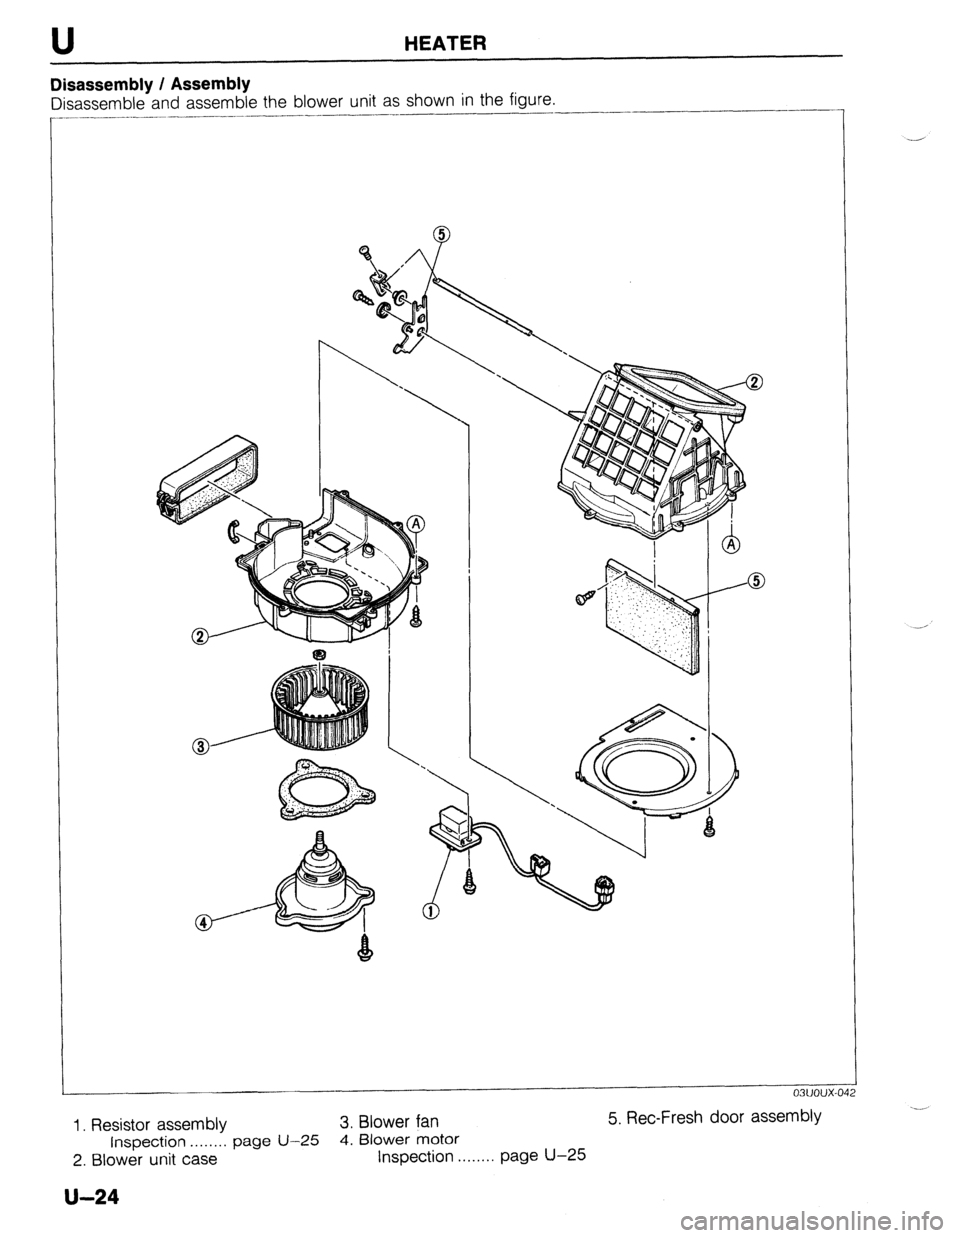
Disassembly / Assembly
Disassemble and assemble the blower unit as shown in the figure.
I
f-4
@X1; ;:‘::j: :‘.;.; .,,,
:. ..
Q . ...;,
: ., ‘,:
-,: ,..’
, :
03uoux-01
1. Resistor assembly 3. Blower fan 5. Ret-Fresh door assembly
Inspection . . . . . . . . page U-25
4. Blower motor
2. Blower unit case Inspection . . . . . . . . page U-25
U-24