stop start MAZDA PROTEGE 1992 User Guide
[x] Cancel search | Manufacturer: MAZDA, Model Year: 1992, Model line: PROTEGE, Model: MAZDA PROTEGE 1992Pages: 1164, PDF Size: 81.9 MB
Page 315 of 1164

TROUBLESHOOTING GUIDE F
12 ROUGH IDLE/ENGINE STALLS JUST AFTER STARTING
DESCRIP-
*Engine starts normally but vibrates excessively or stalls just after starting (acceleration from idle) TION
*Idle conditions are normal in the other conditions [TROUBLESHOOTING HINTS]
@ Fuel injection control system or idle speed control sys-
@ Idle speed misadjustment
tern malfunction @ Ignition timing misadjustment
*Start signal not input to ECU iTEl
-s-- 3
4
5 INSPECTION
-T- ACTION
Check if “00” is displayed on Self-Diagnosis
Checker with ignition switch ON w page F-82
SYSTEM,SELECT: I
r -SELECT SW: A
Check if ECU terminal voltages are OK
MTX...Especially 1 N
ATX... Especially 1T w page F-150
Connect System Selector to diagnosis connector
and set Test Switch to “SELF TEST” and check
for correct ignition timing at idle after warm-up w page F-78
Ignition timing (BTDC)
l BP DOHC : 9”-11 o l BP SOHC : 4O--6O
l B8 : 60-80
Check continuity between throttle sensor termi-
nals IDL and E CT page F-159
MTX
Clearance between throttle
lever and stopper
MTX O.lmm (0.004 in)
1 .Omm (0.039 in)
ATX 0.1 mm (0.004 in)
0.6mm (0.024 in) Continuity
Yes
No
Yes
No
Try known good ECU and check if condition
mproves w page F-149 Yes
No
Yes
Go to next step No
Check for cause Yes
In same condition as Step 3 inspection
and apply parking brake
Check for correct idle speed w page F-80
Idle speed: 700-800 rpm
No
Adjust Yes
Go to next step No
Adjust Go to next step Service Code No. displayed
Check for cause (Refer to specified
check sequence) w page F-83
“88” flashes
Check ECU terminal IF voltage w page F-150
Specification: Battery voltage
(Ignition switch ON)
d If OK, replace ECU w page F-149
* If not OK, check wiring between
ECU and Self-Diagnosis Checker c7 page F-151
3 If OK, go to next step
3 If not OK, adjust idle speed w page F-80
w page F-79
w page F-159
F-49
Page 322 of 1164
![MAZDA PROTEGE 1992 User Guide TROUBLESHOOTING GUIDE
16 ENGINE STALLS SUDDENLY (INTERMITTENT)
DESCRIP- l Engine intermittently stops running
TION l Before stalling, engine condition OK [TROUBLESHOOTING HINTS]
@ Intermittently n MAZDA PROTEGE 1992 User Guide TROUBLESHOOTING GUIDE
16 ENGINE STALLS SUDDENLY (INTERMITTENT)
DESCRIP- l Engine intermittently stops running
TION l Before stalling, engine condition OK [TROUBLESHOOTING HINTS]
@ Intermittently n](/img/28/57077/w960_57077-321.png)
TROUBLESHOOTING GUIDE
16 ENGINE STALLS SUDDENLY (INTERMITTENT)
DESCRIP- l Engine intermittently stops running
TION l Before stalling, engine condition OK [TROUBLESHOOTING HINTS]
@ Intermittently no spark or no-fuel injection caused by ve-
hicle vibration, acceleration, or deceleration
*Poor connection in wire harness
3 INSPECTION
Check if “00” is displayed on Self-Diagnosis
Checker with ignition switch ON c7 page F-82
g
-%ELECT SW: A
Check for poor connection of following parts l ignition coil
l igniter l Distributor l High-tension lead l lniector
l Ci;cuit opening relay l ECU
Check if ECU terminal voltages are OK
MTX...Especially lB, 2A, 28 and 2C
ATX... Especially lB, 3A, 38 and 3C w page F-150
Note
l When checking voltages, tap, move, and
wiggle harness and connector to recreate
problem
Yes
No Service Code No. displayed
Check for cause (Refer to specified
check sequence) Note
l When checking wiring harness and
connectors, tap, move, and wiggle
suspect sensor and/or harness to
recreate problem
“88” flashes
Check ECU terminal IF voltage w page F-150
Specification: Battery voltage
(Ignition switch ON)
c3 If OK, replace ECU CT= page F-149
+ If not OK, check wiring between
ECU and Self-Diagnosis Checker
Yes
Repair or replace
No Go to next step
Yes
No
T ACTION
Go to next step w page F-83
Go to Troubleshooting No.2
‘CRANKS NORMALLY BUT WILL NOT
START (NO COMBUSTION)” CT- page F-30
Check for cause D page F-151
F-56
Page 372 of 1164
SELF-DIAGNOSIS FUNCTION
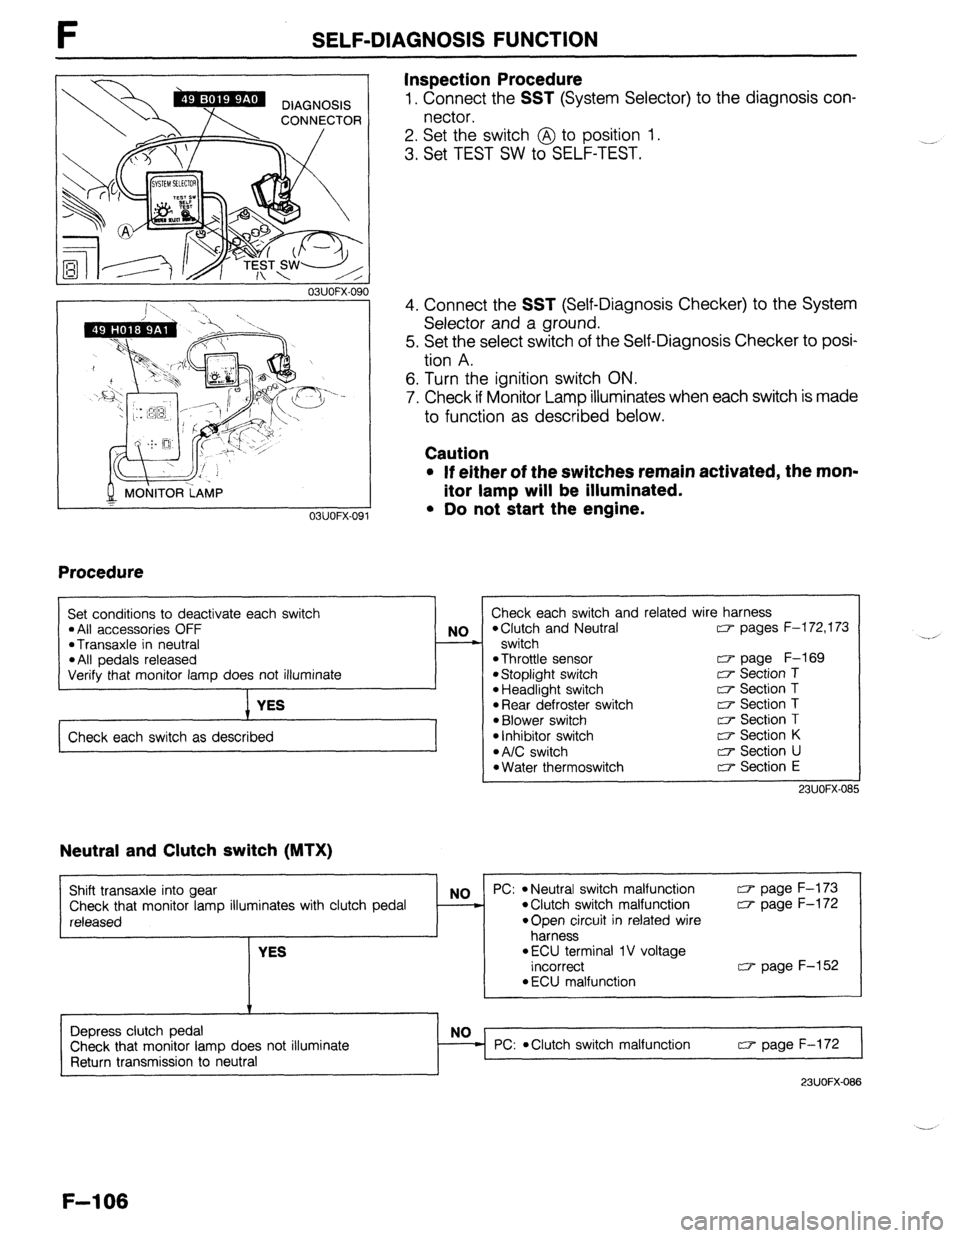
Inspection Procedure
1. Connect the SST (System Selector) to the diagnosis con-
nector.
2. Set the switch @ to position 1.
3. Set TEST SW to SELF-TEST.
03UOFX.090
MONITOR LAMP
T
03UOFX-091
Procedure
4. Connect the SST (Self-Diagnosis Checker) to the System
Selector and a ground.
5. Set the select switch of the Self-Diagnosis Checker to posi-
tion A.
6. Turn the ignition switch ON.
7. Check if Monitor Lamp illuminates when each switch is made
to function as described below.
Caution
* If either of the switches remain activated, the mon-
itor lamp will be illuminated.
l Do not start the engine.
I
I Set conditions to deactivate each switch l All accessories OFF l Transaxle in neutral l All pedals released NO
-
Verify that monitor lamp does not illuminate
YES
Check each switch as described Check each switch and related wire harness
*Clutch and Neutral CT- pages F-l 72,173
switch
*Throttle sensor w page F-169 l Stoplight switch c7 Section T l Headlight switch c7 Section T l Rear defroster switch T;P Section T l Blower switch [r+ Section T
l Inhibitor switch a Section K l A/C switch 0 Section U l Water thermoswitch c7 Section E
23UOFX-OS!
Neutral and Clutch switch (MTX)
Shift transaxle into gear
Check that monitor lamp illuminates with clutch pedal
released
YES NO PC: l Neutral switch malfunction a page F-173 l Clutch switch malfunction w page F-172
*Open circuit in related wire
harness
l ECU terminal 1 V voltage
incorrect w page F-152
l ECU malfunction
Depress clutch pedal
Check that monitor lamp does not illuminate
Return transmission to neutral PC:
*Clutch switch malfunction w page F-172
23UOFX-088
F-l 06
Page 467 of 1164
STARTING SYSTEM G
BP MTX AND B6
3.6-7.1 N.m
(39-72 cm-kg, 34-62 in-lb)
4.1-7.5 N.m
(42-77 cm-kg, 36-67 in-lb)
@
0
2.4-4.4 N.m
(24-45 cm-kg, 21-39 in-lb)
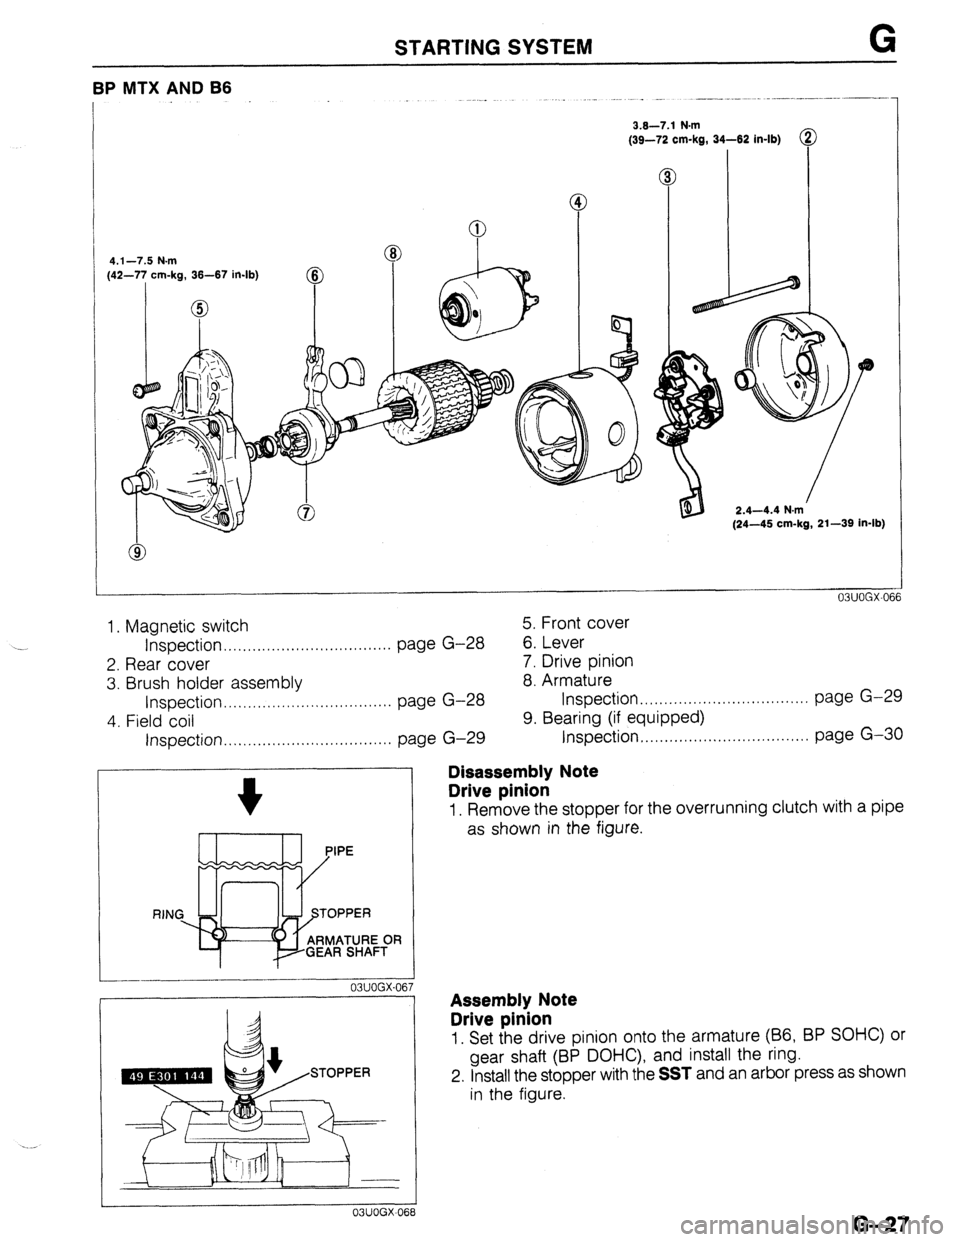
1. Magnetic switch 5. Front cover
Inspection . . . . . . . . . . . . . . . . . . . . . . . . . . . . . . . . . . . page G-28
6. Lever
2. Rear cover 7. Drive pinion
3. Brush holder assembly 8. Armature
Inspection.. .,..,........................... page G-28 Inspection .,,..,...............,.,........... page G-29
4. Field coil 9. Bearing (if equipped)
Inspection . . . . . . . . . . . . . . . . . . . . . . . . . . . . . . . . . . . page G-29 Inspection.. ,....,......................,... page G-30
--_I__-
03UOGX-06
03UOGX-06
Disassembly Note
Drive pinion
1. Remove the stopper for the overrunning clutch with a pipe
as shown in the figure.
Assembly Note
Drive pinion
1. Set the drive pinion onto the armature (66, BP SOHC) or
gear shaft (BP DOHC), and install the ring.
2. Install the stopper with the
SST and an arbor press as shown
in the figure.
G-27
Page 679 of 1164
CONVENTIONALBRAKESYSTEM P
1 SUOPX-001
03UOPX-03
0
o3uoPx-os
0
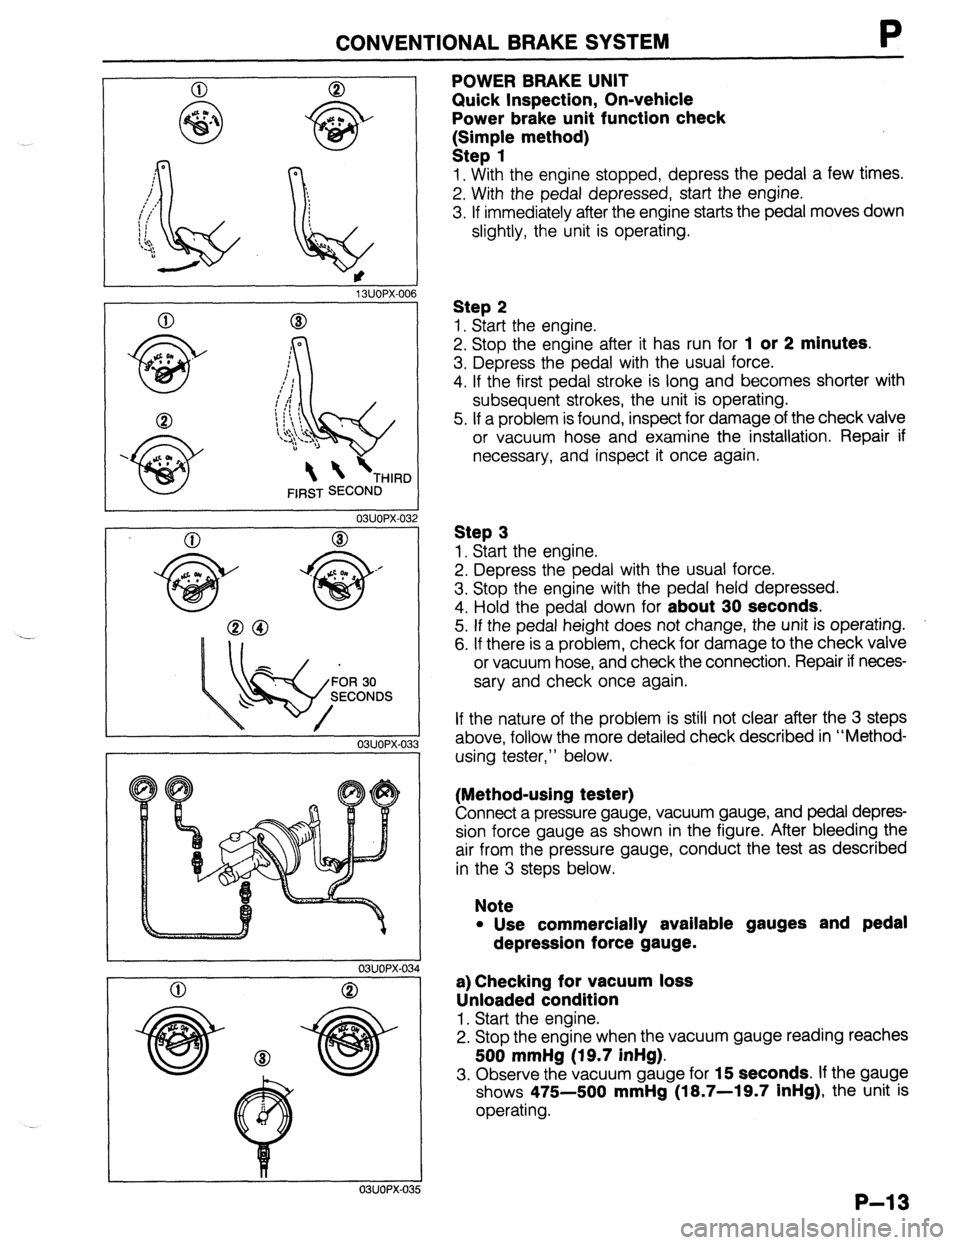
POWER BRAKE UNIT
Quick Inspection, On-vehicle
Power brake unit function check
k:;;p{e method)
1. With the engine stopped, depress the pedal a few times.
2. With the pedal depressed, start the engine.
3. If immediately after the engine starts the pedal moves down
slightly, the unit is operating.
Step 2
1. Start the engine.
2. Stop the engine after it has run for
1 or 2 minutes.
3. Depress the pedal with the usual force.
4. If the first pedal stroke is long and becomes shorter with
subsequent strokes, the unit is operating.
5. If a problem is found, inspect for damage of the check valve
or vacuum hose and examine the installation. Repair if
necessary, and inspect it once again.
Step 3
1. Start the engine.
2. Depress the pedal with the usual force.
3. Stop the engine with the pedal held depressed.
4. Hold the pedal down for
about 30 seconds.
5. If the pedal height does not change, the unit is operating.
6. If there is a problem, check for damage to the check valve
or vacuum hose, and check the connection. Repair if neces-
sary and check once again.
If the nature of the problem is still not clear after the 3 steps
above, follow the more detailed check described in “Method-
using tester,” below.
(Method-using tester)
Connect a pressure gauge, vacuum gauge, and pedal depres-
sion force gauge as shown in the figure. After bleeding the
air from the pressure gauge, conduct the test as described
in the 3 steps below.
Note
l Use commercially available gauges and pedal
depression force gauge.
a) Checking for vacuum loss
Unloaded condition
1. Start the engine.
2. Stop the engine when the vacuum gauge reading reaches
500 mmHg (19.7 inHg).
3. Observe the vacuum gauge for 15 seconds. If the gauge
shows 475-500
mmHg (18.7-19.7 inHg), the unit is
operating.
P-13
Page 680 of 1164

P CONVENTIONAL BRAKE SYSTEM
0 8
500 mmHg
(19.7 inHg)
96 N (20 kg, 44 lb)
03UOPX-03
03UOPX-03
03UOPX-031
Loaded condition
1. Start the engine.
2. Depress the brake pedal with a force of 196 N (20 kg, 44
lb).
3. With the brake pedal depressed, stop the engine when the
vacuum gauge reading reaches 500 mmHg (19.7 inHg).
4. Observe the vacuum gauge for 15 seconds. If the gauge
shows 475-500 mmHg (18.7-19.7 inHg), the unit is
operating.
b) Checking for hydraulic pressure
1. If with the engine stopped (vacuum 0 mmHg) the fluid pres-
sure is within specification, the unit is operating.
Pedal force Fluid pressure
196 N (20 kg, 44 lb) 1 1,177 kPa (12 kg/cm2, 171 psi) min
2. Start the engine. Depress the brake pedal when the vacu-
um reaches 500 mmHg (19.7 inHg). If the fluid pressure
is within specification, the unit is operating.
Pedal force Fluid pressure
196 N (20 kg, 44 lb) 7,063 kPa (72 kg/cm’, 1,024 psi)
P-14
Page 697 of 1164
PARKING BRAKE SYSTEM
PARKING BRAKE SYSTEM
TROUBLESHOOTING GUIDE
Problem
Brakes do not
release
Parking brake does
not hold well Possible cause
Improper return of parking brake cable or improper ad-
justment
Excessive lever stroke
Brake cable stuck or damaged
Brake fluid or oil on pad or lining
Hardening of pad / lining surface or poor contact Remedy Repair or adjust
Adjust
Repair or replace
Clean or replace
Grind or replace Page P-32
P-31
P-32
P-i,28
ONOPX-080
PARKING BRAKE SHOE
Removal / Inspection / Installation
Disc brake
Removal and Installation (Refer to page P-23)
Inspection (Refer to page P-25)
Drum brake
Removal and Installation (Refer to page P-28)
Inspection (Refer to page P-29)
03u0Px-081
13UOPX-021
03UOPX-08
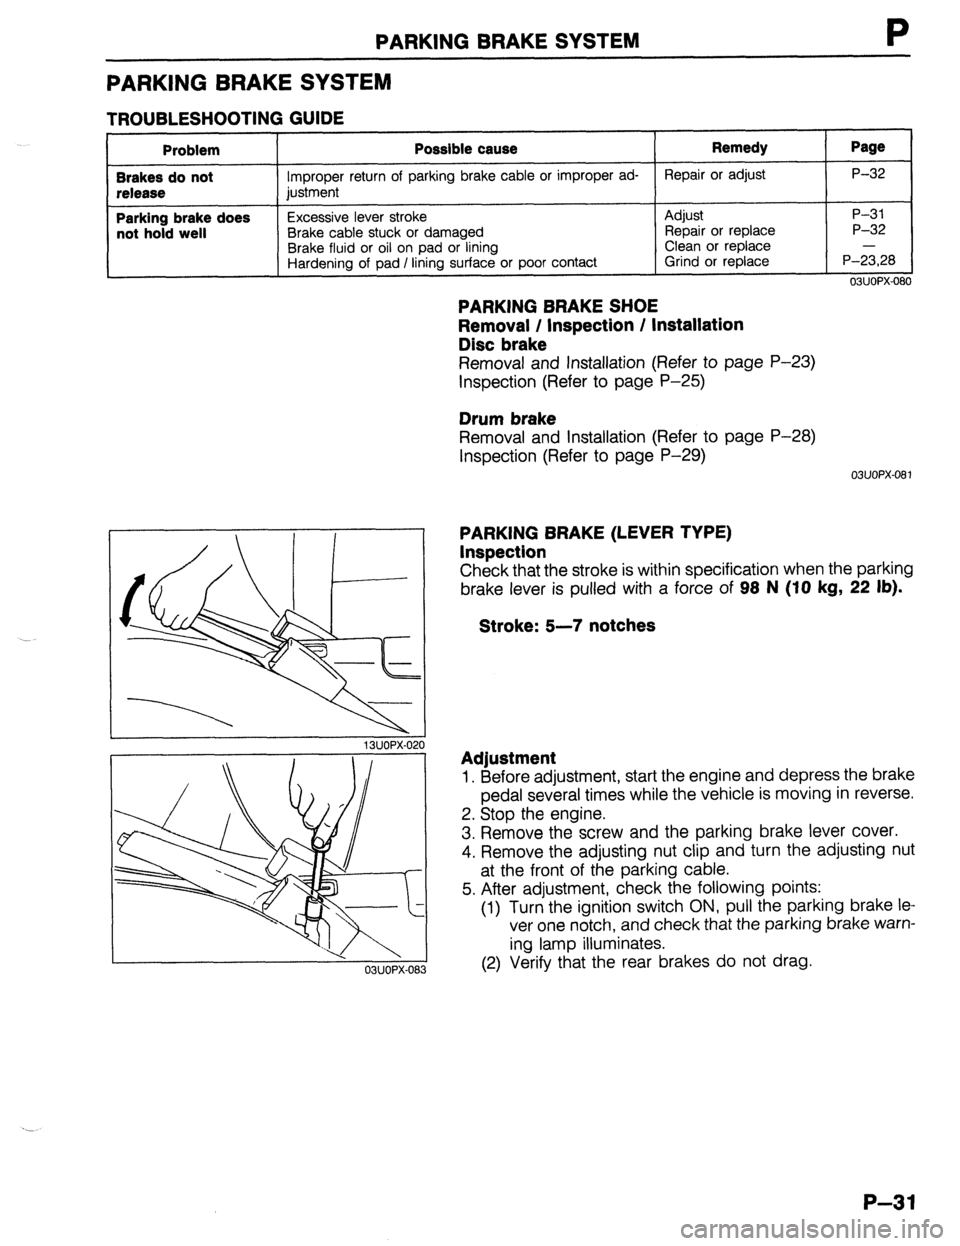
PARKING BRAKE (LEVER TYPE)
Inspection
Check that the stroke is within specification when the parking
brake lever is pulled with a force of 98 N (IO
kg, 22 lb).
Stroke: 5-7 notches
Adjustment
1. Before adjustment, start the engine and depress the brake
pedal several times while the vehicle is moving in reverse.
2. Stop the engine.
3. Remove the screw and the parking brake lever cover.
4. Remove the adjusting nut clip and turn the adjusting nut
at the front of the parking cable.
5. After adjustment, check the following points:
(1) Turn the ignition switch ON, pull the parking brake le
ver one notch, and check that the parking brake warn-
ing lamp illuminates.
(2) Verify that the rear brakes do not drag.
P-31
Page 989 of 1164

U
r
I
23UOUX-061
23UOUX-067
23UOUX-061 3
Caution
l Connect the charging hose to the air purge valve
via its tap pin side.
l Do not disconnect the charging hose or the serv-
ice container valve until the charging operation is
completed.
l Do not open the service container valve when not
used.
Charging from freon recovery and recycling system.
Connect the charging hose and stop valve to the manifold
gauge set air purge valve.
23UOUX-065
Caution
l Connect the charging hose to the air purge valve
via its tap pin side.
l Do not disconnect the charging hose or stop valve
until the charging operation is completed.
l Do not open the stop valve when not used.
4. Start the vacuum pump and open the high-and low-pressure
side valves of the manifold gauge set.
5. Start the pump and let it operate for 15 minutes.
6. Check high- and low-pressure side gauge readings. When
both of them are at 750 mmHg or more, close the manifold
gauge set valves.
7. Stop the vacuum pump and wait for about 5 minutes.
8. Verity that the low-pressure side gauge reading does not
change.
9. If the reading changes, retighten the piping connections and
repeat the evacuation operation.
10. If not changed, check for leaks (see below) and charge the
system.
u-33
Page 990 of 1164
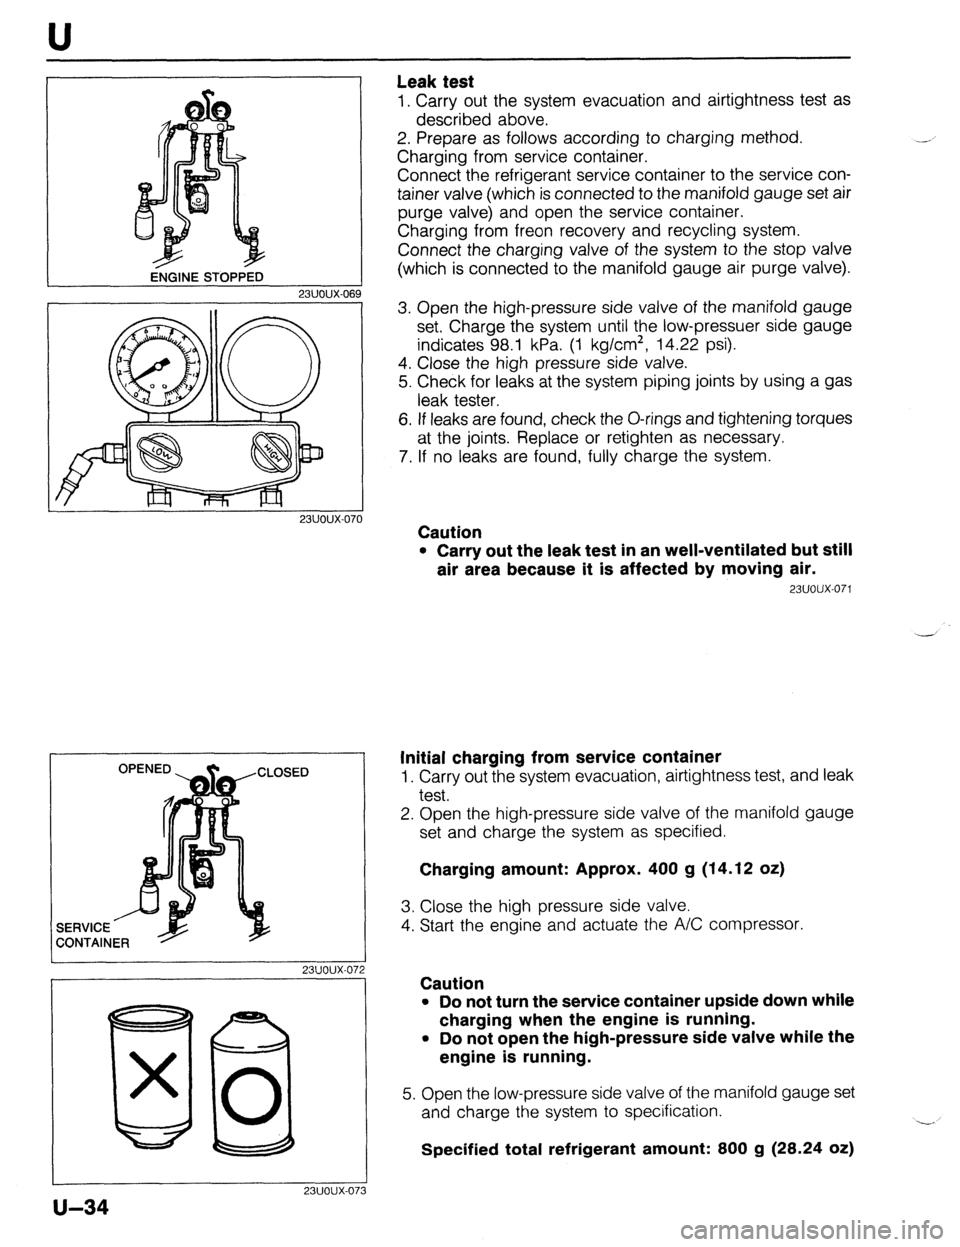
ENGINE sro~i32 U
Leak test
1. Carry out the system evacuation and airtightness test as
described above.
2. Prepare as follows according to charging method.
Charging from service container.
Connect the refrigerant service container to the service con-
tainer valve (which is connected to the manifold gauge set air
purge valve) and open the service container.
Charging from freon recovery and recycling system.
Connect the charging valve of the system to the stop valve
(which is connected to the manifold gauge air purge valve).
23UOUX-06
23UOUX-070
I 23UOUX-072
I
80 x 0
23UOUX-07
u-34
3
3. Open the high-pressure side valve of the manifold gauge
set. Charge the system until the low-pressuer side gauge
indicates 98.1 kPa. (1 kg/cm*, 14.22 psi).
4. Close the high pressure side valve.
5. Check for leaks at the system piping joints by using a gas
leak tester.
6. If leaks are found, check the O-rings and tightening torques
at the joints. Replace or retighten as necessary.
7. If no leaks are found, fully charge the system.
Caution
l Carry out the leak test in an well-ventilated but still
air area because it is affected by moving air.
23UOUX-071
Initial charging from service container
1. Carry out the system evacuation, airtightness test, and leak
test.
2. Open the high-pressure side valve of the manifold gauge
set and charge the system as specified.
Charging amount: Approx. 400 g (14.12 oz)
3. Close the high pressure side valve.
4. Start the engine and actuate the A/C compressor.
Caution
l Do not turn the service container upside down while
charging when the engine is running.
l Do not open the high-pressure side valve while the
engine is running.
5. Open the low-pressure side valve of the manifold gauge set
and charge the system to specification.
Specified total refrigerant amount: 800 g (28.24 oz) -.
Page 991 of 1164

U
L
ENGINE STARTED
*-ENGINE STARTED
23UOUX.071
6. Close the low-pressure side valve.
7. Stop the engine.
8. Close the stop valves and the service container valve.
Caution
l Do not disconnect the stop valves or the service
container valve from the charging hoses when there
is refrigerant remaining in the hoses.
Refilling
Caution
l Do not overcharge the system.
l Note the sight glass during refilling the refrigerant.
Stop charging when no bubbles are observed in the
glass.
(Refer to page U-40).
l Care must be taken when the ambient temperature
is low. The bubbles may not be present even if the
refrigerant amount is insufficient.
1. Connect the manifold gauge set to the refrigerant system
charging valve.
(Refer to page U-32).
2. Start the engine.
3. Open the low-pressure side valve of the manifold gauge set
and charge the system as necessary.
4. Note the sight glass, and when no bubbles can be seen,
close the low-pressure side valve.
5. Stop the engine.
6. Close the stop valve and service container valve. Discon-
nect the stop valves quickly.
u-35