warning MAZDA PROTEGE 1992 Owner's Manual
[x] Cancel search | Manufacturer: MAZDA, Model Year: 1992, Model line: PROTEGE, Model: MAZDA PROTEGE 1992Pages: 1164, PDF Size: 81.9 MB
Page 344 of 1164

F ENGINE TUNE-UP
ENGINE TUNE-UP
PREPARATlON
SST
I
I I
49 BO19 9AO
System Selector For
inspection of igni-
tion timing and
idle speed
hA ‘I
03UOFX-04
03UOFX-04
03UOFX-04
NG POINT
03UOFX-04 03UOFX-045
BASIC INSPECTION
Engine Oil
1. Remove the engine oil level gauge and check the engine
oil level and oil condition.
2. Add or change the oil as necessary.
Coolant
Warning
l Never remove the radiator cap while the engine is
hot.
l Wrap a thick cloth around the cap before carefully
removing it.
1. Remove the coolant level gauge from the coolant reservoir.
2. Check that the coolant level is between the L and F marks
of the gauge.
3. Add coolant if necessary.
Battery
1. Check for corrosion on the terminals and for loose cable
connections. If necessary, clean the clamps and tighten
them firmly.
2. Check that the electrolyte level is between the UPPER LEV-
EL and LOWER LEVEL marks.
3. Add distilled water if necessary.
4. Check the specific gravity with a hydrometer.
Gravity: 1.27-l .29 (at 20% [68OF] )
Page 387 of 1164
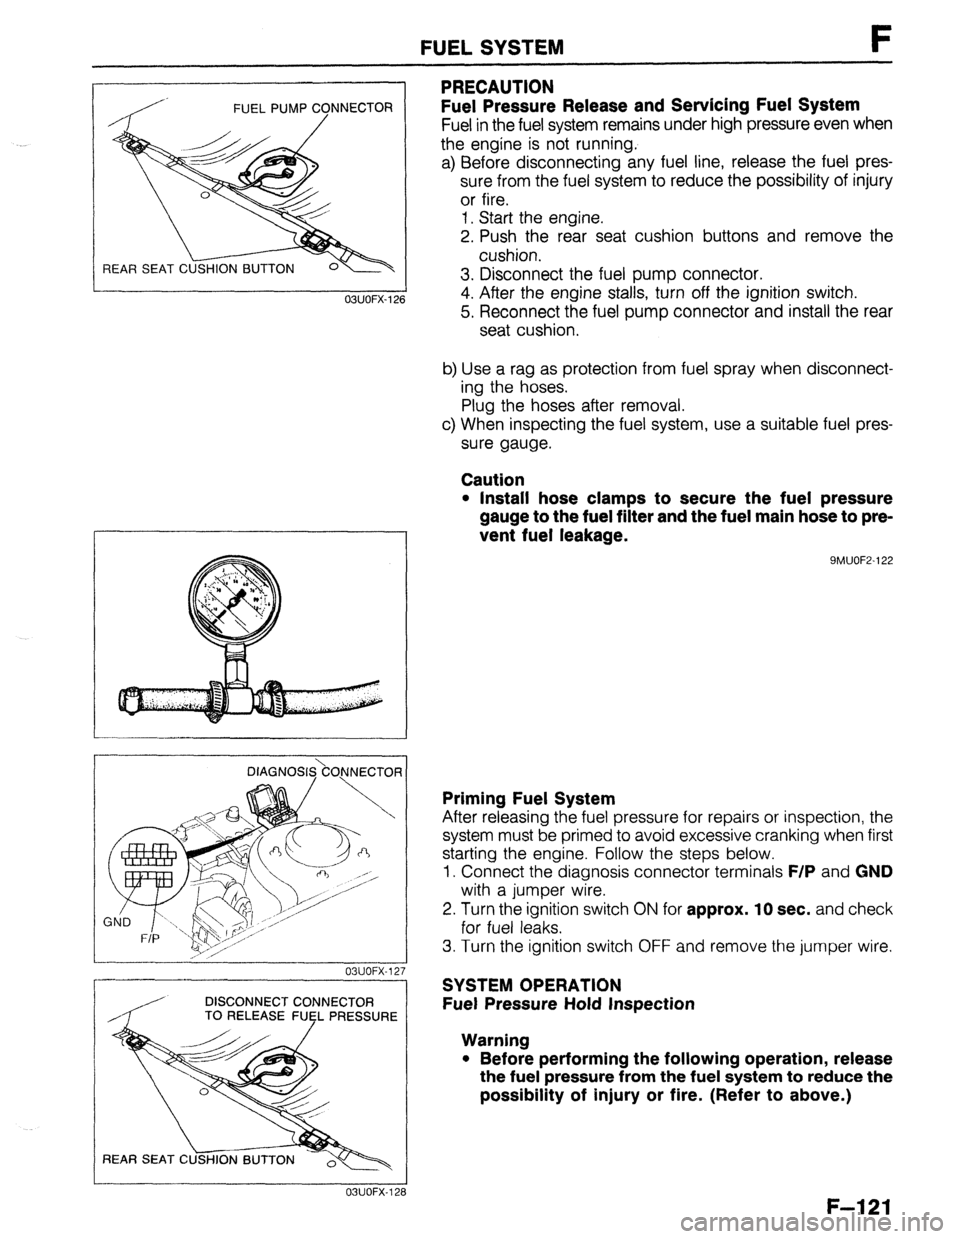
FUEL PUMP CONNECTOR
/
REAR SEAT C
FUEL SYSTEM F
PRECAUTION
Fuel Pressure Release and Servicing Fuel System
Fuel in the fuel system remains under high pressure even when
the engine is not running.
a) Before disconnecting any fuel line, release the fuel pres-
sure from the fuel system to reduce the possibility of injury
or fire.
1. Start the engine.
2. Push the rear seat cushion buttons and remove the
cushion.
3. Disconnect the fuel pump connector.
4. After the engine stalls, turn off the ignition switch.
5. Reconnect the fuel pump connector and install the rear
seat cushion.
b) Use a rag as protection from fuel spray when disconnect-
ing the hoses.
Plug the hoses after removal.
c) When inspecting the fuel system, use a suitable fuel pres-
sure gauge.
Caution
l Install hose clamps to secure the fuel pressure
gauge to the fuel filter and the fuel main hose to pre-
vent fuel leakage.
9MUOF2-122 OBUOFX-126
DlAGNOS&O,NNECTOR
03UOFX-12.
-
DISCONNECT CONNECTOR
/ TO RELEASE FUEL PRESSURE
03UOFX-12;
Priming Fuel System
After releasing the fuel pressure for repairs or inspection, the
system must be primed to avoid excessive cranking when first
starting the engine. Follow the steps below.
1. Connect the diagnosis connector terminals
F/P and GND
with a jumper wire.
2. Turn the ignition switch
ON for approx. 10 sec. and check
for fuel leaks.
3. Turn the ignition switch OFF and remove the jumper wire.
SYSTEM OPERATION
Fuel Pressure Hold Inspection
Warning
l Before performing the following operation, release
the fuel pressure from the fuel system to reduce the
possibility of injury or fire. (Refer to above.)
F-121
Page 388 of 1164
F FUEL SYSTEM
OSUOFX-129
DIAGNOSIS.\CO.NNECTOR j
/, I 23UOFX-104
DISCONNECT CONNECTOR
TO RELEASE FlJsL PRESSURE
L 23UOFX-105
INSTALL CLAMPS
DIAGNOSI$kO)lNECTOfl
I
23UOFX-ll
F-l 22
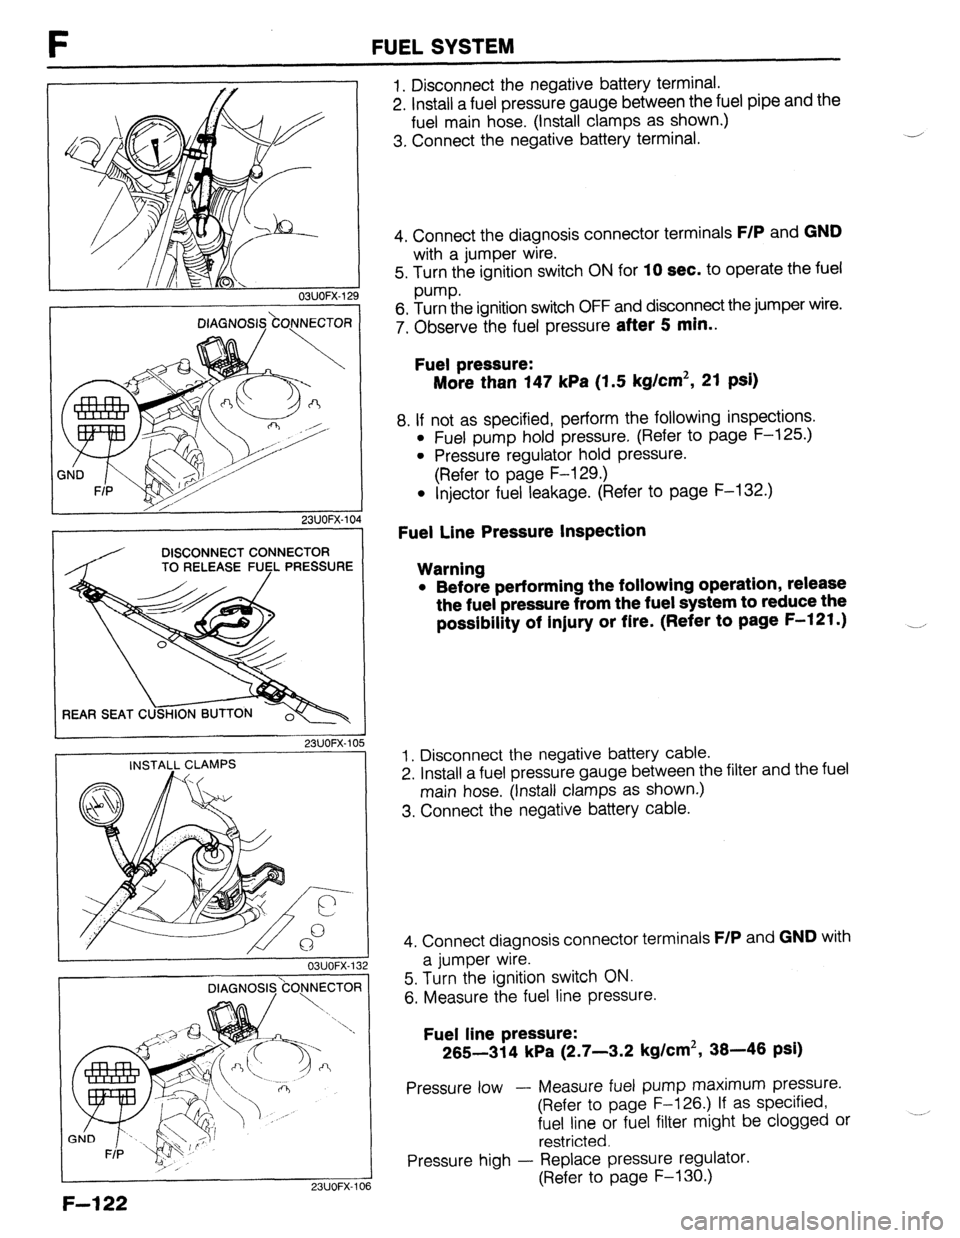
1. Disconnect the negative battery terminal.
2. Install a fuel pressure gauge between the fuel pipe and the
fuel main hose. (Install clamps as shown.)
3. Connect the negative battery terminal. J
4. Connect the diagnosis connector terminals
F/P and GND
with a jumper wire.
5. Turn the ignition switch ON for
10 sec. to operate the fuel
pump.
6. Turn the ignition switch OFF and disconnect the jumper wire.
7. Observe the fuel pressure
after 5 min..
Fuel pressure:
More than 147 kPa (1.5 kg/cm2, 21 psi)
8. If not as specified, perform the following inspections.
l Fuel pump hold pressure. (Refer to page F-125.)
l Pressure regulator hold pressure.
(Refer to page F-129.)
l Injector fuel leakage. (Refer to page F-132.)
Fuel Line Pressure Inspection
Warning
l Before performing the following operation, release
the fuel pressure from the fuel system to reduce the
possibility of injury or fire. (Refer to page F-121.) __,
1. Disconnect the negative battery cable.
2. Install a fuel pressure gauge between the filter and the fuel
main hose. (Install clamps as shown.)
3. Connect the negative battery cable.
4. Connect diagnosis connector terminals
F/P and GND with
a jumper wire.
5. Turn the ignition switch ON.
6. Measure the fuel line pressure.
Fuel line pressure:
265-314 kPa (2.7-3.2 kg/cm2, 38-46 psi)
Pressure low - Measure fuel pump maximum pressure.
(Refer to page F-126.) If as specified,
fuel line or fuel filter might be clogged or
restricted.
Pressure high - Replace pressure regulator.
(Refer to page F-130.)
Page 389 of 1164
FUEL SYSTEM F
FUEL TANK
Removal / Inspection / Installation
Warning
l Before performing the following operation, release the fuel pressure from the fuel system to
reduce the possibility of injury or fire. (Refer to page F-121 .)
l When removing the fuel tank, keep sparks, cigarettes, and open flames away from it.
l Before repair the fuel tank, clean it throughly with steam to remove all explosive gas.
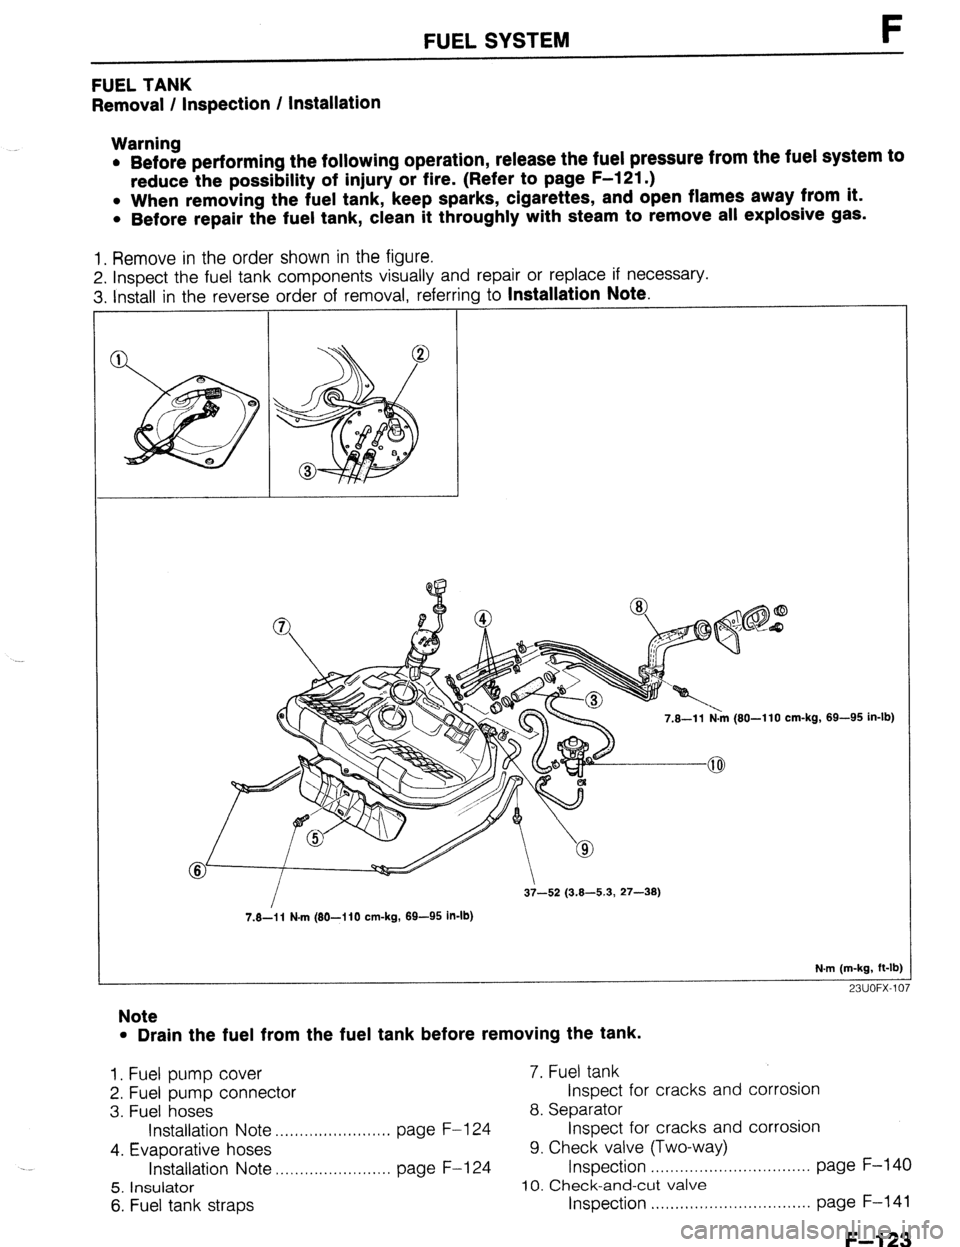
1. Remove in the order shown in the figure.
2. Inspect the fuel tank components visually and repair or replace if necessary.
3. Install in the reverse order of removal, referring to
Installation Note.
7.8-l 1 N.m (80-l 10 cm-kg,
7.8-i 1 N-m (80-I 10 cm-kg, 89-95 in-lb) 69-95 in-lb)
N.m (m-kg, ft-lb]
23UOFX-107
Note
l Drain the fuel from the fuel tank before removing the tank.
1. Fuel pump cover 7. Fuel tank
2. Fuel pump connector Inspect for cracks and corrosion
3. Fuel hoses 8. Separator
Installation Note . ..., I .I,,,,I,I,.,.I.,,. page F-l 24 Inspect for cracks and corrosion
4. Evaporative hoses 9. Check valve (Two-way)
Installation Note ,..,..,................. page F-l 24 Inspection . . . . . . . . . . . . . . . . . . . . . . . . . . . . . . . . . page F-140
5. Insulator 10. Check-and-cut valve
6. Fuel tank straps Inspection . . . . . . . . . . . . . . . . . . . . . . . . . . . page F-141
F--l 23
Page 390 of 1164
F FUEL SYSTEM
MIN. 35mm (1..4 in) -/
23UOFX-10
NJ
23UOFX-l(
OBUOFX-1:
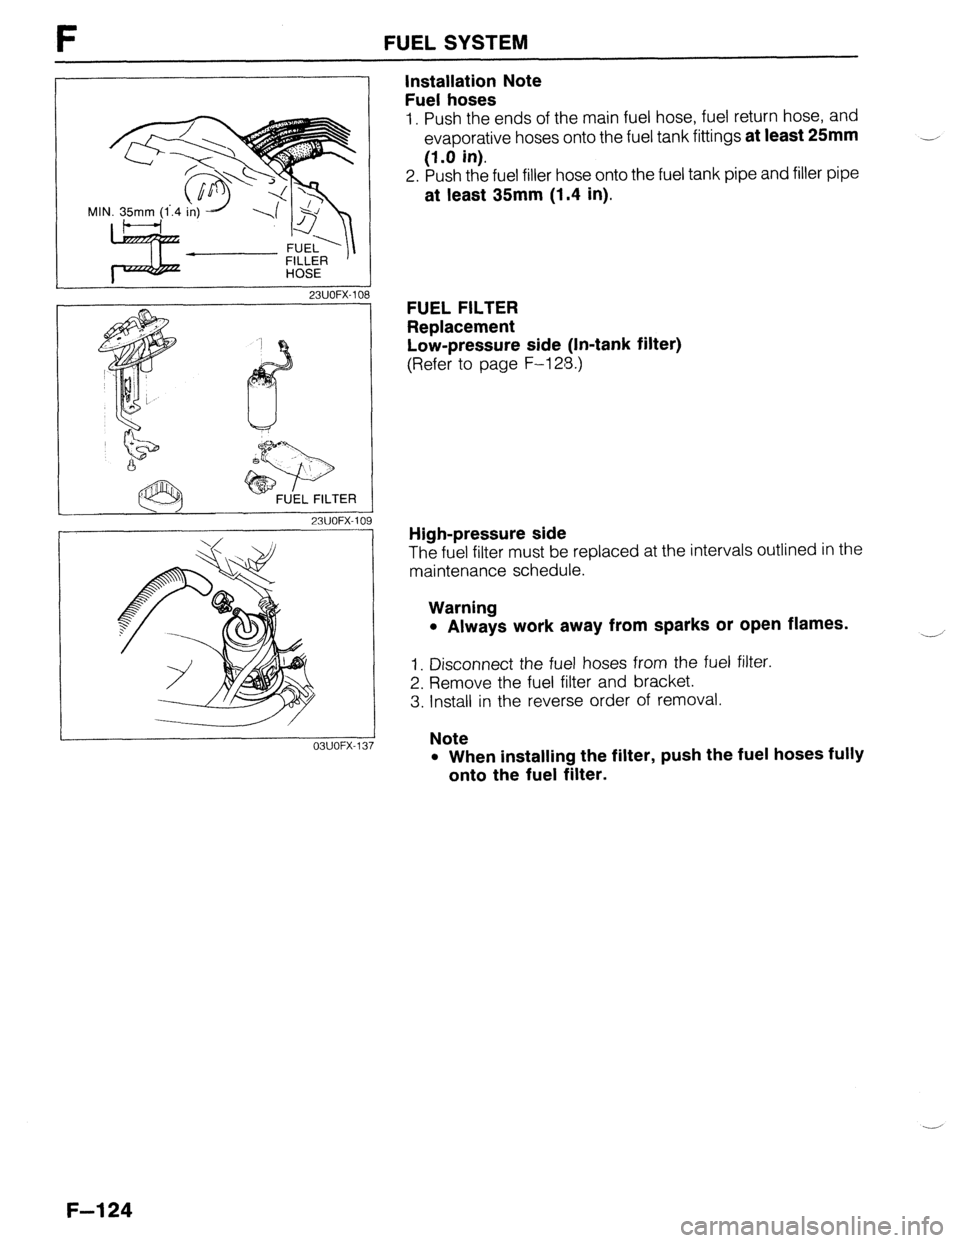
Installation Note
Fuel hoses
1. Push the ends of the main fuel hose, fuel return hose, and
evaporative hoses onto the fuel tank fittings at least 25mm
(1.0 in).
2. Push the fuel filler hose onto the fuel tank pipe and filler pipe
at least 35mm (1.4 in).
FUEL FILTER
Replacement
Low-pressure side (In-tank filter)
(Refer to page F-128.)
High-pressure side
The fuel filter must be replaced at the intervals outlined in the
maintenance schedule.
Warning
l Always work away from sparks or open flames.
1. Disconnect the fuel hoses from the fuel filter.
2. Remove the fuel filter and bracket.
3. Install in the reverse order of removal.
Note
l When installing the filter, push the fuel hoses fully
onto the fuel filter.
F-l 24
Page 391 of 1164
FUEL SYSTEM F
DIAGNOSI&ONNECTOR
03UOFX-138
I I 23UOFX-110
,
DISCONNECT CONNECTOR
REAR SEAT C
23UOFX-11
03UOFX-11
OBUOFX-11
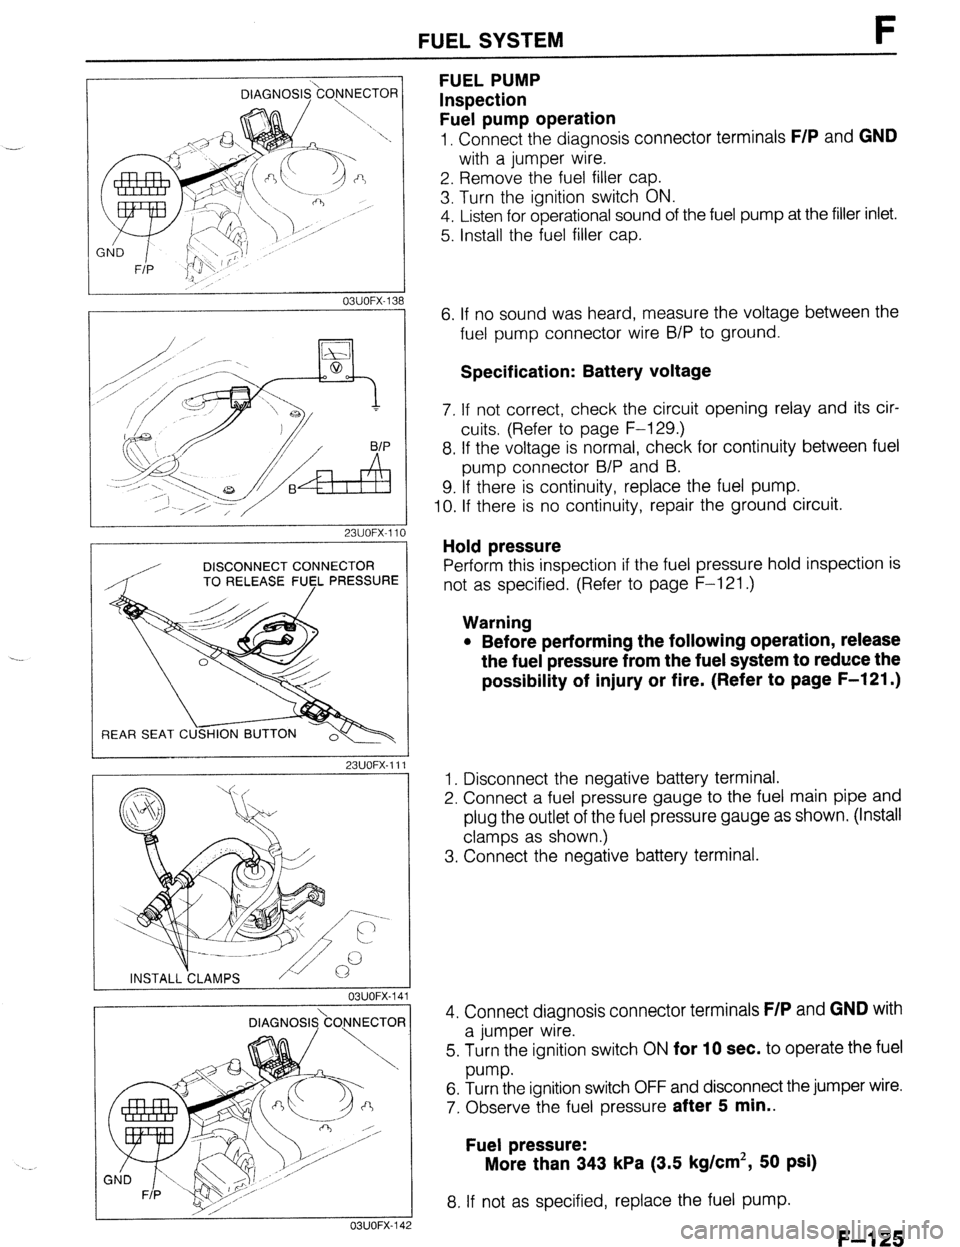
FUEL PUMP
Inspection
Fuel pump operation
1, Connect the diagnosis connector terminals F/P and GND
with a jumper wire.
2. Remove the fuel filler cap.
3. Turn the ignition switch ON.
4. Listen for operational sound of the fuel pump at the filler inlet.
5. Install the fuel filler cap.
6. If no sound was heard, measure the voltage between the
fuel pump connector wire B/P to ground.
Specification: Battery voltage
7. If not correct, check the circuit opening relay and its cir-
cuits (Refer to page F-129.)
8. If the voltage is normal, check for continuity between fuel
pump connector B/P and B.
9. If there is continuity, replace the fuel pump.
IO. If there is no continuity, repair the ground circuit.
Hold pressure
Perform this inspection if the fuel pressure hold inspection is
not as specified. (Refer to page F-121 .)
Warning
l Before performing the following operation, release
the fuel pressure from the fuel system to reduce the
possibility of injury or fire. (Refer to page F-121 .)
1. Disconnect the negative battery terminal.
2. Connect a fuel pressure gauge to the fuel main pipe and
plug the outlet of the fuel pressure gauge as shown. (Install
clamps as shown.)
3. Connect the negative battery terminal.
4. Connect diagnosis connector terminals
F/P and GND with
a jumper wire.
5. Turn the ignition switch ON
for 10 sec. to operate the fuel
w-w.
6. Turn the ignition switch OFF and disconnect the jumper wire.
7. Observe the fuel pressure
after 5 min..
Fuel pressure:
More than 343 kPa (3.5 kg/cm’, 50 psi)
8. If not as specified, replace the fuel pump.
F-l 25
Page 392 of 1164
FUEL SYSTEM
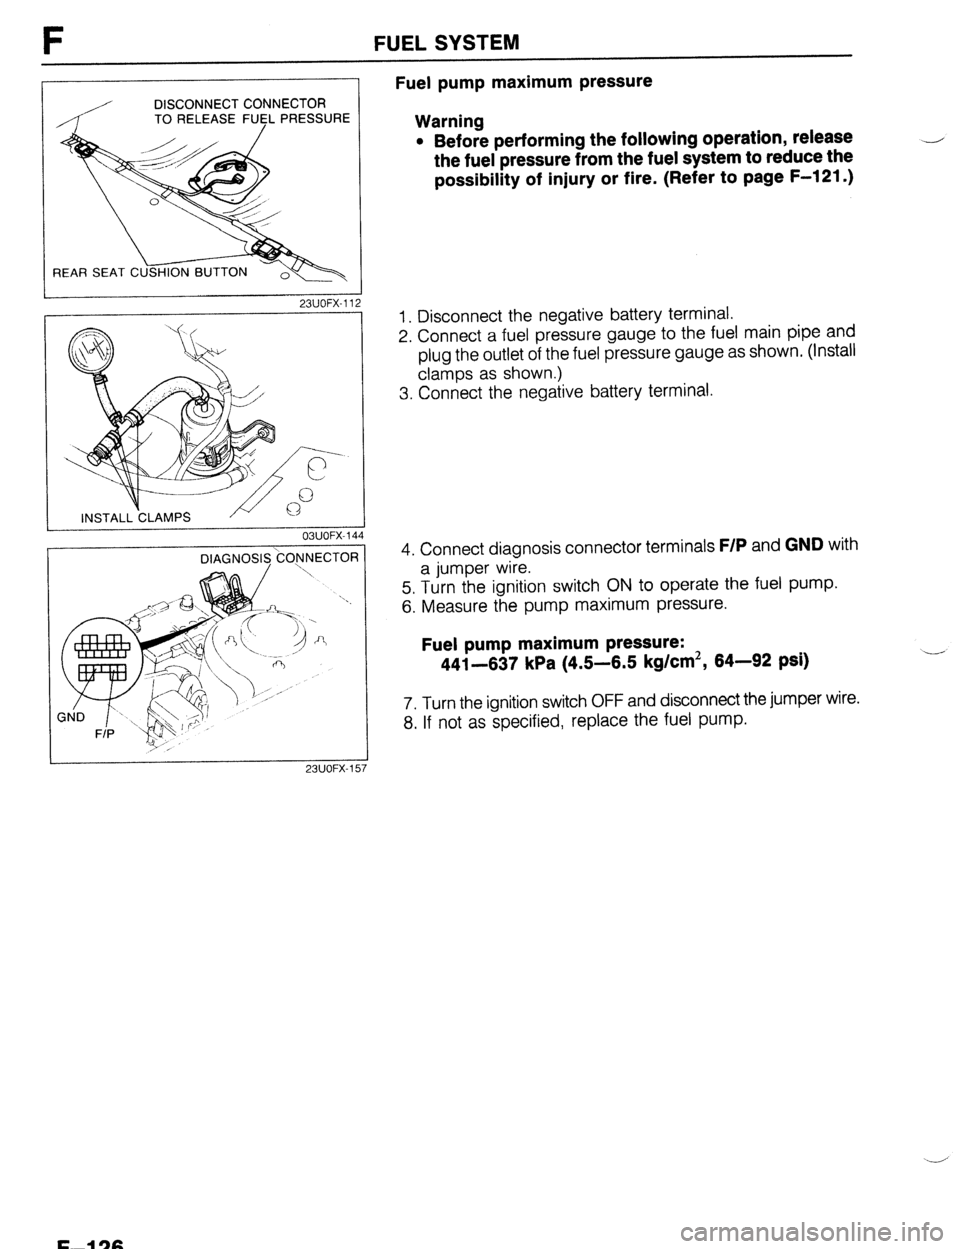
Fuel pump maximum pressure
DISCONNECT CONNECTOR
TO RELEASE FUCL PRESSURE
Warning
23UOFX-11
OBUOFX-144 l
Before performing the following operation, release
the fuel pressure from the fuel system to reduce the
possibility of injury or fire. (Refer to page F-121 .) 4
1
2
23UOFX-15 7
1. Disconnect the negative battery terminal.
2. Connect a fuel pressure gauge to the fuel main pipe and
plug the outlet of the fuel pressure gauge as shown. (Install
clamps as shown.)
3. Connect the negative battery terminal.
4. Connect diagnosis connector terminals
F/P and GND with
a jumper wire.
5. Turn the ignition switch ON to operate the fuel pump.
6. Measure the pump maximum pressure.
Fuel pump maximum pressure:
441-637 kPa (4.5-6.5 kg/cm2, 64-92 psi) .--
7. Turn the ignition switch OFF and disconnect the jumper wire.
8. If not as specified, replace the fuel pump.
F-l 26
Page 393 of 1164
FUEL SYSTEM F
DISCONNECT CONNECTOR
TO RELEASE FU5L PRESSURE
REAR SEAT C
23UOFX-11:
REPLACE
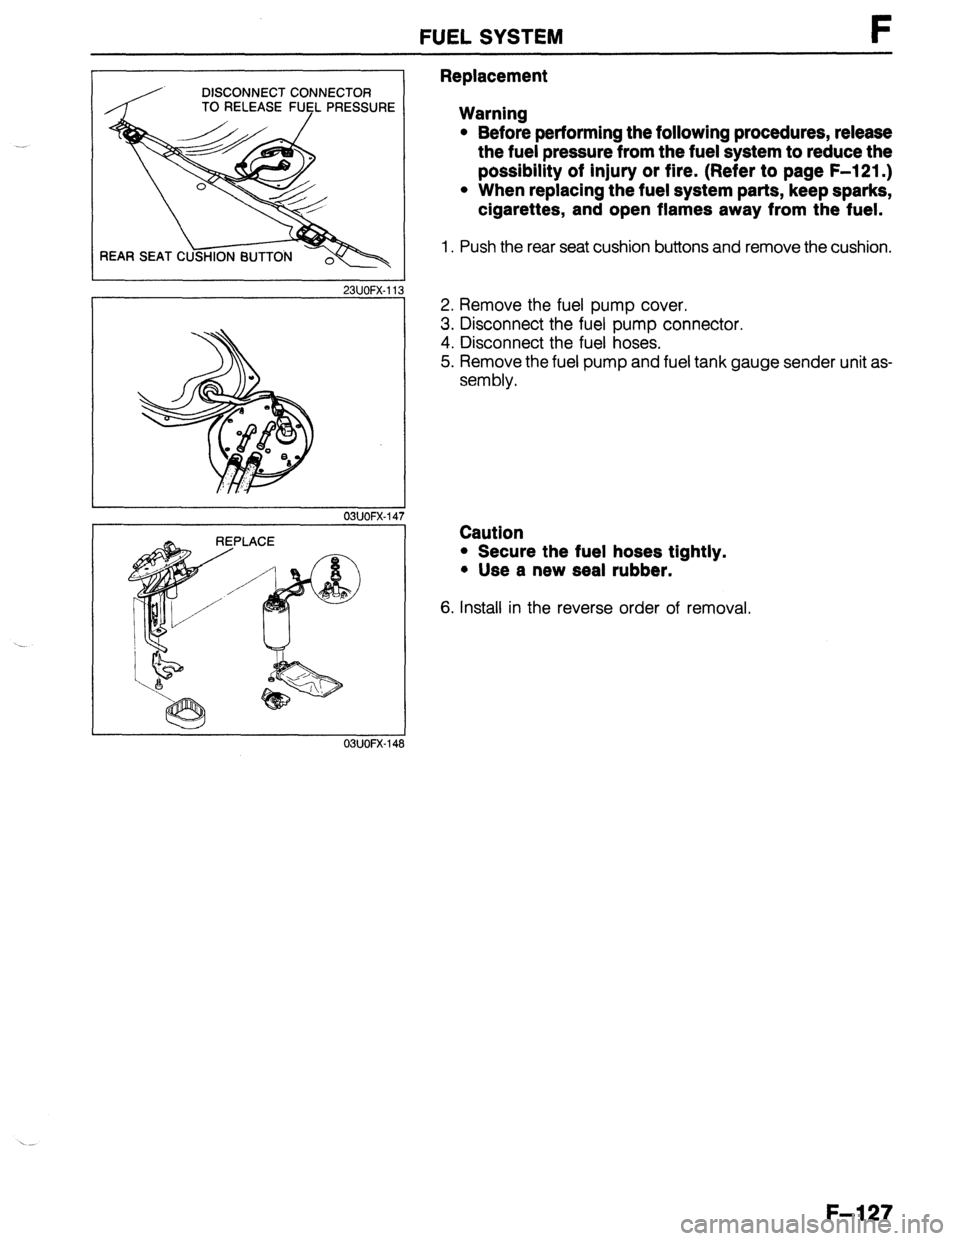
03UOFX-14s Replacement
Warning
l Before performing the following procedures, release
the fuel pressure from the fuel system to reduce the
possibility of injury or fire. (Refer to page F-121 .)
l When replacing the fuel system parts, keep sparks,
cigarettes, and open flames away from the fuel.
1. Push the rear seat cushion buttons and remove the cushion.
2. Remove the fuel pump cover.
3. Disconnect the fuel pump connector.
4. Disconnect the fuel hoses.
5. Remove the fuel pump and fuel tank gauge sender unit as-
sembly.
Caution
l Secure the fuel hoses tightly.
+ Use a new seal rubber.
6. Install in the reverse order of removal.
F-l 27
Page 395 of 1164
FUEL SYSTEM F
STA
OBUOFX- 15
03UOFX-15
DISCONNECT CONNECTOR
TO RELEASE FUfL PRESSURE
REAR SEAT C
23UOFX-11
INSTALL CLAMPS
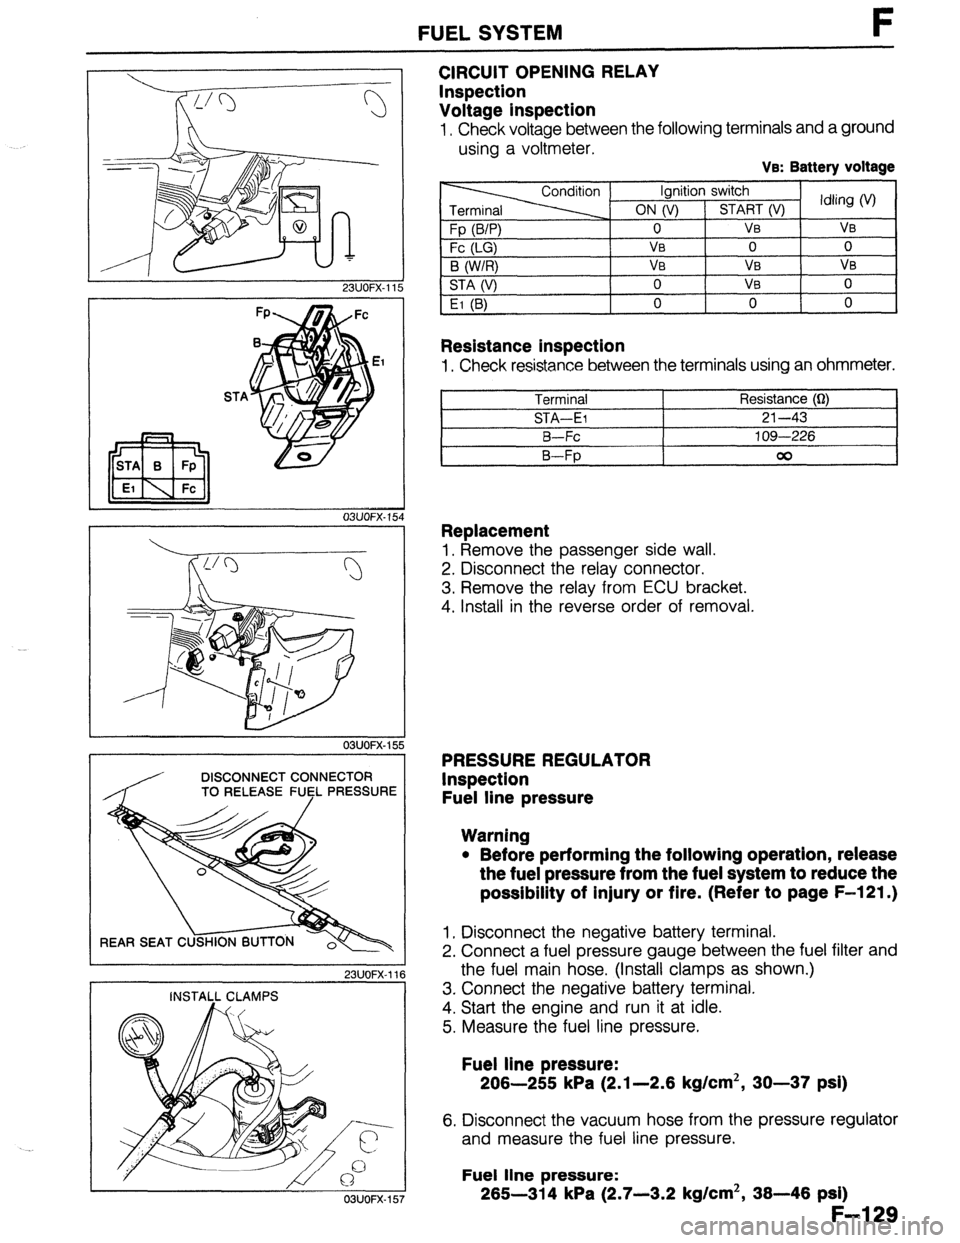
CIRCUIT OPENING RELAY
Inspection
Voltage inspection
I, Check voltage between the following terminals and a ground
using a voltmeter.
Ve: Battery voltage
Resistance inspection
1, Check resistance between the terminals using an ohmmeter.
Terminal Resistance (Q)
STA-El 21-43
B-Fc 109-226
B-Fp 00
Replacement
1, Remove the passenger side wall.
2. Disconnect the relay connector.
3. Remove the relay from ECU bracket.
4. Install in the reverse order of removal.
PRESSURE REGULATOR
Inspection
Fuel line pressure
Warning
l Before performing the following operation, release
the fuel pressure from the fuel system to reduce the
possibility of injury or fire. (Refer to page F-121.)
1, Disconnect the negative battery terminal.
2. Connect a fuel pressure gauge between the fuel filter and
the fuel main hose. (Install clamps as shown.)
3. Connect the negative battery terminal.
4. Start the engine and run it at idle.
5. Measure the fuel line pressure.
Fuel line pressure:
206-255 kPa (2.1-2.6 kg/cm2, 30-37 psi)
6. Disconnect the vacuum hose from the pressure regulator
and measure the fuel line pressure.
Fuel line pressure:
265-314 kPa (2.7-3.2 kg/cm2, 36-46 psi)
F-l 29
03UOFX-157
Page 396 of 1164
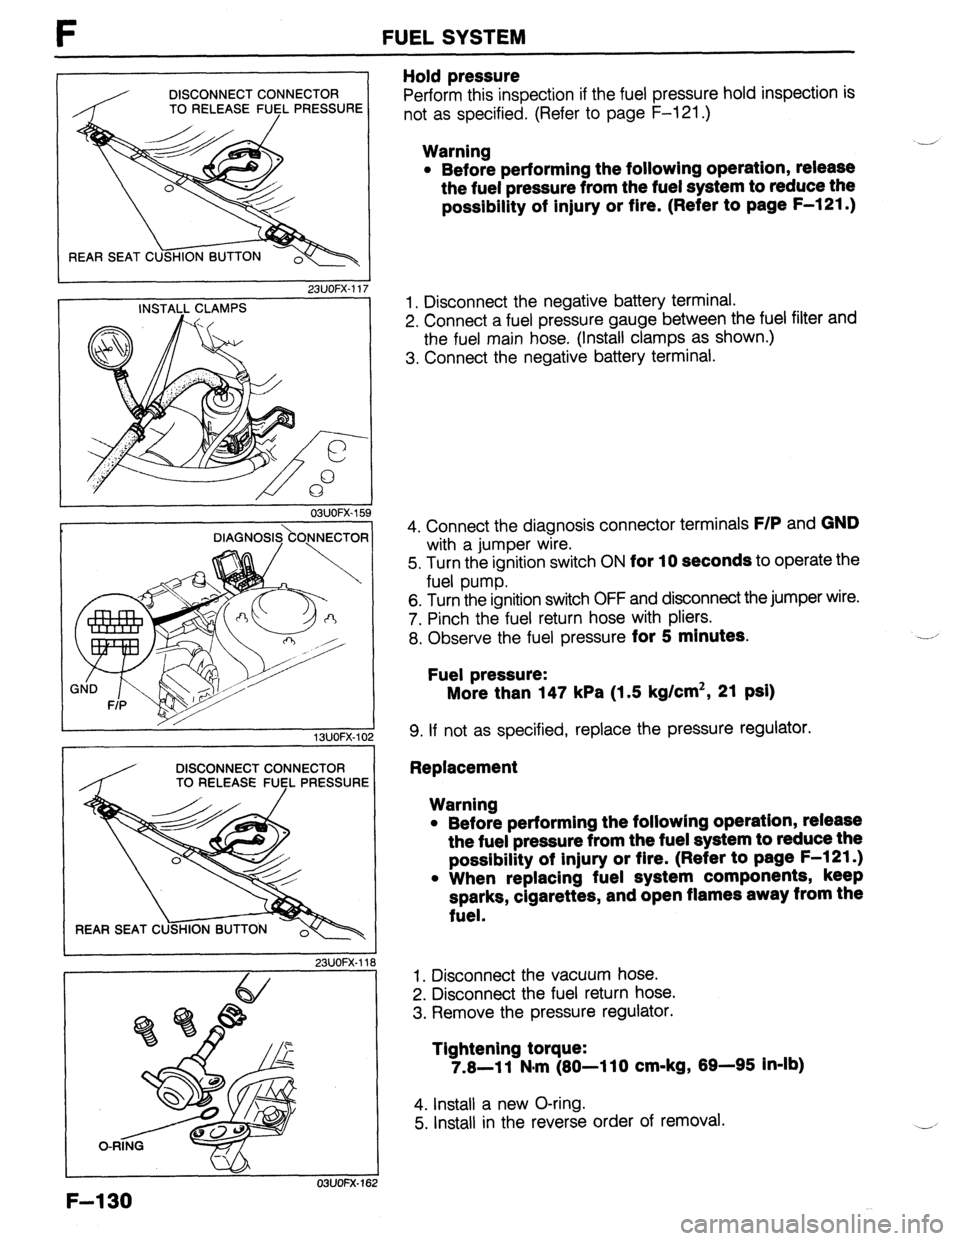
F FUELSYSTEM
DISCONNECT CONNECTOR
TO RELEASE FlJ$L PRESSURE
REAR SEAT C
23UOFX-11
INSTALL CLAMPS 7
03UOFX.I 59
F-l 30
DIAGNOSl&OJNECTOR
/ K
1 SUOFX-10
DISCONNECT CONNECTOR
TO RELEASE
FlJl$L PRESSURE
23UOFX-11
I
Hold pressure
Perform this inspection if the fuel pressure hold inspection is
not as specified. (Refer to page F-121 .)
Warning
l Before performing the following operation, release
the fuel pressure from the fuel system to reduce the
possibility of injury or fire. (Refer to page F-121 .) ,-
1. Disconnect the negative battery terminal.
2. Connect a fuel pressure gauge between the fuel filter and
the fuel main hose. (Install clamps as shown.)
3. Connect the negative battery terminal.
4. Connect the diagnosis connector terminals
F/P and GND
with a jumper wire.
5. Turn the ignition switch ON
for 10 seconds to operate the
fuel pump.
6. Turn the ignition switch OFF and disconnect the jumper wire.
7. Pinch the fuel return hose with pliers.
8. Observe the fuel pressure
for 5 minutes.
Fuel pressure:
More than 147 kPa (1.5 kg/cm2, 21 psi)
9. If not as specified, replace the pressure regulator.
Replacement
Warning
l Before performing the followlng operation, release
the fuel pressure from the fuel system to reduce the
possibility of injury or flre. (Refer to page F-l 21.)
l When replacing fuel system components, keep
sparks, cigarettes, and open flames away from the
fuel.
1. Disconnect the vacuum hose.
2. Disconnect the fuel return hose.
3. Remove the pressure regulator.
Tightening torque:
7.8-11 N#m (80-110 cm-kg, 89-95 In-lb)
4. Install a new O-ring.
5. Install in the reverse order of removal.