check oil MAZDA PROTEGE 1992 Repair Manual
[x] Cancel search | Manufacturer: MAZDA, Model Year: 1992, Model line: PROTEGE, Model: MAZDA PROTEGE 1992Pages: 1164, PDF Size: 81.9 MB
Page 650 of 1164
ENGINE SPEED SENSING POWER STEERING
23UONX-03
03UONX-032
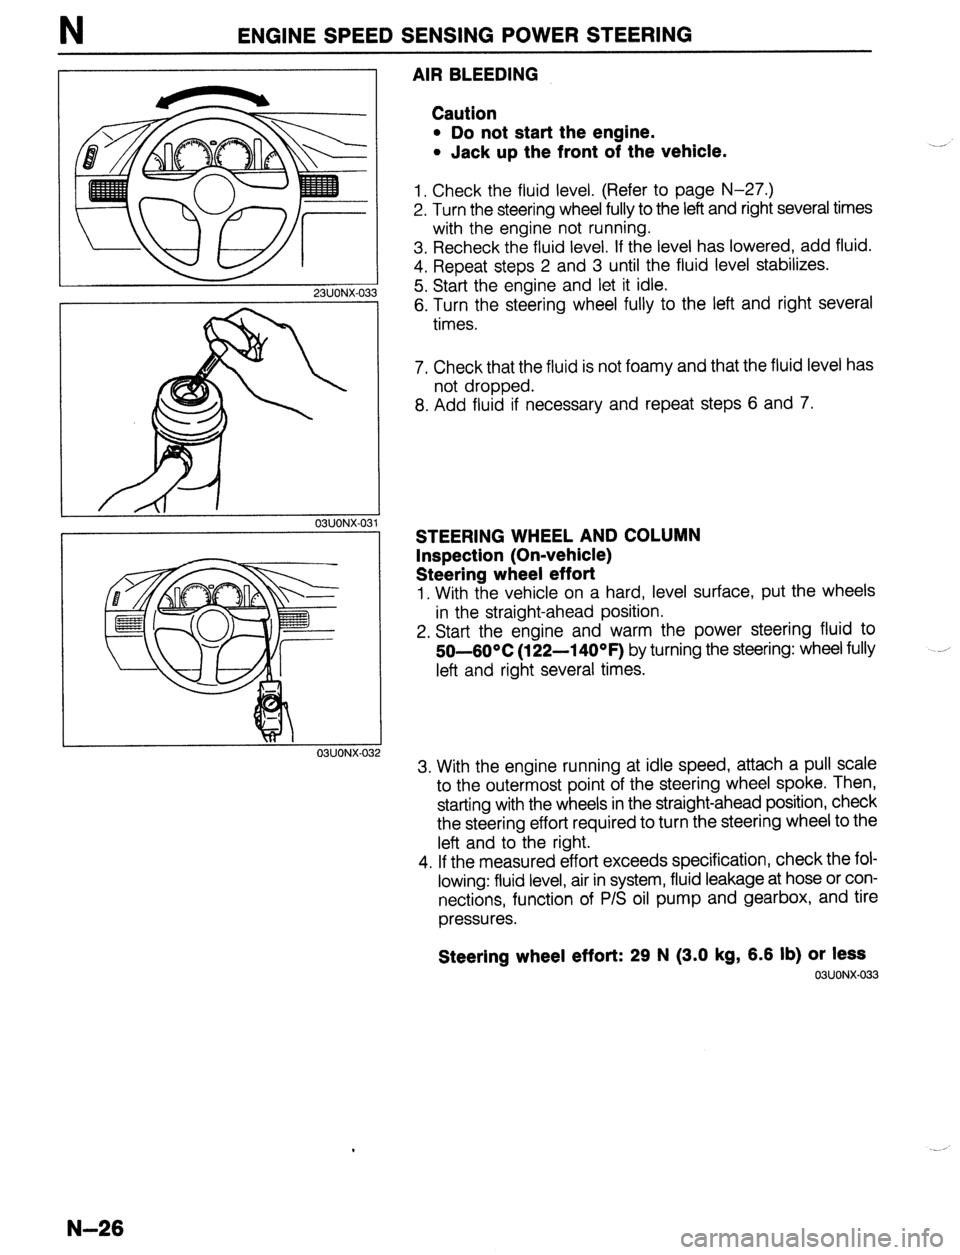
AIR BLEEDING
Caution
l Do not start the engine.
l Jack up the front of the vehicle.
1. Check the fluid level. (Refer to page N-27.)
2. Turn the steering wheel fully to the left and right several times
with the engine not running.
3. Recheck the fluid level. If the level has lowered, add fluid.
4. Repeat steps 2 and 3 until the fluid level stabilizes.
5. Start the engine and let it idle.
6. Turn the steering wheel fully to the left and right several
times.
7. Check that the fluid is not foamy and that the fluid level has
not dropped.
8. Add fluid if necessary and repeat steps 6 and 7.
STEERING WHEEL AND COLUMN
Inspection (On-vehicle)
Steering wheel effort
1. With the vehicle on a hard, level surface, put the wheels
in the straight-ahead position.
2. Start the engine and warm the power steering fluid to
50-60°C
(122-14OOF) by turning the steering: wheel fully
left and right several times.
3. With the engine running at idle speed, attach a pull scale
to the outermost point of the steering wheel spoke. Then,
starting with the wheels in the straight-ahead position, check
the steering effort required to turn the steering wheel to the
left and to the right.
4. If the measured effort exceeds specification, check the fol-
lowing: fluid level, air in system, fluid leakage at hose or con-
nections, function of P/S oil pump and gearbox, and tire
pressures.
Steering wheel effort: 29 N (3.0 kg, 6.6 lb) or less 03UONX-033
N-26
Page 657 of 1164

ENGINE SPEED SENSING POWER STEERING N
I I
-.
* :I
-3==T
I
, 93GONX-031
93GONX-03 2
I
93GONX-03 3
I
03UONX-822
t
~ t
93WJNX-03
Oil seal and bearing
1. Use the SST to remove the bearing and the oil seal from
the plug.
Caution
l The oil seal can not be reused.
Outer box assembly
1. Use the SST to remove the outer box.
Oil seal and inner guide
1, Use the SST to remove the oil seal and inner guide toward
the cylinder side.
Caution
l The oil seal can not be reused.
lnspectlon
Steerlng rack
1. Check the rack for cracking or other damage or for abnor-
mal wear of the teeth; replace it if necessary.
2. Check the seal ring installation part of the rack for abnor-
mal wear or damage; replace it if necessary.
3. Use V blocks to support both ends of the large-diameter
part of the rack; check for excessive bending; replace it if
necessary.
Bending limit: 0.15mm (0.006 In) (near rack center)
Plug
1. Check for scratches or other damage at the oil seal instal-
lation inner diameter; replace it if necessary.
Page 658 of 1164

N ENGINE SPEED SENSING POWER STEERING
23UOiX-055
23UONX-057
23UONX-05s
23UONX-05
Assembly
1. Mounting bracket and mounting rubber (gear housing
side)
(1) install the mounting bracket and mounting rubber (gear
housing side) to the gear box. ,
2. Steering rack
(1) Install a new O-ring and new seal ring to the rack’s
piston.
(2) After installing the seal ring, seat it properly at the pis-
ton circumference.
(3) Install the oil seal and inner guide to the
SST.
(4) Using the SST, place the oil seal and inner guide at the
edge of the steering rack’s pinion.
(5) After mounting the steering rack to the gear box, use
a press to install the oil seal and inner guide to the cor-
rect position.
Caution
l When pressing in, do not apply a load pressure of
more than 29,430 kPa (300 kg/cm2, 4,266 psi), be-
cause to do so will damage the oil seal and inner
guide.
l Apply grease to the seal ring, O-ring oil seal and in-
ner guide.
23UONX-056
3. Outer box assembly
(1) Install a new U-gasket and O-ring to the outer box.
(2) After installing the SST to the rack, install the outer box,
and use the
SST to tighten.
Tightening torque:
39-49 N-m (4-S m-kg, 29-36 ft-lb)
4. Cylinder air-tightness check
(1) Install the SST to the cylinder part of the gear housing.
(2) Using a vacuum pump, apply a vacuum of 400 mmHg
and check to be sure that the vacuum is maintained for
30 seconds.
(3) If there is any leakage, replace the oil seal.
5. Oil seal
(1) Use the SST to install a new oil seal to the gear housing.
Note
l Apply grease to the oil seal.
N-34
Page 663 of 1164

ENGINE SPEED SENSING POWER STEERING
93GONX-05:
93GONX-056
93GONX-O!
93GONX-05
Disassembly note
Oil pump
Note
l As shown in the figure, when securing the oil pump
in a vise, be sure to use the SST so that force is not
applied to the pulley or shaft.
Assembly note
Rotor
1. Install the rotor to the shaft with the rotor’s identification mark
facing upward.
Cam ring
1. Install the cam ring so that its identification mark is facing
downward.
Vane
1. Install the vanes (10 pieces) to the rotor, with the R part of
the vanes facing outward.
Inspection
Note
l Replace the pump assembly if necessary.
Pump body
1. Check the front and rear pump bodies for cracking or oth-
er damage and for abnormal wear of the moving surface
of the rotor.
N-39
Page 671 of 1164
CONVENTIONAL BRAKE SYSTEM
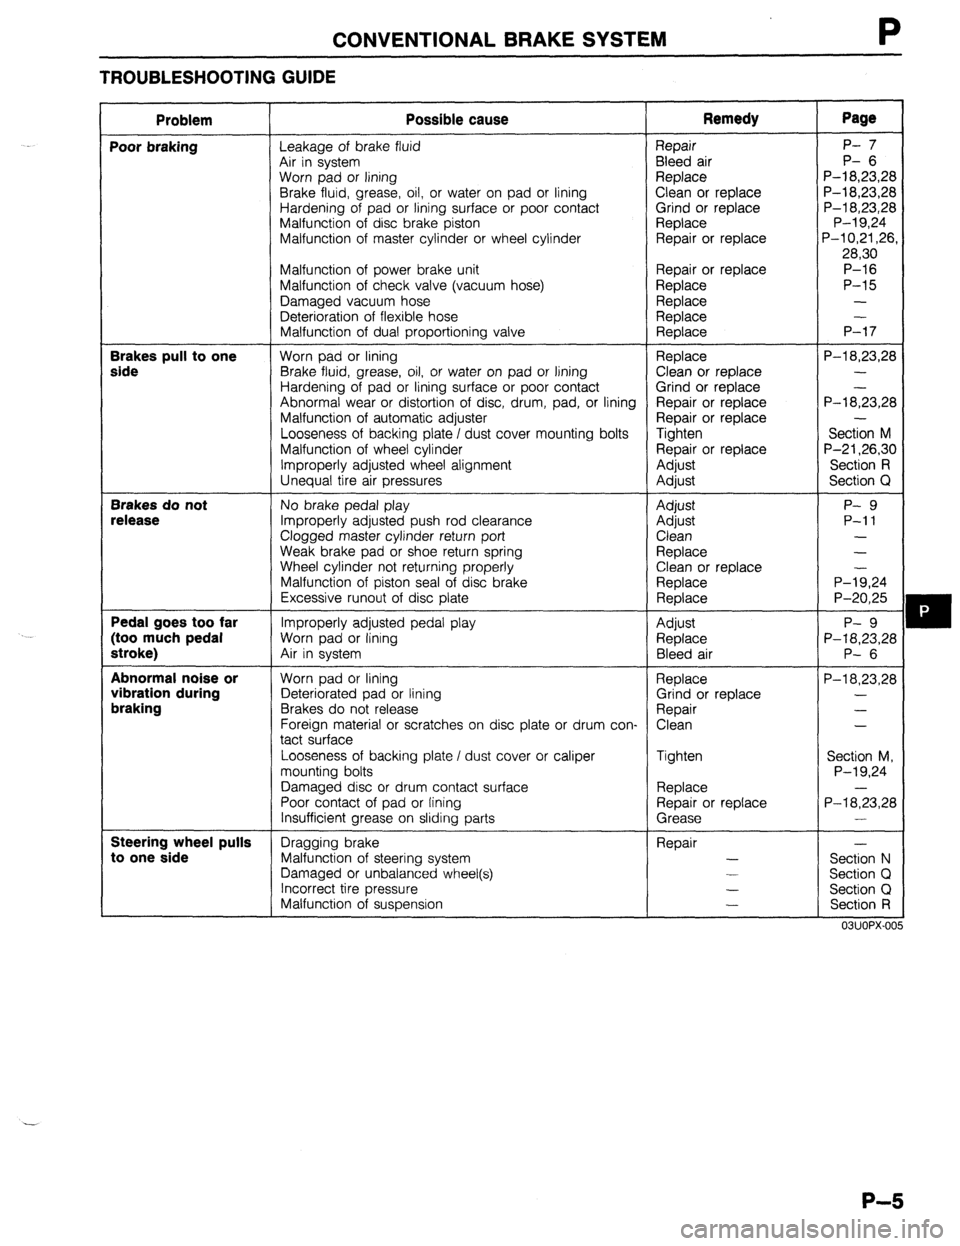
TROUBLESHOOTING GUIDE
Problem Possible cause Remedy Page
Poor braking
Leakage of brake fluid Repair P- 7
Air in system Bleed air P- 6
Worn pad or lining Replace P-l 8,23,28
Brake fluid, grease, oil, or water on pad or lining Clean or replace P-18,23,28
Hardening of pad or lining surface or poor contact Grind or replace P-l 8,23,28
Malfunction of disc brake piston Replace P-l 9,24
Malfunction of master cylinder or wheel cylinder Repair or replace P-l 0,21,26,
28,30
Malfunction of power brake unit Repair or replace P-16
Malfunction of check valve (vacuum hose) Replace P-15
Damaged vacuum hose Replace -
Deterioration of flexible hose Replace -
Malfunction of dual proportioning valve Replace P-17 Brakes pull to one
Worn pad or lining Replace P-l 8,23,28 side Brake fluid, grease, oil, or water on pad or lining Clean or replace -
Hardening of pad or lining surface or poor contact Grind or replace
Abnormal wear or distortion of disc, drum, pad, or lining Repair or replace P-l 8;3,28
Malfunction of automatic adjuster Repair or replace -
Looseness of backing plate I dust cover mounting bolts Tighten Section M
Malfunction of wheel cylinder Repair or replace P-21,26,30
Improperly adjusted wheel alignment Adjust Section R
Unequal tire air pressures
Adjust Section Q Brakes do not
No brake pedal play Adjust P- 9 release Improperly adjusted push rod clearance Adjust P-11
Clogged master cylinder return port Clean -
Weak brake pad or shoe return spring Replace -
Wheel cylinder not returning properly
Clean or replace
Malfunction of piston seal of disc brake Replace P-l;,24
Excessive runout of disc plate
Replace P-20,25 Pedal goes too far
Improperly adjusted pedal play Adjust P- 9 (too much pedal Worn pad or lining
Replace P-18,23,28 stroke) Air in system
Bleed air P- 6 Abnormal noise or
Worn pad or lining
Replace P-18,23,28 vibration during Deteriorated pad or lining Grind or replace - braking Brakes do not release Repair -
Foreign material or scratches on disc plate or drum con- Clean -
tact surface
Looseness of backing plate / dust cover or caliper Tighten
Section M,
mounting bolts P-l 9,24
Damaged disc or drum contact surface Replace -
Poor contact of pad or fining Repair or replace
P-18,23,28
Insufficient grease on sliding parts Grease - Steering wheel pulls
Dragging brake Repair - to one side Malfunction of steering system -
Section N
Damaged or unbalanced wheel(s) -
Section Cl
Incorrect tire pressure -
Section Q
Malfunction of suspension -
Section R
mm> IAn\, ,.e
P-5
Page 686 of 1164

P CONVENTIONAL BRAKE SYSTEM
23UOPX-01. 5
84
03UOPX-055
Inspection
Check for the following and repair or replace parts as
necessary.
Disc pad assembly
1. Check for oil or grease on the facing, abnormal wear or
cracks, and deterioration or damage from heat.
2. Measure the thickness of the lining.
Specified thickness: 1Omm (0.39 in)
Minimum : 2.0mm (0.08 in)
3. Check visually for damage or wear of the guide plate.
Disc plate
1. Measure the thickness of the disc plate.
Standard: 22mm (0.87 in)
Minimum: 20mm (0.79 in)
2. Measure the runout at the outer edge of the contact sur-
face of the disc pad.
Runout: O.lmm (0.004 in) max.
Caution
l There must be no wheel bearing looseness.
l The measurement location is the outer edge of the
disc plate surface.
P-20
Page 691 of 1164

CONVENTIONAL BRAKE SYSTEM P
23UOPX-02
Inspection
Check for the following and repair or replace parts as
necessary.
Disc pad assembly
1. Oil or grease on facing
2. Abnormal wear or cracks
3. Deterioration or damage by heat
4. Remaining lining thickness
Specified thickness: 8.0mm (0.31 in)
Minimum: l.Omm (0.04 in)
Disc plate
1. Runout
Runout: O.lmm (0.004 in) max.
Caution
l There must be no wheel bearing looseness.
l The measurement location is the outer edge of the
disc pad contact surface.
2. Wear or damage
Thickness
Standard: 9.0mm (0.35 in)
Minimum: 7.0mm (0.28 in)
P-25
Page 697 of 1164
PARKING BRAKE SYSTEM
PARKING BRAKE SYSTEM
TROUBLESHOOTING GUIDE
Problem
Brakes do not
release
Parking brake does
not hold well Possible cause
Improper return of parking brake cable or improper ad-
justment
Excessive lever stroke
Brake cable stuck or damaged
Brake fluid or oil on pad or lining
Hardening of pad / lining surface or poor contact Remedy Repair or adjust
Adjust
Repair or replace
Clean or replace
Grind or replace Page P-32
P-31
P-32
P-i,28
ONOPX-080
PARKING BRAKE SHOE
Removal / Inspection / Installation
Disc brake
Removal and Installation (Refer to page P-23)
Inspection (Refer to page P-25)
Drum brake
Removal and Installation (Refer to page P-28)
Inspection (Refer to page P-29)
03u0Px-081
13UOPX-021
03UOPX-08
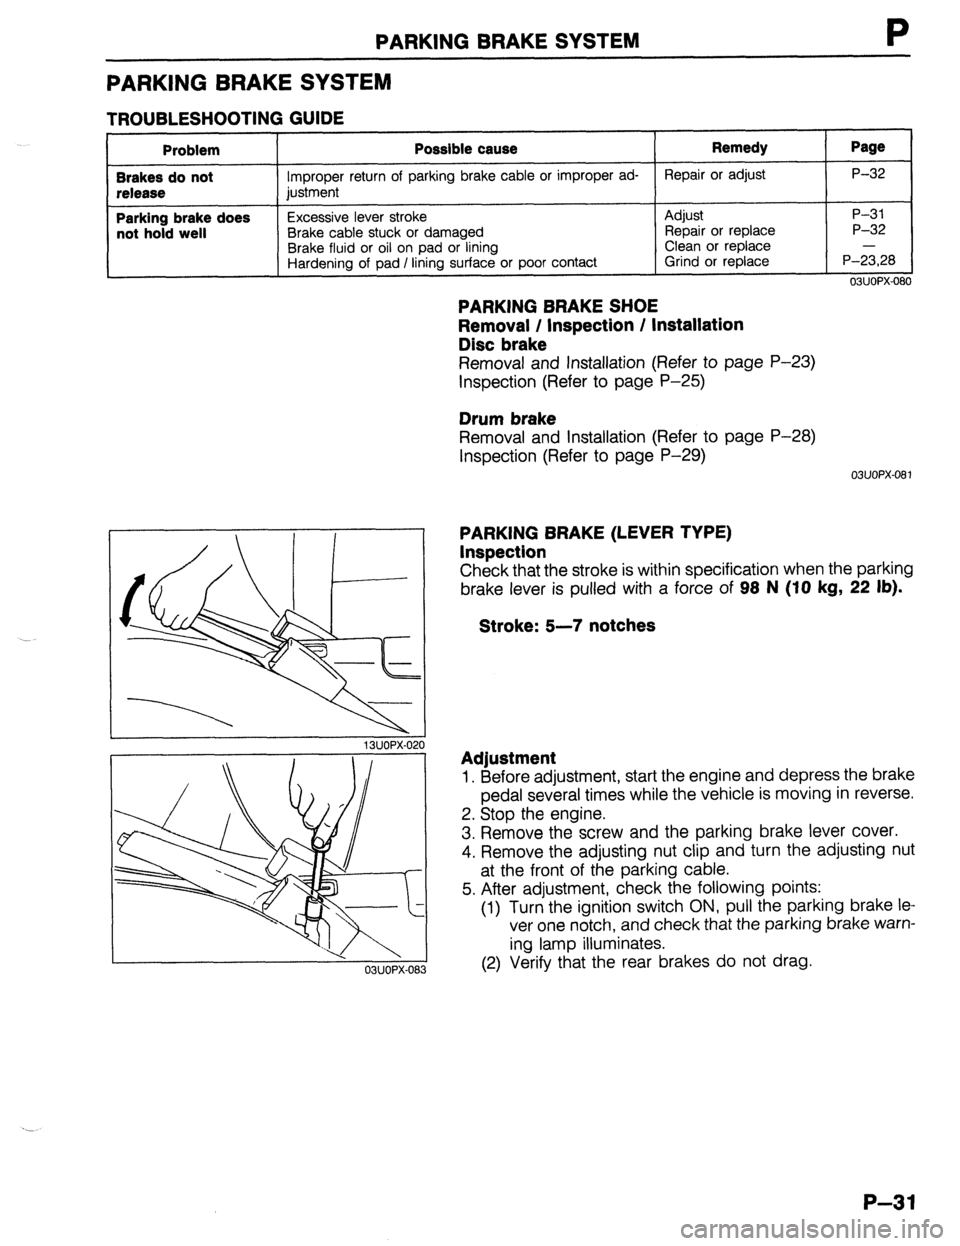
PARKING BRAKE (LEVER TYPE)
Inspection
Check that the stroke is within specification when the parking
brake lever is pulled with a force of 98 N (IO
kg, 22 lb).
Stroke: 5-7 notches
Adjustment
1. Before adjustment, start the engine and depress the brake
pedal several times while the vehicle is moving in reverse.
2. Stop the engine.
3. Remove the screw and the parking brake lever cover.
4. Remove the adjusting nut clip and turn the adjusting nut
at the front of the parking cable.
5. After adjustment, check the following points:
(1) Turn the ignition switch ON, pull the parking brake le
ver one notch, and check that the parking brake warn-
ing lamp illuminates.
(2) Verify that the rear brakes do not drag.
P-31
Page 703 of 1164
WHEELS AND TIRES
WHEELS AND TIRES
SPECIAL NOTES ABOUT WHEELS AND TIRES
1. Do not use wheels or tires other than the specified types.
2. Aluminum wheels are easily scratched. When washing them, use a soft cloth, never a wire brush. If the
vehicle is steam cleaned, do not allow boiling water to contact the wheels.
3. If alkaline compounds (such as saltwater or road salts) get on aluminum wheels, wash them as soon as
possible to prevent damage. Use only a neutral detergent.
9MUOQX-004
NOTES REGARDING TIRE REPLACEMENT
Note the following points when tires are to be removed from or mounted onto the wheels.
1. Be careful not to damage the tire bead, the rim bead, or the edge of the rim.
2. Use a wire brush, sandpaper, or cloth to clean and remove all rust and dirt from the rim edge and the
rim bead.
3. When cleaning aluminum wheels, use a soft cloth, never a wire brush or sandpaper.
4. Remove any pebbles, glass, nails, and other foreign items embedded in the tire tread.
5. Be sure the air valve is installed correctly.
6. Apply a soapy solution to the tire bead and the edge of the rim.
7. After mounting a tire onto a wheel, inflate the tire to 250-300 kPa (2.55-3.06 kg/cm2, 35.55-42.66
psi). Check to be sure that the bead is seated correctly onto the rim and that there are no air leaks. Then
reduce the pressure to the specified level.
8. If a tire iron is used to change a tire on an aluminum wheel, be sure to use a piece of rubber between
the iron lever and the wheel to avoid damage to the wheel. Work should be done on a rubber mat, not
on a hard or rough surface.
03UOQX-004
23UOOX-003
TIRE
I
AIR VALVE
INSPECTION / ADJUSTMENT
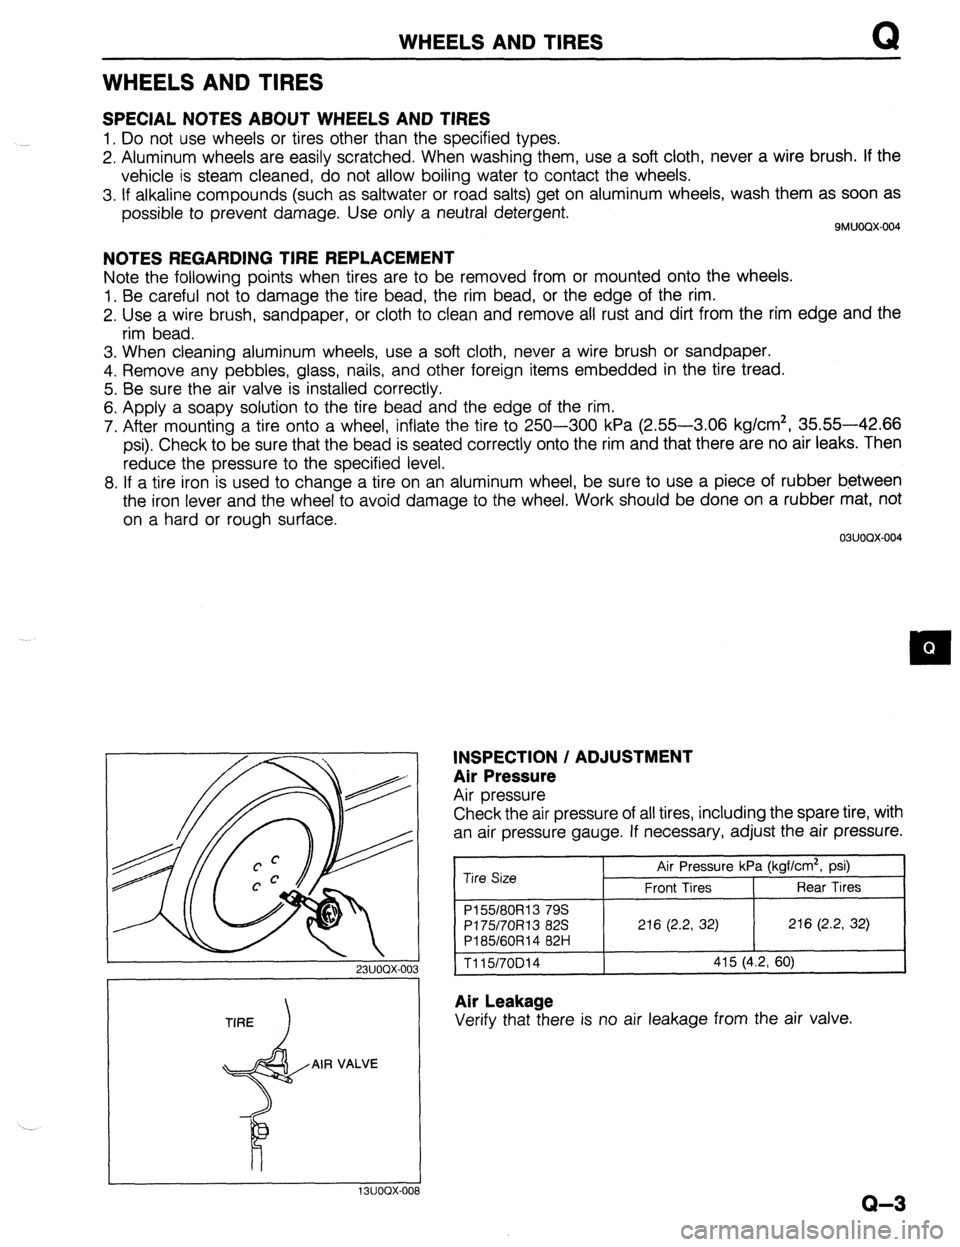
Air Pressure
Air pressure
Check the air pressure of all tires, including the spare tire, with
an air pressure gauge. If necessary, adjust the air pressure.
Tire Size Air Pressure kPa (kgf/cm2, psi)
Front Tires Rear Tires
P155180R13 79s
PI 75/70R13 82s 216 (2.2, 32) 216 (2.2, 32)
P185/60R14 82H
1115/70D14 415 (4.2, 60)
Air Leakage
Verify that there is no air leakage from the air valve.
I I 13UOOX-008
Q-3
Page 713 of 1164
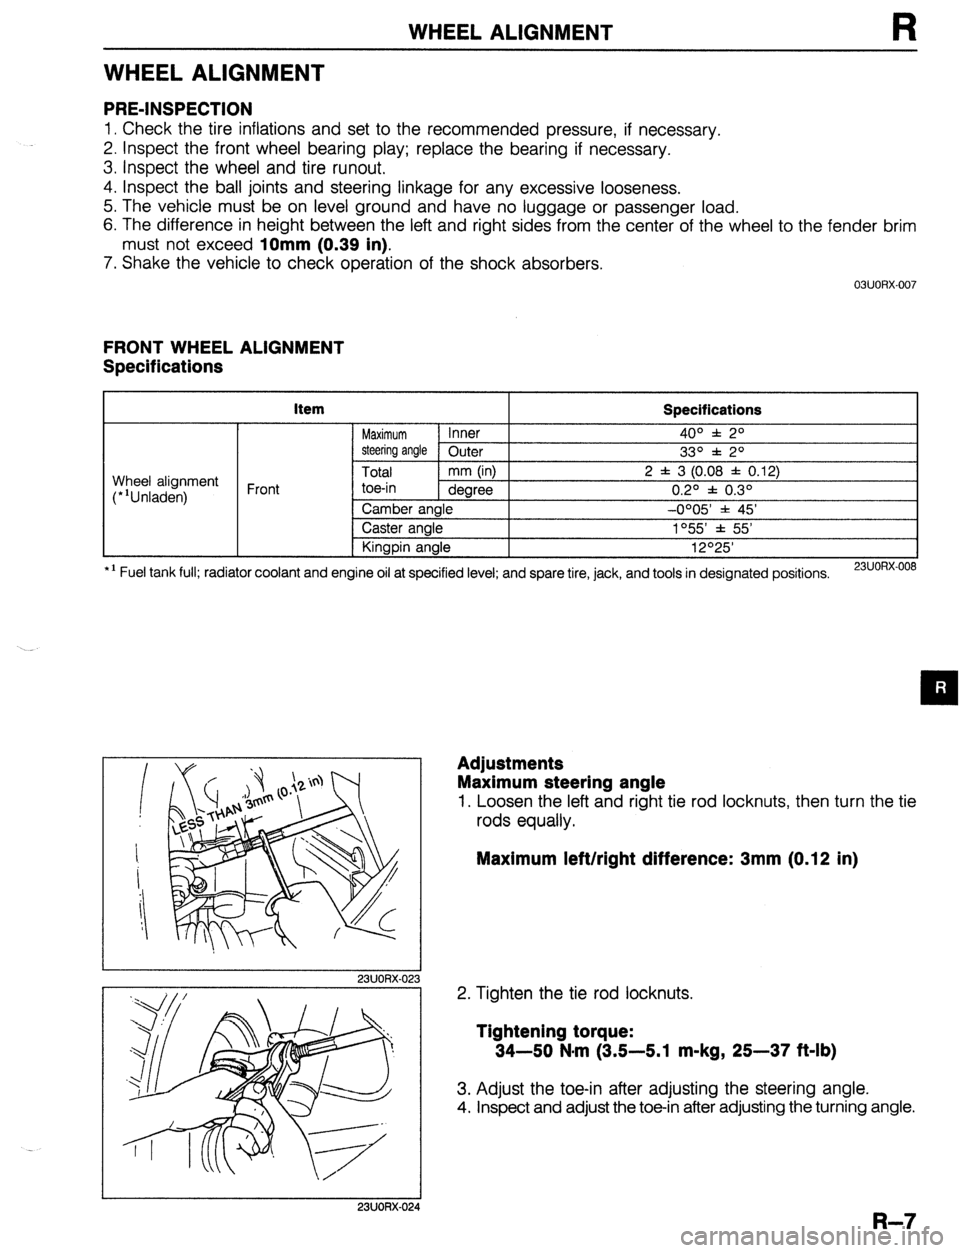
WHEEL ALIGNMENT
WHEEL ALIGNMENT
PRE-INSPECTION
1. Check the tire inflations and set to the recommended pressure, if necessary.
2. Inspect the front wheel bearing play; replace the bearing if necessary.
3. inspect the wheel and tire runout.
4. Inspect the ball joints and steering linkage for any excessive looseness.
5. The vehicle must be on level ground and have no luggage or passenger load.
6. The difference in height between the left and right sides from the center of the wheel to the fender brim
must not exceed
10mm (0.39 in).
7. Shake the vehicle to check operation of the shock absorbers.
03UORX.007
FRONT WHEEL ALIGNMENT
Specifications
item
Specifications
Maximum Inner 4o” f: 2O
steering angle Outer
33O f 2O
Total mm (in) 2 f 3 (0.08 f 0.12)
toe-in dearee 0.20 f 0.30 Wheel alignment
(*‘Unladen) Front
*I Fuel tank full; radiator coolant and Camber angle -0005 * 45’
Caster angle 1°55’ f 55’
Kingpin angle 12O25’
engine oil at specified level; and spare tire, jack, and tools in designated positions.
23UORX-008
I
I 23UORX-023
Adjustments
Maximum steering angle
1. Loosen the left and right tie rod locknuts, then turn the tie
rods equally.
Maximum left/right difference: 3mm (0.12 in)
2. Tighten the tie rod locknuts.
Tightening torque:
34-50 N-m (3.5-5.1 m-kg, 25-37 ft-lb)
3. Adjust the toe-in after adjusting the steering angle.
4. Inspect and adjust the toe-in after adjusting the turning angle.
I 23UORX-024
R-7