alternator MAZDA PROTEGE 1992 Workshop Manual
[x] Cancel search | Manufacturer: MAZDA, Model Year: 1992, Model line: PROTEGE, Model: MAZDA PROTEGE 1992Pages: 1164, PDF Size: 81.9 MB
Page 34 of 1164
Bl TROUBLESHOOTING GUIDE
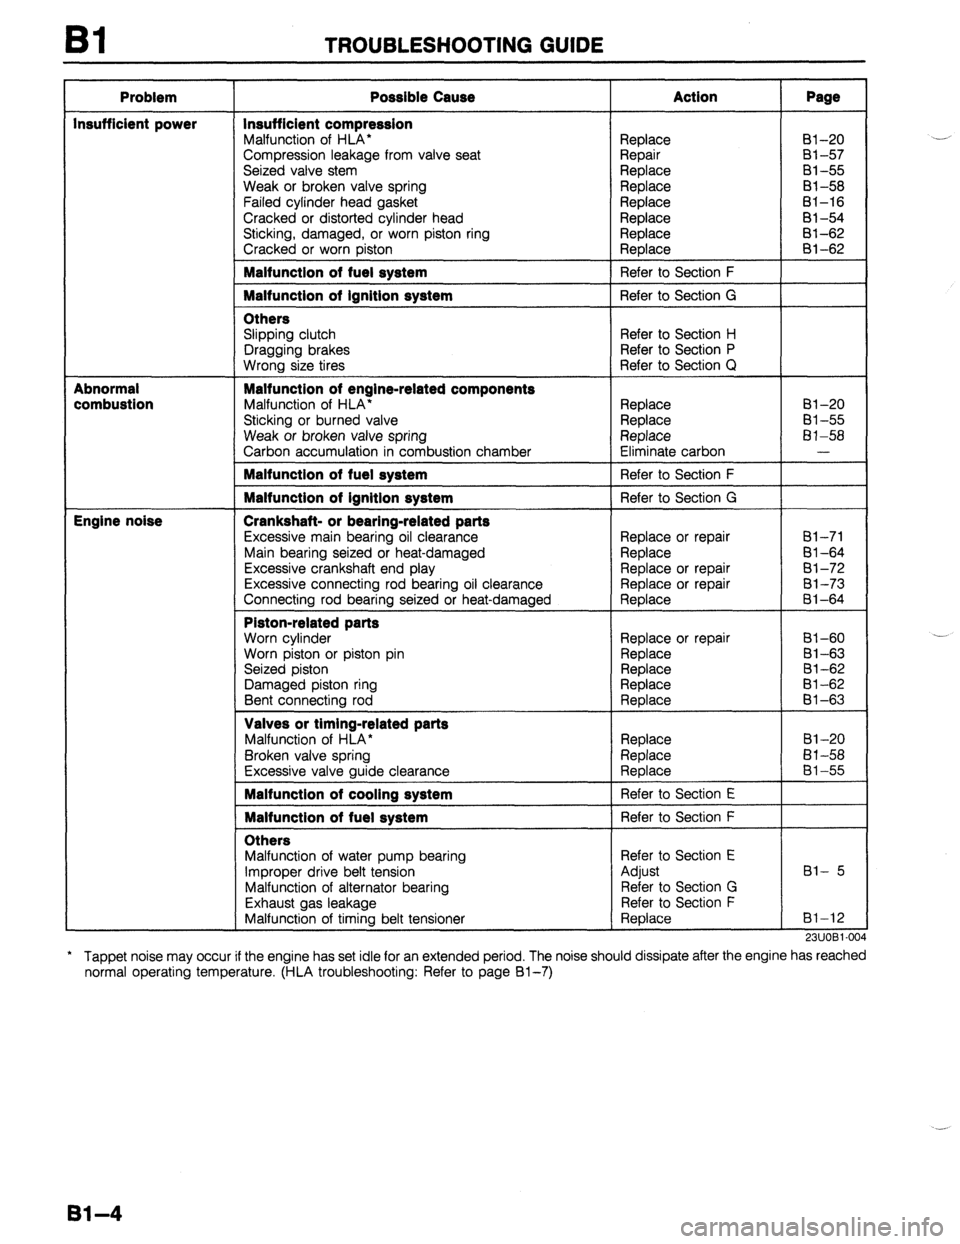
Problem
Insufficient power
Abnormal
combustion
Engine noise Possible Cause
Insufficient compression
Malfunction of HLA*
Compression leakage from valve seat
Seized valve stem
Weak or broken valve spring
Failed cylinder head gasket
Cracked or distorted cylinder head
Sticking, damaged, or worn piston ring
Cracked or worn piston Malfunction of fuel system
Malfunction of ignition system
Others
Slipping clutch
Dragging brakes
Wrong size tires Malfunction of engine-related components
Malfunction of HLA’
Sticking or burned valve
Weak or broken valve spring
Carbon accumulation in combustion chamber Malfunction of fuel system
Malfunction of ignition system
Crankshaft- or bearing-related parts
Excessive main bearing oil clearance
Main bearing seized or heat-damaged
Excessive crankshaft end play
Excessive connecting rod bearing oil clearance
Connecting rod bearing seized or heat-damaged Piston-related parts
Worn cylinder
Worn piston or piston pin
Seized piston
Damaged piston ring
Bent connecting rod Valves or timing-related parts
Malfunction of HLA*
Broken valve spring
Excessive valve guide clearance Malfunction of cooling system
Malfunction of fuel system
Others
Malfunction of water pump bearing
Improper drive belt tension
Malfunction of alternator bearing
Exhaust gas leakage
Malfunction of timing belt tensioner Action
Replace
Repair
Replace
Replace
Replace
Replace
Replace
Replace
Refer to Section F
Refer to Section G
Refer to Section H
Refer to Section P
Refer to Section Q
Replace
Replace
Replace
Eliminate carbon
Refer to Section F
Refer to Section G
Replace or repair
Replace
Replace or repair
Replace or repair
Replace
Replace or repair
Replace
Replace
Replace
Replace
Replace
Replace
Replace
Refer to Section E
Refer to Section F
Refer to Section E
Adjust
Refer to Section G
Refer to Section F
Replace Page 81-20
Bl-57
81-55
81-58
81-16
81-54
81-62
al-62
81-20
81-55
81-58
-
61-71
Bl-64
81-72
81-73 8-i-64
Bl-60
81-63
81-62
81-62
El-63
Bl-20
El-58
81-55
Bl- 5
81-12
911 IORI .N)J LI.,“l. --
* Tappet noise may occur if the engine has set idle for an extended period. The noise should
normal operating temperature. (HLA troubleshooting: Refer to page Bl-7) dissipate after the engine has reached
81-4
Page 36 of 1164
Bl ENGINE TUNE-UP PROCEDURE
iLTERNATOR
ALTERNATOR
I
I I I
IDLER
h ANKSHAFT /A/C
-LEY %OMPRESSC
PULLEY
AIC P/S AND A/C
23UOBl-006
WHEN MEASURED
WHEN SET
23UOBl.00
1 /
23UOBl-001
Bl-6
6
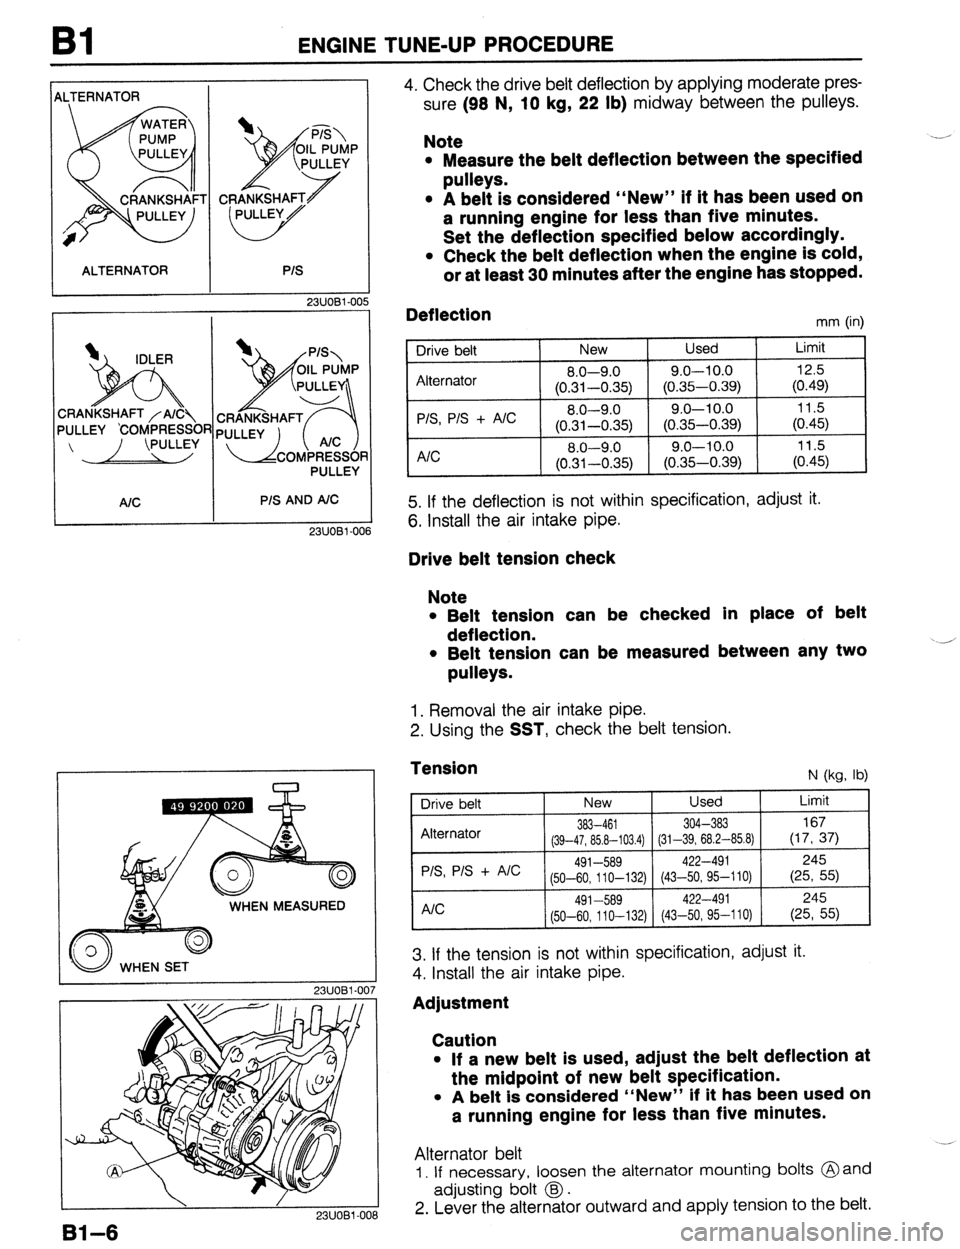
4. Check the drive belt deflection by applying moderate pres-
sure (98 N,
10 kg, 22 lb) midway between the pulleys.
Note
l Measure the belt deflection between the specified
pulleys.
l A belt is considered “New” if it has been used on
a running engine for less than five minutes.
Set the deflection specified below accordingly.
l Check the belt deflection when the engine is cold,
or at least 30 minutes after the engine has stopped.
Deflection
mm (in)
Drive
belt New Used Limit
Alternator 8.0-9.0
9.0-10.0 12.5
(0.31-0.35) (0.35-0.39) (0.49)
P/S, P/S + A/C 8.0-9.0
9.0-10.0 11.5
(0.31-0.35) (0.35-0.39) (0.45) A/C 8.0-9.0 9.0-l 0.0
11.5
(0.31-0.35) (0.35-0.39) (0.45)
5. If the deflection is not within specification, adjust it.
6. Install the air intake pipe.
Drive belt tension check
Note
l Belt tension can be checked in place of belt
deflection.
l Belt tension can be measured between any two
pulleys.
1. Removal the air intake pipe.
2. Using the
SST, check the belt tension.
Tension
N (kg, lb)
Drive belt New Used Limit
Alternator
383-461 304-383 167 (39-47, 85.8-103.4) (31-39, 68.2-85.8) (17, 37) PIS, P/S + AIC
491-589 422-491 245
(50-60, 110-132) (43~-50,95--110) (25, 55)
245 A/C 491-589 422-491
(50-60,110-132) (43-50,95-l 10) (25, 55)
3. If the tension is not within specification, adjust it.
4. Install the air intake pipe.
Adjustment
Caution
l If a new belt is used, adjust the belt deflection at
the midpoint of new belt specification.
l A belt is considered “New” if it has been used on
a running engine for less than five minutes.
Alternator belt
1. If necessary, loosen the alternator mounting bolts @and
adjusting bolt @I.
2. Lever the alternator outward and apply tension to the belt.
Page 42 of 1164
Bl ON-VEHICLE MAINTENANCE
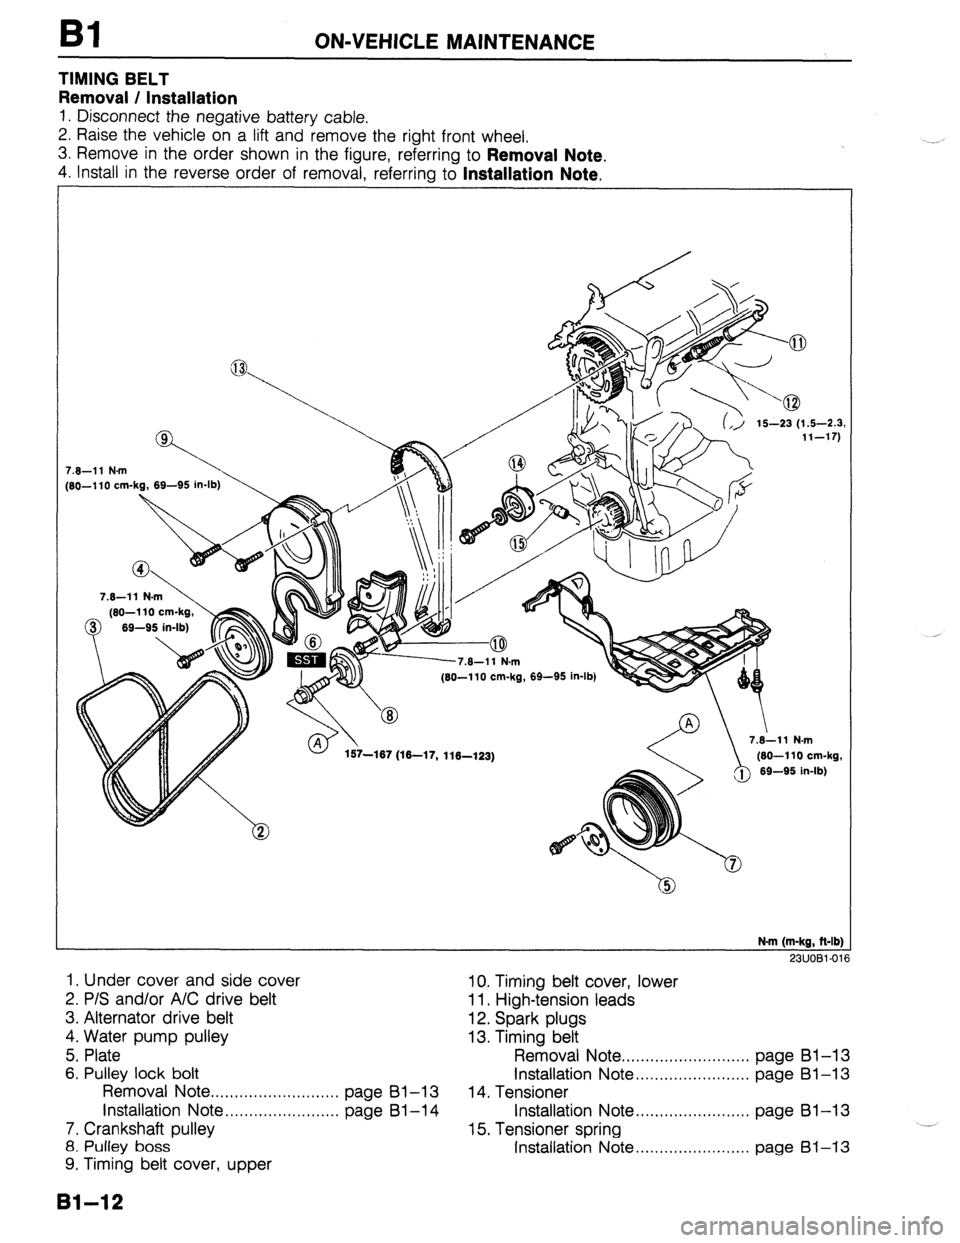
TIMING BELT
Removal / Installation
1. Disconnect the negative battery cable.
2. Raise the vehicle on a lift and remove the right front wheel.
3. Remove in the order shown in the figure, referring to
Removal Note.
4. Install in the reverse order of removal, referrina to Installation Note.
7.6-11 N.m
[SO-110 cm-kg, 69-95 in-lb)
7.6-11 N.m
(60-l 10 cm-kg,
0 69-95 in-lb)
, .v- I . (60-110 cm-kg, 69-95 in-lb)
157-167 (16-17, 116-123) /@ 7.i11 N.m
(60-110 cm-kg,
69-95 in-lb)
N.m (m-kg, ft-lb]
23UOBl-01
1. Under cover and side cover 10. Timing belt cover, lower
2. P/S and/or A/C drive belt 11. High-tension leads
3. Alternator drive belt 12. Spark plugs
4. Water pump pulley 13. Timing belt
5. Plate Removal Note . . . . . . . . . . . . . . . . . . . . . . . . . . . page Bl-13
6. Pulley lock bolt Installation Note . . . . . . . . . . . . . . . . . . . . . . . . page Bl-13
Removal Note ..,.,,.,....,....,...,...,, page Bl-13 14. Tensioner
installation Note . . . . . . . . . . . . . . . . . . . . . . . . page Bl-14 Installation Note . . . . . . . . . . . . . . . . . . . . . . . . page 81-13
7. Crankshaft pulley 15. Tensioner spring .__
8. Pulley boss Installation Note . . . . . . . . . . . . . . . . . . . . . . . . page 61-13
9. Timing belt cover, upper
131-12
Page 59 of 1164

REMOVAL I31
Step 2
2311081-O: ii
1.
Disconnect the harness connectors shown in the figure.
Removal note
P/S oil pump
Caution
l Do not damage the hoses.
1. Remove the P/S oil pump with the hoses still connected.
2. Position the pump away from the engine and affix it with wire.
A/C compressor (if equipped)
Caution
l Do not damage the hoses.
1, Remove the A/C compressor with the hoses still connected.
2. Position the compressor away from the engine and affix it
with wire.
ALTERNATOR
OIL PRESSURE SWITCH
GROUND THROTTLE SENSOR
------- I
INJECTOR
NEUTRAL SWITCH (MTX)
Page 70 of 1164
Bl DISASSEMBLY
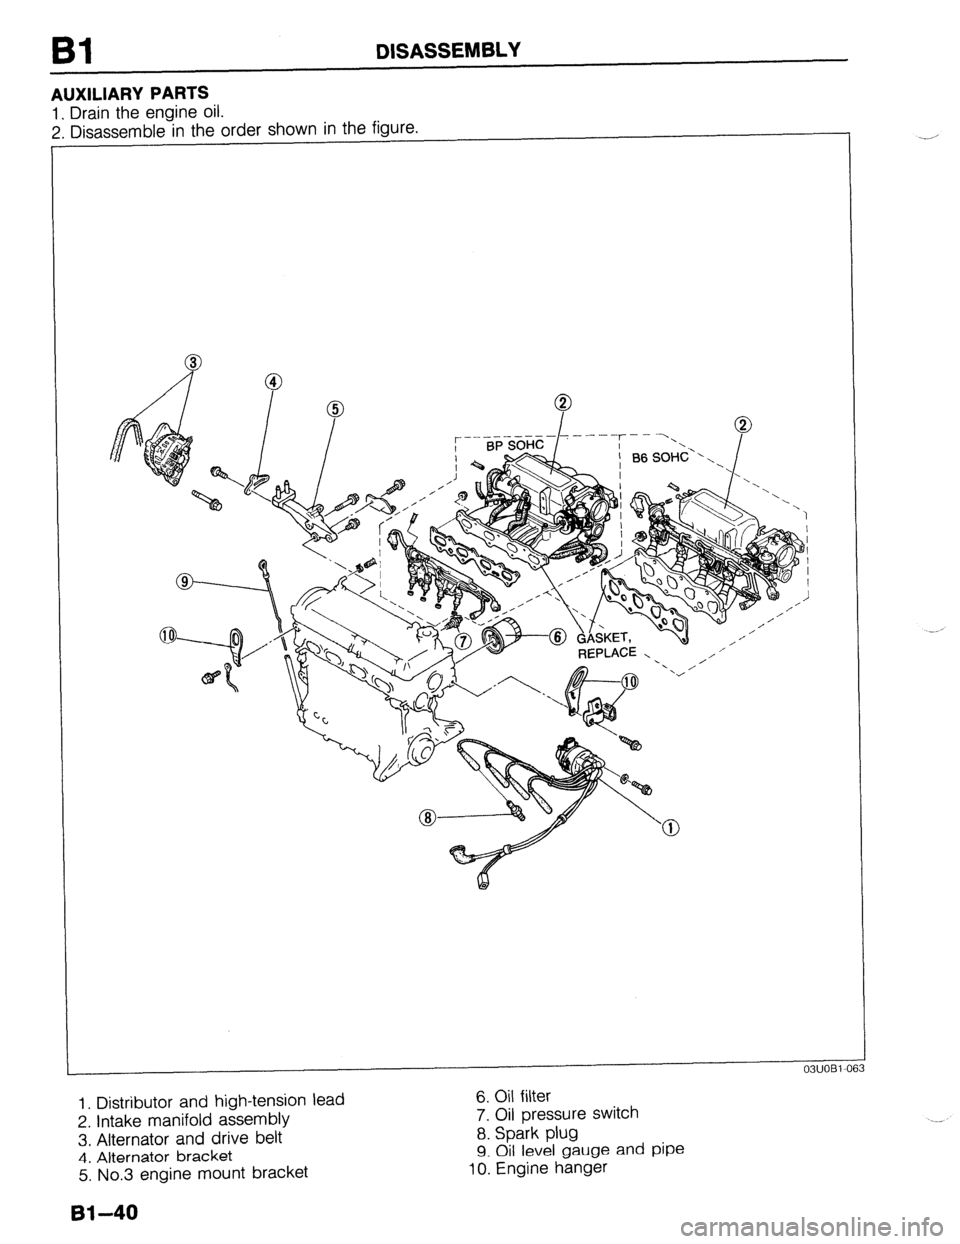
AUXILIARY PARTS
1. Drain the engine oil.
2. Disassemble in the order shown in the figure.
- REPLACE - ’ ,/ I’
1. Distributor and high-tension lead
2. Intake manifold assembly
3, Alternator and drive belt
4. Alternator bracket
5. No.3 engine mount bracket 6. Oil filter
7. Oil pressure switch
8. Spark plug
9. Oil level gauge and pipe 10. Engine hanger
61-40
Page 120 of 1164
Bl ASSEMBLY
05UOBX-24:
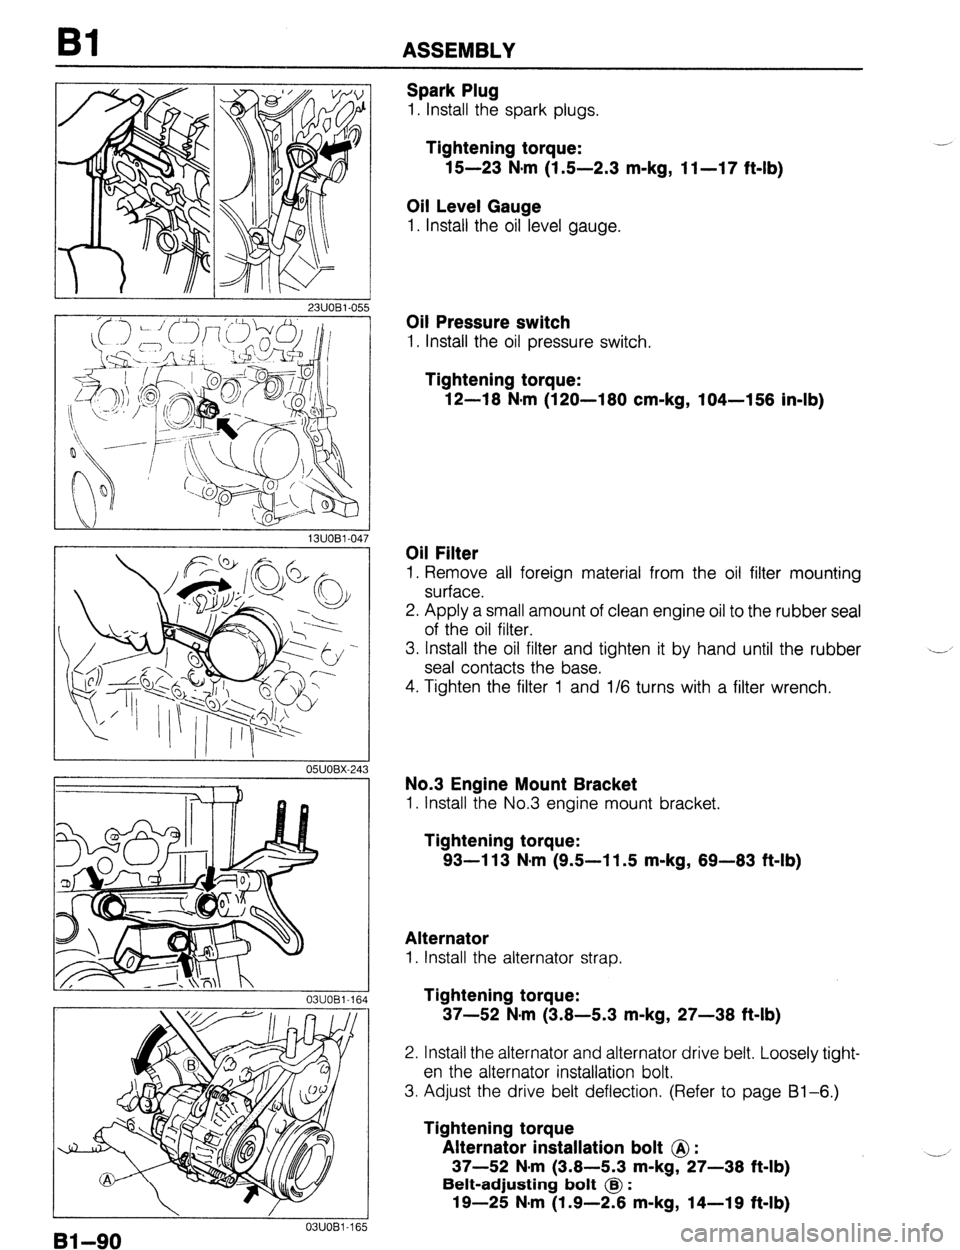
Spark Plug
1. Install the spark plugs.
Tightening torque:
15-23 N*m (1.5-2.3 m-kg, 1 I-17 ft-lb)
Oil Level Gauge
1. Install the oil level gauge.
Oil Pressure switch
1. Install the oil pressure switch.
Tightening torque:
12-18 N-m (120-180 cm-kg, 104-158 in-lb)
Oil Filter
1. Remove all foreign material from the oil filter mounting
surface.
2. Apply a small amount of clean engine oil to the rubber seal
of the oil filter.
3. Install the oil filter and tighten it by hand until the rubber
seal contacts the base.
4. Tighten the filter 1 and l/6 turns with a filter wrench.
No.3 Engine Mount Bracket
1. Install the No.3 engine mount bracket.
Tightening torque:
93-l 13 N-m (9.5-l 1.5 m-kg, 89-83 ft-lb)
Alternator
1. Install the alternator strap.
Tightening torque:
37-52 N#m (3.8-5.3 m-kg, 27-38 ft-lb)
2. Install the alternator and alternator drive belt. Loosely tight-
en the alternator installation bolt.
3. Adjust the drive belt deflection. (Refer to page Bl-6.)
Tightening torque
Alternator installation bolt @ :
37-52 N-m (3.8-5.3 m-kg, 27-38 ft-lb)
Belt-adjusting bolt @ :
19-25 N#m (1.9-2.8 m-kg, 14-19 f&lb) --’ I
I 0311081-165
Bl-90
Page 130 of 1164

Bl INSTALLATION
Step 5
1. Connect the harness connectors shown in the figure.
GROUND ALTERNATOR
OIL PRESSURE SWITCH
I- THFOTTLE SENSOR
NEUTRAL SWITCH (MTX)
IGNITION COIL
$A_c_K;u_p LIGHT SWITCH
____------- ;
Step 6
Torque Specifications
7.8-11 N.m (80-110 cm-kg, 89-95 in-lb)
19-25 (1.9-2.6, 14-19)
2.9-5.9 N.m
(30-60 cm-kg, 26-52 in-lb)
7.8-11 N.m
(80-l 10 cm-kg,
6.4-9.3 N.m 37-52
(3.8-5.3, 27-38)
24-35
(2.4-3.6, 17-26)
7.8-11 N.m 160-110 cmika, 69-95 in-lb) ‘-- -- -..’ ‘-=’ -’ / 166-96 r?m.ka.
66-82 in-lb) 69-95 in-lb)
N.m (m-kg, ft-lb -- OBUOBl-1E
Bl-100
Page 134 of 1164

82 INDEX
NDEX
COMPRESSION INSPECTION, PAGE 92-10
STANDARD: 1,256 kPa (12.8 kg/cm2, 182 psi)-300 rpm
MINIMUM: 883 kPa (9.0 kg/cm2, 128 psi)-300 rpm
INTAKE MANIFOLD
TIGHTENING TORQUE
*(I-I)* hl.m I, (I-0 c m.h.
DRIVE BELT
ADJUSTMENT, PAGE 82-6 TIGHTENIF
36-46 N.m (3.9-4.7 rlG TORQUE
m-kg, 26-34 ft-lb)
JEFLECTION
mm (in)
DRIVE BELT
New Used Limit
ALTERNATOR
8.0-9.0 (0.31-0.35) 9.0-10.0 (0.35-0.39)
12.5 (0.49)
PIS, PIS + AIC 8.0-9.0 (0.31-0.35) 9.0-10.0 (0.35-0.39)
11.5 (0.45)
23UOB2-00:
1. Timing belt
6. Engine
Removal I Installation..
..............
page 62-l 2 Removal ...................................
page 82-31
2. Cylinder head gasket
Engine stand mounting..
.......... page 82-38
Replacement ............................
page B2-16 Disassembly
.............................
page 82-41
3. HLA
Inspection / Repair.. ..................
page B2-54
Removal / Installation
................ page
82-22 Assembly ..................................
page B2-66
4. Front oil seal
Engine stand dismounting
....... page 62-91
Replacement
page 82-26 Installation..
.-- ............................
............................... page 62-93
5. Rear oil seal
Replacement ............................
page 82-28
82-2
Page 136 of 1164
B2 TROUBLESHOOTING GUIDE
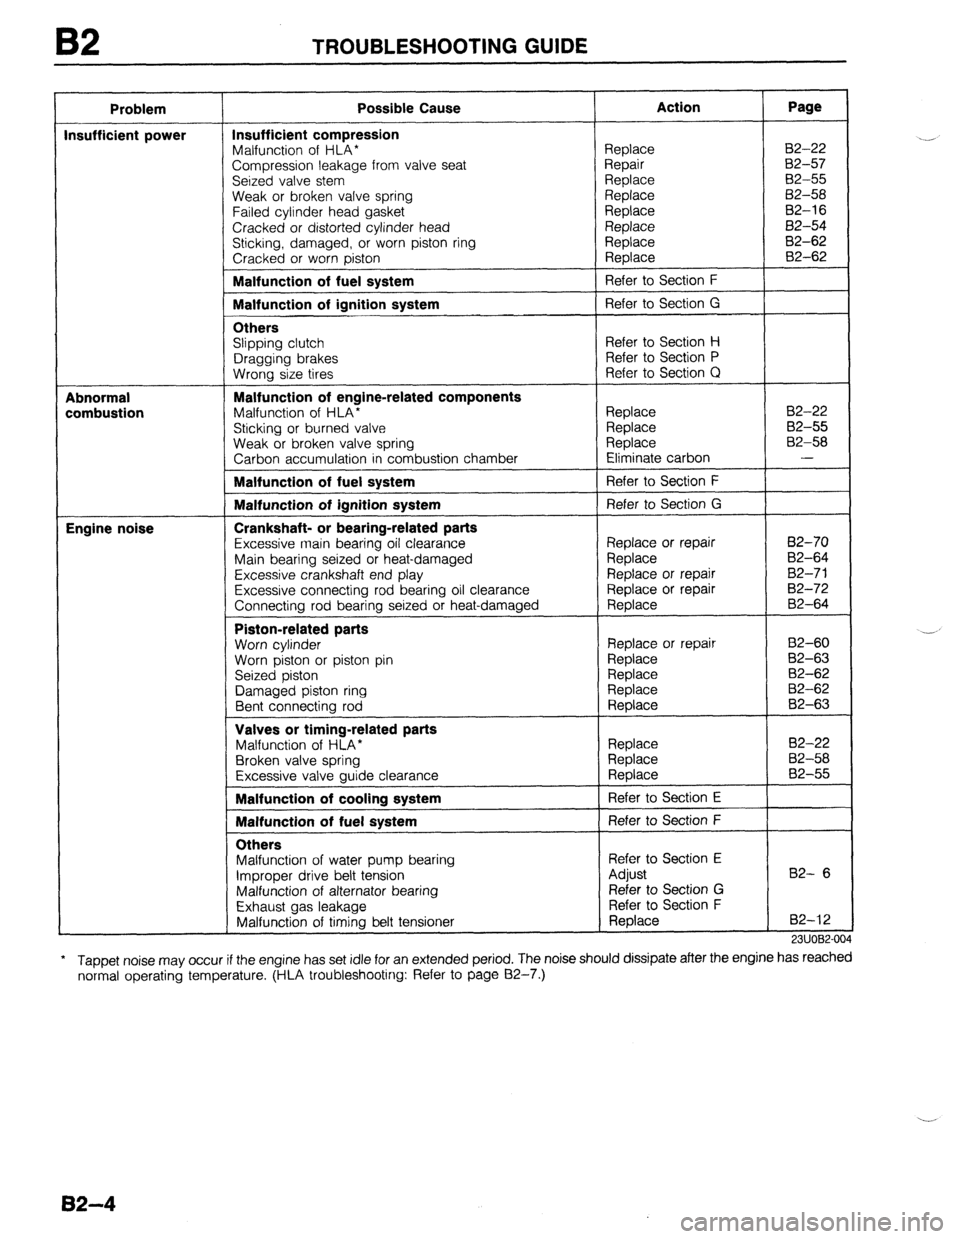
Problem
Insufficient power
Abnormal
combustion
Engine noise -
I
I
f
,
I
I
,
I
I Possible Cause Action Page
Insufficient compression
Malfunction of HLA*
Compression leakage from valve seat
Seized valve stem
Ueak or broken valve spring
Failed cylinder head
gasket Cracked or distorted cylinder head
Sticking, damaged, or worn piston ring
Cracked or worn piston Replace
Repair
Replace
Replace
Replace
Replace
Replace
Replace
Refer to Section F 82-22
82-57
02-55
B2-58
82-16
82-54
82-62
82-62 Malfunction of fuel system
Malfunction of ianition svstem
Others
Slipping clutch
Dragging brakes
Wrong size tires Malfunction of engine-related components
Malfunction of HLA*
Sticking or burned valve
Weak or broken valve spring
Carbon accumulation in combustion chamber Malfunction of fuel system
Malfunction of ignition system
Crankshaft- or bearing-related parts
Excessive main bearing oil clearance
Main bearing seized or heat-damaged
Excessive crankshaft end play
Excessive connecting rod bearing oil clearance
Connecting rod bearing seized or heat-damaged Piston-related parts
Worn cylinder
Worn piston or piston pin
Seized piston
Damaged piston ring
Bent connecting rod Valves or timing-related parts
Malfunction of HLA*
Broken valve spring
Excessive valve guide clearance Malfunction of cooling system
Malfunction of fuel svstem
Others
Malfunction of water pump bearing Refer to Section E
Improper drive belt tension Adjust
Malfunction of alternator bearing Refer to Section G
Exhaust gas leakage Refer to Section F
Malfunction of timing belt tensioner Replace Refer to Section G
Refer to Section H
Refer to Section P
Refer to Section C!
Replace B2-22
Replace 82-55
Replace 82-58
Eliminate carbon -
Refer to Section F
Refer to Section G
Replace or repair B2-70
Replace 82-64
Replace or repair 82-7 1
Replace or repair B2-72
Replace B2-64
Replace or repair
82-60
Replace 82-63
Replace 82-62
Replace 82-62
Replace 82-63
Replace
Replace
Replace
Refer to Section E
Refer to Section F 82-22
82-58
82-55
B2- 6
82-12
23UOB2-00,
..J
.-,
l
Tappet noise may occur if the engine has set idle for an extended period. The noise should dissipate after the engine has reached
normal operating temperature. (HLA troubleshooting: Refer to page 82-7.)
82-4
Page 138 of 1164

B2 ENGINE TUNE-UP PROCEDURE
ALTERNATOR DRIVE BELT
2311082-00
P/S OIL PUMP
DRIVE BELT
-
A/C AND P/S OIL
PUMP DRIVE BELT
23UOB2-001
1
23UOB2-00
23UOB2-OC
3. Check the drive belt deflection by applying moderate pres-
sure (98 N,
10 kg, 22 lb) midway between the pulleys.
Note
l Measure the belt deflection between the specified
pulleys.
l A belt is considered “New” if it has been used on
a running engine for less than five minutes.
Set the deflection specified below accordingly.
l Check the belt deflectlon when the engine is cold,
or at least 30 minutes after the engine has stopped.
Deflectlon
Drive belt
Alternator
P/S, PAS + A/C New Used
8.0-9.0 9.0-10.0
(0.31-0.35) (0.35-0.39)
8.0-9.0 9.0-I 0.0
(0.31-0.35) (0.35-0.39) mm (in)
Limit
12.5
(0.49)
11.5
(0.45)
4. If the deflection is not within specification, adjust it.
5. Install the air intake pipe.
Drive belt tension check
Note
l Belt tension can be checked in place of belt
deflection.
l Belt tension can be measured between any two
pulleys.
1. Removal the air intake pipe.
2. Using the
SST, check the belt tension.
_-
Tenslon
N (kg, lb)
Drive belt
Alternator New
383-461 Used
304-383 Limit
167
(39-47, 85.8-103.4) (31-39, 68.2-85.8) (17, 37)
P/S, P/S + AIC 491-589 422-491 245
(5040, 110-132) (43-50,95-l 10) (25, 55)
3. If the tension is not within specification, adjust it.
4. Install the air intake pipe.
Adjustment
Cautlon
l If a new belt is used, adjust the belt deflection at
the midpoint of new belt specification.
l A belt is considered “New” If it has been used on
a runnlng engine for less than five minutes.
1. Alternator belt
(1) Loosen the alternator mounting bolt @ and adjusting
lock bolt @.
(2) Lever the alternator outward and apply tension to the
belt.
(3) Tighten adjusting lock bolt @I.
82-6